Manage custom state data with Azure Table storage for Node.js in the v3 JavaScript SDK
APPLIES TO: SDK v3
In this article, you’ll implement Azure Table storage to store and manage your bot’s state data. The default Connector State Service used by bots is not intended for the production environment. You should either use Azure Extensions available on GitHub or implement a custom state client using data storage platform of your choice. Here are some of the reasons to use custom state storage:
- higher state API throughput (more control over performance)
- lower-latency for geo-distribution
- control over where the data is stored (e.g.: West US vs East US)
- access to the actual state data
- state data db not shared with other bots
- store more than 32kb
Prerequisites
- Node.js.
- Bot Framework Emulator.
- Must have a Node.js bot. If you do not have one, go create a bot.
- Storage Explorer.
Create Azure account
If you don't have an Azure account, click here to sign up for a free account.
Set up the Azure Table storage service
- After you’ve logged into the Azure portal, create a new Azure Table storage service by clicking on New.
- Search for Storage account that implements the Azure Table. Click Create to start creating the storage account.
- Fill in the fields, click the Create button at the bottom of the screen to deploy the new storage service.
- After the new storage service is deployed, navigate to the storage account you just created. You can find it listed in the Storage Accounts blade.
- Select Access keys, and copy the key for later use. Your bot will use Storage account name and Key to call the storage service to save state data.
Install botbuilder-azure module
To install the botbuilder-azure module from a command prompt, navigate to the bot's directory and run the following npm command:
npm install --save botbuilder-azure
Modify your bot code
To use your Azure Table storage, add the following lines of code to your bot's app.js file.
Require the newly installed module.
var azure = require('botbuilder-azure');Configure the connection settings to connect to Azure.
// Table storage
var tableName = "Table-Name"; // You define
var storageName = "Table-Storage-Name"; // Obtain from Azure Portal
var storageKey = "Azure-Table-Key"; // Obtain from Azure Portal
The
storageNameandstorageKayvalues can be found in the Access keys menu of your Azure Table. If thetableNamedoes not exist in the Azure Table, it will be created for you.Using the
botbuilder-azuremodule, create two new objects to connect to the Azure Table. First, create an instance ofAzureTableClientpassing in the connection configuration settings. Next, create an instance ofAzureBotStoragepassing in theAzureTableClientobject. For example:var azureTableClient = new azure.AzureTableClient(tableName, storageName, storageKey); var tableStorage = new azure.AzureBotStorage({gzipData: false}, azureTableClient);Specify that you want to use your custom database instead of the in-memory storage and add session information to database. For example:
var bot = new builder.UniversalBot(connector, function (session) {
     // ... Bot code ...

     // capture session user information
     session.userData = {"userId": session.message.user.id, "jobTitle": "Senior Developer"};

     // capture conversation information
     session.conversationData[timestamp.toISOString().replace(/:/g,"-")] = session.message.text;

     // save data
     session.save();
})
.set('storage', tableStorage);
Now you are ready to test the bot with the emulator.
Run your bot app
From a command prompt, navigate to your bot's directory and run your bot with the following command:
node app.js
Connect your bot to the emulator
At this point, your bot is running locally. Start the emulator and then connect to your bot from the emulator:
- Type http://localhost:port-number/api/messages into the emulator's address bar, where port-number matches the port number shown in the browser where your application is running. You can leave Microsoft App ID and Microsoft App Password fields blank for now. You'll get this information later when you register your bot.
- Click Connect.
- Test your bot by sending your bot a message. Interact with your bot as you normally would. When you are done, go to Storage Explorer and view your saved state data.
View data in Storage Explorer
To view the state data, open Storage Explorer and connect to Azure using your Azure Portal credential or connect directly to the Table using the storageName and storageKey and navigate to your tableName.
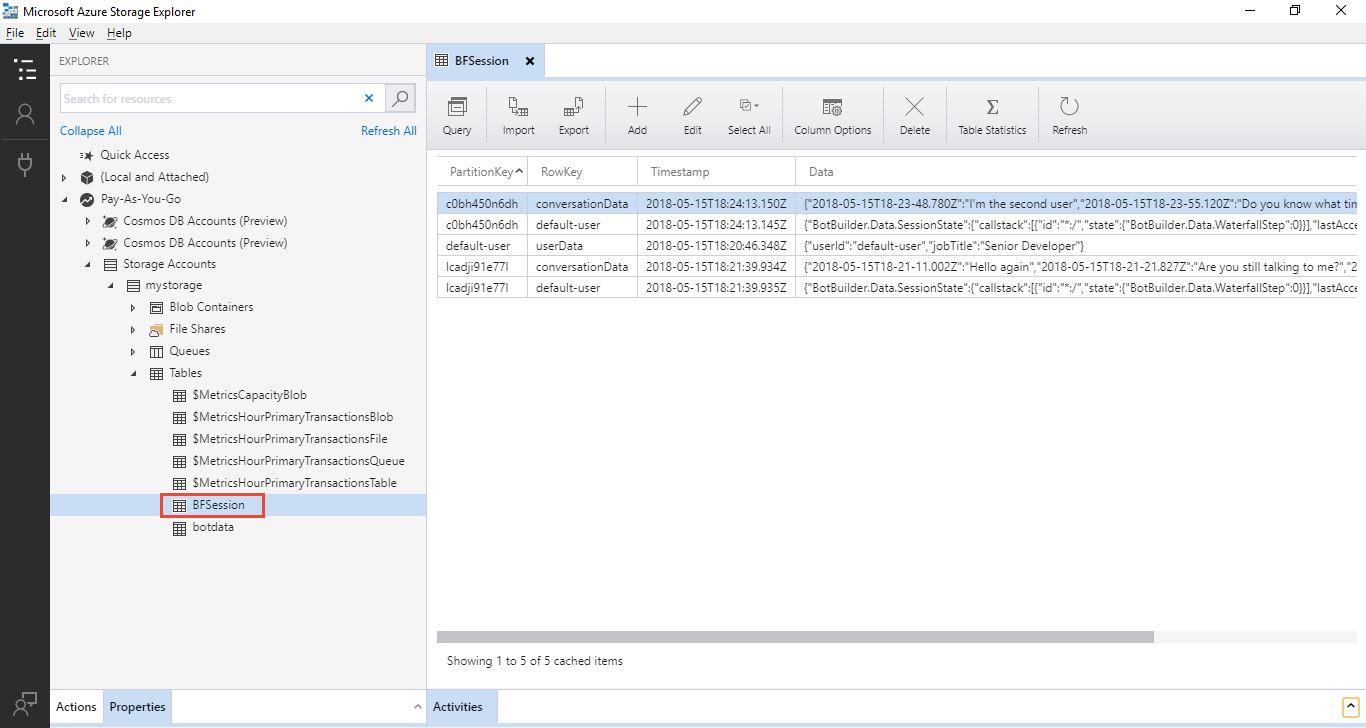
One record of the conversation in the data column looks like:
{
    "2018-05-15T18-23-48.780Z": "I'm the second user",
    "2018-05-15T18-23-55.120Z": "Do you know what time it is?",
    "2018-05-15T18-24-12.214Z": "I'm looking for information about the new process."
}
Next step
Now that you have full control over your bot's state data, let's take a look at how you can use it to better manage conversation flow.