Migrate an SDK-first bot with waterfall dialogs to Composer
APPLIES TO: Composer v2.x
SDK-first bots, bots created and developed outside of Bot Framework Composer, often use waterfall dialogs and have externally managed Language Understanding (LUIS) models used for language understanding and intent recognition. This article demonstrates some methods for migrating assets and functionality from an existing SDK-first bot to a bot created in Composer, without completely rewriting the bot.
Note
Language Understanding (LUIS) will be retired on 1 October 2025. Beginning 1 April 2023, you won't be able to create new LUIS resources. A newer version of language understanding is now available as part of Azure AI Language.
Conversational language understanding (CLU), a feature of Azure AI Language, is the updated version of LUIS. For more information about question-and-answer support in Composer, see Natural language processing.
This article demonstrates how to migrate the SDK C# Core Bot sample to a new bot project built in Composer, making it easier for you to move your bot development over to Composer.
Note
This article demonstrates some approaches to migrating a C# bot. Depending on the bot you're migrating, you might need to alter or extend these principles and methods.
Prerequisites
- A running version of the C# Core Bot sample, with a deployed LUIS natural language model. Instructions for building the sample (including deploying the language model) can be found in the sample's README.
- Install Bot Framework Composer
Create the Composer bot project
When migrating a bot, an important first task is to create a new target bot in Composer and choose a complimentary template to start with. The Core Bot sample we are migrating has the following capabilities.
- Uses LUIS to implement core AI capabilities.
- Implements a multi-turn conversation using dialogs.
- Handles user interruptions for utterances such as "help" or "cancel".
This article uses Composer's Core Bot with Language template, which has support for language understanding and interruption handling.
Open Composer.
Select Create new (+) on the home page.
Select the Core Bot with Language template under the C# section. This template creates a bot containing only a root dialog and an initial greeting dialog. Then select Next.
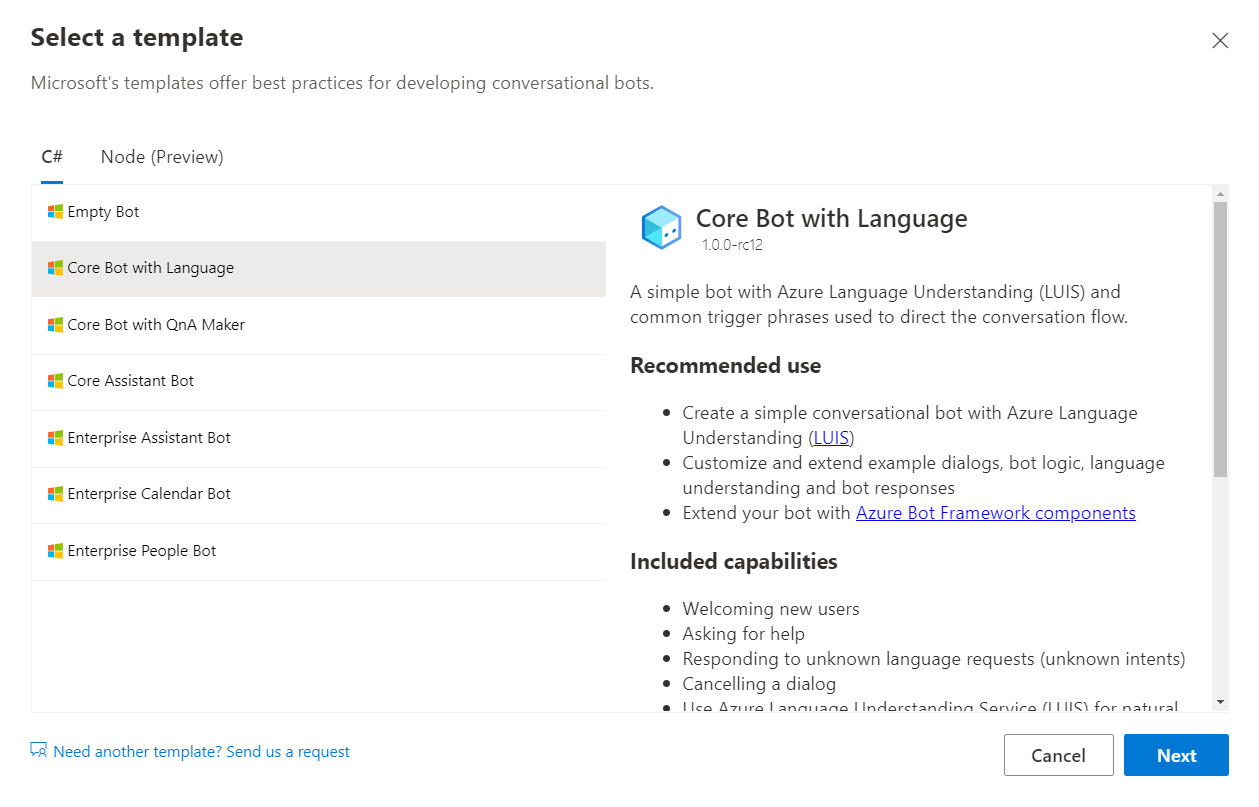
Fill in the Name for the bot as "CoreBotWithLanguage". Then select Azure Web App from the Runtime type, and choose a location for your bot on your machine.
Select Create. Composer might take a few moments to create your bot from the template.
Set up language understanding
Open the Configure view and select the Development resources tab.
Select Set up Language Understanding. The Set up Language Understanding window will appear, shown below:
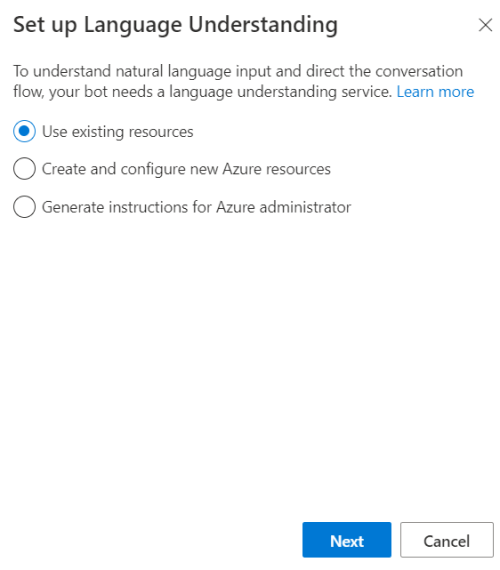
Select Use existing resources and Next to connect to your existing LUIS resource.
How to add LUIS explains the different options for setting up language understanding. See the following sections of that article for when and how to use each option:
- Use existing resources: You already have existing Azure resources.
- Create and configure new Azure resources: You don't have existing Azure resources and need to create and configure new ones.
- Generate instructions for Azure administrator: You need an administrator to create Azure resources for you.
Update the bot welcome message
The Core Bot Sample sends an Adaptive Card to welcome the user within the DialogAndWelcomeBot.cs class. For some bot capabilities such as this, you don't need to migrate the code itself. Instead we can use built in Composer capabilities to send the card for us and the template that you used to create your Composer bot already has a WelcomeDialog dialog, which sends a greeting to the user that we can update.
Composer's Core Bot with Language template has existing actions within the WelcomeDialog to greet the user with a different message, depending on if this is their first time engaging with the bot. For this exercise though, we will replicate the existing functionality of the SDK's Core Bot sample and send the same Adaptive Card as a greeting to users, regardless of if they have engaged with the bot previously.
In Composer, select the
BeginDialogtrigger withinWelcomeDialogin the left-hand navigation tree.Select the Node menu (⋮) for the Loop: for each item action currently on the authoring canvas and select Delete to remove the current welcome actions.
Select Add (+) button on the authoring canvas and select the Send an response action.
With your new Send an response action selected, click the + next to the Text tab and select Attachments.
Click Add new attachment and select Adaptive Card under the Create from template sub menu.
Populate the input field for the attachment content using the Adaptive Card JSON from the
welcomeCard.jsonfile, found within theCardsfolder in Core Bot Sample project.Your attachment content should look like this. Note the need to wrap the Adaptive Card JSON with
- $ { }, as we are using the language generation syntax.- ${{ "$schema": "http://adaptivecards.io/schemas/adaptive-card.json", "type": "AdaptiveCard", "version": "1.0", "body": [ { "type": "Image", "url": "https://encrypted-tbn0.gstatic.com/images?q=tbn:ANd9GcQtB3AwMUeNoq4gUBGe6Ocj8kyh3bXa9ZbV7u1fVKQoyKFHdkqU", "size": "stretch" }, { "type": "TextBlock", "spacing": "medium", "size": "default", "weight": "bolder", "text": "Welcome to Bot Framework!", "wrap": true, "maxLines": 0 }, { "type": "TextBlock", "size": "default", "isSubtle": true, "text": "Now that you have successfully run your bot, follow the links in this Adaptive Card to expand your knowledge of Bot Framework.", "wrap": true, "maxLines": 0 } ], "actions": [ { "type": "Action.OpenUrl", "title": "Get an overview", "url": "https://learn.microsoft.com/azure/bot-service/?view=azure-bot-service-4.0" }, { "type": "Action.OpenUrl", "title": "Ask a question", "url": "https://stackoverflow.com/questions/tagged/botframework" }, { "type": "Action.OpenUrl", "title": "Learn how to deploy", "url": "https://learn.microsoft.com/azure/bot-service/bot-builder-howto-deploy-azure?view=azure-bot-service-4.0" } ] }}
Add a trigger for the Booking intent
The new Bot Framework Composer bot already contains an intent trigger for Cancel, along with an associated pre-built dialog to handle the conversation with the user when that trigger is fired, so we don't need to migrate the existing CancelAndHelpDialog.cs class. However, we do need to add an intent triggers for the remaining intents used by the Core Bot Sample.
In the LUIS.ai portal, go to the LUIS application you deployed as part of the Core Bot Sample. Here we can see there are two additional custom intents that we need to add to our new Composer bot,
BookFlightandGetWeather.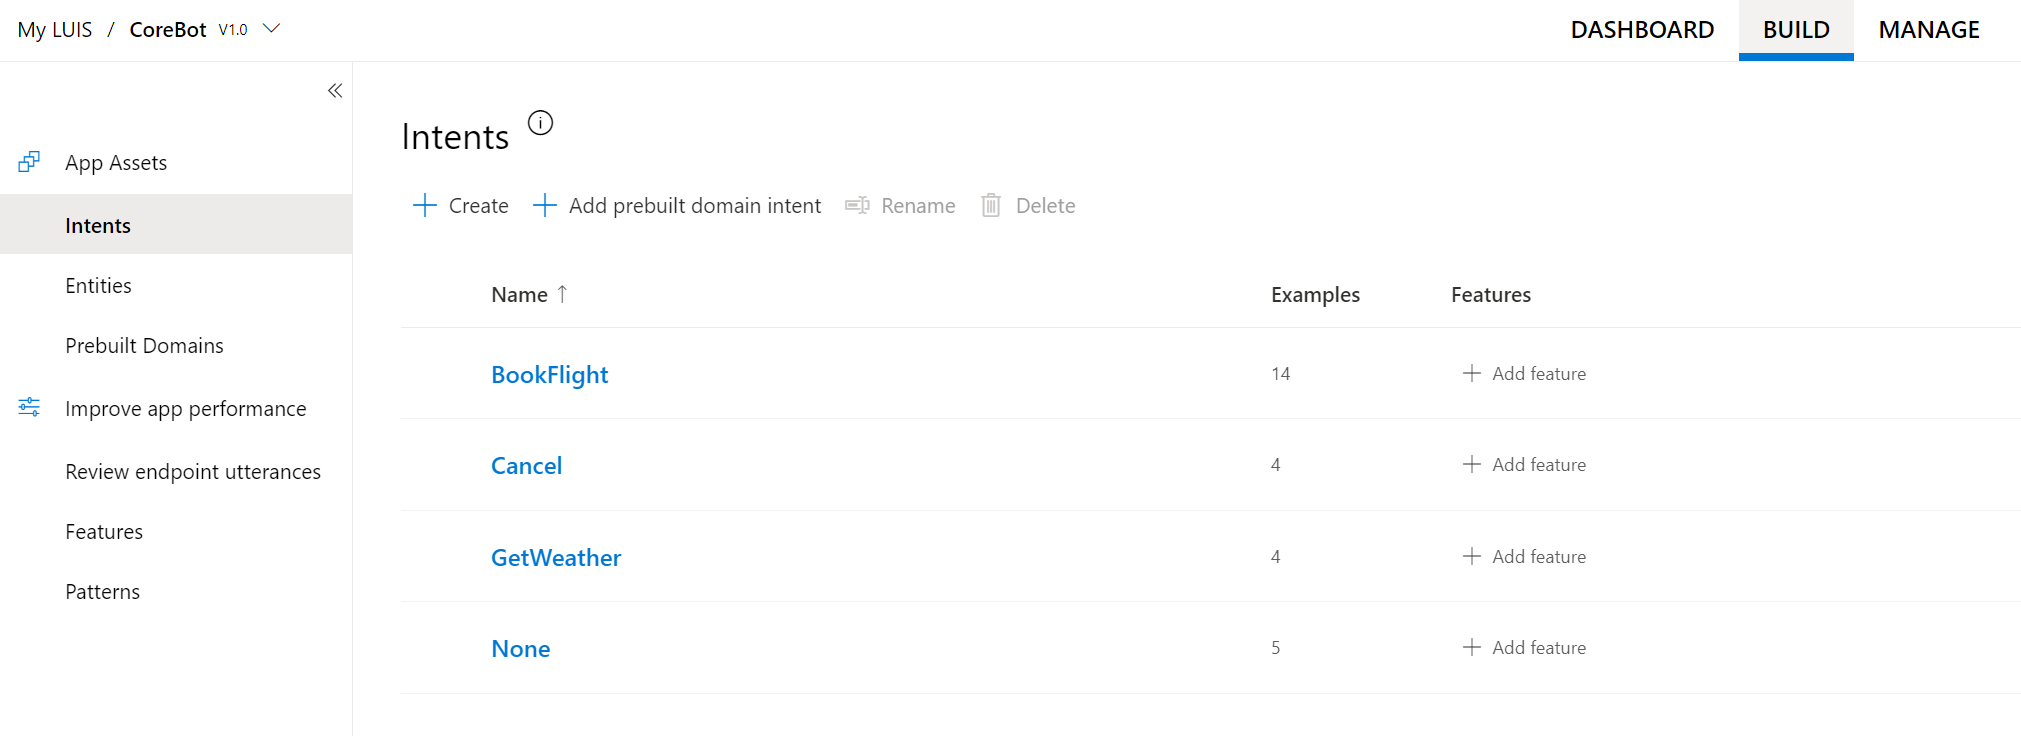
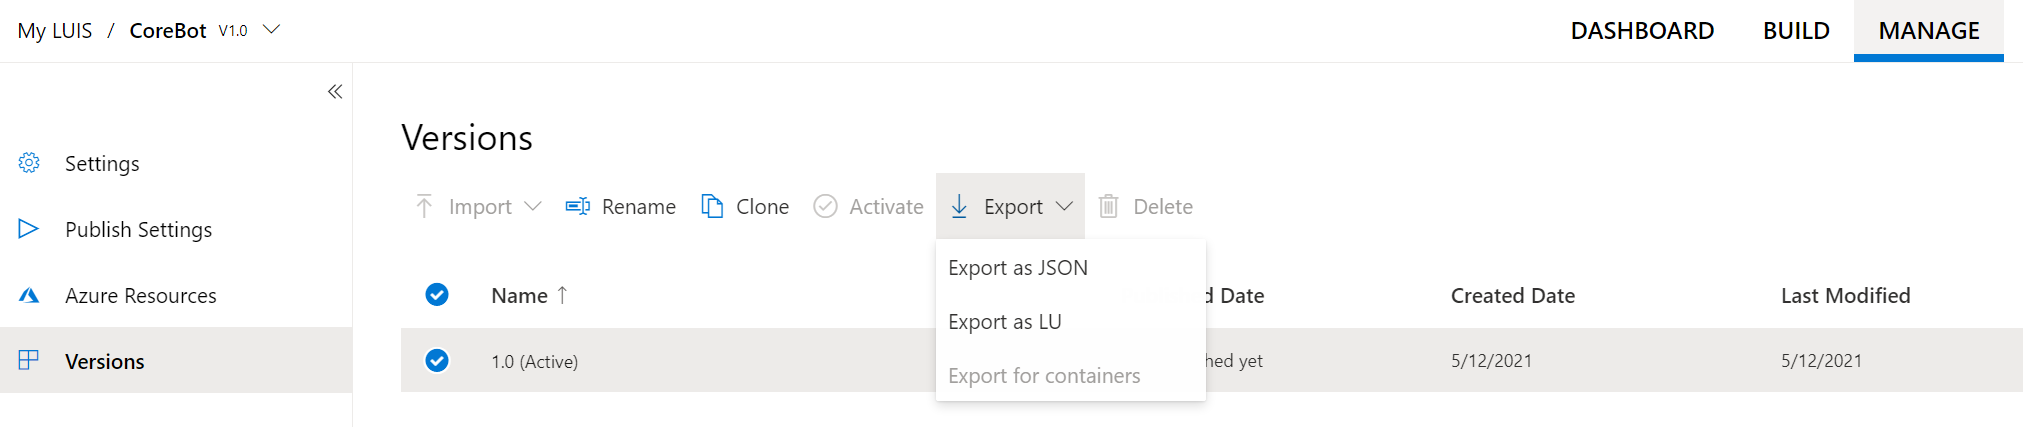
When creating internet triggers within Composer, we need to provide trigger phrases using the Language Understanding format, containing the definition for any LUIS entities that are used as part of those phrases. To get the appropriate Language Understanding content for the new intents in Composer, you can export the Core Bot Sample LUIS application to an .lu file.
To do this, within the LUIS portal, click Manage in navigation at the top and then Versions in the left-hand navigation. Select the latest version of the application available and click Export, Export as LU. Save the file to a location on your computer.
In Composer, select the three dots next to the root dialog in your bot. Then select + Add a trigger.
In the trigger creation screen, select Intent recognized from the drop-down list.
Enter
BookFlightin the What is the name of this trigger? field.Open the .lu file you exported from LUIS in a text editor and locate the
#BookFlightintent and associated utterances. Select and copy the utterances into the Trigger phrases field.The trigger phrases that you copied use LUIS entities—for example, the phrase
book a flight from {@From=new york}has an entity to detect the name of the airport the user will travel from. At the bottom of the exported .lu file you'll find the entity definitions used within the model and you need to include any of these entity definitions that are used as part of your new trigger. In this case, theBookFlighttrigger uses a composite list entity (to provide the airports from which as a user can fly from / to) and a pre-built datetime entity to detect if the user specifies a date as part of their incoming message.> # PREBUILT Entity definitions @ prebuilt datetimeV2 > # Phrase list definitions > # List entities @ list Airport = - Paris : - paris - cdg - London : - london - lhr - Berlin : - berlin - txl - New York : - new york - jfk - Seattle : - seattle - sea > # RegEx entities > # Composite entities @ composite From = [Airport] @ composite To = [Airport]Copy the LU definitions of these entities and paste them at the bottom of the Trigger phrases field. Then click Submit to create your new trigger.

Now, repeat step 7, this time creating a trigger called
GetWeather. This time you only need to copy the trigger phrases from the#GetWeatherintent within the .lu file as these phrases don't contain any intent usage.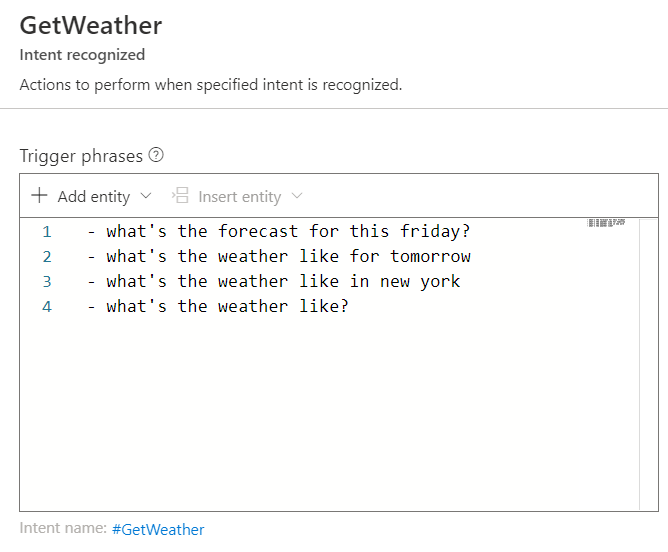
Your new Composer bot now contains the intent triggers needed to mirror the capabilities in the Core Bot Sample.

Make BookingDialog available in Composer
You now need to make the pre-existing waterfall dialog, from the Core Bot Sample for handling the BookFlight intent, available to use within Composer. The process of making an existing waterfall dialog available to use within Bot Framework Composer has the following stages.
- Copy the dialog class file, along with any other files that the dialog depends on, into your Composer bot runtime.
- Create a wrapper dialog class for the dialog, which allows you to use Composer's built in Begin a new dialog action to pass in options for your dialog.
- Register the new dialog wrapper in your bot's
Startup.csfile.
To complete this process for the BookingDialog in Core Bot Sample, complete the following steps.
Navigate to Project Settings in the left-hand navigation within Composer and note the Bot project location for your Composer bot. Navigate to this location within file explorer and open the Visual Studio .sln file within that folder. This will open your bot runtime project in Visual Studio.
Create a new folder within your project in Visual Studio called
MigratedDialogs.Open file explorer and navigate to the folder where your Core Bot Sample is located. Copy the following files from the Core Bot Sample and paste them into the new
MigratedDialogsfolder within your Composer bot Visual Studio project.Dialogs\BookingDialog.csDialogs\DateResolverDialog.csFlightBookingRecognizer.cs
Within your Visual Studio project, open each of the three files and update the namespace to match the namespace of your Composer bot. For example, if you root name space for your Composer bot is
CoreBotWithLanguage, you would update the namespace for each file to beCoreBotWithLanguage.MigratedDialogs.Create a
CastToextension method for casting the dialog options to the type your dialog is expecting.public static partial class Extensions { // Extension method on object to cast to type T. public static T CastTo<T>(this object obj) { if (obj is T asT) { return asT; } else if (obj is JObject asJobject) { // If types are not used by storage serialization, and Newtonsoft is the serializer // the item found can be a JObject. return asJobject.ToObject<T>(); } else if (obj is JArray asJarray) { // If types are not used by storage serialization, and Newtonsoft is the serializer // the item found can be a JArray. return asJarray.ToObject<T>(); } else if (obj == null) { return default(T); } else { throw new InvalidOperationException("Data is not in the correct format for casting."); } } }Create a new class, within the
MigratedDialogsfolder, calledBookingDialogWrapper.csusing the code below as the contents.public class BookingDialogWrapper : ComponentDialog { public BookingDialogWrapper() { this.Dialogs.Add(new BookingDialog() {Id = "BookingDialogWrapper"}); } public override async Task<DialogTurnResult> BeginDialogAsync(DialogContext outerDc, object options = null, CancellationToken cancellationToken = new CancellationToken()) { return await outerDc.BeginDialogAsync("BookingDialog", options.CastTo<BookingDetails>()); } public override async Task<DialogTurnResult> ResumeDialogAsync(DialogContext dc, DialogReason reason, object result = null, CancellationToken cancellationToken = default(CancellationToken)) { // End the current dialog and return result to parent. return await dc.EndDialogAsync(result, cancellationToken).ConfigureAwait(false); } }When migrating other dialogs, you would need to:
- Replace the dialog ID (
BookingDialogWrapperin the example above) with an appropriate ID. - Replace the dialog ID of the migrated dialog being called (
BookingDialogin the example above) with the ID as defined within the existing waterfall dialog you're migrating. - If your dialog uses a specific type for dialog options, you need to ensure that the
optionsobject is correctly cast to that type (BookingDetailsin the example above).
- Replace the dialog ID (
Open the
Startup.csclass in your Composer bot runtime solution and register both the waterfall dialog being migrated and the new wrapper dialog as singletons within theConfigureServicesmethod. The bot runtime will then automatically look for anyDialogsingletons and add them to the available dialogs collection.public void ConfigureServices(IServiceCollection services) { services.AddControllers().AddNewtonsoftJson(); services.AddBotRuntime(Configuration); services.AddSingleton<Dialog, BookingDialog>(); services.AddSingleton<Dialog, BookingWaterfallDialog>(); }Tip
In the example above, because the
BookingDialoghas options that are passed into it, a wrapper was required in order to ensure the proper casting between the JSON object that Composer passes from the Begin a new dialog action and the expected type, in this caseBookingDetails, happens. If you're migrating a waterfall dialog that doesn't use dialog options, you can skip the step of creating a wrapper class and just register the waterfall dialog class itself inStartup.csand call it by its ID using the Begin a new dialog action.
Call the migrated dialog from a Composer bot
After you add the BookingDialog class and all of its dependencies into your Composer bot runtime and registered it correctly, you can call that dialog as easily as you would call any other dialog you authored with Composer.
- Select the BookFlight in the navigation tree of your Composer bot.
- Use the + button on the authoring canvas and select Begin a new dialog action, found under the Dialog management sub menu. This will add a new Begin a new dialog action to your canvas.
- We now need to tell our new action which dialog to call. With the new action selected, select the Dialog name drop-down in the property pane and select Write an expression. Then enter
BookingDialogWrapper(the ID defined within our new dialog wrapper class) into the text field.
Start your bot and test the booking dialog
You're now ready to test your bot with your new triggers and migrated dialog.
Click the Start bot button at the top of the Composer window.
Once the bot has started click Open Web Chat to open the Composer Web Chat testing pane.
Type
book a flightand send the message. The bot should then correctly fire theBookFlightintent trigger, start theBookingDialogWrapper, and prompt you with the first questionWhere would you like to travel to?.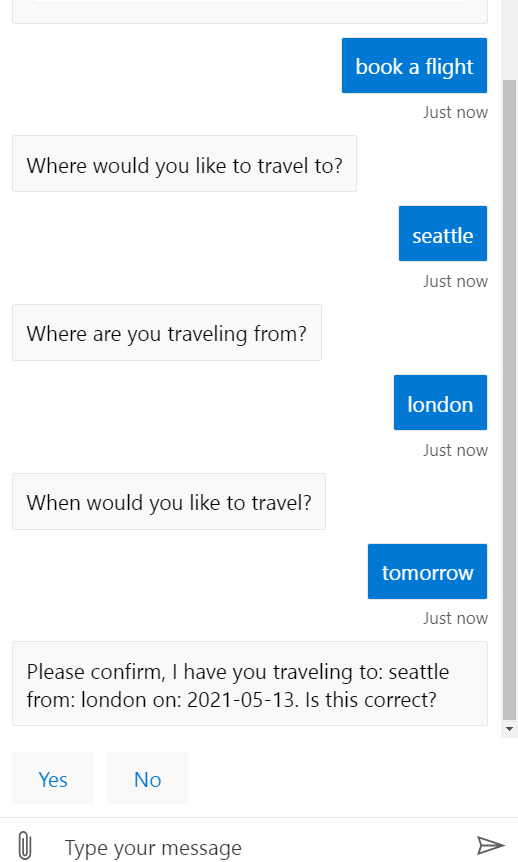
Feedback
Coming soon: Throughout 2024 we will be phasing out GitHub Issues as the feedback mechanism for content and replacing it with a new feedback system. For more information see: https://aka.ms/ContentUserFeedback.
Submit and view feedback for