Clang/LLVM support in Visual Studio projects
Clang/LLVM support for both CMake and MSBuild projects is available in Visual Studio 2019 and Visual Studio 2022.
You can use Visual Studio 2019 version 16.2 and later with Clang/LLVM to edit, build, and debug C++ Visual Studio projects (MSBuild) that target Windows or Linux.
Install
For the best IDE support in Visual Studio, we recommend using the latest Clang compiler tools for Windows. If you don't already have the tools, you can install them by opening the Visual Studio Installer and choosing C++ Clang tools for Windows under Desktop development with C++ optional components. You may prefer to use an existing Clang installation on your machine; if so, choose C++ Clang-cl for v142 build tools or C++ Clang-cl for v143 build tools.
Install
For the best IDE support in Visual Studio, we recommend using the latest Clang compiler tools for Windows. If you don't already have the tools, you can install them by opening the Visual Studio Installer and choosing C++ Clang tools for Windows under Desktop development with C++ optional components. You may prefer to use an existing Clang installation on your machine; if so, choose MSBuild support for LLVM (clang-cl) toolset.
The Microsoft C++ Standard Library requires at least Clang 8.0.0.
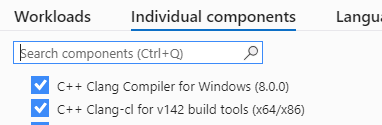
The Individual components tab is selected in the installer. C++ Clang Compiler for Windows is selected. C++ Clang-cl for v142 build tools (x64/x86) is also selected.
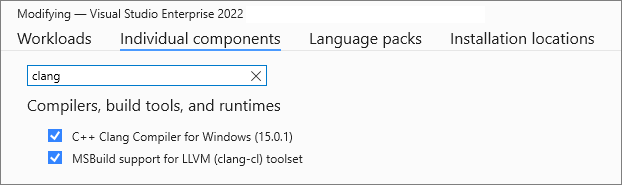
The Individual components tab is selected in the installer. C++ Clang Compiler for Windows is selected. MSBuild support for LLVM (clang-cl) toolset is also selected.
Later versions of Visual Studio provide newer versions of the Clang toolset. The bundled version of Clang gets updated automatically to stay current with updates in the Microsoft implementation of the Standard Library. For example, Visual Studio 2019 version 16.11 includes Clang v12.
Configure a Windows project to use Clang tools
To configure a Visual Studio project to use Clang, right-click on the project node in Solution Explorer and choose Properties. Typically, you should first choose All configurations at the top of the dialog. Then, under General > Platform Toolset, choose LLVM (clang-cl) and then OK.

The project properties page is open to the Configuration Properties > General page. The Platform Toolset dropdown is selected, on which LLVM (clang-cl) is selected.
If you're using the Clang tools that are bundled with Visual Studio, no extra steps are required. For Windows projects, Visual Studio by default invokes Clang in clang-cl mode. It links with the Microsoft implementation of the Standard Library. By default, clang-cl.exe is located in *%VCINSTALLDIR%\Tools\Llvm\bin\* and *%VCINSTALLDIR%\Tools\Llvm\x64\bin\*.
If you're using a custom Clang installation, you can change the value of the LLVMInstallDir property. For more information, see Set a custom LLVM location.
Configure a Linux project to use Clang tools
For Linux projects, Visual Studio uses the Clang GCC-compatible frontend. The project properties and nearly all compiler flags are identical
To configure a Visual Studio Linux project to use Clang:
- Right-click on the project node in Solution Explorer and choose Properties.
- Typically, you should first choose All configurations at the top of the dialog.
- Under General > Platform Toolset, choose Clang for Windows Subsystem for Linux if you're using Windows Subsystem for Linux (WSL). Choose Clang for Remote Linux if you're using a remote machine or VM.
- Press OK.
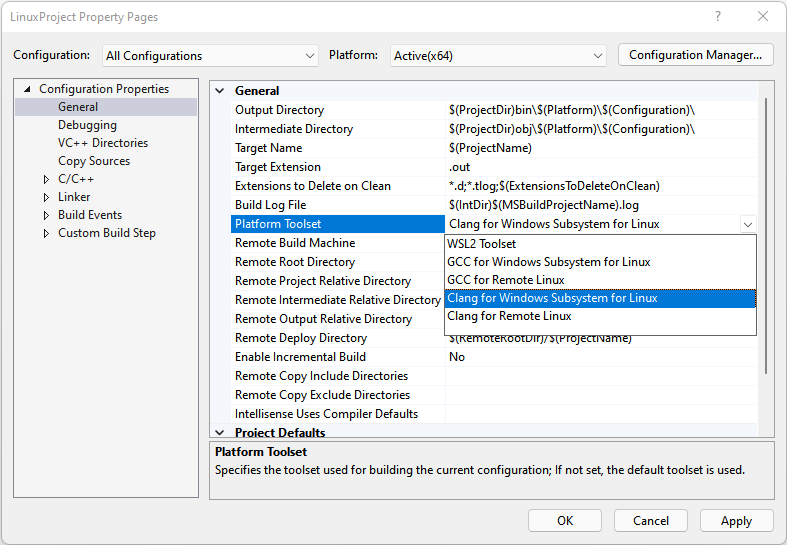
The project properties page is open to the Configuration Properties > General page. Platform Toolset is selected and from the list of options, LLVM (clang- c l) is selected."
On Linux, Visual Studio by default uses the first Clang location that it finds in the PATH environment property. If you're using a custom Clang installation, then either change the value of the LLVMInstallDir property or else enter the path under Project > Properties > Configuration Properties > VC++ DIrectories > Executable Directories. For more information, see Set a custom LLVM location.
Set a custom LLVM location and toolset
To set a custom path to LLVM and set a custom LLVM toolset version for one or more projects, create a Directory.build.props file. Then, add that file to the root folder of any project. You can add it to the root solution folder to apply it to all projects in the solution. The file should look like this example (but use your actual LLVM path and version number):
<Project>
  <PropertyGroup>
    <LLVMInstallDir>C:\MyLLVMRootDir</LLVMInstallDir>
    <LLVMToolsVersion>15.0.0</LLVMToolsVersion>
  </PropertyGroup>
</Project>
Set a custom LLVM toolset version in the IDE
Starting in Visual Studio 2019 version 16.9, you can set a custom toolset version for LLVM in Visual Studio. To set this property in a project:
Open the project's Property Pages dialog box. For more information, see Set C++ compiler and build properties.
Select the Configuration Properties > General property page.
Modify the Platform Toolset property to LLVM (clang-cl), if it isn't already set. Choose Apply to save your changes.
Select the Configuration Properties > Advanced property page.
Modify the LLVM Toolset Version property to your preferred version, and then choose OK to save your changes.
The LLVM Toolset Version property only appears when the LLVM platform toolset is selected.
When you add a Directory.build.props file to a project or solution, the settings appear as the default in the project Property Pages dialog. However, changes to these properties in Visual Studio override the settings in the Directory.build.props file.
Set properties, edit, build, and debug
After you have set up a Clang configuration, right-click again on the project node and choose Reload project. You can now build and debug the project using the Clang tools. Visual Studio detects that you're using the Clang compiler and provides IntelliSense, highlighting, navigation, and other editing features. Errors and warnings are displayed in the Output Window. The project property pages for a Clang configuration are similar to the ones for MSVC. However, some compiler-dependent features such as Edit and Continue aren't available for Clang configurations. You can set a Clang compiler or linker option that isn't available in the property pages. Add it manually in the property pages under Configuration Properties > C/C++ (or Linker) > Command Line > Additional Options.
When debugging, you can use breakpoints, memory and data visualization, and most other debugging features.
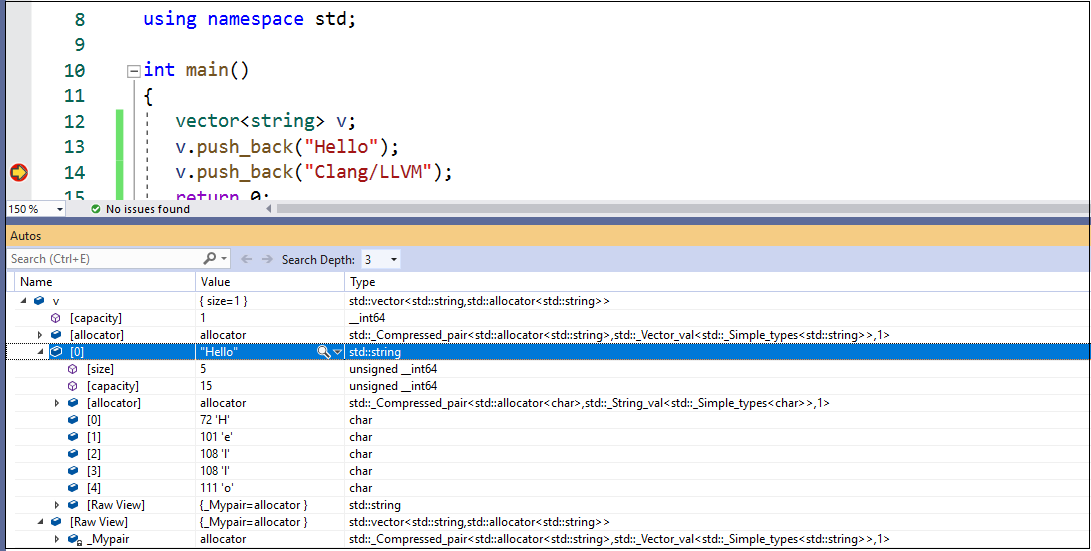
The portion of the app that is visible creates a string vector and adds some strings to it. Execution has stopped on a breakpoint for the code: v.push_back("Clang/LLVM");."
Feedback
Coming soon: Throughout 2024 we will be phasing out GitHub Issues as the feedback mechanism for content and replacing it with a new feedback system. For more information see: https://aka.ms/ContentUserFeedback.
Submit and view feedback for