Set up FIPS-compliant secure remote Linux development
Linux support is available in Visual Studio 2017 and later. FIPS-compliant secure remote Linux development is available in Visual Studio 2019 version 16.5 and later.
Federal Information Processing Standard (FIPS) Publication 140-2 is a U.S. government standard for cryptographic modules. Implementations of the standard are validated by NIST. Windows has validated support for FIPS-compliant cryptographic modules. In Visual Studio 2019 version 16.5 and later, you can use a secure, FIPS-compliant cryptographic connection to your Linux system for remote development.
Here's how to set up a secure, FIPS-compliant connection between Visual Studio and your remote Linux system. This guide is applicable when you build CMake or MSBuild Linux projects in Visual Studio. This article is the FIPS-compliant version of the connection instructions in Connect to your remote Linux computer.
Prepare a FIPS-compliant connection
Some preparation is required to use a FIPS-compliant, cryptographically secure ssh connection between Visual Studio and your remote Linux system. For FIPS-140-2 compliance, Visual Studio only supports RSA keys.
The examples in this article use Ubuntu 18.04 LTS with OpenSSH server version 7.6. However, the instructions should be the same for any distro using a moderately recent version of OpenSSH.
To set up the SSH server on the remote system
On the Linux system, install and start the OpenSSH server:
sudo apt install openssh-server
sudo service ssh start
If you'd like the
sshserver to start automatically when the system boots, enable it usingsystemctl:sudo systemctl enable sshOpen
/etc/ssh/sshd_configas root. Edit (or add, if they don't exist) the following lines:Ciphers aes256-cbc,aes192-cbc,aes128-cbc,3des-cbc HostKeyAlgorithms ssh-rsa KexAlgorithms diffie-hellman-group-exchange-sha256,diffie-hellman-group-exchange-sha1,diffie-hellman-group14-sha1 MACs hmac-sha2-256,hmac-sha1Note
ssh-rsais the only FIPS compliant host key algorithm VS supports. Theaes*-ctralgorithms are also FIPS compliant, but the implementation in Visual Studio isn't approved. Theecdh-*key exchange algorithms are FIPS compliant, but Visual Studio doesn't support them.You're not limited to these options. You can configure
sshto use other ciphers, host key algorithms, and so on. Some other relevant security options you may want to consider arePermitRootLogin,PasswordAuthentication, andPermitEmptyPasswords. For more information, see themanpage forsshd_configor the article SSH Server Configuration.After saving and closing
sshd_config, restart the ssh server to apply the new configuration:sudo service ssh restart
Next, you'll create an RSA key pair on your Windows computer. Then you'll copy the public key to the remote Linux system for use by ssh.
To create and use an RSA key file
On the Windows machine, generate a public/private RSA key pair by using this command:
ssh-keygen -t rsa -b 4096 -m PEMThe command creates a public key and a private key. By default, the keys are saved to
%USERPROFILE%\.ssh\id_rsaand%USERPROFILE%\\.ssh\\id_rsa.pub. (In PowerShell, use$env:USERPROFILEinstead of the cmd macro%USERPROFILE%) If you change the key name, use the changed name in the steps that follow. We recommend you use a passphrase for increased security.From Windows, copy the public key to the Linux machine:
scp %USERPROFILE%\.ssh\id_rsa.pub user@hostname:On the Linux system, add the key to the list of authorized keys, and ensure the file has the correct permissions:
cat ~/id_rsa.pub >> ~/.ssh/authorized_keys
chmod 600 ~/.ssh/authorized_keys
Now, you can test to see if the new key works in
ssh. Use it to sign in from Windows:ssh -i %USERPROFILE%\.ssh\id_rsa user@hostname
You've successfully set up ssh, created and deployed encryption keys, and tested your connection. Now you're ready to set up the Visual Studio connection.
Connect to the remote system in Visual Studio
In Visual Studio, choose Tools > Options on the menu bar to open the Options dialog. Then select Cross Platform > Connection Manager to open the Connection Manager dialog.
If you haven't set up a connection in Visual Studio before, when you build your project for the first time, Visual Studio opens the Connection Manager dialog for you.
In the Connection Manager dialog, choose the Add button to add a new connection.

The Connect to Remote System window is displayed.
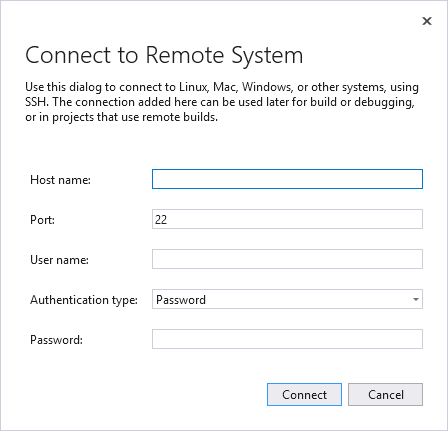
In the Connect to Remote System dialog, enter the connection details of your remote machine.
Entry Description Host Name Name or IP address of your target device Port Port that the SSH service is running on, typically 22 User name User to authenticate as Authentication type Choose Private Key for a FIPS-compliant connection Private key file Private key file created for ssh connection Passphrase Passphrase used with private key selected above Change the authentication type to Private Key. Enter the path to your private key in the Private key file field. You can use the Browse button to navigate to your private key file instead. Then, enter the passphrase used to encrypt your private key file in the Passphrase field.
Choose the Connect button to attempt a connection to the remote computer.
If the connection succeeds, Visual Studio configures IntelliSense to use the remote headers. For more information, see IntelliSense for headers on remote systems.
If the connection fails, the entry boxes that need to be changed are outlined in red.

For more information on troubleshooting your connection, see Connect to your remote Linux computer.
Command-line utility for the Connection Manager
Visual Studio 2019 version 16.5 or later: ConnectionManager.exe is a command-line utility to manage remote development connections outside of Visual Studio. It's useful for tasks such as provisioning a new development machine. Or, you can use it to set up Visual Studio for continuous integration. For examples and a complete reference to the ConnectionManager command, see ConnectionManager reference.
Optional: Enable or disable FIPS mode
It's possible to enable FIPS mode globally in Windows.
To enable FIPS mode, press Windows+R to open the Run dialog, and then run
gpedit.msc.Expand Local Computer Policy > Computer Configuration > Windows Settings > Security Settings > Local Policies and select Security Options.
Under Policy, select System cryptography: Use FIPS-compliant algorithms for encryption, hashing, and signing, and then press Enter to open its dialog box.
In the Local Security Setting tab, select Enabled or Disabled, and then choose OK to save your changes.
Warning
Enabling FIPS mode may cause some applications to break or behave unexpectedly. For more information, see the blog post Why We're Not Recommending "FIPS mode" Anymore.
Additional resources
Microsoft documentation on FIPS 140 validation
FIPS 140-2: Security Requirements for Cryptographic Modules (from NIST)
Cryptographic Algorithm Validation Program: Validation Notes (from NIST)
Microsoft blog post on Why We're Not Recommending "FIPS mode" Anymore
See Also
Configure a Linux project
Configure a Linux CMake project
Connect to your remote Linux computer
Deploy, run, and debug your Linux project
Configure CMake debugging sessions
Feedback
Coming soon: Throughout 2024 we will be phasing out GitHub Issues as the feedback mechanism for content and replacing it with a new feedback system. For more information see: https://aka.ms/ContentUserFeedback.
Submit and view feedback for