Tutorial: Build a movie recommender using matrix factorization with ML.NET
This tutorial shows you how to build a movie recommender with ML.NET in a .NET console application. The steps use C# and Visual Studio 2019.
In this tutorial, you learn how to:
- Select a machine learning algorithm
- Prepare and load your data
- Build and train a model
- Evaluate a model
- Deploy and consume a model
You can find the source code for this tutorial at the dotnet/samples repository.
Machine learning workflow
You will use the following steps to accomplish your task, as well as any other ML.NET task:
Prerequisites
Select the appropriate machine learning task
There are several ways to approach recommendation problems, such as recommending a list of movies or recommending a list of related products, but in this case you will predict what rating (1-5) a user will give to a particular movie and recommend that movie if it's higher than a defined threshold (the higher the rating, the higher the likelihood of a user liking a particular movie).
Create a console application
Create a project
Create a C# Console Application called "MovieRecommender". Click the Next button.
Choose .NET 6 as the framework to use. Click the Create button.
Create a directory named Data in your project to store the data set:
In Solution Explorer, right-click the project and select Add > New Folder. Type "Data" and hit Enter.
Install the Microsoft.ML and Microsoft.ML.Recommender NuGet Packages:
Note
This sample uses the latest stable version of the NuGet packages mentioned unless otherwise stated.
In Solution Explorer, right-click the project and select Manage NuGet Packages. Choose "nuget.org" as the Package source, select the Browse tab, search for Microsoft.ML, select the package in the list, and select the Install button. Select the OK button on the Preview Changes dialog and then select the I Accept button on the License Acceptance dialog if you agree with the license terms for the packages listed. Repeat these steps for Microsoft.ML.Recommender.
Add the following
usingstatements at the top of your Program.cs file:using Microsoft.ML; using Microsoft.ML.Trainers; using MovieRecommendation;
Download your data
Download the two datasets and save them to the Data folder you previously created:
Right click on recommendation-ratings-train.csv and select "Save Link (or Target) As..."
Right click on recommendation-ratings-test.csv and select "Save Link (or Target) As..."
Make sure you either save the *.csv files to the Data folder, or after you save it elsewhere, move the *.csv files to the Data folder.
In Solution Explorer, right-click each of the *.csv files and select Properties. Under Advanced, change the value of Copy to Output Directory to Copy if newer.
Load your data
The first step in the ML.NET process is to prepare and load your model training and testing data.
The recommendation ratings data is split into Train and Test datasets. The Train data is used to fit your model. The Test data is used to make predictions with your trained model and evaluate model performance. It's common to have an 80/20 split with Train and Test data.
Below is a preview of the data from your *.csv files:
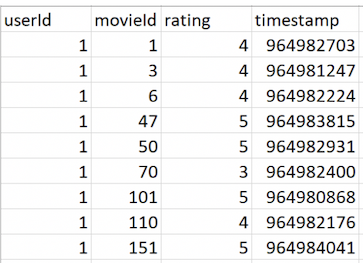
In the *.csv files, there are four columns:
userIdmovieIdratingtimestamp
In machine learning, the columns that are used to make a prediction are called Features, and the column with the returned prediction is called the Label.
You want to predict movie ratings, so the rating column is the Label. The other three columns, userId, movieId, and timestamp are all Features used to predict the Label.
| Features | Label |
|---|---|
userId |
rating |
movieId |
|
timestamp |
It's up to you to decide which Features are used to predict the Label. You can also use methods like permutation feature importance to help with selecting the best Features.
In this case, you should eliminate the timestamp column as a Feature because the timestamp does not really affect how a user rates a given movie and thus would not contribute to making a more accurate prediction:
| Features | Label |
|---|---|
userId |
rating |
movieId |
Next you must define your data structure for the input class.
Add a new class to your project:
In Solution Explorer, right-click the project, and then select Add > New Item.
In the Add New Item dialog box, select Class and change the Name field to MovieRatingData.cs. Then, select the Add button.
The MovieRatingData.cs file opens in the code editor. Add the following using statement to the top of MovieRatingData.cs:
using Microsoft.ML.Data;
Create a class called MovieRating by removing the existing class definition and adding the following code in MovieRatingData.cs:
public class MovieRating
{
    [LoadColumn(0)]
    public float userId;
    [LoadColumn(1)]
    public float movieId;
    [LoadColumn(2)]
    public float Label;
}
MovieRating specifies an input data class. The LoadColumn attribute specifies which columns (by column index) in the dataset should be loaded. The userId and movieId columns are your Features (the inputs you will give the model to predict the Label), and the rating column is the Label that you will predict (the output of the model).
Create another class, MovieRatingPrediction, to represent predicted results by adding the following code after the MovieRating class in MovieRatingData.cs:
public class MovieRatingPrediction
{
    public float Label;
    public float Score;
}
In Program.cs, replace the Console.WriteLine("Hello World!") with the following code:
MLContext mlContext = new MLContext();
The MLContext class is a starting point for all ML.NET operations, and initializing mlContext creates a new ML.NET environment that can be shared across the model creation workflow objects. It's similar, conceptually, to DBContext in Entity Framework.
At the bottom of the file, create a method called LoadData():
(IDataView training, IDataView test) LoadData(MLContext mlContext)
{

}
Note
This method will give you an error until you add a return statement in the following steps.
Initialize your data path variables, load the data from the *.csv files, and return the Train and Test data as IDataView objects by adding the following as the next line of code in LoadData():
var trainingDataPath = Path.Combine(Environment.CurrentDirectory, "Data", "recommendation-ratings-train.csv");
var testDataPath = Path.Combine(Environment.CurrentDirectory, "Data", "recommendation-ratings-test.csv");

IDataView trainingDataView = mlContext.Data.LoadFromTextFile<MovieRating>(trainingDataPath, hasHeader: true, separatorChar: ',');
IDataView testDataView = mlContext.Data.LoadFromTextFile<MovieRating>(testDataPath, hasHeader: true, separatorChar: ',');

return (trainingDataView, testDataView);
Data in ML.NET is represented as an IDataView interface. IDataView is a flexible, efficient way of describing tabular data (numeric and text). Data can be loaded from a text file or in real time (for example, SQL database or log files) to an IDataView object.
The LoadFromTextFile() defines the data schema and reads in the file. It takes in the data path variables and returns an IDataView. In this case, you provide the path for your Test and Train files and indicate both the text file header (so it can use the column names properly) and the comma character data separator (the default separator is a tab).
Add the following code to call your LoadData() method and return the Train and Test data:
(IDataView trainingDataView, IDataView testDataView) = LoadData(mlContext);
Build and train your model
Create the BuildAndTrainModel() method, just after the LoadData() method, using the following code:
ITransformer BuildAndTrainModel(MLContext mlContext, IDataView trainingDataView)
{

}
Note
This method will give you an error until you add a return statement in the following steps.
Define the data transformations by adding the following code to BuildAndTrainModel():
IEstimator<ITransformer> estimator = mlContext.Transforms.Conversion.MapValueToKey(outputColumnName: "userIdEncoded", inputColumnName: "userId")
    .Append(mlContext.Transforms.Conversion.MapValueToKey(outputColumnName: "movieIdEncoded", inputColumnName: "movieId"));
Since userId and movieId represent users and movie titles, not real values, you use the MapValueToKey() method to transform each userId and each movieId into a numeric key type Feature column (a format accepted by recommendation algorithms) and add them as new dataset columns:
| userId | movieId | Label | userIdEncoded | movieIdEncoded |
|---|---|---|---|---|
| 1 | 1 | 4 | userKey1 | movieKey1 |
| 1 | 3 | 4 | userKey1 | movieKey2 |
| 1 | 6 | 4 | userKey1 | movieKey3 |
Choose the machine learning algorithm and append it to the data transformation definitions by adding the following as the next line of code in BuildAndTrainModel():
var options = new MatrixFactorizationTrainer.Options
{
    MatrixColumnIndexColumnName = "userIdEncoded",
    MatrixRowIndexColumnName = "movieIdEncoded",
    LabelColumnName = "Label",
    NumberOfIterations = 20,
    ApproximationRank = 100
};

var trainerEstimator = estimator.Append(mlContext.Recommendation().Trainers.MatrixFactorization(options));
The MatrixFactorizationTrainer is your recommendation training algorithm. Matrix Factorization is a common approach to recommendation when you have data on how users have rated products in the past, which is the case for the datasets in this tutorial. There are other recommendation algorithms for when you have different data available (see the Other recommendation algorithms section below to learn more).
In this case, the Matrix Factorization algorithm uses a method called "collaborative filtering", which assumes that if User 1 has the same opinion as User 2 on a certain issue, then User 1 is more likely to feel the same way as User 2 about a different issue.
For instance, if User 1 and User 2 rate movies similarly, then User 2 is more likely to enjoy a movie that User 1 has watched and rated highly:
Incredibles 2 (2018) |
The Avengers (2012) |
Guardians of the Galaxy (2014) |
|
|---|---|---|---|
| User 1 | Watched and liked movie | Watched and liked movie | Watched and liked movie |
| User 2 | Watched and liked movie | Watched and liked movie | Has not watched -- RECOMMEND movie |
The Matrix Factorization trainer has several Options, which you can read more about in the Algorithm hyperparameters section below.
Fit the model to the Train data and return the trained model by adding the following as the next line of code in the BuildAndTrainModel() method:
Console.WriteLine("=============== Training the model ===============");
ITransformer model = trainerEstimator.Fit(trainingDataView);

return model;
The Fit() method trains your model with the provided training dataset. Technically, it executes the Estimator definitions by transforming the data and applying the training, and it returns back the trained model, which is a Transformer.
For more information on the model training workflow in ML.NET, see What is ML.NET and how does it work?.
Add the following as the next line of code below the call to the LoadData() method to call your BuildAndTrainModel() method and return the trained model:
ITransformer model = BuildAndTrainModel(mlContext, trainingDataView);
Evaluate your model
Once you have trained your model, use your test data to evaluate how your model is performing.
Create the EvaluateModel() method, just after the BuildAndTrainModel() method, using the following code:
void EvaluateModel(MLContext mlContext, IDataView testDataView, ITransformer model)
{

}
Transform the Test data by adding the following code to EvaluateModel():
Console.WriteLine("=============== Evaluating the model ===============");
var prediction = model.Transform(testDataView);
The Transform() method makes predictions for multiple provided input rows of a test dataset.
Evaluate the model by adding the following as the next line of code in the EvaluateModel() method:
var metrics = mlContext.Regression.Evaluate(prediction, labelColumnName: "Label", scoreColumnName: "Score");
Once you have the prediction set, the Evaluate() method assesses the model, which compares the predicted values with the actual Labels in the test dataset and returns metrics on how the model is performing.
Print your evaluation metrics to the console by adding the following as the next line of code in the EvaluateModel() method:
Console.WriteLine("Root Mean Squared Error : " + metrics.RootMeanSquaredError.ToString());
Console.WriteLine("RSquared: " + metrics.RSquared.ToString());
Add the following as the next line of code below the call to the BuildAndTrainModel() method to call your EvaluateModel() method:
EvaluateModel(mlContext, testDataView, model);
The output so far should look similar to the following text:
=============== Training the model ===============
iter      tr_rmse          obj
   0       1.5403   3.1262e+05
   1       0.9221   1.6030e+05
   2       0.8687   1.5046e+05
   3       0.8416   1.4584e+05
   4       0.8142   1.4209e+05
   5       0.7849   1.3907e+05
   6       0.7544   1.3594e+05
   7       0.7266   1.3361e+05
   8       0.6987   1.3110e+05
   9       0.6751   1.2948e+05
  10       0.6530   1.2766e+05
  11       0.6350   1.2644e+05
  12       0.6197   1.2541e+05
  13       0.6067   1.2470e+05
  14       0.5953   1.2382e+05
  15       0.5871   1.2342e+05
  16       0.5781   1.2279e+05
  17       0.5713   1.2240e+05
  18       0.5660   1.2230e+05
  19       0.5592   1.2179e+05
=============== Evaluating the model ===============
Rms: 0.994051469730769
RSquared: 0.412556298844873
In this output, there are 20 iterations. In each iteration, the measure of error decreases and converges closer and closer to 0.
The root of mean squared error (RMS or RMSE) is used to measure the differences between the model predicted values and the test dataset observed values. Technically it's the square root of the average of the squares of the errors. The lower it is, the better the model is.
R Squared indicates how well data fits a model. Ranges from 0 to 1. A value of 0 means that the data is random or otherwise can't be fit to the model. A value of 1 means that the model exactly matches the data. You want your R Squared score to be as close to 1 as possible.
Building successful models is an iterative process. This model has initial lower quality as the tutorial uses small datasets to provide quick model training. If you aren't satisfied with the model quality, you can try to improve it by providing larger training datasets or by choosing different training algorithms with different hyper-parameters for each algorithm. For more information, check out the Improve your model section below.
Use your model
Now you can use your trained model to make predictions on new data.
Create the UseModelForSinglePrediction() method, just after the EvaluateModel() method, using the following code:
void UseModelForSinglePrediction(MLContext mlContext, ITransformer model)
{

}
Use the PredictionEngine to predict the rating by adding the following code to UseModelForSinglePrediction():
Console.WriteLine("=============== Making a prediction ===============");
var predictionEngine = mlContext.Model.CreatePredictionEngine<MovieRating, MovieRatingPrediction>(model);
The PredictionEngine is a convenience API, which allows you to perform a prediction on a single instance of data. PredictionEngine is not thread-safe. It's acceptable to use in single-threaded or prototype environments. For improved performance and thread safety in production environments, use the PredictionEnginePool service, which creates an ObjectPool of PredictionEngine objects for use throughout your application. See this guide on how to use PredictionEnginePool in an ASP.NET Core Web API.
Note
PredictionEnginePool service extension is currently in preview.
Create an instance of MovieRating called testInput and pass it to the Prediction Engine by adding the following as the next lines of code in the UseModelForSinglePrediction() method:
var testInput = new MovieRating { userId = 6, movieId = 10 };

var movieRatingPrediction = predictionEngine.Predict(testInput);
The Predict() function makes a prediction on a single column of data.
You can then use the Score, or the predicted rating, to determine whether you want to recommend the movie with movieId 10 to user 6. The higher the Score, the higher the likelihood of a user liking a particular movie. In this case, let’s say that you recommend movies with a predicted rating of > 3.5.
To print the results, add the following as the next lines of code in the UseModelForSinglePrediction() method:
if (Math.Round(movieRatingPrediction.Score, 1) > 3.5)
{
    Console.WriteLine("Movie " + testInput.movieId + " is recommended for user " + testInput.userId);
}
else
{
    Console.WriteLine("Movie " + testInput.movieId + " is not recommended for user " + testInput.userId);
}
Add the following as the next line of code after the call to the EvaluateModel() method to call your UseModelForSinglePrediction() method:
UseModelForSinglePrediction(mlContext, model);
The output of this method should look similar to the following text:
=============== Making a prediction ===============
Movie 10 is recommended for user 6
Save your model
To use your model to make predictions in end-user applications, you must first save the model.
Create the SaveModel() method, just after the UseModelForSinglePrediction() method, using the following code:
void SaveModel(MLContext mlContext, DataViewSchema trainingDataViewSchema, ITransformer model)
{

}
Save your trained model by adding the following code in the SaveModel() method:
var modelPath = Path.Combine(Environment.CurrentDirectory, "Data", "MovieRecommenderModel.zip");

Console.WriteLine("=============== Saving the model to a file ===============");
mlContext.Model.Save(model, trainingDataViewSchema, modelPath);
This method saves your trained model to a .zip file (in the "Data" folder), which can then be used in other .NET applications to make predictions.
Add the following as the next line of code after the call to the UseModelForSinglePrediction() method to call your SaveModel() method:
SaveModel(mlContext, trainingDataView.Schema, model);
Use your saved model
Once you have saved your trained model, you can consume the model in different environments. See Save and load trained models to learn how to operationalize a trained machine learning model in apps.
Results
After following the steps above, run your console app (Ctrl + F5). Your results from the single prediction above should be similar to the following. You may see warnings or processing messages, but these messages have been removed from the following results for clarity.
=============== Training the model ===============
iter      tr_rmse          obj
   0       1.5382   3.1213e+05
   1       0.9223   1.6051e+05
   2       0.8691   1.5050e+05
   3       0.8413   1.4576e+05
   4       0.8145   1.4208e+05
   5       0.7848   1.3895e+05
   6       0.7552   1.3613e+05
   7       0.7259   1.3357e+05
   8       0.6987   1.3121e+05
   9       0.6747   1.2949e+05
  10       0.6533   1.2766e+05
  11       0.6353   1.2636e+05
  12       0.6209   1.2561e+05
  13       0.6072   1.2462e+05
  14       0.5965   1.2394e+05
  15       0.5868   1.2352e+05
  16       0.5782   1.2279e+05
  17       0.5713   1.2227e+05
  18       0.5637   1.2190e+05
  19       0.5604   1.2178e+05
=============== Evaluating the model ===============
Rms: 0.977175077487166
RSquared: 0.43233349213192
=============== Making a prediction ===============
Movie 10 is recommended for user 6
=============== Saving the model to a file ===============
Congratulations! You've now successfully built a machine learning model for recommending movies. You can find the source code for this tutorial at the dotnet/samples repository.
Improve your model
There are several ways that you can improve the performance of your model so that you can get more accurate predictions.
Data
Adding more training data that has enough samples for each user and movie id can help improve the quality of the recommendation model.
Cross validation is a technique for evaluating models that randomly splits up data into subsets (instead of extracting out test data from the dataset like you did in this tutorial) and takes some of the groups as train data and some of the groups as test data. This method outperforms making a train-test split in terms of model quality.
Features
In this tutorial, you only use the three Features (user id, movie id, and rating) that are provided by the dataset.
While this is a good start, in reality you might want to add other attributes or Features (for example, age, gender, geo-location, etc.) if they are included in the dataset. Adding more relevant Features can help improve the performance of your recommendation model.
If you are unsure about which Features might be the most relevant for your machine learning task, you can also make use of Feature Contribution Calculation (FCC) and permutation feature importance, which ML.NET provides to discover the most influential Features.
Algorithm hyperparameters
While ML.NET provides good default training algorithms, you can further fine-tune performance by changing the algorithm's hyperparameters.
For Matrix Factorization, you can experiment with hyperparameters such as NumberOfIterations and ApproximationRank to see if that gives you better results.
For instance, in this tutorial the algorithm options are:
var options = new MatrixFactorizationTrainer.Options
{
    MatrixColumnIndexColumnName = "userIdEncoded",
    MatrixRowIndexColumnName = "movieIdEncoded",
    LabelColumnName = "Label",
    NumberOfIterations = 20,
    ApproximationRank = 100
};
Other Recommendation Algorithms
The matrix factorization algorithm with collaborative filtering is only one approach for performing movie recommendations. In many cases, you may not have the ratings data available and only have movie history available from users. In other cases, you may have more than just the user’s rating data.
| Algorithm | Scenario | Sample |
|---|---|---|
| One Class Matrix Factorization | Use this when you only have userId and movieId. This style of recommendation is based upon the co-purchase scenario, or products frequently bought together, which means it will recommend to customers a set of products based upon their own purchase order history. | >Try it out |
| Field Aware Factorization Machines | Use this to make recommendations when you have more Features beyond userId, productId, and rating (such as product description or product price). This method also uses a collaborative filtering approach. | >Try it out |
New user scenario
One common problem in collaborative filtering is the cold start problem, which is when you have a new user with no previous data to draw inferences from. This problem is often solved by asking new users to create a profile and, for instance, rate movies they have seen in the past. While this method puts some burden on the user, it provides some starting data for new users with no rating history.
Resources
The data used in this tutorial is derived from MovieLens Dataset.
Next steps
In this tutorial, you learned how to:
- Select a machine learning algorithm
- Prepare and load your data
- Build and train a model
- Evaluate a model
- Deploy and consume a model
Advance to the next tutorial to learn more
Feedback
Coming soon: Throughout 2024 we will be phasing out GitHub Issues as the feedback mechanism for content and replacing it with a new feedback system. For more information see: https://aka.ms/ContentUserFeedback.
Submit and view feedback for