Add a splash screen to a .NET MAUI app project
On Android and iOS, .NET Multi-platform App UI (.NET MAUI) apps can display a splash screen while their initialization process completes. The splash screen is displayed immediately when an app is launched, providing immediate feedback to users while app resources are initialized:
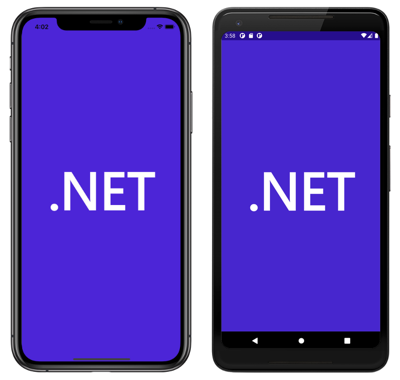
Once the app is ready for interaction, its splash screen is dismissed.
Note
On Android 12+ (API 31+), the splash screen shows an icon that's centred on screen. For more information about splash screens on Android 12+, see Splash screens on developer.android.com.
In a .NET MAUI app project, a splash screen can be specified in a single location in your app project, and at build time it can be resized to the correct resolution for the target platform, and added to your app package. This avoids having to manually duplicate and name the splash screen on a per platform basis. By default, bitmap (non-vector) image formats are not automatically resized by .NET MAUI.
A .NET MAUI splash screen can use any of the standard platform image formats, including Scalable Vector Graphics (SVG) files.
Important
.NET MAUI converts SVG files to PNG files. Therefore, when adding an SVG file to your .NET MAUI app project, it should be referenced from XAML or C# with a .png extension. The only reference to the SVG file should be in your project file.
A splash screen can be added to your app project by dragging an image into the Resources\Splash folder of the project, where its build action will automatically be set to MauiSplashScreen. This creates a corresponding entry in your project file:
<ItemGroup>
  <MauiSplashScreen Include="Resources\Splash\splashscreen.svg" />
</ItemGroup>
Note
A splash screen can also be added to other folders of your app project. However, in this scenario its build action must be manually set to MauiSplashScreen in the Properties window.
To comply with Android resource naming rules, splash screen files names must be lowercase, start and end with a letter character, and contain only alphanumeric characters or underscores. For more information, see App resources overview on developer.android.com.
At build time, the splash screen image is resized to the correct size for the target platform and device. The resized splash screen is then added to your app package. For information about disabling splash screen packaging, see Disable splash screen packaging. For information about generating a blank splash screen, see Generate a blank splash screen.
Set the base size
.NET MAUI uses your splash screen across multiple platforms and can resize it for each platform.
The base size of a splash screen image represents the baseline density of the image, and is effectively the 1.0 scale factor for the image (the size you would typically use in your code to specify the splash screen size) from which all other sizes are derived. If you don't specify the base size for a bitmap image, the image isn't resized. If you don't specify a base size for a vector image, such as an SVG file, the dimensions specified in the image are used as the base size.
The following diagram illustrates how base size affects an image:
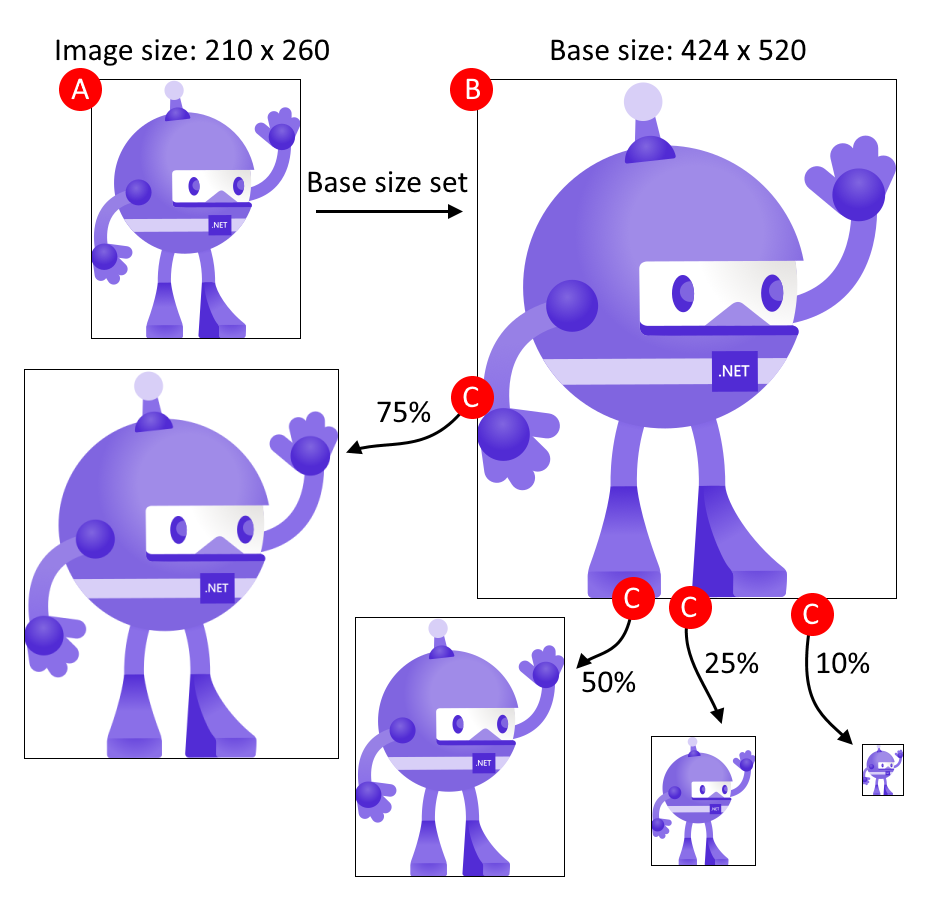
The process shown in the diagram follows these steps:
- A: The image has dimensions of 210x260, and the base size is set to 424x520.
- B: .NET MAUI scales the image to match the base size of 424x520.
- C: As different target platforms require different sizes of the image, .NET MAUI scales the image from the base size to different sizes.
Tip
Use SVG images where possible. SVG images can upscale to larger sizes and still look crisp and clean. Bitmap-based images, such as a PNG or JPG image, look blurry when upscaled.
The base size is specified with the BaseSize="W,H" attribute, where W is the width of the image and H is the height of the image. The following example sets the base size:
<MauiSplashScreen Include="Resources\Splash\splashscreen.svg" BaseSize="128,128" />
At build time, the splash screen will be resized to the correct resolution for the target platform. The resulting splash screen is then added to your app package.
To stop vector images being resized, set the Resize attribute to false:
<MauiSplashScreen Include="Resources\Splash\splashscreen.svg" Resize="false" />
Add tint and background color
To add a tint to your splash screen, which is useful when you have a simple image you'd like to render in a different color to the source, set the TintColor attribute:
<MauiSplashScreen Include="Resources\Splash\splashscreen.svg" TintColor="#66B3FF" />
A background color for your splash screen can also be specified:
<MauiSplashScreen Include="Resources\Splash\splashscreen.svg" Color="#512BD4" />
Color values can be specified in hexadecimal, or as a .NET MAUI color. For example, Color="Red" is valid.
Platform-specific configuration
On Android, the splash screen is added to your app package as Resources/values/maui_colors.xml and Resources/drawable/maui_splash_image.xml. .NET MAUI apps use the Maui.SplashTheme by default, which ensures that a splash screen will be displayed if present. Therefore, you should not specify a different theme in your manifest file or in your MainActivity class:
using Android.App;
using Android.Content.PM;

namespace MyMauiApp
{
      [Activity(Theme = "@style/Maui.SplashTheme", MainLauncher = true, ConfigurationChanges = ConfigChanges.ScreenSize | ConfigChanges.Orientation | ConfigChanges.UiMode | ConfigChanges.ScreenLayout | ConfigChanges.SmallestScreenSize)]
      public class MainActivity : MauiAppCompatActivity
      {
      }
}
For more advanced splash screen scenarios, per-platform approaches apply.
Feedback
Coming soon: Throughout 2024 we will be phasing out GitHub Issues as the feedback mechanism for content and replacing it with a new feedback system. For more information see: https://aka.ms/ContentUserFeedback.
Submit and view feedback for