Defining your multi-container application with docker-compose.yml
Tip
This content is an excerpt from the eBook, .NET Microservices Architecture for Containerized .NET Applications, available on .NET Docs or as a free downloadable PDF that can be read offline.
In this guide, the docker-compose.yml file was introduced in the section Step 4. Define your services in docker-compose.yml when building a multi-container Docker application. However, there are additional ways to use the docker-compose files that are worth exploring in further detail.
For example, you can explicitly describe how you want to deploy your multi-container application in the docker-compose.yml file. Optionally, you can also describe how you are going to build your custom Docker images. (Custom Docker images can also be built with the Docker CLI.)
Basically, you define each of the containers you want to deploy plus certain characteristics for each container deployment. Once you have a multi-container deployment description file, you can deploy the whole solution in a single action orchestrated by the docker-compose up CLI command, or you can deploy it transparently from Visual Studio. Otherwise, you would need to use the Docker CLI to deploy container-by-container in multiple steps by using the docker run command from the command line. Therefore, each service defined in docker-compose.yml must specify exactly one image or build. Other keys are optional, and are analogous to their docker run command-line counterparts.
The following YAML code is the definition of a possible global but single docker-compose.yml file for the eShopOnContainers sample. This code is not the actual docker-compose file from eShopOnContainers. Instead, it is a simplified and consolidated version in a single file, which is not the best way to work with docker-compose files, as will be explained later.
version: '3.4'

services:
  webmvc:
    image: eshop/webmvc
    environment:
      - CatalogUrl=http://catalog-api
      - OrderingUrl=http://ordering-api
      - BasketUrl=http://basket-api
    ports:
      - "5100:80"
    depends_on:
      - catalog-api
      - ordering-api
      - basket-api

  catalog-api:
    image: eshop/catalog-api
    environment:
      - ConnectionString=Server=sqldata;Initial Catalog=CatalogData;User Id=sa;Password=[PLACEHOLDER]
    expose:
      - "80"
    ports:
      - "5101:80"
    #extra hosts can be used for standalone SQL Server or services at the dev PC
    extra_hosts:
      - "CESARDLSURFBOOK:10.0.75.1"
    depends_on:
      - sqldata

  ordering-api:
    image: eshop/ordering-api
    environment:
      - ConnectionString=Server=sqldata;Database=Services.OrderingDb;User Id=sa;Password=[PLACEHOLDER]
    ports:
      - "5102:80"
    #extra hosts can be used for standalone SQL Server or services at the dev PC
    extra_hosts:
      - "CESARDLSURFBOOK:10.0.75.1"
    depends_on:
      - sqldata

  basket-api:
    image: eshop/basket-api
    environment:
      - ConnectionString=sqldata
    ports:
      - "5103:80"
    depends_on:
      - sqldata

  sqldata:
    environment:
      - SA_PASSWORD=[PLACEHOLDER]
      - ACCEPT_EULA=Y
    ports:
      - "5434:1433"

  basketdata:
    image: redis
The root key in this file is services. Under that key, you define the services you want to deploy and run when you execute the docker-compose up command or when you deploy from Visual Studio by using this docker-compose.yml file. In this case, the docker-compose.yml file has multiple services defined, as described in the following table.
| Service name | Description |
|---|---|
| webmvc | Container including the ASP.NET Core MVC application consuming the microservices from server-side C# |
| catalog-api | Container including the Catalog ASP.NET Core Web API microservice |
| ordering-api | Container including the Ordering ASP.NET Core Web API microservice |
| sqldata | Container running SQL Server for Linux, holding the microservices databases |
| basket-api | Container with the Basket ASP.NET Core Web API microservice |
| basketdata | Container running the REDIS cache service, with the basket database as a REDIS cache |
A simple Web Service API container
Focusing on a single container, the catalog-api container-microservice has a straightforward definition:
  catalog-api:
    image: eshop/catalog-api
    environment:
      - ConnectionString=Server=sqldata;Initial Catalog=CatalogData;User Id=sa;Password=[PLACEHOLDER]
    expose:
      - "80"
    ports:
      - "5101:80"
    #extra hosts can be used for standalone SQL Server or services at the dev PC
    extra_hosts:
      - "CESARDLSURFBOOK:10.0.75.1"
    depends_on:
      - sqldata
This containerized service has the following basic configuration:
It is based on the custom eshop/catalog-api image. For simplicity's sake, there is no build: key setting in the file. This means that the image must have been previously built (with docker build) or have been downloaded (with the docker pull command) from any Docker registry.
It defines an environment variable named ConnectionString with the connection string to be used by Entity Framework to access the SQL Server instance that contains the catalog data model. In this case, the same SQL Server container is holding multiple databases. Therefore, you need less memory in your development machine for Docker. However, you could also deploy one SQL Server container for each microservice database.
The SQL Server name is sqldata, which is the same name used for the container that is running the SQL Server instance for Linux. This is convenient; being able to use this name resolution (internal to the Docker host) will resolve the network address so you don't need to know the internal IP for the containers you are accessing from other containers.
Because the connection string is defined by an environment variable, you could set that variable through a different mechanism and at a different time. For example, you could set a different connection string when deploying to production in the final hosts, or by doing it from your CI/CD pipelines in Azure DevOps Services or your preferred DevOps system.
It exposes port 80 for internal access to the catalog-api service within the Docker host. The host is currently a Linux VM because it is based on a Docker image for Linux, but you could configure the container to run on a Windows image instead.
It forwards the exposed port 80 on the container to port 5101 on the Docker host machine (the Linux VM).
It links the web service to the sqldata service (the SQL Server instance for Linux database running in a container). When you specify this dependency, the catalog-api container will not start until the sqldata container has already started; this aspect is important because catalog-api needs to have the SQL Server database up and running first. However, this kind of container dependency is not enough in many cases, because Docker checks only at the container level. Sometimes the service (in this case SQL Server) might still not be ready, so it is advisable to implement retry logic with exponential backoff in your client microservices. That way, if a dependency container is not ready for a short time, the application will still be resilient.
It is configured to allow access to external servers: the extra_hosts setting allows you to access external servers or machines outside of the Docker host (that is, outside the default Linux VM, which is a development Docker host), such as a local SQL Server instance on your development PC.
There are also other, more advanced docker-compose.yml settings that we'll discuss in the following sections.
Using docker-compose files to target multiple environments
The docker-compose.*.yml files are definition files and can be used by multiple infrastructures that understand that format. The most straightforward tool is the docker-compose command.
Therefore, by using the docker-compose command you can target the following main scenarios.
Development environments
When you develop applications, it is important to be able to run an application in an isolated development environment. You can use the docker-compose CLI command to create that environment or Visual Studio, which uses docker-compose under the covers.
The docker-compose.yml file allows you to configure and document all your application's service dependencies (other services, cache, databases, queues, etc.). Using the docker-compose CLI command, you can create and start one or more containers for each dependency with a single command (docker-compose up).
The docker-compose.yml files are configuration files interpreted by Docker engine but also serve as convenient documentation files about the composition of your multi-container application.
Testing environments
An important part of any continuous deployment (CD) or continuous integration (CI) process are the unit tests and integration tests. These automated tests require an isolated environment so they are not impacted by the users or any other change in the application's data.
With Docker Compose, you can create and destroy that isolated environment very easily in a few commands from your command prompt or scripts, like the following commands:
docker-compose -f docker-compose.yml -f docker-compose-test.override.yml up -d
./run_unit_tests
docker-compose -f docker-compose.yml -f docker-compose-test.override.yml down
Production deployments
You can also use Compose to deploy to a remote Docker Engine. A typical case is to deploy to a single Docker host instance (like a production VM or server provisioned with Docker Machine).
If you are using any other orchestrator (Azure Service Fabric, Kubernetes, etc.), you might need to add setup and metadata configuration settings like those in docker-compose.yml, but in the format required by the other orchestrator.
In any case, docker-compose is a convenient tool and metadata format for development, testing and production workflows, although the production workflow might vary on the orchestrator you are using.
Using multiple docker-compose files to handle several environments
When targeting different environments, you should use multiple compose files. This approach lets you create multiple configuration variants depending on the environment.
Overriding the base docker-compose file
You could use a single docker-compose.yml file as in the simplified examples shown in previous sections. However, that is not recommended for most applications.
By default, Compose reads two files, a docker-compose.yml and an optional docker-compose.override.yml file. As shown in Figure 6-11, when you are using Visual Studio and enabling Docker support, Visual Studio also creates an additional docker-compose.vs.debug.g.yml file for debugging the application, you can take a look at this file in folder obj\Docker\ in the main solution folder.
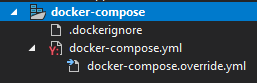
Figure 6-11. docker-compose files in Visual Studio 2019
docker-compose project file structure:
- .dockerignore - used to ignore files
- docker-compose.yml - used to compose microservices
- docker-compose.override.yml - used to configure microservices environment
You can edit the docker-compose files with any editor, like Visual Studio Code or Sublime, and run the application with the docker-compose up command.
By convention, the docker-compose.yml file contains your base configuration and other static settings. That means that the service configuration should not change depending on the deployment environment you are targeting.
The docker-compose.override.yml file, as its name suggests, contains configuration settings that override the base configuration, such as configuration that depends on the deployment environment. You can have multiple override files with different names also. The override files usually contain additional information needed by the application but specific to an environment or to a deployment.
Targeting multiple environments
A typical use case is when you define multiple compose files so you can target multiple environments, like production, staging, CI, or development. To support these differences, you can split your Compose configuration into multiple files, as shown in Figure 6-12.

Figure 6-12. Multiple docker-compose files overriding values in the base docker-compose.yml file
You can combine multiple docker-compose*.yml files to handle different environments. You start with the base docker-compose.yml file. This base file contains the base or static configuration settings that do not change depending on the environment. For example, the eShopOnContainers app has the following docker-compose.yml file (simplified with fewer services) as the base file.
#docker-compose.yml (Base)
version: '3.4'
services:
  basket-api:
    image: eshop/basket-api:${TAG:-latest}
    build:
      context: .
      dockerfile: src/Services/Basket/Basket.API/Dockerfile
    depends_on:
      - basketdata
      - identity-api
      - rabbitmq

  catalog-api:
    image: eshop/catalog-api:${TAG:-latest}
    build:
      context: .
      dockerfile: src/Services/Catalog/Catalog.API/Dockerfile
    depends_on:
      - sqldata
      - rabbitmq

  marketing-api:
    image: eshop/marketing-api:${TAG:-latest}
    build:
      context: .
      dockerfile: src/Services/Marketing/Marketing.API/Dockerfile
    depends_on:
      - sqldata
      - nosqldata
      - identity-api
      - rabbitmq

  webmvc:
    image: eshop/webmvc:${TAG:-latest}
    build:
      context: .
      dockerfile: src/Web/WebMVC/Dockerfile
    depends_on:
      - catalog-api
      - ordering-api
      - identity-api
      - basket-api
      - marketing-api

  sqldata:
    image: mcr.microsoft.com/mssql/server:2019-latest

  nosqldata:
    image: mongo

  basketdata:
    image: redis

  rabbitmq:
    image: rabbitmq:3-management
The values in the base docker-compose.yml file should not change because of different target deployment environments.
If you focus on the webmvc service definition, for instance, you can see how that information is much the same no matter what environment you might be targeting. You have the following information:
The service name: webmvc.
The container's custom image: eshop/webmvc.
The command to build the custom Docker image, indicating which Dockerfile to use.
Dependencies on other services, so this container does not start until the other dependency containers have started.
You can have additional configuration, but the important point is that in the base docker-compose.yml file, you just want to set the information that is common across environments. Then in the docker-compose.override.yml or similar files for production or staging, you should place configuration that is specific for each environment.
Usually, the docker-compose.override.yml is used for your development environment, as in the following example from eShopOnContainers:
#docker-compose.override.yml (Extended config for DEVELOPMENT env.)
version: '3.4'

services:
# Simplified number of services here:

  basket-api:
    environment:
      - ASPNETCORE_ENVIRONMENT=Development
      - ASPNETCORE_URLS=http://0.0.0.0:80
      - ConnectionString=${ESHOP_AZURE_REDIS_BASKET_DB:-basketdata}
      - identityUrl=http://identity-api
      - IdentityUrlExternal=http://${ESHOP_EXTERNAL_DNS_NAME_OR_IP}:5105
      - EventBusConnection=${ESHOP_AZURE_SERVICE_BUS:-rabbitmq}
      - EventBusUserName=${ESHOP_SERVICE_BUS_USERNAME}
      - EventBusPassword=${ESHOP_SERVICE_BUS_PASSWORD}
      - AzureServiceBusEnabled=False
      - ApplicationInsights__InstrumentationKey=${INSTRUMENTATION_KEY}
      - OrchestratorType=${ORCHESTRATOR_TYPE}
      - UseLoadTest=${USE_LOADTEST:-False}

    ports:
      - "5103:80"

  catalog-api:
    environment:
      - ASPNETCORE_ENVIRONMENT=Development
      - ASPNETCORE_URLS=http://0.0.0.0:80
      - ConnectionString=${ESHOP_AZURE_CATALOG_DB:-Server=sqldata;Database=Microsoft.eShopOnContainers.Services.CatalogDb;User Id=sa;Password=[PLACEHOLDER]}
      - PicBaseUrl=${ESHOP_AZURE_STORAGE_CATALOG_URL:-http://host.docker.internal:5202/api/v1/catalog/items/[0]/pic/}
      - EventBusConnection=${ESHOP_AZURE_SERVICE_BUS:-rabbitmq}
      - EventBusUserName=${ESHOP_SERVICE_BUS_USERNAME}
      - EventBusPassword=${ESHOP_SERVICE_BUS_PASSWORD}
      - AzureStorageAccountName=${ESHOP_AZURE_STORAGE_CATALOG_NAME}
      - AzureStorageAccountKey=${ESHOP_AZURE_STORAGE_CATALOG_KEY}
      - UseCustomizationData=True
      - AzureServiceBusEnabled=False
      - AzureStorageEnabled=False
      - ApplicationInsights__InstrumentationKey=${INSTRUMENTATION_KEY}
      - OrchestratorType=${ORCHESTRATOR_TYPE}
    ports:
      - "5101:80"

  marketing-api:
    environment:
      - ASPNETCORE_ENVIRONMENT=Development
      - ASPNETCORE_URLS=http://0.0.0.0:80
      - ConnectionString=${ESHOP_AZURE_MARKETING_DB:-Server=sqldata;Database=Microsoft.eShopOnContainers.Services.MarketingDb;User Id=sa;Password=[PLACEHOLDER]}
      - MongoConnectionString=${ESHOP_AZURE_COSMOSDB:-mongodb://nosqldata}
      - MongoDatabase=MarketingDb
      - EventBusConnection=${ESHOP_AZURE_SERVICE_BUS:-rabbitmq}
      - EventBusUserName=${ESHOP_SERVICE_BUS_USERNAME}
      - EventBusPassword=${ESHOP_SERVICE_BUS_PASSWORD}
      - identityUrl=http://identity-api
      - IdentityUrlExternal=http://${ESHOP_EXTERNAL_DNS_NAME_OR_IP}:5105
      - CampaignDetailFunctionUri=${ESHOP_AZUREFUNC_CAMPAIGN_DETAILS_URI}
      - PicBaseUrl=${ESHOP_AZURE_STORAGE_MARKETING_URL:-http://host.docker.internal:5110/api/v1/campaigns/[0]/pic/}
      - AzureStorageAccountName=${ESHOP_AZURE_STORAGE_MARKETING_NAME}
      - AzureStorageAccountKey=${ESHOP_AZURE_STORAGE_MARKETING_KEY}
      - AzureServiceBusEnabled=False
      - AzureStorageEnabled=False
      - ApplicationInsights__InstrumentationKey=${INSTRUMENTATION_KEY}
      - OrchestratorType=${ORCHESTRATOR_TYPE}
      - UseLoadTest=${USE_LOADTEST:-False}
    ports:
      - "5110:80"

  webmvc:
    environment:
      - ASPNETCORE_ENVIRONMENT=Development
      - ASPNETCORE_URLS=http://0.0.0.0:80
      - PurchaseUrl=http://webshoppingapigw
      - IdentityUrl=http://10.0.75.1:5105
      - MarketingUrl=http://webmarketingapigw
      - CatalogUrlHC=http://catalog-api/hc
      - OrderingUrlHC=http://ordering-api/hc
      - IdentityUrlHC=http://identity-api/hc
      - BasketUrlHC=http://basket-api/hc
      - MarketingUrlHC=http://marketing-api/hc
      - PaymentUrlHC=http://payment-api/hc
      - SignalrHubUrl=http://${ESHOP_EXTERNAL_DNS_NAME_OR_IP}:5202
      - UseCustomizationData=True
      - ApplicationInsights__InstrumentationKey=${INSTRUMENTATION_KEY}
      - OrchestratorType=${ORCHESTRATOR_TYPE}
      - UseLoadTest=${USE_LOADTEST:-False}
    ports:
      - "5100:80"
  sqldata:
    environment:
      - SA_PASSWORD=[PLACEHOLDER]
      - ACCEPT_EULA=Y
    ports:
      - "5433:1433"
  nosqldata:
    ports:
      - "27017:27017"
  basketdata:
    ports:
      - "6379:6379"
  rabbitmq:
    ports:
      - "15672:15672"
      - "5672:5672"
In this example, the development override configuration exposes some ports to the host, defines environment variables with redirect URLs, and specifies connection strings for the development environment. These settings are all just for the development environment.
When you run docker-compose up (or launch it from Visual Studio), the command reads the overrides automatically as if it were merging both files.
Suppose that you want another Compose file for the production environment, with different configuration values, ports, or connection strings. You can create another override file, like file named docker-compose.prod.yml with different settings and environment variables. That file might be stored in a different Git repo or managed and secured by a different team.
How to deploy with a specific override file
To use multiple override files, or an override file with a different name, you can use the -f option with the docker-compose command and specify the files. Compose merges files in the order they are specified on the command line. The following example shows how to deploy with override files.
docker-compose -f docker-compose.yml -f docker-compose.prod.yml up -d
Using environment variables in docker-compose files
It is convenient, especially in production environments, to be able to get configuration information from environment variables, as we have shown in previous examples. You can reference an environment variable in your docker-compose files using the syntax ${MY_VAR}. The following line from a docker-compose.prod.yml file shows how to reference the value of an environment variable.
IdentityUrl=http://${ESHOP_PROD_EXTERNAL_DNS_NAME_OR_IP}:5105
Environment variables are created and initialized in different ways, depending on your host environment (Linux, Windows, Cloud cluster, etc.). However, a convenient approach is to use an .env file. The docker-compose files support declaring default environment variables in the .env file. These values for the environment variables are the default values. But they can be overridden by the values you might have defined in each of your environments (host OS or environment variables from your cluster). You place this .env file in the folder where the docker-compose command is executed from.
The following example shows an .env file like the .env file for the eShopOnContainers application.
# .env file

ESHOP_EXTERNAL_DNS_NAME_OR_IP=host.docker.internal

ESHOP_PROD_EXTERNAL_DNS_NAME_OR_IP=10.121.122.92
Docker-compose expects each line in an .env file to be in the format <variable>=<value>.
The values set in the run-time environment always override the values defined inside the .env file. In a similar way, values passed via command-line arguments also override the default values set in the .env file.
Additional resources
Overview of Docker Compose
https://docs.docker.com/compose/overview/Multiple Compose files
https://docs.docker.com/compose/multiple-compose-files/
Building optimized ASP.NET Core Docker images
If you are exploring Docker and .NET on sources on the Internet, you will find Dockerfiles that demonstrate the simplicity of building a Docker image by copying your source into a container. These examples suggest that by using a simple configuration, you can have a Docker image with the environment packaged with your application. The following example shows a simple Dockerfile in this vein.
FROM mcr.microsoft.com/dotnet/sdk:8.0
WORKDIR /app
ENV ASPNETCORE_URLS http://+:80
EXPOSE 80
COPY . .
RUN dotnet restore
ENTRYPOINT ["dotnet", "run"]
A Dockerfile like this will work. However, you can substantially optimize your images, especially your production images.
In the container and microservices model, you are constantly starting containers. The typical way of using containers does not restart a sleeping container, because the container is disposable. Orchestrators (like Kubernetes and Azure Service Fabric) create new instances of images. What this means is that you would need to optimize by precompiling the application when it is built so the instantiation process will be faster. When the container is started, it should be ready to run. Don't restore and compile at run time using the dotnet restore and dotnet build CLI commands as you may see in blog posts about .NET and Docker.
The .NET team has been doing important work to make .NET and ASP.NET Core a container-optimized framework. Not only is .NET a lightweight framework with a small memory footprint; the team has focused on optimized Docker images for three main scenarios and published them in the Docker Hub registry at dotnet/, beginning with version 2.1:
Development: The priority is the ability to quickly iterate and debug changes, and where size is secondary.
Build: The priority is compiling the application, and the image includes binaries and other dependencies to optimize binaries.
Production: The focus is fast deploying and starting of containers, so these images are limited to the binaries and content needed to run the application.
The .NET team provides four basic variants in dotnet/ (at Docker Hub):
- sdk: for development and build scenarios
- aspnet: for ASP.NET production scenarios
- runtime: for .NET production scenarios
- runtime-deps: for production scenarios of self-contained applications
For faster startup, runtime images also automatically set aspnetcore_urls to port 80 and use Ngen to create a native image cache of assemblies.
Additional resources
Building Optimized Docker Images with ASP.NET Core https://learn.microsoft.com/archive/blogs/stevelasker/building-optimized-docker-images-with-asp-net-core
Building Docker Images for .NET Applications https://learn.microsoft.com/dotnet/core/docker/building-net-docker-images
Feedback
Coming soon: Throughout 2024 we will be phasing out GitHub Issues as the feedback mechanism for content and replacing it with a new feedback system. For more information see: https://aka.ms/ContentUserFeedback.
Submit and view feedback for