Get started with the Surface Duo emulator
With the Surface Duo Emulator you can test your Android app on the Surface Duo and Surface Duo 2 form factors without needing a physical device. The emulator simulates postures, gestures, hinge angle, pen pressure, multi-touch, mimicking the seam between the two screens, and more.
See Get the Surface Duo emulator if you don't yet have the tools installed.
How to debug your app on the emulator
The Surface Duo emulator will not automatically appear in the Android Studio device list nor in AVD Manager, you should start it manually. There are two app icons in the desktop and also in the Start menu available on Windows, or you can use the run_<devicename>.bat/.sh script in the install location to launch the emulator.
- Launch the emulator via the app icon or the script.
- Open your project in Android Studio.
- Build your project: Build > Make Project or Ctrl+F9.
- Select Surface_Duo_2_API_32 from the list of running devices (if it does not appear, you should start it directly from the file system).
- Run your project to deploy it to the emulator: Run > Run 'project name' or Shift+F10.
- To stop debugging: Run > Stop 'project name' or Ctrl+F2.
You can also debug using ADB. Visual Studio users should refer to the Xamarin instructions for the emulator.
Tip
The Surface Duo Android 12L emulator runs API 32 and the Android 11 emulator runs API 30. The original Surface Duo Android 10 emulator runs API 29.
Make sure your project compiles with API 32 or higher when using the latest emulator release.
Span your app in the emulator
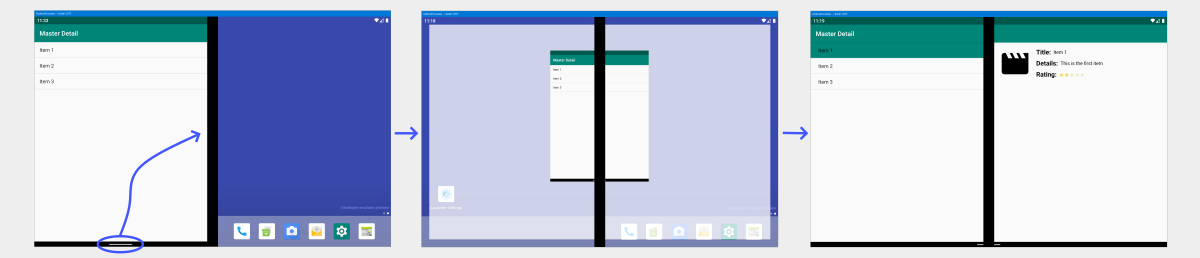
To span your app in the emulator, drag the app from the white bar at the bottom of the app screen towards the middle of the device. When the background is shaded across both screens (white or black tint, depending on light or dark mode), release the app.
Rotate your app in the emulator
You can rotate the emulator using these buttons in the emulator toolbox, or use Control+Left arrow and Control+Right arrow keyboard shortcuts:

If the screen elements don't rotate, check that Auto-rotate is enabled. You can use Settings > Display > Auto-rotate screen or pull down from the status bar and ensure the Auto-rotate option is enabled:

Move, rotate, and preview the device posture
Open the the Extended controls window from the emulator toolbar and the select Virtual sensors item. This shows the Device Pose tab.
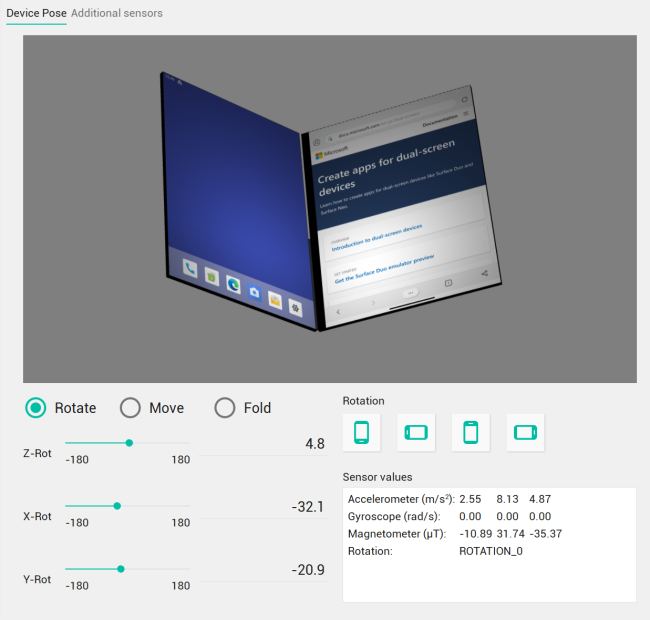
You can also use the Rotation buttons to center the device and set the rotation to 0, 90, 180, or 270 degrees.
Simulate the hinge angle changing
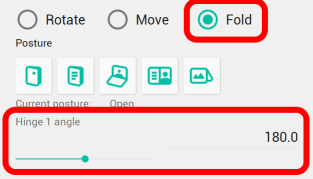
Open the the Extended controls window from the emulator toolbar and the select Virtual sensors item. This shows the Device Pose tab which has a Fold radio button. Clicking that, a hinge angle slider and four Posture buttons will be shown. A specific hinge angle will be set by these buttons.
| Posture name | Hinge angle range |
|---|---|
| Closed | 0(default) - 30 |
| Half-Open | 30 - 90(default) - 150 |
| Open | 150 - 180(default) - 235 |
| Flipped ^ | 235 - 360(default) |
^ Flipped postures should only have one active screen. The second screen will be turned off at angles greater than 235 degrees.
Simulate the device rotation and movement
Access the device posture buttons in the Extended controls window, Virtual sensors section, use the Rotate and Move radio buttons to adjust the device position and orientation using the sliders and buttons or just dragging the device on the 3D preview window.

Add files to the emulator
You can drag supported file types (such as images) into the emulator window, and they will be copied into the emulator's file system. You can also use the Device File Explorer in Android Studio.
If you drag a compatible APK into the emulator window, it will automatically be installed and ready to use.