Sales Order Processing Part 5: Inquiries and reports
This part of the sales order processing documentation explains how to use inquiries and reports to analyze your sales activity. The inquiry windows and reports in Sales Order Processing allow you to access information quickly and to display the information either on screen or on a printed report. The following topics are discussed:
Chapter 28, "Inquiries," explains how to use the Sales Order Processing inquiry windows to view document and item information.
Chapter 29, "Reports," describes how to use reports to analyze sales activity and determine the status of sales documents.
Chapter 28: Inquiries
Analyzing your sales activity is an important part of your accounting system. You can use inquiry windows to view transaction, document, item, customer, or salesperson activity. The inquiry windows provide easy access to detailed or summarized transaction information. You also can create and view customized inquiries based on multiple range restrictions.
Many of the inquiry windows have a feature that allows you to link to transactions as they were originally entered. For example, you can select a document number in the Sales Document Inquiry window, then link to the Transaction Inquiry Zoom window to view the transaction, including distribution and commission information.
The inquiry information is divided into the following sections:
Viewing multiple currencies in sales inquiries
About reporting currency
Viewing salesperson information
Viewing sales documents
Creating inquiries for sales documents
Viewing sales information from a custom inquiry
Viewing items sold
Viewing serial or lot numbers of items sold
Viewing sales process holds
Viewing bulk picking ticket details
Viewing document status details for a document
Viewing multiple currencies in sales inquiries
You can choose whether you want to view multicurrency amounts in the originating, functional, or reporting currency. Choose View >> Currency >> Functional, Originating, or Reporting while viewing an inquiry window. The option will be saved on a per user, per window basis.
You also can use the Currency list button in the windows that support changing the currency view. View >> Currency and the Currency list button are available in the following windows:
Sales Order Processing Document Inquiry
Sales Order Processing Item Inquiry
Sales Transaction Inquiry Zoom
The first time you open these windows after registering Multicurrency Management, all the transactions will be displayed in the originating currency. If you change the currency view, the option you last used will be the default view the next time you open that window.
About reporting currency
A reporting currency is used to convert functional currency amounts to another currency on inquiries and reports. For example, if the British pound is the functional currency for a company, you can set up the euro as your reporting currency to view an inquiry window with currency amounts displayed in the euro currency.
During the reporting currency setup in Multicurrency Management, you'll set up a reporting currency and enter a default exchange rate and rate calculation method. Depending on how your system is set up, you may be able to override the default reporting currency exchange rate or rate calculation method on inquiries and reports. To change the default reporting currency exchange rate, choose View >> Currency >> Modify Reporting Rate to open the Modify Reporting Rate window.
For more information about reporting currency, see the Multicurrency Management documentation.
Viewing salesperson information
Use the Salesperson Inquiry window to view sales and commission information for your salespeople from posted and unposted invoices and returns. You also can view records for all salespeople, or for a range of salespeople.
You can view information as it was originally entered by clicking on link fields. For example, you can select a sales document and link to the Sales Transaction Inquiry Zoom window to view the original document.
To view salesperson information
Open the Salesperson Inquiry window. (Sales >> Inquiry >> Salesperson)
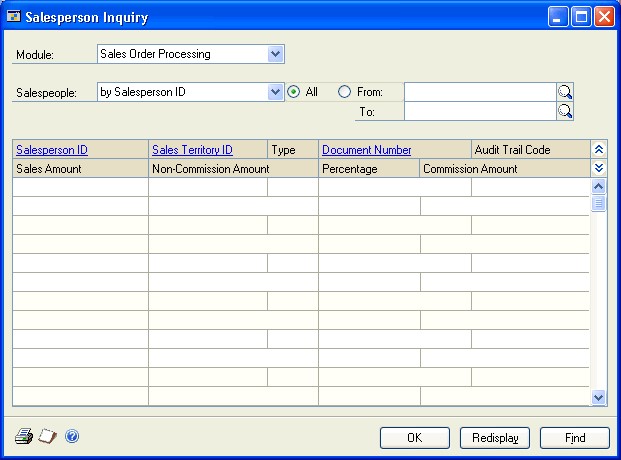
Select the Sales Order Processing module.
Select a sorting option for range of salesperson records. You can sort by salesperson ID, sales territory ID, document number, or audit trail code.
Choose Redisplay. To view more information about the salesperson, territory, or document in the list, highlight a record and click a link to open a window displaying the original record.
The following table lists the link fields in the Salesperson Inquiry window.
Link field Window that opens Salesperson ID Salesperson Maintenance Sales Territory ID Sales Territory Maintenance Document Number Sales Transaction Inquiry Zoom To print the contents of this window, choose File >> Print or the printer button.
The Salesperson Inquiry Report will be printed.
Viewing sales documents
Use the Sales Order Processing Document Inquiry window to view documents entered in Sales Order Processing. You can view records for all documents or for a range of documents.
You can view information as it was originally entered by clicking on link fields. For example, you can select a sales document and link to the Sales Transaction Inquiry Zoom window to view the original document.
To view sales documents
Open the Sales Order Processing Document Inquiry window. (Sales >> Inquiry >> Sales Documents)
Select a sorting option for the documents. You can sort by document number, customer ID, document date, batch ID, document type, or master number.
Mark to include unposted documents or documents that have been moved to history.
Unposted These documents are still in process. They can be quotes, orders, or back orders that haven't been transferred or invoices and returns that haven't been posted.
History These documents have been completely processed and moved to history. They include quotes, orders, and back orders that have been completely transferred, cancelled, or voided, and invoices and returns that have been posted or voided.
Choose Redisplay. The documents included in the inquiry range will be displayed in the scrolling window. To view more information about a document or customer ID in the list, highlight the record and link to a window displaying the original record.
If you click the Customer ID link, you can view the information about the customer in the Customer Inquiry or Sales Prospect Maintenance window. If you click the Document Number link, you can view the original sales document in the Sales Transaction Inquiry Zoom window.
To print the contents of this window, choose File >> Print or the printer icon button or press CTRL+P. The Document Inquiry Report will be printed.
Creating inquiries for sales documents
Use the Sales Inquiry Restrictions window to set up custom inquiries for your sales information. This is useful if you frequently view the same document information. For example, you can set up an inquiry to display the quotes for the month of January that include a particular item.
You can set up an inquiry with multiple restrictions, save it, and use this inquiry whenever you want, instead of reentering the range restrictions each time you need the information. You can process the inquiry from this window, or you can use the inquiry in the Sales Document Range Inquiry window.
To create inquiries for sales documents
Open the Sales Inquiry Restrictions window. (Sales >> Inquiry >> Restrict Sales Documents)
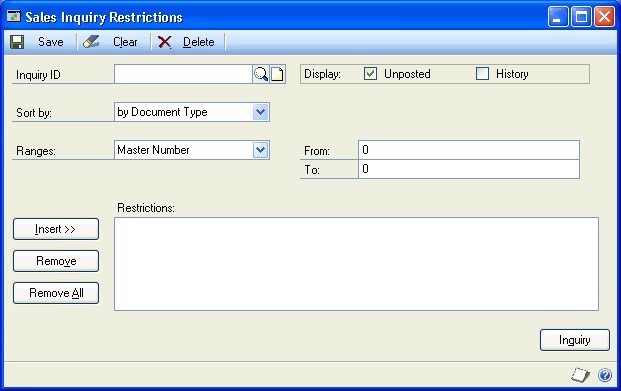
Enter or select an Inquiry ID.
Mark to include unposted documents or documents that have been moved to history.
- Unposted These documents are still in process. They can be quotes, orders, or back orders that haven't been transferred or invoices and returns that haven't been posted.
- History These documents have been completely processed and moved to history. They can include quotes, orders, and back orders that have been completely transferred, cancelled, or voided, and invoices and returns that have been posted or voided.
Select a sorting option and a range restriction for this inquiry ID. You can sort by document type, customer ID, document date, or document number. Choose Insert after defining each restriction. You can enter an unlimited number of restrictions.
Note
You can enter only one restriction for each restriction type. For example, if you enter a restriction for document numbers INV1000 through INV1010, you can't enter another restriction for document numbers INV1100 through INV1150. To specify multiple ranges, you must create separate inquiry IDs for each range. To enter the range for a restriction during the actual inquiry, insert a restriction without entering a range. When you use the Inquiry ID, you'll be asked to enter the starting and ending values. For example, you can insert a range restriction for the master number. When you use the Inquiry ID, you will be asked to enter a starting and ending master number.
Choose Inquiry to process the inquiry or choose Save to save the inquiry ID.
Viewing sales information from a custom inquiry
Use the Sales Document Range Inquiry window to view customized inquiries based on multiple range restrictions. This is useful if you frequently view the same document information. For example, you can set up an inquiry ID to display the quotes for the month of January that contain a particular item.
You can set up inquiry IDs in the Sales Inquiry Restriction window. For more information about customized inquiries, see Creating inquiries for sales documents.
To view sales information from a custom inquiry
Open the Sales Document Range Inquiry window. (Sales >> Inquiry >> Sales Range Inquiry)
Choose an Inquiry ID. The documents included in the inquiry range will appear in the scrolling window.
If the inquiry ID has a restriction without a range, you'll be asked to enter the starting and ending values. For example, you can insert a range restriction for the master number. When you use the Inquiry ID to process an inquiry, you'll be asked to enter a starting and ending master number.
To view more information about a document or customer ID in the list, select the record and click a link to a window showing more information. If you click the Customer ID link, you can view the information about the customer in the Customer Inquiry or Sales Prospect Maintenance window. If you click the Document Number link, you can view the original sales document in the Sales Transaction Inquiry Zoom window.
You can further restrict the documents in the scrolling window by marking Unposted or History and choosing Redisplay to include unposted documents or documents that have been moved to history.
- Unposted These documents are still in process. They can be quotes, orders, or back orders that haven't been transferred or invoices and returns that haven't been posted.
- History These documents have been completely processed and moved to history. They can include quotes, orders, and back orders that have been completely transferred, cancelled, or voided, and invoices and returns that have been posted or voided. If you want to see the purchase orders that would be created from these documents, choose the Purchase button. For more information about creating purchase orders, see Chapter 21, "New purchase orders."
To print the contents of this window, choose File >> Print or the printer icon button or press CTRL+P. The Sales Document Inquiry Report by Range will be printed.
Viewing items sold
Use the Sales Order Processing Item Inquiry window to view all documents entered in Sales Order Processing that include a particular item or range of items. For example, you might want to target a group of customers who purchased a particular item for an upcoming sales promotion. You can limit the items displayed by specifying a range of item numbers, document numbers, or document types. You also can limit the number of items displayed by selecting specific document types and selecting whether you want to view posted or unposted documents.
To view items sold
Open the Sales Order Processing Item Inquiry window. (Sales >> Inquiry >> Sales Items)

Choose a range of item numbers, document numbers, or document types to view.
Choose which document types to include in the inquiry by using the SHIFT or CTRL key in conjunction with the arrow keys. Mark to include unposted documents or documents that have been moved to history.
- Unposted These documents are still in process. They can be quotes, orders, or back orders that haven't been transferred or invoices and returns that haven't been posted.
- History These documents have been completely processed and moved to history. They include quotes, orders, and back orders that have been completely transferred, cancelled, or voided and invoices and returns that have been posted or voided.
Choose Redisplay. The documents included in the inquiry range will be displayed in the scrolling window.
Highlight a record and link to a window displaying more information to view more information about the item, customer, or document in the list. The following table lists the link fields in the Sales Order Item Inquiry window.
Link field Window that opens Item Number Item Inquiry Document Number Sales Transaction Inquiry Zoom Customer ID Customer Inquiry or Sales Prospect Maintenance To print the contents of this window, choose File >> Print or the printer icon button or press CTRL+P. The Item Inquiry Report will be printed.
Viewing serial or lot numbers of items sold
You can use the Sales Serial-Lot Number Inquiry window to view sold items that are tracked by serial or lot numbers. For example, you might have been notified by a manufacturer that a specific lot-numbered item is defective. You can identify every invoice on which items with the specific lot number were sold.
To view serial or lot numbers of items sold
Open the Sales Serial-Lot Number Inquiry window. (Sales >> Inquiry >> Sales Serial/Lots)
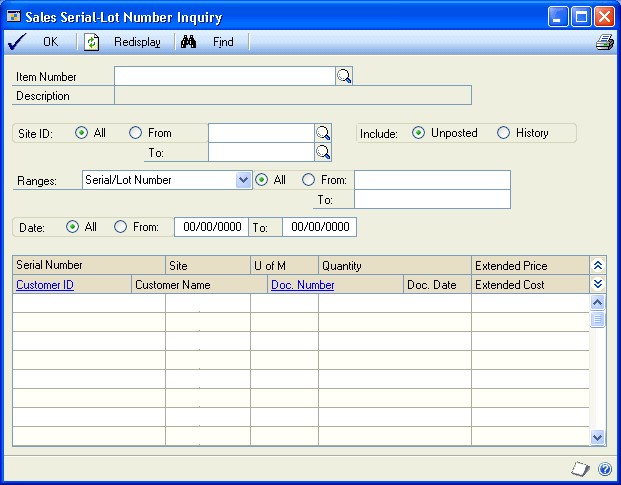
Enter or select an item number.
Select the sites to include and mark to include unposted documents or documents that have been moved to history.
- Unposted These documents are still in process. They can be quotes, orders, or back orders that haven't been transferred or invoices and returns that haven't been posted.
- History These documents have been completely processed and moved to history. They can include quotes, orders, and back orders that have been completely transferred, cancelled, or voided and invoices and returns that have been posted or voided.
Choose to view all the serial/lot number information for this item or choose a range of serial/lot numbers, customers, or document types. You also can choose a specific site and a date range.
Choose Redisplay. The documents included in the inquiry range will be displayed in the scrolling window. To view more information about a document or customer ID in the list, select the record and link to a window showing more information.
If you click the Customer ID link, you can view the information about the customer in the Customer Inquiry window. If you click the Document Number link, you can view the original sales document in the Sales Transaction Inquiry Zoom window.
To print the contents of this window, choose File >> Print or the printer icon button or press CTRL+P. The Serial-Lot Number Inquiry Report will be printed.
Viewing sales process holds
Use the Sales Process Holds Inquiry window to view documents that have a process hold assigned to them. For example, your company might assign a process hold to all discounted orders, which prevents them from being transferred to an invoice until the transaction is approved. If you're responsible for approving orders, this window can provide you with a list of orders that have been assigned that particular process hold.
To view sales process holds
Open the Sales Process Holds Inquiry window. (Sales >> Inquiry >> Sales Process Holds)
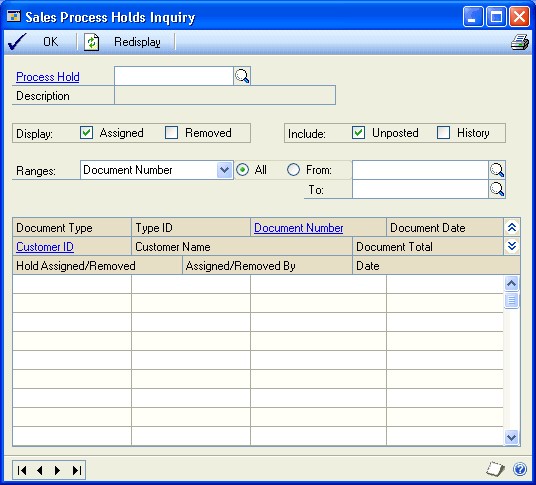
Choose a process hold to view.
Mark to display assigned or removed holds and mark to include unposted documents or documents that have been moved to history.
- Unposted These documents are still in process. They can be quotes, orders, or back orders that haven't been transferred or invoices and returns that haven't been posted.
- History These documents have been completely processed and moved to history. They include quotes, orders, and back orders that have been completely transferred, cancelled, or voided, and invoices and returns that have been posted or voided.
You can enter or select a range of documents to view.
Choose Redisplay. The documents assigned to the process hold will appear in the scrolling window. To view more information about a document or customer ID in the list, select the record, and link to a window showing more information.
If you click the Customer ID link, you can view the information about the customer in the Customer Inquiry or Sales Prospect Maintenance window. If you click the Document Number link, you can view the original sales document in the Sales Transaction Inquiry Zoom window.
To print the contents of this window, choose File >> Print or the printer icon button or press CTRL+P. The Process Holds Inquiry Report will be printed.
Viewing bulk picking ticket details
If you're using advanced picking, use the Sales Bulk Pick Detail window to view the details of groups of picking tickets that have already been printed. This is useful if the physical picking ticket is unavailable and you don't want to reprint the ticket.
To view bulk picking ticket details
Open the Sales Bulk Pick Detail window. (Sales >> Transactions >> Bulk Print >> select an available pick >> click the Available Pick link)
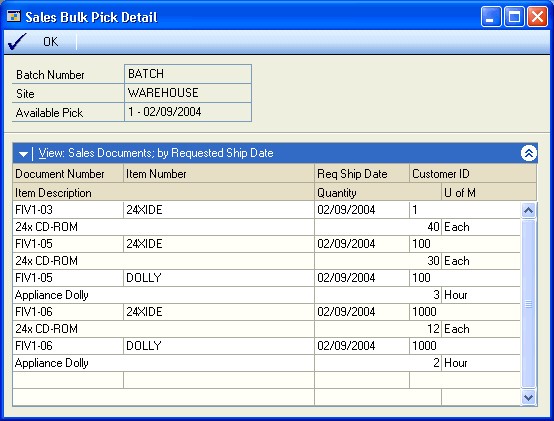
Choose OK to close the window.
Viewing document status details for a document
If you're using sales fulfillment workflow, use the Sales Document Status Inquiry window to view the document status details for a document. You can view information such as the date and time that a document status was changed. You can open this window from the Sales Document Range Inquiry window, the Sales Transaction Entry window, and the Sales Order Fulfillment window.
To view document status details for a document
Open the Sales Document Status Inquiry window. (Sales >> Inquiry >> Sales Range Inquiry >> click the Document Status Link)
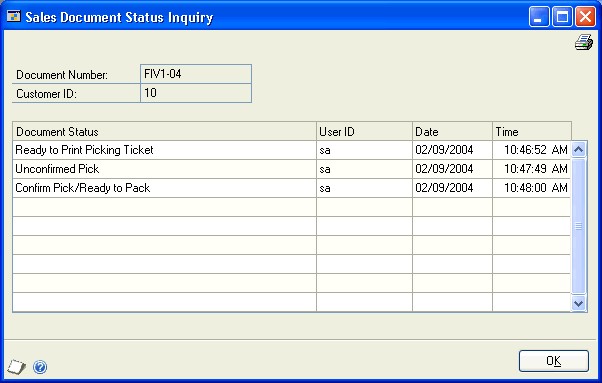
When you've finished, close the window.
Chapter 29: Reports
You can use Sales Order Processing reports to analyze sales activity and identify errors in transaction entry. You can also use reports to review setup, posting, and historical information. Other Sales Order Processing reports are important for the audit trail to ensure that you're accurately tracking financial data. Use this information to guide you through printing reports and working with report options.
For more information about creating and printing reports and the various reporting tools that you can use with Microsoft Dynamics GP, refer to your System User's Guide (Help >> Contents >> select Using The System).
Reports information is divided into the following sections:
Sales Order Processing report summary
Specifying a Sales Order Processing report option
Microsoft SQL Server Reporting Services reports for Sales Order Processing
Sales Order Processing report summary
You can print several types of reports using Sales Order Processing. Some reports automatically are printed when you complete certain procedures; for example, posting journals can be printed automatically when you post transactions, depending on how your posting options are set up. You can choose to print some reports during procedures; for example, you can print an edit list when entering transactions by choosing the Print button in the batch entry window. In order to print some reports, such as analysis or history reports, you must set up report options to specify sorting options and ranges of information to include on the report. For more information, refer to Specifying a Sales Order Processing report option.
The following table lists the report types available in Sales Order Processing and the reports included in those categories.
| Report type | Report | Printing method |
|---|---|---|
| Activity reports | Sales Quote Report * Sales Open Order Report * Sales Back Order Report * Sales Order Fulfillment Report Sales Document Status Report | Create report options in the Sales Activity Reports window. * Indicates reports that can be printed with multicurrency information displayed. † Indicates reports that can be assigned to named printers. See "Printers" in the System Administrator's Guide (Help >> Contents >> select System Administration) for more information. |
| Setup reports | Sales Order Processing Setup List Sales Quote Setup List Sales Order Setup List Sales Invoice Setup List Sales Back Order Setup List Sales Return Setup List Sales Process Holds Setup List Prospect Setup List Prospect List-Detailed Sales User-defined Fields Setup Lists Picking Instructions Report Customer Picking Instructions List Advanced Picking Setup Sales Fulfillment Workflow Setup List | Choose >> Print in the setup windows or create report options in the Sales Setup Reports window. |
| Documents | Quote *† Order *† Invoice *† Back order *† Return *† Picking ticket † Packing slip † Bulk Picking ticket † Fulfillment order † | Select a document in the Sales Transaction Entry window and choose File >> Print to print a single document, select a batch in the Sales Batch Entry window and choose File >> Print to print an entire batch or choose Sales >> Transactions >> Print Sales Documents to print a range of documents or choose Sales >> Inquiry >> Sales Documents to print from history. |
| Labels | Address labels COD labels Prospect mailing labels | Choose Administration >> Reports >> Company >> Mailing labels and choose a label type from the reports list. |
| Posting reports | Sales Edit List * Sales Batch List * Sales Posting Journal *† Sales Voided Journal *† Distribution Breakdown Register *† Inventory Sales Register *† Salesperson Register *† Sales Deposits Journal *† | Choose File >> Print in the window you use to complete the procedure or some will be printed automatically when you complete the procedure. |
| Edit lists | Sales Edit List* Sales Batch List* Sales Edit List Currency Summary*† Edit Sales Document Status | Choose File >> Print in the window you used to complete the procedure. |
| History reports | Sales Transaction History Report* Sales History Register* Distribution Detail History Report* Sales Quote History Report* Sales Order History Report* Sales Serial/Lot History Report* | Create report options in the Sales History Reports window. * Indicates reports that can be printed with multicurrency information displayed. † Indicates reports that can be assigned to named printers. See "Printers" in the System Administrator's Guide (Help >> Contents >> select System Administration) for more information. |
| Utility reports | Transaction Removal Report | These reports will be printed when you complete the corresponding procedure. |
| Analysis reports | Sales Document Analysis Reports † | Create report options in the MISSINGCONTENT |
| Processing reports | Holds Processing Preview List | These reports will be printed when you complete the corresponding procedure. |
| Inquiry reports | Sales Document Inquiry Report | Choose File >> Print in the corresponding Inquiry window. * Indicates reports that can be printed with multicurrency information displayed. |
| Journal Removal Report Account Distribution Removal Report Deposits Removal Report Reconcile-Remove Sales Documents Report Edit Sales Document Status Report Salesperson Report *†Inventory Sales Report *† Sales Analysis Reports window Sales Holds Processing Journal Sales Transfer Log Order Fulfillment Status Report Allocation/Fulfillment Exception Report Print Documents Exception Report Purchase Orders Preview List † Purchase Orders Generation Register † Instruction ID Preview List Instruction ID Processing Journal Item Print Option Preview List Item Print Option Processing Journal Sales Bulk Exception Report Automatic Order Allocation Report Document Inquiry Report Item Inquiry Report Serial-Lot Number Inquiry Report Process Holds Inquiry Report Sales Document Status Inquiry Report Automatic Allocation Preview Report | † Indicates reports that can be assigned to named printers. See "Printers" in the System Administrator's Guide (Help >> Contents >> select System Administration) for more information. |
Specifying a Sales Order Processing report option
Report options include specifications for sorting options and range restrictions for a particular report. In order to print Sales Order Processing reports, you must first create a report option. Each report can have several different options so that you can easily print the information you need. For example, you can create report options for the Sales Quote Report that show either detailed or summary information.
Note
A single report option can't be used by multiple reports. If you want identical options for several reports, you must create them separately.*
Use the Sales report options windows to create sorting, restriction, printing and emailing options for the reports that have been included with Sales Order Processing.
To specify a Sales Order Processing report option
Open a Sales reports window. There are separate windows for each report type. (Sales >> Reports >> Setup) (Sales >> Reports >> Posting Journals) (Sales >> Reports >> History) (Sales >> Reports >> Activity) (Sales >> Reports >> Analysis)
Select a report from the Reports list.
Choose New to open the report options window. Your selection in step 2 determines which report options window appears. For report options window information choose Help >> Index; then enter the name of the specific report options window.
Name the option and enter information to define the option. The name you choose for the option won't appear on the report. The selections available for defining report options vary, depending on the report type you've selected.
Enter range restrictions. The Ranges list shows the available options for each report. The available ranges vary, depending on the type of report.
Note
You can enter only one restriction for each restriction type. For instance, you can insert one document number restriction (Order001 to Order099) and one customer ID restriction (AARONFIT0001 to CELLULAR0001).
Choose Insert to insert the range in the Restrictions List. To remove an existing range from the list, select the range and choose Remove.
Choose Email to enter email options for the report option. Once the email options are set up, you'll be able to send the reports in an email message. You'll also be able to send this report option in an email from any list view where the report option is displayed.
Choose Destination to select a printing destination. Reports can be printed to the screen, to the printer, to a file or to any combination of these options. If you mark Ask Each Time, you can select printing options each time you print this report option.
For more information about creating and printing reports, refer to your System User's Guide (Help >> Contents >> select Using The System).
To print the report option from the report options window, choose Print before saving it. If you don't want to print the option now, choose Save and close the window. The report window will be redisplayed.
Microsoft SQL Server Reporting Services reports for Sales Order Processing
You can view Sales Order Processing Reporting Services reports from the Reporting Services Reports list. If you are using Reporting Services 2008 or later, sales metrics for your home page also appear in the Reporting Services Reports list. You can access the Reporting Services Reports list from the navigation pane or from an area page in the Microsoft Dynamics GP application window. This report list appears if you specified the location of your Reporting Services reports using the Reporting Tools Setup window. See your System Setup Guide (Help >> Contents >> select Setting up the System) for more information.
The following Reporting Services reports are available for Sales Order Processing.
- Sales Distribution History
- Sales Transaction History Tax Details
- Sales Document Status
- SOP Document Analysis
- Sales Transaction History
- SOP Document Analysis by Customer
- Sales Transaction History Payment Details
- SOP Inventory Sales Report Subreport
To print a Sales Order Processing Reporting Services report
In the navigation pane, choose the Sales button, and then choose the Reporting Services Reports list.
Mark the Sales Order Processing report that you want to print.
In the Actions group, choose View to open the Report Viewer.
In the Report Viewer, select the specifications for the report and choose View Report.
After viewing the report, select a format and print the report.
Note
In the French and Spanish versions of Dynamics GP, the Sales Blank Order Form and Sales Blank History Order Form layout is jumbled together. These reports have been updated, and you can download the updated versions using the link below.
https://mbs2.microsoft.com/fileexchange/?fileID=ab5b2af9-1a01-47e8-b539-3664ad6682cc
See Also
Sales Order Processing Part 1: Setup
Sales Order Processing Part 2: Transaction entry
Sales Order Processing Part 3: Allocation, Fulfillment, and Purchasing
Sales Order Processing Part 4: Transaction activity
Sales Order Processing Part 6: Utilities
Glossary
Feedback
Coming soon: Throughout 2024 we will be phasing out GitHub Issues as the feedback mechanism for content and replacing it with a new feedback system. For more information see: https://aka.ms/ContentUserFeedback.
Submit and view feedback for