Microsoft Dynamics GP Receivables Management Part 5: Utilities and routines
You can help ensure the integrity of your Receivables Management data by reconciling your records. Once you've decided how much historical information is necessary, you can remove the information that's no longer needed. Be sure to back up your accounting data before performing any of these procedures, because they might remove data from your system.
This part of the documentation also includes procedures you complete at the end of a month or period and at the end of your calendar or fiscal year. This information includes the following topics:
Chapter 27, "Reconciling," describes reconciliation, the process of verifying that your accounting records are accurate.
Chapter 28, "History removal," explains the different types of historical information you can keep in Receivables Management, and describes how to remove historical information that is no longer needed.
Chapter 29, "Month-end closing," includes tasks usually completed at the end of the month or period, such as aging accounts and printing statements.
Chapter 30, "Year-end closing," includes tasks completed when you close fiscal or calendar years.
Chapter 26: Reports
You can use Receivables Management reports to analyze receivables activity and identify errors in transaction entry. Use the information in this chapter to guide you through printing reports and working with report options.
Reports information is divided into the following sections:
Receivables Management standard report summary
Specifying a Receivables Management report option
Microsoft SQL Server® Reporting Services reports for Receivables Management
| Report type | Report | Printing method |
|---|---|---|
| Setup reports | Customer Setup List Salesperson List Sales Territory List Customer Address List Receivables Setup list Quick Customer Setup List | Choose File >> Print in the setup windows or create report options using the Sales Setup Reports window. |
| Trial Balances | Aged Trial Balance† Aged Trial Balance with Options Aging Report* Historical Aged Trial Balance* Quick Aged Trial Balance | Create report options using the Receivables Trial Balance Report Options window. |
| Analysis reports | Accounts Due Report† | Create report options using the Sales Analysis Report Options window. |
* Indicates reports that can be printed with multicurrency information displayed.
Receivables Transactions List†
Receivables Sales Analysis Report†
Period Sales Analysis Report†
Unapplied Documents List†
† Indicates reports that can be assigned to named printers. See "Printers" in the System Administrator's Guide for more information.
Receivables Management standard report summary
You can print several types of reports using Receivables Management. Some reports automatically are printed when you complete certain procedures; for example, posting journals can automatically be printed when you post transactions, depending on how your posting options are set up. You can print some reports during procedures; for example, you can print an edit list when entering transactions by choosing the Print button in the batch entry window. In order to print some reports, such as analysis or history reports, you must set up report options to specify sorting options and ranges of information to include on the report.
The following table lists the report types available in Receivables Management and the reports that fall into those categories. Reports printed using Sales Order Processing or Invoicing are printed using many of the same windows. See the Sales Order Processing and Invoicing manuals for more information:
| Report type | Report | Printing method |
|---|---|---|
| Posting journals | Receivables Posting Journal*† | Printed when you post Receivables transactions or create report options using the Sales Posting Journal Options window. |
| History reports | Account History Report by Transaction | Create report options using the Sales History Report Options window. |
| Commissions reports | Commission Distribution List by | Create report options using the Sales Commissions Report Options window. |
| Utility reports | Account Distribution Removal Report | Printed when you complete the procedure. |
| Routine reports | Tax Year End Closing Report | Printed when you complete the procedure. |
| Inquiry reports | Transaction by Customer Inquiry | Choose File >> Print in the corresponding Inquiry window. |
| Edit lists | Cash Receipts Edit List | Choose File >> Print in the window you use to complete the procedure. |
| Documents | Sales/Invoices† | Choose Print in the Receivables |
| Statements | Statement forms*† | Choose Print in the Print |
* Indicates reports that can be printed with multicurrency information displayed.
Cash Receipts Posting Journal*†
Receivables Voided/Waived/NSF
Transaction
Distribution Breakdown Register*†
Finance Charge Detail Report
Posting Journal*
Receivables Apply Document
Journal*
Removed Transaction Register
Transferred Commissions Posting
Journal
Transaction History Report*
Distribution History Report
Salesperson
Salesperson Period Commissions
Commission Distribution List by
Sales Territory
Sales Territory Period
Commissions
Salesperson Commission
Summary
Sales Territory Commission
Summary
Journal History Removal Report
Removal Report
Reconcile Purchasing Documents
Report
Year-End Closing Report
Removed Statements Report
Transaction by Document Inquiry Report
Cust. Card Removal Edit List
Transaction Edit List
Debit Memos†
Finance Charges†
Service/Repairs†
Warranties†
Credit Memo†
Returns†
Reprinted statements*†
† Indicates reports that can be assigned to named printers. See "Printers" in the System Administrator's Guide for more information.
Specifying a Receivables Management report option
Report options include specifications for sorting options and range restrictions for a particular report. To print several Receivables Management reports, you must first create a report option. Each report can have several different options, so you can easily print the information you need. For example, you can create report options for the Aged Trial Balance that show either detailed or summary information.
A single report option can't be used by multiple reports. If you want identical options for several reports, you must create them separately.
Use the Sales report options windows to create sorting, restriction, printing and email options for the reports that are included in Receivables Management.
To specify a Receivables Management report option
Open a Sales reports window. There are separate windows for each report type. (Sales >> Reports >> Setup) (Sales >> Reports >> Trial Balance) (Sales >> Reports >> Analysis) (Sales >> Reports >> Posting Journals) (Sales >> Reports >> History) (Sales >> Reports >> Commissions)
Select a report from the Reports list.
Choose New to open the report options window. Your selection in step 2 determines the report options window that appears.
Name the option and enter information to define the option. The name you choose for the option won't appear on the report. The selections available for defining report options vary, depending on the report type you've selected.
Enter range restrictions. The Ranges list shows the available options for each report. The available ranges vary depending on the type of report.
Note
You can enter only one restriction for each restriction type. For instance, you can insert one customer ID restriction (AARONFIT0001 to ADVANCED0001) and one sales territory ID restriction (TERRITORY 3 to TERRITORY 6).
Choose Insert to insert the range in the Restrictions List. To remove an existing range from the list, select the range and choose Remove.
Choose Email Options to enter email options for the report option. Once the email options are set up, you'll be able to send the reports in an email message by choosing Email. You'll also be able to send this report option in an email from any list view where the report option is displayed.
Choose Destination to select a printing destination. Reports can be printed to the screen, to the printer, to a file, or to any combination of these options. If you select Ask Each Time, you can select printing options each time you print this report option.
To print the report option from the report options window, choose Print before saving it. If you don't want to print the option now, choose Save and close the window. The report window will be redisplayed.
Microsoft SQL Server® Reporting Services reports for Receivables Management
You can view Receivables Management Reporting Services reports from the Reporting Services Reports list. If you are using Reporting Services 2008, sales metrics for your home page also appear in the Reporting Services Reports list. You can access the Reporting Services Reports list from the navigation pane or from an area page in the Microsoft Dynamics GP application window. This report list appears if you specified the location of your Reporting Services reports using the Reporting Tools Setup window.
The following Reporting Services reports are available for Receivables Management.
| Accounts Due | Historical Aged Trial Balance |
|---|---|
| Aged Trial Balance - Detail | Receivables Sales Analysis |
To print a Receivables Management Reporting Services report:**
In the navigation pane, choose the Sales button, and then choose the Reporting Services Reports list.
Mark the Receivables Management report that you want to print.
In the Actions group, choose View to open the Report Viewer.
In the Report Viewer, select the specifications for the report and choose View Report.
After viewing the report, select a format and print the report.
Chapter 27: Reconciling
The reconciling process should be used if a system problem occurs and you need to be sure that your Receivables Management data is accurate. You might also find the reconciliation process useful if you discover inconsistencies in reports.
This information is divided into the following sections:
Types of information you can reconcile
Reconciling receivables amounts
Types of information you can reconcile
Select the type of information to reconcile using the Reconcile Receivables Amounts window.
Current Customer Information If marked, the aging periods for each customer card are verified with the amounts recorded for the customer's transactions. Summary information about outstanding amounts, unpaid finance charges, and current balances is verified. If the amounts don't match, the system sets the balances as calculated. The Reconcile Customer Balances report displays only the customers whose balances were changed during the process.
Outstanding Document Amounts If marked, the transaction balances are verified with the amounts applied to them for each customer card in the range. If the calculated transaction balance does not equal the amount on the transaction, the system sets the balances as calculated. Each document that's changed is printed on the Outstanding Documents Reconciliation report.
Batch Information If marked, the system verifies the batch each transaction is assigned to, the number of transactions in the batch, and the batch total. If any of the system calculations don't match the original amounts, the batches are reconciled. Also, any batches that were missing are added. Any batches that are changed or added are printed on the Batch Reconciliation Report.
Fiscal Year If marked, the summary information for the selected fiscal year is verified with the detail transaction information. If the amounts don't match, the period summary amounts are adjusted based on the posted detail transactions.
Calendar Year If marked, the summary information for the selected calendar year is verified with the detail transaction information. If the amounts don't match, the period summary amounts are adjusted based on the posted detail transactions.
Reconciling receivables amounts
Use the Reconcile Receivables Amounts window to compare the aging period amounts for each customer card with the amounts recorded for the customer's transactions, the outstanding document amounts, batch totals and amounts, fiscal year summary information, and calendar-year summary information.
Note
Before reconciling, back up all your company's accounting data.
To reconcile receivables amounts:**
- Open the Reconcile Receivables Amounts window. (Sales >> Utilities >> Reconcile)

Mark which information to reconcile. See Types of information you can reconcile for more information.
Mark whether to reconcile the selected information, print a reconcile report, or both. You can print a reconcile report to verify your entries without reconciling.
Age Finance Charges is only available when Current Customer Information is marked and Compound Finance Charge is not marked in the Receivables Management Setup window.
Select a range of customer cards if you're reconciling current customer information, outstanding document amounts, fiscal year, or calendar year.
Enter a reconcile date if it is a current customer balance. If you marked to reconcile fiscal-year or calendar-year information, enter a valid year to reconcile.
Mark the account type to reconcile—all, open item, or balance forward if it is a current customer balance.
If you mark All, both open item and balance forward accounts are reconciled.
If you mark Open Item, the system checks that the balances for each aging period are correct. If they're incorrect, the aging period amounts are recalculated.
If you mark Balance Forward accounts, the system calculates the age of each document in the current aging period and verifies the balance of the current and non-current periods.
Select the statement cycles of the customer cards to include if it is a current customer balance. When you first open this window, all statement cycles are selected.
Choose Process to start the reconcile process.
Chapter 28: History removal
History records provide useful information for audit and analysis purposes. If you're keeping one of the types of history available in Receivables Management, you can keep these records for an unlimited number of years.
When you remove historical records, the system removes records only for the range you specify. Normally, history is removed before the year-end closing process; however, at other times during the accounting cycle, you might find it necessary to remove ranges of history that are no longer useful.
This information is divided into the following sections:
History removal overview
Removing transaction history
Removing distribution history
Removing period history
Removing journal history
Removing Intrastat history
Removing tax history
History removal overview
When you removal history, you can set up restrictions to limit the historical records to be removed. Depending on the type of history you're removing, you can set up the following ranges:
Audit trail codes
Batch sources
Batch IDs
Customer classes
Customer IDs
Customer names
Customer types
Document numbers
Document types
Periods
Posting dates.
Important
When you remove history, any corresponding multicurrency information is removed, as well.
Removing transaction history
Use the Remove Receivables Transaction History window to remove transaction history. If you're keeping transaction history, detailed information has been kept for all transactions that were posted and paid during the year. If you remove transaction history, complete information might not be available to print Historical Aged Trial Balances or reprint posting journals.
To remove transaction history:**
Back up your company's accounting data. See the System Administrator's Guide (Help >> Contents >> select System Administration) for more information about making backups.
Open the Remove Receivables Transaction History window. (Sales >> Utilities >> Remove Transaction History)
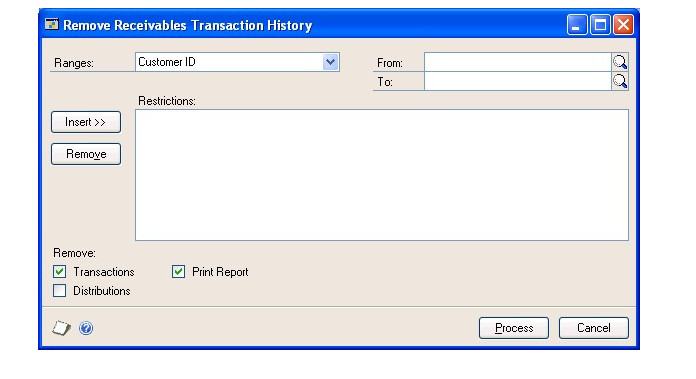
To limit the historical records to be removed, select a type of range and enter a range restriction.
Choose Insert; the range restriction is displayed in the Restrictions list. You can select another range type and insert another restriction.
Note
You can enter only one restriction for each restriction type. For example, if you enter a restriction specifying that history for customer records 100 through 300 should be removed, you can't enter another restriction for customer records 500 through 800. To remove multiple ranges of history, you must remove each range separately.*
Mark the type of records to remove—transactions, distributions, or both. If you mark Distributions, any distributions for the transaction history records you're removing also are removed.
Mark Print Report to print the Transaction History Report for the range of records you specified after history has been removed.
To print the Transaction History Report to verify the ranges you entered before you remove history, mark only Print Report and choose Process.
- Choose Process to begin removing history.
Once history has been removed, you can't print the Transaction History Report for the ranges of information you removed.
Removing distribution history
Use the Remove Receivables Distribution History window to remove distribution history. If you're keeping distribution history, a detailed record has been kept of how Receivables Management transactions have affected the balances of posting accounts. If you remove distribution history, you might not have all the information needed to reprint posting journals in the future.
If you're using General Ledger, those history records aren't affected when you remove distribution history in Receivables Management. This information is kept separately from transaction history for General Ledger, so you can keep distribution history for Receivables Management regardless of whether you use General Ledger.
To remove distribution history
Back up your company's accounting data. See the System Administrator's Guide (Help >> Contents >> select System Administration) for more information about making backups.
Open the Remove Receivables Distribution History window. (Sales >> Utilities >> Remove Distributions)
To limit the historical records to be removed, select a type of range and enter a range restriction.
Choose Insert; the range restriction is displayed in the Restrictions list. You can select another range type and insert another restriction.
You can enter only one restriction for each restriction type. For example, if you enter a restriction specifying that history for customer records 100 through 300 should be removed, you can't enter another restriction for customer records 500 through 800. To remove multiple ranges of history, you must remove each range separately.
Mark Distributions to remove distributions.
Mark Print Report to print the Transaction Distribution History Report for the range of records you specified after history has been removed.
To print the Transaction Distribution History Report to verify the ranges you entered before you remove history, mark only Print Report and choose Process.
- Choose Process to begin removing history.
Once history has been removed, you can't print the Transaction Distribution History Report for the ranges of information you removed.
Removing period history
Use the Remove Receivables Calendar/Fiscal History window to remove period history. If you're keeping calendar year history, customer sales, salesperson, and sales territory information has been recorded in a month-by-month format. If you're keeping fiscal year history, the same information has been recorded according to the fiscal period format you specified using the Fiscal Period Setup window.
Comparative totals (year to date, last year, and life to date) aren't removed when you remove calendar/fiscal history. These totals are kept independently; they are updated when you close the year. This window clears the balances displayed in the Customer Period Summary window.
To remove period history:**
Back up your company's accounting data. See the System Administrator's Guide (Help >> Contents >> select System Administration) for more information about making backups.
Open the Remove Receivables Calendar/Fiscal History window. (Sales >> Utilities >> Remove Period History)
Mark whether to remove period history for customers, salespeople, or sales territories.
Mark whether to remove calendar or fiscal year history, and enter the year.
To limit the historical records to be removed, select a type of range and enter a range restriction.
Choose Insert; the range restriction is displayed in the Restrictions list. You can select another range type and insert another restriction.
You can enter only one restriction for each restriction type. For example, if you enter a restriction specifying that history for customer records 100 through 300 should be removed, you can't enter another restriction for customer records 500 through 800. To remove multiple ranges of history, you must remove each range separately.
Mark History to remove history.
Mark Print Report to print the History Removal Report for the range of records you specified after history has been removed.
To print the History Removal Report to verify the ranges you entered before you remove history, mark only Print Report and choose Process.
- Choose Process to begin removing history.
Once history has been removed, you can't print the History Removal Report for the ranges of information you removed.
Removing journal history
Use the Remove Receivables Journal History window to remove journal history. If you're keeping journal history for customer records, you can reprint posting journals for Receivables Management transactions. Posting journals are valuable audit trail tools that include the audit trail codes assigned to transactions during the posting process. Using posting journals, you can trace any transaction to the point it was entered. If that information is no longer useful for transactions that have been moved to the history tables, you can remove that information.
To remove journal history
Back up your company's accounting data. See the System Administrator's Guide (Help >> Contents >> select System Administration) for more information about making backups.
Open the Remove Receivables Journal History window. (Sales >> Utilities >> Remove Journal History)
A message appears that reads, "Removing this information might affect your historical aged trial balance. Do you want to continue?" Choose Yes.
To limit the historical records to be removed, select a type of range and enter a range restriction.
Choose Insert; the range restriction is displayed in the Restrictions list. You can select another range type and insert another restriction.
You can enter only one restriction for each restriction type. For example, if you enter a restriction specifying that history for batch IDs 100 through 300 should be removed, you can't enter another restriction for batch IDs 500 through 800. To remove multiple ranges of history, remove each range separately.
Mark History to remove history.
Mark Print Report to print the Journal Removal Report for the range of records you specified after history has been removed.
To print the Journal Removal Report to verify the ranges you entered before you remove history, mark only Print Report and choose Process.
- Choose Process to begin removing history.
Once history has been removed, you can't reprint posting journals for the ranges of information you've removed.
Removing Intrastat history
Use the Remove Intrastat History window to remove Intrastat history records that are no longer necessary. Only the Intrastat records for the range you specify are removed.
Once history has been removed, you can't print the Intrastat removal reports for the ranges of information you removed.
To remove Intrastat history:**
Back up your company's accounting data. See the System Administrator's Guide (Help >> Contents >> select System Administration) for more information about making backups.
Open the Remove Intrastat History window. (Administration >> Utilities >> Company >> Remove Intrastat History)
Select a range type for the historical information to remove. Define the beginning and end of the range, then choose Insert to display the range.
You can enter and insert additional ranges. However, you can enter only one range for each range type. For example, if you enter a restriction specifying that history should be deleted for customer records COMPUTER0003 through GRAHAMAR0001, you can't
enter another restriction for customer IDs CONTINEN0001 through EXECUTIV0001.
Mark Transactions to remove the transactions.
Mark Print Report to print the Intrastat removal reports for the range of customer records or vendor records you specified. Print these reports to retain a permanent record of your past Intrastat records after you clear history.
To print the Intrastat removal reports without removing history, mark only Print Report and choose Process.
- Choose Process to begin removing history.
Removing tax history
Use the Tax History Removal window to remove tax detail transactions. Only the tax history for the range you specify will be removed. Once tax history has been removed, the tax details in the range you've removed won't be printed on tax reports.
Before removing history, back up your company's accounting data.
To remove tax history:**
Open the Tax History Removal window. (Administration >> Utilities >> Company >> Remove Tax History)
Select whether you want to remove tax detail transactions and print the Tax History Removal Report, remove the tax detail transactions, or print the Tax History Removal Report.
Enter or select a range of tax history to remove or print a report of.
Choose Insert to insert the range.
Choose Process to remove tax history. If Print Tax History Removal Report was marked, the Tax History Removal Report will print.
Chapter 29: Month-end closing
This information includes tasks that are usually completed at the end of the month or period. You can, however, complete these tasks whenever they're needed.
This information is divided into the following sections:
Aging customer accounts
Finance charges overview
Assessing finance charges
Customer statements overview
Setting up and printing statements
Reprinting or removing statements
E-mail statements overview
Sending e-mail statements
Marking commission amounts as paid
Removing paid transactions
Printing a VAT return
Aging customer accounts
You can calculate the number of days old or days past due each customer account is, and to move the customer balances to the correct aging periods. You should enter and post transactions and payments before aging to ensure up-to-date calculations. Unapplied credit amounts are aged if you marked Age Unapplied Credit Amounts in the Receivables Management Setup window.
To age customer accounts
Open the Receivables Aging Process window. (Sales >> Routines >> Aging)
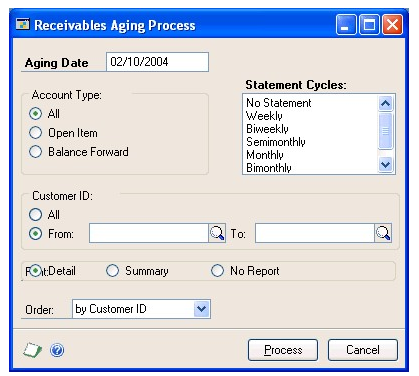
Enter the date to be used for determining the age of a document. This date is compared to either the due date or document date, depending on the selection in the Receivables Management Setup window.
Mark the accounts to age—open item, balance forward, or all accounts.
When you mark All, open item and balance forward accounts both are aged.
When you age open item accounts, the system calculates the age of each document, and the documents are transferred to the correct aging period.
When you age balance forward accounts, the system calculates the age of each document in the current aging period, but doesn't actually move them to the noncurrent aging periods. Noncurrent balances for these accounts are consolidated after you remove paid transactions. See Removing paid transactions for more information.
- Select the statement cycle for the customer cards to be aged.
To select more than one statement cycle, press CTRL as you make your selections.
Select a range of customer accounts to age. Only customers assigned to the statement cycle you selected in step 4, and who are within the customer range, will be aged.
Mark Age Finance Charges if you want finance charges to be included in the aging process.
Age Finance Charges is only available when Compound Finance Charge is not marked in the Receivables Management Setup window.
Mark the type of report to print once the aging process is complete: detailed, summarized, or no report at all.
Select the order for information to appear on the report.
Choose Process to begin aging the accounts in the range. When the process is complete, the Aging report is printed.
To age customer accounts using the action pane:**
In the navigation pane, choose the Sales button, and then choose the Customers list.
Mark the customers that you want to age. The user date is used to age the customer account. Finance Charges are included in the aging process.
If the customer has an open item account, the system calculates the age of each document, and the documents are transferred to the correct aging period.
If a customer has a balance forward accounts, the system calculates the age of each document in the current aging period, but doesn't actually move them to the noncurrent aging periods. Noncurrent balances for these accounts are consolidated after you remove paid transactions. See Removing paid transactions for more information.
In the Actions group, choose Aging to begin aging the customer selected. When the process is complete, the Aging report is printed.
Finance charges overview
You can define your finance charges options in the Assess Finance Charges window. You can enter a range of customers or select which types of accounts to assess finance charges for.
You also can mark whether to include unapplied credits in aged balances, so you can assess finance charges only for customers who have positive balances. Because payments are sometimes received but not applied before you assess finance charges, customers who actually have no outstanding balance might be assessed a finance charge. Marking this option assesses a finance charge on just the outstanding balance, not the total balance.
When you mark Include Unapplied Credits in Aged Balances, Receivables Management will calculate the remaining balance as if the credit documents were applied to the oldest aging periods first—although no documents are actually applied at this time. The remaining balance will be assessed a finance charge.
When Receivables Management calculates the applied amounts and remaining balances for multicurrency transactions, the functional currency amount is used.
The option to include unapplied credits in aged balances is not available if you're assessing finance charges for balance forward accounts, or for the current aging period.
If you marked Compound Finance Charges in the Receivables Management Setup window, unapplied finance charges are included in the balance that's assessed a finance charge. If you don't mark this option, unapplied finance charges are not included in the balance.
Example
On January 2, a customer purchased goods on account for a total of $100.00. On February 5, after you age balances, you assess a 5% finance charge on the 31-60 days and older aging period. The customer's outstanding balances is now $105.00, with the following aging period balances:
| Aging period | Balance |
|---|---|
| Current | $5.00 |
| 31-60 days | $100.00 |
On February 20, you receive a $105.00 payment from the customer, but the payment remains unapplied when you again age periods on March 5. The aging period balances are as follows:
| Aging period | Balance |
|---|---|
| Current | ($105.00) |
| 31-60 days | $5.00 |
| 61-90 days | $100.00 |
Depending on whether you marked Compound Finance Charges in the Receivables Management Setup window and Include Unapplied Credits in Aged Balances in the Assess Finance Charges window, the following situations would occur:
If you didn't mark either option, a $5.00 finance charge would be assessed ($100.00 x 5%).
If you marked only Compound Finance Charges, a $5.25 finance charge would be assessed ($100.00 x 5%) + ($5.00 x 5%).
If you marked only Include Unapplied Credits in Aged Balances, no finance charges would be assessed. Receivables Management will calculate the balances as if the $105.00 payment were applied to the oldest aging period (61-90 days) until that balance was zero, and then to the 31-60-days aging period. After calculating the applied amounts, the balances of both aging periods would be zero. (Receivables Management goes through the apply process for the purpose of assessing finance charges but doesn't actually apply any amounts).
If you marked both options, no finance charges would be assessed. Receivables Management would calculate the balances as if the $105.00 would be pseudoapplied to the oldest aging period (61-90 days) and then to the 31-60-days aging period. Since the balance is zero for both periods, no finance charges are assessed. (Receivables Management goes through the apply process for the purpose of assessing finance charges but doesn't actually apply any amounts.)
Assessing finance charges
Use the Assess Finance Charges window to assess finance charges for a group of customers. If you need to enter a finance charge for just one customer, you might want to use the Receivables Transaction Entry window and use the Finance Charge document type instead. See Entering a finance charge on page 82 for more information on individual finance charges.
To assess finance charges
Open the Assess Finance Charges window. (Sales >> Routines >> Finance Charge)
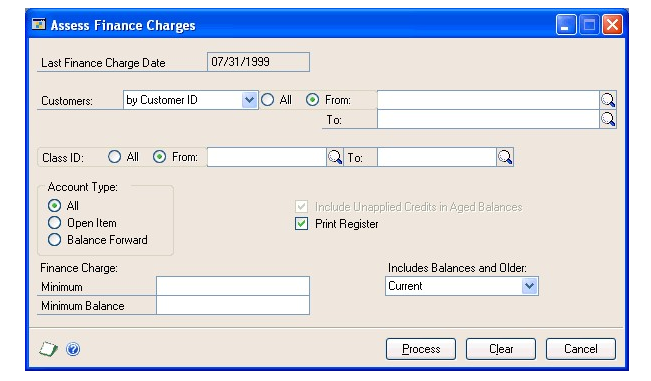
Select a range of customer cards to assess finance charges for.
If you're using national accounts and you marked Base Finance Charge on Consolidated National Account in the National Accounts Maintenance window, the parent customer must be in the customer ID range for finance charges to be assessed against the national account. The finance charge calculation method from the parent customer card will be used to calculate the finance charge and only the parent customer's summary records will be updated with the finance charge amounts.
Select a range of customer class IDs to further restrict the customer records that finance charges are assessed for. A customer record must fall within both the customer range and the class range to be assessed a charge.
Mark the account types to assess charges for—open item, balance forward, or all account types.
Mark whether to include unapplied credits in aged balances when you assess finance charges.
If you're using national accounts and you marked Base Finance Charge on Consolidated National Account in the National Accounts Maintenance window, finance charges will be assessed based on the consolidated national account. If you also mark Include Unapplied Credits in Aged Balances, receivables balances will be calculated as if unapplied credit amounts were applied to the national account aging period balances—oldest aging period first—and the remaining balance will be assessed a finance charge.
Enter the minimum balance that a customer must owe to be charged a finance charge. Any customer having a balance that is less than this amount won't be charged.
Enter the minimum amount that you can charge a customer. Any customer who would be assessed a finance charge that is less than this amount won't be charged.
Mark Print Register to print the Finance Charge Detail Report once the charges have been assessed.
In the Includes Balances and Older field, select the aging period of the balances to include; finance charges will be assessed on balances in that period and older. For example, if your company assesses finance charges only for unpaid balances older than 61 days, select 61 – 90 days as the period to include. Only those unpaid balances that are 61 days old and older are assessed a finance charge.
Choose Process to begin calculating finance charges, and to print the Finance Charge Detail Report.
Transactions are created for the finance charges in a batch named RM FIN CHG. You can edit these transactions using the Receivables Transaction Entry window.
- Post the finance charge batch using the Receivables Batch Entry window. Once the batch is posted, the customer accounts reflect the finance charge.
To assess finance charges using the action pane:**
In the navigation pane, choose the Sales button, and then choose the Customers list.
Mark the customers that you want to assess finance charges to.
In the Actions group, choose Access Finance Charges.
Enter the minimum amount that you can charge a customer.
Enter the minimum balance that a customer must owe to be charged a finance charge. Any customer having a balance that is less than this amount won't be charged.
In the Includes Balances field, select the aging period of the balances to include; finance charges will be assessed on balances in that period and older. For example, if your company assesses finance charges only for unpaid balances older than 61 days, select 61 – 90 days as the period to include. Only those unpaid balances that are 61 days old and older are assessed a finance charge.
Choose Assess to begin calculating finance charges, and to print the Finance Charge Detail Report.
When you assess finance charges for open item customers, any unapplied credits in the aged balances are included so you assess finance charges only for customers with positive balances. Any unapplied credit documents are pseudoapplied to the oldest aging period balances first, and the remaining balance will be assessed a finance charge.
Transactions are created for the finance charges in a batch named RM FIN CHG. You can edit these transactions using the Receivables Transaction Entry window.
- Post the finance charge batch using the Receivables Batch Entry window. Once the batch is posted, the customer accounts reflect the finance charge.
Customer statements overview
Statements are used to show current customer activity, including aging period balance information, the total amounts due, and payments received. They often are sent to customers as bills. Use the Print Receivables Statements window to set up the information to display on customer statements. Refer to Setting up and printing statements for information about printing statements.
When you set up and print customer statements, you can mark whether to reduce aging period balances by the amount of any unapplied credits. If you mark this option, the following conditions apply:
The oldest aging period will be reduced first.
The aging periods will not be reduced to less than zero.
You can mark this option only if you didn't mark Age Unapplied Credit Amounts in the Receivables Management Setup window.
Use the multicurrency versions of the Receivables Management customer statements to print statements in your customer's currency. If you conduct business with customers in multiple currencies, you can print statements that include a subtotal for each currency with activity by marking Include Multicurrency Info in the Posting Setup window.
If you're using national accounts, you can print consolidated statements or individual customer statements. If you mark Consolidated National Account and leave Individual Child Statements unmarked, only one statement will be printed for each national account. Parent and all child documents will be displayed on this single statement.
If you mark both Consolidated National Account and Individual Child Statements, one statement will be printed for each national account, and an additional statement will be printed for each child included on a consolidated statement.
Setting up and printing statements
Use the Print Receivables Statements window to set up and print statements. You can set up different statements for different groups of customers. For example, you can set up statements that include information specific to each customer class, or for customers with different statement cycles.
Once you set up your statement selections, you don't need to reenter the same information each time. Instead, you can just select the appropriate statement ID, change the dates if necessary, and begin printing.
To set up and print statements
Open the Print Receivables Statements window. (Sales >> Routines >> Statements)
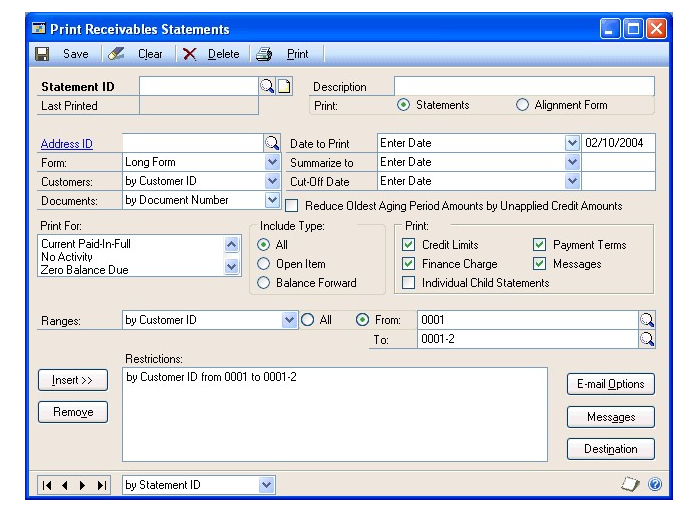
Enter or select a statement ID and enter a description. For example, if you want to print statements for your open item customers, you can enter Open Item as the statement ID.
Select a form to print your statements on—long, short, side, user-definable, blank paper, short continuous, side continuous, multicurrency long, or multicurrency blank.
The Multicurrency Long Form has a page break separating each currency's activity, if the customer has conducted business with you in multiple currencies. The Multicurrency Blank form contains a summary of current activity and each currency's outstanding balances.
- In the Customers and Documents fields, select the order to print the customer statements in, and a method for listing documents for each customer on the statement.
Select printing specifications to indicate the customer groups that should receive statements. You also can indicate how applied payments should appear on statements.
Mark Alignment Form to print an alignment form to verify that the forms are positioned correctly in the printer. Mark Statements to print the actual statements.
Select a date to print on the statement. Select a date in the Summarized to field to summarize transactions before a particular date. Transactions on or before this date are summarized, and a total balance for those transactions is displayed. Transactions after this date are displayed in detail. Select a cutoff date to print statements for transactions through the specified date.
Enter or select the address ID for your company's address to appear on the statement.
Mark whether to reduce the oldest aging period amounts by unapplied credit amounts. This option is available only if you didn't mark Age Unapplied Credit Amounts in the Receivables Management Setup window. See Customer statements overview for more information.
Mark the account types to include—all accounts, open item accounts, or balance forward accounts.
Mark the information to print on the statements—credit limits, payment terms, finance charges, and messages. If you're using national accounts, you also can include individual child statements.
Choose E-mail Options to open the E-mail Statements Options window, where you can mark whether to e-mail customer statements, and define e-mail statements options. See Sending e-mail statements for more information.
To create a message, choose Messages to open the Sales Statement Message Entry window.

Using this window, you can enter your own message. Each of the situations in the description column can have its own message and is printed on any statement where that situation occurs. Choose OK to close the window when you finish.
- Select a range of customers to print statements for and choose Insert; the range restriction is displayed in the Restrictions list.
You can enter only one restriction for each restriction type. For example, if you enter a restriction specifying that only customer IDs 100 through 300 should be printed, you can't enter another restriction for customer IDs 500 through 800. To print multiple ranges of customer records, you must print each range separately.
If you're printing statements for national account customers, the parent customer ID must be in the range selected for either consolidated or individual national account statements to print.
- Choose Save to save the statement ID selections for future printing, or choose Print to immediately print the statements.
Reprinting or removing statements
Use the Reprint Statements window to reprint or remove customer statements at any time, if you marked Reprint Statements in the Receivables Management Setup window.
For example, if a customer misplaces a statement, but they need the statement to receive approval for payment, you could send the customer a reprinted statement that includes the same information as the original. Reprinted statements are marked with "Reprint" in the header.
When you mark to reprint statements, statement data is saved each time you print statements, so that the information is available for reprinting. You also can remove the statements using the Reprint Statements window if you no longer want the statement to be available for reprinting.
If you're using national accounts and you select to reprint or remove a parent customer's statement, you cannot separate that statement into individual child customer statements.
If you're using Multicurrency Management, and if you originally printed a multicurrency statement and you're now reprinting it in a non-multicurrency format, the amounts will be the same as they were on the original multicurrency statement. The amounts won't be converted to the functional currency.
To reprint or remove statements
Open the Reprint Statements window. (Sales >> Routines >> Reprint Statements)
Select a sorting option and enter a range.
Enter a range of statements dates, or mark All. Choose Redisplay.
Select which form to print statements on, if you're printing statements.
Mark which statements in the scrolling window to reprint or remove.
Choose E-mail Options to open the E-mail Reprint Statements Options window, where you can select options for sending reprinted customer statements by email. See Sending e-mail statements on page 207 for more information. Close the window when you finish.
Choose Print to reprint the selected statements, or Remove to remove the selected statements.
E-mail statements overview
If you have set up your company to use the e-mail functionality for documents in Microsoft Dynamics GP, you can select the customer statement as a document to send in e-mail in the Sales E-mail Setup window. When you select to send a customer statement for a customer, you can specify a message ID and the document format to use for the customer. A message ID is a predefined message that you can assign to a document that you want to send in e-mail. For more information about setting up documents for e-mail, refer to your System User's Guide (Help >> Contents >> select Using The System).
If you are using MAPI as your mail service, you can decide to send customer statements in email by marking the Send E-mail Statements option in the Customer Maintenance Options window for each customer. You can send the e-mail statement in Portable Document Format (PDF) to any number of specified customer e-mail addresses. You also must install Adobe Distiller or PDFWriter to send customer statements by e-mail. By marking this option, you can use the E-mail Statements Options and E-mail Reprint Statements Options windows to define your options for sending statements by e-mail. If you are using Exchange as your mail service, the Send E-mail Statements option is not available.
Customer Statement option in the Sales E-Mail Setup window
By using the email functionality in Microsoft Dynamics GP, you can send customer statements if the following conditions are met.
The Customer Statement option is marked in the Sales E-Mail Setup window. By marking the Customer Statement option in the Sales E-Mail Setup window, you cannot use the E-mail Statements Options and E-mail Reprint Statements Options windows when sending statements in email.
The Customer Statement option is marked for the cusomers that you want to send statements to. You can use the Customer E-Mail Options window or the Mass Customer E-Mail Settings window to set up email settings for customer records.
At least one e-mail address, To, Cc, or Bcc, is assigned to the customer's statement address ID using the Internet Information window.
The Print option is marked in the Print Receivables Statements window.
The On Blank Paper option is selected as the form in the Print Receivables Statements window.
Send E-mail Statements option in the Customer Maintenance Options window
If you marked to send e-mail statements to customers in the Customer Maintenance
Options window, you can use the E-mail Statements Options and E-mail Reprint Statements Options windows to define your options for sending statements by email. You also must set up at least one customer e-mail address in the Customer Maintenance Options window before you can send customer statements by e-mail. You also must have Adobe PDFWriter installed to be able to send statements by email.
When you send customer statements by e-mail, they're created as PDF files using Adobe Distiller or PDFWriter, and they're attached to the message sent to the customer. These files are stored in a folder within the Windows temp folder.
If the process of sending statements to customers by e-mail is interrupted, only the status report records in the database are cleaned up. You might need to manually delete the PDF files stored in the temp folder. The full path name of this folder typically will be
\temp\CompanyID\Microsoft Dynamics\GP\UserID.
The statements will be sent to the customer e-mail addresses you set up in the Customer Maintenance Options window, and the From address will be the e-mail address of the user who's logged in to the MAPI-compliant mail service. When the e-mail statement is sent, the PDF file will be removed from your hard disk. If, for some reason, the PDF file is not removed, it will be overwritten if you regenerate the statement.
After e-mail statements are sent, a status report will be sent to the e-mail address you specified in the Receivables Management Setup window. This report includes a list of the e-mail statements that were sent successfully and information about any errors that might have occurred during the process of sending the e-mail statements.
If you didn't specify an e-mail address in the Receivables Management Setup window or if sending the status report by e-mail failed, Receivables Management will print the status report to the default printer and leave the status report file in the folder that you specified or in the default folder which will be \CompanyID\Microsoft Dynamics\GP\UserID\StmtStatus.
Sending e-mail statements
Use the Print Receivables Statements window or the Reprint Statements window to e-mail customer statements. If you have marked the Send E-mail Statements option in the Customer Maintenance Options window, you can set up your options in the E-mail Statements Options or E-mail Reprint Statements Options windows to send e-mail statements.
To send e-mail statements using the Customer Statement option in the Sales E-Mail Setup window
- Open the Print Receivables Statements window or the Reprint Statements window.
(Sales>> Routines >> Statements -or- Sales >> Routines >> Reprint Statements)
- Enter statement information. See Setting up and printing statements and Reprinting or removing statements for more information.
Be sure that you select the On Blank Paper option as the form.
If you are reprinting statements, mark which statements in the scrolling window to resend in email.
- Choose E-mail to send the statements.
To send e-mail statements using the Send E-mail Statements option in the
Customer Maintenance Options window:**
- Open the Print Receivables Statements window or the Reprint Statements window.
(Sales>> Routines >> Statements -or- Sales >> Routines >> Reprint Statements)
Enter statement information. See Setting up and printing statements on page 203 and Reprinting or removing statements on page 205 for more information.
Choose E-mail Options to open the E-mail Statements Options or E-mail Reprint Statements Options window.
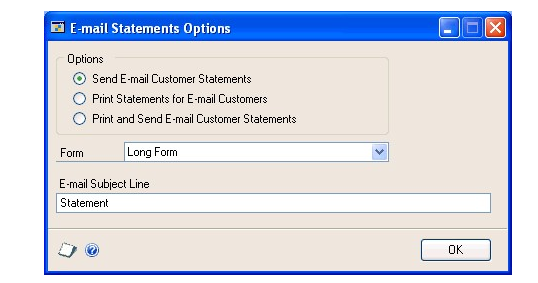
Mark one of the following options:
If you mark Send E-mail Customer Statements, statements will be sent to the customers by e-mail within the selected range for whom you marked Send E-mail Statements in the Customer Maintenance Options window.
If you mark Print Statements for E-mail Customers, statements will be printed for the customers within the selected range for whom you marked Send E-mail Statements in the Customer Maintenance Options window. Statements will not be sent.
If you mark Print and Send E-mail Customer Statements, statements will be printed for and sent by e-mail to the customers within the selected range for whom you marked Send E-mail Statements in the Customer Maintenance Options window.
Select the form to use for the e-mail statements.
Enter an e-mail subject line, which will be used for all the e-mail statements sent during this printing statements process.
Choose OK to close the window.
Choose Save in the Print Receivables Statements or Reprint Statements window to save your changes. Choose Print to print or send e-mail customer statements according to the options you specified.
Marking commission amounts as paid
Use the Transfer Sales Commissions window to group all payable commissions and mark them as paid. You can then assign an audit trail control code to be used for reprinting posting journals.
Depending on whether you marked Pay Commissions After Invoice Paid in the Receivables Management Setup window, commissions are payable either when the invoice is posted or when it has been paid in full.
If you remove paid transactions before marking the commissions as paid, the commissions are saved until you mark them as paid. However, we recommend that you mark commissions as paid before removing paid transactions.
To mark commission amounts as paid
Open the Transfer Sales Commissions window. (Sales >> Routines >> Transfer Commission)
Mark whether to transfer commissions in detail or in summary.
If you mark Detail, each commission distribution is recorded individually.
If you mark Summary, payable commissions for each salesperson are grouped together and only the summary amount is recorded.
Choose Process.
A Transferred Commissions Posting Journal might be printed once commissions are processed, depending on the options you selected using the Posting Setup window.
The posting journal and the commission distributions records show that commissions have been paid. However, you must use the Transferred Commissions Posting Journal to create transactions in Payroll to pay the salespeople.
Removing paid transactions
Use the Paid Sales Transaction Removal window to transfer paid transactions to history and to consolidate balance forward accounts.
If you aren't keeping history, this procedure removes paid transactions from the system, and you can't print reports containing information about the transactions that are removed.
To remove paid transactions
Open the Paid Sales Transaction Removal window. (Sales >> Routines >> Paid Transaction Removal)
Select a range of customer records to remove paid transactions for.
Select a range of customer class IDs to further restrict the customer records to be affected. A customer record must fall within both the customer range and the class range to have transactions removed.
Mark the types of transactions to remove and enter a cutoff date. You can remove NSF checks, voided transactions, waived finance charges, paid transactions, and checks. The selected transactions that fall on or before the cutoff date will be removed.
Checks have a separate cutoff date because those that are transferred to history or removed from the system can't be marked as NSF. Therefore, we recommend that you enter a cutoff date that is one month prior to the transaction cutoff date. That way you won't remove any potential NSF checks.
Mark whether to consolidate balance forward customer accounts. If you mark this option, all documents for the customer are summarized and moved from the current aging period to the noncurrent aging period.
Mark Print Register to print a Removed Transaction Register. After the transactions are removed, the report is printed and all the removed transactions are displayed.
Choose Process to remove the selected transactions. The report is printed if you chose to print it.
Printing a VAT return
Use the VAT Return window to print VAT reports to submit to the government. You can print summary and detailed VAT information for a specified period.
You can save VAT report IDs and reprint reports at a later time.
To print a VAT return
Open the VAT Return window. (Administration >> Routines >> Company >> VAT Return)
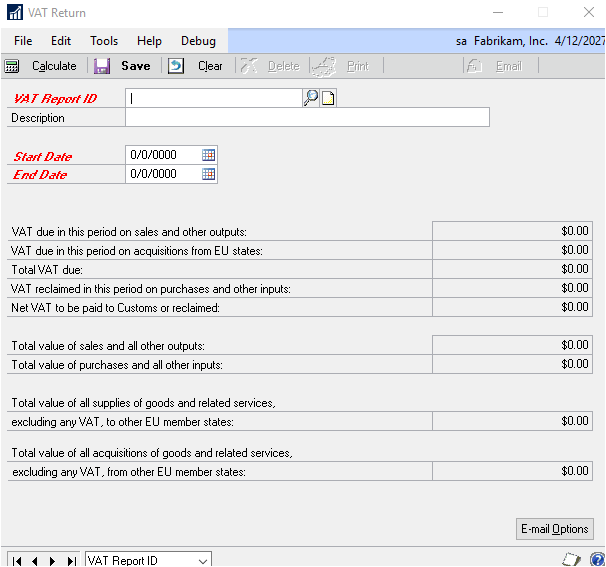
Enter or select a report ID.
Enter a description.
Enter starting and ending dates for the report.
Each VAT Report ID you create must have a unique starting date. You can't use the same starting date on more than one report ID.
Choose Calculate. VAT return information is displayed in the VAT Return window.
To save the report, choose Save. You must calculate VAT information before you can save the report ID. You also must save the report before you can print it.
To print the report, choose Print. The VAT Return Print Options window opens.
Mark the reports to print—summary, detail, tax detail, or exception.
Choose Print.
Chapter 30: Year-end closing
This information includes tasks completed at the end of the year. These procedures transfer current-year balances to last year's balance, and clear out the current-year balances. There are two closing procedures for Receivables Management—fiscal year and calendar year. You must close both the calendar and fiscal year, even if you use only fiscal periods.
This information is divided into the following sections:
Calendar year-end closing overview
Fiscal year-end closing overview
Closing a calendar year
Closing a fiscal year
Closing a tax year
Calendar year-end closing overview
Closing the calendar year updates information that is displayed in the Customer Finance Charge Summary window. The Calendar Finance Charges field is updated to display the date you closed the calendar year. The Current Year field is updated to display total finance charges for the new calendar year. The Last Year column is updated to display totals for the year you closed.
You must enter and post transactions before those amounts are included in the year you're closing. You should close the calendar year after you print the final statements for the year you're closing.
Be sure to complete the following procedures in this order to close your company's calendar year.
Post all transactions for the current year Before closing the year, post all transactions for the calendar year. To enter future period transactions before closing the year, create a batch with new transactions, but don't post it until after the previous year has been closed.
Make a backup Make a backup of all data for your company's permanent records. This gives you a record of the company's financial position at the end of the year so you can restore it later, if necessary.
Close the calendar year Use the Receivables Year-End Closing window to close the calendar year or, if your calendar and fiscal years coincide, both years. See Closing a calendar year on page 215 for more information.
Close the sales tax periods for the year (optional) Use the Tax Year-End Closing window to close the sales tax periods and print the Tax Year-End Closing Report. Be sure to complete the year-end closing procedures for alL sales and purchasing modules before closing the sales tax periods for the year. See Closing a tax year for more information.
Make a final backup Make a final backup of all data for your company's records.
Note
Before you close the year, make a backup of all company data. If you have a current backup, you can restore information, if necessary.*
Fiscal year-end closing overview
Closing the fiscal year updates information that is displayed in the Customer
Summary window only when you select Amounts Since Last Close in the Summary View list. The amounts in the Year to Date column are updated to display totals for the new fiscal year. The amounts in the Last Year column are updated to display totals for the year you closed.
The information that is displayed in the Customer Summary window when you select Amounts Since Last Close in the Summary View list might not represent actual fiscal year totals if you close the fiscal year before or after the last day of the fiscal year. For example, the amounts in the Year to Date column might continue to increase as transactions are posted after the last day of the fiscal year; then when you close the fiscal year, the amounts in the Last Year column will include those transactions posted after the last day of the fiscal year that you closed.
Closing the fiscal year will not affect the information that is displayed in the
Customer Summary window when you select Fiscal Year or Calendar Year in the Summary View list. The amounts displayed for those selections are dependent on the year and periods you enter to display.
Closing the fiscal year also updates information that is displayed in the Customer
Finance Charge Summary window so that you can print finance charge totals on December and January statements for tax reporting purposes. The Fiscal Finance Charges field will be updated to display the date you closed the fiscal year. The amounts in the Year to Date column will be updated to display totals for the new fiscal year. The amounts in the Last Year column will display totals for the year you closed.
If it's the end of the fiscal year and you must enter transactions for the next year, we recommend that you create a batch for the transactions and wait to post them until after you close the year, to avoid posting the new year's transactions to the previous year.
Be sure to complete the following procedures in this order to close your company's calendar year.
Post all transactions for the current year Before closing the year, post all transactions for the fiscal year. To enter future period transactions before closing the year, create a batch with new transactions, but don't post it until after the previous year has been closed.
Make a backup Make a backup of all data for your company's permanent records. This gives you a record of the company's financial position at the end of the year so you can restore it later, if necessary.
Close the fiscal year Use the Receivables Year-End Closing window to close the fiscal year or, if your calendar and fiscal years coincide, both years. See Closing a fiscal year for more information.
Close the fiscal periods for the Sales series (optional) Use the Fiscal Periods Setup window to close any fiscal periods that are still open for the year.
This keeps transactions from accidentally being posted to the wrong period or year. If you later need to post transactions to a fiscal period you already closed, you must return to this window and reopen the period before you can post the transactions.
Close the sales tax periods for the year (optional) Use the Tax Year-End Closing window to close the sales tax periods and print the Tax Year-End Closing Report. Be sure to complete the year-end closing procedures for all sales and purchasing modules before closing the sales tax periods for the year. See Closing a tax year on page 216 for more information.
Make a final backup Make a final backup of all data for your company's records.
Before you close the year, make a backup of all company data. If you have a current backup, you can restore information, if necessary.
Closing a calendar year
Use the Receivables Year-End Closing window to close the calendar year to update information that is displayed in the Customer Finance Charge Summary window. Before you close the year, make a backup of all company data. If you have a current backup, you can restore information, if necessary.
To close a calendar year
Open the Receivables Year-End Closing window. (Sales >> Routines >> Year-End Close)
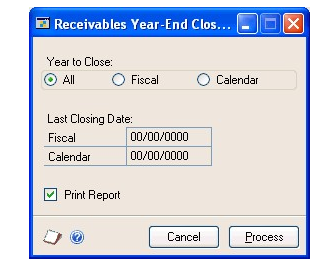
Mark Calendar or, if the calendar year coincides with your fiscal year, mark All. If they don't coincide, close the fiscal year separately. See Closing a fiscal year for more information about closing a fiscal year.
Mark Print Report to print the Year-End Closing Report when the closing process is complete. This report lists the records that have been closed. The Year-End Closing Report is part of the audit trail and should be saved with your company's permanent records.
Choose Process to begin the closing process.
Closing a fiscal year
Use the Receivables Year-End Closing window to close the fiscal year to update information that is displayed in the Customer Summary window when you select Amounts Since Last Close in the Summary View list. Closing the fiscal year also will update information that is displayed in the Customer Finance Charge Summary window.
The information that is displayed in the Customer Summary window when you select Amounts Since Last Close in the Summary View list might not represent actual fiscal year totals if you close the fiscal year before or after the last day of the fiscal year. For example, the amounts in the Year to Date column might continue to increase as transactions are posted after the last day of the fiscal year; then when you close the fiscal year, the amounts in the Last Year column will include those transactions posted after the last day of the fiscal year that you closed.
Closing the fiscal year will not affect the information that is displayed in the
Customer Summary window when you select Fiscal Year or Calendar Year in the Summary View list. The amounts displayed for those selections are dependent on the year and periods you enter to display.
Before you close the year, make a backup of all company data. If you have a current backup, you can restore information, if necessary.
To close a fiscal year
Open the Receivables Year-End Closing window. (Sales >> Routines >> Year-End Close)
Mark Fiscal to close the fiscal year. If your calendar and fiscal years coincide, you can close them at the same time by marking All.
Mark Print Report to print the Year-End Closing Report when the closing process is complete. This report lists the records that have been closed. The Year-End Closing Report is part of the audit trail and should be saved with your company's permanent records.
Choose Process to begin the closing process.
You can close the fiscal periods for the Sales series using the Fiscal Periods Setup window. This prevents transactions from being posted to the periods you have closed. See the System Setup documentation (Help >> Printable Manuals) for more information.
Closing a tax year
Use the Tax Year-End Closing window to prepare your tax records for a new year.
When you close the tax year, the accumulated year-to-date tax totals in the Tax Detail Maintenance window are cleared and transferred to last year's tax totals. Separate year-to-date tax totals can then be recorded for the new year. Any tax amounts you enter after closing the tax year are added to the new year-to-date total.
If you're keeping historical data, you can view tax totals for historical years using the Tax Detail History window.
Closing a tax year affects all the tax details you entered. To help ensure the consistency and integrity of your records, we recommend that you complete this procedure only once every year, after you close any sales and purchasing series years, and before posting any documents to the next year.
To close a tax year
Open the Tax Year-End Closing window. (Administration >> Routines >> Company >> Tax Year-End Close)
Mark Close Year. You can't close the tax year unless you mark this option.
Mark Print Report to print the Tax Year-End Closing Report when the closing process is complete. This report shows year-to-date and last year's tax amounts as they appeared in the Tax Detail Maintenance window before the tax year was closed. The report is part of the audit trail and should be saved with your company's permanent records.
Choose Process to begin the closing process.
Additional Feature Functionality added to Receivables Management
For some time, we have heard from you in regards to the limitations with payment term offerings. For example, if the payment term is a discount date term, in previous versions, it would go to the next month and then the due date goes to the following month. This is another feature that you asked for and we hope you like the new capabilities.
With Microsoft Dynamics GP 2015, you will have the ability to set the Due Date based on Months, Month/Day or Annual. With this increased functionality, you will now have 8 different options for calculating the due date. That is pretty awesome! We have also added a new feature to help assist you in setting this option called the Calculate Action. This new action will allow you to set up a Payment Term, then calculate to see the potential Due Date and Discount Date based on your setup of the Payment Terms.
Wouldn't it be great if when a Customer calls in you have an easy way to know if they are over their credit limit? With GP 2015 R2, now there is!
Introducing the Visual Customer Over Credit Limit!!
Receivables - Automatically post Cash Deposits
You'll be overjoyed to know that new functionality you've been asking for to automatically deposit cash receipts to a lump sum deposit in Bank Reconciliation is finally here!! There were options in previous versions to have cash receipts automatically deposit to Bank Reconciliation, but they only deposited the cash receipts to individual deposits in Bank Rec. With this new functionality, you can have all the cash receipts in the same batch automatically deposit as a lump-sum or single deposit in to Bank Rec. How cool is that?
To use this new functionality in Microsoft Dynamics GP 2016, simply go to the Company Setup options and mark the option to 'Automatically post cash receipt deposits' and the system will take it from there. Now all cash receipts in the same batch will post to Bank Rec as a single deposit.
Sales - All-In-One Document View
In Microsoft Dynamics GP 2016, it is now possible to view related sales documents in one easy to view window. For example, a customer calls asking about a specific invoice. Users will be able to select the customer and then view all documents related to the invoice, such as the quote, order, payment etc.
Receivables Management Credit Limit warning fails and may not work all the time
Microsoft Dynamics GP2016 R2 brings several great new features as well as several product enhancements, such as this update to the Credit Limit Warning.
Dynamics GP is designed to use the following calculation to determine whether the credit limit warning fires.
('Customer Balance' + CurrentInvoiceDollarAmount {this is for your current document}
+ 'Unposted Sales Amount' + 'Unposted Other Sales Amount' + 'On Order Amount'
- 'Unposted Cash Amount' - 'Unposted Other Cash Amount' - 'Deposits Received' ) >
'Credit Limit Amount' of file RM_Customer_MSTR
Ability to Print and Email a single statement from the customer card.
In Microsoft Dynamics GP 2018, we now have the option for Statement when clicking the Print Icon in the Customer Card Window. You can see this by clicking Cards, Sales and then Customer.
Display hold Status on the Sales Transaction
Entry.
I am excited to tell you about another great new feature we have in GP 2018! You
will now see the Hold Status icon when pulling up a customer in Sales
Transaction Entry window. For any customer that has a Hold in place, you will
now see the Stop Sign icon in the Sales Transaction Entry window after entering
the customer ID.
Sales Workflow including credit limit
In Microsoft Dynamics GP 2018 R2, we have added a new Sales Transaction Approval workflow where you can create approvals based on several conditions such as whether or not a Customer Credit Limit is exceeded on the transaction.
New SmartList for Deposits on Unposted Sales Transactions
With the release of Microsoft Dynamics GP 2018 R2, users can easily view deposit amounts associated with unposted Sales Order Invoices and Orders via the new 'Deposits on Unposted Sales Transactions' smart list.
The 'Deposits on Unposted Sales Transactions' default smart list has been added under the 'Sales Transactions' list in the SmartList window.
Email Customer Statements from Customer Maintenance
In the Customer Maintenance Window, you can now E-mail Statements with the click of a button. A new E-mail button can be found on the Menu bar of the Customer Maintenance Window. This is a great way to quickly email out a statement to a customer if they would request it outside of your normal statement cycle.
Customer / Combiner retain ship to address
With the release of Microsoft Dynamics GP 2018 R2, the 'Ship-To-Address Name' is retained when a customer is modified with the Customer Combiner and Modifier Utility. To open the Customer Combiner and Modifier Utility: On the Microsoft Dynamics GP menu, highlight Tools, point to Utilities, select Sales, and click on Customer Combiner and Modifier.
See Also
Part 1: Setup and cards
Part 2: Transaction entry
Part 3: Transaction activity
Part 4: Inquiries and reports
Part 5: Utilities and routines
Feedback
Coming soon: Throughout 2024 we will be phasing out GitHub Issues as the feedback mechanism for content and replacing it with a new feedback system. For more information see: https://aka.ms/ContentUserFeedback.
Submit and view feedback for