Microsoft Dynamics GP System Setup Guide
Microsoft Dynamics GP can provide important information about the money flowing through your business—where it came from, where it is, and where it's going.
Microsoft Dynamics GP is a comprehensive accounting and business management system composed of modules that focus on meeting specific business needs. These modules integrate with System Manager to meet your accounting and business management goals, and are organized into solution series, which group modules that have similar purposes.
Though sold separately, Microsoft Dynamics GP modules integrate with one another automatically when they're installed. In an integrated system, the boundaries between modules are erased—information entered in one module is shared with all the other modules. Perhaps the most important benefit of integration is that transactions can be posted from one module to another, automatically updating records throughout Microsoft Dynamics GP.
This manual is designed to help you set up systemwide information for each company.
Some features described in the documentation are optional and can be purchased through your Microsoft Dynamics GP partner.
To view information about the release of Microsoft Dynamics GP that you're using and which modules or features you are registered to use, choose Help >> About Microsoft Dynamics GP.
The manual is divided into the following parts:
Part 1, Setup overview, contains information to help you start setting up Microsoft Dynamics GP.
Part 2, User setup, describes how to define and categorize who can use Microsoft Dynamics GP. You also can determine the level of access each of your users has to the company information you set up.
Part 3, Company setup, explains how to customize information for each of your companies, including company addresses, the payment terms your business uses, the way posting reports are printed, and the format of your accounts.
Part 4, Tax setup, contains information about tracking taxes on sales and purchases in Microsoft Dynamics GP.
Part 5, Workflow setup, explains how to set up the Workflow system and create individual workflows.
Part 6, Organizational structure, provides information to define as many as four layers of structure within your business, and then to set up specific divisions, departments or other organizational groups. You can create relationships among different groups. You can assign accounts, users and user classes to different parts of the organizational structure.
Part 7, Business Alerts, explains how to set up alerts that notify you when your data matches conditions you specify.
Part 8, Customizing Microsoft Dynamics GP, provides an overview of module-specific setup tasks to complete when you've finished setting up your system and suggests additional tools you can use to further tailor Microsoft Dynamics GP to the way your organization works.
Part 1: Setup overview
This part of the documentation contains information regarding the implementation of Microsoft Dynamics GP. Use this information to help plan the implementation process or to start setting up Microsoft Dynamics GP.
The following information is discussed:
Chapter 1, "Introduction to Microsoft Dynamics GP setup," provides an overview of the setup process for Microsoft Dynamics GP.
Chapter 2, "Setting up Microsoft Dynamics GP," provides instructions for using the Setup Checklist window to set up Microsoft Dynamics GP.
Chapter 3, "Managing workflow," provides an overview of the workflow feature and provides instructions for setting up workflow for your Microsoft Dynamics GP companies.
Chapter 4, "Security considerations," provides security information and practices that will help you to maintain a secure Microsoft Dynamics GP environment.
Chapter 1: Introduction to Microsoft Dynamics GP setup
This information will help you understand the scope of setup tasks and how those tasks fit into deploying and using Microsoft Dynamics GP. The steps and overviews in this documentation are intended for system administrators, information technology (IT) professionals, and managers that will be completing one or more setup tasks, as well as Microsoft partners.
This information is divided into the following sections:
Evaluate
Plan
Build
Operate
Maintain
Evaluate
Implementing business management software is a critical task for any business. Typically, organizations follow a series of steps that include evaluating options, planning for the deployment of the software they select, deploying the software – which includes installing it, entering starting data, and even redesigning part numbers or the chart of accounts, using the software in day-to-day operations, and installing service packs, updates, and upgrades over time.
Although you've finished the formal evaluation process if you're planning to install and set up Microsoft Dynamics GP, proper planning can help you complete this process as quickly and efficiently as possible.
Plan
Some materials have been provided to help you plan for implementing Microsoft Dynamics GP. Check the navigation panel to the left to get an overview of available material. In addition to defining a schedule for setting up and using the software, many businesses make detailed assignments for specific tasks, such as defining customer and vendor numbers, creating vendor, item and customer records, entering and posting beginning balances.
The procedures in Chapter 2, "Setting up Microsoft Dynamics GP," can help you assign specific setup tasks to users from within Microsoft Dynamics GP after the initial installation on the server. If you haven't set up business management software before, your authorized Microsoft partner can help you develop a plan for your business.
The following list is an example of actions that are completed in this stage.
Defining the business implications of implementing Microsoft Dynamics GP.
Learning the technical implications of implementing Microsoft Dynamics GP.
Completing prerequisite tasks within your current system so that you can verify your data after it has been migrated to Microsoft Dynamics GP.
Starting mapping your existing data to Microsoft Dynamics GP.
Build
We refer to the process of installing and setting up Microsoft Dynamics GP as the "build" process. In addition to installing Microsoft Dynamics GP or Microsoft SQL Server on one or more servers, it includes setting up process servers and workstations. This process includes the following tasks:
Installing Microsoft Dynamics GP
Entering a chart of accounts
Importing existing data
Entering additional customer, vendor, employee, and item records
Entering sales tax details and schedules
Entering beginning balances
Printing reports of beginning balances and master records
Backing up your beginning data
The Setup Checklist window lists tasks in the order in which they should be completed. Additional documentation for each task is available in the Setup Guide that is displayed next to the Setup Checklist window. Depending on the size of your organization, a number of people might be involved in completing these tasks.
Operate
The operate phase involves entering and posting transactions, maintaining master records, such as customer records or item records, printing reports, issuing checks, applying payments to invoices, and recognizing revenue. Making regular backups and updating virus protection should be one of the routines you follow in this phase.
Maintain
Using software effectively involves installing service packs, and upgrades. In addition, there are certain tasks that should be completed at the end of accounting periods and fiscal and calendar years. Managers, network administrators and IT professionals will be more involved in completing tasks in this phase than in the operate phase.
Chapter 2: Setting up Microsoft Dynamics GP
The following information explains how you can use the Setup Checklist window to set up Microsoft Dynamics GP. The Setup Checklist window is designed to help make the setup process easier. You can use it to assign setup tasks to other Microsoft Dynamics GP users and open setup windows.
This information is divided into the following sections:
Setup Checklist
Setup checklist views
Setup Guide
Assigning a setup task or category to a user
Completing a setup task
Setting system preferences
Setup Checklist
Use the Setup Checklist window (Administration >> Setup >> Setup Checklist) to set up Microsoft Dynamics GP. The window contains a tree view that organizes setup tasks into System, Company, Field Service, Financial, Posting, Purchasing, Inventory, Human Resources, Payroll, and Sales categories. It also can provide tasks for additional components. You can open the Setup Checklist window
Each category in the tree view contains setup tasks that are displayed when you expand the category. A setup task is an object in the tree view that is associated with a setup window. You can select a setup task and choose Open to display the setup window for that setup task. For example, if you select Account Format and then choose Open, the Account Format Setup window will open, where you can set up an account format for your chart of accounts.
If a setup task is assigned to one or more users, you can expand that task to view who it is assigned to. The setup tasks are listed in a recommended order for setting up Microsoft Dynamics GP.
You can use the Expand All and Collapse All buttons at the top of the Setup Checklist window to expand or collapse all of the objects in the window tree view.
An icon indicates the status of each category, setup task, or task assignment. A setup task that has been assigned to one or more users is complete after each of those users has selected the Complete option in the Assignment window.
You only can modify the status of a setup task if it has not been assigned to a user. However, if you are a system administrator and the setup task is assigned to you, or you assigned the setup task to another user, you can modify the status of the task assignment.
To modify the status of a setup task or task assignment, you can select it and then select a status in the Status field in the Setup Checklist window.
Setup checklist views
You can mark an option in the Setup Checklist window to specify which setup tasks to display in the window tree view. Refer to the following table for a description of the options that are available.
| Option | Description |
|---|---|
| My tasks | Select this option to display only the setup tasks that are assigned to you or were assigned by you. |
| My incomplete tasks | Select this option to display only the setup tasks that are assigned to you or were assigned to you, but are incomplete. |
| All tasks | Select this option to display all of the setup tasks in the Setup Checklist window. |
| All incomplete tasks | Select this option to display all of the setup tasks that are incomplete. |
| All complete tasks | Select this option to display all of the setup tasks that are complete. |
| Optional setup tasks | Select this option to include optional setup tasks in the Setup Checklist tree view. Optional setup tasks are those that aren't required for the system to be set up. |
| Unregistered modules | Select this option to include setup tasks for unregistered modules in the Setup Checklist tree view. |
Setup Guide
The Setup Guide is displayed next to the Setup Checklist window to assist you in setting up Microsoft Dynamics GP. When you select a setup task in the Setup Checklist window tree view, information for that task will be displayed in the Setup Guide. For example, if you select User Preferences in the window tree view, information about using the User Preferences window will be displayed in the Setup Guide.
Assigning a setup task or category to a user
You can assign a setup task or category to another user. When you assign a category to a user, an assignment will be created for each setup task in that category for the user that you assigned the category to. After the start date for the task, a reminder will be created for users who have incomplete setup tasks assigned to them. Reminders are displayed in the Reminders window. See the System User's Guide (Help >> Contents >> select Using the System) for more information about reminders.
Use the Setup Checklist window to assign a setup task or a category to a user.
To assign a setup task or category to a user:
Open the Setup Checklist window. (Administration >> Setup >> Setup Checklist)
Select the setup task or category to assign.
You cannot reassign an existing task assignment. To assign a setup task to multiple users, you must create a task assignment for each user.
Choose Assign to open the Assignment window.
Select the user to assign the task to.
Enter or select a due date and a start date for this task.
If you have already completed part of the setup task, select In Progress in the Status field list and choose OK. If this is a new assignment, choose OK to save your changes and close the Assignment window.
Completing a setup task
Each setup task is associated with a window that you must use to set up Microsoft Dynamics GP. Use the Setup Checklist window to complete a setup task.
To complete a setup task:
Open the Setup Checklist window.
(Administration >> Setup >> Setup Checklist)
Choose Open. The User Preferences window will be displayed.
Modify your user preferences.
Choose OK to save your changes and close the window. The Setup Checklist Status window will be displayed.
Select a status for the User Preferences window, then choose OK to return to the Setup Checklist window.
Setting system preferences
In the System Preferences window, you can set home page defaults, enable the option for users to automatically log in to Microsoft Dynamics GP, and specify the location of your Microsoft SharePoint.
To set system preferences:
Open the System Preferences window. (Administration >> Setup >> System >> System Preferences)
Enter the URL for your SharePoint server so that you can use the search box n Microsoft Dynamics GP.
Select MAPI or Exchange as your email server type.
If you select Exchange, you must be using Exchange 2007 Service Pack 1 or greater with Exchange Web Services. The Autodiscover service must be enabled to connect to the Exchange server.
Note
You can use MAPI or Exchange as the server type for email in the Microsoft Dynamics GP desktop client. You can only use Exchange as the server type for email in the Microsoft Dynamics GP Web Client.
Mark the Protect.docx attachments with a password option to send Word documents in email with password protection. With this option marked, a password must be entered before the recipient of the document can edit the document.
You can select to automatically generate the password for the documents or assign a password yourself. You are not given the password when you automatically generate the password.
Mark the To Do: Reminders if you want to load the home page content area by default for new users.
Mark Enable Remember User to have the Remember user and password option available in the Welcome to Microsoft Dynamics GP window for each user. If the user marks the Remember user and password option in the Welcome to Microsoft Dynamics GP window, the user is automatically logged in to Microsoft Dynamics GP the next time he or she starts Microsoft Dynamics GP.
Tip
You can use the Enable Remember User feature in the Microsoft Dynamics GP desktop client. This feature is not available for the Microsoft Dynamics GP Web Client.
Choose OK.
Chapter 3: Managing workflow
This information introduces features used to manage the progression of tasks that are completed in the course of doing business. You can use workflow features to help automate business processes, such as moving a sales quote to an order to a fulfilled invoice. You also can impose restrictions that force one or more people to approve actions. For example, you might want to have multiple levels of approval for purchases beyond a certain amount.
This information is divided into the following sections.
Workflow overview
Workflow options in Microsoft Dynamics GP
Choosing the right workflow management option for your business
Microsoft Dynamics GP workflow terms
Workflow for SharePoint activation and basic setup
Workflow overview
Workflow refers to the series of ordered tasks that make up a more complex business process. For example, purchasing an item for your business can be a process that involves some or all of the following steps.
Creating a requisition
Approving the requisition
Converting the requisition to a purchase order
Approving the purchase order
Placing the order with a vendor
Receiving items against the purchase order when the order is fulfilled
Of course, the purchase will eventually have to be paid for, but selecting the specific transactions or vendors to pay, deciding when to pay them, and approving cash disbursements can involve one or more separate processes that are completed by other employees. As organizations become larger, the volume of transactions increases, and managing them becomes more complex. The term "workflow" can therefore refer to multiple, related things.
Workflow is the sequence of actions that leads to the completion of a business task. The sequence is carried out according to a set of rules or policies.
Workflow is the automation of a process that requires a number of discrete tasks to be completed.
Workflow is the process of approving one or more individual steps that make up a more complex task.
Microsoft Dynamics GP includes a number of features that can help automate the completion of complex business tasks to help you manage large transaction volumes. However, you also can build checks or restrictions in business processes to help ensure consistency and compliance with company policies and legal requirements.
Choosing the right workflow management option for your business
When choosing a workflow method for your business, here are some items to consider.
Are you more concerned with streamlining the fulfillment of orders, or with implementing a formal approval process for vendor records, employee records, purchases, quotes, credit overrides, and batches?
Does your business require comprehensive, consistent control over the purchasing process, or does it require more flexible checks and restrictions throughout many of your processes? Or do you need both? The Workflow feature provides comprehensive, consistent control over the purchasing and batch posting processes. Field level security and electronic signatures are very flexible throughout Microsoft Dynamics GP, and can be used while you're also using Workflow.
If your organization requires an approval process for purchases, but you also want to minimize the administration and infrastructure investment, the approvals feature in Purchase Order Enhancements can provide an approval process that integrates with the encumbrances feature of Not for Profit Accounting. Purchase Order Enhancements and Workflow must be used separately.
Microsoft Dynamics GP workflow terms
The following terms are used in the content that describes how to set up and use Workflow.
Dynamics Security Service A service used for managing user records and access privileges to multiple Microsoft Dynamics GP features and other integrating products. This term applies to Workflow for SharePoint.
Workflow (feature) The name used for the functionality that manages the procession of documents from one task to another, and specifies approvers who can monitor tasks and allow documents to move to the next task in the process.
Workflow (approval process) A formal approval process set up using the Workflow feature. For example, you can create a purchase order approval workflow to manage the process of approving purchase orders of various quantities and currency amounts.
Workflow alert A message displayed when a task defined in a workflow requires action from someone designated as an approver. This term applies to Workflow for SharePoint.
Workflow status A label assigned to documents at various points in the approval process. Document statuses include not submitted, pending user action, and completed. Refer to the System User's Guide for information about specific workflow statuses.
If you are using Workflow for SharePoint, a Workflow status is a label assigned to documents or batches at various points in the approval process. Document statuses include submitted, pending, and approved. Refer to the Workflow Administrator's Guide for information about specific workflow statuses.
Workflow task A task that requires action from an approver, based on rules defined in a workflow process.
Chapter 4: Security considerations
Use this information to help maintain the security of your Microsoft Dynamics GP data. Security considerations can include the following areas:
Restricting physical access to the computers used to run Microsoft Dynamics GP and store business data.
Installing and maintaining software that detects and removes viruses, or that prevents unauthorized access to servers, workstations, and databases.
Setting user access to Microsoft Dynamics GP windows and fields using field level security and the Microsoft Dynamics GP User Security Setup window.
Backing up and restoring data on a recurring schedule.
Additional security considerations apply to business practices, such as your company's policies for accepting personal checks, extending credit, or approving purchases, and for maintaining the privacy of data from customers, vendors and employees. These policy considerations are not addressed in this documentation.
Security information is divided into the following sections:
Physical security
Network security
Client security
Microsoft Dynamics GP security
Virus protection
Physical security
Physically securing computers is an effective way of preventing unauthorized access to applications and data. For example, if a hard disk drive is stolen, eventually the data on that drive will be stolen, also. The following practices can help maintain the physical security of your data.
For larger businesses with dedicated IT departments, ensure that server rooms and places where software and backups are stored are locked.
Keep unauthorized users away from the power and reset switches on the server.
Consider removing any removable storage devices, including CD burners, from client workstations.
Ensure that security alarms are installed, regardless of how sensitive the data is.
Ensure that backups of critical data are stored off-site and that software is stored in fireproof and waterproof containers when not in use.
Network security
Servers are protected with their own operating system gatekeepers, but it is important that the network also is secure from attacks. The following information will help you to determine the type of security that you should have for your network.
Firewalls
Because the design and deployment of an IP inter–networking environment requires balancing private and public network concerns, the firewall is extremely important to safeguard network integrity. The following list of firewalls will help you to choose the firewall that is right for your network.
| Firewall type | Description |
|---|---|
| IP Packet Filtering | It offers weak security, is cumbersome to manage, and is easily compromised. |
| Application Gateways | These are used when the actual content of an application is of greatest concern. They are more secure than IP packet filtering, but are application–specific and, therefore, don't adapt easily to changes in technology. |
| Circuit Gateways | These are tunnels built through a firewall connecting specific processes or systems on one side with specific processes or systems on the other. Circuit gateways are best used in situations where the person using an application is potentially a greater risk than the information carried by the application. The circuit gateway differs from IP packet filtering in its ability to connect to an out-of-band application scheme that can add additional information. |
| Proxy Servers | These are security tools, which include firewall and application gateway functionality, that manage Internet traffic to and from a Local Area Network (LAN). A proxy server can improve performance by caching and directly supplying frequently requested data, such as a popular Web page. It can also filter and discard requests that the owner does not consider appropriate, such as requests for unauthorized access to proprietary files. |
Wireless networks
By default, wireless networks are typically configured to allow eavesdropping on the wireless signals. They can be vulnerable to a malicious outsider gaining access because of the default settings on some wireless hardware, the accessibility of wireless networks, and present encryption methods. There are configuration options and tools that can protect against eavesdropping, but they do nothing to protect the computers from hackers and viruses that enter through an Internet connection. Therefore, it is extremely important to include a firewall to protect the computers from unwanted intruders on the Internet.
Client security
The following security best practices can help increase the security of the computing environment.
Use the latest operating systems with the most up-to-date security features. Also, operating system editions that are for business purposes typically have more security features.
Use the Windows Update site to get the latest updates available for your computer's operating system, software and hardware.
Use the Microsoft Office Update site to help keep your Office products up-todate. Office product updates are created by Microsoft to bring you the highest levels of security, stability, and critical functionality available.
Microsoft Dynamics GP security
The following security best practices can help increase the security of your Microsoft Dynamics GP environment.
Security settings will not be enforced unless the Security option in the Company Setup window (Administration >> Setup >> Company >> Company) is marked.
The default security settings in Microsoft Dynamics GP allow all users access to only the windows and forms in Microsoft Dynamics GP that are needed to log in to the application. After setting up new user records, you should set access to companies and set up security for new users.
Each time you install a new component in Microsoft Dynamics GP, such as Human Resources, you must set up security for that component. For example, if you have been using Microsoft Dynamics GP for a year and you just installed Human Resources, you will need to set up access to Human Resources before anyone can use it.
Encourage users to use strong passwords for their Microsoft Dynamics GP user account. The easiest way to create a strong password that you will not have to write down is to come up with a passphrase, that is, a sentence that you can remember. Passwords also are considered strong if they have a combination of upper and lower case letters, numbers, and special characters. For example, M$8ni3y0tmd@ is a strong password.
We recommend that you do not leave the system password blank. For more information, refer to Setting system security on page 34.
Virus protection
These are the four main types of viruses that infect computer systems.
Boot-Sector viruses These viruses scan the boot sector of the hard disk before loading the operating system or any other start–up files when a computer is started. A boot-sector virus is designed to replace the information in the boot sectors of the hard disk with its own code.
File-Infecting viruses The most common type of virus, a file-infecting virus, attaches itself to an executable program file by adding its own code to the executable file. Files infected by this type of virus usually have a .com, .exe, or .sys file name extension.
Trojan horse programs This is not really a virus. The key distinction between a virus and a Trojan horse program is that a Trojan horse program does not replicate itself; it only destroys information on the hard disk. A Trojan horse program disguises itself as a legitimate program, such as a game or utility. When it's run, though, it can destroy or scramble data.
Macro viruses This type of computer virus is stored in a macro within a file, template, or add-in. The spread of a macro virus can be prevented. Here are some tips to avoid infection.
Install a virus protection solution that scans incoming messages from the Internet for viruses before the messages pass the router to ensure that messages are scanned for known viruses.
Verify accuracy of documents. Documents should not be opened unless they are from someone that you know is trustworthy.
Talk to the person who created the document. If the you are not sure whether the document is safe, you should contact the person who created the document.
Use the Microsoft Office macro virus protection. In Office, the applications alert the user if a document contains macros. This gives the user the option to run the macros when the document is opened.
Use virus-scanning software to detect and remove macro viruses from documents. We recommend the use of antivirus software that is certified by the International Computer Security Association (ICSA).
Set the macro security level of Microsoft Office files to High or Medium and use a digital signature, which is an electronic, encryption-based, secure stamp of authentication on a macro or document. This signature confirms that the macro or document originated from the signer and has not been altered. For more information about Microsoft Office security features, visit the Microsoft Office Online Web site (https://office.microsoft.com).
Part 2: User setup
If you're using Microsoft Dynamics GP in a multi-user environment, you need to define who can use Microsoft Dynamics GP. You also can determine the level of access each of your users have to the company information you set up.
If you're using Microsoft Dynamics GP in a single-user environment, you don't need to set up any additional users. You do need to set user access to each company that you create, however. See Chapter 5, "User records," for more information.
This part of the documentation includes:
Chapter 5, "User records," explains how to create and use user records in Microsoft Dynamics GP.
Chapter 6, "Security," describes the procedures necessary to set up system and individual security.
Chapter 7, "Field level security," describes how to provide additional security to programs, fields, forms, and windows in Microsoft Dynamics GP.
Chapter 8, "Shortcut administration," describes how to set up shortcuts in user class folders, in which shortcuts to specific tasks are organized for a class of users.
Chapter 9, "Activity tracking," explains how to keep track of the activity in your Microsoft Dynamics GP system. Activities you can track include attempts to log in and log out, access windows and tables, make changes to tables, print, complete processes such as routines and table maintenance, and posting.
Chapter 5: User records
This information explains how to create and use user records in Microsoft Dynamics GP. User records identify all the people who will be using Microsoft Dynamics GP.
This information is divided into the following sections:
Overview of user records
Creating a user record
Copying security access from an existing user
Overview of user records
The number of user records you can create depends on the user system selected for Microsoft Dynamics GP. If you have purchased Microsoft Dynamics GP, you are a perpetual customer. As a perpetual customer, you'll use the concurrent user system to create as many user records as you wish, regardless of the number of users you've registered for Microsoft Dynamics GP. However, the number of active users logged in to Microsoft Dynamics GP at any one time can't exceed the number of active users you've registered. For example, you may have registered the accounting system for 10 users so the maximum number of active users in Microsoft Dynamics GP can't exceed 10. You could create 30 user records—however, only 10 of these users could be in the system at the same time.
If you have purchased the right to use Microsoft Dynamics GP for a period time, you are a subscription customer. As a subscription customer, you'll use the named user system to create as many active user records as you've registered for Microsoft Dynamics GP. For example, you may have registered the accounting system for 10 users so the maximum number of active users in Microsoft Dynamics GP can't exceed 10.
You can group users in user classes and specify the parts of Microsoft Dynamics GP that users will have access to, depending on the types of tasks they typically complete. For more information about user classes and security, see Chapter 6, "Security."
Creating a user record
You'll use the User Setup window to create user records. The User ID identifies each user in the Microsoft Dynamics GP system. You can't change the user ID once the record has been saved. To change a user ID, delete the user record and reenter the user record with a different ID.
You might have some users that will only access the Microsoft Dynamics GP Web Client, and will never use the Microsoft Dynamics GP desktop client. You can set up these users in the User Setup window as web client only users.
A user record with the ID of "sa" (system administrator) that has access to the entire system is created by default. Some procedures within Microsoft Dynamics GP require having a user with this ID.
After you enter user records, see Setting company access to specify the companies each user should have access to.
You can choose the Summary button to open the User Summary window. This window displays user information such as the status and type of user records that are already created. You also can view the number of users who are currently logged in to Microsoft Dynamics GP and the number of users allowed to log in to Microsoft Dynamics GP by status and user type.
To create a user record with a SQL Server Login:
Open the User Setup window. (Administration >> Setup >> System >> User)

In the User ID field, enter a user ID, which will be used throughout Microsoft Dynamics GP to identify this person.
In the User Name field, enter the person's full name.
In the Password field, enter the password this user will use when starting the accounting system.
If you don't assign a password to the user at this time, the user will be required to enter a password before accessing Microsoft Dynamics GP.
In the Class ID field, assign the user to a class, if you wish.
See Creating a user class for more information.
In the Status field, select a status. The user type and status determine the user's access in Microsoft Dynamics GP.
In the User Type field, select a user type. The user type and status determine the user's access in Microsoft Dynamics GP.
In the Home Page Role field, assign the user to a user role. The user role determines the content that is displayed on a user's home page by default.
For more information on home pages, refer to your System User's Guide (Help>> Contents >> select Using the System.)
Mark the Payroll View for Human Resources option if you want a user's changes to Human Resources benefit and deduction codes to update corresponding U.S. Payroll information. You should mark this option for every user who will enter or update benefit information in Human Resources.
You can enforce password policies for SQL Server and Windows Server.
Enforce Password Policy Mark this option to force users to adhere to the same password policies that have been established on the Windows Server domain.
Change Password Next Login Mark this option to force users to change their passwords the next time they log in to Microsoft Dynamics GP. The Enforce Password Policy must be marked for this option to be available.
Enforce Password Expiration Mark this option to force users to change their passwords after the number of days that is defined by the Windows Server domain password policies. This option is available only if you have marked the Enforce Password Policy option. The Enforce Password Policy must be marked for this option to be available.
Choose Copy Access if there is an existing user that you want copy security settings such as roles, tasks, and company access to the user. See Copying security access from an existing user for more information.
Choose Save to save the user record.
To print a User Preferences List showing information for the currently displayed user, choose File >> Print. You can print a similar report for all users from the User Report Options window.
To create a user record with a Windows account:
Open the User Setup window. (Administration >> Setup >> System >> User)
In the User ID field, enter a user ID, whic will be used throughout Microsoft Dynamics GP to identify this person.
In the User Name field, enter the person's full name.
In the Password field, enter the password this user will use when starting the accounting system.
If you don't assign a password to the user at this time, the user will be required to enter a password before accessing Microsoft Dynamics GP.
- In the Class ID field, assign the user to a class, if you wish.
See Creating a user class for more information.
In the Status field, select a status. The user type and status determine the user's access in Microsoft Dynamics GP.
In the User Type field, select a user type. The user type and status determine the user's access in Microsoft Dynamics GP.
In the Home Page Role field, assign the user to a user role. The user role determines the content that is displayed on a user's home page by default.
For more information on home pages, refer to your System User's Guide (Help >> Contents >> select Using the System.)
Mark the Payroll View for Human Resources option if you want a user's changes to Human Resources benefit and deduction codes to update corresponding U.S. Payroll information. You should mark this option for every user who will enter or update benefit information in Human Resources.
Mark the Web Client user only (no SQL Server Account) option if the user will only access the Microsoft Dynamics GP web client, and will never use the Microsoft Dynamics GP desktop client.
Choose the Windows Account tab, enter the Windows login information for the user. The Window account cannot be assigned to more than one Microsoft Dynamics GP user.
Choose Copy Access if there is an existing user that you want copy security settings such as roles, tasks, and company access to the user. See Copying security access from an existing user for more information.
Choose Save to save the user record.
To print a User Preferences List showing information for the currently displayed user, choose File >> Print. You can print a similar report for all users from the User Report Options window.
Copying security access from an existing user
When you create a new user, you need to set up security tasks, security roles, and company access to the new user. To speed user set up, you can copy the user security from one user to another, including company access. For example, if you created a user ID for a new purchasing clerk, you can copy security access from the existing purchasing clerk. You also can copy security access when a current users switches positions in your company.
If you need to remove security access from a user, you remove access by copying access from a user who has no security roles, tasks, and company access.
To copy security access from an existing user:
Open the User Setup window. (Administration >> Setup >> System >> User)
Enter information for a new user or select an existing user.
Choose the Copy Security button.
In the Copy User Security window, select the user ID you want to copy security information from.
Choose OK.
To change company access, use the User Access Setup window.
To change the security roles for a user, use User Security Setup window.
Chapter 6: Security
In Microsoft Dynamics GP, you can specify security settings for your system, companies, individual users and specific tasks. This information explains the procedures you'll perform to secure Microsoft Dynamics GP for your organization.
This information is divided into the following sections:
Overview of Microsoft Dynamics GP security
Security Synchronization Utility
How passwords are used in Microsoft Dynamics GP
Items you can set security for
Setting system security
Setting company access
Creating security tasks
Creating security roles
Setting up individual user security
Activating user security
Verifying security settings with an integrating product
Setting access to alternate/modified forms and reports
Deleting security records
Setting up security for viewing data connections and Microsoft Excel reports
Setting up access to SQL Server Reporting Services reports
User security troubleshooting
Overview of Microsoft Dynamics GP security
Microsoft Dynamics GP provides several types of security:
System System security controls access to systemwide setup information, such as setting up new user records, assigning user security or printing reports that contain that information. System level security is controlled through the use of a password; only a few people should know the password. See Setting system security for more information.
Company Company security controls access to companies on a per-user basis. When you set up a new user record, that person doesn't have access to any companies. You'll need to grant access, using the User Access Setup window, before the user can log in to Microsoft Dynamics GP. See Setting company access for more information.
Security tasks Security tasks are assigned to roles and grant access to windows, reports, files, and other resources within Microsoft Dynamics GP that users need to access to complete a specific task. Some default security tasks have been created for you. For example, the DEFAULTUSER task allows users to access things that most users will need to access in Microsoft Dynamics GP.
Security roles Security roles contain the security tasks that a user needs to access to do their job. Some default security roles have been created for you. For example, the ACCOUNTING MANAGER* role contains security tasks that allow a user who is assigned to this role to view General Ledger account information, enter journal entries, enter bank transactions, and perform other tasks that an accounting manager might need to perform.
Individual users Individual security is role-based in Microsoft Dynamics GP. Each user must be assigned to a security role before they can access any forms, reports, or other data within Microsoft Dynamics GP. To begin assigning user security, identify the daily tasks that a user completes within Microsoft Dynamics GP. Then either select from the default security roles or create new security roles that only grant access to the tasks that the user needs.
For example, user ABC is an accounting manager for Fabrikam, Inc., and needs access to set up General Ledger, taxes, bank accounts, and credit cards as well as perform many other accounting tasks. Review the default security roles in Microsoft Dynamics GP to find one that grants access to the appropriate accounting functionality for user ABC. For our example, the ACCOUNTING MANAGER* security role is appropriate for user ABC. Use the User Security Setup Window to assign the ACCOUNTING MANAGER* security role to user ABC in the Fabrikam, Inc. company.
Module-specific tasks Most Microsoft Dynamics GP modules have specific tasks that can be set up to require a password; each task can have a different password. If a password is required, all users attempting to complete that task must enter the password. See the setup documentation for each accounting module for information about these passwords.
Account Account-level security enhances security and account views. Users can enter, edit, and view information from a reduced account set based on the access granted for accounts. For more information, see Chapter 35, "Account security."
Field level security Field level security restricts access to any field, window, or form in Microsoft Dynamics GP. It allows you to apply a password, or to make a window or form unavailable. It also allows you to hide, lock, or apply passwords to fields. See Chapter 7, "Field level security," for more information.
Security Synchronization Utility
The Security Synchronization Utility can be used to synchronize security for Microsoft Dynamics GP, Web Services, and Business Portal. The Security Synchronization Utility enables you to synchronize role membership between applications with different security infrastructures and different administration experiences. For example, you can synchronize a Business Portal role with a SharePoint group, or you can synchronize a Microsoft Dynamics GP role with a web services role.
The Security Synchronization Utility is a Microsoft Management Console snap-in that allows you to synchronize security permissions between applications. By default, the following applications can be synchronized:
Microsoft Dynamics GP
Web Services for Microsoft Dynamics GP
Business Portal
You can synchronize from any supported application to any other supported application. For example, you can synchronize members of a Business Portal role with members of a SharePoint group, or vice versa.
To use the utility with Microsoft Dynamics GP, the Microsoft Dynamics GP administrator must first map Windows user IDs to Microsoft Dynamics GP user IDs using the Microsoft Dynamics Security Console. Refer to the Microsoft Dynamics
GP Web Services Installation and Administration Guide for more information about the Dynamics Security Console.
How passwords are used in Microsoft Dynamics GP
Microsoft Dynamics GP uses passwords to control access to a company and selected parts of the accounting system. Passwords can contain uppercase and lowercase letters, numeric characters, spaces, and special characters.
There are three types of passwords:
User passwords User passwords control whether a particular user has access to Microsoft Dynamics GP. User passwords are initially set up in the User Setup window. Users can change their own passwords using the User Password Setup window.
System passwords The system password controls access to systemwide setup information, such as setting up new user records, assigning user security, or printing reports that contain that information. The system password is set up using the System Password Setup window. Only a few people should know the system password.
Task passwords Most Microsoft Dynamics GP modules have specific tasks that can be set up to require a password; each task can have a different password. If a password is required, all users attempting to complete that task must enter the password. See the setup documentation for each accounting module for information about these passwords.
Items you can set security for
You can set security for the following items in the Microsoft Dynamics GP product:
| Type | Description |
|---|---|
| Windows | Windows in the selected product. |
| Reports | Reports in the selected product. |
| Modified Windows | Windows customized using Modifier. |
| Modified Reports | Primary copies of reports created using Report Writer. Note: The Report Writer name of the report appears in this list. The Report Writer name is the one that appears in the title bar of the Screen Output window when you print a report. |
| Files | Tables in the selected product. |
| Alternate Microsoft Dynamics GP Reports* | Microsoft Dynamics GP reports that have been incorporated into integrating products you've installed. |
| Alternate Microsoft Dynamics GP Windows* | Microsoft Dynamics GP windows that have been incorporated into integrating products you've installed. |
| Modified Alternate Microsoft Dynamics GP Reports* | Alternate reports that have been modified using Report Writer. |
| *These items appear only if you're using an integrating product and have selected it in the Product list. **These types appear only if the corresponding item is installed and registered. | |
| Type | Description |
| Modified Alternate Microsoft Dynamics GP Windows* | Alternate windows that have been modified using Modifier. |
| Custom Reports | Secondary copies and new reports created in Report Writer. |
| Advanced Financial Reports | Modified advanced financial reports. |
| Series Posting Permissions | Specific posting tasks for each Microsoft Dynamics GP product you've purchased. |
| Customization Tools | Tools you use to customize the accounting system, such as Report Writer or the Modifier. |
| Microsoft Dynamics GP Import** | The Microsoft Dynamics GP Integration Manager. |
| Document Access | Quotes, orders, invoices, returns, and back orders for Sales Order Processing. Standard, blanket, drop-ship, and blanket drop-ship purchase orders for Purchase Order Processing. |
| Letters | Letters to customers, employees, and vendors that are available using the Letter Writing Assistant. |
| Navigation Lists | Default primary lists. Note: If you restrict access to a primary list, access to any list view that is based on that primary list is also restricted. |
| *These items appear only if you're using an integrating product and have selected it in the Product list. **These types appear only if the corresponding item is installed and registered. |
Only main windows are listed if you select Windows. A main window is one you can open from a menu; it's also referred to as a parent window or a primary window. Many windows that you open by clicking a button in a parent window are child windows. To deny access to a child window, deny access to the corresponding parent window.
Setting system security
When you installed Microsoft Dynamics GP, you were asked to enter a system password. You can change the system password using the System Password Setup window.
To set system security:
Open the System Password Setup window. (Administration >> Setup >> System >> System Password >> Enter the current system password)
In the Old Password field, enter the current password.
In the New Password and Reenter New Password fields, enter the new password.
Choose OK to save your changes and close the window.
Setting company access
Granting company rights to individual users allows you to control which users have access to the companies you've created.
Be sure to set company access using the steps in this procedure each time you do either of the following things:
Create a new user record If you don't set access, the user won't be able to access any companies in Microsoft Dynamics GP.
Create a new company If you don't set access, no users will be able to access the company.
If you marked the Copy Access from Company option in Microsoft Dynamics GP Utilities when you created a new company, you've already specified the users who will have access to this company. Complete this procedure within the User Access Setup window only to modify the settings you copied.
After you've set access, each company that a user has access to will appear in the Company Login window for that user.
LESSONUSER1, LESSONUSER2, and users with a status of Lesson User can only have access to the lesson company.
To set company access:
Open the User Access Setup window. (Administration >> Setup >> System >> User Access)
From the Users list, select a user ID.
All the companies you've set up are shown in the Company Name list. If the user has a status of Lesson User, only the lesson company will appear in the list.
- In the Access column, mark the company or companies the user will access.
If you do not have the necessary privileges, you cannot grant or remove access from a user that has a SQL Server login
When you've marked all the companies this user will access, repeat steps 2 and 3 to set access for other users, if necessary.
To print the Company Access Report, showing company access information entered in this window, choose File >> Print. You also can print this report using the User Report Options window.
Choose OK to close the window.
Creating security tasks
Security tasks contain the windows, reports, and other resources that users need to access to complete tasks in Microsoft Dynamics GP. Refer to Items you can set security for 33 for a list of the types of objects that can make up a task.
To create a security task:
Open the Security Task Setup window (Administration >> Setup >> System >> Security Tasks)
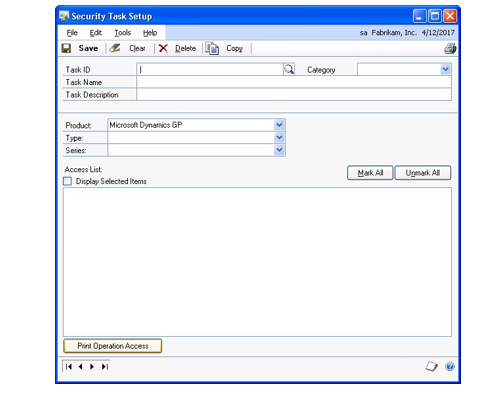
Enter a task ID.
To save time, you can copy all security settings from an existing task into the task that you are about to create. Choose Copy to do this, otherwise, skip to step 6.
The Copy Security Task window is displayed. Enter an existing security task ID to copy settings from.
Choose OK. The Copy Security Task window closes and the Security Task Setup window now contains the security settings of the task that you copied.
Enter a name and description for the task.
Select a category for the task.
Select a product from the Product list. If you're using integrating products with Microsoft Dynamics GP, they are displayed in the list in addition to Microsoft Dynamics GP.
In the Type list, select the type of item you want to limit access to. See Items you can set security for on page 33 for information about the types shown in the list.
Using the Series list, specify the series you want to set access to. For example, to grant access to a window, report or other resource in General Ledger, select Financial from the Series drop-down list.
Using the Access list, mark an item to grant access to it and unmark an item to remove access.
You can choose the Unmark All button to unmark all items that appear in the list, or Mark All to mark all items in the list. You can mark the Display Selected Items option if you want the list to show only the items that you have granted access to.
Tip
Double-click a window or report in the Access List to view it.
Repeat steps 9 through 11 to set security for all series.
Choose Save to save your changes.
Creating security roles
Use the Security Role Setup window to create new security roles. Security roles can contain multiple security tasks and can be assigned to users to provide them with security access to groups of tasks in Microsoft Dynamics GP.
To create security roles:
Open the Security Role Setup window. (Administration >> Setup >> System>> Security Roles)
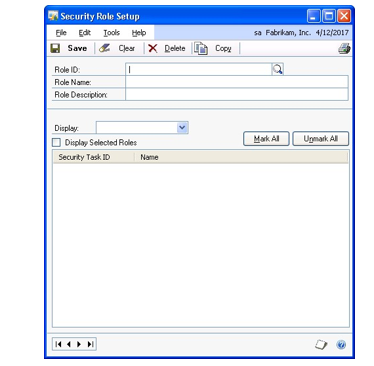
Enter a role ID.
To save time, you can copy all security tasks from an existing role into the role that you are about to create. Choose Copy to do this, otherwise, skip to step 6.
The Copy Security Role window is displayed. Enter an existing security role ID to copy security tasks from.
Choose OK. The Copy Security Role window closes and the Security Role Setup window now contains the security tasks of the role that you copied.
Enter a name for the role.
Enter a description for the role.
Select a category from the drop-down list to display the tasks for that category.
Mark the security tasks that users who are assigned to this role should have access to.
You can choose the Unmark All button to unmark all tasks that appear in the list, or Mark All to mark all tasks in the list. You can mark the Display Selected Roles option if you want the list to show only the items that you have granted access to.
Tip
Double-click a task to view information about that task.
Repeat steps 8 and 9 to set security for all categories for this security role.
Choose Save to save your changes.
Setting up individual user security
Use this procedure to set up individual security settings for each user, in each company. Complete this procedure each time you create a new company or a new user record.
If you marked the Copy Access from Company option in Microsoft Dynamics GP Utilities when you created a new company, you've already set up user security for this company. Complete this procedure using the User Security Setup window only to modify the settings you copied.
Security is defined for each user on a company-by-company basis; be sure to set security for each company accessed by the user.
Security tasks and security roles already must be set up before you can set up individual user security. Refer to Creating security tasks 6 and Creating security roles for more information.
To set up individual user security:
Open the User Security Setup window. (Administration >> Setup >> System >> User Security)
In the User field, select the user ID of the person for whom you're setting security. Once you've selected a user ID, all the companies the user has access to are shown in the Company list.
In the Company list, select a company. The security you set for a company will apply to the user only when he or she accesses that company. Once you've selected a Company, all the security roles are listed.
Mark all the roles that the user should be assigned to.
You can mark the Display Selected Roles option to list only the roles for which access has been granted.
- To specify which alternate or modified forms and reports that the user should have access to, select an Alternate/Modified Forms and Reports ID from the drop-down list.
To create a new Alternate/Modified Forms and Reports ID, refer to Setting access to alternate/modified forms and reports
- Choose the AFA Reports button to open the Advanced Financial Analysis Reports Security window where you can specify which Advanced Financial Analysis reports the user should have access to.
Note
By default, users have access to all Advanced Financial Analysis reports. However, users can only view an Advanced Financial Analysis report if they also are granted access to the Advanced Financial Analysis windows that are associated with that report.
To print a User Security Report for the selected user, choose File >> Print. You also can print this report using the Security Report Options window.
Choose Copy to open the Copy User Security window if you want the user to have the same security access in other companies that the user has access to, otherwise skip to step 11.
In the Copy User Security window, a list of companies that the selected user has access to is displayed. Mark the companies that you want to copy this user's security settings to.
Choose OK to save your changes and close the Copy User Security window.
In the User Security Setup window, choose Save.
Activating user security
To begin using individual security, you be sure that the Security option in the Company Setup window is marked. User security doesn't function unless you activate it in that window.
User security doesn't affect passwords you've set up to allow access to Microsoft Dynamics GP, or to grant permission to perform certain accounting tasks such as overriding a price.
To activate user security:
Open the Company Setup window. (Administration >> Setup >> Company >> Company)
Be sure the correct company is displayed in the Company Name field.
Mark the Security check box if it is not already marked, otherwise, skip to step 5.
Enter the system password and choose OK. A message will appear, indicating that user security is active.
Choose OK to save your changes and close the Company Setup window.
If you want to temporarily turn off your security system at some other time, you can open this window again and unmark the Security option, allowing all users unlimited access to the company.
- Repeat steps 1 through 5 for each of your companies. You must log in to each company to activate user security for that company.
Verifying security settings with an integrating product
After you install an integrating product, you must give users security access to that integrating product before it can be used. You may have to modify existing security tasks and roles or create new security tasks and roles before you can modify a user's security settings. However, depending on the integrating product, there already may be default security tasks and roles that you can use when you modify a user's security settings in the User Security Setup window.
Setting access to alternate/modified forms and reports
Alternate forms and reports are forms and reports that have been incorporated into integrating products that you've installed. Modified forms and reports are existing Microsoft Dynamics GP forms and reports that have been modified using Report
Writer or Modifier. Some of these forms or reports are provided access by default,
others you must grant access to using the Alternate/Modified Forms and Reports window.
Alternate/modified forms and reports IDs grant access to groups of alternate/ modified forms and reports within Microsoft Dynamics GP. These IDs are then assigned to individual users. For more information, refer to Setting up individual user security .
When your company purchases integrating products, you can modify security settings to include all alternate forms and reports for the product at once. Or, you can selectively choose which alternate/modified forms or reports you want for each ID.
If you discontinue using a product that contains alternate or modified forms and reports, or are changing your security structure, you can change all settings to the original defaults. See To reset alternate/modified forms and reports to original settings: for more information.
To set access to alternate/modified forms and reports:
Open the Alternate/Modified Forms and Reports window. (Administration >> Setup >> System >> Alternate/Modified Forms and Reports)
Enter an ID and description.
Select a product from the Product list. If you're using integrating products with Microsoft Dynamics GP, they are displayed in the list in addition to Microsoft Dynamics GP.
In the Type list, select the type of item you want to set access for.
Select the series you want to set access for. This will narrow down the list of windows or reports in the list if you're setting access to specific windows or reports.
Select the integrating product in the Select list. The alternate forms or reports will appear in the list, with the Microsoft Dynamics GP option selected by default.
Click Change All. The access will be changed to the integrating product for all forms or reports.
Note
You can use the Show/Hide button to expand the Alternate/Modified Forms and Reports List to grant access to individual forms or reports.
Repeat steps 3 through 7 to set access to the alternate/modified forms and reports for any other products.
Choose Save.
To reset alternate/modified forms and reports to original settings:
Open the Alternate/Modified Forms and Reports window. (Administration >> Setup >> System >> Alternate/Modified Forms and Reports)
Enter an ID and description.
Select a product from the Product list. If you're using integrating products with Microsoft Dynamics GP, they are displayed in the list in addition to Microsoft Dynamics GP.
In the Type list, select the type of item you want to set access for.
Select the series you want to restore original settings for, or select All to reset the original settings for all of your system.
Select Revert to Default from the Select list.
Choose Change All. The access will be changed to the settings from the time of your original Microsoft Dynamics GP installation.
Choose Save.
To view alternate/modified forms and reports settings:
Open the Alternate/Modified Forms and Reports window. (Administration >> Setup >> System >> Alternate/Modified Forms and Reports)
Select the ID, Product, Type and Series you want to view.
Mark Display Selected. The Alternate/Modified Forms and Reports List will display only the options selected for the criteria above. Changes can't be made when this box is marked.
The Show/Hide button above the list will expand or collapse the list.
Deleting security records
Use the Remove Security Setup Records window to delete groups of security task IDs, security role IDs, and alternate/modified forms and reports IDs.
To delete security records:
Open the Remove Security Setup Records window. (Administration >> Utilities >> System >> Remove Security Setup Records)
Select the type of security records that you want to delete.
Select Security Tasks to delete a group of security task IDs. You cannot delete a security task that is currently assigned to a security role.
Select Security Roles to delete a group of security role IDs. You cannot delete a security role if it is currently assigned to a user.
Select Alternate/Modified Forms and Reports to delete a group of alternate/modified forms and reports IDs. You cannot delete an alternate/ modified forms and reports ID if is currently assigned to a user.
Select the range of IDs to delete.
Choose Process to delete the range of IDs for the type of security record that you selected.
Setting up security for viewing data connections and Microsoft Excel reports
Users need extra privileges in SQL Server before they can view the Microsoft Dynamics GP data that is displayed in data connections and Excel reports.
A Default SQL Server Fixed Database role that corresponds with each data connection and Excel report is created during the installation of Microsoft Dynamics GP. Each role begins with "rpt_" and contains SELECT access to the Microsoft Dynamics GP data for the data connection or report that the role corresponds to.
Users should be added as members to the SQL Server roles that correspond to the reports or data connections that they need access to.
There should also be links to procedures for setting security on the shared folders on the network or SharePoint, depending on how the sysadmin wants to deploy the excel reports.
To set up security for viewing data connections and Microsoft Excel reports:
Create new local groups on the server where the data connections and Microsoft Excel reports are deployed. For more information, refer to Chapter 40, "Excel report deployment," and your Windows Server documentation.
Assign each local group to the default SQL Server fixed database role that corresponds to the report that group will need access to. For more information about adding an Active Directory group to a SQL Server fixed database role, refer to your SQL Server documentation.
Add domain users or domain groups to the local groups that you set up in step 1
Setting up access to SQL Server Reporting Services reports
Users need extra privileges in SQL Server and Report Manager before they can view the Microsoft Dynamics GP data that is displayed in SQL Server Reporting Services reports.
Default SQL Server roles are created when you install Microsoft Dynamics GP. Each
SQL Server role that begins with "rpt_" has enough access to view the Microsoft
Dynamics GP data that is displayed in a report. To view a SQL Server Reporting Services report, a user, or a Windows (local machine) group that the user belongs to, must be added as a member to the SQL Server roles that correspond to that report and the user must be granted access to that SQL Server Reporting Services report in Report Manager.
For detailed information about SQL Server Reporting Services, refer to the SQL
Server Reporting Services Guide. This guide describes how to install Reporting
Services, how to deploy predefined reports that are included in Microsoft Dynamics GP to a server, and how to set up security for reports.
To set up access for SQL Server Reporting Services reports:
Create new local groups on the Web server where the SQL Reporting Services reports are deployed. For more information, refer to Deploying SQL Server Reporting Services reports and your Windows Server documentation.
Assign each local group to the default SQL Server fixed database role that corresponds to the report that group needs access to. For more information about adding an active directory group to a SQL Server fixed database role, refer to your SQL Server documentation.
Using Report Manager, grant access to the SQL Reporting Services reports for the local groups that you created in step 1.
Add domain users or domain groups to the local groups that you set up in step 1. For more information, refer to your Windows Server documentation.
If your SQL Reporting Services reports are stored on a different computer than either the Microsoft Dynamics GP server or the server running Microsoft SQL Server, you must use Kerberos authentication in SQL Server to allow user credentials to be passed to the SQL Server so that users can view SQL Reporting Services reports.
Refer to Knowledge Base article 319723: How to use Kerberos authentication in SQL Server and complete Step 1: Configure the domain controller and Step 2: Configure the IIS services server to use Kerberos authentication on SQL Server.
User security troubleshooting
Many of the processes in Microsoft Dynamics GP, such as posting or printing, require that the user performing the process be able to access multiple windows and reports. If you deny a user access to an item that's part of a process, the user won't be able to complete that process. A message may appear stating that the user isn't privileged to open the resource. However, Microsoft Dynamics GP may not always display a message indicating the problem; the process may simply not be completed.
If a user encounters problems completing a process, verify that the roles that are assigned to the user in the User Security Setup window contain the tasks that the user needs to complete the process. The problem may be caused by the user not having access to all the items used in the process. Contact Microsoft Dynamics GP Technical Support if you need additional assistance.
Chapter 7: Field level security
Field level security restricts access to any field, window, or form in Microsoft Dynamics GP. It allows you to apply a password, or to make a window or form unavailable. It also allows you to hide, lock, or apply passwords to fields.
This information is divided into the following sections:
Adding or modifying a field security ID
Copying a field security ID
Security modes
Resource Explorer
Creating a password
Adding or modifying a field security ID
Use the Field Security Maintenance window to assign field level security IDs, which are necessary to define user passwords, and to lock, hide, or make windows, forms, and fields unavailable. The Field Security Maintenance window also allows you to modify, add, or delete field security IDs.
To add or modify a field security ID:
Open the Field Level Security window. (Administration >> Setup >> System >> Field Level Security)
Choose Add to open the Field Security Maintenance window.
You also can double-click an existing field security ID in the Field Security window to open the Field Level Security Maintenance and continue through this procedure.
Enter or modify the Field Security ID field and a description.
Choose the product name lookup button to open the Resource Explorer window.
Select an object from the Resource Explorer window to apply security to. For more information refer to Resource Explorer .
Apply or modify the security mode for the field, form, or window you have selected. For more information refer to Security modes .
If you selected a security mode that requires a password, enter or select a password ID in the Password ID field.
Choose Save.
You can now use the Field Level Security window to apply this field security ID to users and user classes.
Copying a field security ID
Use the Field Security Maintenance window to copy an existing field security ID to create a new one. To create a new field security ID that will be similar to an existing field security ID, you can copy the existing field security ID as your new field security ID and then modify it.
To copy a field security ID:
Open the Field Level Security window. (Administration >> Setup >> System >> Field Level Security)
Double-click on a field security ID in the field security object tree to open the Field Security Maintenance window.
Choose Copy.
Enter a new ID in the Field Security ID field.
Modify fields, as necessary.
Choose Save.
Security modes
You can select the following security modes from the Field Level Security Maintenance window to give security to fields, forms, or windows.
Password Before You must enter a password before getting access to a field.
Password After You must enter a password after modifying a field for the changes to be saved.
Warning Before A warning will be displayed and access to that field will be denied.
Lock Field You can't use or modify the field.
Disable Field The field will be displayed but it will not be available.
Hide Field The field won't be displayed.
Password Window You must to enter a password before access to the window is permitted.
Disable Window Enter the system administrator's password to have access to the window.
Password Form Users or classes must enter the correct password before access to the form is permitted.
Disable Form You must enter the system administrator's password to modify the form.
Resource Explorer
The Resource Explorer window opens when you choose the lookup button for the
Product Name field. Use the Resource Explorer to look up forms, fields, and tables.
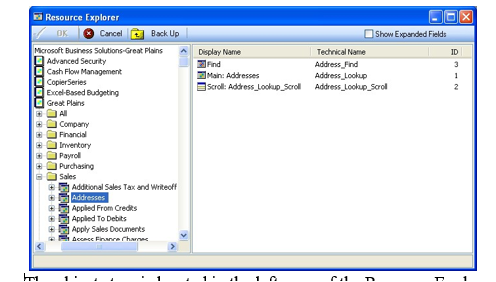
The objects tree is located in the left pane of the Resource Explorer window. Choose the plus sign next to an object to open it in the objects tree.
Double-click on an object to open it in the right pane of the Resource Explorer window.
Select an object in the right pane and choose OK to enter it into the Field Security Maintenance window.
Creating a password
Use the Password Maintenance window to create and modify passwords that you assign to a field, form, or window.
To create a password:
Open the Password Maintenance window by clicking the underlined password ID in the Field Security Maintenance window.
You also can open the Password Maintenance window by opening the lookup window for the password field. You can either select a current password, or you can choose New to clear the fields.
Enter a password ID and a description.
Enter the password.
Choose Save.
You can continue to create new passwords, modify existing passwords, or return to the Field Security Maintenance window.
To create more passwords, choose Clear and repeat steps 2-5.
To modify other passwords, select an existing password and make changes, as necessary.
To exit, close the window.
Chapter 8: Shortcut administration
With shortcut navigation, you can organize shortcuts to the windows, macros, applications, and web sites you frequently use while working in Microsoft Dynamics GP.
This information is divided into the following sections:
Shortcuts and user classes
Assigning shortcuts to a new user class folder
Adding shortcuts to an existing user class folder
For general information about the shortcut bar and creating shortcuts, see your System User's Guide (Help >> Contents >> Using The System).
Shortcuts and user classes
The system administrator's or Microsoft Dynamics GP system administrator's shortcuts include a User Classes folder by default. For each user class in the Microsoft Dynamics GP system, a corresponding folder is located inside the User Classes folder. When you create a new user class, the corresponding user class shortcut folder is created automatically.
The shortcut folder is named the same as the description for the user class. For example, if the class ID is SALES and the description is Sales Clerk, the shortcut folder is Sales Clerk. To change the name of the user class folder, change the description of the user class in the User Class Setup window.
When you assign a user to a user class, the corresponding user class folder appears in the list of shortcuts in the navigation pane for that user. User Classes folders can't be renamed or repositioned by non-administrative users.
Assigning shortcuts to a new user class folder
You can organize shortcuts to user-specific tasks by grouping them into user class folders in the list of shortcuts in the navigation pane. Users can't delete or modify a user class folder that appears in their list of shortcuts.
To assign shortcuts to a new user class folder:
Log in as sa or if you are the database owner, log in as DYNSA.
Open the User Class Setup window. (Administration >> Setup >> System >> User Classes)
Enter a class ID.
Enter a description for the user class. This description will be the name of the user class folder in the list of shortcuts.
By default, the new user class will have access to all resources in the system. Deny access to selected portions of the system, if desired.
Choose Save to save the user class.
In the User Classes folder, locate the folder for the user class you just created. Add shortcuts to the folder by dragging an existing shortcut from your list of shortcuts into the user class folder.
Adding shortcuts to an existing user class folder
As soon as you add a shortcut to a user class folder, users assigned to that user class can see the shortcut by closing and reopening their user class folder.
To add shortcuts to an existing user class folder:
Log in as sa or if you are the database owner, log in as DYNSA.
In the User Classes folder in the list of shortcuts, locate the folder for the user class you want to add shortcuts to. Drag an existing shortcut from your list of shortcuts into the user class folder.
Chapter 9: Activity tracking
Activity tracking allows you to keep track of the activity in your Microsoft Dynamics GP system. You can track activities for each user, for each company, or both.
For day-to-day activity monitoring, use the activity tracking procedures in the System Administrator's Guide.
This information is divided into the following sections:
Activity type overview
Setting up activity tracking
Removing activity tracking detail
Activity type overview
The following types of activities can be tracked in Microsoft Dynamics GP. The selected activities will be tracked for all users and the companies selected in the Activity Tracking Setup window.
Access tracking
| Activity | Description |
|---|---|
| Failed Attempts to Access a Table | Tracks when a user attempts to create a report in Report Writer using a table they do not have access to because of security. This is a valid option only if security is being used for the company. |
| Failed Attempts to Open a Window | Tracks when a user is prevented by security from opening a window. This is a valid option only if security is being used for the company; that is, if security is set up and the Security option is marked in the Company Setup window. If a user is prevented from opening a window because of an alert message not related to security, that will not be tracked. |
| Failed Attempts to Print a Report | Tracks when a user is prevented by security from printing a report. This is a valid option only if security is being used for the company. When the Print button is chosen, Microsoft Dynamics GP verifies whether security is activated for the company. |
| Successful Attempts to Open Modifier | Tracks when a user successfully accesses Microsoft Dynamics GP Modifier. |
| Successful Attempts to Open Report Writer | Tracks when a user successfully accesses Report Writer. |
| Successful Attempts to Open a Window | Tracks when a user opens a window successfully. |
| Successful Attempts to Print a Report | Tracks when a user is successful at starting a report to print. |
Login/logout tracking
| Activity | Description |
|---|---|
| Successful Attempts to Log In | Tracks when a user logs into a company. This takes place when initially entering Microsoft Dynamics GP and also when using the Company Login window to switch to a different company. |
| Activity | Description |
| Successful Attempts to Log Out | Tracks when a user logs out of a company. This takes place when initially entering Microsoft Dynamics GP and also when using the Company Login window to switch to a different company. |
Using the combination of tracking Successful Logins and Successful Logouts allows you to see the length of time that a user was logged into a company.
Table tracking
| Activity | Description |
|---|---|
| Additions to Master Tables Additions to Setup Tables Additions to Trx Tables | Tracks when a record is successfully added to the type of table specified. This includes only additions that are made by using a Save or an OK button. Additions that are performed through a process such as reconciling are not tracked. |
| Deletions from Master Tables Deletions from Setup Tables Deletions from Trx Tables | Tracks when a record is successfully deleted from the type of table specified. This includes only deletions that are made by using a Delete button. Deletions that are performed through a process such as clearing history and paid transaction removal are not tracked. |
| Modifications to Master Tables Modifications to Setup Tables Modifications to Trx Tables | Tracks when a record is successfully modified in the type of table specified. No record of the actual change is kept. This includes only modifications that are made by using a Save or an OK button. Modifications that are performed through a process such as reconciling are not tracked. |
Process tracking
| Activity | Description |
|---|---|
| Table Maintenance Process | Tracks when any task from the Table Maintenance menu is performed such as checking links and clearing data. Both the start and end of the task are tracked (two records are created). |
| Routines Process | Tracks when any task from any routines menu is performed. Both the start and end of the task will be tracked, (two records will be created). |
| Utilities Process | Tracks when any task from any utilities menu is performed. Both the start and end of the task are tracked, (two records are created). |
Posting tracking
| Activity | Description |
|---|---|
| Depends on modules registered. | Depending on which modules are registered, you can choose to track posting of specific transaction types. For example, if General Ledger is installed, you could choose Financial Clearing Entry, Financial General Entry, and Financial Quick Entry. |
Setting up activity tracking
Using the Activity Tracking Setup window, you'll mark the activities you want Microsoft Dynamics GP to track for each user in each company they access.
The table used to store activity information can become large in a short time if you choose to track all activity. To keep the activity table size to a minimum, track only the activities you really need to track and periodically remove the information you no longer need. Tracking successful window access and tracking any of the table activities will cause the activity tracking table to grow rapidly. For information
about removing activity tracking detail, see Removing activity tracking detail .
To set up activity tracking:
Open the Activity Tracking Setup window. (Administration >> Setup >> System >> Activity Tracking)
Select an activity type.
Using one or more of the following techniques, mark the activities you want to track.
In the Activity list, mark the box in the Track column next to each specific activity you want to track.
To track all activities listed for an activity type, choose Mark All. To stop tracking any of the activities that may have been marked for an activity type, choose Unmark All.
Select a user and mark the companies for which you want activities tracked.
Select a user ID for whom you want to track Microsoft Dynamics GP activities.
In the Company Name list, mark the box in the Activate column next to the companies for which you want to track this user's activities.
Repeat steps 5 and 6 for the other users you want to track activity for.
All of the users selected will have the same activities tracked.
Choose OK to save your entries and close the window.
Review the activity tracking information you've entered using the Activity Tracking Setup Report. While the Activity Tracking Setup window is displayed, choose File >> Print.
Removing activity tracking detail
Use the Remove Activity Tracking Detail window to remove records from the Activity Tracking Table, print a report that shows the information in the table, or both. All activities you track are recorded in the Activity Tracking Table. The size of the table can increase very quickly, even if you track only a few activities, so you'll need to remove data from the table periodically.
Important
Be sure to back up your company's data before removing activity tracking detail.
To remove activity tracking detail:
Open the Remove Activity Tracking Detail window. (Administration >> Utilities >> System >> Activity Detail)
Select an activity type.
Using one or more of the following techniques, mark the activities you want to remove or print a report for.
In the Activity list, mark the box in the Remove/Print column next to each specific activity you want to remove or print a report for.
To remove or print all activity detail listed for an activity type, choose Mark All. Choose Unmark All if you don't want to remove or print all activity detail.
Select which range type of activity detail.
Enter or select a range of activity detail.
Choose Insert to insert the range.
Choose whether you want to remove the activity detail, print a report, or both.
Choose Process to remove the activity detail. If Print Report was marked, the Activity Tracking Report will print.
Part 3: Company setup
Use this information to customize each of your companies, including company addresses, the payment terms your business uses, the way posting reports are printed, and the format of your accounts. The information is organized in the order in which you should complete it.
Company setup entries you make apply only to the company you're using when you enter the information. If, for instance, you've created records for three companies and are ready to specify information about each, you must be sure that you're applying that information to the correct company.
For additional information about setting up Microsoft Dynamics GP, detailed reference information is provided in help. Press F1 to view detailed reference information about the window that's currently displayed.
The following information is discussed:
Chapter 10, "Companies," explains how to specify where a new company's data will be stored and how to use default information for this company.
Chapter 11, "Accounts," contains information about setting up an account format and chart of accounts for each company.
Chapter 12, "Fiscal periods," explains how to verify the default fiscal periods and make changes if necessary, and how to create fiscal periods.
Chapter 13, "Posting setup," describes posting procedures and the terminology needed to understand posting.
Chapter 14, "Shipping methods and payment terms," explains how to set up additional shipping methods and payment terms, and how to make changes to existing ones.
Chapter 15, "Financial information," describes how to set up currencies, bank records, and checkbooks for each company.
Chapter 16, "E-mail setup for documents," describes how to set up e-mail functionality for each company.
Chapter 17, "Document attachment setup," describes how to set up document attachment functionality for each company.
Chapter 18, "Intrastat setup," explains how to set up your system to track statistics for Intrastat, the method for collecting statistics on the trade of goods between European Union (EU) countries or regions.
Chapter 10: Companies
This information explains how to specify where a new company's data will be stored and how to use default information for this company.
This information is divided into the following sections:
Company overview
Setting up your first company
Creating an additional company in Microsoft Dynamics GP
Setting access to a new company
Switching to the company you just created
Setting up company address information
Setting up company options
Setting up company Internet information
Customizing an Internet Information label
Setting up company user-defined fields
Setting up a language
Company overview
In Microsoft Dynamics GP, you can set up an unlimited number of companies. Each company tracks information for a particular organization such as a corporation or a partnership. In general, information from one company is not shared with other companies.
All information for a company in Microsoft Dynamics GP is typically stored within a single folder on your computer or network, or in a single database.
Setting up your first company
The process for creating your first company varies, depending on whether you installed the sample company, Fabrikam, Inc. If you installed the sample company, that company is considered the "first company." To set up your own company, see Creating an additional company in Microsoft Dynamics GP .
Your first company must be created using Microsoft Dynamics GP Utilities. For more information on Microsoft Dynamics GP Utilities, refer to your Microsoft Dynamics GP desktop install and upgrade information.
Once you've created your first company, see Creating an additional company in Microsoft Dynamics GP to create more companies.
To set up your first company:
Start Microsoft Dynamics GP; the Welcome to Microsoft Dynamics GP window appears.
Select your user ID and enter a password.
Mark the Remember user and password option to automatically log in to Microsoft Dynamics GP the next time you start Microsoft Dynamics GP. This option is available if you have marked the Enable Remember User field in the System Preferences window.
Choose OK.
In the Company Login window, select the company you want to set up.
Mark the Remember this company option to automatically log in to the company the next time you start Microsoft Dynamics GP. You should mark this option for the company you work with the most often.
Choose OK.
The name of the company will be displayed on the toolbar.
Many of the company setup procedures can be completed using selections from the Administration area page (Administration >> Setup >> Company).
Continue to Setting up company address information
Creating an additional company in Microsoft Dynamics GP
If you're using Microsoft Dynamics GP to track information for multiple companies, you can copy user access information to additional companies you create. Be sure to completely set up your first company and assign user access before creating subsequent companies.
You can copy two types of setup information from any other company (including the sample company) to the new company you're setting up:
The users who will have access to this company, which you also can set up in the User Access Setup window.
The individual items each user has access to within the company, which you can set up in the User Security Setup window.
We recommend installing the default chart of accounts, shipping methods, and payment terms, unless you plan to import that information from your previous accounting system. Using the default entries will streamline the setup process. You'll be able to make modifications to the default entries.
You'll use the Create Company window to create additional companies. How you create additional companies will vary based on the type of database you're using.
To create an additional company in Microsoft Dynamics GP:
- Start Microsoft Dynamics GP Utilities to create a new database for the company and allocate space for it. See your Installation documentation for more information.
(Start >> Programs >> Microsoft Dynamics >> GP >> GP Utilities)
Be sure you are logged in to Windows as a system administrator.
- In the Welcome to Microsoft Dynamics GP Utilities window, verify your server name, and enter your administrator user ID and password; then choose OK.
You must be logged in as sa or as a system administrator to perform database and system functions within Microsoft Dynamics GP Utilities.
The Welcome to Microsoft Dynamics GP Utilities window opens when you are logged into the server you selected. Choose Next until the Additional Tasks window opens.
In the Additional Tasks window, select the Create a Company option and choose Process.
In the Create Company window, enter a company ID and name. Once you save this company, this name can be changed in the Company Setup window, if necessary.
Mark to install shipping methods and payment terms (optional). If you don't mark this option, you can set up shipping methods and payment terms by following the procedures in Chapter 14, "Shipping methods and payment terms."
To load a default chart of accounts, mark the Load Default Data option, then select a business type and an industry type (optional).
To copy user access information from another company, mark the Copy Access From Company option and select a company to copy from (optional).
Copying user access includes all users and security for those users. Access information for lesson users, inactive users, and web client users will not be copied.
Choose Next.
In the Database Setup window, select a default location for new files that will be created and choose Next.
In the Create Database window, choose Next.
In the Confirmation window, choose Finish.
Setting access to a new company
You'll use the User Access Setup window to assign access to the company or companies you just created to specific users.
To set access to a new company:
Open the User Access Setup window. (Administration >> Setup >> System >> User Access)
Select a user ID.
Mark the box next to each company this user should have access to.
Choose OK to save your changes.
Switching to the company you just created
You can access the new company from the Company Login window.
To switch to the company you just created:
On the Microsoft Dynamics GP menu, choose User and Company.
In the Company Login window, select the appropriate company, then choose OK.
To verify the company you're accessing, check the Microsoft Dynamics GP application window status bar; the current company is displayed there.
Setting up company address information
Once you've created a company, you'll need to enter additional information for it. Use the Company Setup window to enter addresses for the selected company.
The main address entered in this procedure will appear on all documents, such as invoices and checks. However, if your business has several locations or different departments and contacts, you can set up multiple addresses, which you can print on those documents instead.
To set up company address information:
Open the Company Setup window. (Administration >> Setup >> Company >> Company)

In the Address ID field, enter an ID for the company's main address.
Enter the company's main address.
Note
Skip the tax, user-defined and security fields for now; you'll return to this window after you've set up additional options for your company and you can finish entering the other information then. The tax information you need to enter for your company differs depending on what countries or regions you do business in. In addition, you'll need to set up tax details and tax schedules before assigning them to your company using the Company Setup window.
To enter addresses for additional locations, departments or contacts, choose the Address button to display the Company Addresses Setup window.
In the Address ID field, enter a short name for the location, department or contact.
Enter the address information.
Choose Save to save the address.
Repeat steps 5 through 7 for additional addresses. When you've finished entering addresses, close the window.
In the Company Setup window, choose OK to save the addresses you've entered.
To print a list of the company settings, open the Company Setup window; then choose File >> Print.
The Company Settings List is printed, showing information that was entered using the Company Setup window. You also can print this report using the Setup Reports window (Administration >> Reports >> Company >> Setup).
To print a Company Addresses Report showing information for all the addresses you've set up for this company, use the Company Setup Report Options window.
Setting up company options
Use the Company Setup Options window to enter additional company setup options such as separating payment distributions, tracking Intrastat Statistics, and merging trade discount distributions.
To set up company options:
Open the Company Setup Options window.(Administration >> Setup >> Company >> Company >> Options button)
Mark the options you want to include. See Part 4, Tax setup, for information about tax setup options.
Use Shipping Method when Selecting Default Tax
Schedule Specify whether or not you want to use the shipping method when selecting the default tax schedule on a transaction. Microsoft Dynamics GP calculates taxes at the point of exchange, using the shipping method assigned to a transaction to determine the point of exchange. The shipping method will determine which tax schedule appears as a default schedule for the transaction. If you decided not to use the shipping method to determine the default tax schedule, the tax schedule assigned to the vendor's purchase address or the customer's ship to address will be the default tax schedule.
Calculate Terms Discount Before Taxes Mark this option to apply taxes only to the discounted amount, regardless of when the payment is actually made.
Enable Intrastat Tracking Mark this option if your company is required to enter Intrastat Statistics. The Intrastat Trade Report is used to report this information. When this option is marked, setup windows for Intrastat codes and Intrastat entry windows become available.
Separate Payment Distributions Mark this option to separate document and payment distributions entered on the same transaction as if the document and payment were entered as separate transactions. You will be able to enter multiple distributions with the same distribution type and account. If you don't mark the option, the distributions that are of the same type with the same account number will be combined.
Merge Trade Discount and Markdown Distributions in Sales Mark this option to merge the trade discount and markdown distributions with the sales distributions. If you don't mark this option, the trade discounts and markdown distributions will be separated from the sales distribution.
Merge Trade Discount Distributions in Purchasing Mark this option to merge the trade discount distributions with the purchase distributions. If you didn't mark this option, the trade discounts and markdown distributions will be separated from the sales distribution.
Calculate Tax Rebates Mark this option to allow correcting tax amounts for a transaction with a terms discount.
Enable Posting Numbers in General Ledger Mark this option to assign each transaction a unique sequence number during posting, in addition to the journal entry number. Use this option if you want solid numbering of transactions, without gaps. Solid numbering is a legal requirement in some countries or regions, for auditing purposes.
Enable GST for Australia Mark this option to set up information used to generate Goods and Services Tax (GST) calculations, designate default creditor IDs, enter tax schedules for items, and specify printing options for tax invoices and adjustment notes.
Enable Tax Date Mark to enter a tax date as you enter documents during transaction entry. If you mark this option, a tax date field will be available in the date entry windows and their inquiry windows for Sales Order Processing, Receivables Management, Invoicing, Payables Management and Purchase Order Processing.
Enable Reverse Charge Taxes Mark to enter reverse charge tax detail IDs in the Tax Detail Maintenance window. You'll be able to assign reverse charge tax details to transactions in Receivings Management, Payables Management, Purchase Order Processing, Sales Order Processing and Invoicing. Reverse charge tax information also will be printed on tax reports.
Calculate Taxes in General Ledger Mark this option to calculate taxes in General Ledger. You'll be able to use the Tax Entry window to enter taxable transactions that can't be entered in Payables Management, Receivables Management, Purchase Order Processing, or Sales Order Processing. For example, a taxable reimbursement to an employee could be entered in General Ledger, rather than in Payables Management.
Allow Summary-Level Tax Edits Mark this option to allow edits to tax information in the tax summary window. Summary tax edits won't change the taxes calculated at the detail level. If this option isn't marked, you will have to edit tax information using the tax detail entry windows.
Require Tax Detail Totals to Match the Pre-Tax Amount Mark to require the pre-tax amount to be fully distributed among the tax details of the transaction. When tax details are required to match the pre-tax amount, you'll have to assign tax schedules so taxes are calculated or enter a tax detail during transaction entry so the goods value matches pre-tax amount.
When this option is marked, you are required to enter a zero percent tax detail in the Tax Detail for System Processes field for receivables and payables documents that are automatically generated within the system.
The pre-tax amount is the sale or purchase amount (less any trade discount) plus freight and miscellaneous charges. If the module you're working with is set up to calculate terms discounts before taxes, the discount available amount is deducted from the pre-tax amount.
Specify Tax Details for Automatic Tax Calculation Specify whether or not you want specific tax details to calculate tax. When this option is marked, you can select which tax details assigned to a tax schedule in the Tax Schedule Maintenance window should calculate tax. You can select as many details as you want to calculate tax for the schedule in the Tax Schedule Maintenance window.
Enable VAT Return Mark this option to generate summary and detailed Value-added Tax (VAT) information for a specified period, helping to meet governmental VAT reporting requirements.
Enable EU Transaction Tracking Mark this option to indicate whether a transaction is an EU transaction without using Intrastat Statistics. The vendor's or customer's tax registration number will be printed on documents.
Enable DDR and European Electronic Funds Transfer Mark this option to enter electronic funds transfers for manual payments and computer checks in Payables Management, and to set up electronic funds transfer information for your checkbooks, vendors and customers.
If you mark this option, you must use the Checkbook Maintenance Window (Financial >> Cards >> Financial >> Checkbook) to assign a cash-in-transit account for an existing checkbook. For more information, refer to the "EFT checkbook setup" chapter in the Electronic Banking documentation.
Enable Canadian Tax Detail Mark this option to be able to select the tax detail posting account and to view the amounts inclusive of tax in the Receivables Management, Sales Order Processing, and Purchase Order
Processing windows. For more information, refer to Canadian tax detail option .
If you have marked the Enable Posting Numbers in General Ledger option, choose an option for the Display Posting Number Per field. For more information, see Specifying posting report options .
Mark to display the posting number for the fiscal year or for the fiscal period. This Display Posting Number Per option is available only if you've marked Enable Posting Numbers in General Ledger.
Choose OK to return to the Company Setup window.
Setting up company Internet information
Microsoft Dynamics GP tracks Internet-related information about your company, such as e-mail addresses, Web page URLs, and FTP sites. If you've set up multiple addresses for your company, you can track Internet information for each address. Use the Internet Information window to set up company Internet information.
To set up company Internet information:
Open the Internet Information window. (Administration >> Setup >> Company >> Internet Information)
In the Select Information for field, select Company.
The current company—the company you're currently logged in to—is displayed in the Company ID field.
In the Address ID field, enter or select an address.
Enter valid e-mail addresses (optional). You can enter multiple addresses in each field.
Enter Internet information.
Typically, the electronic mail address will be in the following form: Mailto: username@domainname.com.
- Choose Save to save your entries.
To print Internet information for the current company, choose File >> Print. The Internet Information Report is printed, showing Internet information for the current company.
- To print an Internet Information Report showing Internet information for all companies, use the General Report Options window. See Help >> Index >> Company General Report Options window for more information.
Customizing an Internet Information label
To customize the labels that appear in the Internet Information window, you can use the Internet User Defined Setup window. Be sure the labels you enter are appropriate for the Internet information you want to track for employees, customers, salespeople, vendors, and items, as well as companies.
To customize an Internet Information label:
Open the Internet User Defined Setup window. (Administration >> Setup >> Company >> Company >> Internet User Defined button)
In the Label 1 field, enter text to describe the information you'll track in the first field in the Internet Information window.
Repeat step 2 for the remaining labels.
Choose OK to save your changes.
Setting up company user-defined fields
Microsoft Dynamics GP provides two user-defined fields in the Company Setup window that you can use to enter additional information about your company. For example, you might want to enter your company's slogan, or other information about the company that you want to track.
If your company is located in Europe, you must use the User Defined 1 field for your country code. The country code is printed on value-added tax documents.
To set up company user-defined fields:
Open the Company Setup window. (Administration >> Setup >> Company >> Company)
In the User Defined 1 field, do one of the following:
If your company is located in Europe, enter your country code.
If your company is located outside Europe, enter additional information about your company.
For more information about how country codes are used, see Setting up country codes .
In the User Defined 2 field, enter additional information about your company.
Choose OK to save your changes.
Note
To add the user-defined fields to a report using Report Writer, link the Company Master table (SY_Company_MSTR) to the report and drag the fields named User Defined 1 and User Defined 2 to the report layout. For more information about adding userdefined fields to reports, refer to the Report Writer documentation.
Setting up a language
Use the Language Setup window to define languages that can be assigned to customers, vendors, and users. The languages that you set up are for your information only.
To set up a language:
Open the Language Setup window. (Administration >> Setup >> System >> Language)
Enter a language.
Enter an ISO 639-1 code (optional).
Choose OK.
Chapter 11: Accounts
Use this information to set up an account format and chart of accounts for each company.
This information is divided into the following sections:
Account formats
Designing an account format
Default account format
Account formats and multidimensional analysis codes
Setting up an account format
Checking links for the Account Master table group
Default charts of accounts
Printing a list of posting accounts in Microsoft Dynamics GP
Account aliases
Understanding account segments
Setting up an account segment
Setting up a posting account in Microsoft Dynamics GP
Modifying a posting account
Deleting a posting account
Account formats
When you installed Microsoft Dynamics GP, you specified an account framework. The account framework applies to all companies in your Microsoft Dynamics GP system, and represents the maximum length of your accounts, number of segments, and segment lengths. The account framework can't be changed.
Note
While Microsoft Dynamics GP imposes a limit of 66 characters and 10 segments for account formats, the maximum number of characters and segments in your system depend on the selections you made when you installed Microsoft Dynamics GP.
An account format is the structure of each account in a particular company—the length of the accounts, the number of segments, and segment lengths. Each company you set up can have a different account format, as long as it fits within the maximums you specified for the account framework. Unlike the account framework, you can change the account format for an individual company, with some restrictions.
- You can shorten one or more segments of the account format only if you haven't set up a chart of accounts yet.
To shorten the format if you've entered your chart of accounts but haven't entered transactions, you must clear data from the Account Master Table. For information on clearing data, refer to Chapter 13 of your System Administrator documentation (Help >> Contents >> select System Administration). Then you can set up a different account format and reenter your chart of accounts. Once you've entered transactions, including beginning balances, you can't shorten the account length or reduce the number of segments.
- You can lengthen one or more segments in the account format, up to the account framework maximums, at any time.
If you lengthen the account format after entering your chart of accounts, the extra space or spaces will be inserted in the segment you specify, at the right side. For example, you could increase the first account segment from four characters to five. Your existing accounts still would contain the same characters, but with the added blank space: 6XAA__-1762. Blank spaces are added only to existing accounts, since these accounts can't be changed; however, you can use the additional digits in any new accounts you add to the chart of accounts.
If you add segments to the current account format, the new segments will appear as blank segments at the end of each account.
Use the Account Definition Setup List, printed during installation, to verify that the values you'll enter for the number of segments and segment lengths don't exceed your account framework maximums.
Designing an account format
It's important that the account format be designed to meet both the current and future needs of the company you're setting up, since the changes you can make to the account format after you've started using Microsoft Dynamics GP are limited.
You can continue using the format you've used with your previous accounting system, or set up a new one. To create a new format, plan the different categories of information you want each segment of the account to represent. For example, if you want to use one segment each for the location, department, account, subaccount, and detail, you can set up the account format to include five segments. The location might identify an individual store within the company, and the department might represent the departmental divisions within the company. The main account segment should identify the type of account: an asset account, an expense account, and so on. Subaccount and detail segments will allow you to identify more specific information about the account.
Default account format
When you create a new company and load a default chart of accounts, the account format in the Account Format Setup window that is set up for you matches the account format of the default chart of accounts. The account format for a default chart of accounts is:
| Account format | Default |
|---|---|
| Account length | 9 characters |
| Number of segments | 3 segments |
| Length of segment 1 | 3 characters |
| Length of segment 2 | 4 characters |
| Length of segment 3 | 2 characters |
The account framework maximums you entered during the installation process appear as defaults in the Account Format Setup window. You can enlarge the account length, number of segments, and the length of the individual segments, up to the account framework maximums.
Account formats and multidimensional analysis codes
Multidimensional analysis codes can be used for further analysis of transaction activity if you want to keep a simpler chart of accounts. Multidimensional analysis codes are best suited for analysis of a particular project or division that spans a fixed time period, such as several months or years. Account formats will remain a part of your organization for the duration of its existence. For more information, refer to the Multidimensional Analysis documentation.
Setting up an account format
The account framework maximums you entered during the installation process appear as default entries in the Account Format Setup window.
To set up an account format:
Open the Account Format Setup window. (Administration >> Setup >> Company >> Account Format)
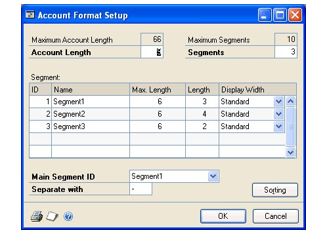
Enter the account length.
Note
You won't be able to shorten the account length after you've entered transactions.
Enter the number of segments in the accounts.
Name each segment. You can change the segment names later if necessary.
Enter the length of each account segment. The combined length of the segments must equal the length of the account.
Enter the display width of each segment.
If a segment will contain only numbers, select Standard.
If a segment will contain letters, select one of the Expansion selections. If you're unsure what width will work best, set up a width and then view the account in the Account Maintenance window (Financial >> Cards >> Financial >> Account). You can return to the Account Format Setup window to adjust the width as needed.
From the Main Segment ID list, select the main segment from the list of segment names you entered in step 4. The main segment will be used on financial reports to sort your accounts. A typical main segment is the one used to indicate whether the account is an asset, liability, owners' equity, revenue, or expense account.
In the Separate with field, enter the character that will appear between the account segments anywhere an account is displayed.
You can use any character: a dash or asterisk, a number or a letter. However, it's best to use a character that won't be confused with the characters in the account itself.
Choose OK in the Account Format Setup window to save the format and close the window.
To print the Account Format Setup List, showing the account format information for your company, open the Account Format Setup window; then choose File >> Print.
Checking links for the Account Master table group
If you change the main segment ID after you've entered a chart of accounts, you must check links for the Account Master table group, using the Check Links window.
To check links for the Account Master table group:
Open the Check Links window. (Microsoft Dynamics GP menu >> Maintenance >> Check Links)
In the Series list, be sure that Financial is displayed.
In the Logical Tables list, select Account Master and choose Insert to insert it into the Selected Tables list.
Choose OK to check links.
Default charts of accounts
When you create a new company, you have the option to load a default chart of accounts. You may want to use a default chart of accounts for the following reasons:
The chart of accounts we've provided reflect sound accounting practices.
Extensive research was done to determine the most commonly used account types for the industries we've included.
Even if changes need to be made after a default chart of accounts is copied for the company, setup time will be greatly reduced by using one of the charts of accounts provided with Microsoft Dynamics GP.
The default charts of accounts we've provided are designed to be accurate estimates of typical business practices. However, we recommend that you review the accounts and make any necessary additions or changes. To add accounts, see Setting up a posting account in Microsoft Dynamics GP . To make changes to existing accounts, see Modifying a posting account to delete accounts you don't need, see Deleting a posting account .
Printing a list of posting accounts in Microsoft Dynamics GP
If you loaded a default chart of accounts, your posting accounts are already set up. Use the Chart of Accounts Report window to review the chart of accounts you loaded and make any changes that are needed.
For more details about setting up posting accounts, see the General Ledger documentation.
To print a list of posting accounts in Microsoft Dynamics GP:
Open the Chart of Accounts Report window. (Financial >> Reports >> Financial >> Account)
From the Reports list, select Posting.
Do one of the following things:
Select an existing report option and choose Insert to insert it in the Print list.
Choose the New button to open the Chart of Accounts Report Options window, where you can create a report option.
Select a report option and choose Modify to open the Chart of Accounts
Report Options window, where you can make changes to a report option.
- When you had selected or created the report option you want to use, choose the Print button.
The Posting Accounts List is printed, showing all of the posting accounts that have been set up for the current company.
Account aliases
An account alias is a "short name" assigned to an account. You can enter an account alias instead of the entire account in any Microsoft Dynamics GP window where you enter accounts. For example, if you've set up the Cash Operating account for your main branch as account 1200-0000-2100-0000-0000, you could assign an alias such as $-CO.
Note
Using account aliases is optional. You can modify the account alias for an account at any time using the appropriate account maintenance window.
Understanding account segments
You can use the Account Segment Setup window to enter segment IDs and descriptions for each account segment number that's used in one or more posting accounts. You also can set up account segments as you set up posting accounts.
If you don't enter a description when you set up posting accounts, the segment descriptions will be combined to form a default account description. The segment descriptions will appear on reports and financial statements, if you select to print them for specific account segments.
For example, if you've created accounts for three stores and you use the first segment to differentiate the accounts for each store's location, you could use segment definitions to identify segment numbers 100, 200, and 300 as North Store, South Store, and Downtown Store.
If you're using Inventory Control, you can use one of the segments to specify sites. When you post transactions that affect inventory—such as sales transactions that reduce inventory at a specific site—the appropriate segment for the site is substituted.
For example, suppose you're entering cash, accounts receivable, and rent expense accounts in your chart of accounts and you want to monitor each account for each store. You can set up separate accounts for each store. When you print financial statements, you can sort the accounts by the first segment, separating each store's accounts, or by the segment identifying the type of account, such as cash or accounts receivable.
If the accounts were sorted by store—the first segment—they would appear in this order.
| Account | Description |
|---|---|
| 100-1100-00 | Cash – North Store |
| 100-1200-00 | Accounts Receivable – North Store |
| 100-5000-00 | Rent Expense – North Store |
| 200-1100-00 | Cash – South Store |
| 200-1200-00 | Accounts Receivable – South Store |
| Account | Description |
| 200-5000-00 | Rent Expense – South Store |
| 300-1100-00 | Cash – Downtown Store |
| 300-1200-00 | Accounts Receivable – Downtown Store |
| 300-5000-00 | Rent Expense – Downtown Store |
If the accounts were sorted by type of account—the second segment—they would appear in this order.
| Account | Description |
|---|---|
| 100-1100-00 | Cash – North Store |
| 200-1100-00 | Cash – South Store |
| 300-1100-00 | Cash – Downtown Store |
| 100-1200-00 | Accounts Receivable – North Store |
| 200-1200-00 | Accounts Receivable – South Store |
| 300-1200-00 | Accounts Receivable – Downtown Store |
| 100-5000-00 | Rent Expense – North Store |
| 200-5000-00 | Rent Expense – South Store |
| 300-5000-00 | Rent Expense – Downtown Store |
Setting up an account segment
Use the Account Segment Setup window to create account segments that can be combined to form account numbers. You also can create accounts without creating segments first; segments will be added as you add them when you set up accounts.
To set up an account segment:
Open the Account Segment Setup window. (Financial >> Setup >> Financial >> Segment)
Enter a segment ID.
Enter or select an existing segment number.
Enter a description for the account segment. If you include this segment in an account number and don't specify an account description, this description will be combined with other account segment descriptions to form the account description.
Choose Save.
Setting up a posting account in Microsoft Dynamics GP
Use the Account Maintenance window to set up posting accounts that weren't included in the default chart of accounts you loaded. To make changes to existing accounts, see Modifying a posting account ; to delete accounts you don't need, see Deleting a posting account .
To set up a posting account in Microsoft Dynamics GP:
Open the Account Maintenance window. (Financial >> Cards >> Financial >> Account)
Enter an account, a description, and account alias. You can enter any combination of letters, numbers, or other characters to define the account.
For more information about account aliases, see Account aliases .
If you don't want users to enter this account on transaction distributions unless it is selected as a default posting account, unmark the Allow Account Entry option.
In the Category field, enter or select an account category. Account categories are used to group the accounts that appear on financial statements.
In the Posting Type box, make one of the following selections:
Mark Balance Sheet if the account is an asset, liability, or equity account that retains a balance throughout the life of the business.
Mark Profit and Loss if the account is a revenue or expense account whose balance is transferred to a Retained Earnings account (or accounts) at the end of the fiscal year.
In the Typical Balance box, make one of the following selections:
Mark Debit if the account is an asset or expense account.
Mark Credit if the account is a liability, revenue, or equity account.
In the Level of Posting from Series fields, specify how much detail you want to post to General Ledger from each series, if the transaction origin is set up to use account settings:
Select Detail if you want to post detailed information about each line item for a group of transactions.
Select Summary if you want to post a summarized total for an entire group of transactions for this account.
See Posting in detail from subsidiary ledgers for information about how these selections work together.
In the Include in Lookup list, select the Microsoft Dynamics GP product series where you plan to use this account; the account will appear in lookup windows for each selected series. (Hold down the SHIFT key to select multiple series.)
If you're using Multicurrency Management, choose the Currency button and assign currencies to the account. You also can select which accounts to revalue and whether to post the revaluation results to the account or to the financial offset. For information, see Help >> Index >> Select Account Currencies window.
Choose Save to save the account.
To print a Posting Accounts List for the account that's displayed, choose File >> Print. You also can print this report for all accounts using the Chart of Accounts Report window.
Modifying a posting account
You can make changes to the default posting accounts, if necessary, using the Account Maintenance window.
To modify a posting account:
Open the Account Maintenance window. (Financial >> Cards >> Financial >> Account)
In the Account field, enter or select the account you want to change.
Make your changes.
Choose Save to save your changes.
Deleting a posting account
If you don't need one or more posting accounts, you can delete them using the Account Maintenance window. If you've already entered transactions for the posting account, you can't delete them using this procedure.
See the General Ledger documentation for more information about posting.
To delete a posting account:
Open the Account Maintenance window. (Financial >> Cards >> Financial >> Account)
In the Account field, enter or select the account you want to delete.
Choose Delete to delete the account.
Chapter 12: Fiscal periods
When you create a new company, default fiscal periods are created for you. This information explains how to verify the default fiscal periods and make changes, if necessary, or to create fiscal periods.
This information contains the following sections:
Fiscal period overview
Setting up fiscal periods
Changing fiscal periods
Fiscal period overview
With Microsoft Dynamics GP, you can define up to 367 periods per year and you can have an unlimited number of years open at the same time. Each year can have a different number of periods and you can keep an unlimited number of historical years.
Beginning and ending dates
Microsoft Dynamics GP automatically calculates beginning dates for fiscal periods. Be sure to verify these dates because they may not match the dates your business uses. You may want to make changes if the calculated day falls during a weekend, for example.
Three fiscal periods per fiscal year may have the same starting date. Extra periods are typically used for closing adjustments, auditors' adjustments, and post-audit transactions.
When Microsoft Dynamics GP calculates fiscal periods, the last period may be longer than the rest. If the number of days in the year can't be divided equally by the number of fiscal periods, the number of days per fiscal period is rounded down to the nearest day and any extra days are added to the last period. For example, if you enter 52 periods, periods 1 through 51 will have 7 days and the 52nd period will have 8 days.
If you change the number of periods or the dates of the fiscal year and choose Calculate, any previous changes you've made in the scrolling window will be deleted. To avoid reentering that information, be sure that your periods are calculated correctly before entering period names.
If you installed the default fiscal periods provided with Microsoft Dynamics GP, they'll be displayed when you open the Fiscal Periods Setup window. You also can print a list of fiscal periods by choosing File >> Print when the Fiscal Periods Setup window is displayed.
Closed fiscal periods
In Microsoft Dynamics GP, you can't post to a period that has been closed in the Fiscal Periods Setup window. If it is necessary to post to a closed period, you can simply open the period in the Fiscal Periods Setup window and post the transaction. If a recent period was closed during a year-end closing process, you can still post to that period as long as the period isn't closed in the Fiscal Periods Setup window. Once you've completed period-end procedures, you can prevent future posting to that period by closing it in the Fiscal Periods Setup window.
The Series Closed columns in the Fiscal Periods Setup window indicate whether an entire series is closed for the period or not. You can open or close each series individually in this window.
The Mass Close button in the Fiscal Periods Setup window opens the Mass Close Fiscal Periods window, where you can select individual transaction origins and series. Using that window, you can open or close origins individually, or you can open or close all selected origins at once.
Setting up fiscal periods
If you didn't install default data, use the Fiscal Periods Setup window to set up historical and current fiscal periods for your company. You also can use this procedure to set up fiscal periods for a new year. (You won't be able to post transactions in a new year until you create fiscal periods for that year.)
To set up fiscal periods:
Open the Fiscal Periods Setup window. (Administration >> Setup >> Company >> Fiscal Periods)
Enter the year.
Enter the first day and last day of the fiscal year. The fiscal year can be any length; it isn't limited to the length of a calendar year.
If you're entering fiscal periods for a historical year, mark the Historical Year check box.
Enter the number of fiscal periods in the fiscal year. For example, if your fiscal periods are quarterly, enter 4; if they're monthly, enter 12.
Choose Calculate to calculate each period's first day and last day.
The beginning date of each period will appear in the scrolling window. You can reenter information and recalculate the periods as many times as necessary.
Using the Date column, review the beginning dates of periods and make changes if necessary.
Using the Period Name column, change the period names to names that reflect the needs of your business. For example, you might enter Ending 1/31/2007 or Quarter 1 for Period 1.
Note
Skip the Series Closed columns for now. You'll use those columns later, as part of your period-end procedures, to prevent further posting to a series after a period has been closed.
Choose OK to save the fiscal period information you've entered and close the window.
Changing fiscal periods
You can make changes to your fiscal periods at any time using the Fiscal Periods Setup window.
To change fiscal periods:
- Open the Fiscal Periods Setup window.
(Administration >> Setup >> Company >> Fiscal Periods)
Make your changes.
Choose OK to save your changes and close the Fiscal Periods Setup window.
Reconcile the General Ledger year using the Reconcile Financial Information window, if necessary.
If you make changes to your fiscal periods before entering beginning balances, you don't have to reconcile General Ledger.
Ιf you make changes to the dates of your fiscal periods after you've entered beginning balances, you must reconcile General Ledger for the appropriate year. Reconciling will ensure that all transactions are correctly assigned to the periods in which they were entered.
Chapter 13: Posting setup
Transactions form the basis of the financial information in your accounting system. A transaction is a record of an event, such as a purchase or sale, that is ultimately reflected in an asset, liability, expense, revenue, or equity account. Entering a transaction in Microsoft Dynamics GP is similar to making a journal entry in a manual accounting system—you have a record of the information, but it's not permanent.
Posting is the process that transfers the transaction amounts to your general ledger. Getting the information there is important, because that's the basis of your financial statements. However, it's also important to be able to trace the amounts back to the original transaction, if necessary. That's where source document codes and audit trail codes come in.
This information is divided into the following sections:
Tracing the audit trail
Default source document codes
Printing a list of default source document codes
Setting up an additional source document code
Modifying a source document code
Audit trail codes
Printing a list of audit trail codes
Assigning source document codes to audit trail codes
Specifying which posting journals to reprint
Assigning default posting accounts
Selecting posting and reporting options
Batch control
Posting in detail from subsidiary ledgers
Posting "to" and "through" General Ledger
Specifying posting settings
About printing destinations
Specifying posting report options
Tracing the audit trail
The audit trail is a collection of records that allows you to trace a transaction from any point in the Microsoft Dynamics GP system back to the location where it was originally entered. With the information you've entered about the transactions, you should be able to trace them from their originating point in Microsoft Dynamics GP to the actual source documents—such as invoices, checks, or receipts—that provided the basis for the transactions.
When you trace the audit trail using posting journals, you'll use two tools: source document codes and audit trail codes. These tools allow you to track a transaction to its origin by two separate paths:
The source document code typically identifies the entry or document that serves as the basis for the transaction.
The audit trail code identifies the posting journal the transaction appears on. For more information about audit trail codes, see Audit trail codes .
Default source document codes
Source document codes are general in nature, and are useful for tracking the type of journal or entry you should examine for more information about a transaction. They don't indicate which journal a given transaction appears on, however. Source document codes are particularly useful if you're entering all transactions in General Ledger because you can assign a source document code that identifies the type of transaction you're entering. For example, you might use the source document code GJ if the transaction represents a general journal entry. You'll find that source document codes are more flexible, but may be less precise, than audit trail codes.
Microsoft Dynamics GP provides a limited number of commonly used source document codes, and you can set up additional codes using the Source Document Setup window.
Source document codes typically indicate the type of document that the transactions first appeared on. The source document codes you enter in the Source Document Setup window are used in two ways:
You can assign source document codes to individual transactions entered in the General Ledger transaction entry windows.
You can assign source document codes to transaction origins using the Audit Trail Code Setup window. Then, all transactions that are entered using the specified transaction origin are assigned the same source document code.
Printing a list of default source document codes
Before setting up additional source document codes or modifying source document codes, you should print the Source Document List.
To print a list of default source document codes:
Open the Source Document Setup window. (Administration >> Setup >> Posting >> Source Document)
Choose File >> Print or choose the printer icon button.
The Source Document List is printed, showing all the source document codes that have been set up. You also can print this report using the Company Setup Report Options window.
Setting up an additional source document code
If you need source document codes in addition to those provided with Microsoft Dynamics GP, set them up using the Source Document Setup window.
To set up an additional source document code:
Open the Source Document Setup window. (Administration >> Setup >> Posting >> Source Document)
In the Source Document field, enter a source document code.
In the Description field, enter a description for the source document code.
Choose Save to save the source document code.
Modifying a source document code
You can change the description for existing source document codes at any time using the Source Document Setup window. To delete a source document code once it's been assigned to an audit trail code, you must first remove the source document code from any origins it's assigned to in the Audit Trail Codes Setup window.
To modify a source document code:
Open the Source Document Setup window. (Administration >> Setup >> Posting >> Source Document)
In the Source Document field, enter or select the source document code you want to change.
Make your changes.
Choose Save to save the source document code.
Audit trail codes
Audit trail codes provide a precise record of each transaction, including where it's been posted as the transaction has made its way through the Microsoft Dynamics GP system. Unlike source document codes, audit trail codes pinpoint the exact posting journal the transaction was included on. Using audit trail codes, you can trace transactions to their origins quickly and accurately.
Audit trail codes are made up of two components: the prefix and the journal number. The prefix indicates a particular type of posting journal, such as the General Transaction Posting Journal, and the journal number indicates which specific journal, among all the General Transaction Posting Journals, that a transaction can be found on.
If a transaction was entered in a subsidiary module and posted through General Ledger, it will have two audit trail codes associated with it, one for General Ledger and one for the originating module. For example, a Receivables Management sales transaction may be assigned codes of RMSLS00000214 when it is posted in Receivables Management and GLTRX00000485 when it is posted in General Ledger. Once the transaction reaches General Ledger, the Receivables Management audit trail code becomes the General Ledger batch ID. As a result, General Ledger posting journals will contain the audit trail codes for both postings—the one in General Ledger and the one in Receivables Management.
If you were to refer to General Transaction Posting Journal number 485, you'd find the transaction, along with the audit trail code (now the batch ID) indicating that this transaction previously appeared on Sales Entry Posting Journal number 214. By cross-referencing the journals in this way, you can trace any transaction to its point of origin in Microsoft Dynamics GP. (You also could learn the customer's purchase order number, and check number by clicking links, if you needed to trace the transaction beyond the transaction entry point.)
To ensure the integrity of the audit trail, the audit trail codes provided with Microsoft Dynamics GP can't be changed, and you can't create additional audit trail codes. However, you can change the number that will be assigned to the next posting journal of a particular type. You also can change the default source document code that's assigned to a particular audit trail code.
Printing a list of audit trail codes
Before assigning source document codes to audit trail codes, you should print the Audit Trail Codes List.
To print a list of audit trail codes:
Open the Audit Trail Codes Setup window. (Administration >> Setup >> Posting >> Audit Trail Codes)
Choose File >> Print.
The Audit Trail Codes List is printed, showing all the audit trail codes in Microsoft Dynamics GP and the source document codes assigned to them. You also can print this report using the Company Setup Report Options window. See Help >> Index >> Company Setup Report Options window for more information.
Assigning source document codes to audit trail codes
Audit trail codes are assigned to each transaction entry method and identify where specific transactions were entered.
To assign source document codes to audit trail codes:
Open the Audit Trail Codes Setup window. (Administration >> Setup >> Posting >> Audit Trail Codes)
Select a series.
Enter the number you want assigned to the next posting journal. (This number is the second half of the audit trail code.) This number is incremented by one each time you post transactions using the specified origin.
Identify a default source document code for each audit trail code. You can change the source document code for a given audit trail code at any time.
To print a list of audit trail codes, choose File >> Print. The Audit Trail Codes List is printed, showing information for the currently displayed series. You also can print this report using the Company Setup Report Options window.
Choose OK to save the audit trail codes and close the window.
Specifying which posting journals to reprint
Using the Audit Trail Codes Setup window, you can specify, by audit trail code, whether you want to be able to reprint posting journals. You may want to do this for one of the following reasons:
As a safeguard against lost or misplaced posting journals.
If you don't want to print posting journals every time you post transactions.
If you mark the option to reprint posting journals, Microsoft Dynamics GP will retain more information about your transactions than if the option is unmarked. Depending on your transaction volume, these historical records may take a great deal of hard disk space. If your hard disk space is limited, you may want to unmark the option to reprint posting journals.
History records are kept automatically for transactions and accounts if you choose to reprint posting reports. Refer to the documentation for each Microsoft Dynamics GP module for more information on keeping history.
To specify which posting journals to reprint:
Open the Audit Trail Codes Setup window. (Administration >> Setup >> Posting >> Audit Trail Codes)
Select a series.
Specify which posting journals can be reprinted, using one of the following techniques:
Choose Mark All if you want the option of reprinting posting journals for all transaction origins within the selected series.
Choose Unmark All if you don't want to have the option to reprint posting journals for any transaction origins within the selected series.
In the Reprint column, mark individual transaction origins that you want to be able to reprint and unmark the transaction origins you don't want to be able to reprint.
To print a list of audit trail codes, which also shows the posting journal reprint options for each origin, choose File >> Print. The Audit Trail Codes List is printed, showing information for the series. You also can print this report using the Company.
Choose OK to save changes and close the Audit Trail Codes Setup window.
Assigning default posting accounts
To simplify data entry, it's a good idea to set up a default posting account for every type of account that could be posted to when you post a batch or transaction. For instance, when you post a sales transaction, amounts may need to be posted to a cash account, an accounts receivable account, a cost of goods sold account, and so on. You'll use the Posting Accounts Setup window to assign default posting accounts.
Once the accounts are set up, they appear as default entries in Microsoft Dynamics GP transaction entry windows. You also can use the customer, item, or vendor maintenance window to enter posting accounts unique to each customer, item, or vendor. You'll be able to override the default accounts if they're not appropriate for a given transaction.
To assign default posting accounts:
Open the Posting Accounts Setup window. (Administration >> Setup >> Posting >> Posting Accounts)
From the Display list, select an individual series to assign default posting accounts for, or select All to display all posting accounts in the Posting Account column.
Place the pointer in the Accounts column of the row containing the posting account you want to assign an account for.
Enter an account, or select one from the lookup window. (To display the lookup window, choose the lookup button next to the Accounts heading.)
Repeat steps 3 and 4 until you've assigned default posting accounts for each account description in the scrolling window.
To print a Posting Accounts Report showing a list of the default posting accounts that have been assigned, choose File >> Print. You also can print this report using the Company Setup Report Options window.
Choose OK to save the information and close the window.
Selecting posting and reporting options
A variety of posting and reporting options can be specified for each transaction origin in Microsoft Dynamics GP. The origin refers to the transaction entry window or method by which transactions are entered.
For each origin, you can choose whether to post transactions to General Ledger, or to post them through General Ledger to automatically update account balances in the chart of accounts.
You can specify how much or how little detail you want posted from an origin to General Ledger. However, if you enter a batch and distribute the same debit and credit amount to the same posting account, you must create a journal entry for each transaction and post through General Ledger in detail. If you posted the transaction in summary form, the transaction balance would be zero and posting in General Ledger wouldn't be allowed.
You also can choose whether to print posting journals for each transaction origin. We recommend that you choose to print these reports and store them with your company's permanent records as part of the audit trail, but the choice is yours. For more information on using the audit trail in Microsoft Dynamics GP, refer to the General Ledger documentation.
Batch control
You can choose to use batch controls to limit the batches that can be posted to only those that meet certain criteria. If you want to post only those batches that have a certain number of transactions, mark the Verify Number of Trx option. If you want to post only those batches whose totals equal a certain amount, mark the Verify Batch Total option in the Posting Setup window. If you want to post only those batches that have been approved for posting, mark the Require Batch Approval option and enter the Approval Password.
Posting in detail from subsidiary ledgers
You can choose the level of detail that will be included when transactions are posted from subsidiary origins to General Ledge using the Create a Journal Entry Per options in the Posting Setup window.
If you want a separate journal entry created in General Ledger for each transaction, mark the Create a Journal Entry Per Transaction option.
If you want to create one journal entry in General Ledger for all the transactions in a batch, mark the Create a Journal Entry Per Batch option. If you select this option, you can select additional options to summarize the information:
If you want transaction distributions to a particular account to be posted using the Level of Posting settings for each account (set in the Account Maintenance window), mark the Use Account Settings option. If the account is to be posted in detail, a separate distribution line item is created in General Ledger for each transaction that affects the account. If the account is to be posted in summary*,* a single distribution line item is created in General Ledger for all transaction amounts that affect the account. For more information, see Setting up a posting account in Microsoft Dynamics GP .
If you want all transaction distributions to a particular account to be posted as a summarized total, do not mark the Use Account Settings option.
For the fastest performance when posting to General Ledger, select Create a Journal Entry Per Batch and leave Use Account Settings unmarked.
Due to the additional processing required, the slowest performance option is Create a Journal Entry Per Batch with Use Account Settings marked. However, this option gives you the greatest control over the amount of detail that is provided in your General Ledger.
Posting "to" and "through" General Ledger
The main difference between these posting options is that when you are posting to General Ledger, you'll have an extra opportunity to verify transactions before they affect your permanent records. When you are posting through General Ledger, you'll save time by not completing the additional verification step.
Post to General Ledger If you choose to post to General Ledger, batches posted in all other modules will update the module in which the transaction originated, then create a batch of General Ledger transactions. Then you must post those batches within General Ledger, as well, to update the posting accounts for the transactions.
If you decide not to mark the Post to General Ledger option, batches will be posted within the selected series only. You might want to unmark this option while entering beginning balances or while making adjustments within the series.
When you're ready to begin posting routine transactions, be sure to return to the Posting Setup window and mark the option if you want transactions to be available for posting in General Ledger.
Post Through General Ledger Files You also can choose whether General Ledger accounts will be updated automatically when you post from another module to General Ledger. If you mark the Post Through General Ledger Files option, batches posted in other modules automatically will update the module in which the transactions originated and the appropriate posting accounts in General Ledger. Your transactions will post to General Ledger and not through General Ledger when posting transaction individually (without a batch).
If you don't mark the option, you'll be able to edit the transactions again using General Ledger's Transaction Entry window before posting them to your permanent General Ledger records. However, if you edit amounts at this point, you must reconcile General Ledger's year-to-date tables to ensure that posted amounts are identical. For more information on reconciling financial information, refer to the General Ledger documentation.
Specifying posting settings
Use the Posting Setup window to determine how transactions are posted for each origin or transaction entry method within a particular Microsoft Dynamics GP series.
To specify posting settings:
Open the Posting Setup window. (Administration >> Setup >> Posting >> Posting)
From the Series list, select a series.
From the Origin list, select a transaction origin. You can specify settings for each origin, or for all origins.
To specify how you want transactions from subsidiary modules posted to General Ledger, make one of the following selections:
Mark Post to General Ledger to transfer transactions from subsidiary modules to General Ledger when you post. You can verify the transactions in the General Ledger Transaction Entry window and you'll have to post the batches in General Ledger before they update your account balances.
Mark Post Through General Ledger Files to transfer transactions from subsidiary modules to General Ledger and automatically post them to your posting accounts.
Leave both selections unmarked if you don't want to post to General Ledger. You might unmark these selections when you're entering beginning balances or if you're entering correcting transactions in a subsidiary module and don't want the amounts to affect General Ledger.
For more information, refer to Posting "to" and "through" General Ledger .
If you're posting to General Ledger, specify how detailed you want your journal entries to be. You can make the following selections:
Create a journal entry per transaction to post in detail (to create a separate journal entry for each transaction). Select this option to have the most detailed information available.
Create a journal entry per batch and leave Use Account Settings unmarked to post in summary (to create a single journal entry for the batch total for each account). Select this option for the fastest posting.
Create a journal entry per batch and mark Use Account Settings to post according to the specifications for each account. Select this option to get a mix of detail and summary information. (This option is the slowest of the three.)
If you selected Payroll as the series, mark Post in Detail to have the most detailed information available.
Refer to Posting in detail from subsidiary ledgers for more information.
Mark Allow Transaction Posting to have the option of posting transactions individually from the selected transaction origin. Unmark this selection to require all transactions to be entered in a batch.
In the Posting Date From field, make one of the following selections if you selected Transaction in step 5:
Mark Batch to post all transactions in the batch by the same date.
Mark Transaction to post each transaction by the transaction's posting date.
Mark Include Multicurrency Info if you're using Multicurrency Management. Posting journals printed as part of the posting process will include multicurrency information; reprinted posting journals won't include multicurrency information even if this option is marked.
In the If Existing Batch field, make one of the following selections to specify what happens if you post additional transactions from the same source and the first batch still exists in General Ledger:
Mark Append to add the transactions to the existing batch.
Mark Create New to create a new batch.
Specify options for posting reports. For more information, see Specifying posting report options .
Choose Save to save the posting setup information.
About printing destinations
You can select any combination of the following printing destinations for posting journals and other audit reports.
Printer The report is printed to the default printer specified in your computer's printer setup.
Screen The report appears on the screen and you can then choose to print to the printer. In addition, if you're using an e-mail system that's compatible with MAPI (Messaging Application Programming Interface) or Exchange, you can mail any Microsoft Dynamics GP report that you print to the screen.
File The report is saved as a file. You can specify the following:
The report file name and location.
One of the file formats described below.
Whether you want to replace an existing copy of the report file each time you print it, or append the new report to the end of the existing file.
The file formats you can select when you print a report to a file are listed in the following table:
| File format | Description |
|---|---|
| Tab-delimited | The tab-separated ASCII character format used by spreadsheet programs, such as Microsoft Excel. |
| Comma-delimited | The standard comma-separated ASCII character format used by database programs. |
| Text | Text with no formatting. Use this option only if the application you'll use to read the report can't read any other format. |
| HTML | A format that can be views in a web browser. |
| XML Data | A text file that contains an XML representation of the report layout and all the report data. Choose this format if you want to process the report using an external application. |
| Adobe PDF | This format is available if you have the PDFWriter printer driver installed (included with Acrobat 5 and earlier), or Acrobat Distiller from Acrobat 6 or later. PDF (Portable Document Format) files can be read using Adobe Reader software available from Adobe. |
| Word Document | The Microsoft Office Open XML (.docx) file format used by Word 2007 or later. You can select this format if you select Template as the report type. |
Specifying posting report options
By default, Microsoft Dynamics GP automatically prints posting reports. If you don't want to print the reports, or if you want to select different destinations for the reports, you can change them using the Posting Setup window.
To specify posting report options:
- Open the Posting Setup window.
(Administration >> Setup >> Posting >> Posting)
From the Series list, select a series.
From the Origin list, select a transaction origin.
In the Print column of the Reports scrolling window, unmark any reports you don't want to print.
To unmark all reports that are currently displayed in the scrolling window, choose Unmark All.
To mark all reports in the scrolling window, choose Mark All.
In the Send To column, specify one or more destinations for the reports you want to print.
If you selected File as one of the options in step 5, make the following selections:
In the Type column, select a file format.
In the Append/Replace column, select what to do if the report file already exists.
In the Path column, enter the location and the file name for the report file.
To print the Posting Settings Report, showing the posting and reporting options for the selected series and origin, choose File >> Print. You also can print this report for all series and origins for the current company using the Company Setup Report Options window.
Choose Save to save the posting report options.
Chapter 14: Shipping methods and payment terms
When you create a new company, you have the option to load default shipping methods and payment terms. You also can set up additional shipping methods and payment terms, or make changes to existing ones.
This information is divided into the following sections:
Shipping methods
Setting up a shipping method
Payment terms
Setting up payment terms
Setting up payment terms with discounts
Taxes calculations for New Zealand payment terms with discounts
Shipping methods
A shipping method is one of many ways that goods are transported to your company from your vendors, and from you to your customers. You can use the same shipping methods for your vendors and your customers.
A shipping type indicates whether the goods are delivered by the vendor or picked up by the customer. The shipping type is used when calculating taxes. See Part 4, Tax setup, for more information.
If you installed the default shipping methods provided with Microsoft Dynamics GP when you created the company you're setting up, they'll appear when you open the Shipping Methods Setup window and you choose the Shipping Method lookup button. You also can print a list of shipping methods by choosing File >> Print in the Shipping Methods Setup window.
Setting up a shipping method
If you didn't load default shipping methods, or if you need additional shipping methods, use the Shipping Methods Setup window to create them. If several carriers routinely provide the same type of shipping service, set up a unique shipping method name for each carrier.
If, after beginning to use your system, you need to update or remove any of the shipping methods, you can do so. Existing transactions that used the shipping methods won't be affected by the changes.
To set up a shipping method:
Open the Shipping Methods Setup window. (Administration >> Setup >> Company >> Shipping Methods)
Enter a shipping method and description.
Select either pickup or delivery as the shipping type.
Select Pickup if the purchaser picks up the goods.
Select Delivery if the goods must be delivered by the seller, a shipping company, or by mail.
Enter the name of the carrier providing the shipping method.
Enter the account number assigned to your company by the carrier.
Enter the name of the person you speak or deal with most often, and the phone number where the contact person can be reached.
Choose Save to save the shipping method information.
Payment terms
Payment terms outline the terms under which a vendor expects payment from a customer. In Microsoft Dynamics GP, you'll work with payment terms that your company extends to customers, and also with payment terms that vendors extend to your company.
The following table displays common payment terms and descriptions.
| Invoice Date | Payment Terms | Discount Days | Discount Date | Percent Discount | Due Date |
|---|---|---|---|---|---|
| 11/30 | 2%-10/Net 30 | 10 | 2.00% | 12/30 | |
| The customer is offered a 2% discount in return for payment within 10 days after the purchase, or invoice date. The payment is due in full 30 days after the invoice date. | |||||
| 11/30 | 2%-10th/Net 30 | 12/10 | 2.00% | 1/09 | |
| The customer is offered a 2% discount in return for making payment by the 10th of the month following the month in which the invoice date occurred. Since the invoice date is in November, the "10th" referenced in the payment terms would be the 10th of December. The payment is due in full 30 days after the discount date. If the invoice is generated in one of the first 9 days of the month, the discount is available only until the 10th of the month in which the invoice occurred. | |||||
| 11/30 | 2%-15th/EOM | 12/15 | 2.00% | 12/30 | |
| The customer is offered a 2% discount in return for payment by the 15th of the month. Since the invoice date is November 30th, the discount date is the 15th of the following month. If the invoice date were December 5th or 10th, the discount date still would be December 15th. The payment is due in full at the end of the same month as the discount date. | |||||
| 11/30 | Net 30 days | 12/30 | |||
| The payment is due in full 30 days after the invoice date. |
Setting up payment terms
If you chose to install the default payment terms provided with the accounting system when you created the company you're setting up, they'll appear when you open the Payment Terms Setup window and choose the Payment Terms lookup button. You also can print a Payment Terms Report by choosing File >> Print in the Payment Terms Setup window.
If you didn't load default payment terms, or if you need additional payment terms, use the Payment Terms Setup window to create them. Use the following procedure to set up payment terms that don't include a discount.
If, after beginning to use your accounting system, you need to update or remove any of the payment terms, you can do so at any time. Existing transactions using the payment terms won't be affected by the changes.
For payment terms that use a date or the end of month (EOM) payment terms, you can specify a grace period for each customer to whom you're offering Date/EOM payment terms, or for each vendor from whom you're receiving those terms.
To specify a grace period for customers, use the Customer Maintenance window. See the Receivables Management documentation for more information.
To specify a grace period for vendors, use the Vendor Maintenance Options window. See the Payables Management documentation for more information.
To set up payment terms:
Open the Payment Terms Setup window. (Administration >> Setup >> Company >> Payment Terms)
Enter the name of the payment terms, such as Net 30 or EOM.
From the Due list, select when the full amount of the payment is due.
If the payment is due within a certain number of days after the invoice date, select Net Days and enter the number of days.
If the payment is due by a given date, select Date and enter a date. For example, assume that you enter 10 as the date. If an invoice has an invoice date is 11/12/2017, the payment is due on 12/10/2017, the 10th day of the next month.
If the payment is due in full by the end of the month in which the invoice date occurs, select EOM.
If the payment is due on the 20th of the month following the document date, select Next Month.
Choose Save to save the payment terms.
Setting up payment terms with discounts
Use the Payment Terms Setup window to set up payment terms that include a discount. You can calculate the discount percentage on the entire payment, or on any of the amounts that typically appear on an invoice: tax, freight, and so on. You can choose any combination of these amounts, depending on what you allow customers to discount, or what you are allowed to discount.
To set up payment terms with discounts:
Open the Payment Terms Setup window.
(Administration >> Setup >> Company >> Payment Terms)
Enter the name of the payment terms, such as 2%-10/Net 30.
From the Due list, select when the full amount of the payment is due. See Setting up payment terms for more information.
From the Discount list, select when the payment must be made for the customer to receive a discount.
If a discount is given if payment is made within a certain number of days after the invoice date, select Days and enter the number of days.
If a discount is given if payment is made by a certain date following the invoice date, select Date and enter the date. For example, assume that you enter 10 as the date. If an invoice has an invoice date is 11/12/2017, the discount expires on 12/10/2017, the 10th day of the next month.
If the discount is given if payment is made by the end of the month in which the invoice date occurs, select EOM.
In the Discount Type field, select whether to base the discount on a percentage of the total amount or a fixed currency amount.
If you select Percent, enter a percentage for the discount.
If you select Amount, enter a currency amount for the discount.
In the Calculate Discount On list, select the amounts that the discount applies to.
Choose Save to save the payment terms.
Taxes calculations for New Zealand payment terms with discounts
Assume a debtor has a payment terms discount of 2%/10 Net 30, and makes a $100 purchase.
- If the debtor doesn't pay the invoice within 10 days (the discount period), the following amount is charged:
| Sale amount | $100.00 |
|---|---|
| GST amount | $12.50 |
| Total | $112.50 |
To calculate taxes correctly for this situation in Microsoft Dynamics GP, the Calculate Terms Discount Before Taxes box in the Company Setup Options window must be unmarked.
If the debtor pays the invoice within 10 days, the debtor is eligible for a 2% discount, and the total sale would be as shown:
| Sale amount | $100.00 - 2% discount = | $98.00 |
|---|---|---|
| GST amount | $12.50 - 2% discount = | $12.25 |
| Total | $110.25 |
- To calculate taxes correctly for this situation in Microsoft Dynamics GP, the Calculate Terms Discount Before Taxes box in the Company Setup Options window must be marked.
Chapter 15: Financial information
Use this information to set up currencies, bank records, and checkbooks for each company. This information is divided into the following sections:
Setting up currencies
Setting up a currency record
Setting company access to a currency
Specifying functional and reporting currencies
Checking links for currency tables
Setting up a bank record
Using checkbooks throughout Microsoft Dynamics GP
Check numbers and deposit numbers
Inactive checkbooks
Last reconciled date and last reconciled balance
Setting up a checkbook
Setting up payables options for a checkbook
Setting up a credit card
Setting up currencies
Currency records track information about how the currency will be used in Microsoft Dynamics GP, as well as how it appears in windows and on reports. Currency records are used throughout the Microsoft Dynamics GP system; once a currency record is set up, you can set access to it for multiple companies, if needed.
The functional currency is the currency in which a company maintains its financial records.
The reporting currency is used to convert financial currency amounts to another currency on inquiries and reports.
You must set up a functional currency, even if you're not using Multicurrency Management.
To set up currencies, you'll need to complete the following procedures:
Set up one or more currency records.
Set access to the currency for your company.
Specify functional and reporting currencies.
Check links to ensure that related tables are updated.
Note
If you've loaded the sample company, you can use its currency records in your own company.
Setting up a currency record
Currency records are used throughout the Microsoft Dynamics GP system; once a currency record is set up using the Currency Setup window, you can set access to it for multiple companies, if needed.
To set up a currency record:
Open the Currency Setup window. (Administration >> Setup >> System >> Currency)

In the Currency ID field, enter or select a name for the currency.
In the Description, ISO code, and Symbol fields, enter the information that's appropriate for the currency.
Select additional display and separator options and enter payables check terminology.
Choose Save to save the currency information.
Setting company access to a currency
Once a currency record is set up using the Multicurrency Access Setup window, you can set access to it for multiple companies, if needed.
To set company access to a currency:
Open the Multicurrency Access Setup window. (Administration >> Setup >> System >> Multicurrency Access)
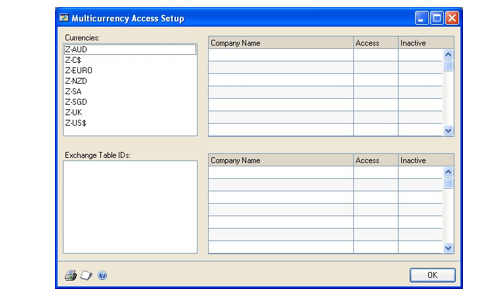
From the Currencies list, select the currency to which you want to set access.
In the Access column, mark the box for each company that uses this currency.
Choose OK to save your entries and close the window.
Specifying functional and reporting currencies
Use the Multicurrency Setup window to specify functional and reporting currencies for each company. The functional currency is the primary currency that the company uses for maintaining accounting records. The reporting currency is used to convert functional currency amounts to another currency on inquiries and reports. For a subsidiary, the reporting currency typically is the functional currency of the parent company.
To specify functional and reporting currencies:
Open the Multicurrency Setup window. (Financial >> Setup >> Financial >> Multicurrency)
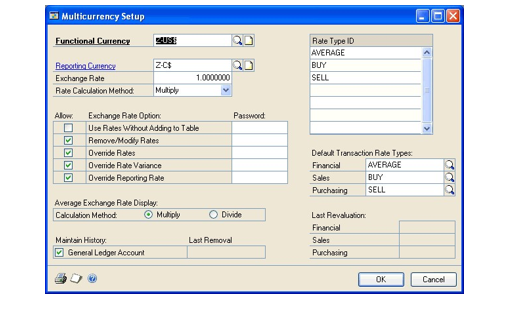
In the Functional Currency field, enter the currency that your business uses most often. Typically, this is the currency of the country or region in which your organization is located.
In the Reporting Currency field, enter the currency that your organization uses for reporting. (optional)
Enter the exchange rate and rate calculation method to be used when calculating the reporting currency. If no reporting currency was entered, these fields will be disabled.
Tip
You can mark the Override Reporting Rate option if you would like the user to override the reporting currency exchange rate or rate calculation method on inquiries and reports. You also can enter a password if you want the password to be required when overriding the rate and calculation method.
In each of the Default Transaction Rate Types fields, enter or select a rate type.
If you're not using Multicurrency Management, make the following selections:
| Field | Selection |
|---|---|
| Financial | AVERAGE |
| Sales | AVERAGE |
| Purchasing | AVERAGE |
- Choose OK to save your changes and close the window.
When you choose OK, a message may instruct you to check links on the Multicurrency Setup table. For example, if you have changed the functional currency, the message will appear.
Checking links for currency tables
Use the Check Links window to check relationships among tables to find information that may be missing from one table within the relationship. To verify that all updated multicurrency information is present, you'll need to add the Multicurrency Setup table into your list of tables to check links for.
To check links for currency tables:
- Open the Check Links window.
(Microsoft Dynamics GP menu >> Maintenance >> Check Links)
In the Series list, be sure that Financial is displayed.
In the Logical Tables list, select Multicurrency Setup and choose Insert to insert it into the Selected Tables list.
Choose OK to check links.
Setting up a bank record
A bank is a financial institution with which you do business. You'll use the Bank Maintenance window to set up bank records.
If you do business with a bank at more than one location, you can set up separate bank IDs for each of the bank branches. For example, if you do business with Metro Bank at both its Main office and its Park Avenue office, you could set up Metro Bank1 and Metro Bank2 as bank IDs and enter Main and Park Avenue as the bank branches.
To set up a bank record:
Open the Bank Maintenance window. (Administration >> Setup >> Company >> Bank)
Enter a bank ID and name.
Enter the bank's address information, including phone and fax numbers. If you're using Bank Reconciliation, this information can be formatted to be printed on deposit slips.
Enter the bank's transit number. This is the first group of numbers (usually followed by a colon) in the lower left corner on checks issued by the bank.
Enter the bank branch to further identify this bank ID.
Choose Save to save the bank information.
To print a Bank List containing information for the currently selected bank, choose File >> Print. You also can print this report using the Company Setup Report Options window.
Using checkbooks throughout Microsoft Dynamics GP
Use checkbooks to maintain records of deposits, checks, or cash paid out. Later, you can reconcile this information with the statement of activity provided by your bank.
You can set up an unlimited number of checkbooks to manage your company's cash. For example, one checkbook can be set up for writing payroll checks, another for making payments to vendors, and a third for recording miscellaneous payments made by your business.
If you add Bank Reconciliation after you've begun using Microsoft Dynamics GP, it's a good idea to set up completely new checkbook IDs. This way, transactions that were entered in other modules won't need to be posted before using Bank Reconciliation.
If you're moving checkbooks to Microsoft Dynamics GP from another accounting system, see Chapter 1, "Setup preparation," in the Bank Reconciliation documentation.
The Cash Account From option in each of the following windows specifies whether to use the cash account from the checkbook assigned to a transaction or the cash account assigned to the customer, employee, or vendor.
Customer Class Accounts Setup
Customer Account Maintenance
Vendor Class Accounts Setup
Vendor Account Maintenance
Employee Maintenance
Employee Class Setup
If you're using Bank Reconciliation, be sure to use the cash account from the checkbook to ensure that your checkbook balances can be easily reconciled.
Check numbers and deposit numbers
Check and deposit numbers can be alphanumeric. If alphabetic characters are entered, the numerals—not the letters—will increment as you process checks and enter deposits.
By defining the next number, you're also determining the number of unique numbers that will be available. For example, if you enter CK001 as the next check number, you'll only be able to enter up to 999 unique checks. Be sure to enter a number large enough to accommodate your business.
If alphabetic characters are entered between numbers, only the numbers to the right of the last letter you've entered will increment. For example, if the next check number is CK00M18888, the following check number will be CK00M18889.
Inactive checkbooks
You can inactivate a checkbook at any time. For example, if you plan to close a checking account in the near future and you don't want to write new checks or add receipts to this checkbook before you reconcile, you could inactivate the checkbook to prevent any new checks or receipts from being entered for that checkbook.
When a checkbook is inactive, you can perform the following functions for the checkbook:
Post transactions that were entered in any module.
Void receipts, transactions or deposits in any module except Payroll. (You can't void checks in Payroll.)
Enter Deposits With Receipts or Deposits To Clear Receipts transactions using the Bank Deposit Entry window.
Enter adjustment transactions using the Reconcile Bank Adjustments window.
Adjust the checkbook balance to zero using the Reconcile Bank Statements window.
Last reconciled date and last reconciled balance
For new checkbooks, the last reconciled balance is the checkbook's current balance. You can make changes to this amount until you've reconciled the checkbook for the first time. If you change the last reconciled balance after saving the checkbook, you'll need to enter an adjustment in General Ledger for the Cash account, because an adjusting entry won't be made automatically.
After you reconcile a checkbook, the amount in the Last Reconciled Balance field is the same as the bank statement's ending balance in the Reconcile Bank Statements window. This amount can't be changed in the Checkbook Maintenance window.
Setting up a checkbook
Use the Checkbook Maintenance window to set up a new checkbooks.
To set up a checkbook:
Open the Checkbook Maintenance window. (Financial >> Cards >> Financial >> Checkbook)
Enter a checkbook ID and description.
Enter a currency ID, payment rate type ID, and deposit rate type ID.
Enter the Cash account to which this checkbook's transactions will be posted.
It's best to set up a separate Cash account for each checkbook. That way, you'll have a separate record of each checkbook's activity in General Ledger. The checkbook Cash account must be a posting account—it can't be either a unit account or an allocation account if a unit account is assigned as one of the distributions.
Enter the number of the next check and deposit transaction that will be issued from or entered in this checkbook. Each time you enter a check or deposit, the number is incremented by one to the next available number.
Select the address ID of the company location that uses this checkbook. This information appears on the Bank Deposit Worksheet when you print that report.
Enter the checkbook account number at the bank where the checking account is located. Then, select the ID of the bank where this checkbook account is located.
Enter the date and balance from the last time you reconciled this checkbook. This information can be changed, if necessary, until you reconcile the checkbook the first time.
Enter user-defined information. The entry you make in the first user-defined field can be used as a sorting option when printing reports such as the Checkbook List.
Choose Save to save the checkbook information you've entered.
To print a checkbook list containing information for the currently displayed checkbook, choose File >> Print. You also can print this report using the Checkbook Report Options window.
Setting up payables options for a checkbook
For greater control, you can specify additional Payables Management options within the Checkbook Maintenance window for checkbooks that are used to pay vendors. You can control the following options:
Maximum check amount
Allow duplicate check numbers or not
Allow default check numbers to be changed or not
To set up payables options for a checkbook:
- Open the Checkbook Maintenance window.
(Financial >> Cards >> Financial >> Checkbook)
Enter checkbook information. See Setting up a checkbook .
In the Maximum Payables Check Amount field, enter the largest amount a check from this checkbook can be written for. If you don't want to set a limit, leave the amount at $0.00; no maximum will apply.
In the Maximum Payables Check Password, enter a password to allow checks to be written for more than the maximum, if the password is entered.
To use a check number more than once when entering payments, printing checks or posting checks in Payables Management for this checkbook, mark the Duplicate Check Numbers option.
To change the check number when entering payables transactions and payments, mark the Override Check Number option.
Choose Save to save the checkbook information you've entered.
Setting up a credit card
With Microsoft Dynamics GP, you can track information about credit cards that are accepted from customers and cards that are used by your company. The same card can be used for both purposes.
Use the Credit Card Setup window to set up information about each of the credit cards that your company uses.
If, after beginning to use your accounting system, you need to update or remove any of the credit cards, you may do so at any time. Existing transactions that were paid using the credit cards won't be affected by the changes.
Credit cards and check cards
Both credit cards and check cards can be used by your company to purchase goods and services. The difference lies in where the amounts will be posted for transactions involving these cards.
Credit cards require that you specify a vendor ID for the credit card company. Payments made with credit cards are treated as accounts payable amounts. The credit card company acts as a vendor to you in this instance, since you'll pay them for the goods and services you purchase with the card.
Check cards require that you enter a checkbook ID. Payments made with check cards are treated as check or cash payments, because the amount is automatically withdrawn from your bank account. Banks issue a variety of check cards. The checkbook ID is the checkbook in which payments with the card should be tracked.
Bank cards and charge cards
Both bank cards and charge cards can be accepted from customers. The difference lies in where the amounts will be posted for transactions involving these cards.
Bank cards require that you specify a checkbook ID. Payments with bank cards are treated as check or cash payments. The checkbook ID identifies the checkbook in which you will track payments made with this card.
Charge cards require that you enter a posting account. Payments made with charge cards are treated as accounts receivable amounts. They must be submitted to the credit card company and the reimbursement received before the payment is considered received.
To set up a credit card:
Open the Credit Card Setup window. (Administration >> Setup >> Company >> Credit Cards)
Enter the name of any credit card your business accepts from customers or uses to make payments.
If the card name you entered is one you accept in payment from customers, mark Accepted from Customers. Then do one of the following:
If the card is a bank card, mark Bank Card and enter a checkbook ID.
If the card is a charge card, mark Charge Card and enter a posting account.
If the card is used by your company to make payments, mark Used by Company. Then do one of the following:
If the credit card company bills you monthly for purchases made, mark Credit Card and enter a vendor ID for the credit card company.
If the card is a check card, mark Check Card and enter a checkbook ID.
Choose Save to save the credit card information.
To print a Credit Card Report showing information for the currently displayed credit card, choose File >> Print. You also can print this report using the Company Setup Report Options window.
Chapter 16: E-mail setup for documents
Use this information to set up the e-mail functionality for documents in Microsoft Dynamics GP. For information about sending reports in e-mail, see Report Writer reports in your System Users Guide (Help >> Contents >> select Using The System)
This information is divided into the following sections:
E-mail overview for documents
E-mail requirements for documents
E-mail setup for documents checklist
Setting up e-mail document options for a company
Setting up messages for e-mail documents
Customizing a message with additional fields
Copying an existing email message to a new message
Setting up e-mail options for sales documents
Setting up e-mail options for multiple customers
Setting up e-mail options for purchasing documents
Setting up e-mail options for multiple vendors
E-mail overview for documents
By using the e-mail functionality for documents in Microsoft Dynamics GP, you can embed document into the body of an e-mail or send documents as attachment. You can send a single document, batches of documents, or multiple documents from sales and purchasing transaction lists. When setting up the e-mail functionality, you can select which documents to send and which customers and vendors should receive their documents in e-mail. If you are using Word templates for Microsoft Dynamics GP, you can send predefined or customized forms. For more information, see Chapter 42, "Word templates."
You can send the following documents in e-mail.
| Documents | Documents |
|---|---|
| Sales quote | Receivables finance charges |
| Sales order | Receivables service/repair |
| Sales fulfillment order | Receivables warranty |
| Sales invoice | Customer statement |
| Sales return | Standard purchase order |
| Sales back order | Standard purchase order |
| Packing slip | Blanket purchase order |
| Receivables invoice | Drop-ship purchase order |
| Receivables return | Drop-ship blanket purchase order |
| Receivables debit memo | Vendor remittances |
| Receivables credit memo |
You can embed documents into the body of the e-mail or send documents as attachment. A document can be sent in an HTML, XPS, PDF, or DOCX file format type. Multiple documents can be combined in a single e-mail.
You also can create predefined messages to send to your customers and vendors. These messages can be assigned to the documents that you want to send in e-mail so all customers or vendors receive the same message for selected documents. For example, you can send a promotional message to your customers when sending sales quotes in e-mail. You also can assign a specific message to an individual customer or vendor. For example, you can send a holiday greeting message to a vendor. When you create a message, you can enter an alternate e-mail address so your customer or vendor can reply to a specific e-mail address.
You also can customize your messages by adding fields that are associated with a document type. For example, a message can be personalized to address each customer or vendor by name. You could add the due date for a sales invoice in a message or the on order amount for a purchase order.
E-mail requirements for documents
Review the following requirements.
You can send documents by email if you're using a MAPI-compliant e-mail service or Exchange 2007 Service Pack 1 or greater with Exchange Web Services.
If you are using Exchange 2007 Service Pack 1 or greater with Exchange Web
Services, the Autodiscover service must be turned on to connect to the Exchange server.
- The e-mail functionality in Microsoft Dynamics GP supports the following document types. Depending on the document type, Microsoft Word 2010 or later and Word templates for Microsoft Dynamics GP are required.
| File format | Word 2010 or later | Word templates | Web Client |
|---|---|---|---|
| XPS | Required for MAPI | Enabled | Not available |
| Required for MAPI | Enabled | Not available | |
| DOCX | Not required | Enabled | Available* |
| HTML | Not required | Not required | Available* |
*Email for Microsoft Dynamics GP Web Client will only be available if Exchange is your server type in the System Preferences window.
Before you can send documents as DOCX, PDF, or XPS attachments, the Word template for the document must be enabled in the Template Configuration Manager window.
The email functionality is supported on the 32-bit edition of Microsoft Office 2010.
The email functionality is supported on the 64-bit edition of Microsoft Office 2010 is supported, if you are using Exchange 2007 Service Pack 1 or greater with Exchange Web Services.
Depending on the file format you choose to send your documents in e-mail, your customers and vendors must be using the following components to view their documents.
| File format | Component |
|---|---|
| XPS | Microsoft XPS Viewer |
| Adobe Reader | |
| DOCX | Microsoft Word Viewer |
| HTML | Internet Explorer 9 Internet Explorer 8 |
| *If you are using Microsoft Dynamics GP Web Client only, your customers and vendors must be using HTML to view their documents |
Setting up e-mail document options for a company
Use the Company E-mail Setup window to select options to use when sending documents in e-mail. You can select to embed documents, attach documents, or both. If you select to send documents as attachments, you can specify which type of file formats you want to attach the documents as. The options you select in this window are available for customer and vendor records.
If you selected to use an option, such as the DOCX file format, and then decide not to use the option, you must update the customer and vendor records that were set up to use the DOCX file format.
To set up e-mail document options for a company:
Open the Company E-mail Setup window. (Administration >> Setup >> Company >> E-mail Settings)
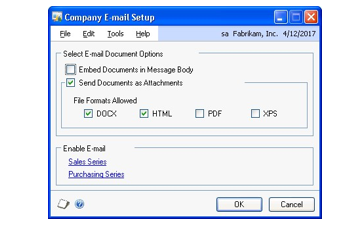
Mark whether to embed documents into the body of e-mail messages.
Mark whether to send documents as attachments in e-mail messages.
If you are attaching documents in messages, select the formats to send the documents in.
Before you can send documents as DOCX, PDF, or XPS attachments, the Word template for the document must be enabled in the Template Configuration Manager window. Standard reports (reports generated by Report Writer) are sent when you send documents as HTML attachments.
Choose one of the following options.
Choose OK to save your changes and close the window.
Click the Sales Series link to open the Sales E-mail Setup window. See Setting up e-mail options for sales documents for more information.
Click the Purchasing Series link to open the Purchasing E-mail Setup window. See Setting up e-mail options for purchasing documents for more information.
Setting up messages for e-mail documents
Use the Message Setup window to create messages that you can send to customers or vendors when sending documents in e-mail. Messages can be predefined on a company-wide basis, and used on Sales Order Processing, Receivables Management, or Purchase Order Processing documents, or Payables Management remittances.
Messages can be assigned to the documents that you want to send in e-mail so all customers or vendors receive the same message for selected documents. For example, you can send a promotional message to your customers when sending sales quotes in e-mail. You also can assign a specific message to an individual customer or vendor. For example, you can send a holiday greeting message to a vendor. When you create a message, you can enter an alternate e-mail address so your customer or vendor can reply to a specific e-mail address.
You also can customize your messages by adding fields that are associated with a document type. For example, a message can be personalized to address each customer or vendor by name. You could add the due date for a sales invoice in a message or the PO number for a purchase order.
To set up messages for e-mail documents:
Open the Message Setup window. (Administration >> Setup >> Company >> E-mail Message Setup)
Enter an ID to identify the message.
Enter a description of the message ID.
Select the series in which you want this message to appear. Messages assigned to All can be used with both the Sales and Purchasing series.
Select a document type from the series you selected. This field isn't available if you selected All as the series.
Enter a subject line for the message. If you don't enter a subject for the message, the document number of the transaction you are sending is used.
You also customize the subject line by adding a field or fields associated with a document type. See Customizing a message with additional fields for more information.
- Enter the message that will appear in the e-mail when sending documents.
You also customize the message by adding a field or fields associated with a document type. See Customizing a message with additional fields for more information.
- Enter or select an address that a customer or vendor can use to send a reply to a specific e-mail address. For example, assume that you have entered sales@fabrikam.com as the reply to address. If you send a document in e-mail to a vendor, the vendor receives e-mail from username@domainname.com. When the vendor replies to the e-mail, sales@fabrikam.com is used in the To field.
The default reply to address is the address displayed in the Sales E-mail Setup window or the Purchasing E-mail Setup window.
Choose Validate to verify the field or fields you added to the message body or subject line match the document type assigned to the message.
Choose Save to save the message ID.
Customizing a message with additional fields
You customize the subject or message body by adding a field or fields associated with a document type from the series you selected. For example, a message can be personalized to address each customer or vendor by name. You also could add a tracking number in the message for a sales invoice or a PO number and promised date in a message for a purchase order.
To customize a message with additional fields:
Enter an ID to identify the message.
Select Sales or Purchasing as the series in which you want this message to appear.
Select a document type from the series you selected.
Place the cursor in the Subject field or in the message body.
From the Field field, select an additional field.
Choose Insert.
To customize a message with additional fields using the right-click menu:
Enter an ID to identify the message.
Select Sales or Purchasing as the series in which you want this message to appear.
Select a document type from the series you selected.
Place the cursor in the Subject field or in the message body.
Right-click in the body or subject of a message ID and select Insert.
In the Insert window, select the field or fields you want to add.
Choose OK.
Copying an existing email message to a new message
When you create a new message, you can copy the message information, except for the document type, from an existing message ID to a new message ID. For example, if you created a message ID for a receivables invoice, you can copy message information from the existing message ID from a sales invoice.
To copy an existing email message to a new message:
Open the Company E-mail Setup window. (Administration >> Setup >> Company >> E-mail Message Setup)
Enter a new message ID.
Choose the Copy button.
In the Copy Email Message window, select the message ID you want to copy security information from.
Choose OK.
The Copy Email Message window closes and the message information is copied to the new message ID displayed in the Message Setup window. The document type from the existing message ID is not copied to the new message ID.
Setting up e-mail options for sales documents
Use the Sales E-mail Setup window to mark which sales documents can be sent in e-mail and select a default message ID for each of those documents. You also can enter an e-mail address where customers can send replies to and select options to change the reply to address and change the message when you enter a sales document. The options you select in this window are available when you set up or modify e-mail options for your customer records.
To set up e-mail options for sales documents:
- Open the Company E-mail Setup window.
(Administration >> Setup >> Company >> E-mail Settings)
Click the Sales Series link to open the Sales E-mail Setup window.
Mark the documents you want to send in e-mail to your customers. If a document is unmarked, it can't be sent in e-mail. To select all documents, mark the Enable option.
Enter or select the message ID you want to send for each document type you want to send in e-mail. A message ID isn't required when sending documents in e-mail.
Enter or select an address that a customer can use to send a reply e-mail for the document type. The address you enter in this field is the default reply to address if you created a new message for the sales series.
Mark to change the address used as a reply to address when entering a sales document. If you mark this option, you can edit the message in the Sales E-mail Detail Entry window or the Receivables E-mail Detail Entry window.
Mark to change the e-mail message when entering the sales document. You can edit the message in the Sales E-mail Detail Entry window or the Receivables Email Detail Entry window.
If you don't mark this option, you wont be able to edit the subject and message body of the Sales E-mail Detail Entry window or the Receivables E-mail Detail Entry window.
- Choose OK to save your changes or choose the Customer Setup button to update multiple customer records with e-mail options. For more information about updating multiple customer records with e-mail options, see Setting up email options for multiple customers .
Setting up e-mail options for multiple customers
Use the Mass Customer E-mail Settings window to assign e-mail settings to multiple customers. You can select which documents you want to send to the customers. You also can specify message IDs and the document format to use for the vendor. A message ID is a predefined message that you can assign to a document that you want to send in e-mail. For example, you can send a promotional message to your customers when sending sales quotes in e-mail.
If you want to set up an individual customer, you can use the Customer E-mail Options window. For more information, see the Receivables Management documentation.
To set up e-mail options for multiple customers:
In the navigation pane, choose the Sales button, and then choose the Customers list.
Mark the customers you want to set up e-mail options for.
In the Modify group or its overflow menu, and then select E-mail Settings to open the Mass Customer E-mail Settings window.
Select to send documents as attachments or embed documents in the message body. The options available depend on your selections in the Company E-mail Setup window.
If you are sending documents as attachments, you can mark to send multiple attachments for documents of the same document type with the same subject, message body, address to send replies to, To, Cc, and Bcc address in one e-mail.
If you are sending documents as attachments, mark to set a maximum file size limit for attached documents sent to the customers and enter the file size. If this field is unmarked, there isn't a size limit.
Mark the documents you want to send in e-mail. If a document is unmarked, it can't be sent in e-mail. The documents available to send depend on the documents you selected in the Sales E-mail Setup window. To select all documents, mark the Enable option.
Enter or select the message ID to use with the document type. If you didn't select a message ID for the document type in the Sales E-mail Setup window, the Message ID field is blank. A message ID isn't required when sending documents in e-mail.
Select the file format to send the documents in as attachments. The files formats available to send attachments depend on the formats you selected in the Company E-mail Setup window.
Before you can send documents as DOCX, PDF, or XPS attachments, the Word template for the document must be enabled in the Template Configuration Manager window. Standard reports (reports generated by the Report Writer) are sent when you send documents as HTML attachments.
- Choose OK to update the selected customers with the options you entered.
Setting up e-mail options for purchasing documents
Use the Purchasing E-mail Setup window to mark which purchasing documents can be sent in e-mail and select a default message ID for those documents. You also can select an e-mail where vendors can send replies to and select options to change the reply to address and the message when you enter a purchasing document. The options you select in this window are available when you set up or modify e-mail options for vendor records.
To set up e-mail options for purchasing documents:
Open the Company E-mail Setup window. (Administration >> Setup >> Company >> E-mail Settings)
Click the Purchasing Series link to open the Purchasing E-mail Setup window.
Mark the documents you want to send in e-mail. If a document is unmarked, it can't be sent in e-mail. To select all documents, mark the Enable option.
Enter or select the message ID you want to send for each document type you want to send in e-mail. A message ID isn't required when sending documents in e-mail.
Enter or select an address that a vendor can use to send a reply e-mail for the document type. The address you enter in this field is the default reply to address if you created a new message for the purchasing series.
Mark to change the address used as a reply to address when entering a purchase order. If you mark this option, you can edit the message in the Purchasing E-mail Detail Entry window.
Mark to change the e-mail message when entering the purchasing document. You can edit the message in the Purchasing E-mail Detail Entry window.
If you don't mark this option, you wont be able to edit the subject and message body of the Purchasing E-mail Detail Entry window.
- Choose OK to save your changes or choose the Vendor Setup button to update multiple vendor records with e-mail options. For more information about updating multiple vendor records with e-mail options, see Setting up e-mail options for multiple vendors .
Setting up e-mail options for multiple vendors
Use the Mass Vendor E-mail Settings window to assign e-mail settings to multiple vendors. You can select which documents you want to send to the vendors. You also can specify message IDs and the document format to use for the vendors. A message ID is a predefined message that you can assign to a document that you want to send in e-mail. For example, you can send a promotional message to your vendors when sending purchase orders in e-mail.
You can either send documents as attachments or embed documents in the message body. If you send documents as attachments, you can select to send multiple attachments to the vendors and set the maximum file size of the document.
If you want to set up an individual vendor, you can use the Vendor E-mail Options window. For more information, see the Payables Management documentation.
To set up e-mail options for multiple vendors:
In the navigation pane, choose the Purchasing button, and then choose the Vendors list.
Mark the vendors you want to set up e-mail options for.
In the Modify group or its overflow menu, and then select E-mail Settings to open the Mass Vendor E-mail Settings window.
Select to send documents as attachments or embed documents in the message body. The options available depend on your selections in the Company E-mail Setup window.
If you are sending documents as attachments, you can mark to send multiple attachments for documents of the same document type with the same subject, message body, address to send replies to, To, Cc, and Bcc address in one e-mail.
If you are sending documents as attachments, mark to set a maximum file size limit for attached documents sent to the vendors and enter the file size. If this field is unmarked, there isn't a size limit.
Mark the documents you want to send in e-mail. If a document is unmarked, it can't be sent in e-mail. The documents available to send depend on the documents you selected in the Purchasing E-mail Setup window. To select all documents, mark the Enable option.
Enter or select the message ID to use with the document type. If you didn't select a message ID for the document type in the Purchasing E-mail Setup window, the Message ID field is blank. A message ID isn't required when sending documents in e-mail.
Mark the file format or formats to send the documents in as attachments. The files formats available to send attachments depend on the formats you selected in the Company E-mail Setup window.
Before you can send documents as DOCX, PDF, or XPS attachments, the Word template for the document must be enabled in the Template Configuration Manager window. Standard reports (reports generated by the Report Writer) are sent when you send documents as HTML attachments.
- Choose OK to update the selected vendors with the options you entered.
Chapter 17: Document attachment setup
Use this information to set up the document attachment functionality in Microsoft Dynamics GP.
This information is divided into the following sections:
Document attachment overview
Setting up document attachment options
Document attachment overview
By using the document attachment functionality in Microsoft Dynamics GP, you attach documents such as requisitions, credit reports and images to master records, Sales Order Processing transactions and Purchase Order Processing transactions. You can attach documents to individual line items on transactions.
You can flow or roll down attachments from master records to transactions. For example, you can attach directions to a vendor's location to the vendor record. If you are rolling down attachments for the vendor record, the directions are attached to each purchase order that the vendor is assigned to.
You also can define attachment attributes to further describe the attachment. For example, you could enter Image as a user-defined label for an attachment in the Document Attachment Setup window and then enter a description of the image in the Attachment Properties window after attaching the image to an item record.
If you are using the email functionality for documents in Microsoft Dynamics GP, you can select attachments to send in email when you send the purchase order or sales document in email.
You can attach documents to the following master records.
| Master records | Master records |
|---|---|
| Item record | Vendor record |
| Customer record |
You can attach documents to the following documents and transactions. You also can attach documents to the line items assigned to the documents and transactions.
| Transactions | Transactions |
|---|---|
| Sales quote | Purchasing Invoice receipt |
| Sales order | In-transit transfer receipt |
| Sales fulfillment order | Purchasing return |
| Sales invoice | Purchasing return/credit |
| Sales return | Purchasing inventory |
| Sales back order | Purchasing inventory w/Credit |
| Standard purchase order | Payables invoice |
| Blanket purchase order | Payables finance charge |
| Drop-ship purchase order | Payables return |
| Drop-ship blanket purchase order | Payables miscellaneous charge |
| Shipment receipt | Payables credit memo |
| Shipment/Invoice receipt |
Setting up document attachment options
Use the Document Attachment Setup window to select options for attaching documents.
To set document attachment options:
Open the Document Attachment Setup window. (Administration >> Setup >> Company >> Document Attachment Setup)

Mark to attach documents to transactions, transaction line items, and master records.
Enter or select the default location.
Mark to delete the file from the default location after attaching a document to a transaction or master record.
Enter the maximum file size limit for attached documents.
Mark to delete attachments from master records and transactions in the Document Attachment Management window. If you don't mark this option, you cannot delete attachments from master records and transactions.
Assign a password that will be required to use when deleting attachments. If this field is blank, no password is required to delete an attachment.
Mark to allow attachments to flow or roll down from a customer record to a transaction.
Mark Flow or Not Flow as the default type when entering attachments for the customer records. You can use the Attachment Properties window to change the type after entering attachments. If you mark Not Flow, the attachment assigned to the customer record will not roll down to the transactions entered for the customer.
Mark to allow attachments to flow or roll down from an item record to a transaction.
Mark Flow or Not Flow as the default type when entering attachments for the item records. You can use the Attachment Properties window to change the type after entering attachments. If you mark Not Flow, the attachment assigned to the item record will not roll down to the transactions that the item is assigned to.
Mark to allow attachments to flow or link from a vendor record to a transaction.
Mark Flow or Not Flow as the default type when entering attachments for the vendor records. You can use the Attachment Properties window to change the type after entering attachments. If you mark Not Flow, the attachment assigned to the vendor record will not roll down to the transactions entered for the vendor.
Mark to send attachments in email. By marking this option, the Mark Send Attachments in Email option is available in the Attachment Properties window. If you are using the email functionality in Microsoft Dynamics GP, you can select attachments to send in email when you send purchase order or sales document in email.
Enter labels for user-defined attribute fields for attachments. The labels you enter here will appear in the Attachment Properties window, and you can enter information about the label in the field. For example, you might enter Picture as the label in this window and then enter a description of the picture in the Attachment Properties window.
You can select a default attribute label.
- Choose OK to save your changes and close the window.
Chapter 18: Intrastat setup
Intrastat is the system for collecting statistics on the trade of goods between European Union (EU) countries or regions. Intrastat data is required for all items either bought from EU vendors or sold to EU customers, and must be provided on a monthly basis. Requirements for Intrastat are similar in all EU countries or regions. The government uses these statistics as an economic indicator.
The entries you make will be used to create the Intrastat Trade Report you submit to your government, and the EC Sales List, which displays cumulative goods value totals by each vendor or customer Tax Registration number.
This information is divided into the following sections:
Tracking Intrastat statistics for a company
Setting up country codes
Setting up transport mode codes
Setting up transaction natures
Setting up incoterms codes
Setting up procedure/regime codes
Setting up port codes
Setting up region codes
Setting up country of origin codes
Setting up tax commodity codes
Tracking Intrastat statistics for a company
Use the Company Setup Options window to enable a company to track Intrastat trade statistics.
Note
The options in this procedure may have been marked automatically, depending on the country or region you chose when you installed Microsoft Dynamics GP.
To track Intrastat statistics for a company:
- Open the Company Setup window.
(Administration >> Setup >> Company >> Company)
Enter or select a company.
Choose the Options button to open the Company Setup Options window.
Mark Enable Intrastat Tracking to make Intrastat entry windows available. If you don't mark this option, you won't be able to enter Intrastat information for transactions, vendors, or customers.
Choose OK to close the Company Setup Options window.
Choose OK in the Company Setup window to save your changes.
Setting up country codes
Use the Country Code Maintenance window to set up country codes.
These codes are used when you prepare the Intrastat Trade statistics reports for each item sold to a customer or purchased from a vendor located in an EU member state. The following are examples of country codes:
| Country code | Country |
|---|---|
| BE | Belgium |
| DE | Germany |
| DK | Denmark |
| EL | Greece |
| ES | Spain |
| FR | France |
| GB | United Kingdom |
| IE | Ireland |
| IT | Italy |
| LU | Luxembourg |
| NL | Netherlands |
| PT | Portugal |
| TK | Türkiye |
To set up country codes:
- Open the Country Code Maintenance window.(Administration >> Setup >> Company >> Country Codes)
The Country Code Maintenance window will be available only if you have marked to enable Intrastat tracking in the Company Setup Options window.
Enter a country code and indicate whether this country is an EU member.
Enter a description for this country code.
Save your changes and continue entering country codes.
Setting up transport mode codes
Use the Transport Mode Maintenance window to set up transport mode codes identifying all the shipping methods you use to transport goods to EU member states or to receive goods from EU member states.
These codes are used when you prepare the Intrastat Trade statistics reports for each item sold to a customer or purchased from a vendor located in an EU member state.
You may wish to refer to the transport mode codes defined by your government. The following are examples of transport mode codes:
| Transport mode code | Transport mode |
|---|---|
| 1 | Sea Freight |
| 2 | Rail Freight |
| 3 | Road Freight |
| 4 | Air Freight |
| 5 | Post |
| 7 | Fixed Transport Installations |
| 8 | Inland Waterway |
| 9 | Own Propulsion |
To set up transport mode codes:
- Open the Transport Mode Maintenance window.
(Administration >> Setup >> Company >> Transport Mode Codes)
The Transport Mode Maintenance window will be available only if you have marked to enable Intrastat tracking in the Company Setup Options window.
Enter a transport mode code.
Enter a description for this transport mode code.
Save your changes and continue entering transport mode codes.
Setting up transaction natures
Use the Transaction Nature Maintenance window to set up transaction natures for the types of transactions you usually enter for EU vendors or customers.
These codes are used when you prepare the Intrastat Trade statistics reports for each item sold to a customer or purchased from a vendor located in an EU member state. You may wish to refer to the transaction nature codes defined by your government. The following are examples of transaction natures:
| Transaction nature code | Transaction nature |
|---|---|
| 10 | Sale of Goods/Services Invoice |
| 16 | Sale of Goods/Services Credit |
| 20 | Return Goods/Services Invoice |
| 26 | Return Goods/Services Credit |
| 30 | Free of Charge Supply Invoice |
| 36 | Free of Charge Supply Credit |
| 40 | Goods for Processing or Repair |
| 60 | Move Goods/No Change of Owner |
| 90 | Other Transactions |
To set up transaction natures:
- Open the Transaction Nature Maintenance window.
(Administration >> Setup >> Company >> Transaction Nature Codes)
The Transaction Nature Maintenance window will be available only if you have marked to enable Intrastat tracking in the Company Setup Options window.
Enter a transaction nature.
Enter a description for this transaction nature.
Save your changes and continue entering transaction natures.
Setting up incoterms codes
Use the Incoterms Maintenance window to set up incoterms codes that are used to determine the point at which responsibility for the goods will change from the exporter to the importer. Incoterms stands for International Commercial Terms and are maintained by the International Chamber of Commerce.
These codes are used when you prepare the Intrastat Trade statistics reports for each item sold to a customer or purchased from a vendor from an EU member state. The following list provides examples of incoterms codes:
| Incoterms code | Delivery method |
|---|---|
| CIF | Cost, Insurance and Freight |
| DDU | Delivered Duty Unpaid |
| EXW | Ex-Works |
| FOB | Free on Board |
To set up incoterms codes:
- Open the Incoterms Maintenance window.
(Administration >> Setup >> Company >> Incoterms)
The Incoterms Maintenance window will be available only if you have marked to enable Intrastat tracking in the Company Setup Options window.
Enter a incoterms code.
Enter a description for this incoterms code.
Save your changes and continue entering incoterms codes.
Setting up procedure/regime codes
Use the Procedure/Regime Maintenance window to set up procedure/regime codes.
These codes are used when you prepare the Intrastat Trade statistics reports for each item sold to a customer or purchased from a vendor from an EU member state. You may wish to refer to the transaction nature codes defined by your government.
To set up procedure/regime codes:
- Open the Procedure/Regime Maintenance window.(Administration >> Setup >> Company >> Procedure/Regime)
The Procedure/Regime Maintenance window will be available only if you have marked to enable Intrastat tracking in the Company Setup Options window.
Enter a procedure/regime code.
Enter a description for this procedure/regime code.
Save your changes and continue entering process type codes.
Setting up port codes
Use the Port Maintenance window to track the goods port of entry for a purchase and the port of exit for a sale
These codes are used when you prepare the Intrastat Trade statistics reports for each item sold to a customer or purchased from a vendor from an EU member state. You may wish to refer to the transaction nature codes defined by your government.
To set up port codes:
- Open the Port Maintenance window.(Administration >> Setup >> Company >> Port)
The Port Maintenance window will be available only if you have marked to enable Intrastat tracking in the Company Setup Options window.
Enter a port code.
Enter a description for this port code.
Save your changes and continue entering port codes.
Setting up region codes
Use the Region Maintenance window to track from which region the goods originated for a purchase and the region of destination for a sale.
These codes are used when you prepare the Intrastat Trade statistics reports for each item sold to a customer or purchased from a vendor from an EU member state. You may wish to refer to the transaction nature codes defined by your government.
To set up region codes:
Open the Region Maintenance window.(Administration >> Setup >> Company >> Region)
The Region Maintenance window will be available only if you have marked to enable Intrastat tracking in the Company Setup Options window.
Enter a region code.
Enter a description for this region code.
Save your changes and continue entering region codes.
Setting up country of origin codes
Use the Country of Origin Maintenance window to track the country the goods originated in.
These codes are used when you prepare the Intrastat Trade statistics reports for each item sold to a customer or purchased from a vendor from an EU member state. You may wish to refer to the transaction nature codes defined by your government.
To set up country of origin codes:
- Open the Country of Origin Maintenance window.(Administration >> Setup >> Company >> Country of Origin)
The Country of Origin Maintenance window will be available only if you have marked to enable Intrastat tracking in the Company Setup Options window.
Enter a country of origin code.
Enter a description for this country of origin code.
Save your changes and continue entering country of origin codes.
Setting up tax commodity codes
Use the Tax Commodity Code Maintenance window to set up tax commodity codes for products or services you either sell or purchase. Commodity codes for goods and services are defined in the EU Combined Nomenclature.
These codes are used when you prepare the Intrastat Trade statistics reports for each item sold to a customer or purchased from a vendor from an EU member state. You may wish to refer to the transaction nature codes defined by your government.
To set up tax commodity codes:
- Open the Tax Commodity Code Maintenance window.(Administration >> Setup >> Company >> Tax Commodity Codes)
The Tax Commodity Code Maintenance window will be available only if you have marked to enable Intrastat tracking in the Company Setup Options window.
Enter a tax commodity code.
Enter a description for this tax commodity code.
Save your changes and continue entering tax commodity codes.
Part 4: Tax setup
This part of the documentation contains information about tracking taxes on sales and purchases in Microsoft Dynamics GP. For information about payroll taxes, refer to the Payroll documentation.
For additional information about tax setup windows, refer to the help. (From the Help menu, choose Index; then type the name of the window and choose Display.) The following information is discussed:
Chapter 19, "International taxes," provides an overview of some tax features and special setup information for different areas of the world.
Chapter 20, "Value-added tax," explains how to set up information needed to correctly process Value-added Taxes (VAT).
Chapter 21, "Tax overview," provides an introduction to tax calculation and tax schedules in Microsoft Dynamics GP.
Chapter 22, "Tax details," explains how to use the Tax Detail Maintenance window to add, change, or delete tax details.
Chapter 23, "Tax schedules," describes how to set up tax schedules used to calculate all the taxes that apply to a sales or purchase transaction.
Chapter 19: International taxes
Microsoft Dynamics GP accommodates the different tax rates on goods and services in cities, states, provinces, regions, and countries in many areas of the world. These taxation methods include goods and services tax (GST), Provincial Sales Tax (PST), Québec Sales Tax (QST), Value-added Tax (VAT), and Pay As You Go (Withholding), as well as taxes calculated as a percent of sale or purchase.
This information provides an overview of some features and special setup information for different areas of the world.
Review the sections listed below that apply to countries or region in which you do business and complete any preliminary setup tasks that are necessary. Then, continue to Chapter 21, "Tax overview," to set up taxes.
| Country/region | Default tax options |
|---|---|
| Africa | Calculate Taxes in General Ledger Enter VAT Return Require Tax Detail Totals to Match the Pre-Tax Amount Specify Tax Details for Automatic Tax Calculations Use Shipping Method when Selecting Default Tax Schedule |
| Australia | Enable GST for Australia Enter Tax Date Use Shipping Method when Selecting Default Tax Schedule |
| Belgium | Calculate Taxes in General Ledger Calculate Terms Discount Before Taxes Enable Reverse Charge Taxes Enter VAT Return Require Tax Detail Totals to Match the Pre-Tax Amount Specify Tax Details for Automatic Tax Calculations |
| Canada | Allow Summary-Level Tax Edits Use Shipping Method when Selecting Default Tax Schedule |
| Colombia | Allow Summary-Level Tax Edits Calculate Taxes in General Ledger Use Shipping Method when Selecting Default Tax Schedule |
Default tax options
Setting up taxes in the United States
Setting up taxes in Canada
Setting up company GST information for Canada
Canadian tax detail option
Setting up taxes in New Zealand
Setting up company GST information for New Zealand
Setting up taxes for Europe and the United Kingdom
Setting up taxes in the United States
The United States has varying state and local tax rates and calculation bases. Tax can be calculated on sales and purchases.
In the United States, most states have a sales tax, and many cities and counties assess additional taxes. Tax rates for different types of goods and services vary from jurisdiction to jurisdiction. Certain goods may be subject to a "luxury tax," as well.
Not-for-profit organizations and certain businesses may qualify for exemptions from some taxes; check with your taxing authority for more information.
In most jurisdictions in the United States, taxes are not assessed on other taxes; "taxable taxes" in Microsoft Dynamics GP are most commonly used outside the United States.
If you do business exclusively in the United States, you can set up all your tax information using the Tax Detail Maintenance and Tax Schedule Maintenance windows.
If you do business outside the United States, set up additional tax information using the Company Setup window. Then enter tax details and tax schedules for taxes in all countries and regions in which you do business.
To set up taxes in the United States:
- Open the Company Setup window.
(Administration >> Setup >> Company >> Company)
Enter your federal taxpayer identification number (TIN) in the Tax Registration field.
Choose OK to save your changes.
When you've finished entering tax details and tax schedules, be sure to return to the Company Setup window and specify the default sales and purchases tax schedules for the company.
Setting up taxes in Canada
Canada has a federal Goods and Services Tax (GST) that applies to every province and territory in Canada. Generally, GST is collected on all supplies and services. However, the following conditions may apply:
An Exempt tax rate and a 0% tax rate may apply to certain goods. Exempt supplies should be assigned a 0% tax detail as the rate and no tax should be collected. Generally, sales of exempt supplies are tracked and reported, but can't be claimed as Input Tax Credit.
Zero-rated supplies are taxable, but taxed at a rate of 0% and can be claimed as Input Tax Credit. As a result, no tax is applied to the sale of these goods, but information is available for input tax credit purposes when you complete the GST returns.
Provincial Sales Tax (PST) is collected at different rates throughout Canada. Each province also determines whether the GST is taxable by the PST. Québec Sales Tax (QST) is the provincial sales tax in Québec. QST is taxed at two rates, one for products and another for services.
Enter tax exempt and tax registration information using the Company Setup window.
To set up GST, PST, and QST taxes, use the Tax Detail Maintenance and Tax Schedule Maintenance windows.
Setting up company GST information for Canada
You'll use the Company Setup window to enter company GST information.
To set up company GST information for Canada:
- Open the Company Setup window.
(Administration >> Setup >> Company >> Company)
Enter your tax exemption numbers in the Tax Exempt fields.
Enter your company's GST registration number in the Tax Registration field.
Choose OK to save your changes.
When you've finished entering tax details and tax schedules, be sure to return to the Company Setup window and specify the default sales and purchases tax schedules for the company.
Canadian tax detail option
Mark the Enable Canadian Tax Detail option in the Company Setup Options window (Administration >> Setup >> Company >> Company >> Options button) to do the following things:
Select the account that taxes calculated posts to when a you have selected a purchase tax detail type.
Select to post the tax detail to either the account on the tax detail, or the purchases account associated with the vendor, or the inventory account from the item on the purchase order/shipment order receipt.
View sales and purchases transactions with the taxes included in the amounts if you have marked Inclusive of Tax on the View menu (View >> Inclusive of Tax).
Setting up taxes in New Zealand
New Zealand uses a federal Goods and Services Tax (GST); it also has a system of handling payment terms discounts.
When a customer pays an invoice within the time that a discount is allowed, the discount is taken on the GST amount, as well as the amount of the sale.
Enter company GST information using the Company Setup window.
To set up federal and state taxes, use the Tax Detail Maintenance and Tax Schedule Maintenance windows.
Setting up company GST information for New Zealand
You'll set up company GST information for New Zealand by choosing the appropriate option in the Company Setup Options window.
To set up company GST information for New Zealand:
- Open the Company Setup window.
(Administration >> Setup >> Company >> Company)
Enter your company's GST registration number in the Tax Registration field.
Choose Options to open the Company Setup Options window
Mark the Calculate Terms Discount Before Taxes option to indicate how your company typically pays invoices that include a terms discount. Marking this selection will result in taxes being applied only to the discounted amount, regardless of when the payment is actually made.
If you typically pay invoices that include a terms discount before the discount expires, mark this option. On occasions where you don't pay before the discount expires, you'll need to adjust the tax amounts manually.
If you typically don't pay invoices before their discounts expire, leave this option unmarked. On occasions where you do pay before the discount expires, you'll need to adjust the tax amounts manually.
Choose OK to save your changes.
When you've finished entering tax details and tax schedules, be sure to return to the Company Setup window and specify the default sales and purchases tax schedules for the company.
Setting up taxes for Europe and the United Kingdom
Value-Added Tax (VAT) is a general tax used throughout Europe and elsewhere in the world. Each country or region that uses VAT has its own rate of taxation and often has different rates for various goods or special zones within the country or region. VAT is collected on sales, and any credit for tax paid on purchases is also tracked. The difference is remitted to the taxation authority in each country or region. See Chapter 20, "Value-added tax," for more information on VAT.
Set up company VAT information using the Company Setup window.
Enter a zero percent tax detail for receivables and payables documents that are automatically generated within the system when the Require Tax Detail Totals to Match the Pre-Tax Amount option is marked in the Company Setup Options window. This tax detail will be used when refunding a check, consolidating vendors and customers, assessing finance charges, and handling non-sufficient funds.
Set up taxes using the Tax Detail Maintenance and Tax Schedule Maintenance windows.
To enter VAT information for each of your debtors, use the Debtor Maintenance Options window when you're setting up debtor information.
To enter VAT information for each of your creditors, use the Creditor
Maintenance Options window when you're setting up creditor information.
Chapter 20: Value-added tax
Value-added Tax (VAT) is an input tax due on purchases and an output tax due on sales. It is used throughout Europe and elsewhere in the world. This information explains how to set up information needed to correctly process VAT data.
This information is divided into the following sections:
Value-added tax overview
Setting up VAT for a company
Setting up VAT details and schedules
Entering VAT information for debtors and creditors
Value-added tax overview
Microsoft Dynamics GP accommodates the different tax rates on goods and services sold in cities, states, provinces, regions, and countries or regions in many areas of the world. These taxation methods include VAT. VAT is an input tax due on purchases and an output tax due on sales. It is used throughout Europe and elsewhere in the world.
Each country or region that uses VAT has its own rate of taxation and often has different rates for various goods or special zones within the country or region. VAT is collected on sales, and any credit for tax paid on purchases also is tracked. The difference is remitted to the taxation authority in each country or region.
VAT entries will be used to compile the Detail Tax Report or the Summary Tax Report, which displays the total sale or purchase amount, the total tax amount, the total EU sale or purchase amount and the total EU tax.
Setting up VAT for a company
Use the Company Setup window and the Company Setup Options window to set up company VAT information.The following options in the Company Setup Options window will be marked automatically for you:
Calculate Taxes in General Ledger
Require Tax Detail Totals to Match the Pre-Tax Amount
Specify Tax Details for Automatic Tax Calculation
Be sure to enter a registration number for each company you set up. The options in this procedure may have been marked automatically, depending on the country or region you chose when you installed Microsoft Dynamics GP.
To set up VAT for a company:
Open the Company Setup window. (Administration >> Setup >> Company >> Company)
Enter your company's VAT registration number in the Tax Registration field.
Choose the Options button to open the Company Setup Options window.
Mark the Calculate Terms Discount Before Taxes option. Marking this selection will result in taxes being applied only to the discounted amount, regardless of when the payment is actually made.
Mark the Enable VAT Return option.
Enter a zero percent tax detail for receivables and payables documents that are automatically generated within the system when the Require Tax Detail Totals to Match the Pre-Tax Amount option is marked. This tax detail will be used when refunding a check, consolidating vendors and customers, assessing finance charges, and handling non-sufficient funds.
Choose OK to close the Company Setup Options window.
Choose OK in the Company Setup window to save your changes.
Setting up VAT details and schedules
Use the Tax Detail Maintenance window and the Tax Schedule Maintenance window to set up tax details and schedules. For more information about tax details and schedules, see Chapter 22, "Tax details" and Chapter 23, "Tax schedules."
When you set up a tax detail, you'll define the basis that will be used to calculate the tax, the maximum or minimum amount that will be taxed, and the account that will be used to track input or output tax amounts. Once you've set up tax details, you can create tax schedules. Tax schedules are groups of tax details that will be assigned to a transaction.
Input and output taxes usually are included in the item price or based on a percentage of the sale or purchase amount, but Microsoft Dynamics GP supports all methods of calculation.
Entering VAT information for debtors and creditors
Before using Microsoft Dynamics GP to calculate input and output taxes, you must enter tax registration information for your debtors and creditors. For more information about debtors and creditors, refer to the Receivables Management and Payables Management documentation.
To enter VAT information for each of your debtors, use the Debtor Maintenance Options window when you're setting up debtor information.
To enter VAT information for each of your creditors, use the Creditor
Maintenance Options window when you're setting up creditor information.
Chapter 21: Tax overview
This information contains an introduction to tax calculation and tax schedules in Microsoft Dynamics GP. You'll complete two procedures to set up your taxes; setting up tax details and setting up tax schedules.
For additional information about tax setup windows, refer to the help. (From the Help menu, choose Index; then type the name of the window and choose Display.)
This information is divided into the following sections:
Before you enter tax details and schedules
Overview of Microsoft Dynamics GP taxes
Why tax schedules are used
How taxes are calculated
Default tax schedules
Freight and miscellaneous charge tax calculations
Withholding taxes
Before you enter tax details and schedules
Complete the following tasks before you begin entering tax details and schedules:
Enter a chart of accounts. For information on entering accounts, refer to the General Ledger documentation, or to Setting up a posting account in Microsoft Dynamics GP if you're not using General Ledger.
Set up shipping methods if you've marked the Use Shipping Method when Selecting Default Tax Schedule option in the Company Setup Options window. Taxes are calculated based on the point of exchange, using the shipping method assigned to a transaction to determine the point of exchange. Refer to Setting up a shipping method
Complete international setup procedures. Review the information and complete the preliminary setup procedures that apply to each country or region in which you do business.
Overview of Microsoft Dynamics GP taxes
You'll complete two procedures to set up your taxes; setting up tax details and setting up tax schedules. At the most basic level, the difference between tax details and tax schedules is this:
Tax details Tax details identify specific taxes, their rate of taxation and the taxing authority to whom taxes must be paid.
Tax schedules Tax schedules provide a method of grouping the tax details that apply to companies, items, customers, or vendors.
For example, if you're setting up sales taxes for your business in Seattle,
Washington, you'll need to set up details for each Washington state tax and each
Seattle city tax. After all the details have been defined, you can group the details for Washington and those for Seattle into a schedule. This schedule can be assigned to all the customers, vendors, and items that are subject to Seattle and Washington taxes.
When you enter transactions in Microsoft Dynamics GP, you don't need to select all the tax details that apply to the transaction; once you've set up tax schedules, Microsoft Dynamics GP calculates all applicable taxes automatically.
Why tax schedules are used
Consider the following example:
A business is located in the same taxing jurisdiction as all its customers and vendors.
All the goods and services the business provides or purchases are taxed at the same rate.
There's only one taxing authority to remit taxes to.
In this case, every transaction has exactly the same rate of taxation and the business can set up one tax detail. It also must set up at least one tax schedule; when entering transactions in Microsoft Dynamics GP, the business's clerk selects the tax schedule, rather than a tax detail.
Chances are that your organization operates in a more complex taxing situation than the previous example. Your situation is probably similar to the following example:
Your organization and at least some of your customers and vendors are subject to different tax jurisdictions.
Different goods and services are taxed at different rates, and the rates are different for different tax jurisdictions.
There are multiple taxing authorities to remit taxes to.
Tax schedules are used to simplify the process of assigning all applicable details to each company, item, customer, and vendor. These default schedules are used to calculate taxes automatically when you enter a transaction. If you don't specify a default tax schedule, you can select one as you're entering the transaction.
How taxes are calculated
When the system calculates tax on a sale or purchase, it compares the tax schedule assigned to the customer or vendor, as well as the tax schedule assigned to the sale or purchase and any freight and miscellaneous charges. The system checks for details that match between the customer or vendor and the sale or purchase amounts. Taxes are calculated only for the details that match.
If you change the shipping method for a transaction, taxes are automatically recalculated. When the shipping method is pickup, the tax schedule for the vendor is compared to the tax schedules for the items. When the shipping method is delivery, the tax schedule for the customer is compared to the tax schedules for the items.
Different tax rates for different items
Consider the following example:
A retail store is selling three items to a customer:
A shirt at US$20.00
A portable radio at US$50.00
A liter of milk at US$1.00
The store is located in a town that is subject to 1.0% city tax and a 5.0% state tax. However, clothing and food are not taxable in either jurisdiction. Because the customer is purchasing the items at a retail store, the exchange of goods happens in the store's jurisdiction, not the customer's. To calculate the taxes, Microsoft Dynamics GP compares the tax schedules that are assigned to each item with the tax schedules assigned to the store and calculates taxes only for the details that appear for both.
| Item | Tax details in the tax schedule assigned to the: | Calculated tax | Calculated tax | Tax paid |
|---|---|---|---|---|
| Item | Store | Customer | ||
| Shirt (Clothing) | 5% State | 5% State | US$0 because the shirt isn't taxable. | |
| 1% City | ||||
| Radio (General) | 5% State | 5% State | 5% State | US$3.00 because the tax schedules for both the item and the store contain the same tax details. |
| 1% City | ||||
| Milk (Food) | 5% State | 5% State | US$0 because the milk isn't taxable. | |
| 1% City |
Different tax rates for different customers
Consider the following example:
A mail-order distributor is selling three items to a customer:
A shirt at US$20.00
A portable radio at US$50.00
A box of chocolates at US$10.00
The distributor is located in a town that is subject to 1.0% city tax and a 5.0% state tax. The customer is located in another town, where no city taxes apply. Clothing and food are not taxable in either jurisdiction. Because the items are being shipped to the customer, the exchange of goods happens in the customer's jurisdiction, not the distributor's. To calculate the taxes, Microsoft Dynamics GP compares the tax schedules that are assigned to each item with the tax schedule assigned to the customer and calculates taxes only for the details that appear for both.
| Item | Tax details in the tax schedule assigned to the: | Calculated tax | Calculated tax | Tax paid |
|---|---|---|---|---|
| Item | Store | Customer | ||
| Shirt (Clothing) | 5% State | 5% State | US$0 because the shirt isn't taxable. | |
| 1% | City | |||
| Radio (General) | 5% State | 5% State | 5% State | US$2.50 because only the state tax applies to both the item and the customer. |
| 1% City | ||||
| Chocolate (Food) | 5% State | 5% State | US$0 because the chocolate isn't taxable. | |
| 1% City |
If you've marked the Use Shipping Method when Selecting Default Tax Schedule option in the Company Setup Options window, Microsoft Dynamics GP uses the shipping method assigned to the transaction to determine where the exchange of goods takes place, and provides the appropriate tax schedule as a default schedule for the transaction.
| Series | Shipping method's shipping type | Default tax schedule comes from |
|---|---|---|
| Sales | Pickup | Your company |
| Delivery | Customer | |
| Purchasing | Pickup | Vendor |
| Delivery | Your company |
Default tax schedules
Default tax schedules for freight and miscellaneous charges are set up by module; not by customer or vendor.
Receivables Management and Payables Management Default tax
schedules for sales or purchases, freight, and miscellaneous charges can be set up in the Receivables Setup Options window for sales taxes and in the Payables Setup Options window for purchase taxes.
Sales Order Processing and Invoicing Default tax schedules for noninventoried items, freight, and miscellaneous charges can be set up in the Sales Order Processing Setup Options window and in the Invoicing Setup Options window. In these modules, you also have the option of basing the taxes for noninventoried items, freight, and miscellaneous charges on the customer. If you select that option, the customer's tax schedule is used for the tax calculations. For more information, see the Sales Order Processing and Invoicing documentation.
Purchase Order Processing Default tax schedules for non-inventoried items, freight, and miscellaneous charges can be set up in the Purchase Order Processing Setup Options window. You also have the option of basing the taxes for noninventoried items, freight, and miscellaneous charges on the vendor. If you select that option, the vendor's tax schedule is used for the tax calculations. For more information, see the Purchase Order Processing documentation.
Freight and miscellaneous charge tax calculations
Calculations for taxes on freight are based on comparisons between the tax schedule for the transaction—which, depending on the transaction, can be the tax schedule for your company, the customer or the vendor—and the freight tax schedule. For information about freight and miscellaneous charge tax calculations in Invoicing, Sales Order Processing or Purchase Order Processing, refer to your Invoicing, Sales Order Processing, or Purchase Order documentation.
Calculations for taxes on miscellaneous charges are based on comparisons between the tax schedule for the transaction and the miscellaneous tax schedule.
The following example illustrates how these tax details are compared in Receivables Management and Payables Management. Schedule A, B, and C contain these tax details:
| Tax Schedule A | Tax Schedule B | Tax Schedule C |
|---|---|---|
| TAX001 | TAX001 | |
| TAX002 | ||
| TAX003 | ||
| TAX004 | TAX004 | TAX004 |
| TAX005 | ||
| TAX006 |
Assume the tax schedules are assigned in the following manner:
| Tax Schedule A | Tax Schedule B | Tax Schedule C |
|---|---|---|
| Freight | Miscellaneous | |
| Company | Customer/Vendor | |
| Sale/Purchase |
Now, assume you're recording a purchase of goods in Payables Management, and the shipping method is pickup. The tax schedule assigned to the vendor appears as the default schedule, and the following taxes are charged:
| Transaction | Details | Tax Schedule |
|---|---|---|
| Purchase: $100 taxed using: | TAX001 TAX004 TAX005 | Tax Schedule C (assigned to the purchase and vendor) contains details TAX001, TAX004 and TAX005. |
| Freight: $10 taxed using: | TAX001 TAX004 | Tax Schedule A (assigned to Freight) and Tax Schedule C (assigned to the vendor) both contain details TAX001 and TAX004. |
Next, assume that you are recording a purchase of goods and the shipping method is set to delivery. The tax schedule assigned to the company appears as the default schedule and the following taxes are charged:
| Transaction | Details | Tax Schedule |
|---|---|---|
| Purchase: $100 taxed using: | TAX001 TAX004 | Tax schedule A (assigned to the company) and tax schedule C (assigned to the purchase) both contain details TAX001 and TAX004. |
| Freight: $10 taxed using: | TAX001 TAX004 TAX006 | Tax schedule A (assigned to freight and to the company) contains details TAX001, TAX004 and TAX006. |
| Miscellaneous: $10 taxed using: | TAX004 | Tax schedule A (assigned to the company) and tax schedule B (assigned to the transaction) both contain detail TAX004. |
Withholding taxes
Withholding is a system of taxation used in Australia to pay tax for people who work and earn money under contract, such as providers of architectural services, building and construction companies, cleaning services, engineering services, and motor vehicle repair businesses.
Withholding is paid and recorded differently in Receivables Management and Payables Management because the debtor who makes the purchase is responsible for remitting the Withholding tax to the government. The company selling the goods or services must write off the amount that the debtor paid to the government.
When a company purchases goods or services from a supplier who is subject to Withholding, the supplier must include a partially completed Withholding Deduction Form with his or her bill to the purchasing company.
Using in Receivables Management
The supplier must account for the difference between the amount billed to the purchasing company and the amount actually received due to the amount that was remitted to the taxing authority on its behalf. To do this in Microsoft Dynamics GP, the supplier would follow this scenario:
An accounts receivable clerk prepares a bill for the full amount of goods or services rendered. The clerk also prepares a Withholding Deduction Form, showing the amount billed.
The supplier sends the bill and the partially completed Withholding Deduction Form to the purchasing company.
When the payment is received, the accounts receivable clerk records the amount received.
In addition, the clerk for the supplier should record the Withholding amount in the Additional Tax Distributions and Writeoffs window.
Using in Payables Management
The purchasing company is required to remit the Withholding on behalf of the supplier. To do this using Microsoft Dynamics GP, the purchasing company would follow this scenario:
An accounts payable clerk creates a creditor record for the supplier and records the withholding rate in the Creditor Withholding Options window.
When the purchasing company receives the supplier's bill, the clerk records the full bill amount.
When the clerk pays the bill, however, the Withholding amount is deducted from the payment and a separate document for the Withholding amount is created automatically, payable to the Withholding creditor (usually the taxing authority) specified in the Company Setup Options window.
The purchasing company would send the Withholding payment to the taxing authority, along with the completed Withholding Deduction Form showing the
total amount billed and the Withholding amount deducted, and a Reconciliation Form.
- In addition, the clerk for the purchasing company should record the Withholding amount in the Additional Tax Distributions and Writeoffs window.
Transactions for Withholding amounts
When entering transactions for Withholding amounts, use the following windows to enter the Withholding amounts.
| Window | Field | What to enter |
|---|---|---|
| Additional Tax and Writeoff Distributions (Receivables) | Unposted Write-offs Distributed to Withholding: Withholding Amount | The Withholding amount that the debtor paid to the tax office on your behalf. |
| Additional Tax and Write Off Distributions (Payables) | Unposted Write-offs Distributed to Withholding: Withholding Amount | The amount you are paying to the tax office on the creditor's behalf. |
Example
Assume a supplier is a building contractor with a Withholding rate of 20%. If the purchasing company buys $1,000 of contracting services from the supplier, the supplier must provide a partially completed Withholding Deduction form with the bill for $1,000.
The purchasing company would record the purchase for $1,000; when the bill was paid, a check for $800 would be printed for the supplier, and a separate payment for $200 (20% of the $1,000 sale) would be created for the Withholding taxing authority. The purchasing company would send the completed Withholding Deduction form to the taxing authority along with this payment.
When the supplier receives the payment, it will use the Additional Tax and Writeoff Distributions window to record the $200 that the purchasing company remitted to the taxation office.
Chapter 22: Tax details
The Tax Detail Maintenance window can be used to add, change, or delete tax details. Tax details identify the tax specifics that are used in a tax schedule for a customer, vendor, or item.
This information contains the following sections:
What to set up tax details for
Minimum and maximum taxable amounts
Setting up tax details
What to set up tax details for
Set up a tax detail for each tax rate in each jurisdiction where you plan to do business.
If you plan to sell goods or services in that jurisdiction, set up a sales tax detail.
If you plan to purchase goods or services in that jurisdiction, set up a purchases tax detail.
If different goods or services are taxed at different rates, set up a separate tax detail for each type of good or service. (Be sure to set up both sales and purchases details, if applicable.)
If certain goods and services aren't taxable in a particular jurisdiction, you may not need to set up a tax detail for them. However, if you are required to track sales or purchases of these exempt or zero-rate taxes, you can set up tax details to do so.
Minimum and maximum taxable amounts
When you set up tax details, you can specify minimum and maximum taxable amounts. For example, if the law requires that at least $100 must be purchased before any tax is added to the sale price, enter $100 as the minimum taxable amount. If the tax only applies to amounts up to $500, enter $500 as the maximum taxable amount.
You also can indicate whether tax should be calculated on the full amount. In this example, the full $500 is taxable if you select Full Amount from the Include list. If you select Amount within Range, the difference between the $100 minimum and $500 maximum—$400—is taxable.
Refer to the following tables for more information.
| Full Amount | Full Amount | Full Amount |
|---|---|---|
| Minimum = $100 | Maximum = $500 | |
| Sale amount | Tax calculated? | Tax calculated on: |
| $50 | No | — |
| $150 | Yes | $150 |
| $400 | Yes | $400 |
| $550 | Yes | $500 (Full amount) |
| Amount within Range | Amount within Range | Amount within Range |
| Minimum = $100 | Maximum = $500 | |
| Sale amount | Tax calculated? | Tax calculated on: |
| $50 | No | — |
| $150 | Yes | $50 ($150 - Minimum) |
| $400 | Yes | $300 ($400 - Minimum) |
| $550 | Yes | $400 (Maximum - Minimum) |
Setting up tax details
Use the Tax Detail Maintenance window to set up tax details.
To set up tax details:
- Open the Tax Detail Maintenance window.(Administration >> Setup >> Company >> Tax Details)
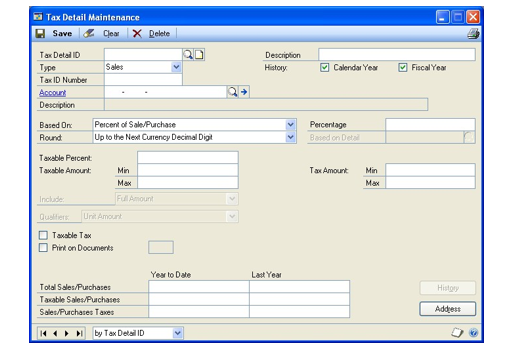
A screenshot of a cell phone Description automatically generated
A screenshot of a cell phone Description automatically generated
A screenshot of a cell phone Description automatically generated
A screenshot of a cell phone Description automatically generated
- Enter a tax detail ID and a description for the detail. You may want to use a descriptive ID that will identify the tax as sales or purchases, such as NY-S for a New York sales tax or GST-P for purchases.
Because the details are sorted in alphanumeric order, you may want to name them so they sort in the order that you want. Give the details names such as VAT07 and VAT16 to make them sort correctly.
In the Type list, select either Sales or Purchases.
In the Tax ID Number field, enter your tax registration code for this tax, if your country or region requires it.
In the Account field, enter an account to track taxes paid or received. For example, you might select a Sales Tax Payable account for sales type details and a Sales Tax Expense account or Input Tax Credit account for purchase type details.
If you are setting up a purchasing tax detail for Australian GST, specify whether you want the purchase tax detail to be posted to a tax detail account, vendor purchase account, or inventory account. This field wont be available for a sales tax detail.
For the History option, mark one or both of the selections.
Mark Calendar Year to track tax detail history by calendar months, which will help you track information that the government may require.
Mark Fiscal Year to track tax detail information for each of the periods you defined for the fiscal year. This information allows you to print reports that accurately reflect activity in each fiscal period.
From the Based On list, select a tax base. Your selection will determine how taxes for this detail are calculated.
In Canada, a general GST is considered a percent of sale/purchase tax. In the United Kingdom, a general VAT is considered a percent of sale/ purchase tax.
In Canada, some PST taxes are considered percent of sale/purchase plus taxable taxes. The percent of sale/purchase plus taxable taxes tax base is rarely if ever used in the United States.
From the Round list, select a method by which you want to round the tax amount.
In the Percentage or Amount field, enter the rate or amount of the tax detail.
The name of the field changes depending on your selection in the Based On list.
In the Based On Detail field, select the tax detail this tax is based on, if applicable.
In the Taxable Amount Min and Max fields, enter the minimum and maximum taxable amount for this detail, if applicable. If you don't enter a minimum or maximum, taxes will be calculated on transactions of any amount.
If there is no maximum taxable amount, don't enter anything other than 0 in the maximum taxable amount field. If the amount shown in that field is greater than zero, Microsoft Dynamics GP will compare the taxable amount to the maximum each time taxes are recalculated, which can significantly increase processing time. If the amount in the Taxable Amount Max field is 0, Microsoft Dynamics GP doesn't perform the comparison and processing time is reduced.
If you entered a minimum or maximum taxable amount, complete the following steps:
Use the Include list to select whether to calculate the tax on the full amount of the transaction or only to the amount that's within the minimum - maximum range of the tax.
Use the Qualifiers list to select what the taxable minimum and maximum are compared to when deciding whether the tax should be calculated. The selection you make in the Based On field determines which options appear in the Qualifiers list.
If other taxes will be calculated on this tax, mark the Taxable Tax option. For example, if the GST on an item may be in the amount taxed by PST, mark the GST detail as a taxable tax.
If you're required by law to identify taxes on invoices, complete the following steps:
Mark the Print on Documents option.
In the field next to Print on Documents, enter a one-character code, such as G for GST or P for PST. The character will appear on your invoices next to each of the items taxed.
Mark the Tax Invoice Required option if you want to claim any input tax on your Business Activity Statement (BAS) for the tax detail. If you mark this field and a purchase transaction uses this tax detail, the Tax Invoice Required field will be marked for the transaction. For more information about BAS, refer to your GST and Australian Tax documentation
Select the BAS assignments for the tax detail. These assignments will be used to determine which amounts should be printed in each field on the BAS. For more information about BAS, refer to your GST and Australian Tax documentation.
To enter address information for the taxing authority, choose the Address button. (The address for the tax detail is used on period-end reports for the taxing authority.)
In the Tax Detail Address window, enter the address.
Choose OK to save the address and redisplay the Tax Detail Maintenance window.
Choose Save to save the tax detail.
Verify your entries with a Tax Detail ID Report. (In the Tax Detail ID field, select a tax detail, then choose File >> Print.)
Chapter 23: Tax schedules
After you've set up details for all the taxes you're required to collect or pay, you can begin creating tax schedules. Tax schedules are groups of tax details that are assigned to a transaction. These schedules are used to calculate all the taxes that apply to a sales or purchase transaction.
This information is divided into the following sections:
What to set up tax schedules for
Setting up a tax schedule
Copying a tax schedule
Setting up default company tax schedules
What to set up tax schedules for
For each jurisdiction where you plan to do business, set up the following tax schedules:
A purchases tax schedule*,* including all purchases tax details that apply to that jurisdiction. Purchases tax schedules are assigned to vendor records, and a default purchases tax schedule can be specified in the Payables Management Setup Options window.
A sales tax schedule, including all sales tax details that apply to that jurisdiction. Sales tax schedules are assigned to customer records, and a default sales tax schedule can be specified in the Receivables Management Setup Options window.
For each category of inventoried items that you buy or sell that is taxed at different rates in different jurisdictions, set up a single tax schedule:
- An item tax schedule that contains applicable tax details for all jurisdictions. Be sure to include both sales and purchases details in this tax schedule. Item tax schedules are assigned to item records.
For non-inventoried items, freight, and miscellaneous charges, set up the following tax schedules:
At least one non-inventoried item tax schedule, including the tax details that most commonly apply to the non-inventoried items you buy or sell. Non-inventoried tax schedules are assigned to transactions.
At least one freight tax schedule, including the tax details that most commonly apply to the freight charges you incur. Freight tax schedules are assigned to transactions.
At least one miscellaneous charge tax schedule*,* including the tax details that most commonly apply to the miscellaneous charges you incur. Miscellaneous charge tax schedules are assigned to transactions.
Default tax schedules for non-inventoried items, freight, and miscellaneous charges are specified in the setup options window for each module in which these tax schedules can be used.
In addition to the other recommended tax schedules, you may want to set up a tax schedule that contains all tax details.
Setting up a tax schedule
You'll use the Tax Schedule Maintenance window to set up a tax schedule. You can use the Copy button to create schedules if you have a long list of details that belong in several schedules. For more information see Copying a tax schedule .
To set up a tax schedule:
Open the Tax Schedule Maintenance window. (Administration >> Setup >> Company >> Tax Schedules)
Enter a tax schedule ID and a description. You may want to identify your schedule with a descriptive name. For example, if you're creating a tax schedule for the city of Austin, Texas, you may want to name the schedule TXAUST.
To add details to the schedule, complete the following steps for each detail you want to add:
In the Available Tax Detail IDs list, select the tax detail you want to add.
Choose the Insert button; the detail is inserted in the Selected Tax Detail IDs list.
If the Auto-Calc. option is available, you can mark this option to include tax details in the tax calculation. Tax calculations will be based on the tax details marked to automatically calculate. This option is available if you marked the Specify Tax Details for Automatic Tax Calculation option in the Company Setup Options window.
Choose Save to save the schedule.
Verify your entries with a Tax Schedule Report. (In the Tax Schedule ID field, select a tax schedule, then choose File >> Print.)
Copying a tax schedule
To save time, you can copy all tax details from an existing tax schedule into the tax schedule you're currently setting up using the Tax Schedule Maintenance window.
For example, assume that you've created a schedule for Illinois taxes, and now you want to create a sales tax schedule for the city of Chicago. The tax schedule for Chicago should include Illinois taxes. Rather than inserting each Illinois tax separately, you can enter an ID and description for the Chicago tax, such as ILCHIC and copy the Illinois tax details to the new tax schedule. Then you can insert the other tax details that apply to the city of Chicago.
To copy a tax schedule:
Open the Tax Schedule Maintenance window. (Administration >> Setup >> Company >> Tax Schedules)
Enter the ID and description for the new schedule.
Choose Copy.
In the Tax Schedule Copy window, enter or select the name of the existing schedule you want to copy and choose OK to close the window. The details for the existing schedule are copied to the Selected Tax Detail IDs list. You can copy from more than one schedule.
In the Tax Schedule Maintenance window, add or delete details to complete the new schedule.
Choose Save to save the schedule.
Setting up default company tax schedules
Once you've set up your tax schedules, you should assign default tax schedules to your company using the Company Setup window.
See Chapter 21, "Tax overview," for information about how default tax schedules are used.
To set up default company tax schedules:
Open the Company Setup window.(Administration >> Setup >> Company >> Company)
Enter the default sales tax schedule for the company.
Enter the default purchases tax schedule for the company.
Choose OK to save your changes.
Part 5: Workflow setup
This part of the documentation explains how to set up the Workflow system and create individual workflows.
Chapter 24, "Plan the Workflow setup," provides a checklist to help guide you through the setup process.
Chapter 25, "Workflow E-mail Setup," helps you set up e-mail options to send messages and perform actions in messages. You also can create messages that you can send to originators and approvers.
Chapter 26, "Configure the Workflow calendar," explains what the Workflow calendar is and how to configure it.
Chapter 27, "Configure a workflow," helps you create and configure a workflow.
Chapter 28, "Configure a workflow step," explains how to define a specific step of a workflow.
Chapter 29, "Set up Workflow delegates," explains how to delegate workflow tasks.
Chapter 30, "Workflow maintenance," explains how to copy a workflow from one company to another, how to modify a workflow, and how to delete and inactivate workflows you're no longer using.
Chapter 24: Plan the Workflow setup
The following information will help guide you through setting up the Workflow system.
Workflow setup checklist
Prepare for the Workflow setup
Workflow setup checklist
To set up the Workflow system, you'll need to complete several tasks. The following table lists the tasks you'll need to complete and the order in which you should complete them.
| Task | For more information |
|---|---|
| 1. Be sure that the SQL Server Agent service is set up to start automatically with the operating system. If the SQL Server Agent service isn't set up to start automatically, the escalation action you selected for your workflows will not be performed. When an approver fails to act on a task by the task's due date, the task is considered overdue, or escalated. You can select the action to be taken when a task in the workflow overdue in the Workflow Maintenance window. | Refer to the Microsoft SQL Server Books Online. |
| 2. Install Web Services for Microsoft Dynamics GP. This component is required if you want to perform actions directly from the e-mail message, such as an approving a document. Note: When you install Web Services, be sure that the application user account is a domain account that has privileges to access Active Directory. | Refer to the Microsoft Dynamics GP Web Services Installation and Administration Guide. Web Services for Microsoft Dynamics GP can be installed from the Microsoft Dynamics GP installation media. |
| 3. Set up e-mail options for workflow. Set up e-mail options for Workflow so you can send e-mail messages and perform actions in e-mail messages such as such as approving or rejecting a document. | Chapter 25, "Workflow E-mail Setup" |
| 4. Set up e-mail messages for workflow notifications. Create messages that you can send to originators and approvers when workflow tasks are assigned to them or when documents they've submitted have completed the workflow approval process. | Chapter 25, "Workflow E-mail Setup" |
| 5. Display workflow task on your home page. Mark the Microsoft Workflow tasks option to display a list of the workflow tasks that are assigned to you on your home page. | See Customizing the To Do area on your home page in the System User's Guide. |
| 5. Configure the Workflow calendar. Configure the Workflow calendar to show which days are work days and which days are non-work days for each of your companies. The Workflow system will count only the work days when calculating a step's deadline. | Chapter 26, "Configure the Workflow calendar." |
| 6. Create workflow. Create and configure workflow, such as a purchase order workflow or a requisition workflow. | Chapter 27, "Configure a workflow." |
| 7. Delegate Workflow tasks. Specify how to delegate tasks. | Chapter 29, "Set up Workflow delegates." |
Prepare for the Workflow setup
The best way to prepare for setting up the Workflow system is to create diagrams illustrating the workflow you want to create. We recommend you draw each workflow using a software program such as Visio, or by simply using pen and paper.
Your diagrams should indicate:
The order in which the workflow steps occur
Who the approvers are at each step, and the conditions under which their approval is required
For example, your diagram may look similar to the following workflow diagram.
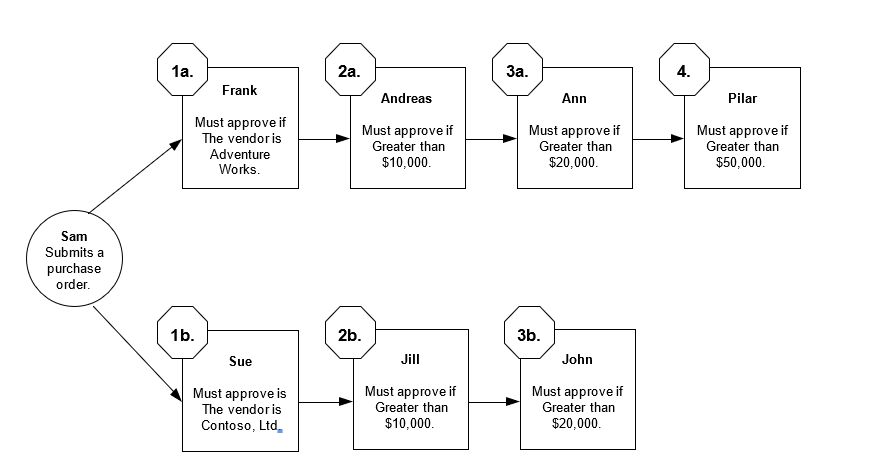
Chapter 25: Workflow E-mail Setup
By setting up e-mail options for Workflow, you can send messages and perform actions in messages such as approving or rejecting a document. You also can create messages to send to originators and approvers when workflow tasks are assigned to them or when documents they've submitted have completed the workflow approval process.
Setting up e-mail options for Workflow
Sending a test e-mail message for Workflow
Setting up messages for Workflow
Customizing a workflow message with additional fields
Adding document item fields to a workflow message
Setting up e-mail options for Workflow
You can use the Workflow Setup window to set up e-mail options for Workflow. After marking the Enable E-Mail for Workflow option, enter the e-mail address, the Simple Mail Transfer Protocol (SMTP) server, and authentication information for the e-mail account so you can send e-mail notifications.
If you enable e-mail actions, you can perform actions directly from the e-mail message, such as approving a document. Be sure that you have installed Microsoft Dynamics GP Web Services and that the application user account set up in Microsoft Dynamics GP Web Services is a domain account that has privileges to access Active Directory.
To set up e-mail options for Workflow
Open the Workflow Setup window. (Administration >> Setup >> System >> Workflow Setup)
Mark the Enable E-Mail for Workflow option to send e-mail notifications.
Enter the name of the e-mail address for the account. This is the e-mail address that e-mail is sent from.
Enter the name to show on e-mail messages sent from this account. The display name is optional.
Enter the name of the SMTP server the account uses to send e-mail. Typically this is in a format similar to smtp.<your_company>.com.
Enter the port number of the SMTP server for this account. The default port is 25.
Mark the This server requires a secure connection (SSL) option if required.
Select which credentials to use when sending e-mail. You can use the credentials of the SQL Server Database Engine, other credentials that you supply, or anonymously.
Choose Test E-mail button to open the Test Workflow E-Mail window. You can use this window to send an e-mail message to verify that you can send a message using the current settings. See Sending a test e-mail message for Workflow for more information.
Mark the Enable E-Mail Action option to take actions in e-mail notifications such as such as approving or rejecting a document.
Enter the name of the Web Services server.
Enter the port number of the Web Services server. The default port is 48620
Mark the This server requires a secure connection (SSL) option if required.
Choose Test E-mail Action button to verify your server information for Microsoft Dynamics GP Web Services and the connectivity to the server.
Sending a test e-mail message for Workflow
After setting up e-mail options in the Workflow Setup window, you can use the Test Workflow E-Mail window to send a test message.
To send a test message for Workflow:
Open the Workflow Setup window. (Administration >> Setup >> System >> Workflow Setup >> Test E-Mail)
Enter a valid e-mail address for the test e-mail message.
Enter a subject line for the message. The default entry is "Test E-Mail for Microsoft Dynamics GP Workflow".
Enter the message that will appear in the e-mail when sending the test message.The default entry for the body is "This is a test e-mail for Microsoft Dynamics GP Workflow."
Choose Send Test E-Mail.
Setting up messages for Workflow
Use the Message Setup window to create messages that you can send to notify a user when a workflow step is assigned or an originator when a workflow action is completed. Messages can be predefined on a workflow type basis.
You also can customize your messages by adding fields that are associated with a document type or workflow. For example, you could add the action deadline or comments from the originator of a purchase order approval.
To set up messages for Workflow:
Open the Message Setup window. (Administration >> Setup >> Company >> Workflow >> E-mail Message Setup)
Enter an ID to identify the message.
Enter a description of the message ID.
Select Workflow Assignment or Workflow Action Completed as the message type.
Select the series in which you want this message to appear. Messages assigned to All can be used with all series that have workflow types.
Select a document type from the series you selected. This field isn't available if you selected All as the series.
Enter a subject line for the message.
You also can customize the subject line by adding a field or fields associated with a document or workflow. See Customizing a workflow message with additional fields for more information.
- Enter the message that will appear in the e-mail when sending notifications.
You also can customize the message by adding a field or fields associated with a document or workflow. See Customizing a workflow message with additional fields for more information.
- Choose Document Lines to add document line item information in a message body. Document line items can be used to make decisions on whether to approve or reject the document in workflow. See Adding document item fields to a workflow message for more information.
This tab is not available if you selected All as the series.
Enter or select an address that the originator or approver can use to send a reply to a specific e-mail address. For example, assume that you have entered purchasing@fabrikam.com as the reply to address. If you send a document in email to an approver, the approver receives e-mail from username@domainname.com. When the vendor replies to the e-mail, purchasing@fabrikam.com is used in the To field.
Choose Validate to verify the field or fields you added to the message body or subject line match the document type assigned to the message.
Choose Save to save the message ID.
Customizing a workflow message with additional fields
You customize the subject or message body by adding a field or fields associated with a document type and workflow from the series you selected. For example, you could add the action deadline or comments from the originator of a purchase order approval.
To customize a workflow message with additional fields:
Enter an ID to identify the message.
Select Workflow Assignment or Workflow Action Completed as the message type.
Select Workflow Assignment if you are creating messages that notifying a user that a workflow action has been assigned to him or her.
Select Workflow Action Completed if you are creating messages that you can send to the workflow originator informing the user that action has been completed for the workflow.
Select the series in which you want this message to appear. Messages assigned to All can be used with all series that have workflow types.
Select a document type from the series you selected. This field isn't available if you selected All as the series.
Place the cursor in the Subject field or in the message body.
Select Document Fields or Workflow fields.
From the Field field, select an additional field.
Choose Insert.
To customize a workflow message with additional fields using the right-click menu:
Enter an ID to identify the message.
Select Workflow Assignment or Workflow Action Completed as the message type.
Select the series in which you want this message to appear. Messages assigned to All can be used with all series that have workflow types.
Select a document type from the series you selected. This field isn't available if you selected All as the series.
Place the cursor in the Subject field or in the message body.
Right-click in the body or subject of a message ID and select Insert.
In the Insert window, select the field or fields you want to add.
Choose OK.
Adding document item fields to a workflow message
You customize the body of a workflow message by adding document line item information associated with a document type from the series you selected. For example, you could add a line number, item number, unit of measure, quantity ordered, unit cost, and extended cost in a message for a purchase order workflow. An approver can use the purchase order line item detail you added to the message to make a decision on whether to approve or reject the document.
To customize a workflow message with additional fields:
Enter an ID to identify the message.
Select Workflow Assignment or Workflow Action Completed as the message type.
Select the series in which you want this message to appear. Messages assigned to All can be used with all series that have workflow types.
Select a document type from the series you selected. This field isn't available if you selected All as the series.
Choose Document Lines to add document line item information to the message. This tab is are not available if you selected All as the series.
The fields that display in the Selected Fields list are the fields that appear in the message.
- In the Available Fields list, select a field you want to use in the body of the message and choose Insert. Choose Insert All to move all fields to the Selected Fields list.
To remove a field from the Selected Fields list, select it and choose Remove. Choose Remove All to remove all fields.
- To change the order of how the fields appear in a message, use the Move up and Move down buttons.
Chapter 26: Configure the Workflow calendar
As part of setting up the Workflow system, you need to configure a Workflow calendar. The following sections explain what the Workflow calendar is and how to configure it.
Overview of the Workflow calendar
Configure the Workflow calendar
Overview of the Workflow calendar
The Workflow calendar shows which days are work days and which are non-work days. The Workflow system will count only the work days when calculating a step's due date. The Workflow calendar uses the date and time values from server that has Microsoft Dynamics GP installed. Work days are typical work days and times for the company. A task's due date is calculated using the time limit specified for workflow steps and the work days and times entered in the Workflow Calendar window. The Workflow calendar uses the date and time values from server that has Microsoft Dynamics GP installed.
For example, assume that you have set up a calendar to have Monday through Friday as the work days and 8 A.M. to 5 P.M. as hours worked for each day. The workflow step assigned to Amy, the purchasing manager, gives Amy a four–hour time limit to act on her workflow task. Using the Workflow calendar, if Amy is assigned a purchase order at 3 P.M. on Monday, she'll have until 10 A.M. on Tuesday to approve or reject the purchase order.
As another example, assume that the workflow step assigned to Amy gives her a three days to act on her workflow tasks. Using the Workflow calendar, if Amy is assigned a purchase order at 2 P.M. on Thursday, she'll have until 2 P.M. of Tuesday to approve or reject the purchase order. This is because Saturday and Sunday are not counted toward the task's due date.
Non-work days are not counted against the time limit set for activity assignments for workflow steps. For example, assume that you have set up a calendar to have Monday through Friday as the work days and 8 A.M. to 5 P.M. as hours worked for each day. Plus, you added Monday, July 22 to the calendar as a non-working day. The workflow step assigned to Amy gives her two days to act on her workflow tasks. Using the Workflow calendar, if Amy is assigned a purchase order at 3 PM on Thursday, July 18, she'll have until 3 P.M. of Tuesday, July 23 to approve or reject the purchase order.
Configure the Workflow calendar
The Workflow calendar shows which days are work days and which are non-work days. The Workflow system will count only the work days when calculating a step's due date.
To configure the Workflow calendar:
Open the Workflow Calendar window. (Administration >> Setup >> Company >> Workflow >>Workflow Calendar)
Select the option for each day that is typically a work day in your company and enter the start and end time of the day.
To define non-work days, select the year that you want to define non-work days for.
Enter the date and description of the non-work day.
Choose Save.
Chapter 27: Configure a workflow
Creating and configuring a workflow is a multiple step process. The first section in this chapter provides the checklist you can use to create and configure a workflow. The second section in this chapter provides a detailed procedure you'll need to follow to create and configure a workflow.
Creating and configuring a workflow checklist
Creating and configuring a workflow
Creating and configuring a workflow checklist
To create and configure a workflow, you'll need to complete several tasks. The following steps lists the tasks you'll need to complete and the order in which you should complete them. See Creating and configuring a workflow for more detailed steps.
Open the Workflow Maintenance window. (Administration >> Setup >> Company >> Workflow >>Workflow Maintenance)
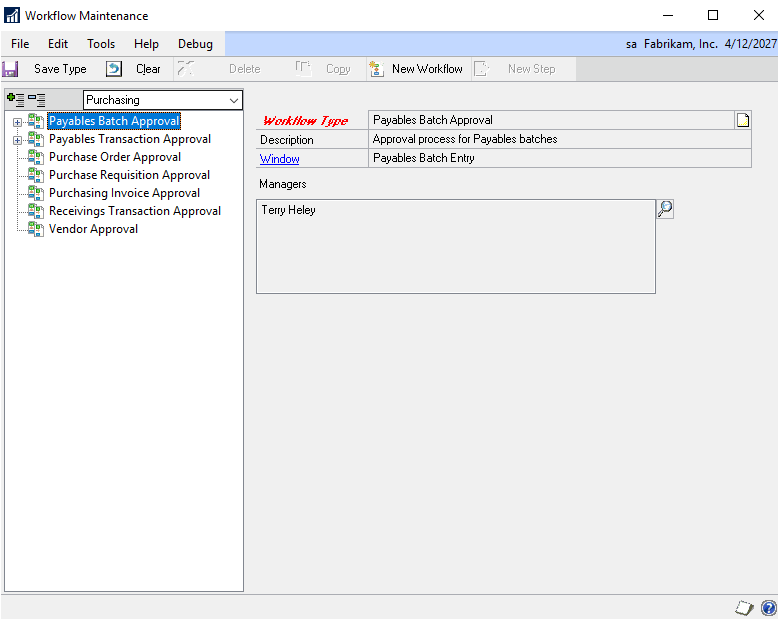
A screenshot of a cell phone Description automatically generated
Select the type of workflow to create.
Choose New Workflow.
Name the workflow.
Indicate whether notifications should be sent for completed actions.
Indicate whether approvers can delegate tasks.
Indicate whether an originator should be an approver.
Indicate if documents should be approved by at least one person.
Specify an alternate final approver.
Indicate what should happen when a task is overdue.
Choose Save Workflow.
Set up the workflow steps.
Activate the workflow.
Creating and configuring a workflow
A workflow is the approval process for a document. A workflow defines how a document "flows" through the system by showing who must approve it, and the conditions under which they must approve it.
To create and configure a workflow:
Open the Workflow Maintenance window. (Administration >> Setup >> Company >> Workflow >>Workflow Maintenance)
A screenshot of a cell phone Description automatically generated
- Select the type of workflow to create.
Select the series and then the workflow type in the tree view. Each workflow you create will be based on a type. The type indicates the purpose of the workflow. After you select the type of workflow you want to create, you can define the properties of the workflow.
At least one manager must be selected before you can activate a workflow for the type. Choose the Manager lookup button to open the Workflow User Selection window to add managers to the workflow type.
Choose New Workflow.
Name the workflow.
Enter a unique name for the workflow. We recommend that the name include your company name and the type of document the workflow is for. For example, if you're configuring a workflow for purchase orders created in the Fabrikam sample company, you may want to name the workflow "Fabrikam Purchase Orders."
You also can enter a description of the workflow, such "Multiple approval steps for purchase orders."
You can choose the Copy button to copy an existing workflow from one company to another company. For more information, see Copying a workflow .
- Indicate whether notifications should be sent for completed actions.
You can send notifications messages to users when the documents they've submitted have completed actions in the workflow approval process.
Mark the Send notifications for completed actions option and choose the expansion button to open Workflow Email Notification Maintenance window. You can use this window to select which completed action that the originator should be notified about, the message to send for the notification of the action, and the carbon-copy (cc) recipients of the notification.
- Indicate whether approvers can delegate tasks.
To allow an approver to delegate a task to another approver in the workflow, mark the Allow approver to manually delegate tasks option.
For example, assume that Frank is reviewing a purchase order. If the Allow approver to delegate tasks option has been selected, Frank will be able to delegate the purchase order to another approver in the workflow.
- Indicate whether an originator should be an approver.
Any user who creates a document such as a purchase order can submit it for approval. You can specify that the originator for the workflow can be an approver.
For example, assume that Sue submits a purchase order for Northwind Traders totaling $25,000.
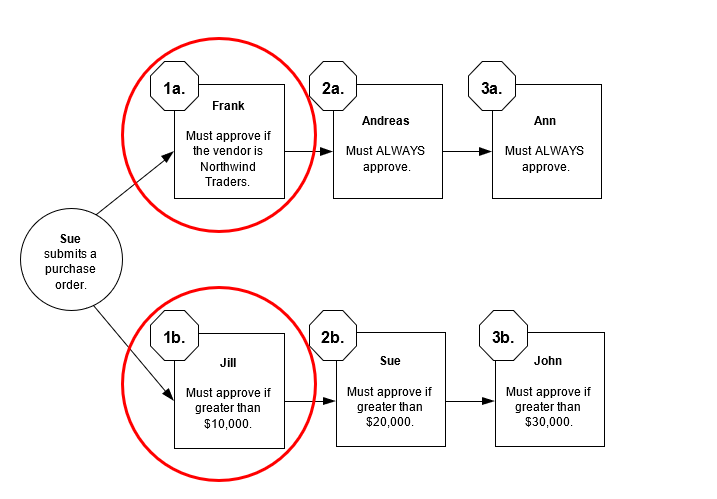
The system starts by evaluating the first steps to determine if approval is required there. Since the purchase order meets the conditions specified in both first steps, it is sent to Frank and Jill for approval.
When Frank and Jill approve the purchase order, it is assigned to Andreas and Sue. Note that Sue will have to approve her own purchase order. After Andreas approves the purchase order, Ann must approve it.
Suppose the Allow originator to be an approver option is not selected. This means that when Sue submits a document for approval, she is removed from the list of approvers for the step, and replaced by the alternate final approver, or manager if there is no alternate final approver.
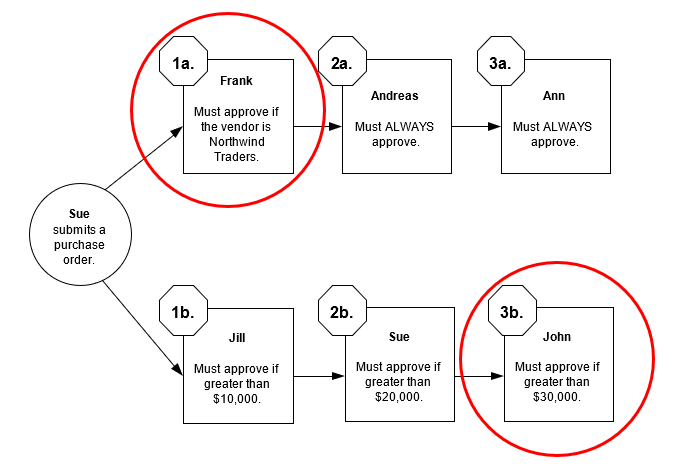
A close up of text on a white background Description automatically generated
A close up of text on a white background Description automatically generated
A close up of text on a white background Description automatically generated
To understand this better, review the top approval path. Because Sue is not part of this approval path, the system starts at the first step in the path and determines if approval is required there. From that point, the purchase order will move along the approval path as required.
Now review the bottom approval path. Because Sue is an approver in this approval path, the assignment is changed to the alternate final approver or workflow manager.
Keep in mind, approvers always can submit documents for approval. This option does not affect their ability to submit documents for approval.
- Indicate if documents should be approved by at least one person.
There may be cases when a document does not require approval. For example, consider the following workflow. If Sam submits a purchase order for $100, no approval is needed because the purchase order does not meet any of the conditions specified in the workflow steps. In this scenario, the purchase order will be saved automatically with a status of No Action Needed.
If you want documents to be approved by at least one person, select the Always require at least one approver option. Documents that do not meet any of the specified conditions will be routed to the alternate final approver in the workflow. For more information about the alternate final approver, see the next step.
- Specify an alternate final approver.
The final approver is the last person in the approval path who is required to approve a document. For example, assume that Sam submits a purchase order for Northwind Traders totalling $7,000. This purchase order must be approved by Frank and Sue. Because the purchase order is not greater than $10,000, Ann's approval is not required. In this scenario, Sue is the final approver.
Mark the Use alternate final approver option and enter the name of an alternate final approver if you want a different escalation approver. The alternate final approver is assigned to the approval action under the following conditions.
The Always Require at Least One Approver option is marked and there are no approval steps whose conditions are met.
The Always Require at Least One Approver option is marked and the approver edits the document and there are no following approval steps.
There are no approval steps following an overdue step, depending on your escalation settings.
To better understand when the alternate final approver is used, assume that Ann edits the $11,000 purchase order that Sam submitted. Ann increases the quantity of items requested so that the purchase order now totals $12,000. She then approves the document. Ann typically would be the final approver (because the document is more than $10,000). However, because Ann edited the document, she can't final approve it. The document will be sent to the alternate final approver for approval.
- Indicate what should happen when a task is overdue.
When an approver fails to act on a task by the task's due date, the task is considered overdue, or escalated. Indicate what should happen to overdue tasks by selecting one of the following options.
Take no action Select this option if you want the task to remain assigned to the current approver.
Escalate to next approver Select this option if you want the system to automatically assign the task to the next approver in the workflow.
Escalate to Select this option if you want the system to automatically assign the task to a specific user. You must enter the name of the user you want the task assigned to.
Automatically reject the overdue Select this option if you want the system to automatically reject the task.
Choose Save Workflow.
Set up the workflow steps.
Choose the New Workflow Step button to add a step to this workflow. For instructions on how to configure a step, see Chapter 28, "Configure a workflow step."
- Activate the workflow.
You can create multiple workflows of a specific workflow type. For example, you can create multiple purchase order workflows. However, only one workflow of that type can be used at a time. The Active option indicates which workflow of that type will be used.
Mark the Active option to make the workflow you're configuring the active workflow. You must have at least one step created for the workflow before you can activate a workflow. If you do not want to implement this workflow in your company just yet, leave the Active option unmarked.
If there is already an active workflow of this type, you'll need to deactivate that workflow first, before activating this workflow. When you save the workflow and there is already an active workflow of this type, a message appears stating that there may be only one active workflow per workflow type. If you decide that the current workflow should be the active workflow, the Active option for the other workflow is unmarked.
Note
Before inactivating an existing workflow, you may want to verify that all documents submitted to the workflow have been processed.
Chapter 28: Configure a workflow step
As part of configuring a workflow, you'll need to define the specific steps in the workflow. The first section in this chapter provides a checklist you can use to configure a workflow step. The second section in this chapter provides the detailed procedure you'll need to follow to configure a workflow step.
Configuring a workflow step checklist
Configuring a workflow step
Configuring a workflow step checklist
To create and configure a workflow step, you'll need to complete several tasks. The following steps list the tasks you'll need to complete and the order in which you should complete them. See Configuring a workflow step for more detailed steps.
From the Workflow Maintenance window, select the workflow for which you want to a create a step and click the New Step button.
Name the step.
Specify a step type.
Specify where this step should occur.
Specify when approval or task is required at this step..
Assign approvers.
Set a time limit.
Send a notification message.
Specify the completion policy of a step.
Choose Save Step.
Configuring a workflow step
You can define the order in which a workflow step falls in the workflow, conditions for running the step, and properties associated with assigning the activity to users.
To configure a workflow step:
From the Workflow Maintenance window, select the workflow for which you want to a create a step and click the New Step button.
Name the step.
Enter a unique name for the step. We recommend that you keep the step names simple, such as Step 1 and Step 2, or Purchasing Manager Approval and CEO Approval. Keeping the step names simple will help you manage the order in which they occur.
You also can enter a description of the workflow step, such Approval for purchase orders over $5000 or Perform credit check.
- Specify a step type.
Approval If this step requires that a user must give approval as part of the workflow process, select Approval.
Task If this step requires that a user must complete a procedure as part of the workflow process, select Task.
- Specify where this step should occur.
You must specify where this step should occur in the workflow.
First step in the workflow If this step is the first step in the workflow, select This step is a first step. Keep in mind, you can have multiple first steps.
Subsequent step in the workflow If this step is not a first step, select This step follows the selected step. Then select the workflow step that this step should follow.
- Specify when approval or task is required at this step.
You must specify when approval or a task is required at this step. Approval or a task may be required always, or only under specific conditions.
Action is always required If approval or task is always required at this step, select the Action is always required for this step option.
Keep in mind, if you select this option, it doesn't mean that this step will always occur in the workflow; rather, it means that any document that reaches this step must always be approved or the task be completed.
To understand this better, consider the following workflow illustration. There are two approval paths for purchase orders: one for purchase orders for Adventure Works, the other for purchase orders for Contoso, Ltd. Notice that when a purchase order for Contoso, Ltd. reaches step 2b, Jill's approval is always required. Purchase orders for Adventure Works will never reach step 2b, so Jill's approval is not required in those situations.
A close up of a map Description automatically generated
A close up of a map Description automatically generated
Action is required under specific conditions If approval or a task at this step is required only under specific conditions, select the Action is required only when the following conditions is met option. Then specify the conditions under which approval or the action is required. Choose the expansion button to open the Workflow Condition Editor window.
For an example of adding a specific condition, consider the previous workflow diagram. Notice that Frank's approval is required only when the vendor on the purchase order is Adventure Works. You would use the following steps to add Frank's approval requirement as a condition.
| 1. | Open the Workflow Condition Editor. |
|---|---|
| 2. | Since this is the first condition created for the workflow step, the first part of the condition is Where. |
| 3. | The second part of the condition is to select the field that you want to use in the condition. Since Frank's approval is needed for a specific vendor ID, you would select Purchase Order Work Vendor ID. |
| 4. | Next, select a restriction to apply to the field you selected. The restrictions available depend on the type of field you selected. In this case, you would select "is" as your restriction. |
| 5. | After selecting the restriction, determine the comparison. Since Frank's approval is needed for a specific vendor ID, you would select Constant to use a value instead of a field on the same document. |
| 6. | Then, enter a specific value to use in the condition. For this condition, it would be ADVENWORK001. |
| 7. | The last step is to choose Add to add the condition to the Conditions list. The condition should look like the following. where Purchase Order Work.VendorID is 'ADVENWORK001' |
| After adding this condition in the Conditions list, the "and" and "or" options are available for the next condition for the workflow step, if applicable. |
- Assign approvers.
Specify who must approve the documents that reach this step in the workflow. You can have one approver or multiple approvers. Enter the names of the approvers in the Assign To field.
If you have one approver, that person will be responsible for approving all documents that reach this step in the workflow.
- Set a time limit.
Specify how many hours, days, or weeks the approver has to respond to the task—that is, approve or reject it. The number of hours, days, or weeks you enter will be used to calculate the task's due date.
Mark the Apply Workflow Calendar option to include the Workflow calendar in the due date calculations for the step. For example, assume that you have set up work days in the Workflow calendar as being from Monday to Friday, 8:00 A.M. to 5:00 P.M., and entered four hours as the time limit for a step. If the step is starts at 3:00 P.M. on Wednesday, and the option is marked, then the due date for the task will be set to 10:00 A.M. Thursday morning. If the option is not marked, the due date for the task is set to 7:00 P.M. Wednesday evening.
For detailed information about how a task's due date is calculated, see Overview of the Workflow calendar .
If an approver fails to respond by the due date, the task is considered overdue, or escalated. The task will then be handled according to the option you selected in the When a task is overdue area for the workflow. For more information, see Indicate what should happen when a task is overdue. .
- Send a notification message.
Mark to send e-mail messages to users when workflow tasks are assigned to them. Then, enter or select the message ID for the notification for when the step is run.
You can click the Send Message link to open the Message Setup window, where you can view or edit the message.
- Specify the completion policy of a step.
If you have multiple approvers, you must specify how many of the approvers must approve the documents that reach this step. Select one of the following options.
Only one response needed If you select this option, the action applied to the document is determined by the first person who responds.
Majority must approve or take action If you select this option, a majority of the approvers must approve the document for it to continue down the workflow approval path.
For example, consider the workflow previously illustrated. Assume that Sam has submitted a purchase order for $50,000 and it is currently at step 3 in the workflow.
If Bill and Jo are the first two approvers to respond—and they both approve the document—the document is sent to Ann for approval. Because a majority is reached, the system does not wait for Mary to respond.
If Bill and Jo are the first two approvers to respond—and one of the approvers reject the document—the document is given the status of Rejected and the workflow process is complete. Because a majority is reached, the system does not wait for Mary to respond.
If Bill approves the document and then Jo requests a change, the document is given the status of Pending User Action. Because a change is requested, the document is immediately sent back to the originator. The system does not wait for Mary to respond.
Keep in mind, if a workflow step has an even number of approvers, a majority must still approve the document in order for it to continue down the workflow approval path. For example, suppose step 3 has four approvers (Bill, Jo, Mary, and Chris). Three approvers must approve the document in order for it to continue down the approval path. If two approvers approve the document, and two reject it, the document is given the Rejected status because a majority was not reached.
All must approve or take action If you select this option, all of the approvers must approve the document in order for it to continue down the workflow approval path.
For example, consider the workflow previously illustrated. Assume that Sam has submitted a purchase order for $50,000 and it is currently at step 3 in the workflow. If all of the approvers (Bill, Jo, and Mary) approve the document, it is sent to Ann for approval. If one person rejects the document, it is given the status of Rejected and the workflow process is complete. If one person requests a change to the document, it is sent to Sam with a status of Pending User Action.
Choose Save Step.
Chapter 29: Set up Workflow delegates
After you've set up and activated a workflow in Microsoft Dynamics GP, specify how to delegate workflow tasks to other users.
- Delegating tasks
Delegating tasks
Approvers can delegate, or reassign, their tasks to other approvers. For example, if Frank will be out of the office for a period of time, he can delegate his tasks to another approver in the workflow, such as Sue or Ann.
If users will be out of the office for a period of time, or will be unavailable to respond to tasks, have them delegate their tasks using the following steps.
To delegate tasks:
Open the Workflow User Delegation window. (Home >> User Preferences >> Workflow Delegation)
Enter or select the user to delegate tasks for.
Mark Automatically delegate my workflow tasks.
Select to delegate all of your workflow types or select to delegate by workflow type.
For each workflow type that you selected, specify who you want your tasks delegated to.
For each workflow type that you selected, specify when your tasks should be delegated by entering a starting and ending date.
Choose OK.
If users will be out of the office for a period of time, or unavailable to respond to tasks, have them delegate their tasks. For more information, see Chapter 15, "Workflow tasks."
Chapter 30: Workflow maintenance
The following sections explain how to copy, modify, delete, and inactivate a workflow.
Copying a workflow
Modifying a workflow
Deleting a workflow
Inactivating a workflow
Troubleshooting Workflow
Copying a workflow
An easy way to create a new workflow is to copy an existing one and modify it, as necessary. When you copy an existing workflow definition using the Copy Workflow window, you will copy all the steps included in the existing workflow. You also can copy a workflow from one company to another.
To copy a workflow:
Open the Workflow Maintenance window. (Administration >> Setup >> Company >> Workflow >>Workflow Maintenance)
Select the series that has the workflow you want to copy.
Expand the workflow type in the tree view.
Select the workflow you want to copy.
Choose the Copy button to open the Copy Workflow window.
Enter a unique name for the workflow.
We recommend that the name include your company name and the type of document the workflow is for. For example, if you're configuring a workflow for purchase orders created in the Fabrikam sample company, you may want to name the workflow "Fabrikam Purchase Orders."
Enter the description of the workflow.
Select the company this workflow is for.
You can copy this workflow to the company you are currently working in, or you can copy the workflow to another company.
- Choose Copy.
Modifying a workflow
Use the following steps to modify a workflow. Once documents have been submitted to the workflow, you can no longer add, remove, or change the order of steps.
- Open the Workflow Maintenance window.
(Administration >> Setup >> Company >> Workflow >>Workflow Maintenance)
Select the series that has the workflow you want to modify.
Expand the workflow type in the tree view.
Select the workflow you want to modify.
Modify the workflow, as necessary.
For more information about each of the options in the window, see Chapter 27,
"Configure a workflow" and Chapter 28, "Configure a workflow step."
- Choose Save Workflow.
Deleting a workflow
To delete a workflow you're no longer using, use the following steps.
You cannot delete a workflow that has an instance started.
To delete a workflow:
- Open the Workflow Maintenance window.
(Administration >> Setup >> Company >> Workflow >>Workflow Maintenance)
Select the series that has the workflow you want to delete.
Expand the workflow type in the tree view.
Select the workflow you want to delete.
Choose Delete Workflow.
Inactivating a workflow
Use the Workflow Maintenance window to inactivate a workflow that you no longer use. If documents are submitted before inactivating the workflow, the documents continue through the original workflow until they are complete.
When you inactivate a workflow, the message bar and workflow related buttons that appeared in the associated entry window are removed, assuming that you haven't activated another workflow. For example, the message bar that appeared in the Purchase Order Entry window would be removed.
Before you make a workflow inactive, you may want to process the documents that are awaiting approval.
To inactivate a workflow:
Open the Workflow Maintenance window. (Administration >> Setup >> Company >> Workflow >>Workflow Maintenance)
Select the series that has the workflow you want to inactivate.
Expand the workflow type in the tree view.
Select the workflow you want to inactivate.
Unmark the Active option.
Choose Save Workflow.
Troubleshooting Workflow
Review the following information.
Escalation actions are not performed
Be sure that the SQL Server Agent service is set up to start automatically with the operating system.
The default daily frequency for a SQL Server job is every 15 minutes. This means that the SQL Server job that performs escalations only runs every 15 minutes, unless you changed the default daily frequency. The escalation may happen up to 15 minutes after the due date and time passes.
Cannot perform Workflow actions from e-mail notifications
Be sure that you have installed Microsoft Dynamics GP Web Services and that the application user account set up in Microsoft Dynamics GP Web Services is a domain account that has privileges to access Active Directory.
Verify that the browser you are using is a supported browser.
An error occurs when submitting a document
If an error occurs when submitting a document after you restore a SQL Server backup to a new server or you have upgraded to a newer version of Microsoft .NET Framework, you must execute the wfDeployClrAssemblies stored procedure.
- Open the SQL Server Management Studio.
Log in to the server.
In the Object Explorer, expand the Microsoft Dynamics GP system database.
Expand Programmability and then expand Stored Procedures.
Right-click on dbo.wfDeployClrAssemblies and click Execute Stored Procedure.
Part 6: Organizational structure
You can define as many as four layers of structure within your business, and then to set up specific divisions, departments, or other organizational groups. Later you can create relationships among different groups. You can assign accounts, users, and user classes to different parts of the organizational structure.
This part of the documentation includes:
Chapter 31, "Organizational levels and entities," explains how to define the components of your organizational structure.
Chapter 32, "Organizational relationships," describes how to define the association between levels and entities in your organization.
Chapter 33, "User and user class assignments," shows how to assign users and user classes to the organizational structure you have created.
Chapter 34, "Account assignments," explains how to assign both individual accounts and account ranges to your organizational structure.
Chapter 35, "Account security," describes how to activate account security and provides information on the effects of account security.
Chapter 31: Organizational levels and entities
Setting up organizational levels and entities involves defining the components of your organization. This information describes how to add, delete, and rename levels and entities in your organizational structure.
This information is divided into the following sections:
Understanding organizational levels and entities
Defining levels and entities
Adding a level to an organizational structure
Deleting a level in an organizational structure
Adding an entity in an organizational structure
Deleting an entity in an organizational structure
Renaming levels and entities in an organizational structure
Understanding organizational levels and entities
Your organization might be defined in various ways, such as by geographic regions, functional areas, product lines, or target markets. For example, your organization might be composed of a number of companies, each with its own set of product lines and departments. Each level of the organization—in this example, company, product line, and department—includes a number of entities, that is, distinct identifiable units. For example, the entities at the department level might include the following:
Purchasing
Facility management
Accounting
Production
Defining levels and entities
Use the Organizational Structure Setup window to establish the levels of your organization and the entities at each level within the organizational structure. You can define up to four levels and up to 256 entities at each level. For example, the four levels could be Company, Region, Division, and Department, and the entities at the Department level could be Manufacturing, Distribution, Research, and Marketing.
Take some time before you begin the actual setup and think about the way your organization works. Using your existing organizational chart is an excellent place to begin.
Be sure you've identified each of the units in all of your companies. The levels and entities you create in this window will be used for all of your Microsoft Dynamics GP companies.
To define levels and entities:
Open the Organizational Structure Setup window.(Administration >> Setup >> System >> Organizational Structure)
Enter a label for each organizational level you want to use. The labels you enter for each of the levels will appear throughout Microsoft Dynamics GP. You can change these labels at any time.
You don't have to enter labels for all four levels if you don't need them all. For example, if you have only one company and your organization includes regions, divisions, and departments, you could enter those labels for levels 1, 2, and 3 and leave level 4 blank. If you leave a level blank, you won't be able to enter any entities in it, and it won't appear anywhere in Microsoft Dynamics GP.
Enter an ID and a description for each entity that exists at each level of your organization. You can change entity IDs and descriptions at any time.
Verify your entries with the Organizational Structure Setup Report.
Use the Organizational Structure Setup Report to verify that you have entered labels for each of the levels you'll use, and that you've entered IDs and descriptions for each entity in your organization. You can print this report while the Organizational Structure Setup window is open by choosing File >> Print.
- Choose OK to save your entries.
Adding a level to an organizational structure
Use the Organizational Structure Setup window to add levels to your organizational structure. You can add levels at any time.
To add a level to an organizational structure:
- Open the Organizational Structure Setup window.
(Administration >> Setup >> System >> Organizational Structure)
Enter the label of the level you want to add. When you create a new level, you'll need to add entities to that level.
Choose OK to save your changes.
Deleting a level in an organizational structure
Use the Organizational Structure Setup window to delete levels from your organizational structure. You can delete levels at any time.
To delete a level in an organizational structure:
Open the Organizational Structure Setup window. (Administration >> Setup >> System >> Organizational Structure)
Delete the label of the level to remove. If a level does not have a label, you won't be able to create any entities in it, and it won't appear anywhere in Microsoft Dynamics GP.
You can't delete a level if any entities exist in it or if any levels exist below it in the organizational structure.
- Choose OK to save your changes.
Adding an entity in an organizational structure
Use the Organizational Structure Setup window to add entities to the organizational structure. You can add entities at any time.
To add an entity in an organizational structure:
Open the Organizational Structure Setup window. (Administration >> Setup >> System >> Organizational Structure)
Choose the level to add entities to.
Enter an ID and a description for each entity you want to add to your organizational structure. You can change entity IDs and descriptions at any time.
Choose OK to save your changes.
Deleting an entity in an organizational structure
Use the Organizational Structure Setup window to delete entities from the organizational structure. You can delete entities at any time.
If you have created an organizational structure and assigned users, user classes, and accounts to positions in the organization, deleting an entity will have the following effects:
Any relationships that exist for that entity will be removed.
Any existing Organizational Structure assignments for users, user classes, and accounts assigned to those relationships will be removed.
Users and user classes can be assigned to only one position in the organizational structure; therefore, user and user classes assigned to removed positions will not have access to any accounts until they are assigned to a different position.
Accounts can be assigned to multiple positions in the organizational structure; therefore, accounts assigned to positions that are removed may still be assigned to other positions.
To delete an entity in an organizational structure:
Open the Organizational Structure Setup window. (Administration >> Setup >> System >> Organizational Structure)
Choose the level you want to delete an entity from.
Select the entity you want to delete and choose Edit >> Delete Row. Any relationships associated with this entity will be removed.
You can delete an entity at any time; however, if it is part of a parent-child relationship—that is, if it has any entities below it in the structure—any relationships below it also will be deleted. (Only the relationship will be deleted, not the child entities.)
- Choose OK to save your changes.
Renaming levels and entities in an organizational structure
Use the Organizational Structure Setup window to rename levels and entities. You can change the labels for the levels of your organization and change the IDs and descriptions of the entities at each level within the organizational structure.
To rename levels and entities in an organizational structure:
Open the Organizational Structure Setup window. (Administration >> Setup >> System >> Organizational Structure)
Change the labels for your organization levels.
Change the IDs and descriptions for the entities at each level.
Verify your entries with the Organizational Structure Setup Report. To print the report, choose File >> Print.
Choose OK to save your changes.
Chapter 32: Organizational relationships
Setting up organizational relationships involves defining the association between levels and entities in your organization. This information describes how to set up relationships in your organizational structure. You can then use this structure as a basis for defining account security and assigning users and accounts to entities.
This information is divided into the following sections:
Understanding organizational relationships
Defining organizational relationships
Copying organizational relationships
Examples of copying organizational relationships
Adding organizational relationships
Removing an organizational relationship
Understanding organizational relationships
Organizational relationships define the association between levels and entities in your organization. Organizational relationships are defined in terms of parent/ child relationships. For example, a company's East region may have a Products division and a Services division; the East region is a parent entity, and the Products and Services divisions are child entities.
Parent/child relationships must be defined in a "top-down" manner—that is, you must begin with a level 1 entity and assign the level 2 entities that are its children. You can then assign the level 3 child entities for a level 2 parent, so on.
You can copy the relationships you've defined for one entity to another entity, or to all other entities at the same level. For example, assume you have a Company/Division/Department structure, and all your companies have a Hardware division with a Production department. You could create the appropriate parent/child relationships in one company, and copy that set of relationships to all other companies in your organization. For more information, refer to Copying organizational relationships .
Defining organizational relationships
Use the Organizational Tree window and the Define Entity Relationships window to define the parent/child relationships among the entities in your organization.
To define organizational relationships:
Open the Organizational Tree window. (Administration >> Cards >> System >> Organizational Tree)
Highlight the parent entity to which you want to define relationships.
When you first open this window, all of the level 1 entities you defined in the Organizational Structure Setup window will appear in the tree view. If some relationships have been defined, a plus sign (+) will appear next to the entity. Click the plus sign to expand the tree view.
When the Organizational Tree window is open, you can use the buttons in the window to create, copy, or delete relationships, or you can use the selections on the Relationships menu.
Choose the Define Relationship button (or choose Relationships >> Define Relationship) to open the Define Entity Relationships window.
Mark the entities to be children of the selected parent.
All unassigned entities that exist in the level below the entity you selected in the Organizational Tree window will appear in this window. If an entity has already been assigned to the selected parent entity, it will not appear in this window. For example, if you have already assigned the North and South Regions to Company A, only the East and West regions will appear in this window.
- Choose Process to create the relationships and update the entities displayed in the Organizational Tree window.
When the organizational tree displayed in the Organizational Tree window is updated, only the level 1 entities are displayed. Click the plus sign to expand the tree view.
- In the Organizational Tree window, select another entity and continue defining relationships.
Copying organizational relationships
If you have a basic structure that appears throughout your organization, you can create the appropriate parent/child relationships once, and copy that structure to the rest of your organization. You can copy the relationships from one entity to another entity or to all the entities at the same level. If you're copying to entities that have already been assigned relationships, you can choose to add to the existing structure, or replace it with the new structure. You also can specify to copy specific level-2 or level-3 relationships. For more information on copying relationships, see Examples of copying organizational relationships .
Use caution when copying relationships to entities with existing structures. Be sure you don't add or replace relationships that you don't intend to add or replace.
To copy organizational relationships:
Open the Organizational Tree window. (Administration >> Cards >> System >> Organizational Tree)
Highlight the relationship to copy.
You can select a level 1, 2, or 3 entity. For example, if you have a Company/ Region/Division/Department structure and want to copy every parent/child relationship under the company ACME, highlight that company. If you want to copy the relationships below ACME company and region EAST, expand the ACME branch and select EAST.
If you're copying a portion of the organizational structure that has accounts assigned to it, those accounts will not be assigned to the new structure.
- Choose the Copy Relationship button (or choose Relationships >> Copy Relationships) to open the Copy Organizational Structures window.
The Copy From fields display information from the entity that you selected in the Organizational Tree window. For example, suppose you expand the tree and choose a level 3 entity of a specific branch. Then the three Copy From fields displays information about the appropriate parent and child entities. These values can be changed.
- Decide if you want to copy the relationship to all entities or to a specific one.
If you're copying to all entities, the relationship will be copied only to entities that exist at the lowest level entered in the Copy From fields—that is, if you specify a level 3 entity to copy from, the relationships will be copied only to existing level 3 entities.
If you want to select a specific entity to copy to, you must specify entities in the Copy To fields at each of the levels entered in the Copy From fields— that is, if you specify a level 3 entity to copy from, you must specify a level 3 entity in the Copy To fields.
You also can choose to add the relationship to existing structures, or you can replace the existing structures with the specified relationship.
Choose the Copy button to begin copying the selected relationships. When the copying process is finished, the window will remain open and you'll be able to select more relationships to copy.
When you've finished copying entities, close the window.
Examples of copying organizational relationships
For all of the following examples, assume you have a structure with Company at the first level, Division at the second, and Department at the third, with three companies: Fabrikam, Fabrikam–United Kingdom, and Fabrikam–Canada.
Copying a level 1 relationship to all entities
Assume you've created the following structure for Fabrikam:
Fabrikam Hardware
Administration
Consulting
Production
Research
Sales
If all three companies have a Hardware division that includes the same departments, you could copy the entire structure of Fabrikam to both other companies. In the Organizational Tree window, select Fabrikam, then choose the Copy Relationship button. In the Copy Organizational Structures window, mark
Copy to All Entity IDs and choose Copy. The following structure would be created
Fabrikam Hardware
Administration
Consulting
Production
Research
Sales
Fabrikam–UK Hardware
Administration
Consulting
Production
Research
Sales
Fabrikam–CAN Hardware
Administration
Consulting
Production Research Sales
Copying one level 2 relationship to another
Assume you have created the structure for Fabrikam with a Hardware division that includes several departments.
Also, assume the UK company has a Hardware division, but the Canada company has a Software division, and you want to copy the departments under Fabrikam/ Hardware to both the Hardware division of the UK company and the Software division of the Canada company. You can do this by first adding the Hardware division to the UK company and the Software division to the Canada company. The following table illustrates the structures you'd need to define before copying relationships.
Fabrikam Hardware
Administration
Consulting
Production
Research Sales Fabrikam–UK Hardware Fabrikam–CAN Software
After you've created this structure, you can copy the relationships from Fabrikam/
Hardware. In the Organizational Tree window, select Fabrikam, then select
Hardware and choose the Copy Relationship button. In the Copy Organizational Structures window, mark Copy to All Entity IDs, and choose Copy. The following structure will be created:
Fabrikam Hardware
Administration
Consulting
Production
Research Sales Fabrikam–UK Hardware
Administration
Consulting
Production
Research Sales Fabrikam–CAN Software
Administration
Consulting
Production Research Sales
You also can copy the departments for Fabrikam/Hardware only to the Software division of Fabrikam–Canada. In the Organizational Tree window, select Fabrikam, then select Hardware and choose the Copy Relationship button to open the Copy Organizational Structures window. In the Copy To fields, select Fabrikam–Canada and Software, and choose Copy.
Adding organizational relationships
Use the Organizational Tree window and the Define Entity Relationships window to add parent/child relationships to the entities in your organization.
To add organizational relationships:
Open the Organizational Tree window. (Administration >> Cards >> System >> Organizational Tree)
Select the parent entity to which you want to add relationships.
Choose the Define Relationships button (or choose Relationships >> Define Relationship) to open the Define Entity Relationships window.
Mark the child entities to add.
Choose Process to update the entities displayed in the Organizational Tree window.
Removing an organizational relationship
Use the Organizational Tree window and the Define Entity Relationships window to remove parent/child relationships from the entities in your organization.
Because relationships are defined in a "top-down" manner, changes made to a parent entity can affect its child entities. For example, if you remove a parent/child relationship, all the relationships below that are lost. You can't move a branch—that is, a child entity that has other child entities below it—from one parent entity to another and preserve the relationships below it.
Removing an organizational relationship will delete the organizational structure for the users and accounts assigned to that relationship. Because a user can be assigned to only one position, any user assigned to a position that is removed will not be able to access any accounts. Accounts can be assigned to more than one position, so an account assigned to a position that is removed may still be assigned to other positions.
To remove an organizational relationship:
Open the Organizational Tree window. (Administration >> Cards >> System >> Organizational Tree)
Select the child entity you want to remove from the relationship. You can expand a branch of the organizational tree by choosing the plus sign next to a parent entity.
Choose Delete Relationship (or choose Relationships >> Delete Relationships).
Chapter 33: User and user class assignments
This information describes how to create user classes and assign users and user classes to the organizational structure you've created. You must assign user and user classes before you can activate account level security.
You can create user classes and assign them to an organizational entity in your organizational structure so that you can activate account level security.
You also can specify sets of specific shortcuts to common tasks for each user class with the shortcut bar. Each set of shortcuts will appear on the user's shortcut bar in a user class folder. See Assigning shortcuts to a new user class folder for instructions on creating a user class shortcut folder.
This information is divided into the following sections:
Creating a user class
Assigning users to a class
Assigning a user class to an organizational entity
Changing the assignment of a user class
How rolling down changes affects users in a class
Assigning a user to an organizational structure
Changing the assignment of a user
For information about assigning accounts to the organizational structure, see Chapter 34, "Account assignments."
Creating a user class
You'll use the User Class Setup window to create a user class.
To create a user class:
Open the User Class Setup window. (Administration >> Setup >> System >> User Classes)
In the Class ID field, enter a class name. You may find it helpful to enter a name that identifies this class, such as SUPERVISOR or DATA ENTRY.
If you use Organizational Structures, choose the Class ID organization button to open the Organizational Structure Assignment window, where you can assign the selected user class to a position in your organizational structure.
Enter a description that identifies the class further. This description will be used as the name of the shortcut bar folder that corresponds to this user class.
To print a User Classes Report, showing the information you entered for the selected record, choose File >> Print. You also can print this report using the User Report Options window.
Assigning users to a class
After creating your user classes, assign each user to a class using the User Setup window.
To assign users to a class:
Open the User Setup window. (Administration >> Setup >> System >> User)
Enter or select a user.
In the Class ID field, enter or select the class you want to assign the user to.
Mark the Default option if you want the settings that you enter for this class to automatically appear as the default for every subsequent class that you create.
Choose Save to save your changes.
Assigning a user class to an organizational entity
Use the Organizational Structure Assignment window to assign a user class to a position in the organizational structure. You can assign a user class to only one position in the organizational structure.
If you have a large number of users, we recommend that you use user classes to assign groups of them to positions in the organizational structure. If you do need to make changes to the structure, you'll be able to apply those changes to all the users in a class, rather than one at a time. For more information, see How rolling down changes affects users in a class .
Only the system administrator, and users granted full access to all accounts can assign a user class to the organizational structure. (Full access to accounts can be granted to users and user classes in the Organizational Structure Assignment window.)
To assign a user class to an organizational entity:
Open the User Class Setup window. (Administration >> Setup >> System >> User Classes)
Enter or select the user class to assign to the organizational structure, and choose the organization icon button to open the Organizational Structure Assignment window.
If members of this user class should have access to all accounts, mark Grant Access To All Accounts.
Enter or select the entities that specify the position to assign the user class to.
The position you specify for this user class must already exist in the organizational structure. You can view the existing organizational structure in the Organizational Tree window (Administration >> Cards >> System >> Organizational Tree). For more information, see Defining organizational relationships .
As you enter the entities, you also are selecting the position in the organizational structure you're assigning the user class to. For example, if to assign the user class to the Consulting department of the Hardware division of Fabrikam, you would enter Fabrikam in the first level, Hardware in the second level and Consulting in the third level.
Choose Insert to insert the position into the Assigned Positions list.
Choose OK to save the position assignment.
Changing the assignment of a user class
Use the Organizational Structure Assignment window to change a user class's position in the organizational structure. You can assign a user class to only one position in the organizational structure.
If you have a large number of users, changing the assignment for a user class is an easy way to change the position assignments for several users at once, rather than one at a time. For more information, see How rolling down changes affects users in a class .
Only the system administrator and users granted full access to all accounts can change a user class's position in the organizational structure. (Full access to accounts is granted to users and user classes in the Organizational Structure Assignment window.)
To change the assignment of a user class:
- Open the User Class Setup window.
(Administration >> Setup >> System >> User Classes)
Enter or select the user class whose position in the organizational structure you want to change, and choose the organization icon button to open the Organizational Structure Assignment window.
If members of this user class should have access to all accounts, mark Grant Access To All Accounts.
Highlight the current position assignment of the user class and choose Remove.
Because a user class can't be assigned to more than one position, you must first remove its current position assignment before selecting a new one.
- Enter or select the entities that specify the new position to assign the user class to.
As you enter the entities, you also are selecting the position in the organizational structure you're assigning the user class to. For example, if you want to assign the user class to the Production department of the Eastern region of Fabrikam, you would enter Fabrikam in the first level, East in the second level and Production in the third level.
Choose Insert to insert the position into the Assigned Positions list.
Choose OK to save the position assignment.
How rolling down changes affects users in a class
When you make changes to the organizational assignment for a user class, you'll have the option to apply those changes to the user records assigned to that class. If you roll down changes, all the changes you make will apply to all the users in the class.
Rolling down changes applies all the settings for a user class, not just those that you changed in an individual session.
If you roll down changes for a class, any individual position assignments you've made for users in that class will be lost. For more information on position assignments for individual users, see Assigning a user to an organizational structure .
If you choose not to roll down changes, the changes won't affect any existing users but will be reflected in the settings for all users you assign to this class in the future.
Assigning a user to an organizational structure
Use the Organizational Structure Assignment window to assign a user to a position in the organizational structure. You can assign a user to only one position in the organizational structure.
If you have a large number of users, we recommend that you use user classes to assign groups of users to positions in the organizational structure. For more information, see Assigning a user class to an organizational entity .
Only the system administrator and users granted full access to all accounts can assign a user to the organizational structure. (Full access to accounts can be granted to users and user classes in the Organizational Structure Assignment window.)
To assign a user to an organizational structure:
Open the User Setup window. (Administration >> Setup >> System >> User)
Enter or select the user you want to assign to the organizational structure, and choose the organization icon button to open the Organizational Structure Assignment window.
If the user should have access to all accounts, mark Grant Access To All Accounts.
Enter or select the entities that specify the position to assign the user to.
The position you specify for this user must already exist in the organizational structure. You can view the existing organizational structure in the Organizational Tree window (Administration >> Cards >> System >> Organizational Tree). For more information, see Defining organizational relationships .
As you enter the entities, you also are selecting the position in the organizational structure you're assigning the user to. For example, if you want to assign the user to the Consulting department of the Hardware division of Fabrikam, you would enter Fabrikam in the first level, Hardware in the second level and Consulting in the third level.
Choose Insert to insert the position into the Assigned Positions list.
Choose OK to save the position assignment.
Changing the assignment of a user
Use the Organizational Structure Assignment window to change a user's position in the organizational structure. You can assign a user to only one position in the organizational structure.
Only the system administrator and users granted full access to all accounts can change a user's position in the organizational structure. (Full access to accounts is granted to users and user classes in the Organizational Structure Assignment window.)
To change the assignment of a user:
- Open the User Setup window.
(Administration >> Setup >> System >> User)
Enter or select the user whose position in the organizational structure you want to change, and choose the organization icon button to open the Organizational Structure Assignment window.
Indicate whether this user should have access to all accounts, regardless of their position in the organizational structure.
Highlight the user's current position assignment and choose Remove.
Because a user can't be assigned to more than one position, you must first remove their current position assignment before selecting a new one.
- Enter or select the entities that specify the new position to assign the user to.
As you enter the entities, you also are selecting the position in the organizational structure you're assigning the user to. For example, to assign a user to the Production department of the Eastern region of Fabrikam, you would enter Fabrikam in the first level, East in the second level and Production in the third level.
Choose Insert to insert the position into the Assigned Positions list.
Choose OK to save the position assignment.
Chapter 34: Account assignments
After assigning users to the organizational structure you've created, you must assign accounts to the structure. This information describes how to assign individual accounts and ranges of accounts. Then, when you activate account level security, users will be able to access only those accounts that they are assigned to, based on their position in the organizational structure.
This information is divided into the following sections:
Assigning a range of accounts to an entity
Changing the assignment for a range of accounts
Assigning an account to an organizational entity
Changing the assignment of an account
Assigning a range of accounts to an entity
Use the Organizational Structure Mass Assignment window to assign a range of accounts to a position in the organizational structure. You can assign accounts to more than one position in the organizational structure.
You can assign posting accounts, unit accounts, and variable and fixed allocation accounts to positions in the organizational structure. You also can allow users to have access to an allocation account—either fixed or variable—while not allowing them to have access to any of the distribution or breakdown accounts for the allocation account.
If you activate account security and you have accounts that aren't assigned to at least one position in the organizational tree, those accounts will be available only to users who have been given access to all accounts.
Only the system administrator and users granted full access to all accounts can assign a range of accounts to the organizational structure. (Full access to accounts can be granted to users and user classes in the Organizational Structure Assignment window.) For more information on granting users and user classes access to all accounts, see Chapter 33, "User and user class assignments."
To assign a range of accounts to an entity:
Open the Organizational Structure Mass Assignment window. (Administration >> Cards >> System >> Organizational Assignments)
Enter or select the entities that specify the position to which you want to assign the range of accounts.
The position you specify for this range of accounts must already exist in the organizational structure. You can view the existing organizational structure in the Organizational Tree window (Administration >> Cards >> System >> Organizational Tree). For more information, see Defining organizational relationships .
As you enter the entities, you also are selecting the position in the organizational structure to which you're assigning the range of accounts. For example, to assign accounts to the Sales department of the Hardware division of Fabrikam, you would enter Fabrikam in the first level, Hardware in the second level and Sales in the third.
- Select the ID of the company to which you're making account assignments.
If you are using Intercompany Processing and want account security to apply to transactions originating in another company, you must assign the appropriate accounts in the originating company to the organizational structure.
- Select Assign, and indicate whether you want the assigned accounts to be available to the parent levels of the entity.
Using the previous example, if you enter the organizational structure The Fabrikam/Hardware/Sales and select the Apply To Parent Levels option, the accounts you enter will be available to users and user classes assigned to the following three positions of the structure:
Fabrikam/Hardware/Sales
Fabrikam/Hardware
Fabrikam
If you leave the option unmarked, the accounts will be available only to users and user classes assigned to Fabrikam/Hardware/Sales.
- Select the type of range of accounts to assign—segment or account—then enter restrictions for that range. You can insert multiple ranges of each type into the Restrictions list.
If you insert multiple ranges into the Restrictions list, any account that falls within one of the ranges you define will be assigned. For example, you could choose to restrict by segments, and enter Account segment 1200 through 1270 and Account segment 1300 through 1330 in the Restrictions list. Any account with segments 1200 to 1270 or 1300 to 1330 will be assigned.
If you use a segment range to assign accounts to a position in the organizational structure, then later add accounts that fall within that range, the new accounts will not be assigned automatically to the same position. You must add the new accounts to the structure.
- Choose Details to open the Organizational Assignment Details window, where you can view the accounts that fall within the ranges you selected, and make changes if necessary.
In this window, you can select individual accounts to exclude from the ranges you defined. When you finish, choose OK to return to the Organizational Structure Mass Assignment window.
- Choose Process.
After processing is completed, the Organizational Assignments Journal will print, showing the account restrictions you entered, the assignment options, the position you assigned accounts to, and the accounts that were assigned.
Changing the assignment for a range of accounts
Use the Organizational Structure Mass Assignment window to change the organizational structure assignments for a range of accounts. You can assign additional ranges of accounts to the position, remove specific ranges of accounts from the position, or remove specific ranges of accounts from all assigned positions for the selected company.
To change the assignment for a range of accounts:
- Open the Organizational Structure Mass Assignment window.
(Administration >> Cards >> System >> Organizational Assignments)
- Enter or select the entities that specify the position to which you want to change account assignments.
If you want to remove specific ranges of accounts from all assigned positions for the selected company, you can leave these fields blank.
As you enter the entities, you also are selecting the position in the organizational structure to which you're assigning the range of accounts. For example, if you want to change the ranges of accounts that will be available to the Production department of the Eastern region of Fabrikam, you would enter Fabrikam in the first level, East in the second level and Production in the third level.
Select the ID of the company to which you're changing account assignments.
You can assign additional ranges of accounts to the position, remove specific ranges of accounts from the position, or remove specific ranges of accounts from all assigned positions for the selected company.
To assign additional ranges of accounts to the position, choose Assign, and indicate whether you want the assigned accounts to be available to the parent levels of the entity. Then select the type of range you want to assign, and enter restrictions for the range of accounts. For more information, see Assigning a range of accounts to an entity .
To remove specific ranges of accounts from the position, choose Remove Assigned, and indicate whether you want the assigned accounts to be removed from the parent levels of the entity. Then select the type of range you want to remove, and enter restrictions for the range of accounts.
To remove specific ranges of accounts from all assigned positions for the selected company, choose Remove All Assigned, then select the type of range to remove, and enter restrictions for the range of accounts.
Choose Details to open the Organizational Assignment Details window, where you can view the accounts that fall within the ranges you selected, and make changes if necessary.
Choose OK to return to the Organizational Structure Mass Assignment window.
Choose Process. Processing your selections may take some time, depending on the number of accounts in the ranges you specified.
Assigning an account to an organizational entity
Use the Organizational Structure Assignment window to assign an account to positions in the organizational structure. You can assign an account to more than one position in the organizational structure.
You can assign posting accounts, unit accounts, and variable and fixed allocation accounts to positions in the organizational structure. You also can allow users to
have access to an allocation account—either fixed or variable—while not allowing them to have access to any of the distribution or breakdown accounts for the allocation account.
To assign an account to an organizational entity:
- Open one of the account maintenance windows. (Financial >> Cards >> Financial >> Account)
(Financial >> Cards >> Financial >> Unit Account)
(Financial >> Cards >> Financial >> Variable Allocation)
(Financial >> Cards >> Financial >> Fixed Allocation)
Enter or select the account to assign to the organizational structure.
Choose the organization icon button to open the Organizational Structure Assignment window.
Enter or select the entities that specify the position to which you want to assign the account.
As you enter the entities, you also are selecting the position in the organizational structure to which you're assigning the account. For example, to assign an account that will be available to the Hardware division of Fabrikam, you would enter Fabrikam in the first level and Hardware in the second level.
- Choose Insert to insert the position into the Assigned Positions list. When you insert the position into the Assigned Positions list, a message will appear, asking if you want to make this account available to the parent levels of the organization.
You can assign an account to more than one position in the organization at a time.
- Choose OK to save the position assignments.
Changing the assignment of an account
Use the Organizational Structure Assignment window to change the position assignment of an account. You can assign an account to more than one position in the organizational structure.
To change the assignment of an account:
- Open one of the account maintenance windows. (Financial >> Cards >> Financial >> Account)
(Financial >> Cards >> Financial >> Unit Account)
(Financial >> Cards >> Financial >> Variable Allocation)
(Financial >> Cards >> Financial >> Fixed Allocation)
Enter or select the account to which you want to change the position assignment.
Choose the organization icon button to open the Organizational Structure Assignment window.
Enter or select the entities that specify the position to which you want to assign the account.
As you enter entities, you also are selecting the position in the organizational structure to which you're assigning the account. For example, to assign an account to the Hardware division of Fabrikam, you would enter Fabrikam in the first level and Hardware in the second level.
Choose Insert to insert the position into the Assigned Positions list. When you insert the position into the Assigned Positions list, a message will appear, asking if you want to make this account available to the parent levels of the organization.
Important
You can assign an account to more than one position in the organization at a time.
To remove a position assignment, select it in the Assigned Positions list and choose Remove.
Choose OK to save the position assignments.
Chapter 35: Account security
This information describes how to use account security and explains the effects of account security. Once you activate account security, users will be able to use only those accounts to which they have been given access.
This information is divided into the following sections:
Activating account security
Effects of account security on transactions
Effects of account security on inquiries
Effects of account security on reports and report options
Effects of account security on maintenance windows
Effects of account security on secured windows
Activating account security
The organizational structure you create—including the user, user class, and account assignments—won't take effect until you activate account security in the Company Setup window. You must activate account security separately for each of the companies you create in Microsoft Dynamics GP.
Account security settings will take effect for each user when the user logs into the system after account security has been activated.
Before beginning this procedure, be sure you're logged in to the company to which you want to activate account security.
To activate account security:
Open the Company Setup window. (Administration >> Setup >> Company >> Company)
Mark the Account Security option.
Choose OK to save your settings. When you've finished, close the window.
Effects of account security on transactions
Once you activate account security, you can't enter, view, edit, or post any transactions in General Ledger windows that include a secured account—that is, an account to which you don't have access.
When you use the transaction entry windows in Receivables Management, Payables
Management, Sales Order Processing, Invoicing, Inventory Control, Intercompany Processing, Payroll, Purchase Order Processing, and Bank Reconciliation, you can enter, view, and edit transactions that include default distributions to secured accounts. However, account security will apply to account distributions. You can open the distribution entry windows, but if any accounts are secured—not available to you—the account field will be blank and the message "Access denied/Account missing" will appear in the Description field. If you attempt to enter an account number that is secured, the message "You don't have permission to create new accounts or view all accounts" will appear when you move from the field. The account and description fields will be cleared.
If you attempt to post a transaction in a module other than General Ledger that includes a secured account, the batch will not be posted—it will not post through General Ledger, even if the Post Through General Ledger Files option for the series is marked in the Posting Setup window. A user who has access to all accounts will have to use the Batch Recovery window to mark the batch and continue the posting process.
When you enter or edit a transaction in any of the transaction entry windows, if any of the distribution accounts are secured, they will be saved when you save the transaction. A user with access to those accounts or a user with access to all accounts could view the transaction and all of the account distributions.
If a transaction includes Multidimensional Analysis information and you remove a distribution for a secured account, any Multidimensional Analysis information associated with that distribution also will be removed. (When an account distribution is deleted for any reason, the Multidimensional Analysis information associated with the distribution will be removed, whether it is a secured account or not.)
Effects of account security on inquiries
Account security will apply to all account fields in the inquiry windows in all modules. If you don't have full access to all accounts, you won't be able to view secured accounts by using an account lookup, by using the browse buttons, by entering a secured account number, or by zooming from an account field on another window.
When you use an inquiry window that includes an account field you can view records that include secured accounts. However, the account field will be blank and the message "Access denied/Account missing" will appear in the Description field. If you attempt to enter an account number that is secured, the message "You don't have permission to create new accounts or view all accounts" will appear when you move from the field. The account and description fields will be cleared.
Effects of account security on reports and report options
Account security applies to all reports in all modules. If you don't have full access to all accounts, you won't be able to create a report that includes secured accounts.
In the report options windows, if you don't have full access to all accounts, you won't be able to restrict the report using a secured account number.
Effects of account security on maintenance windows
Only the system administrator and users granted full access to all accounts will be able to create new accounts in the account maintenance windows in General Ledger.
Account security applies to all account fields in the maintenance windows in all modules. If you don't have full access to all accounts, you won't be able to view secured accounts by using an account lookup, by using the browse buttons, or by entering a secured account number. If you open a record that includes a secured account, the account field will be blank and the message "Access denied/Account missing" will appear in the Description field. If you attempt to enter an account number that is secured, the message "You don't have permission to create new accounts or view all accounts" will appear when you move from the field. The account and description fields will be cleared.
Effects of account security on secured windows
Some Microsoft Dynamics GP windows can be opened only if you have full access to all accounts. These windows include the Year-End Closing window, the Period Consolidation window, the Reconcile Financial Information window, and the remove history windows for all modules.
Part 7: Business Alerts
You can use this information to set up Business Alerts to notify you when your data matches conditions you specify. The Business Alert information is designed to give you an in-depth understanding of how to use the features of Business Alerts, and how Business Alerts integrates with the Microsoft Dynamics GP system.
This part of the documentation contains the following information:
Chapter 36, "Business Alerts overview," contains information about how Business Alerts works.
Chapter 37, "Business Alerts setup," contains information about setting up Business Alerts.
Chapter 38, "Business Alerts maintenance," contains information about maintaining Business Alerts.
Chapter 36: Business Alerts overview
Business Alerts uses the power of Microsoft SQL Server to monitor your business's data, delivering faster access to business-critical information and enabling your organization to make quicker, more informed decisions to improve your business success.
This information is divided into the following sections:
How Business Alerts works
Alert notifications
Business Alerts terms
How Business Alerts works
Business Alerts takes advantage of the query features of Microsoft SQL Server to monitor your data for specific conditions. For example, suppose that you want to be notified when a customer's credit limit has been exceeded. In that case, you can use the Business Alert wizard to create a query that compares the credit limit amounts to the current amounts for your customers.
You can use the wizard to set up the schedule for the alert—that is, when, how often, and for how long you want Microsoft Dynamics GP to check whether the conditions you've defined exist. You also can specify a list of people to notify when those conditions occur.
You can create an unlimited number of business alerts, combining information from any of the tables in company or system databases. For example, you can compare the outstanding commissions per salesperson from the sales tables to commissions paid in the payroll tables.
Once you have created and enabled a business alert, the conditions will be checked according to the schedule you set up. Whenever the alert condition is found, an email message is sent to the people or groups that you specified or a task is created for the user that you specified.
Alert notifications
You can use any of the notification methods supported by your messaging system with Business Alerts. For example, you can notify alert recipients using any combination of e-mail, fax, and pager messages. You also can create tasks that will be displayed on their home pages and their task list whenever an alert condition is found.
Important
We strongly recommend that you use a MAPI-compliant messaging system, and that you ensure that it is working correctly with Microsoft SQL Server before using Business Alerts.
Business Alerts terms
Terms specific to Business Alerts are defined in the following table.
| Term | Definition |
|---|---|
| Alert formula | A SQL query that defines the conditions you want the business alert to test for. |
| Joining tables | Identifying the columns in two different tables that store the same information. Also referred to as creating table joins. |
| Notification | Informing a person or group of people that the alert conditions have occurred. |
| Recipient | A person or group you want to notify when the alert condition occurs. |
Chapter 37: Business Alerts setup
Use the Business Alert wizard to create a Microsoft SQL Server query that checks your data for the conditions you specify. Next, create the schedule for the query— that is, when, how often, and for how long you want Microsoft Dynamics GP to check whether the conditions you've defined exist. You also can specify the list of people to notify when it does.
Before you set up Business Alerts be sure that Microsoft SQL Server Agent is started and that you've set up SQL Mail or Database Mail. SQL Server Agent is not available for SQL Server Express. For more information about setting up SQL Mail or Database Mail, refer to SQL Server Books Online.
This information is divided into the following sections:
Starting the Business Alert wizard
Defining a business alert
Selecting and joining tables for alerts
Rules for Business Alerts formulas
Defining an alert formula
Setting up an alert notification
Scheduling an alert
Using data from integrating applications in alerts
Starting the Business Alert wizard
Use the Business Alert wizard to create a business alert. You can create an unlimited number of business alerts, combining information from any of the tables in a company database or in the system database. For example, you can compare the outstanding commissions per salesperson from the sales tables to commissions paid in the payroll tables.
To start the Business Alert wizard:
Open the Business Alert Welcome window. (Administration >> Setup >> System >> Business Alerts)
Decide if you want to create a new business alert or modify an existing business alert.
To create a new business alert, mark Create New Alert and choose Next. Refer to Defining a business alert for more information.
To modify an existing business alert, mark Modify Existing Alert and choose Next. Refer to Modifying a business alert for more information.
Defining a business alert
Use the Define Business Alert window to select the database for a business alert and to assign an ID and description to the alert. You can set up an alert for any company database or for the Microsoft Dynamics GP system database. If you select a company database, the Microsoft Dynamics GP system tables also will be included.
Before you begin this procedure, you should have started the Business Alert wizard. Refer to Starting the Business Alert wizard for more information.
To define a business alert:
In the Business Alert Welcome window, choose Next to open the Define Business Alert window.
Select the database that will be checked with the alert. The database name is displayed.
Enter an alert ID and brief description of the alert.
To continue setting up the alert, choose Next to open the Select Tables window.
Refer to Selecting and joining tables for alerts for more information.
Selecting and joining tables for alerts
Use the Select Tables window to select the tables that contain the information you'll use to define the formula for this business alert.
For more information about the tables Microsoft Dynamics GP uses to store information, use the Table Descriptions window. On the Microsoft Dynamics GP menu, choose Tools >> Resource Descriptions >> Tables.
If you select more than one table, you must join the tables using the Joining Tables window. For example, suppose you want to create an alert using the RM Customer MSTR table and the Customer Master Summary table, which both have a Customer
Number column. In this case, you could join the Customer Number columns of these tables.
If you're using an integrating application with Microsoft Dynamics GP and you want to include its information in a business alert, you must select the tables you need to include using the Business Alert Table Maintenance window. For more information, refer to Using data from integrating applications in alerts .
To select and join tables for alerts:
Open the Select Tables window. (In the Define Business Alert window, choose Next.)
Select the series that includes the tables to include in the alert, then select each table to include and choose Insert. You can include tables from more than one series.
Choose Next; if you've selected more than one table, the Joining Tables window will appear.
Select two tables that have columns you want to join. (To select more than one table, hold down the CTRL key while selecting.)
Select a column from each table and choose Insert. The columns you select must have the same data type, that is, they must store the same type of information. For example, you could not join a date column with a currency amount column. You can create multiple table joins, including multiple table joins between the same tables.
Each table must be joined to at least one other table before you can continue setting up an alert.
- Choose Next and refer to Defining an alert formula to continue setting up this alert.
Rules for Business Alerts formulas
Formulas for Business Alerts must adhere to the following rules:
String constants must be enclosed in single quotes.
The total number of left parentheses must equal the total number of right parentheses.
An OR operator can't precede an aggregate function.
The formula must include a comparison operator (=,<,>,<=,>=,<>).
The formula can't have two operators next to each other.
The formula can't have two columns or constants next to each other.
The formula can't begin with an operator.
Defining an alert formula
Use the Define Alert Formula window to create the formula that specifies the conditions you want this alert to check for. For example, you can set up a formula to monitor when a customer's on-order amount exceeds their credit limit.
To define an alert formula:
Open the Define Alert Formula window. (In the Select Tables window or the Joining Tables window, choose Next.)

Build the formula by adding columns, constants, and operators to the business alert formula.
For example, to create a credit alert that notifies you when customer orders exceed customer credit limits, you might select the Customer Master Summary table, then select the On Order Amount column. Choose Add Column. Choose the > button to insert the greater than operator. Then select the RM Customer MSTR table and the Credit Limit Amount column, and choose Add Column.
When you choose Next, your formula is checked to ensure that it complies with the rules for formulas.
- Choose Next and refer to Setting up an alert notification to continue setting up an alert.
Setting up an alert notification
Use the Alert Notification window to enter the addresses or user IDs of the people who should be notified when the alert conditions specified in the business alert formula occur. Depending on how you choose to deliver notifications, the addresses might be e-mail addresses, or fax, or pager numbers.
You also can specify whether the recipients should receive a message, or a message and a report. If you choose to send a message and a report, use the Select Report Columns window and the Select Report Sorting Options window to set up the information to be included in the report.
You can use any of the notification methods supported by your messaging system. For example, if you're using Microsoft Exchange, you could notify alert recipients using a combination of e-mail, fax, and pager messages.
We strongly recommend that you use a MAPI-compliant messaging system, and that you ensure that it is working correctly with Microsoft SQL Server before using Business Alerts.
If the recipients are listed by their user IDs, the alert that they receive will be in the form of a new Microsoft Dynamics GP task that is created and assigned to them when the alert conditions that you specify are met.
To set up an alert notification:
Open the Alert Notification window. (In the Define Alert Formula window, choose Next.)
Indicate if alert recipients will be listed by e-mail addresses or by user IDs. If you mark user ID, skip to step 4.
Indicate if alert recipients should receive a message, or a message and a report.
Enter the addresses or user IDs of the people or groups to notify when the alert conditions occur. If you entered addresses in the alert recipients list, you should send a test mail message to be sure that all the recipients will receive the message.
If you have a MAPI-compliant messaging system and you marked E-mail in step 2, you also can choose the To button to open the address window for your system, where you can select addresses. For example, if you're using Microsoft Exchange, choosing this button will open the Address Book window, where you can select recipients, as well as carbon-copy (cc) and blind-carbon-copy (bcc) recipients.
If you marked User ID in step 2, you can choose the To button to open the Users lookup window, where you can select user IDs.
The list of recipients can't have more than 255 characters. If you need to create a longer list of recipients, we recommend that you set up and use a mail group, rather than entering each recipient individually.
Enter the message you want the recipients to receive. This message can't be more than 255 characters.
Choose Next; if you marked the Message and Report option, the Select Report Columns window will appear.
In the Select Report Columns window, select a table that includes columns you want to appear in the report, then select the columns you want and choose Insert. You also can change the heading that will appear above each column on the report. If you enter a new column heading, Microsoft Dynamics GP automatically will enclose it in single quotation marks, and replace any spaces with underscore characters.
Columns will appear on the report in the order they appear in the Report Column list.
Choose Next to open the Select Report Sorting Options window.
Select the column for sorting the report and choose Insert. You can insert additional columns into the Report Sort Order list.
Choose Next and refer to Scheduling an alert to continue setting up this alert.
Scheduling an alert
Use the Schedule Alert window to specify when, how often, and for how long your data will be checked for the business alert conditions you've defined.
To schedule an alert:
- Open the Schedule Alert window.
(In the Define Alert Output window or the Select Report Sorting Options window, choose Next.)
Decide if your data should be checked for the alert conditions on a daily, weekly, or monthly basis. Other options in the window will change, depending on your selection.
Decide if your data should be checked once each interval, or more frequently. For example, if you chose to have data checked every week on Monday, you could then have it occur every two hours, beginning at 6 a.m. and ending at 6 p.m.
Enter the date you want the checks of your data to begin and to end. If you don't want the checks of your data to end, mark the No End Date option.
Mark Keep Alert History to keep a record of dates and times that the alert conditions occurred and the recipients who were notified each time, and mark Enable Business Alert if you want to start using this alert.
Choose Test Alert to see if the alert formula you entered is valid, and to send a test message to the alert recipients.
Choose Finish to save your changes and close the Business Alert wizard.
Using data from integrating applications in alerts
Use the Business Alert Table Maintenance window to make tables from integrating applications available for business alerts. You must complete the steps in this procedure if you use integrating applications with Microsoft Dynamics GP and you want to include information from these applications in a business alert. After you complete this procedure, you'll be able to select tables from integrating applications when you're creating a business alert with the Business Alert wizard.
To use data from integrating applications in alerts:
Open the Business Alert Table Maintenance window. (Administration >> Utilities >> System >> Business Alerts)
Select the dictionary and series that includes the tables to use in a business alert.
From the list of tables available in the dictionary, select the tables to use and choose Insert.
When you have selected all the tables to use in a business alert, choose Process to add the selected tables to the tables available for business alerts.
Chapter 38: Business Alerts maintenance
After you've set up and enabled Business Alerts, you might need change an alert by modifying the formula, using different tables, changing the alert schedule, or adding, or removing people from the list of people to be notified when the alert conditions occur.
If you marked the option to keep alert history, you can print a report showing when the alert conditions occurred and which the recipients were notified each time. You also can remove that history if it is no longer needed.
This information is divided into the following sections:
Modifying a business alert
Modifying an alert schedule and notification
Making tables unavailable for alerts
Printing and removing alert history
Modifying a business alert
Once you've created a business alert, you can use the Business Alert Maintenance window to view or modify the details of the alert. You can make changes to virtually any aspect of an alert, such as the alert formula, the list of notification recipients, the alert schedule and the report that is generated by the alert.
To modify a business alert:
Open the Business Alert Maintenance window. (Administration >> Cards >> System >> Business Alerts)
Enter or select a business alert.
Decide how the business alert needs to be modified. In the Business Alert Maintenance window, you can change the contents of the alert message, change options for keeping history and enable or disable a business alert.
- To change the alert message, enter new text in the Message field.
To keep a record of the dates and times that the alert conditions occurred and the recipients who were notified each time, mark Keep Alert History.
To disable a business alert, clear the Enable Business Alert option.
- To change the schedule or the notification options, choose Schedule/
Notification to open the Schedule and Notification window. Refer to Modifying an alert schedule and notification for more information.
To change the formula or the tables used in the alert, choose Modify Alert to open the Business Alert wizard. Choose Next one or more times to open the appropriate window for making your change.
To change the formula, use the Define Alert Formula window. Refer to Defining an alert formula for more information.
To select different tables, use the Select Tables window. Refer to Selecting and joining tables for alerts for more information.
To print a report showing the history for this alert, choose Print/Remove History to open the Print/Remove Alert History window. Refer to Printing and removing alert history for more information.
Save your changes.
Verify your changes with the Business Alert Setup List. To print the list, choose File >> Print when the Business Alert Maintenance window is open.
Modifying an alert schedule and notification
Use the Schedule and Notification window to modify when, how often, and for how long Microsoft Dynamics GP will check whether the business alert conditions exist. Microsoft Dynamics GP will check your data for the conditions specified in the business alert formula at the intervals you set up here. You also can add or remove e-mail addresses or user IDs from the list of recipients for this business alert.
To modify an alert schedule and notification:
Open the Schedule and Notification window. (Administration >> Cards >> System >> Business Alerts >> Select an alert >> choose Schedule/Notification)
Make the necessary changes to the schedule.
Add or remove recipients.
To disable a business alert, clear the Enable Business Alert option.
Choose Test Alert to ensure that the alert works correctly with the changes you made.
Choose OK to close the Schedule and Notification window.
In the Business Alert Maintenance window, choose Save. Close the window.
Making tables unavailable for alerts
Use the Business Alert Table Maintenance window to make tables unavailable for business alerts.
To make tables unavailable for alerts:
Open the Business Alert Table Maintenance window. (Administration >> Utilities >> System >> Business Alerts)
Select the dictionary and series that includes the tables you want to make unavailable for business alerts.
From the list of tables available in the dictionary, select the tables to use and choose Insert.
When you have selected all the tables to make unavailable for business alerts, choose Process to remove the selected tables from the tables available for business alerts.
Printing and removing alert history
When you create a business alert, you have the option to have Microsoft Dynamics GP keep history, which is a record of the dates and times when the alert conditions occurred and the recipients who were notified each time. Use the Print/Remove Alert History window to print the Business Alert History Report, or remove business alert history and print the Business Alert History Removal Report.
To print and remove alert history:
Open the Print/Remove Alert History window. (Administration >> Cards >> System >> Business Alerts >> Select an alert >> choose Print/Remove History.)
Select the option to print the Business Alert History Report, or to print the Business Alert History Removal Report and remove history.
Enter the range of dates you want to include in the report or remove from history.
Choose Process to print the report, or to print the report and remove history.
Part 8: Customizing Microsoft Dynamics GP
You can use this information to locate the setup instructions for additional components that you purchased. You also can use this information to help you extend your system to your exact specifications. The Microsoft Dynamics GP interface makes your system highly customizable.
This part of the documentation contains the following information:
Chapter 39, "Report deployment," explains how to deploy predefined SQL Server Reporting Services reports that are included in Microsoft Dynamics GP to a server or to a Microsoft SharePoint library.
Chapter 40, "Excel report deployment," explains how Excel reports and Office Data Connection (ODC) technology work together and how to deploy the reports.
Chapter 41, "Sorting options," explains how to tailor specific elements in the Microsoft Dynamics GP user interface to your specific needs.
Chapter 42, "Word templates," explains how you can set up and use the Microsoft Word templates for Microsoft Dynamics GP functionality.
Chapter 43, "Extending system functionality," provides an overview of the tools you can use to customize your reports, user interface, and data integration processes.
Chapter 39: Report deployment
This information explains how you can deploy predefined SQL Server Reporting
Services reports that are included in Microsoft Dynamics GP to a server or Microsoft
SharePoint site. If you are using SQL Server 2008 Reporting Services, SQL Server 2008 R2 Reporting Services, or SQL Server 2012 Reporting Services, you also can deploy charts and key performance indicators (KPIs). Once the reports and charts and KPIs are stored on a server or on a Microsoft SharePoint library, users can access them without starting Microsoft Dynamics GP as long as they have the appropriate security access.
Refer to the System User's Guide (Help >> Contents >> select Using the System) for more information about using SQL Server Reporting Services with Microsoft Dynamics GP.
This information is divided into the following sections:
Reporting Services reports that you can deploy from Microsoft Dynamics GP
Modify the Report Server web.config file
Deploying SQL Server Reporting Services reports
Reporting Services reports that you can deploy from Microsoft Dynamics GP
Microsoft Dynamics GP contains predefined SQL Server Reporting Services reports that you can deploy to a server or a Microsoft SharePoint library. If you are using SQL Server 2008 Reporting Services, SQL Server 2008 R2 Reporting Services, or SQL Server 2012 Reporting Services, you also can deploy charts and KPIs. These reports must be deployed before they can be used. When you deploy reports and charts and KPIs, new files are created in locations that you specify for you to use.
Once the reports and charts and KPIs are deployed, a user can access them even when Microsoft Dynamics GP is not running and as long as that user has access to the location where those reports and charts and KPIs are stored.
It is the system administrator's responsibility to create secure locations on a server or on a SharePoint library for these reports.
Modify the Report Server web.config file
To deploy the SQL Server Reporting Services reports, you must modify the Report Server web.config file for the timeout execution and the maximum request length. If you don't update the Report Server web.config file for the timeout execution, you might receive an error that states that "the operation has timed out." If you don't update the Report Server web.config file for the maximum request length, you will receive an error that the deployment has exceeded the maximum request length allowed by the target server.
You must be an administrator to modify the Report Serve rweb.config file.
To modify the Report Server Web.config file:
- Create a backup copy of the web.config file located in the ReportServer folder. (The ReportServer folder is located in C:\Program Files\Microsoft SQL
Server\MSSQLSERVER\Reporting Services\ReportServer where Reporting
Services is installed.)
Open the Report Server web.config file using a text editor, such as Notepad.
Search for <httpRuntime executionTimeout="9000" />.
In that line, change executionTimeout="9000" to executionTimeout="19000" and add the value maxRequestLength="20960".
(<httpRuntime executionTimeout="19000" maxRequestLength="20960"/>
- Save and close the Report Server web.config file.
Deploying SQL Server Reporting Services reports
Use the Reporting Tools Setup window to deploy the predefined SQL Server
Reporting Services reports that are available in Microsoft Dynamics GP to the
Report Server or to a Microsoft SharePoint library. You also can use the Reporting Tools Setup window to redeploy reports or deploy reports to a different location. If you are using Reporting Services 2008, Reporting Services 2008 R2, or SQL Server 2012 Reporting Services, you also can deploy charts and KPIs. If you are using more than one instance of Microsoft Dynamics GP, you should only deploy reports to the report server for one instance at a time.
The Deployment Options list has a tree view that displays the deployment status of each company and of each report type. You can select to deploy reports by company and by report type.
There are three levels in the tree view. You can choose the + symbol next to a level to view additional levels in the tree view. You can collapse and expand the entire tree or just portions of it. A check mark next to a level means that the reports are available to deploy. All items that are not fully deployed will automatically be marked.
To deploy SQL Server Reporting Services reports:
- Open the Reporting Tools Setup window.
(Administration >> Setup >> System >> Reporting Tools Setup)
- On the SQL Reporting Services tab, select the report server mode.
Microsoft Dynamics CRM 2011 or later supports only the native mode of deployment of Microsoft SQL Server Reporting Services.
- Depending on your report server mode, enter the following locations. Be sure that your location doesn't end with a slash.
Native mode location:
| Location | Example |
|---|---|
| Report Server URL | https://<servername>/ReportServer |
| Report Manager URL | https://<servername>/Reports |
SharePoint Integrated mode location:
| Location | Example |
|---|---|
| SharePoint Site | https://<servername>/SharePoint site |
| Report Library | ReportsLibrary |
If you selected Native as the report server mode, you can enter the name of the folder to deploy the reports to. By using a folder, you can deploy Reporting Services reports for multiple Microsoft Dynamics GP instances to a single Microsoft SQL Server Reporting Server. The default folder name is the name of the system database. If DYNAMICS is the system database name, the Folder Name field is blank. After deploying reports to the folder, you must provide access to the folder.
If you are using Microsoft Dynamics CRM 2011, enter the URL for the CRM service, the name of the organization, and specify credentials for the data source.
We recommend that you use Windows Authentication (Integrated Security). If you select to be prompted for credentials, you must mark the Use as Windows credentials when connecting to the data source option on the data source deployed.
You must be using SQL Server 2008 R2 or 2012 Reporting Services and Microsoft Dynamics CRM 2011 or later to deploy SQL Server Reporting Services reports and metrics that includes CRM data. Microsoft Dynamics CRM supports only the native mode of deployment of SQL Server Reporting Services.
To verify your locations, choose the Refresh button in the upper right hand corner of the Deployment Options tree view.
In the Deployment Options tree view, all items that are not fully deployed are automatically marked.
To exclude an item, unmark the check box. For example, if you don't want to deploy SQL Server Reporting Services reports in Fabrikam, Inc., expand the Company level in the tree view and unmark SRS Reports.
- Choose Deploy Reports to deploy reports. To redeploy reports for all companies, mark Redeploy all reports for selected companies and then choose Deploy Reports.
The Business Intelligence Deployment Progress window appears. This window displays the report deployment progress.
If you don't have the appropriate permissions to deploy reports, a window opens where you can enter a domain\user name and the password you use to log in to Microsoft Windows.
- After the reports are deployed, choose Print Status Report to view the deployment status of reports.
Chapter 40: Excel report deployment
Microsoft Dynamics GP comes with many predefined Excel reports, which contain the same information as the default SmartList favorites. Excel reports use Office Data Connection (ODC) technology to maintain a direct link to the underlying company database, so that users with appropriate security access can view real-time data in an Excel worksheet, without needing to start Microsoft Dynamics GP.
This information explains how Excel reports and ODC work together, and how to make the Excel reports available for users to view.
Understanding data connections and Excel reports
Deploying Excel reports
Understanding data connections and Excel reports
Microsoft Dynamics GP and Microsoft Office provide an integration method, called an Office Data Connection (ODC), that allows you to view live Microsoft Dynamics GP data in an Excel worksheet.
ODC provides a link to a system or company database in SQL Server. The ODC connection ensures that when the Excel report is viewed, it contains the most recent data.
Each ODC file supplied with Microsoft Dynamics GP corresponds to a default
SmartList object. For example, an ODC file named
TWO_Accounts_AccountSummary.odc links to the same data as the Account Summary SmartList object.
For each ODC file there is a corresponding worksheet. The Excel report connects to the ODC file to display data. For example, the Excel report named
Accounts_AccountSummary.xlsx displays the data from the ODC file named TWO_Accounts_AccountSummary.odc.
Before users can view Excel reports, a system administrator must perform a process called "deployment" to create the ODC files and corresponding Excel worksheets, and make them available for users to access. There are two ways deploy Excel reports:
To a shared folder on a secure server location
To a SharePoint document library
To view the reports, users must meet the following requirements.
To view the data that is displayed in an ODC file, users must have the appropriate SQL Server access rights. Refer to Setting up security for viewing data connections and Microsoft Excel reports for more information.
To open the .xlsx worksheet files, users must have the 2010 Microsoft Office system.
Additional user permissions are required for the shared network folder or SharePoint Server document library, depending on where you choose to deploy the reports.
As part of the deployment process, the system administrator can designate a location where each user can store any Excel reports and data connections they modify or create. This allows each user to customize reports individually, without affecting the reports and data connections available to all users at the system level.
Once the deployment process is complete, both system-level and user-level Excel reports and their corresponding data connections appear automatically in reports lists within Microsoft Dynamics GP.
To view Excel reports and data connections for a particular series, choose the appropriate series button in the navigation pane, then choose the Excel Reports shortcut. To view Excel reports for all series, choose Administration in the navigation pane, then choose the Excel Reports shortcut. See the System User's Guide (Help >> Contents >> select Using the System) for more information about report lists.
Deploying Excel reports
Use the Reporting Tools Setup window to deploy Excel reports and data connections to a shared network location or to a Microsoft SharePoint site. During this process, ODC files are created and saved to the designated location. Excel reports and data connections that are stored in the locations that you specify in the Reporting Tools Setup window also will be listed in Excel Reports lists. See the System User's Guide (Help >> Contents >> select Using the System) for more information about report lists.
The Deployment Options list has a tree view that displays the deployment status of each company and of each report type. You can use the tree view to deploy reports by company and by report type.
You can choose the + symbol next to a level to view additional levels in the tree view. You can collapse and expand the entire tree or just portions of it. A check mark next to a level means that the reports are available to deploy. All items that are not fully deployed will automatically be marked.
To deploy Excel reports:
Decide if you are going to deploy reports to a network share or to a Microsoft SharePoint site.
If you are deploying reports to a new network share, create a shared folder to store the Excel report file sin a secure network location. Set the share permissions to Change (the minimum) or Full Control. You can use the same folder as you used to deploy the data connection files, or you can create a separate folder.
If you are deploying reports to a Microsoft SharePoint location, create a document library to store the Excel report files.
- Open the Reporting Tools Setup window.
(Administration >> Setup >> System >> Reporting Tools Setup)
- In the System Level area, select the location to deploy reports to.
You must have access to the server to deploy reports to a shared network location.
If you are using Microsoft 365 and want to deploy Excel reports to a reports library in SharePoint Online 2010, mark Using SharePoint Online option. This option is available if you selected SharePoint as the location to deploy reports to.
Depending on the location you selected, enter the following information. Be sure to use back slashes when you are entering the location for Excel reports even if you are using a UNC path. You should also be sure that the location doesn't end in a slash.
Network Share location:
| Location | Example |
|---|---|
| Report Server URL | \\<servername>\Reports |
SharePoint location:
| Location | Example |
|---|---|
| SharePoint Site | http:\\<servername>\SharePoint site |
| Data Connections Library | DataConnections |
| Report Library | ReportsLibrary |
- In the User Level area, enter the location to where Excel reports are stored on each user's computer. You must use the "%" character as the variable for the Windows user ID in the path.
For example: C:\Documents and Settings\%\My Documents\My Data Sources\GP Connections
Data connections that are stored in this location also will be listed in report lists.
To verify your locations, choose the Refresh button in the upper right hand corner of the Deployment Options tree view.
In the Deployment Options tree view, all items that are not fully deployed are automatically marked.
To exclude an item, unmark the check box. For example, if you don't want to deploy Excel reports in Fabrikam, Inc., expand the Company level in the tree view and unmark Excel Reports.
- Choose Deploy Reports to deploy reports. To redeploy reports for all companies, mark Redeploy all reports for selected companies and then choose Deploy Reports.
The Business Intelligence Deployment Progress window appears. This window displays the report deployment progress.
If you don't have the appropriate permissions to deploy reports, a window opens where you can enter a domain\user name and the password you use to log in to Microsoft Windows.
- After the reports are deployed, choose Print Status Report to view the deployment status of reports.
Chapter 41: Sorting options
Use this information to tailor specific elements in the Microsoft Dynamics GP user interface to your specific needs, enabling you to work more efficiently and spend less time moving from one task to another. This information is divided into the following sections:
Setting up custom sorting options for an advanced lookup window
Adding new custom links
Modifying custom links
Copying custom links
Setting up custom sorting options for an advanced lookup window
Use the Advanced Lookups Setup window to set up custom sorting options to be used in addition to the default sorting options that are provided. For example, if you want to sort the Customers list by phone number or postal code, you could set up a custom sorting option to do so.
If you make custom sorting option changes for one company, those changes won't be applied to your other companies. Custom sorting options can be set on a per-company basis.
To set up custom sorting options for an advanced lookup window:
Open the Advanced Lookups Setup window. (Administration >> Setup >> Company >> Advanced Lookups)
Select the advanced lookup to which you want to create a custom sorting option.
Select the field you want to sort by. The fields that appear in the list will change depending on which object is selected.
Enter a description for the sorting option, or accept the default description. The description will appear in the View >> Additional Sorts menu in the corresponding lookup window.
Repeat steps 4 and 5 to set up additional options for the selected object.
Choose Save to save the sorting options and synchronize the Advanced Lookup indexes.
Adding new custom links
Use the Customer Link Setup window and the Create/Modify Custom Link window to create custom links to launch Microsoft Outlook to address an e-mail message, to launch Internet Explorer to view a web page, or to open a document in Word, Excel, or some other application for customers, vendors, items, salespeople, and employees.
Tracking Number links can be created based on the shipping method for a document, linking to tracking information on the shipper's web site. Currencyspecific links can be created based on the currency selected, linking to a web site with exchange rate information. Checkbook and credit card links can be created based on the checkbook selected, linking to the bank's online banking web page.
You can also choose to link to the same location for all values. For example, all checkbooks could be made to link to the same online banking web page.
To add new custom links for currencies, exchange rates, tracking numbers, checkbooks, and credit cards:
Open the Custom Link Setup window. (Administration >> Setup >> Company >> Custom Link)
Choose New to open the Create/Modify Custom Link window.
Select the prompt for which you can create a custom link.
Enter the description of the link.
Enter or select a field value.
If the All field values field is available, you can mark this field to attach the link to all the fields using the same field value. For example, you decided to create a link for Exchange Rate. By marking All Field Values, you can click the link for any Exchange Rate prompt for any currency and open the same web site defined for exchange rates.
Enter the internet address of the link you want to create.
Choose Save. When you save the link, information about the link will appear in the Custom Link Setup window.
To add new custom links for customers, vendors, items, salespeople, and employees:
Open the Custom Link Setup window. (Administration >> Setup >> Company >> Custom Link)
Choose New to open the Create/Modify Custom Link window.
Select the prompt for which you can create a custom link.
Enter the description of the link.
Select an address type. The types of addresses available depend on the prompt you selected. For example, if you selected Customer, you could select the primary, ship to, bill to, or statement to addresses. An address type isn't available for items or sales people.
Select an address field. This information is defined in the Internet Information window. You must define the custom link information in the Internet Information window for the link to work.
Choose Save. When you save the link, information about the link will appear in the Custom Link Setup window.
Modifying custom links
Use the Custom Link Setup window to modify custom links.
To modify custom links:
Open the Custom Link Setup window. (Administration >> Setup >> Company >> Custom Link)
Select the custom link you want to change and choose Modify to open the Create/Modify Custom Link window.
In the Create/Modify Custom Link window, enter the modify the information.
Choose Save.
Copying custom links
Use the Custom Link Setup window to copy custom links. You may want to copy a link if you want to create a new link that uses the same information.
To copy custom links:
Open the Custom Link Setup window. (Administration >> Setup >> Company >> Custom Link)
Select a customer link and choose Copy to open the Create/Modify Custom Link window.
In the Create/Modify Custom Link window, make any changes to the link that you want.
Choose Save. If you didn't change the custom link label for the new link, Copy1 will be added to the label.
Chapter 42: Word templates
You can use the Word template functionality in Microsoft Dynamics GP to use predefined templates or create your own.
This information is divided into the following sections:
Word template overview
Word templates prerequisites
Predefined Word templates for Microsoft Dynamics GP
Configuring Word templates
Assign a company image to Word templates
Installing the Microsoft Dynamics GP Add-in for Microsoft Word
Word template overview
Predefined Word templates for document types such as sales quotes and purchase orders are provided for you with Microsoft Dynamics GP. The templates are based on standard reports in Microsoft Dynamics GP. By default, the Word templates functionality is enabled for Microsoft Dynamics GP. You can print the predefined Word templates for your customers and vendors in each of the companies you have access to. For a list of the predefined templates, see Predefined Word templates for Microsoft Dynamics GP .
You also can create your own template or create a template from an existing template. For example, you might want to change the font size for a template or create separate templates for your customers in the United States and in Canada based on a standard report because of regulatory requirements. The Word template must be based on a standard report.
After creating or modifying a template, you can assign the template to your companies and then to customers or vendors. You can assign a specific template to an individual customer or vendor or a class of customers or vendors. For example, you can create a specific template for a promotion and assign that template to your local customers for that promotional period.
Word templates prerequisites
The following components are required to modify Word templates for Microsoft Dynamics GP.
Microsoft Word 2010 or later to make layout changes such changing the font size
Microsoft Dynamics GP Add-in for Microsoft Word to add fields and data sources to the template
Visual Studio Tools for Office Runtime 2.0 or later—Visual Studio Tools for Office Runtime 3.0 is installed with Microsoft Dynamics GP Add-in for Microsoft Word
Predefined Word templates for Microsoft Dynamics GP
The following predefined Word templates are installed with Microsoft Dynamics GP. Predefined templates cannot be modified or removed. You can make copies of the predefined templates and make your changes such as changing the font. Predefined templates do not have logos assigned to them.
You can print the predefined Word templates for your customers and vendors in each of the companies you have access to. If you don't want use a predefined template, remove the assignment to the company and select a new default Word template.
| Document type | Report Writer report name | Predefined Word template name |
|---|---|---|
| Sales Order Processing Quote | SOP Blank History Options Quote Form | SOP Blank History Options Quote Form Template* |
| SOP Blank History Quote Form | SOP Blank History Quote Form Template* | |
| SOP Blank Options Quote Form | SOP Blank Options Quote Form Template* | |
| SOP Blank Quote Form | SOP Blank Quote Form Template* | |
| Sales Order Processing Order | SOP Blank History Options Order Form | SOP Blank History Options Order Form Template* |
| SOP Blank History Order Form | SOP Blank History Order Form Template* | |
| SOP Blank Options Order Form | SOP Blank Options Order Form Template* | |
| SOP Blank Order Form | SOP Blank Order Form Template* | |
| Sales Order Processing Invoice | SOP Blank History Options Invoice Form | SOP Blank History Options Invoice Form Template* |
| SOP Blank History Invoice Form | SOP Blank History Invoice Form Template* | |
| SOP Blank Options Invoice Form | SOP Blank Options Invoice Form Template* | |
| SOP Blank Invoice Form | SOP Blank Invoice Form Template* | |
| Sales Order Processing Packing Slip | SOP Blank Packing Slip Form | SOP Blank Packing Slip Form Template* |
| Sales Order Processing Return | SOP Blank Return Form | SOP Blank Return Form Template* |
| SOP Blank Options Return Form | SOP Blank Options Return Form Template* | |
| SOP Blank History Return Form | SOP Blank History Return Form Template* | |
| SOP Blank History Options Return | SOP Blank History Options Return Form Template* | |
| Sales Order Processing Back Order | SOP Blank History Options Back Order | SOP Blank History Options Back Order Template* |
| SOP Blank History Back Order | SOP Blank History Back Order Template* | |
| SOP Blank Options Back Order | SOP Blank Options Back Order Template* | |
| SOP Blank Back Order | SOP Blank Back Order Template* | |
| Sales Order Processing Picking Ticket | SOP Blank Picking Ticket Bin Sequenced | SOP Blank Picking Ticket Bin Sequenced Template* |
| SOP Blank Picking Ticket Order Entered | SOP Blank Picking Ticket Order Entered Template* | |
| SOP Blank Options Picking Ticket Form | SOP Blank Options Picking Ticket Form Template* | |
| Receivables Statement Form | RM Statement on Blank Paper | RM Statement on Blank Paper Template* |
| MC Statement Blank Form | MC Statement Blank Form Template* | |
| Receivables Sales/Invoices | RM Blank Document | RM Blank Document Template* |
| Receivables Debit Memos | RM Blank Document | RM Blank Document Template* |
| Receivables Finance Charges | RM Blank Document | RM Blank Document Template* |
| Receivables Service/Repairs | RM Blank Document | RM Blank Document Template* |
| Receivables Warranties | RM Blank Document | RM Blank Document Template* |
| Receivables Credit Memo | RM Blank Document | RM Blank Document Template* |
| Receivables Returns | RM Blank Document | RM Blank Document Template* |
| Document type | Report Writer report name | Predefined Word template name |
| Purchase Order | POP Purchase Order Blank Form | POP Purchase Order Blank Form Template* |
| POP History Purchase Order Blank Form | POP History Purchase Order Blank Form Template* | |
| POP Purchase Order Rollup Blank Form | POP Purchase Order Rollup Blank Form Template* | |
| POP History Purchase Order Rollup Blank | POP History Purchase Order Rollup Blank Form* | |
| Payable Invoices | PM Blank Document | PM Blank Document Template* |
| Payable Finance Charges | PM Blank Document | PM Blank Document Template* |
| Payable Miscellaneous Charges | PM Blank Document | PM Blank Document Template* |
| Payable Credit Memo | PM Blank Document | PM Blank Document Template* |
| Payable Returns | PM Blank Document | PM Blank Document Template* |
| Payable Check Remittance | Check Remittance | Check Remittance Template* |
Configuring Word templates
You can use the Template Configuration Manager window to configure Word templates for Microsoft Dynamics GP. By default, the Word templates functionality is enabled for all companies. If you don't want to use the Word template functionality, you can use this window to disable Word templates.
The Template Configuration Manager window has a tree view that you can use to select the companies, series, and Word templates you want to use.
To configure Word templates:
Open the Template Configuration Manager window. (Administration >> Reports >> Template Configuration)
Expand to the levels you want to exclude or include, and unmark or mark the companies, series, or Word templates. A check mark next to a level means that the templates available for that level will be made available for use. To exclude a level, unmark the check box.
For example, if you don't want to use the POP Purchase Order Blank Form Template* in Fabrikam, Inc., expand to the Word template level in the tree view and unmark the template.
- Choose Save in the Template Configuration Manager window to save your changes.
Assign a company image to Word templates
Use the Image Assignment window to assign an image (company logo) for each company that has the Word templates functionality enabled in the Template Configuration Manager window. Each company can have only one image assigned to it. You also can remove an image from a company.
The image you assign to a company can be from one of the following formats.
| Graphics Interchange Format (GIF) | Joint Photographic Experts Group (JPEG) |
|---|---|
| Tagged Image File Format (TIFF) | Windows bitmap (BMP) |
| Portable Network Graphics (PNG) |
You should keep in mind that the format and resolution of the image you chose may affect the maximum file size when attaching documents for your customers and vendors if you are using the Microsoft Dynamics GP e-mail functionality. The image also affects the size of the reports and documents generated by the Word template functionality. This can affect performance of the printing process.
To assign a company image to Word templates:
Open the Image Assignment window. (Administration >> Reports >> Template Configuration >> Images)
Select a company in the Company images list.
Click the Add button to open the Select an image window.
Select an image and choose the Open button to assign image to the company for Word templates.
Choose OK in the Image Assignment window to save your changes.
Installing the Microsoft Dynamics GP Add-in for Microsoft Word
You must install the Microsoft Dynamics GP Add-in for Microsoft Word only if you want to create new Word templates. The Microsoft Dynamics GP Add-in for Microsoft Word is used when creating the layout of the Word template document for a report. You also need to install the Microsoft Dynamics GP Add-in for Microsoft Word when you want add data sources and fields to existing Word templates.
To install the Microsoft Dynamics GP Add-in for Microsoft Word:
From the Microsoft Dynamics GP 2010 installation media, double-click the Setup.exe file to open the Microsoft Dynamics GP installation window.
Click Microsoft Dynamics GP Add-in for Microsoft Word under Additional Products, and then select Install.
If you haven't installed Visual Studio Tools for Office Runtime, the Software
Update Visual Studio Tools for the Office system 3.0 Runtime wizard appears.
Follow the instructions in the window to accept the software license agreement. To install Visual Studio Tools for the Office system 3.0 Runtime, you must accept this agreement.
After Visual Studio Tools for Office Runtime is installed, the Microsoft Dynamics GP Add-in for Microsoft Word wizard appears.
Follow the instructions in the window to accept the software license agreement. To install Microsoft Dynamics GP Add-in for Microsoft Word, you must accept this agreement and click Next.
Specify the folder where you want the predefined Word templates installed.
The default folder is C:\Program Files\Microsoft Dynamics\Report Templates. To select a different folder, click Browse.
Click Install.
Click Finish after the installation is complete.
Chapter 43: Extending system functionality
Use this information as your guide to identifying the types of customization that best fit your needs.
This information is divided into the following sections:
Importing and exporting data
Customizing documents and reports
Customizing the Microsoft Dynamics GP interface
Customizing the functionality of Microsoft Dynamics GP
Importing and exporting data
Microsoft provides several tools to simplify the process of importing and exporting data.
Integration Manager Use Integration Manager to set up integrations which can be used on an ongoing basis to import data into Microsoft Dynamics GP tables. For example, you may want to use an integration to import sales transactions from another data collection system. See the Integration Manager documentation for more information.
eConnect eConnect is a set of development utilities and application programming interfaces (APIs) that integrate outside data sources with Microsoft Dynamics GP back office components. Use eConnect for high-volume, real time integrations from such external data sources as Web services, CRM applications, Web storefronts, and legacy applications.
Excel-based budgeting Use General Ledger to export budgets to Excel, manipulate them, and import them back into Microsoft Dynamics GP. See the General Ledger documentation for information about using Excel to create and modify budgets.
SmartList Use SmartList to easily export data to Excel, Word, or other file formats. See the System User's Guide for information about SmartList.
In addition to the tools available from Microsoft Dynamics, you can use ODBC to use other tools such as Microsoft Access to import or export data. It's important to understand the Microsoft Dynamics GP data structure. If you import data incorrectly, you can damage your data. Use the Microsoft Dynamics GP Software Development Kit (installed from the installation media) and the Resource Descriptions windows (Microsoft Dynamics GP Tools >> Resource Descriptions) to find this information.
Customizing documents and reports
As you begin using Microsoft Dynamics GP, you may find that you want to modify the format of your checks, invoices, sales documents, purchase orders, or other documents. You also may want to customize some reports provided with the system, or create new ones. Microsoft Dynamics offers the following reporting tools.
Report Writer Use Report Writer to modify the default documents and reports that are provided with Microsoft Dynamics GP. Refer to your Report Writer documentation for more information.
Advanced Financial Analysis Use Advanced Financial Analysis to modify the default financial statements that are provided with Microsoft Dynamics GP. Refer to the Advanced Financial Analysis documentation for more information.
Management Reporter for Microsoft Dynamics ERP You can use Management Reporter to create customized financial statements. Refer to the Management Reporter documentation for more information.
SmartList Use SmartList to create simple reports. SmartList's report formatting capabilities are limited, but since you don't need to link tables or set up table relationships, it's easier to use than other reporting tools. Refer to the System User's Guide (Help >> Contents >> select Using the System) for more information.
Customizing the Microsoft Dynamics GP interface
Microsoft Dynamics GP provides numerous tools you can use to tailor the user interface to the way your organization works.
User Preferences Each person who uses Microsoft Dynamics GP can use the User Preferences window to control the appearance and behavior of certain aspects of the user interface, including display colors, whether the tab or enter key is used to move to the next field in a window, and default entries for several parts of the system. See the System User's Guide (Help >> Contents >> select Using the System) for more information about user preferences.
Shortcut Bar Each person who uses Microsoft Dynamics GP can set up and use shortcuts to streamline access to windows, macros and other frequently used applications. See your System User's Guide (Help >> Contents >> select Using the System) for more information about shortcut bar changes that can be made for each user.
Use user-class shortcuts to customize a portion of the shortcut bar for each user class in your organization. See Part 2, User setup, for information about changes that apply to user classes.
Modifier Use the Modifier to move fields, change text, or adjust the order in which the TAB or ENTER key advances through the fields in the window. See the Modifier documentation for more information.
Visual Basic for Applications (VBA) Use VBA to create new forms or to set default values for specific fields in windows. See the Microsoft Dynamics GP VBA Developer's Guide for more information.
Customizing the functionality of Microsoft Dynamics GP
Microsoft Dynamics GP provides several ways to add custom functionality that's not available within Microsoft Dynamics GP or through products developed by Microsoft Dynamics GP Developers.
Microsoft Dexterity Use Microsoft Dexterity to add custom functionality with the same tool used to create Microsoft Dynamics GP. See the Microsoft Dexterity documentation for more information.
Continuum API Use the Continuum application programming interface (API) to create integrations for Microsoft Dynamics GP. See the Continuum API Guide for more information.
Part 9: Report Scheduler Setup
The Report Scheduler module enables flexible, secure scheduling and publishing of your Report Writer reports, schedule Check Links and Workflow Automation. Report Scheduler is installed automatically when you install Microsoft Dynamics® GP. Report Scheduler is simple to set up and use, and requires little maintenance.
Report Scheduler works with Microsoft Dynamics GP report options and reports that have been created using Report Writer.
This section contains information on how to set up Report Scheduler and change report names.
Setting up Report Scheduler
Report Scheduler setup involves defining the default publish location, the value for the Next Report File Name field, and the export file type for reports. Use the Report Scheduler Setup window to define these default settings for published reports.
To set up Report Scheduler:
Open the Report Scheduler Setup window. (Microsoft Dynamics GP menu >> Tools >> Routines >> Company >> Report Setup)
Enter the Universal Naming Convention (UNC) path for the default location to publish reports to. You can either type the UNC path or select the folder icon in the Default Location field to open the Select Pathname window where you can select the default location for published reports.
Be sure that all users who will be publishing reports have write access to the folder you select.
- Enter the next report file name. This file name should allow for incrementing because the Next Report Name field will be incremented every time a report option is published that needs a report file name.
The name in this field is used for reports that do not have a file name stored as part of the report option. This file name will also be used if you choose to keep prior versions of a published report.
*When you define the next report file name, you determine the number of report file names that will be available. For example, if you enter BDR001 in the Next Report File Name field, only 999 unique report file names will be available. *
Select a file type for report output files. The Adobe Acrobat PDF option is available if you have Acrobat Distiller or PDFWriter installed. These items can be purchased from Adobe Systems. You can set the export file type to Adobe Acrobat PDF, even if there are some workstations that do not have Acrobat Distiller or PDFWriter installed. If the report is not set to print to a file, and the default export file type is set to Adobe PDF, workstations that don’t have Acrobat Distiller or PDFWriter installed will publish the report as a text file.
Choose Save to save your selections and close the Report Scheduler Setup window.
Selecting a publish location
Because it is possible for users to map different drive letters to the same location, a Universal Naming Convention (UNC) path is required. A UNC path provides a common method for accessing files on a network without using a “mapped” drive letter. The UNC format is //server/shared folder/. Server is the name of the network machine where the files reside. Shared folder is the shared folder where the files reside and are published. There must be two forward slashes before the machine name (//) followed by the shared folder and a final forward slash (/).
You can type the location directly into the Report Scheduler Setup window or you can use the following steps to select a path in the Select Pathname window: Before you select the location, you may wish to create a new Report Scheduler folder on the server where you will be saving reports.
To select a publish location:
- To set the default publish location for all reports, open the Report Scheduler Setup window. (Microsoft Dynamics GP menu >> Tools >> Routines >> Company >> Report Setup)
To set a publish location for selected reports, open the Report Schedule window. (Microsoft Dynamics GP menu >> Tools >> Routines >> Company >> Report Schedule) 2. Choose the folder icon. The Select Pathname window opens.
Select My Network Places from the Save in list. This path must be selected from My Network Places in order for the share to take effect, even if it is local.
Select the domain where the server is located.
Select the server you will be saving reports to.
Select the folder to store reports in and choose Save.
Changing report names
It is important to be able to change report names in Report Scheduler because several reports in Microsoft Dynamics GP have the same name. For example, an Aged Trial Balance report appears in both Receivables Management and Payables Management. To distinguish between these reports more easily, you can change the report names to Receivables Aged Trial Balance and Payables Aged Trial Balance. Use the following steps to change a report name:
To change report names:
Open the Report Names window. (Microsoft Dynamics GP menu >> Tools >> Routines >> Company >> Report Names)
Click in the Report Name column next to the report to modify. Remember that many reports have the same name. Check the location of the report in the Report Navigation column to ensure you are modifying the report from the correct module.
Type the new name of the report. This must be a unique name. The default value in the Report Name column is the original name of the report. You can change it to another name, as long as that name doesn't already exist. A blank name is not allowed.
Close the Report Names window to save report name changes.
Scheduling Reports**
After you set up Report Scheduler, you can schedule reports. Scheduling reports includes defining the publish frequency and location. Use the Report Schedule window to define the publish location and frequency for each report to publish.
To schedule a report:
- Open the Report Schedule window. (Microsoft Dynamics GP menu >> Tools >> Routines >> Company >> Report Schedule)

Mark the box next to the report(s) to schedule in the scrolling window.
Select the frequency option indicating how often to publish the marked reports then set the scheduling options. Scheduling options in the Report Schedule window change based on the frequency option you select. See online help for descriptions of each frequency option.
Enter the start date. This field controls when a report is first scheduled to be published.
Choose Calculate Next Date to verify that the report will publish on the desired date.
Select the versions of the report to keep. Select Current Only to remove prior versions of the report output when a new report is published. Select Current & Prior to save the report with the value in the Next Report File Name field in the Report Scheduler Setup window the next time a report is published.
To change the publish location for the marked report(s), select a new location. See Selecting a publish location on page 6 for more information. Be sure all users who will publish the report(s) have write access to the folder you select.
To view details for a specific report, select the report in the scrolling window, then choose the expansion button next to the Report Name column heading. The Report Schedule Details window opens where you can view or modify the settings for Versions of Report To Keep, Publish To Location, and Frequency. You also can view information about publishers for the report.
To change the Report Option settings for a specific report, select the report in the scrolling window, then choose the Report Option link.
Choose Publish Now to publish the marked reports now or choose Apply to apply the settings to the marked reports and wait until the scheduled publish date. See Automatic publishing on page 13 for more information. The settings you choose in the Report Schedule window will affect the marked reports once you choose Apply.
When you choose either Apply or Publish Now, you will be added as a publisher for the marked reports.
Report options
Microsoft Dynamics GP report options provide the ability to save criteria about a report, such as range restrictions, sorting options, and destinations.
These report options can be used to generate separate versions of a report.
Since Report Scheduler works with Microsoft Dynamics GP report options, you need to take into account the restrictions, or lack thereof, a report option has when you are publishing it. For reports created with Report Writer, you save criteria about a report using the Restrictions window in Report Writer.
If the people who will have access to the report output should see only certain ranges of the data, then you should create a report option for each grouping, with the appropriate restrictions for each group. For example, you could create a single sales commission report for all salespeople and use report options to publish separate reports for each salesperson
Frequency examples
This section contains examples of setting daily, weekly, and monthly frequency.
These examples show how frequency options and start dates affect the publish date. Use this information as a reference to help you select frequency settings for your report.
Frequency example - Daily
If you use September 6, 2027, as the start date and choose the Daily frequency option combined with the Every Day scheduling option, the selected reports will print every day from September 6, 2027, onwards.
If you combine the Daily option with the Weekdays option, the report would be scheduled to print Monday through Friday with September 8, 2027, being the first scheduled date. Because it is on a weekend, September 6, 2027, is not included as a scheduled date.
If a report was last published on September 5, 2027, with a Daily frequency option and an increment of 5 in the Every ? days field, the next scheduled publishing date would be September 10, 2027. If, however, someone were to publish the report manually on September 7, 2027, the next due date would be September 12, 2027.
You can use a number between 1 and 999 in the Every ? days field.
Frequency example - Weekly Selecting the Weekly frequency option combined with the Day Of The Week scheduling option makes the check boxes for each week day visible. You must mark at least one of these boxes.
If you mark Monday and Wednesday, the report will be published the next Monday or Wednesday, which ever comes first. If the report option is scheduled to publish on Mondays and Wednesdays, and for some reason it is not published on Monday, when you log on to Microsoft Dynamics GP on Tuesday, this report option would be listed as overdue. If you don’t log on to Microsoft Dynamics GP on Tuesday, and instead log on to Microsoft Dynamics GP on Wednesday, the report option will be published then, but only once. The Monday publishing is skipped.
You also can specify the number of weeks between publishing. For example, if the report was last published on September 6, 2008, and it is set to publish every 2 weeks, the next time it will be due to be published is September 20, 2008.
Frequency example - Monthly
When you select the Monthly frequency option, you also can specify the day, week, and month(s) to publish a report. As a result, you can define a report option to be published the first Monday of each month, regardless of the number day this happened to be. If a report option is set up to publish on the first Monday of the month in March, June, September, and December, and it is published manually on August 25, 2027, it will be due for publishing on September 1, 2027.
If a report option is scheduled to be published on the 15th day of the month in March, June, September, and December, and it is published manually on September 1, 2027, it will be due for publishing on September 15, 2027.
You can select any value between 1 and 31 in the Day option when the Frequency is set to Monthly. If you enter day 31 and the month you selected does not have 31 days, the report will be scheduled for the last day of that month.
Publishing Reports
Publishing involves creating an output file for a report. Publishing can be done either manually from the Report Schedule window or automatically when users log on to Microsoft Dynamics GP. Before automatic publishing can occur, you will need to set up publishers for the reports.
Automatic publishing
When you log on to Microsoft Dynamics GP, Report Scheduler views the information in the Report Publishers window to determine the reports you have been set up to publish. If it finds any reports that are either due that day, or are past due, it displays the Report Scheduler Overdue Reports Message window.
Choose Yes to publish the reports in the background. If you choose No, the reports remain overdue and the message will reappear next time you log on to Microsoft Dynamics GP. If you unmark Ask Each Time, any reports that are due or overdue will be published automatically the next time you log on to Microsoft Dynamics GP. If you later decide that you don’t want reports to be published automatically, open the Report Publishers window, enter your user ID, then mark Ask Each Time.
Choose Details to open the Report Schedule window where all reports that are due or overdue will be marked. If the list is correct, choose Publish Now to publish the reports. You also can mark additional reports, unmark reports, or make any other changes in the window before you publish the reports.
The following information also applies to automatic publishing: • Because some computers may never be logged off, a check will be made at 00:01 every 24 hours. If the computer is still logged on at that time, any reports due that day will be published automatically.
• If more than one user is set up to publish a report, the first user to log on will be the one to publish the report. Any other users set up to publish the report will not trigger the report to be published because it no longer has an overdue publishing status.
Manual publishing
To publish a report at any time, choose Microsoft Dynamics GP menu >> Tools >> Routines >> Company >> Report Schedule, mark the reports to publish and choose Publish Now. When you choose Publish Now, you will be added as a publisher for the marked reports. After the reports have been published, the last published date and location information for those reports will be updated and all reports will be unmarked.
Setting up report publishers
You can define multiple users to publish a report so that if a user is unavailable when the report needs to be published, another user could publish it. It is also a secure way of ensuring users see only those reports they are entitled to view. To set up report publishers:
Open the Report Publishers window. (Microsoft Dynamics GP menu >> Tools >> Routines >> Company >> Report Publishers)
Enter or select a user. The scrolling window displays all reports that have a publish frequency other than Not Scheduled, as defined in the Report Schedule window. If the user you selected has already been set up as a publisher, the scrolling window will display all current settings.
Unmark Ask Each Time if you want overdue scheduled reports to print automatically when the selected user logs on to Microsoft Dynamics GP.
In the Publish column, mark the reports the user will publish, or choose Mark All to mark all reports.
To view the report option settings for a given report, select the report, then choose the Report Option link.
To view details for a specific report, select a report, then choose the expansion button in the top right of the scrolling window. The Report Schedule Details window opens where you can view or modify report settings.
Choose Save to keep all changes made in the Report Publishers window or choose Delete to remove all reports from the user’s publish list. If you close the window without choosing Save, any selections you have made since you opened the window will be retained. This occurs because information about publishers is saved each time you mark or unmark a report.
Troubleshooting publishing
Report Scheduler displays a message if there are errors during publishing. Choose Yes to view the error log or choose No to close the window. If an error message appears when a report is published, check the following items:
• Because Report Scheduler supports the printing of custom reports, each user needs the necessary report dictionaries for publishing to occur. If the report to be published does not exist in the report dictionary on the workstation publishing the reports, or if the publisher does not have the product installed, an error log will be created. The Last Published date on the Report Schedule window will not be updated.
• If the publisher does not have access to the default location for the selected reports due to such issues as network permissions, an error will be written to the Error Log table.
• If the publisher does not have access to print all the reports a report option prints, an error log will be written, and the report will not be published. The Report Catalog Maintenance window will not be updated.
Report Catalog Maintenance
Information about published reports is recorded in the Report Catalog. It is important to manage reports to ensure unwanted information is not using memory unnecessarily. This is particularly important if you select to keep current and prior versions of a report in the Report Schedule window.
Viewing published reports
Use the Report Catalog Maintenance window (Microsoft Dynamics GP menu >> Tools >> Routines >> Company >> Report Catalog Maintenance) to view information about records in the Report Catalog table relating to published reports. To open the output file for a report, select the report and choose the expansion button in the upper right corner of the scrolling window.
Deleting report catalog information
You can use the Report Catalog Maintenance window to delete entries from the Report Catalog. When you delete an entry from the catalog, you also delete the output file for the report. The Publish To Location column in the Report Schedule window displays the location of the output files.
To delete report catalog information:
- Open the Report Catalog Maintenance window. (Microsoft Dynamics GP menu >> Tools >> Routines >> Company >> Report Catalog Maintenance)
- Mark the reports to remove, choose Delete, then choose Yes if you wish to delete the output files associated with the marked reports.
If any of the marked reports has a publish frequency other than Not Scheduled, you will be asked if you want to remove the schedule for each of those reports. Choose Yes to set the publish frequency to Not Scheduled and clear the last published date, publish location, and list of publishers. Choose No to leave the report schedule information unchanged.
Schedule Check Links
With the October 2020 release, customers are now able to set up a schedule to run Check Links outside of normal business hours. This will let them run the processes without having to manually select them. A customer can setup which logical file groups they want to run check links on. This process will utilize the Report Scheduler setup and functionality, so it will require that a Microsoft Dynamics GP is open and logged into the correct company. Also, this feature is just scheduling the existing Check Links processes, so performance is not expected to be any different than manually running them.
First, in order to set a default location for the Checks Links reports to save you can go to Tools>Routines>Company>
To select which check links you want to schedule you will navigate to the Report Schedule window at Tools>Routines>Company>Report Schedule.
This list will populate depending on what dictionaries you have loaded on the client you have logged into. The Report Option for the new records will be "Check Links". You can choose the frequency of Daily, Weekly, or Monthly and you have further options for Every Day, Weekdays or every X number of days. If you had setup a default publish location in the Report Scheduler Setup window this will default to that location, otherwise you will need to enter a location before you are able to apply your selections.
If you want to remove reports from being scheduled you would use the Report Catalog Maintenance window at Tools>Routines>Company>Report Catalog Maintenance.
Feedback
Coming soon: Throughout 2024 we will be phasing out GitHub Issues as the feedback mechanism for content and replacing it with a new feedback system. For more information see: https://aka.ms/ContentUserFeedback.
Submit and view feedback for