Integrating with Dynamics 365 Sales
Note
Azure Active Directory is now Microsoft Entra ID. Learn more
The sales person role is often considered as one the most outward-facing jobs in a business. However, it can be helpful for sales people to be able to look inward in the business and see what is happening on the back end. By integrating Business Central and Dynamics 365 Sales, you can give your sales people that insight. The integration will let people view information in Business Central while they're working in Dynamics 365 Sales. For example, when preparing a sales quote it could be useful to know whether you have enough inventory to fulfill the order. For more information, see Use Dynamics 365 Sales from Business Central.
Note
This topic describes the process of integrating the online versions of Dynamics 365 Sales and Business Central through Dataverse. For information about on-premises configuration, see Preparing Dynamics 365 Sales for Integration on-premises.
Integrate through Dataverse
To make it easy to connect and synchronize data with other Dynamics 365 applications, Business Central also integrates with Dataverse. For example, you can connect to Dynamics 365 Sales, or even apps that you build yourself. If you're integrating for the first time, you must do so through Dataverse. For more information, see Integration with Dataverse.
If you've already integrated Dynamics 365 Sales with Business Central, you can continue to synchronize data using your setup. However, if you upgrade or turn off your Dynamics 365 Sales integration, to turn it on again you must connect through Dataverse. For more information, see Upgrading an Integration with Dynamics 365 Sales.
Note
Reconnecting through Dataverse will apply default synchronization settings, and will overwrite any configurations you have. For example, the default table mappings will be applied.
Integration settings that are specific to a Dynamics 365 Sales integration
Integration with Business Central happens through Dataverse, and many standard settings and tables are provided. In addition to the standard settings, there are some that are specific to Dynamics 365 Sales. The following sections list those settings.
Permissions and security roles for user accounts in Sales
When you install the Integration Solution, permissions for the integration user account are configured. If those permissions are changed, you might need to reset them. You can do that by reinstalling the Integration Solution by choosing Redeploy Integration Solution on the Dynamics 365 Connection Setup page. The following security roles are deployed:
- Dynamics 365 Business Central Integration Administrator
- Dynamics 365 Business Central Integration User
- Dynamics 365 Business Central Product Availability User
Note
To use the Open in Business Central action in Sales, you must have the following privileges for the following tables:
- You must have Read permissions for the Dynamics 365 Business Central Connection (nav_connection) table.
- You must have Read, Write, and Delete permissions for the Default Dynamics 365 Business Central Connection (nav_defaultconnection) table.
Connection settings in the setup guide
You can use an assisted setup guide to quickly set up the connection and specify advanced features, such as coupling between records.
- Choose Setup and Extensions, and then choose Assisted Setup.
- Choose Set up the Dynamics 365 Sales Connection to start the assisted setup guide.
- Fill in the fields as necessary.
- Optionally, there are advanced settings that can enhance security and enable more capabilities. The following table describes the advanced settings.
| Field | Description |
|---|---|
| Import Dynamics 365 Sales Solution | Install and configure the integration solution in Dynamics 365 Sales. |
| Automatically Synchronize Item Availability | Specifies that the item availability job queue must be scheduled. The job queue runs every 30 minutes, and updates the availability of the coupled items. |
| Enable Legacy Sales Order Integration | When people create sales orders in Dynamics 365 Sales and fulfill orders in Business Central, this setting integrates the process in Dynamics 365 Sales. For more information, see Enable sales order processing integration. Note: You can't use this option if you use the Bidirectional Synch of Sales Orders option. The two settings are mutually exclusive. To learn more about this option, go to Single and bi-directional synchronization of sales orders. |
| Enable Dynamics 365 Sales Connection | Enable the connection to Dynamics 365 Sales. |
| Dynamics 365 SDK Version | This is relevant only if you're integrating with an on-premises version of Dynamics 365 Sales. This SDK is the Dynamics 365 software development kit (also referred to as Xrm) you use to connect Business Central to Dynamics 365 Sales. The version must be compatible with the SDK version that is used by Dynamics 365 Sales, and equal to or newer than the version used by Dynamics 365 Sales. |
| Bidirectional Synch of Sales Orders | Synchronize sales orders in both directions. To learn more about this option, go go Single and bi-directional synchronization of sales orders. Note: You can't use this option if you use the Enable Legacy Sales Order Integration option. The two settings are mutually exclusive. |
Connection settings on the Microsoft Dynamics 365 Connection Setup page
Enter the following information for the connection from Dynamics 365 Sales to Business Central.
| Field | Description |
|---|---|
| Dynamics 365 Sales URL | The URL of your Dynamics 365 Sales instance. This setting lets users open the records in Business Central that correspond to records in Dynamics 365 Sales. For example, an account or product. The Business Central records open in Business Central. |
| Automatically Synchronize Item Availability | Specifies that the item availability job queue must be scheduled. The job queue runs every 30 minutes, and updates the availability of the coupled items. |
| Dynamics 365 SDK Version | If you're integrating with an on-premises version of Dynamics 365 Sales, this is the Dynamics 365 software development kit (also referred to as Xrm) you use to connect Business Central to Dynamics 365 Sales. The version that you select must be compatible with the SDK version that is used by Dynamics 365 Sales. This version equal to or newer than the version used by Dynamics 365 Sales. |
In addition to the settings above, enter the following settings for Dynamics 365 Sales.
| Field | Description |
|---|---|
| Sales Order Integration is Enabled | Enable users to submit sales orders and activated quotes in Dynamics 365 Sales and then view and process them in Business Central. This setting integrates the process in Dynamics 365 Sales. For more information, see Enable sales order processing integration. |
| Automatically Create Sales Orders | Create a sales order in Business Central when a user creates and submits one in Dynamics 365 Sales. |
| Automatically Process Sales Quotes | Process a sales quote in Business Central when a user creates and activates one in Dynamics 365 Sales. For more information, see Handling Sales Quotes Data. |
| Bidirectional Synch of Sales Orders | Synchronize sales orders in both directions. To learn more about this option, go to Single and bi-directional synchronization of sales orders. |
Single and bi-directional synchronization of sales orders
When you set up your integration, either in the setup guide or on the Microsoft Dynamics 365 Connection Setup page, there are options that control the direction in which you synchronize sales orders, and how you submit them.
The Bidirectional Synch of Sales Orders option lets you synchronize sales orders from Sales to Business Central, and vice versa. For example, if a customer changes their mind about the product or quantity they ordered in Dynamics 365 Sales, you can archive the sales document and create a new one in Business Central. The same is true for changes in Business Central. For example, when prices, tax amounts, or expected shipment dates change, the changes synchronize to Dynamics 365 Sales. Bidirectional synchronization helps keep your sellers up to date with the latest changes and the status of sales orders.
For bidirectional synchronization, you make sales orders available for synchronization when you change their status to Submitted in Sales. When you set that status, you can no longer change information on the order's lines. When you synchronize, the order is transferred to Business Central with the status Released. If there's a mistake, you can revert the order to Open (in Business Central) or Active (in Sales), and then add or delete lines to correct the mistake, and submit the order again.
Tip
When you enable the Bidirectional Synch of Sales Orders option, Business Central creates a record on the Sales Order Archives page when you post or change information on an order. For example, the archived versions can be useful for exploring an order's history.
The Enable Legacy Sales Order Integration option synchronizes only from Sales to Business Central. For this option, you use the Submit action in Sales to make orders available for synchronization. When you do, you can no longer change any information on the order. When you synchronize, the order is transferred to Business Central with the status Released.
To use this option, you must provide credentials for an administrator user account in Dynamics 365 Sales. To learn more, see Handling Sales Order Data.
Note
The Bidirectional Synch of Sales Orders and Enable Legacy Sales Order Integration options are mutually exclusive. You can't use both options at the same time.
For both options, Business Central shows all sales orders with the Submitted status on the Orders - Microsoft Dynamics 365 Sales page.
Standard Sales entity mapping for synchronization
Entities in Dynamics 365 Sales, such as orders, are integrated with equivalent types of tables in Business Central, such as sales orders. To work with Dynamics 365 Sales data you set up links, called couplings, between tables in Business Central and Dynamics 365 Sales.
The following table lists the standard mapping between tables in Business Central and Dynamics 365 Sales that Business Central provides.
| Business Central | Dynamics 365 Sales | Synchronization Direction | Default Filter |
|---|---|---|---|
| Unit of Measure | Unit Group | Business Central -> Dynamics 365 Sales | |
| Item | Product | Business Central -> Dynamics 365 Sales and Dynamics 365 Sales -> Business Central | Sales contact filter: Product Type is Sales Inventory |
| Resource | Product | Business Central -> Dynamics 365 Sales and Dynamics 365 Sales -> Business Central | Sales contact filter: Product Type is Services |
| Item Unit of Measure | CRM UOM | Business Central -> Dynamics 365 Sales | |
| Resource Unit of Measure | CRM UOM | Business Central -> Dynamics 365 Sales | |
| Unit Group | CRM Uomschedule | Business Central -> Dynamics 365 Sales | |
| Customer Price Group | Price List | Business Central -> Dynamics 365 Sales | |
| Sales Price | Product Price List | Business Central -> Dynamics 365 Sales | Business Central contact filter: Sales Code isn't blank, Sales Type is Customer Price Group |
| Opportunity | Opportunity | Business Central -> Dataverse and Dynamics 365 Sales -> Business Central | |
| Sales Invoice Header | Invoice | Business Central -> Dynamics 365 Sales | |
| Sales Invoice Line | Invoice Product | Business Central -> Dynamics 365 Sales | |
| Sales Order Header | Sales Order | Business Central -> Dynamics 365 Sales and Dynamics 365 Sales -> Business Central To synchronize in both directions, you must turn on the Bidirectional Synch of Sales Orders toggle on the Dynamics 365 Connection Setup page. |
Business Central Sales Header filter: Document Type is Order, Status is Released |
| Sales Order Notes | Sales Order Notes | Business Central -> Dynamics 365 Sales and Dynamics 365 Sales -> Business Central |
Note
The mappings for the Item Unit of Measure, Resource Unit of Measure, and Unit Group tables are available only if your administrator has turned on the Unit Group Mapping toggle on the Microsoft Dynamics 365 Connection Setup page. To learn more, go to Synchronizing Items and Resources with Products in Different Units of Measure.
Synchronize items and resources with products with different units of measure
Businesses often produce or purchase the items in one unit of measure, and then sell them in another. To synchronize items that use multiple units of measure, you must turn on the Unit Group Mapping toggle on the Microsoft Dynamics 365 Connection Setup page.
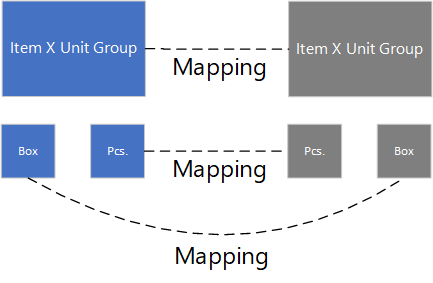
When you turn on the feature update, a new Unit Group table is created and assigned to each item and resource in Business Central. The tables let you map the Unit Group, Item Unit of Measure, and Resource Unit of Measure tables in Business Central to the Dynamics 365 Sales Unit Group in Dynamics 365 Sales. The following image shows the mappings.
You can create multiple units of measure for each unit group, and assign the groups to products in Dynamics 365 Sales. Afterward, you'll be able to synchronize the products with items and resources in Business Central. You can manually couple item units of measure or resource units of measure with a unit group. When you do, if the unit group for the item or resource isn't coupled to a unit group in Dynamics 365 Sales, for example, because the unit group didn't exist, Business Central will automatically create the unit group in Dynamics 365 Sales.
Map items and resources to products
When you turn on the Unit Group Mapping toggle on the Microsoft Dynamics 365 Connection Setup page, the following happens:
- New mappings are created for items and resources.
- Existing mappings are deleted.
- A data upgrade creates unit groups for items and resources.
To use the new mappings, you must synchronize unit groups, item unit of measure, and resource unit of measures. You must also resynchronize items and resources.
Note
Dynamics 365 Sales does not allow you to change a unit group for a product. Therefore, you must retire your products and uncouple the items and resources, and then synchronize by creating new products in Dynamics 365 Sales.
The following steps describe the steps to start mapping unit groups:
- Be sure that products in Dynamics 365 Sales aren't coupled with items or resources in Business Central. If they are, go to the Items and/or Resources pages and use the filter options to select the coupled records. Then choose the Dynamics 365 Sales action, and select Uncouple. This action schedules a background job to uncouple the records. While the job is running, you can check its status by using the Synchronization Log action. For more information, see Coupling and Synchronizing.
- Because new products will be created in Dynamics 365 Sales with new unit groups, to avoid duplicate names, do one of the following steps:
- Rename your products, and then retire them in Dynamics 365 Sales. For more information, see Retire products (Sales Hub). To bulk edit your products in Microsoft Excel, sign in to Power Apps, choose your environment, go to the Product table, and then choose the Data tab. Clear any filters that are applied. In the Data group, choose the Edit Data in Excel action. Add a prefix or suffix to the coupled products, and then retire them.
- Retire your products and delete them.
Follow these steps to synchronize Unit Groups, Unit of Measures, Items, and Resources:
- In Business Central, open the Dynamics 365 Sales Connection Setup page.
- Use the Run Full Synchronization action to open the Dataverse Full Synch. Review page.
- For the ITEM UOM, RESOURCE UOM, AND UNIT GROUP mappings, choose the Recommend Full Synchronization action.
- Choose the Sync All action.
Note
For mappings that have not yet been fully synchronized, this action will fully synchronize them. To prevent those mappings from synchronizing, delete the mappings from the page. This only removes them from the current full synchronization, and does not delete the mappings.
Choose the ITEM-PRODUCT mapping, and then choose the Restart action. Restarting creates new products from the items in Dynamics 365 Sales, and assigns a new unit group that is specific to the item.
Choose the RESOURCE-PRODUCT mapping, and then choose the Restart action. Restarting creates new products from the resources in Dynamics 365 Sales, and assigns a new unit group that is specific to the resources.
Synchronization rules
The following table lists the rules that control the synchronization between Dynamics 365 Sales and Business Central. These rules are in addition to rules defined for Dataverse, which also apply. For more information, see Standard Entity Mapping.
Note
Changes to data in that were made by the integration user account are not synchronized. Therefore, we recommended that you do not change data while using that account. For more information, see Setting Up User Accounts for Integrating with Dynamics 365 Sales.
| Table | Rule |
|---|---|
| Units of Measure | Units of measure are synchronized with unit groups in Dynamics 365 Sales. There can only be one unit of measure defined in the unit group. |
| Items | When synchronizing items with Dynamics 365 Sales products, Business Central automatically creates a price list in Dynamics 365 Sales. To avoid synchronization errors, you shouldn't modify this price list manually. |
| Resources | Resources are synchronized with Dynamics 365 Sales products that have product type Service. |
| Customer Price Groups | Customer price groups are synchronized with Sales price lists. |
| Sales Prices | Sales prices that have sales type Customer Price Group and have a sales code defined are synchronized with Dynamics 365 Sales price list lines |
| Opportunities | Opportunities are synchronized with Dynamics 365 Sales opportunities. The Salesperson Code value defines the owner of the coupled table in Dynamics 365 Sales. |
| Posted Sales Invoices | Posted sales invoices are synchronized with sales invoices. Before an invoice can be synchronized, it's better to synchronize all other tables that can participate in the invoice, from salespersons to price lists. The Salesperson Code value in the invoice header defines the owner of the coupled table in Sales. |
| Sales Orders | When sales order integration is enabled, sales orders in Business Central that are created from submitted sales orders in Dynamics 365 Sales are synchronized with sales orders in Dynamics 365 Sales when they're released. Before you synchronize orders, we recommend that you first synchronize all tables that the are involved with the order, such as sales persons and price lists. The Salesperson Code field in the order header defines the owner of the coupled table in Dynamics 365 Sales. |
Synchronization jobs for a Sales integration
The jobs are run in the following order to avoid coupling dependencies between tables. There are more jobs available from Dataverse. For more information, see Use Job Queues to Schedule Tasks.
- UNITOFMEASURE - Dynamics 365 Sales synchronization job
- RESOURCE-PRODUCT - Dynamics 365 Sales synchronization job
- ITEM-PRODUCT - Dynamics 365 Sales synchronization job
- CUSTPRCGRP-PRICE - Dynamics 365 Sales synchronization job.
- SALESPRC-PRODPRICE - Dynamics 365 Sales synchronization job.
- POSTEDSALESINV-INV - Dynamics 365 Sales synchronization job.
Default synchronization job queue entries
The following table describes the default synchronization jobs for Dynamics 365 Sales.
| Job Queue Entry | Description | Direction | Integration Table Mapping | Default Synchronization Frequency (mins) | Default inactivity sleep time (mins) |
|---|---|---|---|---|---|
| UNITOFMEASURE - Dynamics 365 Sales synchronization job | Synchronizes Dynamics 365 Sales unit groups with Business Central units of measure. | From Business Central to Dynamics 365 Sales | UNIT OF MEASURE | 30 | 720 (12 hrs) |
| RESOURCE-PRODUCT - Dynamics 365 Sales synchronization job | Synchronizes Dynamics 365 Sales products with Business Central resources. | From Business Central to Dynamics 365 Sales | RESOURCE-PRODUCT | 30 | 720 (12 hrs) |
| ITEM - PRODUCT - Dynamics 365 Sales synchronization job | Synchronizes Dynamics 365 Sales products with Business Central items. | From Business Central to Dynamics 365 Sales | ITEM-PRODUCT | 30 | 1440 (24 hrs) |
| CUSTPRCGRP-PRICE - Dynamics 365 Sales synchronization job | Synchronizes Dynamics 365 Sales sales price lists with Business Central customer price groups. | CUSTOMER PRICE GROUPS-SALES PRICE LISTS | 30 | 1440 (24 hrs) |
|
| SALESPRC-PRODUCTPRICE - Dynamics 365 Sales synchronization job | Synchronizes Dynamics 365 Sales product prices with Business Central sales prices. | PRODUCT PRICE-SALES PRICE | 30 | 1440 (24 hrs) |
|
| POSTEDSALESINV-INV - Dynamics 365 Sales synchronization job | Synchronizes Dynamics 365 Sales invoices with Business Central posted sales invoices. | From Business Central to Dynamics 365 Sales | INVOICES-POSTED SALES INVOICES | 30 | 1440 (24 hrs) |
| Customer Statistics - Dynamics 365 Sales synchronization | Updates Dynamics 365 Sales accounts with the latest Business Central customer data. In Dynamics 365 Sales, this information appears in Business Central Account Statistics quick view form of accounts that are coupled to Business Central customers. This data can also be updated manually from each customer record. For more information, see Couple and Synchronize Records Manually. Note: This job queue entry is relevant only if the Business Central integration solution is installed in Dynamics 365 Sales. |
Not applicable | Not applicable | 30 | Not applicable |
Connect to on-premises versions of Business Central 2019 release wave 1 and Microsoft Dynamics NAV 2018
The Microsoft Power Platform team has announced that it's deprecating the Office365 authentication type. If you're using a version of Business Central on-premises that is earlier than Business Central 2019 release wave 1, you must use the OAuth authentication type to connect to Dynamics 365 Sales online. The steps in this section describe how to connect the following product versions:
- Business Central 2019 release wave 1
- Microsoft Dynamics NAV 2018
Prerequisites
You must have a Microsoft Azure subscription. A trial account will work for application registration.
Dynamics 365 Sales is configured to use one of the following authentication types:
Office365 (legacy)
Important
Effective April 2022, Office365 (legacy) will no longer be supported. For more information, see Important changes (deprecations) coming in Power Apps, Power Automate and customer engagement apps.
OAuth
Connect Business Central 2019 release wave 1 and Dynamics NAV 2018
Import the Microsoft Dynamics 365 Business Central Integration Solution into your Dynamics 365 Sales environment. The integration solution is available in the CrmCustomization folder on your Business Central or Dynamics NAV 2018 installation DVD. Depending on your product version, import one of the following solutions:
- For Business Central, the folder contains the DynamicsNAVIntegrationSolution_v9 and DynamicsNAVIntegrationSolution_v91. solutions. The solution you should import depends on the version of Dynamics 365 Sales you're connecting to. Dynamics 365 Sales online requires the DynamicsNAVIntegrationSolution_v91 integration solution.
- For Dynamics NAV 2018, install the DynamicsNAVIntegrationSolution solution.
Create a non-interactive integration user in your Dynamics 365 Sales environment, and assign the user the following security roles. For more information, see Create a non-interactive user account.
- Dynamics 365 Business Central Integration Administrator
- Dynamics 365 Business Central Integration User
Important
This user must not have the System Administrator security role. Also, you cannot use the system administrator account as the integration user.
In the Azure portal, create an app registration for Business Central. For more information, see Register an application in Microsoft Entra ID.
Note
We recommend that you register the app in the same tenant as your Dataverse environment so that you do not have to consent to letting the app access the environment. If you register the app in another environment, you must sign in to Microsoft Entra ID using the administrator account for your Dataverse environment and give consent.
Additionally, the app that you register must not have a secret. Connecting an app with a secret to Dataverse is available only in Business Central 2020 release wave 1 and later.
Depending on your product version, do one of the following steps:
- In Business Central, search for Microsoft Dynamics 365 Connection Setup, and then choose the related link.
- In Dynamics NAV 2018, search for Microsoft Dynamics 365 for Sales Connection Setup, and then choose the related link.
In the Authentication Type field, choose the option for OAuth.
Choose the CRM SDK version that matches solution version you imported in step 1.
Note
This step is only relevant for Business Central.
Enter the URL of your Dynamics 365 Sales environment, and then enter the user name and password for the integration user.
- In Business Central, use the Server Address field.
- In Dynamics NAV 2018, use the Dynamics 365 Sales URL field.
In the Connection String field, specify the ID of the app registration. This field has two tokens in which the ID of your application should be specified.
Token Description AppId Set to the application ID. RedirectUri Set to the application ID, but add the app:// prefix. Example The following example shows a connection string.
AuthType=OAuth;Username=jsmith@contoso.onmicrosoft.com;Password=****;Url=https://contosotest.crm.dynamics.com;AppId=<your AppId>;RedirectUri=app://<your AppId>;TokenCacheStorePath=;LoginPrompt=AutoEnable the connection.
Note
If you want to configure a connection to a Dynamics 365 Sales instance with a specific authentication type, fill in the fields on the Authentication Type Details FastTab. For more information, see Authentication with Microsoft Dataverse web services. This step is not required when connecting an online version of Business Central.
See also
Setting Up User Accounts for Integrating with Dynamics 365 Sales
Set Up a Connection to Dynamics 365 Sales
Synchronizing Business Central and Dynamics 365 Sales
Preparing Dynamics 365 Sales for Integration on-premises
Feedback
Coming soon: Throughout 2024 we will be phasing out GitHub Issues as the feedback mechanism for content and replacing it with a new feedback system. For more information see: https://aka.ms/ContentUserFeedback.
Submit and view feedback for