Connect to an Azure Data Lake Storage account by using a Microsoft Entra service principal
Note
Azure Active Directory is now Microsoft Entra ID. Learn more
Dynamics 365 Customer Insights - Data provides an option to connect to an Azure Data Lake Storage account by using a Microsoft Entra service principal.
Automated tools that use Azure services must have restricted permissions. Instead of having applications sign in as a fully privileged user, Azure offers service principals. Use service principals to securely add or edit a Common Data Model folder as a data source or create or update an environment.
Prerequisites
- The Data Lake Storage account has hierarchical namespace enabled.
- Admin permissions for your Azure tenant, if you have to create a new service principal.
Create Microsoft Entra service principal for Customer Insights
Before creating a new service principal for Customer Insights, check whether it already exists in your organization. In most cases, it already exists.
Look for an existing service principal
Go to the Azure admin portal and sign in to your organization.
From Azure services, select Microsoft Entra.
Under Manage, select Microsoft Application.
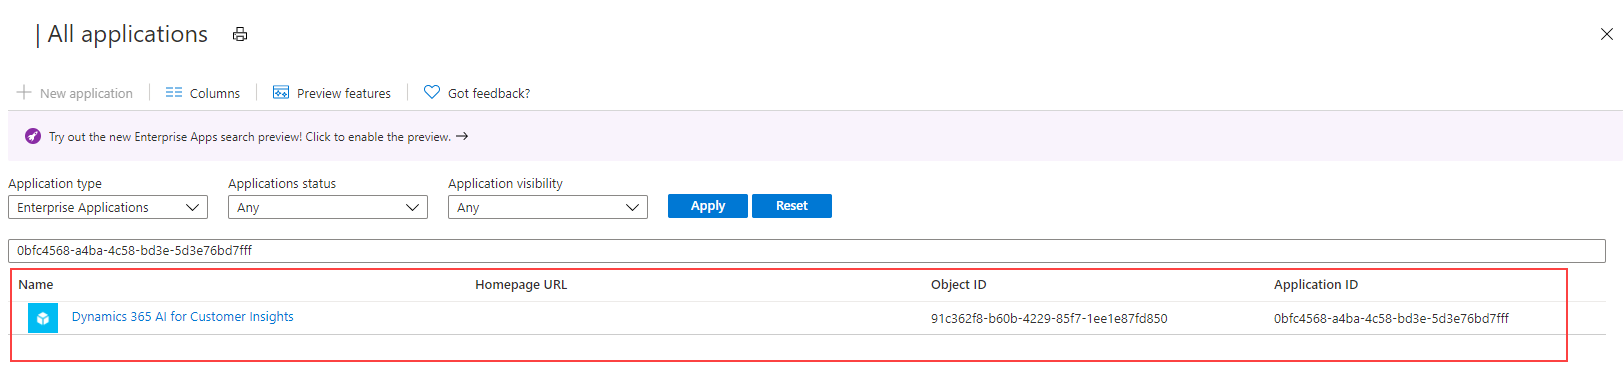
Add a filter for Application ID start with
0bfc4568-a4ba-4c58-bd3e-5d3e76bd7fffor search for the nameDynamics 365 AI for Customer Insights.If you find a matching record, it means that the service principal already exists. Grant permissions for the service principal to access the storage account.
If no results are returned, create a new service principal.
Create a new service principal
Install the latest version of Microsoft Entra ID PowerShell for Graph. For more information, go to Install Microsoft Entra ID PowerShell for Graph.
On your PC, press the Windows key on your keyboard and search for Windows PowerShell and select Run as administrator.
In the PowerShell window that opens, enter
Install-Module AzureAD.
Create the service principal with the Microsoft Entra ID PowerShell module.
In the PowerShell window, enter
Connect-AzureAD -TenantId "[your Directory ID]" -AzureEnvironmentName Azure. Replace [your Directory ID] with the actual Directory ID of your Azure subscription where you want to create the service principal. The environment name parameter,AzureEnvironmentName, is optional.Enter
New-AzureADServicePrincipal -AppId "0bfc4568-a4ba-4c58-bd3e-5d3e76bd7fff" -DisplayName "Dynamics 365 AI for Customer Insights". This command creates the service principal on the selected Azure subscription.
Grant permissions to the service principal to access the storage account
To grant permissions to the service principal for the storage account you want to use in Customer Insights - Data, one of the following roles must be assigned to the storage account or container:
| Credential | Requirements |
|---|---|
| Currently logged in user | When connecting to the Azure Data Lake using the Azure subscription option:
When connecting to the Azure Data Lake using the Azure resource option:
AND
Storage Blob Data Reader role is sufficient to read and ingest data to Customer Insights – Data. However, the Storage Blob Data Contributor or Owner role is required to edit the manifest files from within the data connection experience. |
| Customer Insights Service Principal - Using Azure Data Lake Storage as a data source |
Option 1
|
| Customer Insights Service Principal - Using Azure Data Lake Storage as an output or destination |
Option 1
|
Go to the Azure admin portal and sign in to your organization.
Open the storage account you want the service principal to have access to.
On the left pane, select Access control (IAM), and then select Add > Add role assignment.

On the Add role assignment pane, set the following properties:
- Role: Storage Blob Data Reader, Storage Blob Contributor, or Storage Blob Owner based on credentials listed above.
- Assign access to: User, group, or service principal
- Select members: Dynamics 365 AI for Customer Insights (the service principal you looked up earlier in this procedure)
Select Review + assign.
It can take up to 15 minutes to propagate the changes.
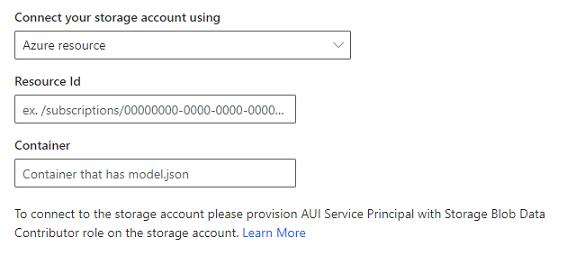
Enter the Azure resource ID or the Azure subscription details in the storage account attachment to Customer Insights -Data
Attach a Data Lake Storage account in Customer Insights - Data to store output data or use it as a data source. Choose between a resource-based or a subscription-based approach and follow those steps.
Resource-based storage account connection
Go to the Azure admin portal, sign in to your subscription, and open the storage account.
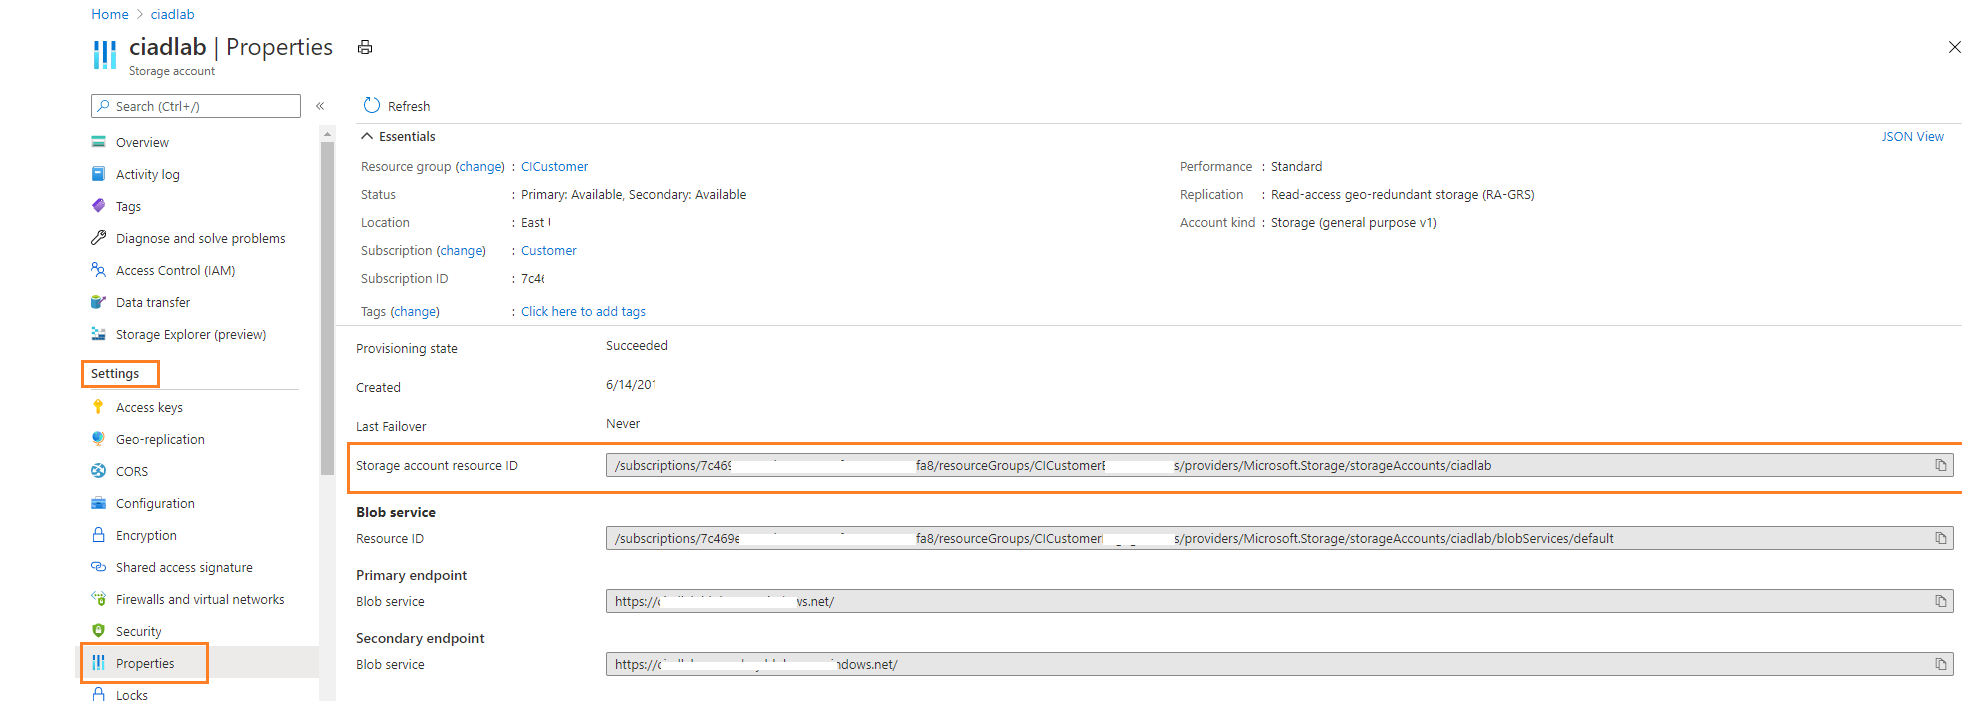
On the left pane, go to Settings > Endpoints.
Copy the storage account resource ID value.
In Customer Insights - Data, insert the resource ID in the resource field displayed on the storage account connection screen.
Continue with the remaining steps to attach the storage account.
Subscription-based storage account connection
Go to the Azure admin portal, sign in to your subscription, and open the storage account.
On the left pane, go to Settings > Properties.
Review the Subscription, Resource group, and the Name of the storage account to make sure you select the right values in Customer Insights - Data.
In Customer Insights - Data, choose the values for the corresponding fields when attaching the storage account.
Continue with the remaining steps to attach the storage account.