Quickly configure a chat widget
Omnichannel for Customer Service offers a suite of capabilities that extend the power of Dynamics 365 Customer Service Enterprise to enable organizations to instantly connect and engage with their customers across digital messaging channels. An additional license is required to access Omnichannel for Customer Service. For more information, see the Dynamics 365 Customer Service pricing overview and Dynamics 365 Customer Service pricing plan pages.
Use the Customer Service admin center or the Omnichannel admin center app (deprecated) to quickly configure and add a chat widget to your portal to chat with your website visitors.
Important
Omnichannel admin center is deprecated. Use the Customer Service admin center app for admin tasks across Customer Service.
To configure a chat widget and embed it in portal, you must:
Step 1: Create a workstream for chat
Sign in to Dynamics 365, and open the Customer Service admin center app.
In the site map, go to Workstreams and select New workstream from the command bar.
On the Create a workstream dialog box, do the following:
- Name: Specify a workstream name
- Work distribution mode: Select Push or Pick.
- Type: Select Messaging.
- Channel: Select Chat.
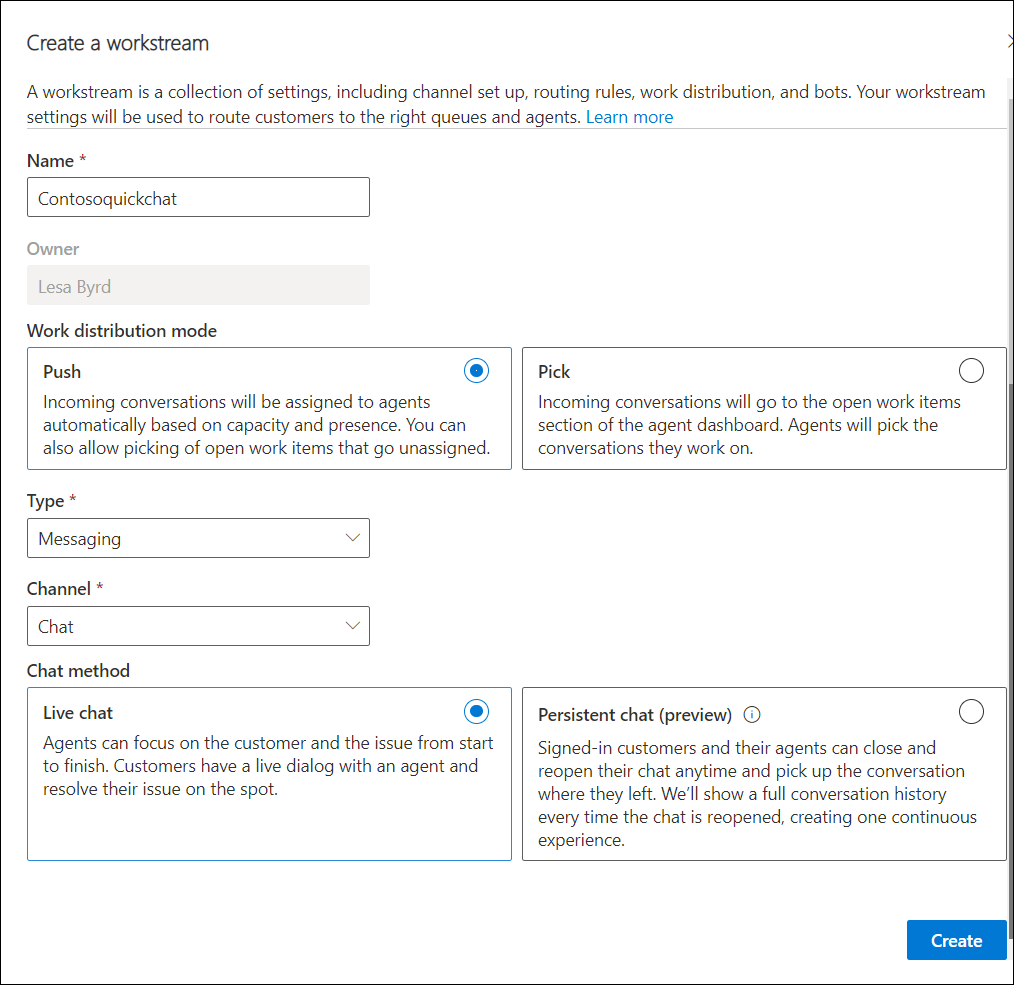
Select Create.
Step 2: Configure a chat widget
- On the workstream page that you created, select Set up chat.
- On the Live chat setup wizard that appears, enter the details. More information: Configure a chat widget.
Step 3: Embed chat widget in portal
Note
The chat widget requires session storage and local storage to be functional in your customers’ browsers. Make sure to notify your customers to enable cookies in their browsers so these services can work properly.
Follow these steps to embed your chat widget into a Power Apps portal. For steps to embed your chat widget into your website, see Embed chat widget in your website or Power Apps portal. For steps to embed your chat widget into mobile experiences, see Render a live chat widget on the mobile app.
Go to Portal > Content Snippets.
Find the Chat Widget Code content snippet and open it.

On the General tab, scroll down to the Value (HTML) section.
Paste the chat widget snippet code in the HTML tab.
Save the changes. The chat widget is now embedded into the portal. By default, the chat widget is displayed in minimized mode as follows:

You can maximize the chat widget by selecting it.

See also
create workstreams for unified routing
Configure work classification
Configure a chat widget
Embed chat widget in your website or Power Apps portal
Supported browsers for live chat widget
Render a live chat widget on the mobile app