Create a solution and add components
This topic applies to Dynamics 365 Customer Engagement (on-premises). For the Power Apps version of this topic, see: Create a solution
Because the default solution contains all the solutions components, it may be easier for you to locate just the solution components that you’ve customized if you create a separate solution and do all your customization there. This also makes it easy to export a backup of your solution as a smaller file. If you choose to do this, you must always remember to add any of the solution components you edit to this solution. When you create new solution components, you should always create them in the context of this solution. This way the solution publisher customization prefix will be applied consistently. After you have created solution components in your solution, or added existing solution components to that solution, you can also edit them in the default solution if you wish.
For more information about solution concepts, see Working with solutions.
Navigate to Settings > Solutions.
Choose New and complete the required fields for the solution
Field Description Display Name The name shown in the list of solutions. You can change this later. Name The unique name of the solution. This is generated using the value you enter in the Display Name field. You can edit this before you save the solution, but after you save the solution, you can’t change it. Publisher You can select the default publisher or create a new publisher. Unless you plan to distribute your solution, you should just use the default publisher for your organization. Version Enter a number for the version of your solution. This is only important if you export your solution. The version number will be included in the file name when you export the solution. Choose Save.
After you save the solution, you may wish to add information to fields that aren’t required. These steps are optional. Use the Description field to describe the solution and choose an HTML web resource as a Configuration Page for the solution. The configuration page is typically used by ISVs who distribute solutions. When this is set, a new Configuration node appears below the Information node to display this web resource. Developers will use this page to include instructions or controls to allow you to set configuration data or launch their solution.
Add solution components
After you’ve created your solution, it won’t contain any solution components. You can create new solution components or use the Add Existing button in the list menu to add any solution components from the default solution.
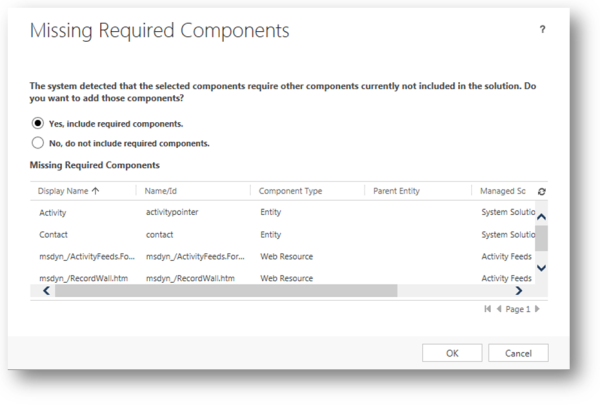
When you do this you may see a Missing Required Components dialog.

This dialog alerts you that the solution component has dependencies on other solution components. If you select No, do not include required components, the solution may fail if you import it into another organization where all those required components do not exist. If the solution import succeeds, the behavior in the other solution may not be identical as the original organization because the components are configured differently than those in the source solution.
Generally, it’s safer to include the required components if you intend to export the solution into another organization. If you don’t add these components when you add an individual solution component, you can come back later, select the solution component you added, and choose Add Required Components from the menu.
If you don’t intend to export the solution, or if you only intend to export it as an unmanaged solution and import it back into the same organization, it isn’t necessary to include required components. If you ever export the solution you’ll see another warning indicating that some required components are missing. If you are only going to import this solution back into the same organization, it is OK to disregard this warning. The steps to edit application navigation or the ribbon without using a third-party editing tool expect that you’ll export the solution back into the same organization.
Important
If you plan to include appointments in solutions, we strongly recommend that you don’t include only appointments and only recurring appointments in separate solutions. If you install and uninstall separate solutions with different appointment types, you’ll encounter a SQL Server error and you’ll have to re-create the appointments.
See also
Feedback
Coming soon: Throughout 2024 we will be phasing out GitHub Issues as the feedback mechanism for content and replacing it with a new feedback system. For more information see: https://aka.ms/ContentUserFeedback.
Submit and view feedback for