Install and configure Connected Field Service for Azure IoT Hub
Follow the steps in this article to set up Connected Field Service for use with Azure IoT Hub.
- Step 1: Deploy Connected Field Service and Azure resources from an ARM template
- Step 2: Create an IoT provider instance
- Step 3: Set up an IoT endpoint
- Step 4: Authorize the Azure app connection
- Step 5: Update devicerules.json
- Step 6: Start the Azure Stream Analytics jobs
- Step 7: Set up the Azure Time Series Insights connection
- Step 8: (Optional) Set up the simulator
Note
Time Series Insights will be deprecated after March 2025. Connected Field Service is transitioning to Azure Data Explorer. More information about the transition is coming soon.
Prerequisites
You have the System Administrator and IoT Administrator security roles.
You have an active Azure subscription with privileges to create resources and services.
You have created an app registration for Azure Time Series Insights in the Azure portal and have the Application (client) ID and the Object ID. Add a Client Secret and record the value. You need these values multiple times in this procedure.
Tip
Images that include an icon that looks like this:  may be expanded to show more detail. Select the image to expand it. To close it, press the Esc key.
Deploy Connected Field Service and Azure resources from an ARM template
Use an Azure Resource Management (Azure Resource Manager) template to deploy Azure IoT Hub and connect it to your Field Service environment.
Select Deploy to Azure on the page https://github.com/microsoft/Dynamics-365-Connected-Field-Service-Deployment.
Select your Azure subscription.
Select a resource group or create one.
Set the region to the same region as your Field Service environment.

Enter the unique name of your organization and the organization URL of the Field Service environment.
Select the optional resources you want to deploy.
- Select Deploy Simulator (optional) to test and validate IoT scenarios with sample data.
- Select Azure Time Series Insights (optional) to enable visualizations of device readings and summary tiles.
- Select Deploy SQL Server for Power BI (optional) and enter the SQL server and credentials to create your own reports in Power BI.
Select Review + create.

Make sure the deployment is complete before you proceed.
Create an IoT provider instance
Sign in to Dynamics 365 and open the Connected Field Service app.
In Connected Field Service, go to the Settings area.
Select Providers, and then select New.
Enter the following information:
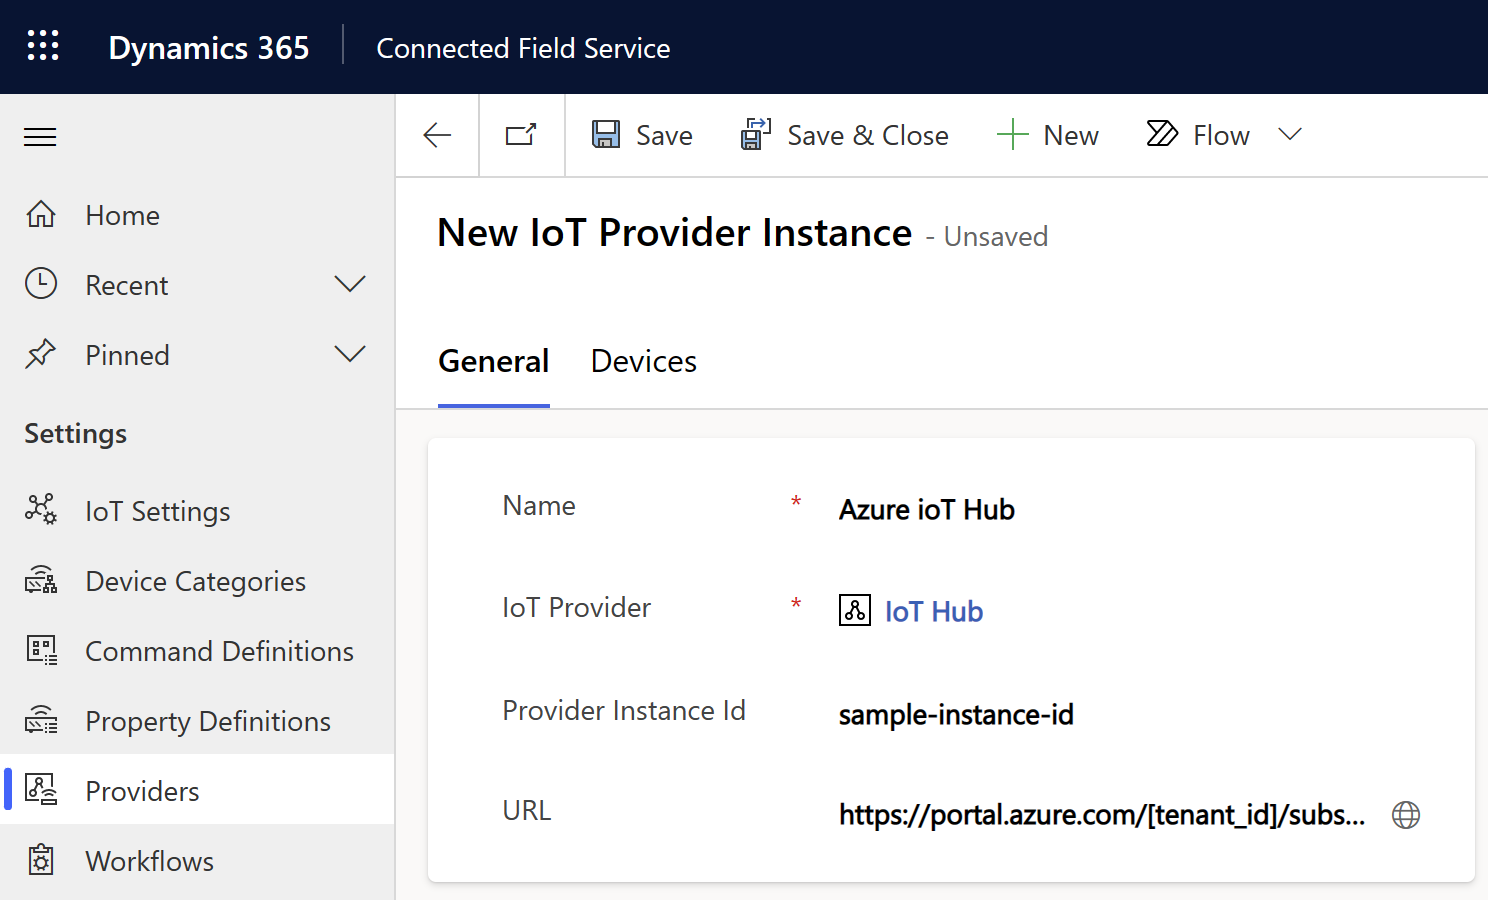
- Name: The name of the resource group in Azure where you deployed IoT resources
- IoT Provider: The IoT provider for IoT Hub
- Provider Instance Id: The name of the IoT Hub resource that you deployed to your resource group in Azure
- URL: The URL of the overview for the resource group in the Azure portal; for example,
https://portal.azure.com/[tenant_id]/subscriptions/[subscription_id]/resourceGroups/[resource_group_name]/overview.
Select Save.
You now need to update the settings for the new provider instance.
In the Settings area, select IoT Settings > IoT Provider Settings.

For Default IoT Provider, select the IoT provider instance you created.
Select Save & Close.
For a later step, find the IoT Provider Instance row in the
msdyn_iotproviderinstancetable and copy the GUID.
Set up an IoT endpoint
For this step, you need to know the hostname for the Service Bus Namespace deployed to your resource group.
Download the Power Platform CLI and install it.
Open the CLI and launch the Plugin Registration Tool (PRT) using the command
pac tool prt.In the PRT window, select Create New Connection.
In Display list of available organizations, select Office 365.
Select Display list of available organizations, and then select Show Advanced.
Select the region of your Field Service environment, enter your Field Service credentials, and then select Login.
If you have access to multiple Dynamics 365 organizations, select the name of the org you want to work with.
Now you need to update the IoT Message service endpoint.
After you're connected to the organization, find and select the IoT Message Service Endpoint.
Select Update.
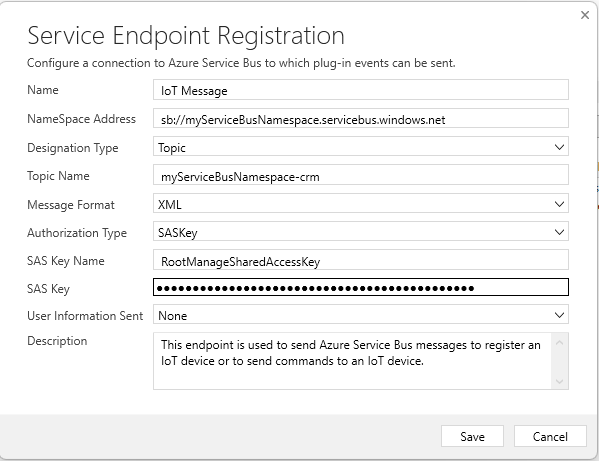
For NameSpace Address, enter the hostname of the Service Bus Namespace in the Plug-in Registration Tool, prefixed by
sb://; for example,sb://myServiceBusNamespace.servicebus.windows.net.In the Service Bus Namespace resource, go to Queues and find the queue with a name ending in
-crm. Copy the full name and enter it as the Topic Name in the Plug-in Registration Tool.For Message Format, choose XML.
In the Service Bus Namespace resource, go to Shared access policies > RootManageSharedAccessKey.
Copy the name and paste it in SaS Key Name.
Copy the primary key and paste it in SAS Key.
Select Save.
Authorize the Azure app connection
Sign in to your Azure account and go to the Azure portal.
Go to Resource Groups and find the resource group you deployed IoT Hub to.
Select and edit the API Connection resource commondataservice.
Under General, select Edit API Connection, and then select Authorize.
Sign in with the Dynamics 365 credentials that you use to sign in to your Connected Field Service environment.
They may be different from the credentials you use to sign in to the Azure portal.
Select Save.
Update devicerules.json
The Stream Analytics job deployed to your resource group refers to a file named devicerules.json. This file defines a rule that creates IoT Alerts when you're using the optional device simulator.
To use the rule, upload the devicerules.json file. You must reproduce the exact directory structure for the sample alert to work.
Download the
devicerules.jsonfile from the GitHub repo.Open the resource group in the Azure admin portal and select the storage account deployed to your resource group.
Select Containers, and then create a container called
devicerules.Open the new container
devicerulesand select Upload.Browse to and select
devicerules.json.Expand the Advanced section. In the Upload to folder field, enter 2016-05-30, and then select Upload.
Open the new folder
2016-05-30and select Upload.Browse to and select
devicerules.json.Expand the Advanced section. In the Upload to folder field, enter 22-40, and then select Upload.
Start the Azure Stream Analytics jobs
In the Azure portal, go to Resource Groups and find the resource group you deployed IoT Hub to.
Select each Stream Analytics job and from the Overview tab, select Start.
Congratulations! You're now ready to pass data between Azure IoT Hub and Dynamics 365 to use Connected Field Service.
Set up the Azure Time Series Insights connection
Use Azure Time Series Insights to create visualizations. For this step, you need to know your your Azure tenant ID.
In Dynamics 365, open the Connected Field Service app.
Launch the browser developer tools and go to the console.
Type or paste the following script in the console and run it. Replace the
Valueparameter with your Azure tenant ID.
var req = {};

req.getMetadata = function () {
return {
boundParameter: null,
parameterTypes: {
"Key": {
"typeName": "Edm.String",
"structuralProperty": 1
},
"Value": {
"typeName": "Edm.String",
"structuralProperty": 1
},
},
operationType: 0,
operationName: "msdyn_IoTSetConfiguration"
};
};

req["Key"]="TSI_PLUGIN_AZURE_TENANT_ID";
req["Value"]="REPLACE";

Xrm.WebApi.online.execute(req).then(
function (data) {
console.log("Success Response Status: " + data.status);
},
function (error) {
console.log("Error: " + error.message);
}
);
Run the script again. This time, replace
KeywithTSI_PLUGIN_CLIENT_APPLICATION_IDandValuewith the Application Client ID from the Time Series Insights app registration you created as a prerequisite.Run the script one more time. This time, replace
KeywithTSI_PLUGIN_CLIENT_SECRETandValuewith the Client Secret from the Time Series Insights app registration you created as a prerequisite.Run the following script, using your Time Series Insights URL and the GUID of the IoT provider instance row in the msdyn_iotproviderinstance table for the IoT provider instance you created earlier.
var data = {"msdyn_timeseriesinsightsurl": "Enter Data Access FQDN found on Time Series Insights environment overview"};
Xrm.WebApi.updateRecord("msdyn_iotproviderinstance", "Copy the value for msdyn_iotproviderinstanceid from the json object returned with the API call https://[your-environment-name].crm.dynamics.com/api/data/v9.2/msdyn_iotproviderinstances", data);
(Optional) Set up the simulator
The simulator lets you test Connected Field Service without the need to connect physical hardware. Simulated IoT devices and data help you understand the parts of the system that contribute to turning IoT data into work orders.
For this step, you need the simulator URL and the primary key for the iothubowner policy.
Get the access key
Sign in to your Azure account and go to the Azure portal.
Go to Resource Groups and find the resource group you deployed IoT Hub to.
Select the IoT hub.
Select Shared access policies, and then copy the primary key for iothubowner.

Get the simulator URL
In the Azure portal resource group you deployed IoT Hub to, select the App Service resource type that starts with
Simulatorand copy the URL in the upper-right corner.Paste the URL into your browser's address bar and load the page.
Select Connection.
Enter the host name from the IoT Hub resource and iothubowner as the policy name. In the Key field, paste the primary key you copied earlier.
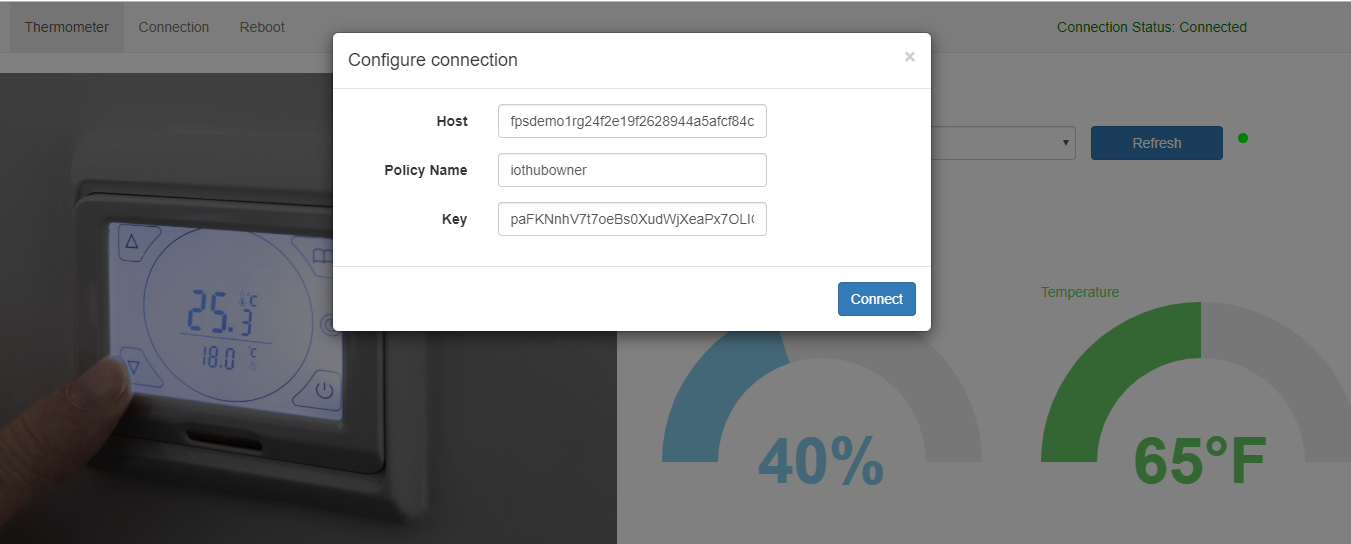
Make sure Connection status is Connected and then close the connection window.
Send a test command using the simulator. For example, select the temperature and increase it to above 70 degrees. The simulator is preprogrammed to create an IoT alert if the temperature rises above 70 degrees.
Next steps
Feedback
Coming soon: Throughout 2024 we will be phasing out GitHub Issues as the feedback mechanism for content and replacing it with a new feedback system. For more information see: https://aka.ms/ContentUserFeedback.
Submit and view feedback for