Design an ER format to paginate generated documents in Excel
This article explains how a user in the System Administrator or Electronic Reporting Functional Consultant role can configure an Electronic reporting (ER) format to generate outbound documents in Microsoft Excel and manage document pagination.
In this example, you will modify the Microsoft-provided ER format that is used to print the control report when the Intrastat declaration is generated. This report lets you observe reported Intrastat transactions. Your modifications will let you manage the pagination of control reports that are generated.
The procedures in this article can be completed in the DEMF company. No coding is required. Before you begin, download and save the following files.
| Description | File name |
|---|---|
| Report template 1 | ERIntrastatReportDemo1.xlsx |
| Report template 2 | ERIntrastatReportDemo2.xlsx |
Configure the ER framework
Follow the steps in Configure the ER framework to set up the minimal set of ER parameters. You must complete this setup before you start to use the ER framework to design a custom version of a standard ER format.
Import the standard ER format configuration
Follow the steps in Import the standard ER format configuration to add the standard ER configurations to your current instance of Dynamics 365 Finance. Import version 1.9 of the Intrastat report format configuration. Base version 1 of the base Intrastat model configuration is automatically imported from the repository.
Customize the standard ER format
Create the custom ER format
In this scenario, you're the representative of Litware, Inc., which is currently selected as the active ER configuration provider. You must create a new ER format configuration by using the Intrastat report configuration as a base.
- Go to Organization administration > Electronic reporting > Configurations.
- On the Configurations page, in the configuration tree in the left pane, expand Intrastat model, and select Intrastat report. Litware, Inc. will use version 1.9 of this ER format configuration as the base for the custom version.
- Select Create configuration to open the drop-down dialog box. You can use this dialog box to create a new configuration for a custom payment format.
- In the New field group, select Derive from Name: Intrastat report, Microsoft.
- In the Name field, enter Intrastat report Litware.
- Select Create configuration to create the new format.
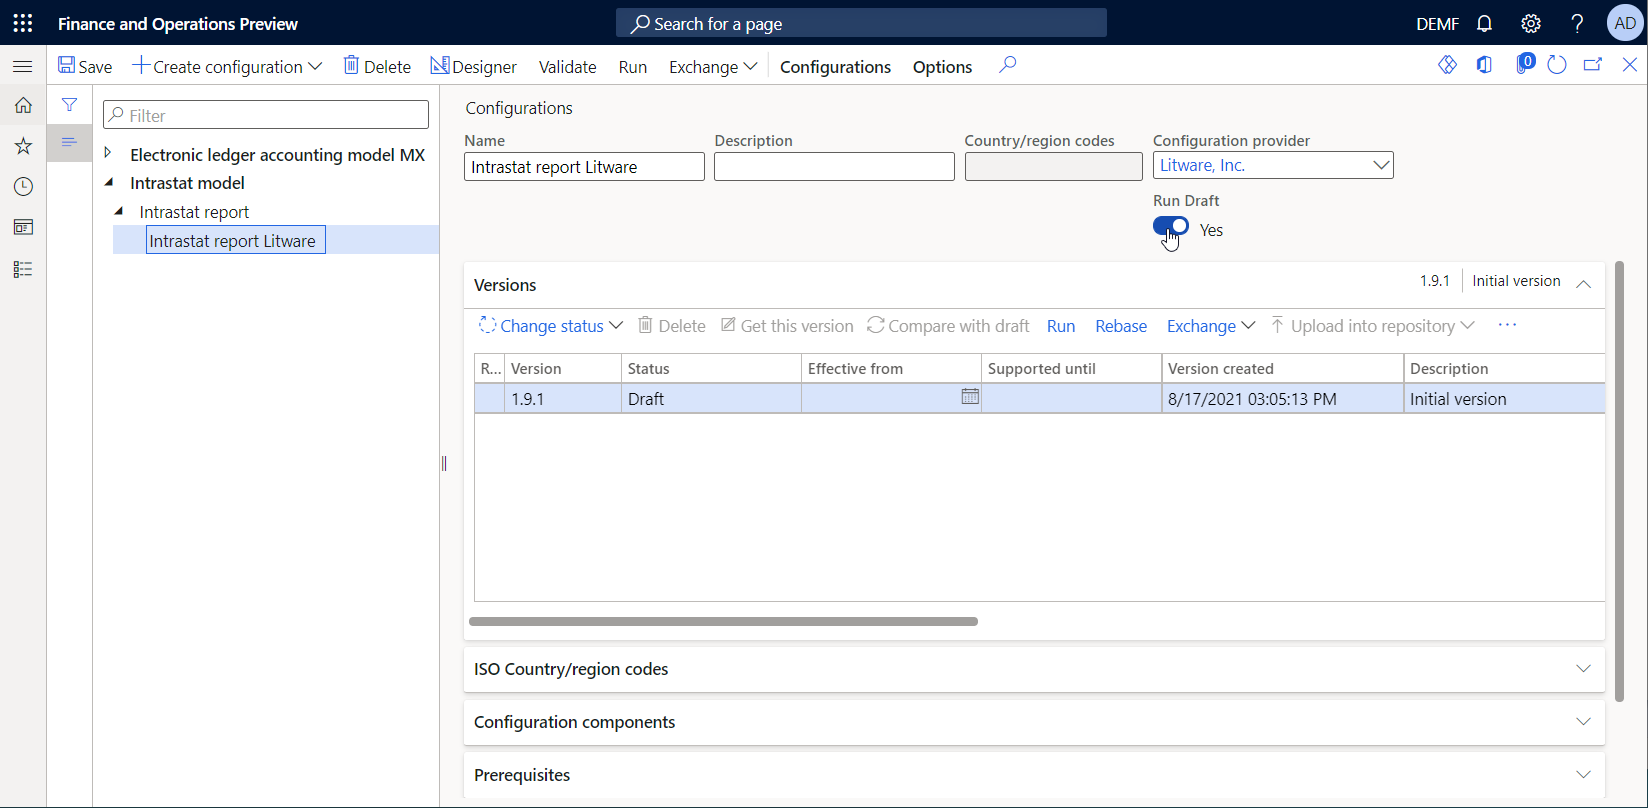
Version 1.9.1 of the Intrastat report Litware ER format configuration is created. This version has a status of Draft and can be edited. The current content of your custom ER format matches the content of the format that is provided by Microsoft.
Make the custom format runnable
Now that the first version of your custom format has been created and has a status of Draft, you can run the format for testing purposes. To run the report, process a vendor payment by using the payment method that refers to your custom ER format. By default, when you call an ER format from the application, only versions that have a status of Completed or Shared are considered. This behavior helps prevent ER formats that have unfinished designs from being used. However, for your test runs, you can force the application to use the version of your ER format that has a status of Draft. In this way, you can adjust the current format version if any modifications are required. For more information, see Applicability.
To use the draft version of an ER format, you must explicitly mark the ER format.
Go to Organization administration > Electronic reporting > Configurations.
On the Configurations page, on the Action Pane, on the Configurations tab, in the Advanced settings group, select User parameters.
In the User parameters dialog box, set the Run settings option to Yes, and then select OK.
Select Edit to make the current page editable, as required.
In the configuration tree in the left pane, select Intrastat report Litware.
Set the Run Draft option to Yes and then select Save.
Set up Foreign trade parameters to use the custom ER format
Follow these steps to configure Foreign trade parameters so that you can use the custom format.
- Go to Tax > Setup > Foreign trade > Foreign trade parameters.
- On the Foreign trade parameters page, on the Electronic reporting FastTab, in the File format mapping field, select Intrastat report Litware.
- In the Report format mapping field, select Intrastat report Litware.
- Select Save.
Configure the custom format to use the downloaded report template
Review the first downloaded Excel template
In the Excel desktop application, open the ERIntrastatReportDemo1.xlsx template file that you downloaded earlier.
Verify that the template contains named ranges to create report header, report details, and report footer sections in generated documents.
Replace the current Excel template in the custom ER format
You must add a new Excel template to the custom ER format.
- Go to Organization administration > Electronic reporting > Configurations.
- On the Configurations page, in the configuration tree in the left pane, expand Intrastat model > Intrastat report, and select the Intrastat report Litware configuration.
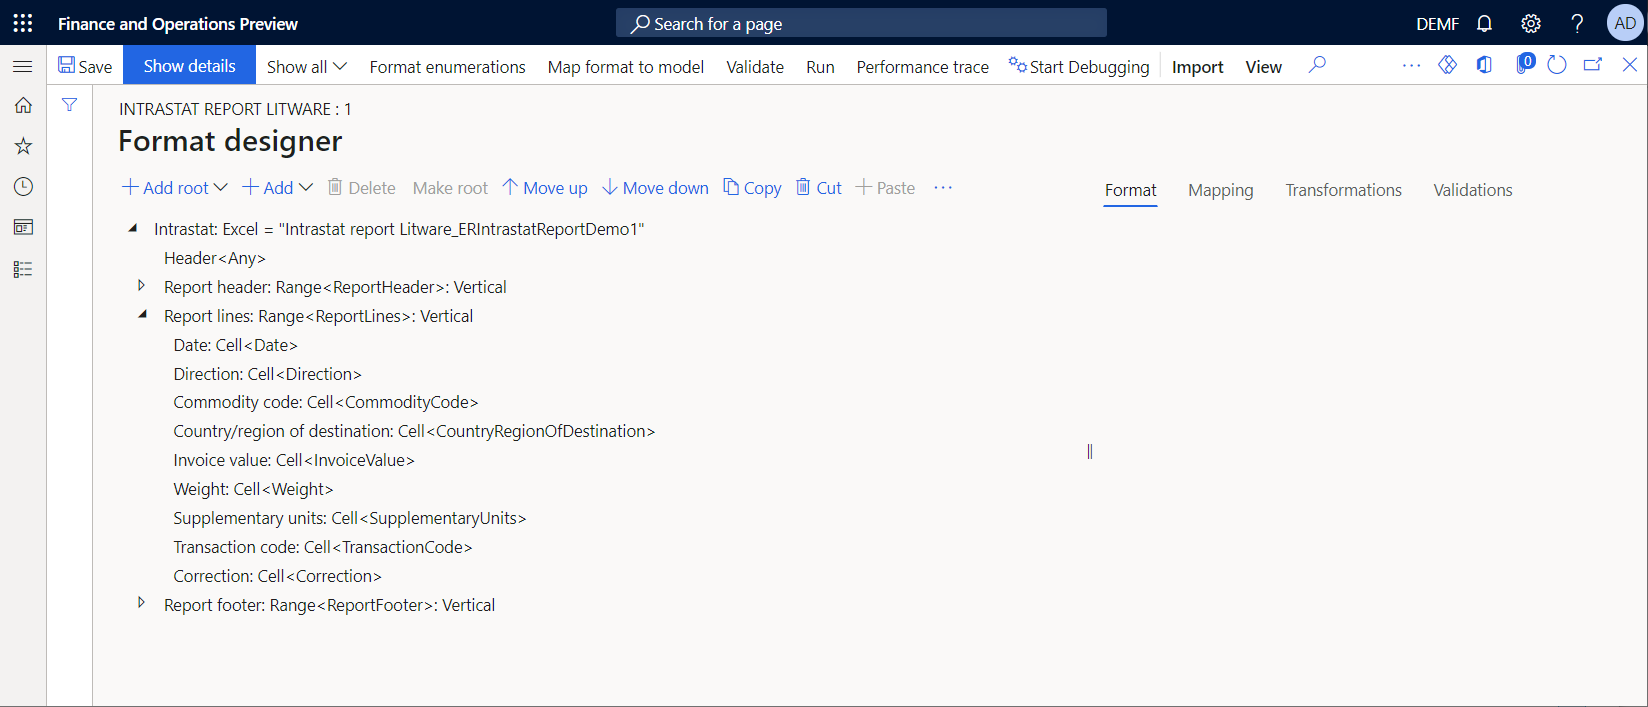
- Select Designer.
- On the Format designer page, on the Action Pane, select Show details.
- Make sure that the Intrastat: Excel root format component is selected, and then, on the Action Pane, on the Import tab, in the Import group, select Update from Excel.
- In the Update from Excel dialog box, select Update template.
- In the Open dialog box, browse to and select the ERIntrastatReportDemo1.xlsx file that you downloaded earlier, and then select Open.
- Select OK.
- Select Save.
Change the data binding to show the item description on a generated report
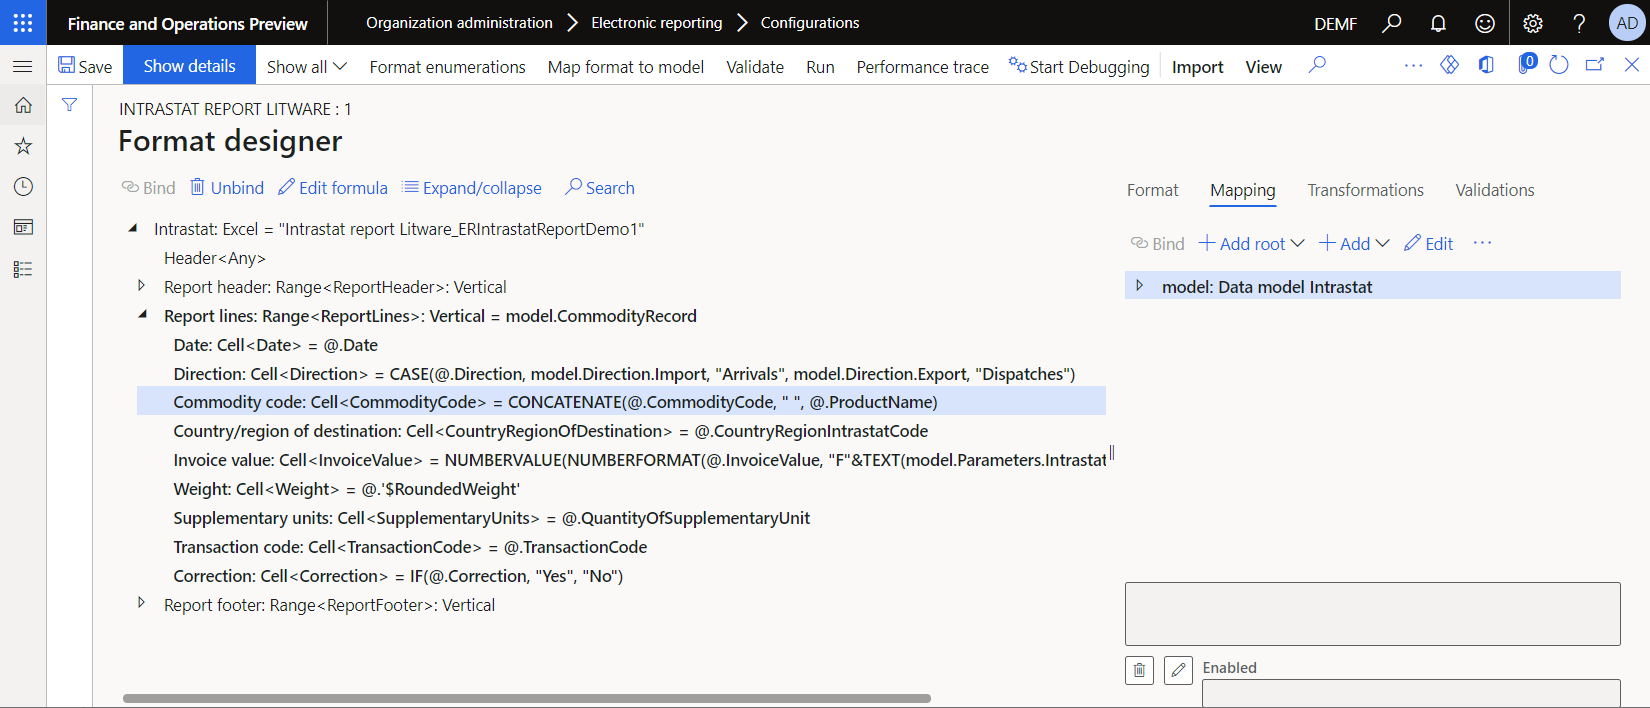
- On the Format designer page, select the Mapping tab.
- Expand Intrastat > Report lines, and select the Commodity code component.
- Select Edit formula.
- Change the binding formula from
@.CommodityCodetoCONCATENATE(@.CommodityCode, " ", @.ProductName). - Select Save.
Generate an Intrastat declaration control report
First, make sure that you have Intrastat transactions for reporting on the Intrastat page.
Then use the custom ER format to generate the control report of the Intrastat declaration.
Go to Tax > Declarations > Foreign trade > Intrastat.
On the Intrastat page, on the Action Pane, select Output > Report.
In the Intrastat Report dialog box, follow these steps to run the report:
- Set the From date and To date fields to include specific Intrastat transactions to the report.
- Set the Generate file option to No.
- Set the Generate report option to Yes.
- Select OK.
Download and save the document that is generated.
Open the document in Excel, and review it.

Configure the custom format to paginate generated documents
Review the second downloaded Excel template
In Excel, open the ERIntrastatReportDemo2.xlsx template file that you downloaded earlier.
Compare this template with the ERIntrastatReportDemo1.xlsx template, and verify that it contains several new Excel names to create and fill in page-specific sections in generated documents:
- The ReportPageHeader range is added to create page headers.
- The ReportPageFooter range is added to create page footers.
- The ReportPageFooter_PageLines cell is configured to show the number of transactions per page.
- The ReportPageFooter_PageAmount cell is configured to show the total amount of transactions per page.
- The ReportPageFooter_PageWeight cell is configured to show the total weight of transactions per page.
- The ReportPageFooter_RunningCounterLines cell is configured to show the running counter of transactions from the beginning of the report through the current page.
- The ReportPageFooter_RunningTotalAmount cell is configured to show the amount running total for all transactions from the beginning of the report through the current page.
- The ReportPageFooter_RunningTotalWeight cell is configured to show the weight running total for transactions from the beginning of the report through the current page.
The CommodityCode cell of this template is configured to wrap cell text. Because the transaction details row is configured so that it will automatically fit the height of a row, the height of the whole row must automatically change when the text in the CommodityCode cell is wrapped.
Repeat the replacement of the current Excel template in the custom ER format
Follow the steps in the Replace the current Excel template in the custom ER format section of this article. However, in step 7, select the ERIntrastatReportDemo2.xlsx file.
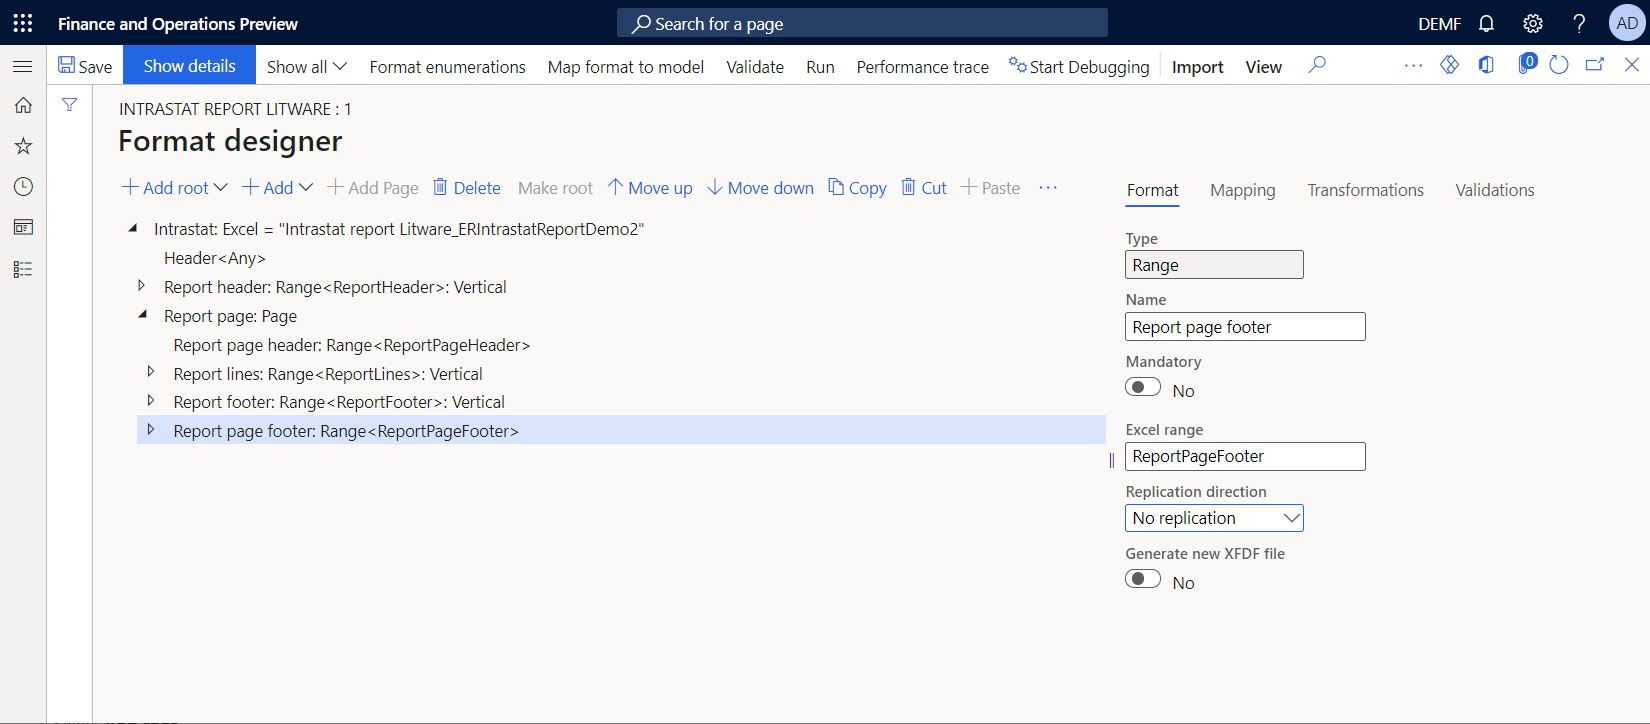
On the Format designer page, expand Intrastat.
Name the Range format components that have been added to the editable ER format to sync the structure with the structure of the applied Excel template:
- Select the Range component that is associated with the Excel name ReportPageHeader.
- On the Format tab, in the Name field, enter Report page header.
- Select the Range component that is associated with the Excel name ReportPageFooter.
- On the Format tab, in the Name field, enter Report page footer.
Select Save.

Change the format structure to implement document pagination
On the Format designer page, in the format tree in the left pane, select the Intrastat root component.
Select Add.
In the Add dialog box, select the Page component in the Excel group of components.
In the Component properties dialog box, in the Name field, enter Report page. Then select OK.
To use the Report page header component as a page header on every generated page, follow these steps:
- Select the Report page header component, and then select Cut.
- Select the Report page component, and then select Paste.
- Expand Report page.
- To force the Page component to consider this range a page header, select Report page header, and then, on the Format tab, in the Replication direction field, select No replication.
To paginate a generated document so that the content on report lines is considered, follow these steps:
- Select the Report lines component, and then select Cut.
- Select the Report page component, and then select Paste.
To include the report footer after report lines but before the final page footer, follow these steps:
- Select the Report footer component, and then select Cut.
- Select the Report page component, and then select Paste.
To use the Report page footer component as a page footer on every generated page, follow these steps:
- Select the Report page footer component, and then select Cut.
- Select the Report page component, and then select Paste.
- To force the Page component to consider this range a page footer, select Report page footer, and then, on the Format tab, in the Replication direction field, select No replication.
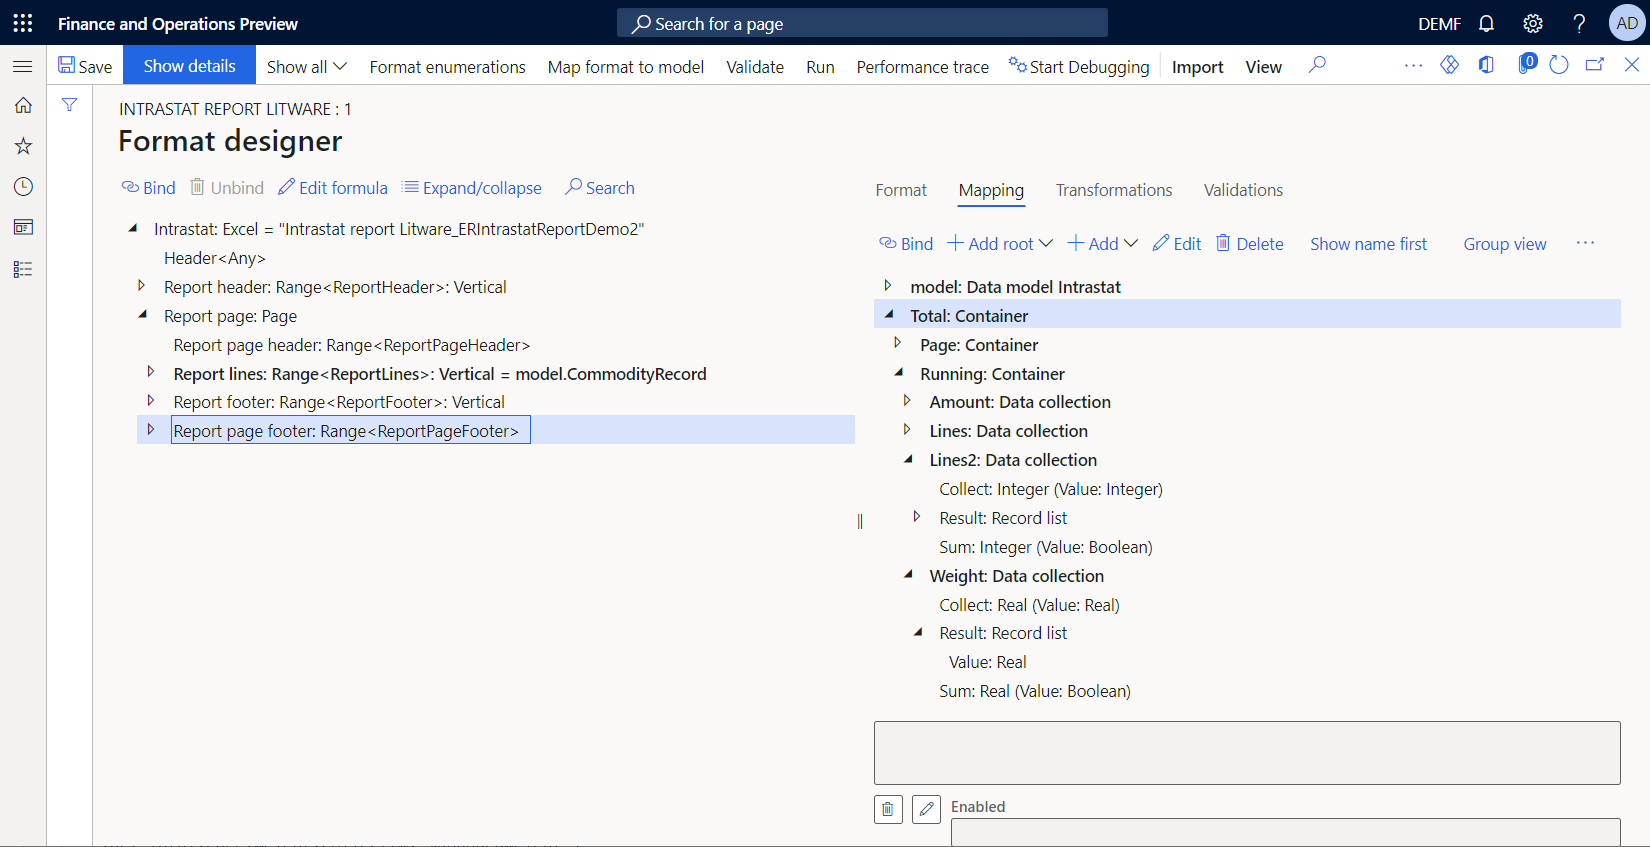
Add data sources to calculate page footer totals
You must configure new data sources to calculate the page total, the running counter, and the running total values, and to show them in the page footer section. We recommend that you use Data collection data sources for this purpose.
On the Format designer page, select the Mapping tab.
Select Add root, and then follow these steps:
- In the Add data source dialog box, in the General section, select Empty container.
- In the 'Empty container' data source properties dialog box, in the Name field, enter Total.
- Select OK.
Select the Total data source, select Add, and then follow these steps:
- In the Add data source dialog box, in the General section, select Empty container.
- In the 'Empty container' data source properties dialog box, in the Name field, enter Page.
- Select OK.
Select Add again, and then follow these steps:
- In the Add data source dialog box, in the General section, select Empty container.
- In the 'Empty container' data source properties dialog box, in the Name field, enter Running.
- Select OK.
Select the Total.Page data source, select Add, and then follow these steps:
- In the Add data source dialog box, in the Functions section, select Data collection.
- In the 'Data collection' data source properties dialog box, in the Name field, enter Amount.
- In the Item type field, select Real.
- Set the Collect all values option to Yes.
- Select OK.
Select Add again, and then follow these steps:
- In the Add data source dialog box, in the Functions section, select Data collection.
- In the 'Data collection' data source properties dialog box, in the Name field, enter Weight.
- In the Item type field, select Real.
- Set the Collect all values option to Yes.
- Select OK.
Select the Total.Running data source, select Add, and then follow these steps:
- In the Add data source dialog box, in the Functions section, select Data collection.
- In the 'Data collection' data source properties dialog box, in the Name field, enter Amount.
- In the Item type field, select Real.
- Set the Collect all values field to Yes.
- Select OK.
Select Add again, and then follow these steps:
- In the Add data source dialog box, in the Functions section, select Data collection.
- In the 'Data collection' data source properties dialog box, in the Name field, enter Weight.
- In the Item type field, select Real.
- Set the Collect all values field to Yes.
- Select OK.
Select Add again, and then follow these steps:
- In the Add data source dialog box, in the Functions section, select Data collection.
- In the 'Data collection' data source properties dialog box, in the Name field, enter Lines.
- In the Item type field, select Integer.
- Set the Collect all values field to Yes.
- Select OK.
Select Save.
Add data sources to control page footer visibility
If you plan to control page footer visibility, and you don't plan to include the footer on the final page if it contains transactions, configure a new data source to calculate the required running counter.
- On the Format designer page, select the Mapping tab.
- Select the Total.Running data source, select Add.
- In the Add data source dialog box, in the Functions section, select Data collection.
- In the 'Data collection' data source properties dialog box, in the Name field, enter Lines2.
- In the Item type field, select Integer.
- Set the Collect all values option to Yes.
- Select OK.
- Select Save.
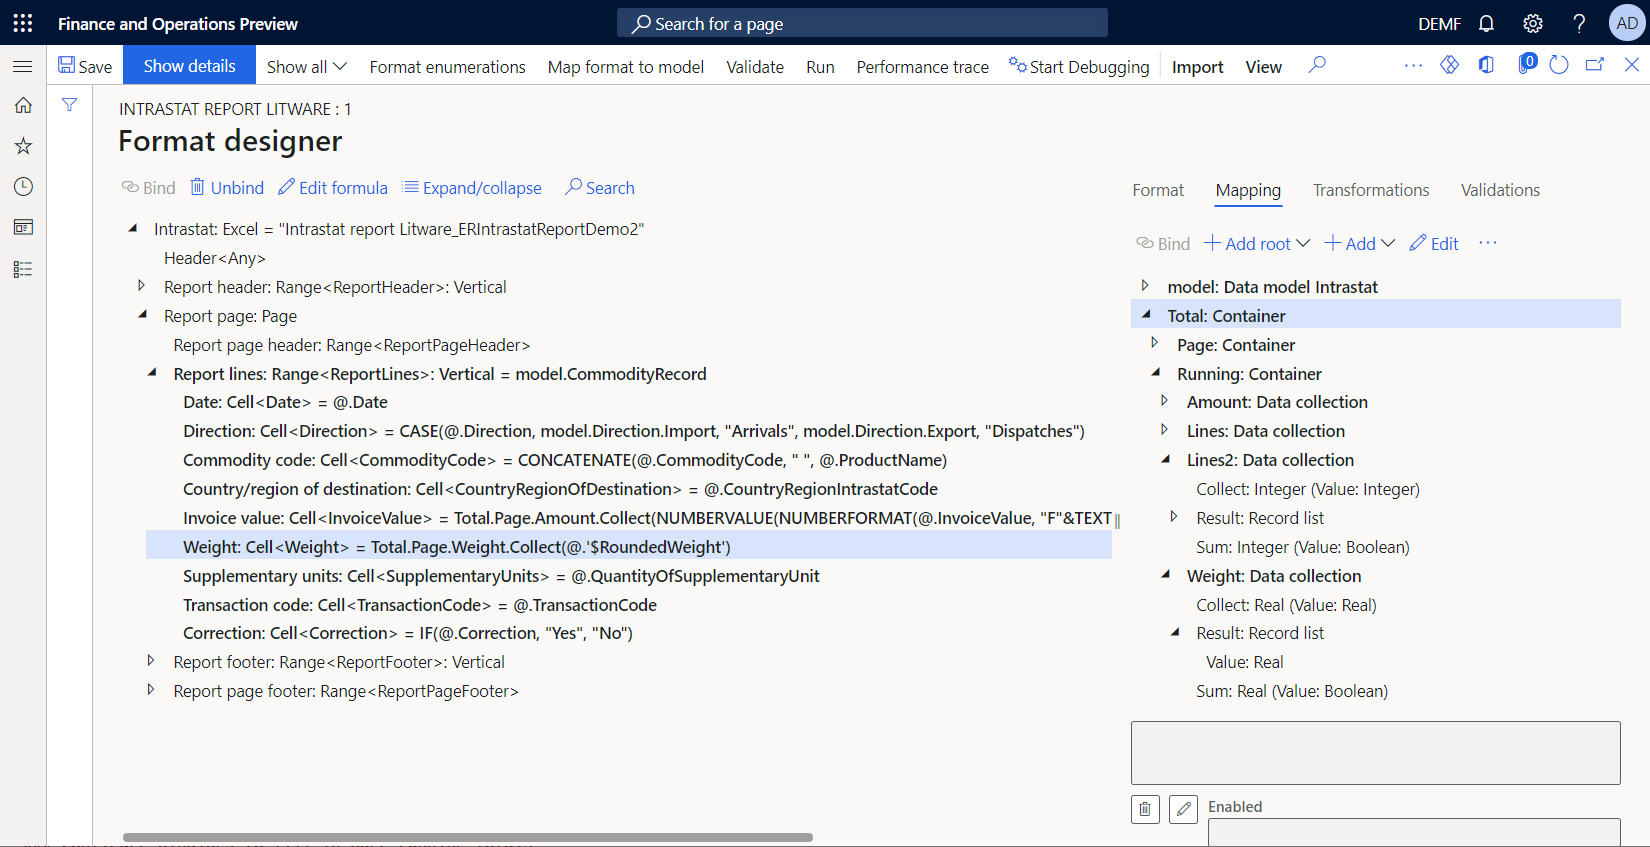
Configure bindings to collect total values
On the Format designer page, in the format tree, expand the Report lines component, and select the nested Invoice value component.
Select Edit formula.
Change the binding formula from
NUMBERVALUE(NUMBERFORMAT(@.InvoiceValue, "F"&TEXT(model.Parameters.IntrastatAmountDecimals)), ".", "")toTotal.Page.Amount.Collect(NUMBERVALUE(NUMBERFORMAT(@.InvoiceValue, "F"&TEXT(model.Parameters.IntrastatAmountDecimals)), ".", "")).Note
In addition to putting the amount value in an Excel cell for every iterated transaction, this binding collects the value in the data collection Total.Page.Amount data source.
Select the nested Weight component.
Select Edit formula.
Change the binding formula from
@.'$RoundedWeight'toTotal.Page.Weight.Collect(@.'$RoundedWeight').Note
In addition to putting the weight value in an Excel cell for every iterated transaction, this binding collects the value in the Total.Page.Weight data source.
Configure bindings to fill in page footer totals
On the Format designer page, in the format tree, expand the Report page footer component, select the nested Range component that refers to the Excel ReportPageFooter_PageAmount cell, and then follow these steps:
- In the data sources tree in the right pane, select the Total.Page.Amount.Sum() item.
- Select Bind.
- Select Edit formula.
- Update the formula to
Total.Page.Amount.Sum(false).
Note
You must specify the argument of this function as False to keep collected data for the current page, because this data is required to calculate the amount running total, total number of lines per page, and running counter of lines.
In the format tree, select the nested Range component that refers to the Excel ReportPageFooter_PageWeight cell, and then follow these steps:
- In the data sources tree in the right pane, select the Total.Page.Weight.Sum() item.
- Select Bind.
- Select Edit formula.
- Update the formula to
Total.Page.Weight.Sum(false).
Configure bindings to fill in page running totals
On the Format designer page, in the format tree, expand the Report page footer component, select the nested Range component that refers to the Excel ReportPageFooter_RunningTotalAmount cell, and then follow these steps:
- In the data sources tree in the right pane, select the Total.Running.Amount.Collect() item.
- Select Bind.
- Select Edit formula.
- Update the formula to
Total.Running.Amount.Sum(false)+Total.Running.Amount.Collect(Total.Page.Amount.Sum(true)).
Note
The
Total.Running.Amount.Sum(false)operand returns the previously collected amount running total. TheTotal.Running.Amount.Collect(Total.Page.Amount.Sum(true))operand returns the total amount of the current page. You must specify the argument of the nested function of the second operand as True to reset theTotal.Page.Amountdata collection as soon as this value is put in theTotal.Running.Amountrunning total collection. The specified argument must start to collect the next page total from a 0 (zero) value.The
Total.Running.Amount.Sum(false)function is called to enter the amount running total in the Excel ReportPageFooter_RunningTotalAmount cell on the current page.In the format tree, select the nested Range component that refers to the Excel ReportPageFooter_RunningTotalWeight cell, and then follow these steps:
- In the data sources tree in the right pane, select Total.Running.Weight.Collect() item.
- Select Bind.
- Select Edit formula.
- Update the formula to
Total.Running.Weight.Sum(false)+Total.Running.Weight.Collect(Total.Page.Weight.Sum(true)).
Configure bindings to fill in the page running counter
On the Format designer page, in the format tree, expand the Report page footer component, and select the nested Range component that refers to the Excel ReportPageFooter_RunningCounterLines cell.
Select Edit formula.
Add the formula
Total.Running.Lines.Collect(COUNT(Total.Page.Amount.Result)).Note
This formula returns the number of collected amount values for the whole report. This number equals the number of transactions that have been iterated at the current moment. At the same time, the formula collects the returned value in the Total.Running.Lines collection.
Configure bindings to fill in the page footer counter
On the Format designer page, in the format tree, expand the Report page footer component, and select the nested Range component that refers to the Excel ReportPageFooter_PageLines cell.
Select Edit formula.
Add the formula
COUNT(Total.Page.Amount.Result)-Total.Running.Lines.Sum(false).Note
This formula calculates the number of transactions on the current page as the difference between the number of transactions that was collected in Total.Page.Amount.Result for the whole report and the number of transactions that has been stored at this stage in Total.Running.Lines.Sum. Because the number of transactions for the current page is stored in Total.Running.Lines in the binding of the Range component that refers to the Excel ReportPageFooter_RunningCounterLines cell, the number of transactions on the current page isn't yet included. Therefore, this difference equals the number of transactions on the current page.

Configure component visibility
You can change the visibility of the page header and footer on a specific page of a generated document to hide the following elements:
- The page header on the first page, because the report header already contains column titles
- The page header on any page that doesn't have transactions that can occur for the last page
- The page footer on any page that doesn't have transactions that can occur for the last page
To change the visibility, update the Enabled property of the Report page header and Report page footer components.
On the Format designer page, in the format tree, expand the Report page component, select the nested Report page header component, and then follow these steps:
Select Edit for the Enabled field.
On the Formula designer page, in the Formula field, enter the following expression:
AND(
COUNT(Total.Page.Amount.Result)<>0,
COUNT(Total.Page.Amount.Result)<>COUNT(model.CommodityRecord)
)
In the format tree, select the nested Report page footer component, and then follow these steps:
Select Edit for the Enabled field.
On the Formula designer page, in the Formula field, enter the following expression:
(
COUNT(Total.Page.Amount.Result)-Total.Running.Lines2.Sum(false)+
0*Total.Running.Lines2.Collect(COUNT(Total.Page.Amount.Result))
)<>0
Note
The
COUNT(Total.Page.Amount.Result)-Total.Running.Lines2.Sum(false)construction is used to calculate the number of transactions on the current page. The0*Total.Running.Lines2.Collect(COUNT(Total.Page.Amount.Result)construction is used to add the number of transactions on the current page to the collection, to correctly handle the visibility of the next page footer.The
Total.Running.Linescollection can't be reused here, because the Enabled property of a base component is processed after the bindings of nested components are processed. When the Enabled property is processed, theTotal.Running.Linescollection is already incremented by the number of transactions on the current page.Select Save.
Generate an Intrastat declaration control report (updated)
Make sure that you have 24 transactions on the Intrastat page. Repeat the steps in the Generate an Intrastat declaration control report section of this article to generate and review the control report.
All transactions are presented on the first page. The page totals and counters equal the report totals and counters. The page header range is hidden on the first page because the report header already contains column titles. The page header and footer are hidden on the second page because that page contains no transactions.
Update two transactions on the Intrastat page by changing the Item number code from D00006 to L0010. Notice that the product name of the new item, Active stereo speaker pair, is longer than the product name of the original item, Standard speaker. This situation forces text wrapping in the corresponding cell of the generated document. Document pagination, and page-related summing and counting, must now be updated. Repeat the steps in the Generate an Intrastat declaration control report section to generate and review the control report.
Currently, transactions are presented on two pages, and page totals and counters are correctly calculated. The page header range is correctly hidden on the first page and visible on the second page. The page footer is visible on both pages because they contain transactions.
Frequently asked questions
Is there any way to recognize when the final page is processed by the Page format component?
The Page component doesn't expose information about the number of the processed page and the total number of pages in a generated document. Nevertheless, you can configure ER formulas to recognize the final page. Here is an example:
- Calculate the total number of transactions that have already been processed by using the Report page component. You can do this calculation by using the formula
COUNT(Total.Page.Amount.Result). - Calculate the total number of transactions that must be processed based on the
model.CommodityRecordbinding that is configured for the Report lines component. You can do this calculation by using the formulaCOUNT(model.CommodityRecord). - Compare two numbers to recognize the final page. When both values are equal, the final page is generated.
Note
We recommend that you use this approach only when the Enabled property of the Report lines component contains no formula that might return False at runtime for some of the iterated records of the bound Record list.
Additional resources
Feedback
Coming soon: Throughout 2024 we will be phasing out GitHub Issues as the feedback mechanism for content and replacing it with a new feedback system. For more information see: https://aka.ms/ContentUserFeedback.
Submit and view feedback for