Manage rules
Microsoft Dynamics 365 Fraud Protection gives you the flexibility to create rules that use the score that Fraud Protection's state-of-the-art artificial intelligence (AI) model generates, together with additional parameters from the request payload. Based on these inputs, rules can convert an assessment into a decision, such as Approve, Reject, Review, or Challenge.
If your Fraud Protection instance has multiple environments, you can manage rules in a specific environment by using the environment switcher. If the environment has parent environments, the rules in the top-level parent environment are evaluated first. If the rule settings for the top-level parent environment are set to Run all matching rules until a decision is made, the rules in the second-level parent environment are evaluated next. This process continues unless the rule settings for an environment are set to Run only the first matching rule, or until all the rules for the parent environment and the current environment are evaluated.
Defining a rule: Quick start guide
Rules consist of clauses, and are defined by the RETURN and WHEN keywords. They have the following basic structure.
RETURN <decision>
WHEN <condition>
The RETURN statement is only executed if the WHEN statement evaluates to True. The RETURN statement terminates rule execution and must specify a valid decision function: Approve, Reject, Challenge, or Review. Each decision function also accepts an optional parameter, allowing you to express the reason for the decision. To learn more, see Decision functions.
In addition to a decision, the RETURN statement can also be used to write data to the API response or to event tracing. To learn more, see Observation functions.
The WHEN statement specifies a Boolean condition that determines if the RETURN statement executes.
The WHEN statement can use any of the following items:
- Any attributes that are sent in the API request for the assessment, including custom data. You can access these attributes with the @ operator. For example, @"user.userId".
- The scores that are generated from Fraud Protection's artificial intelligence models. For example, @"riskscore".
- Lists that you have uploaded to Fraud Protection. For more information on how to upload lists, see Manage lists. For more information on referencing these lists in your rules, see Using Lists in rules.
- Velocities that you have defined in Fraud Protection. For more information, see Perform velocity checks.
- External calls that you have created in Fraud Protection. For more information, see External calls.
- Functions that you have created in Fraud Protection. For more information, see Functions.
Expressions can be compared using comparison operators (such as ==, !=, >, <), and can be combined using logical operators such as and (&&) and or (||).
For more information on rule syntax, see the Language reference guide.
Visual view
Use visual mode to write rules quickly and easily using the attributes from the request payload.
- To create visual rules, select + New Clause.
- Select Visual View next to the clause name.
- You can add multiple filters to the clause and choose the attributes from the drop-down menu.
- Switch back to the Code View to view and edit the rules in the Fraud Query Language. After the rule is edited in the Code View, you can't go back to the Visual View.
The following graphic shows the Visual View of the rules and the Code View button you can select to change the view.

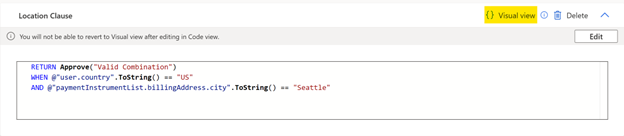
The following graphic shows the Code View of the rules and the Visual View button you can select to change the view.
Examples of rules
RETURN Reject("high score")
WHEN @"riskScore" > 900
RETURN Review("medium score")
WHEN @"riskScore" <= 900 and @"riskScore" > 400
RETURN Approve(), Other(ip=@"device.ipAddress")
WHEN @"user.countryRegion" == "US"
RETURN Reject("user on block list")
WHEN ContainsKey("Email Block List", "Emails", @"user.email")
RETURN Review()
WHEN @"user.email".EndsWith(“@contoso.com”)
Rules tab
You can create custom rules and manage existing rules on the Rules tab.
- To create and manage rules that are related to purchases, select Purchase, and then select the Rules tab.
- To create and manage rules that are related to accounts, select Account creation or Account login, and then select the Rules tab.
- To create and manage rules that are related to a custom assessment, select Custom assessments, select a custom assessment, and then select the Rules tab.
The Rules tab shows a list of the rules that are configured for an assessment type. These rules are divided into two sections: Published Rules and Drafts. For information about drafts, see the Drafts section later in this article.
You can view the following information for each rule or draft:
You can also select the tile for each rule to expand it and show additional information. Here are some examples:
- The description
- The number of clauses in the rule
- Who last updated the rule
- When the rule was last updated
Note
On the Rules tab, published rules are listed in the order that they're run in.
Rule settings
You can access the rule settings on the Rules tab for a specific assessment. There, you can change the rule evaluation behavior and the sample payload. These changes apply to rules only for the assessment that you're editing.
Rule evaluation behavior
You can update how your rules are evaluated. If you select Run the first matching rule, only one rule is evaluated per transaction. If that rule doesn't return a decision, no further rules are evaluated, and a default decision of Approve is returned. If you select Run all matching rules until a decision is made, multiple rules can be evaluated for a single transaction. If the first rule that is evaluated doesn't return a decision, each subsequent matching rule is evaluated until a decision is returned.
Sample payload
In the Payload settings pane, you can define the sample payload for the assessment type. The sample payload is intended to contain an example of the fields that are sent in the request API for the assessment and can be used in your rule.
In the API request, you might choose not to send optional fields from the assessment schema. Alternatively, you might choose to send additional custom fields. In both cases, be sure to update the payload sample that is shown in the Payload settings pane, so that it reflects the specific fields that you're sending.
This payload sample is shown every time that a new rule is created for the assessment (see the Payload sample section later in this article). Any changes that you make apply only to rules that you create from that time onward.
To undo all changes that you or other people made to the payload sample, and return it to the system's default payload sample, select Revert.
Components of a rule
A rule consists of the following components:
- A name and description that describe the purpose of the rule
- The current status of the rule: Active or Inactive
- A sample of fields, to help you write and evaluate the rule
- Components that help you build the logic that automatically approves, rejects, challenges, or reviews events:
A published rule can also have a draft version.
Name and description
When you create a rule, you can add a name and description to help yourself and your team easily identify the rule. Rule names must be unique, and they're case-insensitive.
Status
When you first create a rule, the status is set to Draft only before it's published.
When you publish a rule, you can set the status to either Active or Inactive.
- If a rule is active, it affects real-time production traffic, and all events are evaluated against the rule.
- If a rule is inactive, it doesn't affect production traffic.
When you edit a previously published rule, the rule is saved with a status of either Active (with Draft) or Inactive (with Draft), depending on the status of the published rule.
Samples
When you create or edit a rule, the Sample pane appears on the right side of the page. This pane has two sections: one for the payload sample and one for the score sample.
To view the sample variables that are used in your rule, select Show used variables.
Payload sample
The payload sample contains an example of the fields that can be sent in the request API for the assessment, as defined in the Payload settings pane. These fields can be used as variables in your rule.
Score sample
The score sample contains scores that are generated from Fraud Protection's AI models. You can reference score variables in rules after you run the associated AI model and generate the score. For example, you can use @"botScore" after the bot evaluation is run, and you can use @"riskScore" after the risk evaluation is run. For more information, see the Clauses section later in this article.
Editing the sample
To verify that your rule works for various events, you can edit the sample as you require and then evaluate the sample data against the rule. All values in both the payload sample and the score sample can be edited. When you edit a sample, the changes don't affect which data you send (or don't send) to Fraud Protection.
When you publish a rule, any changes made to the sample are saved and persisted as part of the rule.
To undo all changes that you or other people made to the sample, select Revert. The score sample is reverted to the system's default score sample, and the payload sample is reverted to the user-defined payload sample in the Payload settings pane.
Conditions
Conditions start with the keyword WHEN and are followed by a Boolean expression that evaluates a statement to either True or False. A condition can be created to determine which rule is evaluated and to group related business logic. For example, the following condition is related to digital product transactions.
WHEN @"productList.type" == "Digital"
You can then create clauses that configure a fraud strategy that is related to digital product transactions.
The addition of a condition to a rule is optional. If you want a rule to apply to all events, don't add a condition. For information about how to use conditions to order rules, see the Rule ordering section later in this article.
Clauses
Clauses contain the fraud logic and business policies that are relevant to the segment of traffic that is defined in the condition. Clauses use values in the event payload together with Fraud Protection's AI scores to accept, reject, review, or challenge events. Each rule must contain at least one clause, and each a unique name is assigned to each clause. You can select the name to customize it.
Clauses have the following basic structure.
RETURN <decision>
WHEN <condition is true>
You can use this structure to create a clause that returns a decision of Approve, Reject, Challenge, or Review. You can then add optional parameters that send more information about the decision.
Everything after the WHEN keyword must be able to be evaluated to either True or False. This Boolean expression can consist of values from the event payload, user-defined lists, and AI-based bot and risk scores.
For information about the syntax for clauses, see the Language reference guide.
When a clause is triggered (that is, when the WHEN statement returns True), the decision that is specified in the RETURN statement is returned, and no subsequent clauses are run.
If a condition matches the decision but doesn't trigger a clause, the rule is then run.
RETURN Approve("NO_CLAUSE_HIT")
Clauses are run sequentially in the order in which they appear on the Rules tab. You can use the arrow buttons on the right side of a clause to change its position in the list.
Clauses are organized into sections. AI models are run based on these sections and generate a score as part of the assessment. The sections differ per assessment and indicate when the clause is run relative to the AI model.
- For purchase protection, an AI risk model is run that generates a risk score for the transaction. Therefore, these rules contain both prior-to-all-scoring clauses and post-risk scoring clauses.
- For account protection, a bot model is run in addition to a risk model. These models generate a bot score and risk score, respectively. Therefore, these rules contain prior-to-all-scoring clauses, post-bot-scoring clauses, and post-risk-scoring clauses.
- For custom assessments, no AI models are run, and these rules contain only prior-to-all-scoring clauses.
- Assessments created using the Assessment wizard don’t have a concept of prior-to-scoring and post-scoring clauses. Instead, all clauses are executed sequentially (top to bottom) based on the order they're listed in the rule.
Prior-to-all-scoring clauses
Prior-to-all-scoring clauses are run before Fraud Protection's AI models are run. Therefore, they're run before any bot or risk assessment scores have been generated. These clauses can use any combination of fields that are sent as part of the event payload and contained in lists. They can be configured to implement embargo, geofencing, or other business policies.
The following example helps you review purchases when users buy a product in a market outside their geographical location.
RETURN Review("location inconsistency")
WHEN Geo.MarketCode(@"device.ipAddress") != "@productList.market"
In this section, you can also write a clause to cross-reference lists. For example, if you have a custom list that is named Risky Emails, the following clause rejects events if the user's email address appears in the list.
RETURN Reject ("risky email")
WHEN ContainsKey ("Risky Emails", "Emails", @"user.email")
For information about the syntax that is used to reference lists in rules, see the Language reference guide.
Post-bot-scoring clauses
Post-bot-scoring clauses are run after Fraud Protection's AI models generate a bot score for an event. This score represents the probability that a bot initiated the event. It's a number between 0 and 999. A higher score indicates a higher bot probability.
In post-bot-scoring clauses, you can use this score together with fields from the payload and lists to make decisions. You reference this score by using the @botScore variable. For example, the following clause rejects events from a specific email domain that has a bot score that is more than 700.
RETURN Reject()
WHEN @"user.email".EndsWith("@contoso.com") && @"botScore" > 700
Post-risk-scoring clauses
Post-risk-scoring clauses are run after Fraud Protection's AI models generate a risk assessment score for an event. This score is a number between 0 and 999. A higher score indicates a higher perceived risk.
In post-risk-scoring clauses, you can use this score together with fields from the payload and lists to make decisions. You reference this score by using the @riskScore variable. For example, the following clause rejects expensive transactions that have a risk score that is more than 700.
RETURN Reject("high price and risk score")
WHEN @purchasePrice >= 199.99 && @riskScore > 700
Drafts
A rule can have both a published version and a draft version. Both versions can be viewed as side-by-side tabs on the Rules tab.
The published version is read-only and can be viewed by anyone. The draft version is visible only to its author. Drafts can be edited, and all changes are automatically saved.
- To discard your draft, select Discard.
- To publish your draft, select Publish.
When you publish a draft, Fraud Protection overwrites the published version of the rule with the draft version.
Rule ordering
The Rules tab shows a list of the published rules that are configured for the assessment. The order that the rules are listed in affects the order that they're evaluated in. To reorder the rules, just drag a rule to its desired position, and then select Save.
An event is evaluated against each rule condition, in order, until a condition returns True. Each clause in the selected rule is then evaluated. If one of these clauses returns a decision, no further rules are evaluated. If none of these clauses returns a decision, either the transaction is approved by default, or the next published rule that has a matching condition is evaluated. The behavior depends on the rule evaluation behavior that is selected in the rule settings.
Create a new rule
You can create rules that make decisions that are related to purchase, account creation, and account login events.
Important
By default, when a new rule is published, it appears at the bottom of the list in the Published Rules section of the Rules tab. For information about how to reposition the rule, see the Change the order of a rule section later in this article.
On the Rules tab, select New Rule.
A new draft rule is created. All changes that you make to your drafts are automatically saved.
Select Rename, and then enter a name and description.
Add a condition to your rule.
Add clauses to express your business policies and fraud strategies.
- To create a new clause from scratch, select New clause in the appropriate clause section.
- You can also start from an existing clause template by selecting the arrow to the right of New clause. To view a full list of templates and their contents, select See all.
To evaluate your rule and make sure that it works as you expect, select Expand in the lower right of the Rules tab to open the rule evaluation pane.
To publish your rule, select Publish. In the confirmation dialog box, change the name, description, and status, and then select Publish.
Set the status to either Active or Inactive.
To reposition the rule in the list on the Rules tab, select the rule, drag it to its new position, and then select Save order.
System-defined (default) rules
Fraud Protection may create rules per environment. For example, the following default rule may be created.
- Default Support Rule
Some Fraud Protection functionality relies on default rules. After you add an email, IP address, or other known list content to a support list (safe, watch, or reject), this default rule ensures that the lists are checked during assessment evaluation.
You can edit, delete, and deactivate system-defined rules. As a best practice, consider creating or editing a different rule unless you want to change the default behavior.
Assessment (default) rules
Each assessment template mentioned in the Select template step of the Assessment wizard comes predefined with one or both of the following default rules:
- Sample template rule – This rule contains a series of sample clauses that serve as the building blocks for defining your own logic for making decisions based on values like risk score, bot score, and device attributes where applicable. None of these clauses make decisions by default, however they can quickly be altered to do so using the samples provided.
- Support list rule – This rule consists of a series of clauses that use Fraud Protection’s support lists (safe, block, watch) to help you make informed decisions (accept, reject, review) based on entities in those lists.
Where applicable, these default rules show up as active under Published Rules immediately after an assessment is created. The following table is a summary of the default rules supported by assessment template:
| Template | Template rule | Support list rule |
|---|---|---|
| Card payment | Supported | Supported |
| Device fingerprinting | Supported | N/A |
| Loyalty program | Supported | Supported |
| Money transfer | Supported | Supported |
| Software piracy | Supported | Supported |
| Custom | N/A | Supported |
Additional rules and clauses can be manually added to an assessment in both its root and child environments.
To invoke Fraud Protection’s risk and bot scores from within a rule for an assessment created using one of the templates, the following Model functions must be used:
- Risk score: Model.Risk().Score
- Bot score: Model.Bot(@"deviceFingerprinting.id").Score
Branches
Branches allow you to safely modify rules without impacting what is happening in production. You can create branches on the Rules tab, where each branch represents a collection of rules. The default branch is the Production branch, which is the branch of rules that is executed whenever traffic is sent to an assessment.
Create a branch
To create a new branch, go to Branch action > Create a new branch. You can name the branch, provide an API name, and select which rules you want to copy over from the source branch. The source branch is whatever branch you were on when you selected Create a new branch, production or otherwise. No drafts are preserved during branch creation.
Modify rules within branches
Any rule changes to nonproduction branches don't affect the production rule stack. You can edit rules normally and publish them to the branch, where they can be seen by everyone who has access to the rules page.
Testing and experiments
There are two ways to test branch rule behavior: sending traffic directly to a branch and shadowing production traffic.
Send traffic directly to a branch
You can send test traffic directly to a specific branch in an assessment using the branch API endpoint found under Branch actions > Branch information. This API endpoint uses the same payload structure as the assessment, and executes the rule stack of the branch.
Note
Sending traffic directly to a branch has no impact on production, so velocities aren't updated and branch transactions aren't visible in search.
Shadow production traffic
You can also test branch rule behavior by shadowing production traffic. To shadow production traffic, set up and start an experiment for a branch by selecting on Run experiment. Once an experiment is in progress, you can view its performance on the Monitoring tab by switching to the branch the experiment is running in. Once an experiment is in progress, its parameters can't be edited, but you can always stop an experiment to make changes and start it again. On the payment service provider (PSP) navigation view, the Branch actions drop-down menu is only visible on the rules page, not on the monitoring page.
Note
Shadowed traffic that executes on the branch rule stack doesn't have any impact on production, so velocities won't be updated twice as a result of the shadow, but only updated once as a result of the production execution.
Promote branches to production
If you want to make a branch the production branch, you can do so by promoting a branch to production. The promotion action can be found under Branch actions > Promote to production. This action makes the current branch you're promoting the new production branch. You can clone the existing production rules in a new branch to save them for reference. Drafts are preserved if the option to clone is selected. Once the promotion completes, the production branch is updated to contain the rules of the promoted branch.
Note
The first time you promote a branch to production for a given assessment, you'ren't able to clone the existing production rules in a new branch. If you want to save the existing production rules the first time you ever promote, make a new branch from production with those rules to preserve existing production rules.
Manage existing rules
On the Rules tab, you can perform the following operations on an existing rule:
Update the name and description of a rule
To update the name and description of a rule, select the rule, select Rename, and then enter a unique name and description.
Change the status of a rule
To change the status of a rule, select the rule, and then select Activate or Deactivate.
Delete a rule
To delete a rule, select it, and then select Delete. This operation can't be undone.
Edit an existing rule
When you edit a rule that is published, Fraud Protection saves your changes as a draft until you publish them. Both the published version of the selected rule and the draft version can be viewed as side-by-side tabs. Until a draft is published, it's visible only to the person who creates it. For more information, see the Drafts section earlier in this article.
Select the rule, and then select Edit.
The Draft tab and the Published tab appear.
Select the Draft tab, and then make your changes to the rule.
Fraud protection automatically saves all changes that you make to the rule.
To discard your changes, select Discard. Fraud Protection deletes the draft but retains the original published rule.
To publish your changes, select Publish.
When you publish a draft, Fraud Protection overwrites the original published version of the rule with the changes that you made in the draft version.
If a teammate updates and publishes a rule while you're still editing it, your changes might be out of date. In this case, you receive a warning message that asks whether you still want to publish your changes.
- If you select Publish, your changes overwrite all changes that were previously made.
- If you select Cancel, you can review the changes that other people made before you publish your version.
Search for a rule
When you search for a rule, all rule names and descriptions are searched, and the results are filtered accordingly.
To search for a rule, enter a keyword in the Search field.
To remove a filter, delete the keyword from the Search field, or select the X on the right side of the field.
Change the order of a rule
Because published rules appear on the Rules tab in the order that they're run in, the position of a published rule significantly affects how events are evaluated.
Reorder a published rule
- Select the published rule that you want to move, and drag it to a new position.
- Repeat step 1 for every rule that you want to move, and then select Save.
- To cancel your changes, select Cancel.
Note
Rules in the Drafts section can't be reordered.
Evaluate a rule
Before you publish your new rule, you can use the rule evaluation pane to make sure that it returns the results that you expect.
- To open the rule evaluation pane, select Expand in the lower right of the Rules tab.
- To close the pane, select Collapse.
When the evaluation pane is open, you can watch your rule being is evaluated against the current payload sample and score sample. As you make changes to the sample, or to the rule itself, the content in the evaluation pane is updated.
The evaluation pane shows the decision that Fraud Protection returns for the sample event. It also shows any values that are associated with the response, such as a reason or a support message. The clause that triggers the decision is outlined in green outside the pane.
If the payload sample doesn't match the condition, the rule isn't evaluated. If the condition is matched, but none of the clauses triggers a return, the default decision is Approve, and the reason is NO_CLAUSE_HIT.
Evaluation example
Create a rule that has the following three clauses.
`// Approves when email from contoso domain has been validated`
`RETURN Approve()`
`WHEN @"email.isEmailValidated" == true && @"email.emailValue".EndsWith("@contoso.com")`
`// Rejects when email has not been validated and high risk score`
`RETURN Reject()`
`WHEN @"email.isEmailValidated" == false && @"riskscore" > 700`
`// Reviews when email has not been validated and medium risk score`
`RETURN Review()`
`WHEN @"email.isEmailValidated" == false && @"riskscore" > 400`
The payload sample contains the following object.
"email": {
    "email": "Primary",
    "emailValue": "kayla@contoso.com",
    "isEmailValidated": true,
    "emailValidatedDate": "2020-02-25T15:12:26.9733817-08:00",
    "isEmailUsername": true
},
The score sample contains the following value.
"riskScore": 500,
When the evaluation pane is expanded, clause 1 is triggered, and a decision of Approve is returned.
In the sample payload, you change the value of the isEmailValidated field in the payload from true to false.
"isEmailValidated": false,
In this case, clause 2 is triggered, and a decision of Review is returned.
In the sample score, if you change the value of "riskScore" from 500 to 700, clause 3 is triggered, and the decision is updated to Reject.
Feedback
Coming soon: Throughout 2024 we will be phasing out GitHub Issues as the feedback mechanism for content and replacing it with a new feedback system. For more information see: https://aka.ms/ContentUserFeedback.
Submit and view feedback for