Design the production floor execution interface
You can design the content of the user interface for each configuration used by the production floor execution interface. For example, workers in one work cell might need to be able to open job instructions on the production floor, while in another work cell, instructions are not needed. In that case, two configurations should be created, one with a button for opening document attachments and one without this button.
Design a tab
On the Configure production floor execution page, you can create and configure tabs by selecting Design tabs on the Action Pane.
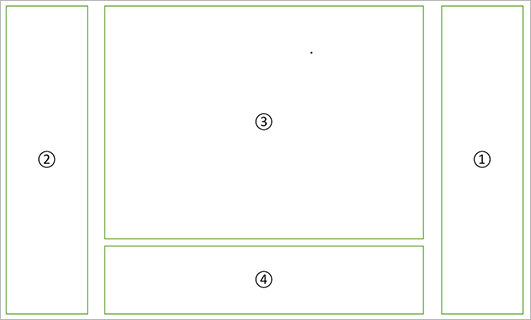
Each tab is divided into four sections, as shown in the following illustration.

The following elements are shown in the illustration:
- Primary toolbar
- Secondary toolbar
- Main view
- Detailed view
To create and configure a new tab, follow these steps:
Go to Production control > Setup > Manufacturing execution > Configure production floor execution.
Select Design tabs on the Action Pane to open the Design tabs page.

Select New on the Action Pane.
Make the following settings in the header of the page:
- Tab name – Specify a name for the tab.
- Main view – Select among the predefined job lists (Active jobs, All jobs, My jobs, and My machine).
- Details view – Select between a blank value or Job details. If you select the blank value, there will be no detailed view in the tab. If you select Job details, the detailed view will contain a detailed description of the job selected in the job list in the main view.
In the Primary toolbar section, choose which buttons should be available in the primary toolbar. The Available actions column shows a list of all the buttons that can be added. The Selected actions columns shows a list of all the buttons that are included in the current configuration. Use the buttons between the columns to move selected items between the columns as needed. Use the up and down buttons next to the Selected actions column to control the order in which the buttons are presented in the user interface.
In the Secondary toolbar section, choose which buttons should be available in the secondary toolbar. The Available actions column shows a list of all the buttons that can be added. The Selected actions columns shows a list of all the buttons that are included in the current configuration. Use the buttons between the columns to move selected items between the columns as needed. Use the up and down buttons next to the Selected actions column to control the order in which the buttons are presented in the user interface.
Associate a tab with a configuration
After you designed all the tabs you need, you can associate them with a configuration.
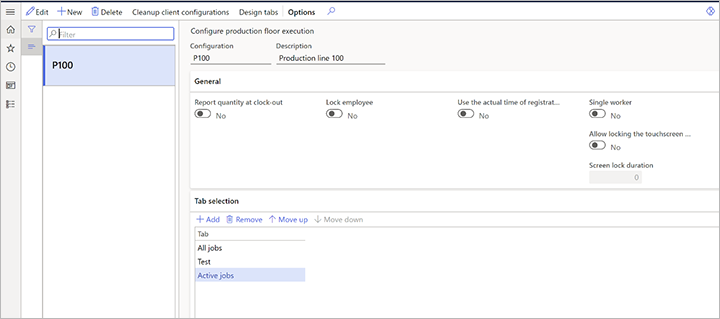
Go to Production control > Setup > Manufacturing execution > Configure production floor execution.

On the Tab selection FastTab, select Add.
A new row is added to the grid. For this new row, select the name of a tab that you want to add to the configuration.
Continue to add additional tabs as needed.
Use the Move up and Move down buttons on the toolbar to arrange the tabs as needed. The tabs will be displayed from left to right in the order shown in the above screenshot (the tab at the top is shown on the left).
Feedback
Coming soon: Throughout 2024 we will be phasing out GitHub Issues as the feedback mechanism for content and replacing it with a new feedback system. For more information see: https://aka.ms/ContentUserFeedback.
Submit and view feedback for