Modify a workspace with a tile, list, and data cache
In this tutorial, you will create a new tile and include it in the summary section of a workspace, build a new list for a workspace, and create a data cache for the list in the workspace.
Prerequisites
For this tutorial, you must access the environment by using Remote Desktop, and you must be provisioned as an administrator on the instance. For more information, see Deploy and access development environments.
Key concepts
- Learn about and use form patterns that are related to workspaces.
- Create a new tile, and include it in the Summary section of a workspace.
- Build a new list for a workspace.
- Create a data cache for the list in the workspace.
Setup
Import the tutorial project and transactional data
Use Microsoft Visual Studio to import the tutorial project. The tutorial project includes the artifacts that you will use to complete this tutorial. Use Visual Studio to open the FMTutorial project and load the data for the tutorial. You will use the FMTDataHelper class to load data for the Fleet Management tutorial. If this is the first tutorial that you’re working on, review Deploy and access development environments, and make sure that you provision your administrator user if you’re working on a local virtual machine (VM).
Download the FMTutorialDataModel.axpp file from the Microsoft Dynamics Lifecycle Services (LCS) methodology, and copy it to the Downloads folder of the VM.
On the desktop, double-click the Visual Studio shortcut to open the development environment.
On the Dynamics 365 menu, click Import Project.
In the Import Project dialog box, next to the File name field, click the ellipsis (...) button.
In the Select the file to import dialog box, browse to the Downloads folder, click FMTutorialDataModel.axpp, and then click Open.
Select the Overwrite Elements check box and the Current solution option. The following illustration shows the completed Import Project dialog box.

Click OK.
In Solution Explorer, expand Classes, and then, under the FMTutorial project, right-click FMTDataHelper, and then click Set as Startup Object.
On the Build menu, click Rebuild Solution. Use the rebuild to make sure that all the files in the project are built, regardless of timestamps. You can view the build progress in the Output window.
After the build is completed, press Ctrl+F5 to run the project. The browser opens and runs the class that imports the data.
Open the FMTutorial project
Use Visual Studio to open the FMTutorial project. If you have Visual Studio open and have already loaded the FMTutorial project, you can continue to the next section.
- If the development environment isn’t already open, on the desktop, double-click the Visual Studio shortcut to open it.
- On the File menu, click Open > Project/Solution.
- In the Open Project dialog box, browse to Documents > Visual Studio 15.0 > Projects, select the FMTutorial solution, and then click Open.
- The FMTutorial project appears in Solution Explorer.
Exercise 1: Understand the operational workspace pattern
Before you start to make adjustments to FmtClerkWorkspace form, you will look at the current state of the form to better understand what content is already there and how that contents fits the Operational Workspace pattern.
In Solution Explorer, double-click the FmtClerkWorkspace form to open it in the designer.
Click the Design node.
Click the Pattern tab. Operational workspaces have an optional Action Pane and optional filter group (as indicated by the 0..1 notation to the left of those nodes). However, the panorama-style tab is required by this pattern. The Patterns tab shows that the PanoramaBody control matches the required Tab in the pattern, but there are no corresponding controls for the optional items at this level of the pattern.
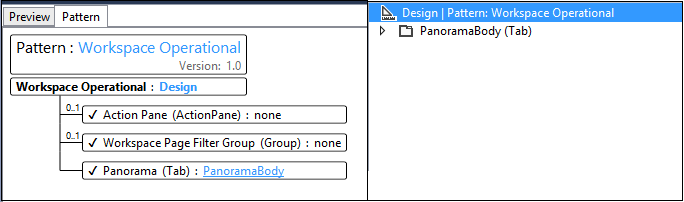
Click PanoramaBody.
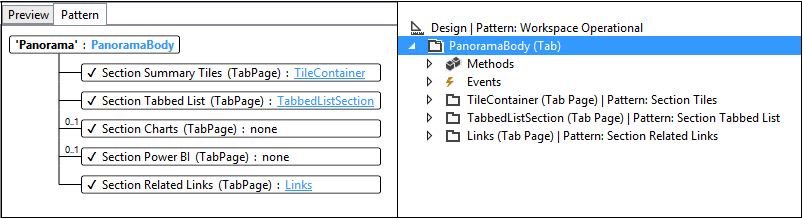
All workspaces have three required sections:
- Summary section – This section is intended to contain tiles or form parts, which correspond to a card or chart.
- Tabbed list – This section consists of one or more lists of data that is relevant to the user’s work. Only one list is shown at a time, and each list can optionally include local filters and actions. Individual lists are modeled inside form part controls.
- Related links – This section consists of important or commonly used links for this activity or persona.
Operational workspaces can optionally include a panorama section that contains up to two charts (the Section Charts tab page) and a Power BI section.
View the workspace
In Solution Explorer, right-click the FmtClerkWorkspace form, and then click Set as Startup Object.
Press Ctrl+F5 to build and run the form. The form opens in your web browser.

Exercise 2: Create a new tile for the workspace
Now that you understand the content structure of a workspace, you will see how to add content to a workspace. For example, one important piece of information for this workspace might be the number of rentals that are currently in progress. In this section, you will add the required metadata to add a new tile to the Summary section of the FmtClerkWorkspace form to show this information. To make this tile work correctly, you will have to add four metadata artifacts: a query, a menu item, a tile, and a tile button.
Add a query that retrieves current rentals
All tiles require a backing query to retrieve the correct information.
In Solution Explorer, in the FMTutorial project, right-click the Queries folder, point to Add, and then click New item.
Click Dynamics 365 Items > Data Model > Query. For the Name property, enter FMTRental_Current.
Click Add.
If the new FMTRental_Current query isn’t already open in the designer, double-click it in Solution Explorer.
In the designer, right-click Data Sources, and then click New Data Source.
In the Properties window, set the following properties.
Property Value Table FMTRental Dynamics Fields Yes Right-click Ranges, and then click New Range.
In the Properties window, set the following properties.
Property Value Field State Value InProgress Right-click Order By, and then click New Field.
In the Properties window, set the following properties.
Property Value Direction Descending Data Source FMTRental Field StartDate Press Ctrl+S to save.
Add the corresponding menu item
In Solution Explorer, in the FMTutorial project, right-click the Menu items folder, point to Add, and then click New item.
Click Dynamics 365 Items > User Interface > Display menu item. Set the Name property to FMTRental_Current.
Click Add.
If the new FMTRental_Current menu item isn’t already open in the designer, double-click it in Solution Explorer.
In the Properties window, set the following properties.
Property Value Label @FMT197 This value corresponds to “Current rentals”. Object FMTRental Query FMTRental_Current Press Ctrl+S to save.
Add a tile
In Solution Explorer, in the FMTutorial project, right-click the Tiles folder, point to Add, and then click New item.
Click Dynamics 365 Items > User Interface > Tile. Set the Name property to FMTCurrentRentalsTile.
Click Add.
If the new FMTRental_Current tile isn’t already open in the designer, double-click it in Solution Explorer.
In the Properties window, set the following properties.
Property Value Size ShortWide Menu Item Name FMTRental_Current Type Count Press Ctrl+S to save.
Tiles also have a refresh frequency property that controls how often the counts on the tiles are automatically updated. The value that is set for this property should be based on the demand for updated counts, together with query execution speed against volume data. For guidance about how to set this property, see Tile and List Caching for Workspaces. For this lab, the default value of 10 minutes will be enough.
Add a tile button to the workspace form
In Solution Explorer, double-click the FmtClerkWorkspace form to open it in the designer.
Right-click Design > PanoramaBody > TileContainer, point to New, and then click Tile Button.
Press Alt+Up arrow four times to move the tile button to the top of TileContainer.
In the Properties window, set the following properties.
Property Value Name FMTCurrentRentalsTile Tile FMTCurrentRentalsTile Press Ctrl+S to save.
View the new tile on the workspace
Use Visual Studio to build and run the updated FmtClerkWorkspace form.
In Solution Explorer, right-click the FmtClerkWorkspace form, and then click Set as Startup Object.
Press Ctrl+F5 to build and run the form. The form opens in your web browser.
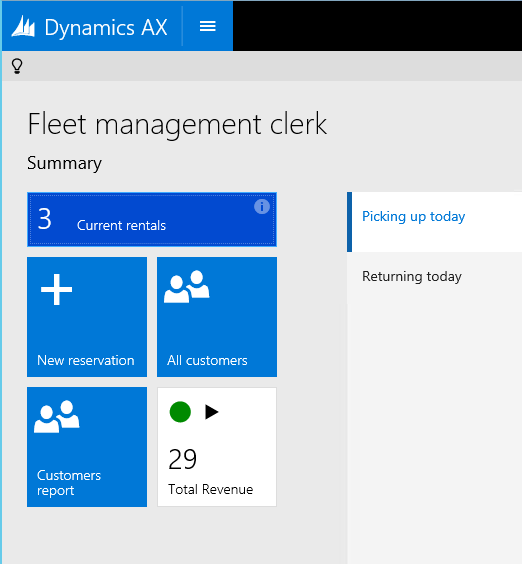
Click the Current rentals tile. You go to the Rentals page, which should be filtered to the three current rentals.
Click the Back button or the Close button to return to the workspace.
Click on the small i button in the upper-right corner of the Current rentals tile. You see information about how current the data in the tile is. Additionally, a link is provided that you can use to manually refresh the tile to view updated data.
View tile data cache values at run time
A system administrator can modify tile cache parameters at run time by using the Tile data cache configuration page.
Click in the navigation search field on the navigation bar.
Type Tile data, and then click Tile data cache configuration in the search results.
Find the FMTCurrentRentalsTile record.
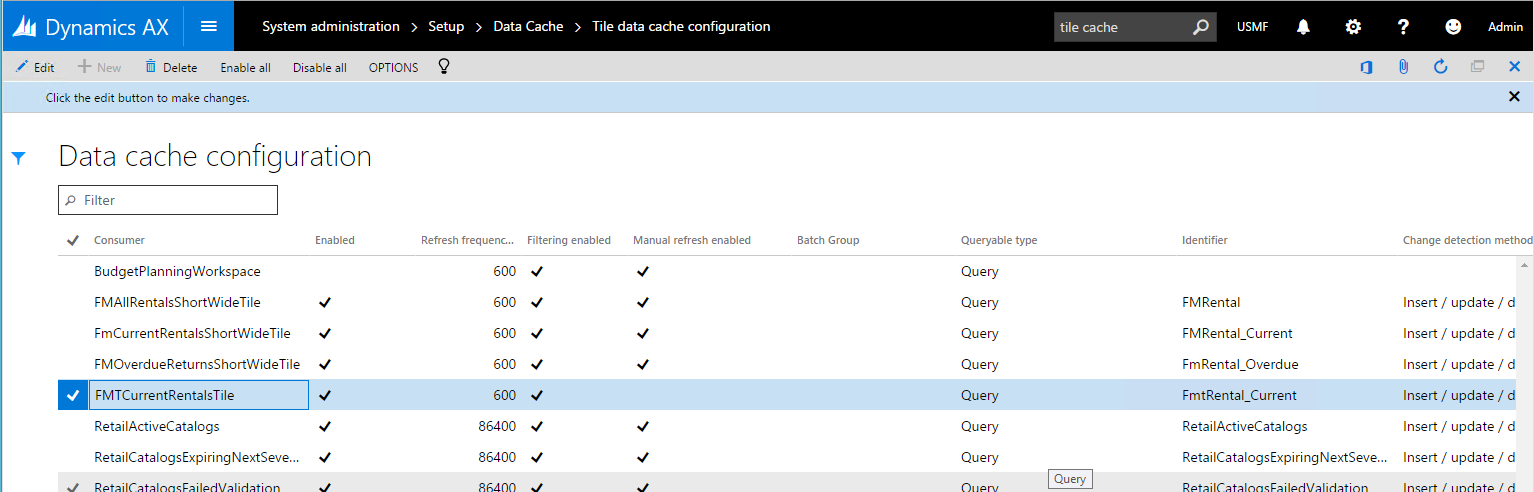
From this page, the system administrator can perform several run-time modifications to a tile cache. For example, the system administrator can enable/disable the data cache, modify the refresh frequency, and enable/disable the ability to manually refresh the count tile. Note that tile caches are registered when a form that has a tile is first opened. Therefore, the list of tiles that is shown in your environment might differ from the list in the preceding illustration.
Exercise 3: Create a new tabbed list in the workspace
Next, you will next see how to include an additional list in the workspace. This section will give you some experience with building forms and will also expose you to form patterns. You will add a list of available vehicles, so that you will be able to initiate a new rental by selecting an available vehicle. In this section, you will just add the new list to the new workspace but won't add the action to initiate the rental. To add this list, you will have to complete the following tasks:
- Add a new tab page to the workspace.
- Add a new form that has the list content.
- Add a new menu item that points to the new form.
- Add a new query to limit the vehicles to available vehicles.
Add space in the workspace for a new list
In Solution Explorer, double-click the FmtClerkWorkspace form to open it in the designer.
Right-click Design > PanoramaBody > TabbedListSection > TabbedLists, and then click New Tab Page.
In the Properties window, set the following properties.
Property Value Name AvailableVehiclesContainer Caption @FMT199 This value corresponds to “Available vehicles”. Right-click AvailableVehiclesContainer, point to New, and then click Form Part. Form Part is the only control type that the Operational Workspace pattern allows here. This control will be used to link to the form that you will build to hold the content for this section.
In the Properties window, set the Name property to AvailableVehiclesPart.
Press Ctrl+S to save.
Add a new form that has the new workspace content
In Solution Explorer, in the FMTutorial project, right-click the Forms folder, point to Add, and then click New item.
Click Dynamics 365 Items > User Interface > Form. Set the Name property to FMTAvailableVehicles.
Click Add.
If the new FMTAvailableVehicles form isn’t already open in the designer, double-click it in Solution Explorer.
Add the FmtVehicle table as a data source for the form.
Right-click Data Sources, and then click New Data Source.
Click the new data source node. In the Properties window, set the following properties.
Property Value Table FMTVehicle Name FMTVehicle Note: Be sure to specify the value for the Table property first. This property is automatically updated so that it uses the same value.
Add the FmtVehicleModel table as a second data source for the form.
Right-click Data Sources, and then click New Data Source.
Click the new data source node. In the Properties window, set the following properties.
Property Value Table FMTVehicleModel Name FMTVehicleModel Note: Be sure to specify the value for the Table property first. This property is automatically updated so that it uses the same value. Join Source FMTVehicle Link Type Inner Join
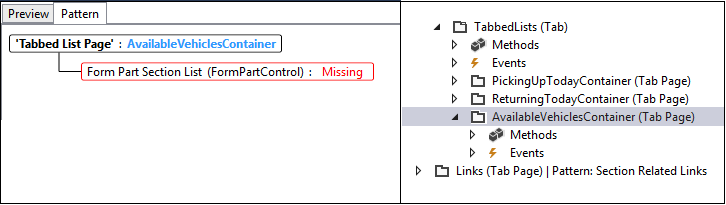
Notice the Pattern: <select> notation next to Form Design. This indicates the required pattern for this node. Right-click Design, point to Apply pattern, and then click Form Part Section List. This form pattern is typically used by workspace lists.
Click the Pattern tab to see the expected content for this pattern. This information will help guide you as you create content for the form. Note: In the future, we plan to provide a mechanism for automatically creating a form structure, based on a selected form pattern.

In particular, this pattern looks for the following elements:
- An optional header group that contains any filters and actions that are required for this workspace list.
- A required grid. As the red border in the preceding illustration indicates, the patterns engine can't currently find this element.
- An optional default action, which can provide navigation to a backing form for an individual record in the grid.
- An optional button that takes the user to a backing form that shows the full list of items in this section.
Right-click Design, point to New, and then click Grid.
In the Properties window, set the following properties. Note: The grid that we are building will contain cards and will be two cards wide.
Property Value ExtendedStyle cardList Multi Select No Style List Data Source FMTVehicle Name VehicleList Visible Columns Mode Fixed Visible Columns 2 Right-click the VehicleList grid, point to New, and then click Group.
In the Properties window, set the Name property to VehicleCard.
Right-click the VehicleCard group, point to Apply pattern, and then click Business Card – Three Fields.
Right-click the VehicleCard group, point to New, and then click Image.
In the Properties window, set the following properties.
Property Value Data Source FMTVehicleModel Data Method vehicleImage Expand Data Sources > FMTVehicle > Fields.
Drag the VehicleId and DisplayRelationType fields into the VehicleCard group.
Right-click Design, point to New, and then click Group. Update the new group's Name property to HeaderGroup.
The new HeaderGroup element requires a subpattern, because there are two variants for the arrangement of filters and actions in these sections. Right-click HeaderGroup, point to Apply pattern, and then click Filters and Toolbar – Inline.
Right-click HeaderGroup, point to New, and then click Group. Update the new group’s Name property to FilterGroup.
Right-click FilterGroup, point to New, and then click QuickFilter.
In the Properties window, set the following properties.
Property Value Name VehicleQuickFilter Target Control VehicleList Press Ctrl+S to save.
Add a new query that limits the data to available vehicles
In Solution Explorer, in the FMTutorial project, right-click the Queries folder, point to Add, and then click New item.
Click Dynamics 365 Items > Data Model > Query. Set the Name property to FMTAvailableVehicles.
Click Add.
If the new FMTAvailableVehicles query isn’t already open in the designer, double-click it in Solution Explorer.
In the designer, right-click Data Sources, and then click New Data Source.
In the Properties window, set the following properties.
Property Value Table FMTVehicle Dynamics Fields Yes Right-click Ranges, and then click New Range.
In the Properties window, set the following properties.
Property Value Field Status Value Available Press Ctrl+S to save.
Add a new menu item that references the new form
In Solution Explorer, in the FMTutorial project, right-click the Menu items folder, point to Add, and then click New item.
Click Dynamics 365 Items > User Interface > Display menu item. Set the Name property to FMTAvailableVehicles.
Click Add.
If the new FMTAvailableVehicles menu item isn’t already open in the designer, double-click it in Solution Explorer.
In the Properties window, set the following properties.
Property Value Object FMTAvailableVehicles Query FMTAvailableVehicles Press Ctrl+S to save.
Link the new list to the workspace
- In Solution Explorer, double-click the FmtClerkWorkspace form to open it in the designer.
- Click Design > PanoramaBody > TabbedListSection > TabbedLists > AvailableVehiclesContainer > AvailableVehiclesPart.
- In the Properties window, set the Menu item name property to FmtAvailableVehicles.
View the new menu item
Use Visual Studio to build and run the updated FmtClerkWorkspace form.
In Solution Explorer, right-click the FmtClerkWorkspace form, and then click Set as Startup Object.
Press Ctrl+F5 to build and run the form. The form opens in your web browser.
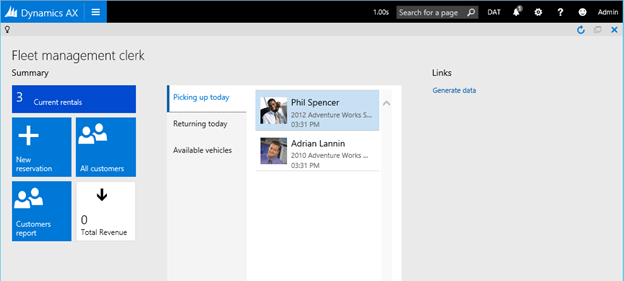
Click the Available vehicles tab to see the new list.
Click in the QuickFilter, type Lit, and then press Enter to filter down to Litware model vehicles that are available.
Exercise 4: Create a backing data cache for a list
For lists that have expensive queries, or lists where multiple users might use and work from the same workspace, consider caching the list to improve performance. In this section, you will add the necessary artifacts to create a data cache for a list. These artifacts include a query that maps fields to the cache, a table that holds the cache, and a class that provides the mapping between the query and the table. You will then uptake this cache on one of the tabbed lists in the workspace.
Add a query that maps fields to the data cache
The first step is to build a query that will be used to populate the cache table. This query should include all the tables that you want to get your cache data from, and it should limit the results to those records/columns that you want cached.
In Solution Explorer, in the FMTutorial project, right-click the Queries folder, point to Add, and then click New item.
Click Dynamics 365 Items > Data Model > Query. Set the Name property to FMTPickupAndReturnQuery.
Click Add.
If the new FMTPickupAndReturnQuery query isn’t already open in the designer, double-click it in Solution Explorer.
In the designer, right-click Data Sources, and then click New Data Source.
In the Properties window, set the following properties.
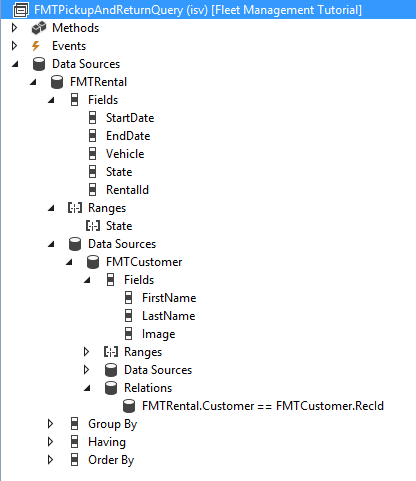
Property Value Table FMTRental Dynamics Fields No Add the following five fields to the FMTRental data source. For each field, right-click Fields, point to New, and then click Field. In the Properties window, set the Field property as appropriate.
- StartDate
- EndDate
- Vehicle
- State
- RentalId
Right-click Ranges, and then click New Range.
In the Properties window, set the following properties.
Property Value Field State Value 1..2 Note: This value will cache rentals that are Ready for Pickup or In Progress. Under FMTRental, right-click Data Sources, and then click New Data Source.
In the Properties window, set the following properties.
Property Value Table FMTCustomer Dynamics Fields No Add the following three fields to the FMTCustomer data source. For each field, right-click Fields, point to New, and then click Field. In the Properties window, set the Field property as appropriate.
- FirstName
- LastName
- Image
Right-click Relations, and then click New Relation.
In the Properties window, set the following properties.
Property Value Join Data Source FMTRental Field Customer Related Field RecID The query that you've constructed should match the following illustration.
Press Ctrl+S to save.
Add a cache table
The second step is to define a table that has the fields that are returned from the cache query. You must also add a SysDataCacheContextId field that will be used to map the cache row to the base framework cache tables. Additionally, you should also define any required relations between this table and other tables, and also any data methods that you require that involve the cached fields.
In Solution Explorer, in the FMTutorial project, right-click the Tables folder, point to Add, and then click New item.
Click Dynamics 365 Items > Data Model > Table. Set the Name property to FMTPickupAndReturnTableCache.
Click Add.
If the new FMTPickupAndReturnTableCache table isn’t already open in the designer, double-click it in Solution Explorer.
In the designer, right-click Fields, and then add the following fields. For each field, the following table shows the data type and the extended data type (EDT) or enum type.
Field type Field name EDT/enum type String FirstName FirstName (EDT) String LastName LastName (EDT) Container Image Bitmap (EDT) Int64 Vehicle FMTVehicleRecId (EDT) Utc Date Time StartDate StartDateTime (EDT) Utc Date Time EndDate EndDateTime (EDT) Int64 SysDataCacheContextId SysDataCacheContextId (EDT) Enum State FMTReservationState (Enum) String RentalId FMTRentalId (EDT) In the designer, right-click Relations, point to New, and then click Relation.
In the Properties window, set the following properties.
Property Value Name FMTRental Related Table FMTRental Right-click the FMTRental relation, point to New, and then click Normal.
In the Properties window, set the following properties.
Property Value Field RentalId Related Field RentalId In the designer, right-click Mappings, and then click New.
In the Properties window, set the Map property to SysDataSetCacheTableMap.
Click Id. In the Properties window, set the Map Field To property to RecId.
Click SysDataCacheContextId. In the Properties window, set the Map Field To property to SysDataCacheContextId. Note: If the field doesn't appear in the list, you might have to save the table first, by pressing Ctrl+S.
Press F7 to view the table’s code. Alternatively, right-click FMTReturnAndPickupTableCache, and then click View Code.
Add the following display methods to the table. The form will use these methods later.
public display FMTName fullName()
{
    return this.FirstName + ' ' + this.LastName;
}
public display container customerImage()
{
    ImageReference imgRef;
    container imgContainer = this.Image;
    if(imgContainer == connull())
        {
            imgRef = ImageReference::constructForSymbol("Person");
            imgContainer = imgRef.pack();
        }
        return imgContainer;
}
public display str rentalVehicle()
{
    FMTVehicle vehicle;
    str value;
    if(this.Vehicle == 0)
    {
        value = "No vehicle assigned";
    }
    else
    {
        select vehicle where vehicle.RecId == this.Vehicle;
        value = vehicle.Description;
    }
    return value;
}
Press Ctrl+S to save.
Adding a cache class that links the query and table
The third step is to create a class that defines the relationship between the cache query and the catch table.
In Solution Explorer, in the FMTutorial project, right-click the Classes folder, point to Add, and then click New item.
Click Dynamics 365 Items > Code > Class. Set the Name property to FMTPickupAndReturnClass.
Click Add.
If the new FMTPickupAndReturnClass class isn’t already open in the designer, double-click it in Solution Explorer.
Add the following code to the class.
[SysDataSetExtension(classStr(FMTPickupAndReturnClass)), // The name of this class
SysDataSetCacheTableExtension(tableStr(FMTPickupAndReturnTableCache))] // The name of the cache table
class FMTPickupAndReturnClass extends SysDataSetQuery implements SysIDataSet
{
    public SysDataCacheRefreshFrequency parmRefreshFrequency()
    {
        return 600; // Cache refresh frequency, in seconds.
    }
    public SysQueryableIdentifier parmQueryableIdentifier()
    {
        return queryStr(FMTPickupAndReturnQuery); // The name of the query.
    }
    public SysDataCacheTypeId parmCacheTypeId()
    {
        return tableNum(FMTPickupAndReturnTableCache); // The name of the table.
    }
    public static FMTPickupAndReturnClass construct()
    {
        return new FMTPickupAndReturnClass();
    }
}
Press Ctrl+S to save.
Uptake the data cache on a list in the workspace and table
After you've set up the data cache, you can start to use the cache in your forms. In this section, you will update one of the workspace lists so that it uses the data cache.
In Solution Explorer, double-click the FMTReturningTodayPart form to open it in the designer.
Expand the Data Sources node.
Delete the FMTCustomer data source.
Click the FMTRental data source. In the Properties window, set the Table property to FMTPickupAndReturnTableCache.
Click Design > ReturningTodayGrid. In the Properties window, set the Data Source property to FMTPickupAndReturnTableCache.
Inside ReturningTodayGrid, click CustomerImage. Update the Data Source property to FMTPickupAndReturnTableCache and the Data Method property to customerImage.
Inside ReturningTodayGrid, click FirstNameCopy1. Update the Data Source property to FMTPickupAndReturnTableCache and the Data Method property to fullName.
Press F7 to view code for the form.
Instrument the form so that it can react to data caching, as shown in the following code.
[Form]
public class FMTReturningTodayPart extends FormRun implements SysIDataSetConsumerForm
{
    public void registerDatasourceOnQueryingEvent()
    {
        FMTPickupAndReturnTableCache_DS.OnQueryExecuting +=
            eventhandler(this.parmDataSetFormQueryEventHandler().prepareDataSet);
    }
}
Press Ctrl+S to save.
Update the action above the list so that it works with the cache table
Actions that are performed from the workspace might expect records from the base tables. Therefore, these actions might have to be updated so that they work with the cache table. In this example, the FmtCompleteRecord form currently expects a FMTRental record as context. Therefore, this form must be updated so that it works correctly with either a base rental record or a cache table record as context.
In Solution Explorer, double-click the FmtCompleteRental form to open it in the designer.
Press F7 to view the form’s code.
public void init()
{
    //If this form was opened with a Rental as context
    if(element.args() != null && element.args().record() != null && element.args().record().TableId == tablenum(FMTRental))
    {
        //Get the Rental context
        rentalDS = FormDataUtil::getFormDataSource(element.args().record());
        rental = element.args().record();
        if(rental != null)
        {
            select firstonly forupdate vehicle where vehicle.RecId == rental.Vehicle;
        }
    }
    super();
}
Update the init() method so that it matches the following code.
public void init()
{
    //If this form was opened with a record context
    if(element.args() != null && element.args().record() != null))
    {
        //Get that context
        rentalDS = FormDataUtil::getFormDataSource(element.args().record());
        if(element.args().record().TableId == tableNum(FMTPickupAndReturnTableCache))
        {
            FMTPickupAndReturnTableCache cacheRecord = element.args().record();
            select firstonly forupdate rental where rental.RentalId == cacheRecord.RentalId;
        }
        else if(element.args().record().TableId == tableNum(FMTRental))
        {
            rental = element.args().record();
        }
        if(rental != null)
        {
            select firstonly forupdate vehicle where vehicle.RecId == rental.Vehicle;
        }
    }
    super();
}
Press Ctrl+S to save.
Update the Returning today query so that it works with the cache table
- In Solution Explorer, double-click the FmtRental_ReturningToday query to open it in the designer.
- Expand the Data Sources node, and then click FMTRental.
- In the Properties window, update the Table property to FMTPickupAndReturnTableCache. Note: The Name property should be updated automatically to the same value.
- Press Ctrl+S to save.
View the updated query
Use Visual Studio to build and run the updated FmtClerkWorkspace form.
- In Solution Explorer, right-click the FmtClerkWorkspace form, and then click Set as Startup Object.
- Press Ctrl+F5 to build and run the form. The form opens in your web browser.
- Click the Returning today vertical tab.
- Click Complete rental for the second record in the list.
- Set End Mileage to 200, and then click OK. Notice that the rental that you just returned still appears in the list.
Make sure that your workspace is responsive
You must make sure that your lists remain up to date after a user performs an action that should remove a record from the list (for example, the user completes a rental). In this section, we will instrument that action to help guarantee that the workspace reacts appropriately.
In Solution Explorer, double-click the FmtCompleteRental form to open it in the designer.
Press F7 to view the code for the form.
Locate the clicked() code for OKButton. Near the end of this method is a research call on the calling form’s data source. Just before that line of code, add the following if statement to delete the processed rental from the cache table.
. . .
if(rentalDS.table() == tableNum(FMTPickupAndReturnTableCache))
{
    //Delete updated record from backing cache
    FMTPickupAndReturnTableCache cacheRecord = element.args().record();
    cacheRecord.delete();
}
rentalDS.research(true);
}
Press Ctrl+S to save.
View the updated form
Use Visual Studio to build and run the updated FmtClerkWorkspace form.
- In Solution Explorer, right-click the FmtClerkWorkspace form, and then click Set as Startup Object.
- Press Ctrl+F5 to build and run the form. The form opens in your web browser.
- Click the Returning today vertical tab.
- Click Complete rental for the second record in the list.
- Set End Mileage to 100, and then click OK. Notice that the rental that you just returned no longer appears in the list.
Related tutorials
- Build the Customer form – See this tutorial if you want more exposure to form patterns. This tutorial will walk through the process of applying the Details Master pattern to a form.
- Build navigation – See this tutorial if you want instructions for adding your workspace to the menu structure.
Feedback
Coming soon: Throughout 2024 we will be phasing out GitHub Issues as the feedback mechanism for content and replacing it with a new feedback system. For more information see: https://aka.ms/ContentUserFeedback.
Submit and view feedback for