Vendor rebates
Vendor rebates help companies better manage their supplier rebate programs by automating tasks that are required in order to administer, track, and claim rebates that are earned.
This article provides an overview of the most common tasks that you might want to perform when you work with vendor rebates. The overview covers the following tasks:
- Review details of a rebate agreement.
- Identify orders that qualify for rebates, and generate rebate claims.
- Review and approve claims.
Audience and purpose
The information in this article is intended for business decision makers in enterprise companies, in positions such as purchase manager, chief financial officer (CFO), and accounting manager, who have the following responsibilities:
- Negotiate vendor price, discount, and rebate agreements.
- Manage staff that processes rebate claims and collects payments.
- Order inventory at the best possible prices.
People in these positions are looking for ways to achieve various goals. Here are some examples:
- Flexibly accommodate different types of vendor promotion programs and rebate conditions.
- Reduce the administrative burden and errors that are associated with monitoring promotion performance and processing claims.
- Improve cash flow forecasts by accruing for future receivables.
- Have a quantified basis for ongoing and future negotiations with vendors about rebates.
Review details of a vendor rebate agreement
A vendor rebate agreement is a record of a contract with a vendor that specifies the negotiated terms and conditions under which the company qualifies for a monetary reward in return for achieving preset purchase targets. Vendor rebate agreements are recorded on the Rebate agreements page.
To open the Vendor rebate agreements page, select Procurement and sourcing > Vendor rebates > Rebate agreements.
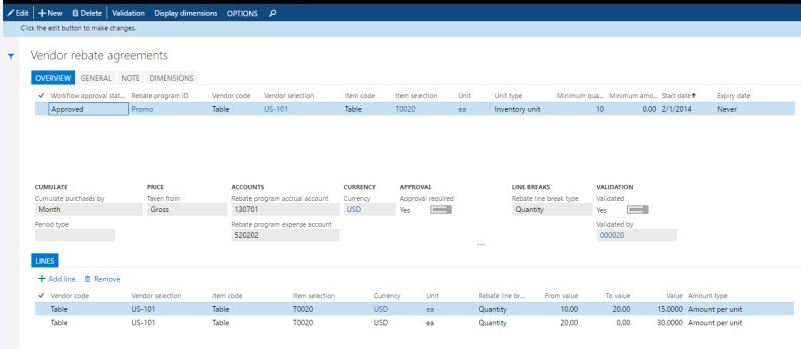
On the Vendor rebate agreements page, you can view details about the negotiated conditions of a vendor agreement.
The agreement's header specifies the general conditions that qualify a company for rebates. In effect, the header information specifies that a vendor grants a rebate when a specific product is bought in a specific quantity. On the header, you also specify the unit of measure rebate option and the calculation date type.
On the Overview tab, if you have lines with Item code set to table to specify the item, then the agreement is for that specific item. If you have lines with Item code set to Group or All to specify the items, then the vendor rebate agreement will be individually processed per item qualifying for the item code, not across all items qualifying for the item code.
On the General tab, in the Unit of measure rebate option field, you can define whether a unit of measure should be a condition for the purchase order line to qualify for a rebate claim.
- Convert – A purchase order line qualifies for a vendor rebate per the rebate agreement. You will receive a rebate regardless of the unit of measure that is applied on the line.
- Exact match – To qualify for a rebate, a purchase line must have the same unit of measure that is specified on the agreement.
On the General tab, in the Calculation date type field, select the date that is used to determine whether the purchase occurs in the validity period of the rebate agreement.
- Created – Use the creation date of the purchase order.
- Requested delivery – Use the requested receipt date.
On the agreement lines, you can specify the vendor rebate agreement in more detail.
In the Cumulate purchase by field, you can set the calculation of the rebate claim. The amount can be set to depend on a period (of week, month, year, lifetime or a customized period). The Invoice value indicates that a rebate claim will be determined every time that a purchase order line is invoiced.
In the Taken from field, you can specify the basis for the rebate calculation.
- Gross – The rebate is calculated based on the gross price of the item.
- Net – The rebate is calculated based on the net price of the item (that is, the price after other discounts have been applied).
The Rebate program accrual account and Rebate program expense account fields specify account numbers that will receive accrued rebate amounts during the intermediate stage between approval and processing.
When the Approval required option is set to Yes, the rebate claim must be approved before it can be accrued or paid out.
The Rebate line break type field specifies the basis for the rebates.
- Quantity – The rebates are volume-based.
- Amount – The rebates are amount-based.
On the Lines FastTab, you can see how different quantity tiers can be set up to grant different rebates. For example, in the previous illustration, the From value and To value fields indicate that a product quantity between 10 and 19 units will qualify for a rebate of USD 15 per unit.
Note
The From value value is inclusive, whereas the To value value is exclusive. For example, the Rebate line break type field is set to Quantity, and you enter 1 in the From value field and 3 in the To value field. In this case, the rebate amount applies when you purchase one or two items, but not when you purchase three items.
In the Workflow approval status field, the Approved value indicates that the agreement can be applied to purchase orders that meet the agreement’s conditions.
Identify orders that qualify for rebates, and generate rebate claims
When purchase orders are placed with a vendor that the company has a rebate agreement with, the program identifies any future vendor credit payments. If the purchase orders qualify for a rebate, a rebate claim is generated for every order line as soon as a purchase invoice has been posted. This process is automatic. Later, you can review the expected rebates and see the impact of those rebates on the product’s cost and profit margin.
View details of rebates that are applied to a purchase order line per the vendor rebate agreement
- On the Purchase order page, select an order line, and then select Purchase order line > View > Price details.
- On the Price details page, select the Rebates FastTab.
The rebate information is also shown in the Vendor rebate field in the Margin estimation section of the Price details page.
Note
On the Procurement and sourcing parameters page, on the Prices tab, verify that the Enable price details option is set to Yes. If the option is set to No, you won’t be able to view the rebates.
Review and approve claims
Rebate claims that are generated represent the future payments that can be expected from the vendor. Before a credit note is issued to the vendor, the agreement owner typically wants to review the claims and approve them. However, note that the status of a claim determines whether the claim is ready to go through the approval process.
The status of claims and the effect on the approval process
When a claim is generated, its status is set to To be calculated if the rebate is granted on a cumulative basis or Calculated if the rebate is granted per invoice. If the status of a claim is To be calculated, the claim must go through a calculation process that is handled by the Cumulate function. Only claims that have a status of Calculated can be included in the approval process.
Note
If the Approval required option on a vendor rebate agreement is set to No, any claims that are generated will have a status of Approved. The approval is mandatory for claims that are granted on a cumulative basis.
Approve claims, and view postings and invoice details
When claims have been approved, they can be processed by Accounts payable (A/P). A credit memo (vendor invoice) for the rebate claim amount is automatically generated. The credit can then be added to the vendor balance, and the A/P team can include it in the regular settlement process.
Select Procurement and sourcing > Vendor Rebates > Rebate claims to open a rebate claim.
Close the rebate claim.
Mark the claim, and then, on the Action Pane, select Approve.
On the request page, in the Vendor field, select the vendor that you’re authorized to receive a rebate from, and then select OK.
A Rebate accrual journal is posted for the claim amount. This posting debits the Accrued Vendor Rebates Receivable account for the expected vendor credit and credits the interim Accrued Vendor Rebates Received account for the expected gain.
In the rebate list, select the line, and then, on the Action Pane, select Rebate transactions to see and navigate to the journal batch number for this rebate accrual posting.
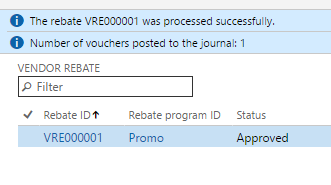
To move the claims to the regular A/P process, the A/P clerk must now complete the rebate claim handling by running the Process function.
On the Action Pane, select Process, and then select Filter. In the Criteria field for the Vendor account field, select the vendor to process rebate claims for, select other relevant filters, and then select OK.
The message bars and the fact that the status is changed to Completed indicate that the following events have occurred:
A Rebate accrual journal posting has reversed the previous interim amounts on the accrual receivable and expense accounts.
A vendor invoice (credit note) for the rebate amount has been created.
Note
The setting of the Manual invoice posting option on the Rebate program tab of the Procurement and sourcing parameters page determines whether a vendor invoice is posted manually or automatically as part of claim processing.
When the vendor invoice is posted, either automatically or manually, the vendor’s Payable account has been debited, and the Discounts and Allowances Received account has been credited.
Note
The Discounts and Allowances Received account number is specified for the procurement category that is used on the purchase invoice line for the rebate. The procurement category, in turn, is set on the Rebate program tab of the Procurement and sourcing parameters page.
In the rebate list, select the line, and then, on the Action Pane, select Rebate transactions to see and navigate to the journal batch number for this rebate accrual posting and also the vendor invoice number.
Select the line for the vendor invoice transaction, and then, on the Action Pane, select Vendor invoice. If the vendor invoice has been posted, you will see the Invoice journal. Otherwise, you will see the vendor invoice as a pending vendor invoice that requires manual posting.
The invoice line specifies the details of the vendor invoice for the Commissions and Rebates procurement category.
On the All vendors page, select the vendor that you receive a rebate from, and then, on the Action Pane, select Transactions. Find the line for the invoice. The rebate amount has now been added to the vendor balance.
Summary
The process for handling vendor rebates involves multiple manual tracking tasks that are often tedious. By automating these tasks, the vendor rebate management feature can help you move through the following processes:
- Generating accurate rebate claims
- Accruing the expected receivable and interim gain in the general ledger
- Updating the vendor balance and the income statement with the allowance that is due
Feedback
Coming soon: Throughout 2024 we will be phasing out GitHub Issues as the feedback mechanism for content and replacing it with a new feedback system. For more information see: https://aka.ms/ContentUserFeedback.
Submit and view feedback for