Model First
This video and step-by-step walkthrough provide an introduction to Model First development using Entity Framework. Model First allows you to create a new model using the Entity Framework Designer and then generate a database schema from the model. The model is stored in an EDMX file (.edmx extension) and can be viewed and edited in the Entity Framework Designer. The classes that you interact with in your application are automatically generated from the EDMX file.
Watch the video
This video and step-by-step walkthrough provide an introduction to Model First development using Entity Framework. Model First allows you to create a new model using the Entity Framework Designer and then generate a database schema from the model. The model is stored in an EDMX file (.edmx extension) and can be viewed and edited in the Entity Framework Designer. The classes that you interact with in your application are automatically generated from the EDMX file.
Presented By: Rowan Miller
Pre-Requisites
You will need to have Visual Studio 2010 or Visual Studio 2012 installed to complete this walkthrough.
If you are using Visual Studio 2010, you will also need to have NuGet installed.
1. Create the Application
To keep things simple we’re going to build a basic console application that uses the Model First to perform data access:
- Open Visual Studio
- File -> New -> Project…
- Select Windows from the left menu and Console Application
- Enter ModelFirstSample as the name
- Select OK
2. Create Model
We’re going to make use of Entity Framework Designer, which is included as part of Visual Studio, to create our model.
Project -> Add New Item…
Select Data from the left menu and then ADO.NET Entity Data Model
Enter BloggingModel as the name and click OK, this launches the Entity Data Model Wizard
Select Empty Model and click Finish

The Entity Framework Designer is opened with a blank model. Now we can start adding entities, properties and associations to the model.
Right-click on the design surface and select Properties
In the Properties window change the Entity Container Name to BloggingContext This is the name of the derived context that will be generated for you, the context represents a session with the database, allowing us to query and save data
Right-click on the design surface and select Add New -> Entity…
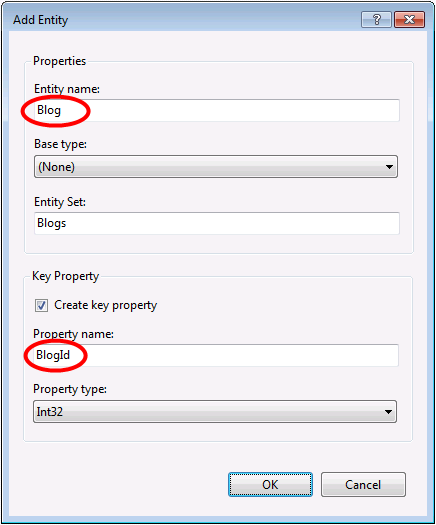
Enter Blog as the entity name and BlogId as the key name and click OK
Right-click on the new entity on the design surface and select Add New -> Scalar Property, enter Name as the name of the property.
Repeat this process to add a Url property.
Right-click on the Url property on the design surface and select Properties, in the Properties window change the Nullable setting to True This allows us to save a Blog to the database without assigning it a Url
Using the techniques you just learnt, add a Post entity with a PostId key property
Add Title and Content scalar properties to the Post entity
Now that we have a couple of entities, it’s time to add an association (or relationship) between them.
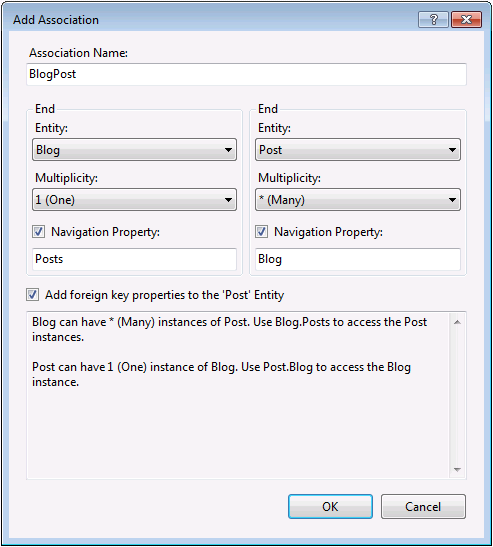
Right-click on the design surface and select Add New -> Association…
Make one end of the relationship point to Blog with a multiplicity of One and the other end point to Post with a multiplicity of Many This means that a Blog has many Posts and a Post belongs to one Blog
Ensure the Add foreign key properties to 'Post' Entity box is checked and click OK
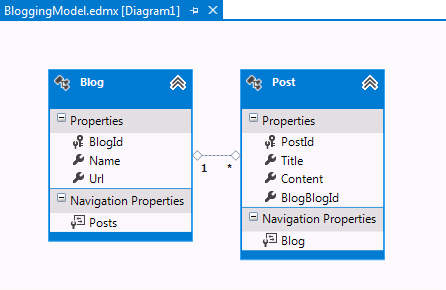
We now have a simple model that we can generate a database from and use to read and write data.
Additional Steps in Visual Studio 2010
If you are working in Visual Studio 2010 there are some additional steps you need to follow to upgrade to the latest version of Entity Framework. Upgrading is important because it gives you access to an improved API surface, that is much easier to use, as well as the latest bug fixes.
First up, we need to get the latest version of Entity Framework from NuGet.
- Project –> Manage NuGet Packages… If you don’t have the Manage NuGet Packages… option you should install the latest version of NuGet
- Select the Online tab
- Select the EntityFramework package
- Click Install
Next, we need to swap our model to generate code that makes use of the DbContext API, which was introduced in later versions of Entity Framework.
Right-click on an empty spot of your model in the EF Designer and select Add Code Generation Item…
Select Online Templates from the left menu and search for DbContext
Select the EF 5.x DbContext Generator for C#, enter BloggingModel as the name and click Add

3. Generating the Database
Given our model, Entity Framework can calculate a database schema that will allow us to store and retrieve data using the model.
The database server that is installed with Visual Studio is different depending on the version of Visual Studio you have installed:
- If you are using Visual Studio 2010 you'll be creating a SQL Express database.
- If you are using Visual Studio 2012 then you'll be creating a LocalDB database.
Let's go ahead and generate the database.
Right-click on the design surface and select Generate Database from Model…
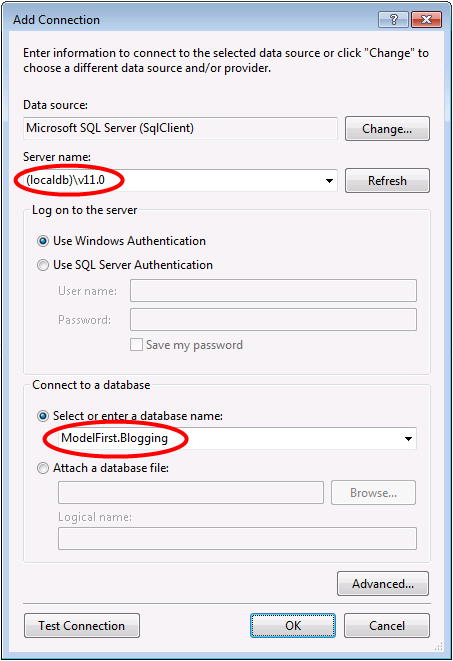
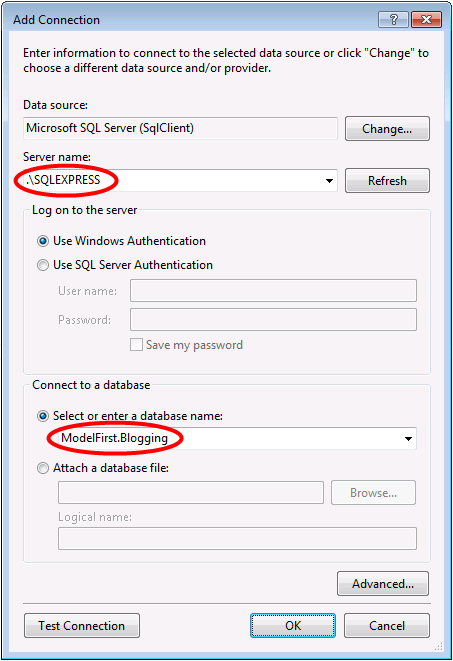
Click New Connection… and specify either LocalDB or SQL Express, depending on which version of Visual Studio you are using, enter ModelFirst.Blogging as the database name.
Select OK and you will be asked if you want to create a new database, select Yes
Select Next and the Entity Framework Designer will calculate a script to create the database schema
Once the script is displayed, click Finish and the script will be added to your project and opened
Right-click on the script and select Execute, you will be prompted to specify the database to connect to, specify LocalDB or SQL Server Express, depending on which version of Visual Studio you are using
4. Reading & Writing Data
Now that we have a model it’s time to use it to access some data. The classes we are going to use to access data are being automatically generated for you based on the EDMX file.
This screen shot is from Visual Studio 2012, if you are using Visual Studio 2010 the BloggingModel.tt and BloggingModel.Context.tt files will be directly under your project rather than nested under the EDMX file.

Implement the Main method in Program.cs as shown below. This code creates a new instance of our context and then uses it to insert a new Blog. Then it uses a LINQ query to retrieve all Blogs from the database ordered alphabetically by Title.
class Program
{
    static void Main(string[] args)
    {
        using (var db = new BloggingContext())
        {
            // Create and save a new Blog
            Console.Write("Enter a name for a new Blog: ");
            var name = Console.ReadLine();

            var blog = new Blog { Name = name };
            db.Blogs.Add(blog);
            db.SaveChanges();

            // Display all Blogs from the database
            var query = from b in db.Blogs
                        orderby b.Name
                        select b;

            Console.WriteLine("All blogs in the database:");
            foreach (var item in query)
            {
                Console.WriteLine(item.Name);
            }

            Console.WriteLine("Press any key to exit...");
            Console.ReadKey();
        }
    }
}
You can now run the application and test it out.
Enter a name for a new Blog: ADO.NET Blog
All blogs in the database:
ADO.NET Blog
Press any key to exit...
5. Dealing with Model Changes
Now it’s time to make some changes to our model, when we make these changes we also need to update the database schema.
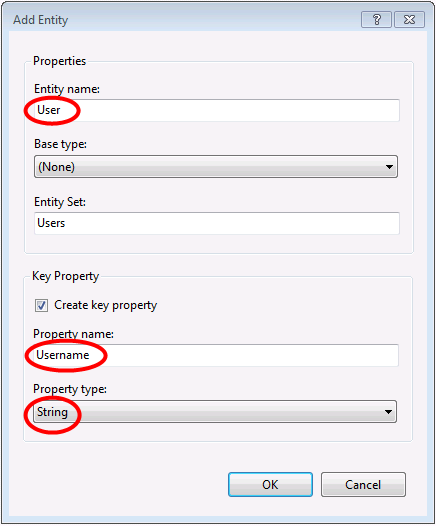
We’ll start by adding a new User entity to our model.
Add a new User entity name with Username as the key name and String as the property type for the key
Right-click on the Username property on the design surface and select Properties, In the Properties window change the MaxLength setting to 50 This restricts the data that can be stored in username to 50 characters
Add a DisplayName scalar property to the User entity
We now have an updated model and we are ready to update the database to accommodate our new User entity type.
- Right-click on the design surface and select Generate Database from Model…, Entity Framework will calculate a script to recreate a schema based on the updated model.
- Click Finish
- You may receive warnings about overwriting the existing DDL script and the mapping and storage parts of the model, click Yes for both these warnings
- The updated SQL script to create the database is opened for you
The script that is generated will drop all existing tables and then recreate the schema from scratch. This may work for local development but is not a viable for pushing changes to a database that has already been deployed. If you need to publish changes to a database that has already been deployed, you will need to edit the script or use a schema compare tool to calculate a migration script. - Right-click on the script and select Execute, you will be prompted to specify the database to connect to, specify LocalDB or SQL Server Express, depending on which version of Visual Studio you are using
Summary
In this walkthrough we looked at Model First development, which allowed us to create a model in the EF Designer and then generate a database from that model. We then used the model to read and write some data from the database. Finally, we updated the model and then recreated the database schema to match the model.
Feedback
Coming soon: Throughout 2024 we will be phasing out GitHub Issues as the feedback mechanism for content and replacing it with a new feedback system. For more information see: https://aka.ms/ContentUserFeedback.
Submit and view feedback for