Microsoft Hybrid Agent
The Hybrid Agent removes some of the challenges you might face when you configure an Exchange Hybrid environment. The Agent, which is built on the same technology as the Microsoft Entra Application Proxy, removes some of the configuration requirements for Hybrid. For example:
- External DNS entries.
- Certificate updates.
- Inbound network connections through your firewall to enable Exchange hybrid features.
The Hybrid Agent supports Free/Busy sharing and mailbox migrations, mail flow, directory synchronization, and other hybrid features.
Important
Publishing Outlook Web App (OWA) and Exchange Control Panel (ECP) through Microsoft Entra Application proxy is unsupported.
Agent location and requirements
Installation of the Agent and Hybrid configuration via the Hybrid Configuration wizard (HCW) is supported in either of the following locations:
- On a standalone computer (designed as your "Agent server").
- On an Exchange Server:
- Exchange 2016 or later: Mailbox role.
- Exchange 2013: Client Access role (CAS).
System requirements
The Hybrid Agent has multiple methods of installation with different requirements. In all cases, the core computer requirements are the same as described in the following list:
Windows Server 2012 R2, Windows Server 2016, or Windows Server 2019
- .NET Framework 4.7.2 or later.
- TLS 1.2 enabled.
- Application Proxy in Microsoft Entra ID
- Capable of establishing outbound HTTPS connections to the internet.
- Capable of establishing HTTPS connections to the Exchange Server chosen for hybrid configuration.
The HCW can download and install the Agent MSI automatically, as long as the following requirements are met:
The computer is a member of an Active Directory domain.
The computer is capable of establishing remote PowerShell connections to the Exchange Server that's chosen for hybrid configuration.
The computer uses a browser that supports ClickOnce technology (for example, Microsoft Edge).
The on-premises Active Directory account you're using must meet the following requirements:
- Membership in the Organization Management role group in your on-premises Exchange organization.
- Membership in the local Administrators group on the computer where you're installing the Hybrid Agent.
Having the HCW download and install the Agent MSI automatically is ideal if you're installing the Agent directly on a CAS server.
Port and protocol requirements
Outbound ports HTTPS (TCP) 443 and 80 must be open between the computer where the Hybrid Agent installed and the internet as shown here.
Ports TCP ports 443, 80, 5985, and 5986 must be open between the computer where the Hybrid Agent is installed and the CAS that's selected in the Hybrid Configuration wizard.
Important
Free/busy requests from on-premises users to Exchange Online users do not traverse the Hybrid Agent. All Exchange Mailbox Servers (including Exchange 2013 Mailbox Servers) must be able to communicate with the Microsoft 365 or Office 365 endpoints via HTTPS (TCP port 443). The required URLs, IP addresses, and ports are described here.
Proxy server considerations
If your network environment uses outbound proxy servers, you need to do some extra configuration as described in this section. This list might not be exhaustive.
Agent
The Agent supports outbound unauthenticated proxy servers, but you need to do more configuration after the installation. Run the ConfigureOutBoundProxy.ps1 script located in \Program Files\Microsoft Hybrid Service\ on the computer where the Agent is installed. For example:
PS C:\Program Files\Microsoft Hybrid Service\>.\ConfigureOutBoundProxy.ps1 -ProxyAddress http://proxyserver:8080
By running the script, the following section will be added to the Microsoft.Online.EME.Hybrid.Agent.Service.exe.config file located in the same folder:
  <system.net>
    <defaultProxy>
      <proxy proxyaddress="http://proxyserver:8080" bypassonlocal="True" usesystemdefault="True" />
    </defaultProxy>
  </system.net>
Important
A proxy server that prevents registration will cause the following items to fail:
- Connector installation.
- Test-Connectivity after installation.
We recommend that you allow the connectors to bypass the proxy until you can make app config changes.
Exchange Server
The HCW establishes connections from your Exchange Server to domains.live.com to exchange metadata and establish trusts. Because connections originate from your CAS server, the proxy settings on that server (from Get-ExchangeServer | Format-List internetWebProxy) must be set correctly or outbound free/busy can fail. In addition to connection failures, the HCW won't be able to configure delegated authentication if the proxy setting is incorrect.
Free/Busy requirements
The hybrid wizard automatically handles the free/busy information that's required in on-premises Exchange and Exchange Online.
If you need to configure free/busy sharing with a third-party, go to the Organization tab in the Exchange admin center and configure individual or organization sharing between the two systems (Exchange Online and Exchange on-premises or Exchange on-premises and Exchange on-premises).
If you encounter problems, see How to troubleshoot free/busy issues in a hybrid deployment.
Constraints
Keep the following issues in mind before you install the Hybrid Agent:
Hybrid Modern Authentication is not supported with the Hybrid Agent. You need to use the Classic Exchange Hybrid Topology and publish AutoDiscover, EWS, ActiveSync, MAPI and OAB endpoints for hybrid Modern Authentication to function with various Outlook clients.
For Teams calendaring features that require access to on-premises mailboxes, we recommended the full Classic Exchange Hybrid Topology. For more information, see How Exchange and Microsoft Teams interact.
Message tracking and multi-mailbox search do not traverse the Hybrid Agent. These Hybrid features require the classic connectivity model where Exchange Web Services (EWS) and Autodiscover are published on-premises and are externally available to Exchange Online.
The Hybrid Agent registers the internal FQDN of the CAS server that was selected when you ran the Hybrid Configuration wizard in the Entra Hybrid proxy infrastructure. If the registered CAS server is offline, free/busy look-ups from Exchange Online to on-premises and mailbox migration to and from Exchange Online won't work. If the selected CAS is permanently offline, you must register a new CAS server by running the Hybrid Configuration wizard again.
The Hybrid Agent supports a single migration endpoint with the service default limits. Multiple migration endpoints using custom endpoints or URLs is not supported.
The Hybrid Agent supports a single Exchange organization. Multiple Exchange organizations are not supported.
Note
SMTP doesn't traverse the Hybrid Agent and still requires a public certificate for mail flow between Exchange Online and your on-premises organization. SMTP traffic is out of scope for the Hybrid Agent.
Running setup
You must run the HCW on the computer where you want to install the Agent. After the Agent is installed and configured, the HCW will locate a preferred server to connect to and run the standard hybrid configuration steps. You don't need to run the HCW from the Exchange server directly. But, the computer where you run the HCW must be able to connect to the Exchange Server on the ports specified in the Ports and protocols section.
Installation Prerequisites
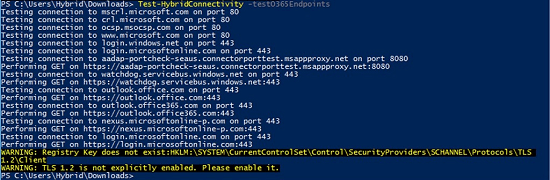
Optional: Verify connectivity.
On the server where you will be running the Hybrid Configuration wizard (Hybrid Agent install and subsequent hybrid configuration steps), download the following sample script and save it to any directory: https://aka.ms/hybridconnectivity.
Open the Exchange Management Shell and change directory to the location of the script.
Import the cmdlets by running the following command:
Import-Module .\HybridManagement.psm1Run the following command to verify the computer where you're installing can reach out to all required endpoints for the Hybrid Agent installation and Hybrid Configuration wizard setup.
Test-HybridConnectivity -TestO365EndpointsThe output of the command looks like this:
To allow installation of the Hybrid Agent and perform mailbox migrations to and from your Microsoft 365 or Office 365 organization, enable the Mailbox Replication service (MRS) proxy on the EWS virtual directory by running the following command:
Set-WebServicesVirtualDirectory -Identity "EWS (Default Web Site)" -MRSProxyEnabled $trueNote
If you don't complete this step before you run the HCW, the HCW will enable MRS proxy. However, we recommend that you complete this step before you run the HCW to ensure the IIS cache has time to clear before HCW validates the endpoint.
Go to Programs and Features in Control Panel and verify that a previous version of the Hybrid Configuration Wizard is not already installed. If it is, uninstall it.
Install .NET Framework version 4.6.2 on the computer where the HCW is being run. You might need to install a later version of .NET Framework depending on the version of Exchange you have installed. Alternatively, if this version isn't installed, the HCW prompts you to install it or upgrade the version already installed on your computer.
Installation steps
Log into your on-premises Exchange admin center (EAC), navigate to the Hybrid node, and then click Configure.
Select the Exchange server where you want to run traditional hybrid setup. Either select the default server provided by the HCW or specify a specific server in the second radio button. Select Next.
Enter your on-premises Exchange credentials and your Microsoft 365 or Office 365 Global Administrator credentials. Click Next.
Wait while the HCW gathers information and configuration about your environments. When it's completed, click Next.
Select either Minimal or Full Hybrid Configuration. You can also choose Organization Configuration Transfer. For more information, see Hybrid Organization Configuration Transfer V2. Click Next.
Follow the steps to enable federation. Click Next.
Select Use Exchange Modern Hybrid Topology
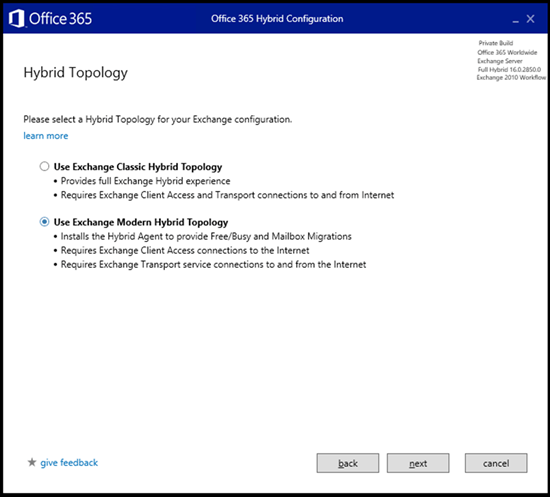
Click Next.
The HCW installs the Hybrid Agent. There are four basic phases:
Download the Agent install package.
Installation of the Agent on the local computer (note: this prompts for your Microsoft 365 or Office 365 Global Administrator credentials again).
Registration of the Agent in Entra, including creation of the URL used to proxy requests. The URL has the format:
uniqueGUID.resource.mailboxmigration.his.msappproxy.net.Testing migration viability from your Microsoft 365 or Office 365 organization to your on-premises Exchange organization via the Agent.
Note
The Hybrid Agent installation process could take up to 10 minutes to complete.
The remaining HCW inputs and actions are the same as a Classic Hybrid deployment.
During the update phase, the HCW creates a migration endpoint with the custom URL created in step 8.3 above. It will also set the TargetSharingEPR value on the Organization Relationship and/or the IntraOrganization Connector object on the Microsoft 365 or Office 365 side to this value. The new URL is used to send requests from your Microsoft 365 or Office 365 organization to your on-premises Exchange organization for free/busy and migrations.
You can view the specific values by running Get-MigrationEndpoint and Get-OrganizationRelationship from an Exchange Online PowerShell connection to your Microsoft 365 or Office 365 organization.
The following example shows the output that you might see when you run the Get-MigrationEndpoint and Get-OrganizationRelationship cmdlets:
Get-MigrationEndpoint | Format-List Identity,RemoteServer

Identity : Hybrid Migration Endpoint - EWS (Default Web Site)
RemoteServer : 087f1c2e-8711-4176-ab4f-4b1c1777a350.resource.mailboxmigration.his.msappproxy.net
Get-OrganizationRelationship | Format-List Name,TargetSharingEpr

Name : O365 to On-premises - c6d22e11-2340-4432-9122-19097bacf0c1
TargetSharingEpr : https://087f1c2e-8711-4176-ab4f-4b1c1777a350.resource.mailboxmigration.his.msappproxy.net/EWS/Exchange.asmx
Hybrid Agent PowerShell module
The Hybrid Management PowerShell module is installed by the Hybrid Configuration wizard at *\Program Files\Microsoft Hybrid Service* on the computer where the Hybrid Agent is installed. This module provides the following cmdlets that can now be used with or without a multifactor authentication-enabled administrator account.
| Cmdlets | Purpose |
|---|---|
| Get-HybridAgent | To view Hybrid Agents installed. |
| Update-HybridApplication | To edit parameters like the target URI of Hybrid Application. |
| Get-HybridApplication | To view all Hybrid Applications in the organization. |
| Remove-HybridApplication | To remove a specific Hybrid Application. |
How to use Hybrid Agent cmdlets with or without multifactor authentication-enabled accounts
To use these cmdlets you would need to import the latest HybridManagement.psm1 available at **\Program Files\Microsoft Hybrid Service**. It can also be downloaded directly from https://aka.ms/HybridAgentPSM.
To import the Hybrid Management module, run the following command from a Windows PowerShell prompt as an administrator:
Import-module .\HybridManagement.psm1
To execute these cmdlets with multifactor authentication-enabled admin credentials you need to provide a userPrincipalName parameter. If your account is not a multifactor authentication-enabled admin account, you can also use the Credential parameter in lieu of the userPrincipalName parameter, which will result in the usage of basic authentication.
The following table shows how the usage differs in these two modes:
| Admin with a multifactor authentication-enabled account | Admin with basic authentication | |
|---|---|---|
| 1 | Get-HybridAgent -UserPrincipalName <tenant admin UPN> | Get-HybridAgent -Credential (Get-Credential) |
| 2 | Get-HybridApplication -UserPrincipalName <tenant admin UPN> -AppId <GUID> | Get-HybridApplication -Credential (Get-Credential) -AppId <GUID> |
| 3 | Remove-HybridApplication -UserPrincipalName <tenant admin UPN> -AppId <GUID> | Remove-HybridApplication -Credential (Get-Credential) -AppId <GUID> |
| 4 | New-HybridApplication -UserPrincipalName <tenant admin UPN> -TargetUri "Server FQDN" | New-HybridApplication -Credential (Get-Credential) -TargetUri "Server FQDN" |
| 5 | Update-HybridApplication -AppId <GUID> -TargetUri "Server FQDN" -UserPrincipalName <tenant admin UPN> | Update-HybridApplication -AppId <GUID> -TargetUri "Server FQDN" -Credential (Get-Credential) |
Multi Agent Deployment
Option 1: Use the Hybrid Configuration wizard to install additional Agents
Additional Hybrid Agents can be installed for redundancy. Simply download the latest version of the HCW and open the application on the computer where you would like to install an additional Hybrid Agent.
Like previous HCW installations, start the application, select Next.
Select a desired server to execute against, select Next.
Provide credentials to sign in to your Microsoft 365 or Office 365 organization, and then select Next.
The HCW will gather configuration information, select Next when complete.
Select the default option provided for either Full or Minimal, select Next.
Select Exchange Modern Hybrid Topology, Next.
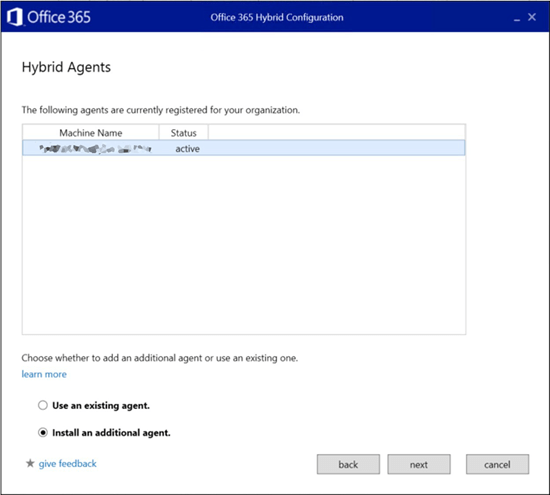
A page will be shown that will provide you with the status of your existing or previously installed Agents. Make sure the status of the existing Agent is accurate before proceeding to the next step. Select Install an additional agent, and then click Next.
Example:
The HCW will install the additional Hybrid Agent. When the installation is complete, you can open the Microsoft Windows Services console from the computer and verify the service or Agent is installed and running (look for Microsoft Hybrid Service - mshybridsvc). At that point, you can either re-run HCW if you wish to make further changes to your hybrid config, or simply cancel the wizard.
You can repeat this step on each computer where you would like an additional Hybrid Agent installed.
Option 2: Manually download and install additional Agents
A second option for installing additional Agents is outside the HCW itself and is done by downloading and manually installing the Agent on the desired computer.
Save the MSHybridService.msi to a location on your computer.
From that computer, open a Windows Command console as Administrator and run the following command to install the Hybrid Agent:
Msiexec /i MSHybridService.msiYou will be prompted for your tenant Global Admin credentials.
After the installation is complete, you can open the Microsoft Windows Services console from the computer and verify the service or Agent is installed and running.
You can repeat this step on each computer where you would like an additional Hybrid Agent installed.
Checking the Status of Your Hybrid Agents
Option 1: Get status via the Hybrid Configuration wizard
Start the HCW application and select Next.
Select a server in your Exchange organization and select Next.
Provide credentials to sign in to your Microsoft 365 or Office 365 organization, and then select Next.
The HCW will gather configuration information. Select Next when it's complete.
Select default option provided for either Full or Minimal and select Next.
Select Exchange Modern Hybrid Topology and select Next.
A page will be shown that will provide you with the status of your existing installed Agents.
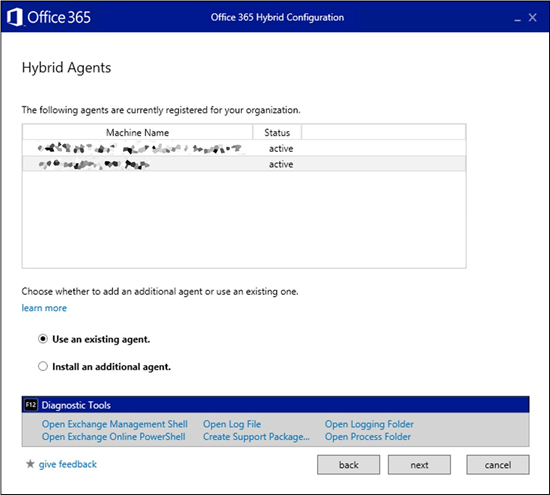
Click Cancel when you're finished.
Option 2: Get status via the Hybrid Management PowerShell Module
With each installation of the Hybrid Agent, the HCW installs the Hybrid Management PowerShell module in \Program Files\Microsoft Hybrid Service\ on the computer where the Agent is installed. By default, this module is not imported and so you will need to import it before you can use it. This module also requires the Azure module for PowerShell if not already installed. First install the PackageManagement modules and then see this topic for the Azure PowerShell module installation instruction.
To import the Hybrid Management module, run the following command from a Windows PowerShell prompt as Administrator:
Import-module .\HybridManagement.psm1
After that you can run the following command to view Agent status:
Get-HybridAgent -Credential (Get-Credential)
The output of the command looks like this:
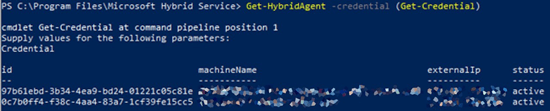
Note
The id value in the results is the Agent identity and not your unique tenant guid assigned to the route.
Direct your Hybrid Agent(s) to the load balancer instead of a specific server
You can use the Hybrid Management PowerShell module to configure your Hybrid Agent(s) to direct requests to your load balancer instead of a specific Exchange Server. The Hybrid Agent supports routing requests to the load balancer for Exchange Server 2013 Client Access Servers and Exchange Server 2016 servers or later.
Follow the steps from the previous section to import the Hybrid Management module for PowerShell.
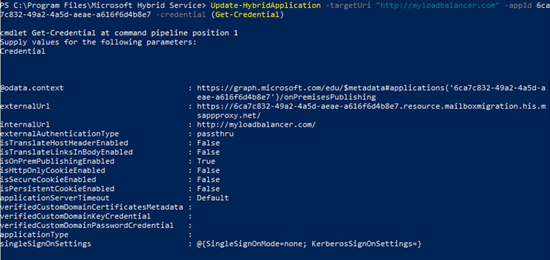
Use the targetUri parameter on the Update-HybridApplication cmdlet to change the value of the internalURL from a specific server to your load balancer endpoint.
Use the unique endpoint GUID value for your tenant for the appId parameter (for example, 6ca7c832-49a2-4a5d-aeae-a616f6d4b8e7). Note that this GUID value is not the Agent ID. To find the endpoint GUID value, use either of the following procedures:
From the
TargetSharingEPRvalue:Get-OrganizationRelationship ((Get-OnPremisesOrganization).OrganizationRelationship) | Select-Object TargetSharingEprThe output looks like this:
TargetSharingEpr
----------------
https://6ca7c832-49a2-4a5d-aeae-a616f6d4b8e7.resource.mailboxmigration.his.msappproxy.net/EWS/Exchange.asmxFrom the MRS configuration:
Get-MigrationEndpoint "Hybrid Migration Endpoint - EWS (Default Web Site)" | Select-Object RemoteServerThe output looks like this:
RemoteServer
------------
6ca7c832-49a2-4a5d-aeae-a616f6d4b8e7.resource.mailboxmigration.his.msappproxy.net
After you have the endpoint GUID value for your tenant, run the following command:
targetUri:
https://myloadbalancer.comin this example (your value will be different).appId: 6ca7c832-49a2-4a5d-aeae-a616f6d4b8e7 in this example (your value will be different).
Update-HybridApplication -targetUri "https://myloadbalancer.com" -appId 6ca7c832-49a2-4a5d-aeae-a616f6d4b8e7 -Credential (Get-Credential)Example:
Additional Information
You can view installation details of the Hybrid Agent in the following locations on the server where it's installed.
In the Services console:

In the registry at
HKEY_LOCAL_MACHINE\SOFTWARE\Microsoft\Microsoft Hybrid Service: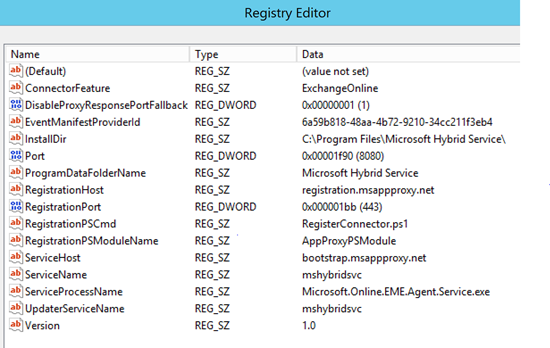
On the hard drive:
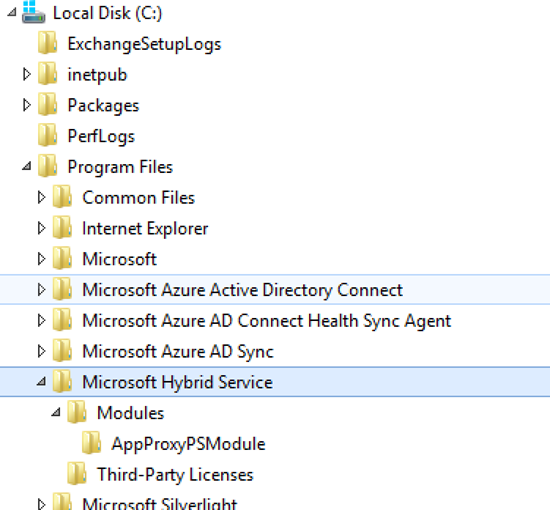
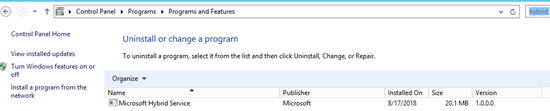
In Programs and Features in Control Panel:
Testing and validation of the Hybrid Agent
After a successful deployment of the Hybrid Agent and hybrid configuration, you can use the following steps to validate free/busy and mailbox migration flow via the Agent.
On the server where the Hybrid Agent is installed, open Performance Monitor.
Add the object Microsoft AD App Proxy Connector and the # requests counter to your view.

Migration
Open an Exchange Online PowerShell connection to your Microsoft 365 or Office 365 organization.
Replace <your customguid> with the unique endpoint GUID value as described in Direct your Hybrid Agent(s) to the load balancer instead of a specific server and run the following command:
Test-MigrationServerAvailability -ExchangeRemoteMove:$true -RemoteServer '<your customguid>.resource.mailboxmigration.his.msappproxy.net' -Credentials (Get-Credential)Enter your on-premises credentials in the dialog that appears.
After the test returns the success result, switch back to Performance Monitor and confirm that the number of requests has increased.
Performing a test mailbox move from your on-premises Exchange organization to your Microsoft 365 or Office 365 organization is also an option.
Note
If this test fails try running Update-HybridApplication and point it to a single Exchange Server instead of a load balancer.
Free/Busy
To perform the same validation for free/busy information, log in to a Microsoft 365 or Office 365 mailbox in your tenant, create a test meeting invite, and send it to an on-premises mailbox.
Uninstall the Hybrid Agent
To uninstall the Hybrid Agent, re-run Hybrid Configuration wizard from the same computer you ran the installation on and select Classic Connectivity. Selecting classic connectivity uninstalls and unregisters the Hybrid Agent from the computer and Entra. After you unregister the Hybrid Agent, you can resume setup and configure hybrid in classic mode.
Switching modes from Classic to Modern
You can switch to Modern Hybrid (Hybrid Agent) after successfully configuring Classic Hybrid (publishing the EWS namespace and allowing inbound). But, we only recommend switching if you're blocked from migrating mailboxes to the cloud after this setup is complete. If you chose to revert to Modern Hybrid, see the previous Constraints section, because not all hybrid features or experiences are supported with the Hybrid Agent.
If you have weighed the pros and cons of switching from Classic to Modern, you proceed by deleting your existing migration batches and migration endpoint in Exchange Online and re-running the Hybrid Configuration wizard and selecting Modern Hybrid.