Scenario: Integrate Exchange Online with an email add-on service
Many third-party cloud service solutions provide add-on services for Exchange Online. For security reasons, we don't allow third-party email add-on services to be installed in Exchange Online. But, you can work with the service provider to configure the settings in your Exchange Online organization so that you can use the service.
This topic describes the best practices for how your organization can use a third-party email add-on service by examining a fictional service named Contoso Signature Service. This fictional service runs in Azure and provides custom email signatures.
Note
This service could be deployed in a cloud environment other than Azure.
The mail flow and a high-level summary of the service are shown in the following diagram.
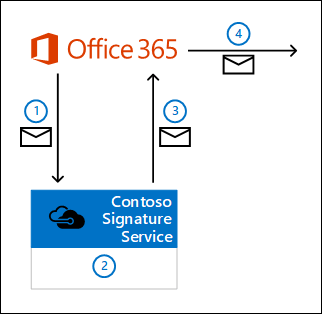
When a user in your Exchange Online organization composes and sends a message, the message is diverted to Contoso Signature Service by using a connector and a mail flow rule (also known as a transport rule) that you create.
Connections from Exchange Online to Contoso Signature Service are encrypted by TLS, because you configure the certificate domain name for the service in the connector settings (for example, smtp.contososignatureservice.com).
Contoso Signature Service accepts the message and adds an email signature to the message. The service also stamps the message with a custom header to indicate the message has been processed.
Contoso Signature Service routes the message back to Exchange Online. A connector that you create accepts the incoming messages from Contoso Signature Service.
- Contoso Signature Service uses smart host routing to route messages back to the region where your Exchange Online organization is located. For example, if your Exchange Online domain is fabrikam.onmicrosoft.com, the destination smart host is fabrikam.mail.protection.outlook.com.
- Contoso Signature Service provides a unique certificate domain name for each customer. You configure this domain name as an accepted domain in your Exchange Online organization and in the connector settings (for example, S5HG3DCG14.smtp.contososignatureservice.com).
Exchange Online sends the message with the customized signature to the original recipients.
The rest of this topic explains how to configure mail flow in Exchange Online to work with the email add-on service.
Note
These elements are required for any email add-on service that you want to integrate with your Exchange Online organization. You need to work with the email add-on service provider to configure their required settings in Exchange Online.
What do you need to know before you begin?
Estimated time to complete: 15 minutes
You need permissions before you can perform this procedure or procedures. To see what permissions you need, see the "Mail flow" entry in the Feature permissions in Exchange Online topic.
To open the Exchange admin center (EAC), see Exchange admin center in Exchange Online. To learn how to use Windows PowerShell to connect to Exchange Online, see Connect to Exchange Online PowerShell.
For information about keyboard shortcuts that may apply to the procedures in this topic, see Keyboard shortcuts for the Exchange admin center.
Tip
Having problems? Ask for help in the Exchange forums. Visit the forums at Exchange Online or Exchange Online Protection.
Step 1: Create a connector that routes messages from Office 365 to the email add-on service
The important settings for the connector are:
- From Office 365 to the email add-on service.
- Uses smart host routing to the email add-on service.
- Uses TLS to encrypt the connection based on the domain name of the email add-on service (smart host).
Use the EAC to create the connector that routes messages from Office 365 to the email add-on service
Create the outbound connector in the new EAC
In the EAC, go to Mail flow > Connectors, and then click Add a connector
 .
.
The new connector wizard opens. On the first page, configure these settings:
- Connection from: Select Office 365.
- Connection to: Your organization's email server
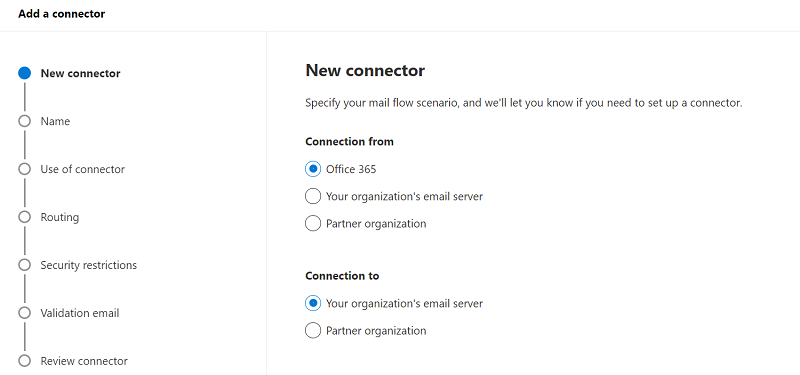
When you're finished, click Next.
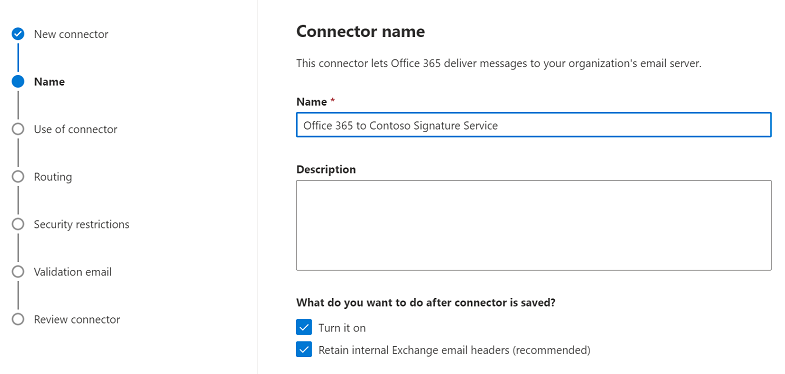
On the next page, configure these settings:
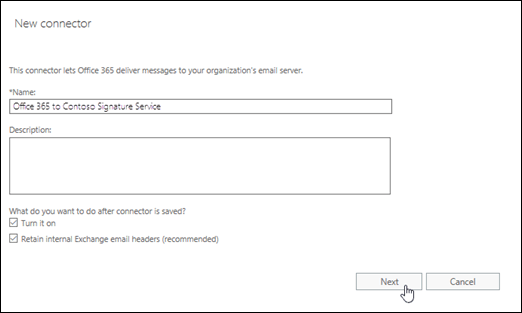
- Name: Enter a descriptive name (for example, Office 365 to Contoso Signature Service).
- Description: Enter an optional description.
- What do you want to do after connector is saved?: Configure these settings:
- Turn it on leave this value selected.
- Retain internal Exchange email headers (recommended): Configure one of these values:
- Checked: Preserves internal headers in messages that are sent to the email add-on service, which means the messages are treated as trusted internal messages. If you select this value, you'll also need to use the same value on this setting for the inbound connector that you create in Step 4 (otherwise, the inbound connector will remove the internal Exchange headers from the returning messages).
- Unchecked: Removes internal headers from messages before they're sent to the email add-on service. If you select this value, the value of this setting on the inbound connector that you create in Step 4 is meaningless (by definition, there will be no internal Exchange headers to keep or remove in returning messages).
When you're finished, click Next.
On the Use of connector page, select Only when I have a transport rule set up that redirects messages to this connector, and then click Next.

On the Routing page, enter the smart host value click or the email add-on service (for example, smtp.contososignatureservice.com), click Add
, and then click Next.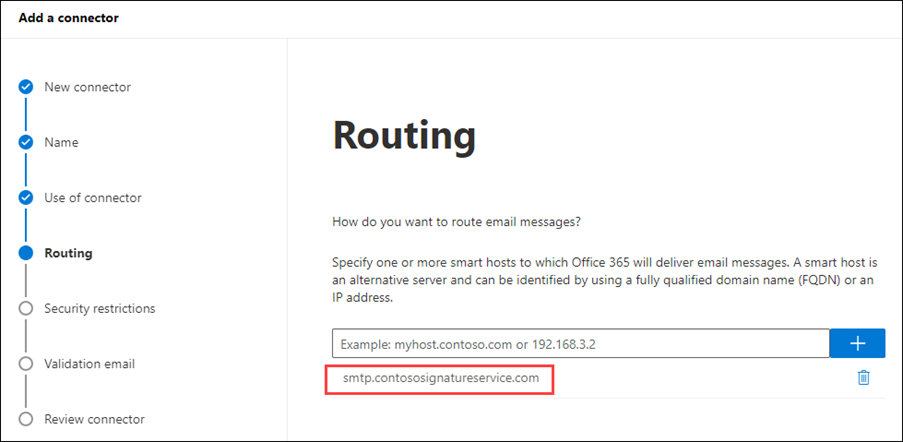
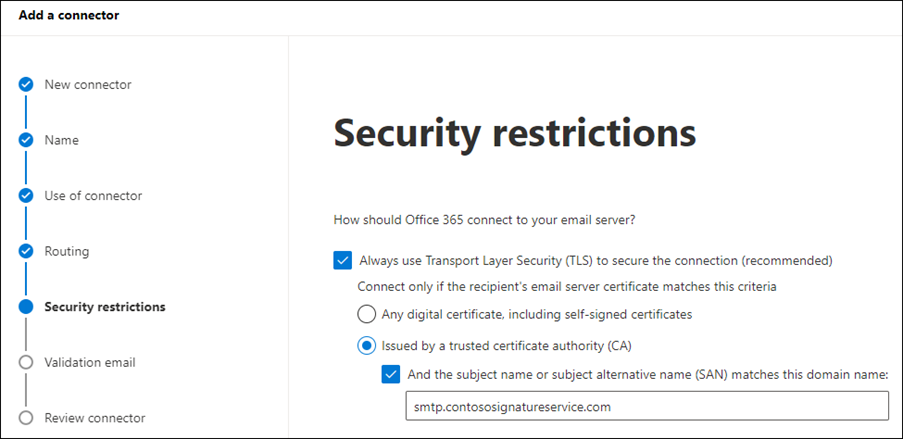
On the Security restrictions page, configure these settings:
- Verify Always use Transport Layer Security (TLS) to secure the connection (recommended) is selected.
- Verify Issued by a trusted certificate authority (CA) is selected.
- Select And the subject name or subject alternative name (SAN) matches this domain name, and enter the smart host that you used in the previous step (for example, smtp.contososignatureservice.com).
When you're finished, click Next.
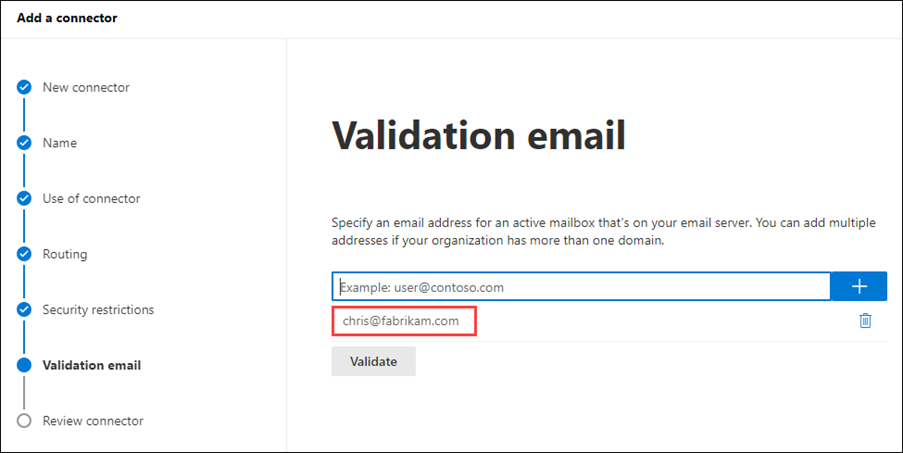
On the Validation email page, do these steps:
- Enter a valid email address on your organization's email server, and then click Add .
- Click Validate to start the validation process.
After the validation process is complete, click Next.
- Enter a valid email address on your organization's email server, and then click Add
On the Review connector page, review the settings for the new connector. You can click Edit in the specific section to edit those settings.
When you're finished, click Create connector.

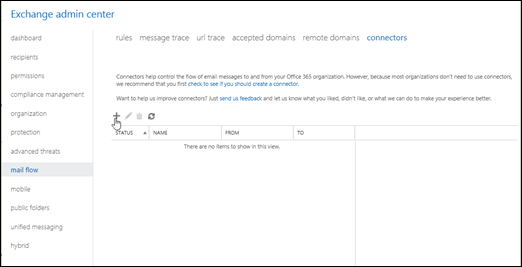
Create the outbound connector in the classic EAC
Go to Mail flow > Connectors, and then click New
.
The new connector wizard opens. On the Select your mail flow scenario page, configure these settings:
- From: Select Office 365.
- To: Select Your organization's email server.
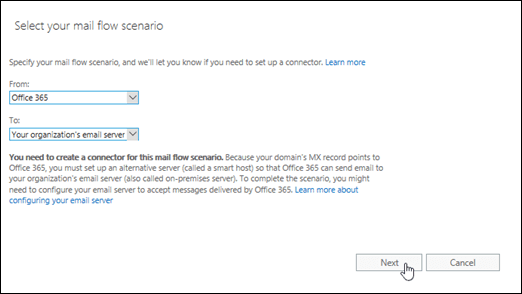
When you're finished, click Next.
On the next page, configure these settings:
- Name: Enter a descriptive name (for example, Office 365 to Contoso Signature Service).
- Description: Enter an optional description.
- What do you want to do after connector is saved?: Configure these settings:
- Turn it on leave this value selected.
- Retain internal Exchange email headers (recommended): Configure one of these values:
- Checked: Preserves internal headers in messages that are sent to the email add-on service, which means the messages are treated as trusted internal messages. If you select this value, you'll also need to use the same value on this setting for the inbound connector that you create in Step 4 (otherwise, the inbound connector will remove the internal Exchange headers from the returning messages).
- Unchecked: Removes internal headers from messages before they're sent to the email add-on service. If you select this value, the value of this setting on the inbound connector that you create in Step 4 is meaningless (by definition, there will be no internal Exchange headers to keep or remove in returning messages).
(By definition, there will be no internal Exchange headers to keep or remove in returning messages).
When you're finished, click Next.
On When do you want to use this connector? page, select Only when I have a transport rule set up that redirects messages to this connector, and then click Next.

On the How do you want to route email messages? page, click Add
. In the Add smart host dialog that appears, enter the smart host value for the email add-on service (for example, smtp.contososignatureservice.com), click Save, and then click Next.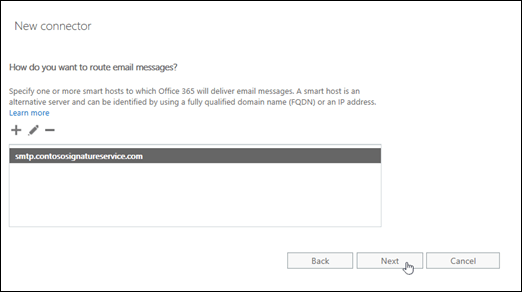
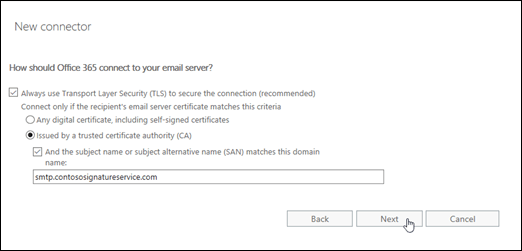
On the How should Office 365 connect to your email server? page, configure these settings:
- Verify Always use Transport Layer Security (TLS) to secure the connection (recommended) is selected.
- Verify Issued by a trusted certificate authority (CA) is selected.
- Select And the subject name or subject alternative name (SAN) matches this domain name, and enter the smart host that you used in the previous step (for example, smtp.contososignatureservice.com).
When you're finished, click Next.
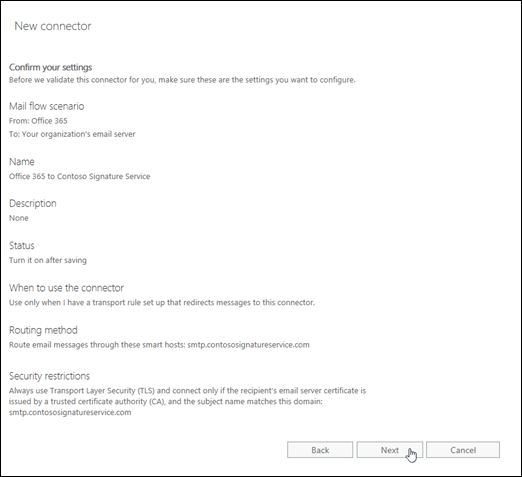
On the Confirm your settings page, verify the settings. Click Back to modify the settings as necessary.
When you're finished, click Next.
On the Validate this connector page, click Add
. In the Add email dialog that appears, enter an email address that isn't in Exchange Online to test the connector (for example, admin@fabrikam.com), click OK, and then click Validate.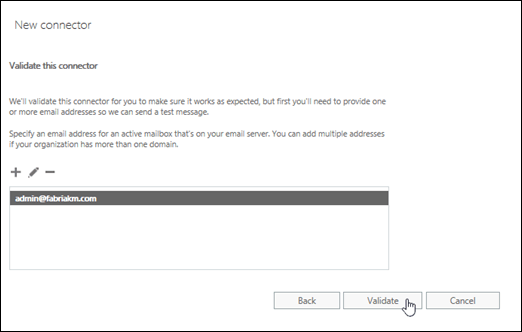
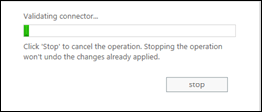
A progress indicator appears. When the connector validation is complete, click Close.
On the Validation result page, click Save.
Use Exchange Online PowerShell to create the outbound connector to the email add-on service
To create the outbound connector to the email add-on service in Exchange Online PowerShell, use this syntax:
New-OutboundConnector -Name "<Descriptive Name>" -ConnectorType OnPremises -IsTransportRuleScoped $true -UseMxRecord $false -SmartHosts <SmartHost> -TlsSettings DomainValidation -TlsDomain <SmartHost> [-CloudServicesMailEnabled $true]
This example creates an outbound connector with these settings:
- Name: Office 365 to Contoso Signature Service
- Smart host destination of the email add-on service: smtp.contososignatureservice.com
- TLS domain for domain validation: smtp.contososignatureservice.com
- Internal Exchange message headers that identify messages as internal are preserved in the outbound messages.
New-OutboundConnector -Name "Office 365 to Contoso Signature Service" -ConnectorType OnPremises -IsTransportRuleScoped $true -UseMxRecord $false -SmartHosts smtp.contososignatureservice.com -TlsSettings DomainValidation -TlsDomain smtp.contososignatureservice.com -CloudServicesMailEnabled $true
For detailed syntax and parameter information, see New-OutboundConnector.
Verify that you've successfully created the outbound connector
To verify that you've successfully created an outbound connector to route messages to the email add-on service, use either of these procedures:
In the EAC, go to Mail flow > Connectors, select the connector, and then verify the settings.
In Exchange Online PowerShell, replace <Connector Name> with the name of the connector, and run this command to verify the property values:
Get-OutboundConnector -Identity "<Connector Name>" | Format-List Name,ConnectorType,IsTransportRuleScoped,UseMxRecord,SmartHosts,TlsSettings,TlsDomain,CloudServicesMailEnabled
Step 2: Create a mail flow rule to route unprocessed messages to the email add-on service
The rule routes messages from internal senders to the connector that you created in Step 1 if the messages haven't already been processed by the email add-on service (the custom header isn't stamped on the message).
Use the EAC to create a mail flow rule to route unprocessed messages to the email add-on service
Note
Mail flow rule creation in the new EAC is exactly the same as in the classic EAC.
Go to Mail flow > Rules, and click New
, and then select Create a new rule.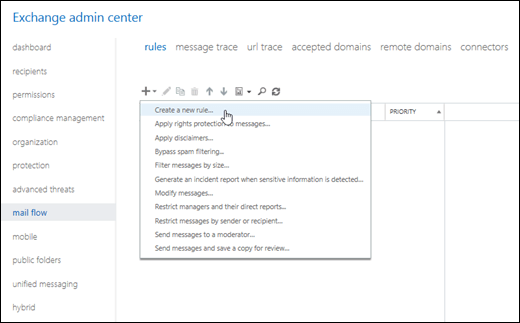
In the New rule page that opens, click More options near the bottom of the page.
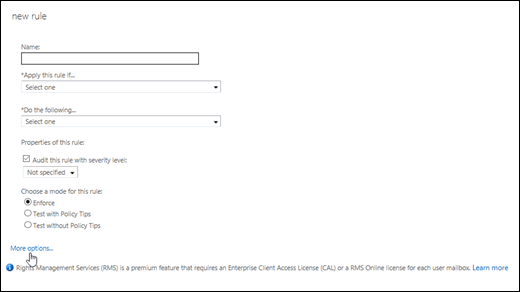
On the New rule page, configure these settings:
- Name: Enter a descriptive name (for example, Route email to Contoso Signature Service).
- Apply this rule if: Select The sender > Is external/internal > Select Inside the organization, and then click OK.
- Do the following: Select Redirect the message to > The following connector > Select the connector you created in Step 1, and then click OK.
- Except if: Click Add exception > Select A message header > Includes and of these words.
- Click Enter text, enter the name of the custom header field that's applied by the email add-on service (for example, SignatureContoso), and then click OK.
- Click Enter words, enter the header field value that indicates a message has been processed by the email add-on service (for example, true), click Add , and then click OK.
- Near the bottom of the page, select Stop processing more rules.
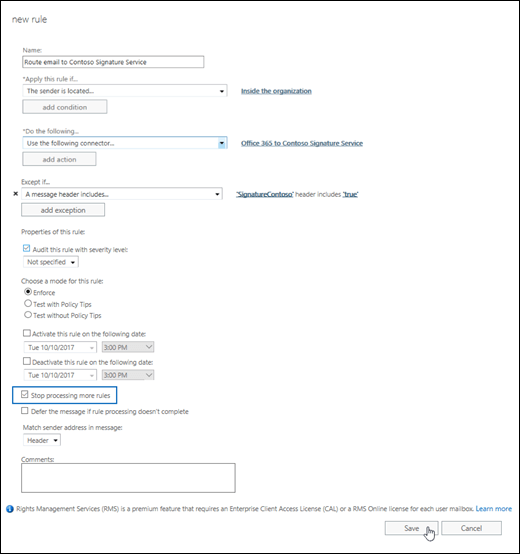
When you're finished, click Save.
Use Exchange Online PowerShell to create a mail flow rule to route unprocessed messages to the email add-on service
To create the mail flow rule in Exchange Online PowerShell, use this syntax:
New-TransportRule -Name "<Descriptive Name>" -FromScope InOrganization -RouteMessageOutboundConnector "<Connector Name>" -ExceptIfHeaderContainsMessageHeader <HeaderName> -ExceptIfHeaderContainsWords <HeaderValue> -StopRuleProcessing $true
This example creates the mail flow rule with these settings:
- Name: Route email to Contoso Signature Service
- Outbound connector name: Office 365 to Contoso Signature Service
- Header field and value that indicates processing by the email add-on serviceSignatureContoso with the value true.
New-TransportRule -Name "Route email to Contoso Signature Service" -FromScope InOrganization -RouteMessageOutboundConnector "Office 365 to Contoso Signature Service" -ExceptIfHeaderContainsMessageHeader SignatureContoso -ExceptIfHeaderContainsWords true -StopRuleProcessing $true
For detailed syntax and parameter information, see New-TransportRule.
Verify that you've successfully created the mail flow rule
To verify that you've successfully created a mail flow rule to route unprocessed messages to the email add-on service, use either of these procedures:
In the EAC, go to Mail flow > Rules, select the rule, click Edit
 , and verify the settings of the rule.
In Exchange Online PowerShell, replace <Rule Name> with the name of the rule, and run this command to verify the property values:
Get-TransportRule -Identity "<Rule Name>" | Format-List Name,FromScope,RouteMessageOutboundConnector,ExceptIfHeaderContainsMessageHeader,ExceptIfHeaderContainsWords,StopRuleProcessing
Step 3: Add the custom certificate domain provided by the email add-on service as an accepted domain in Exchange Online
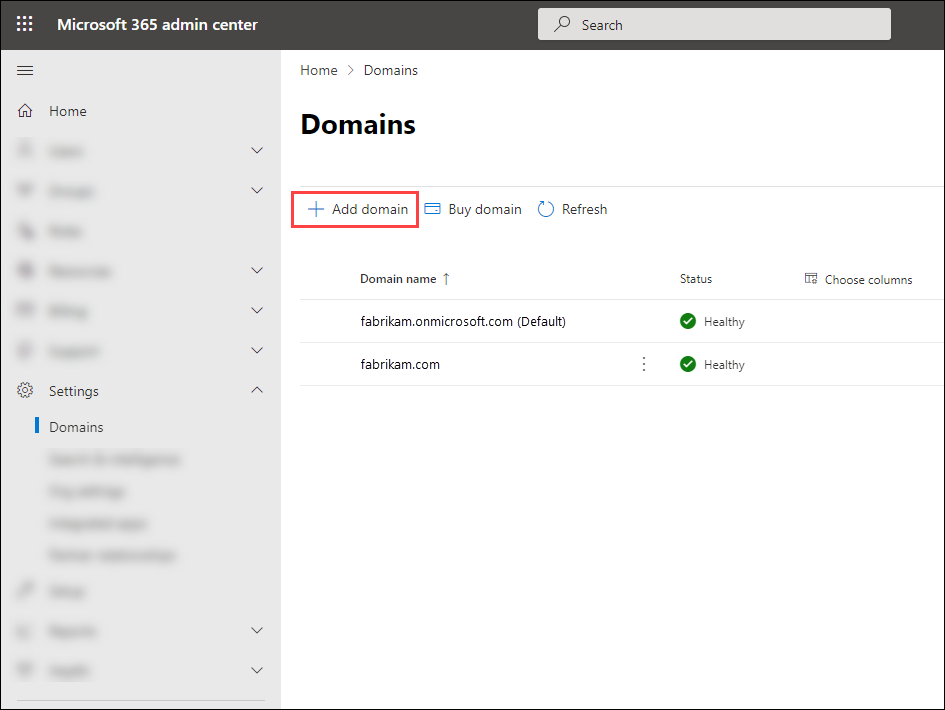
In the Microsoft 365 admin center at https://admin.microsoft.com, go to Settings > Domains, and then click Add domain.
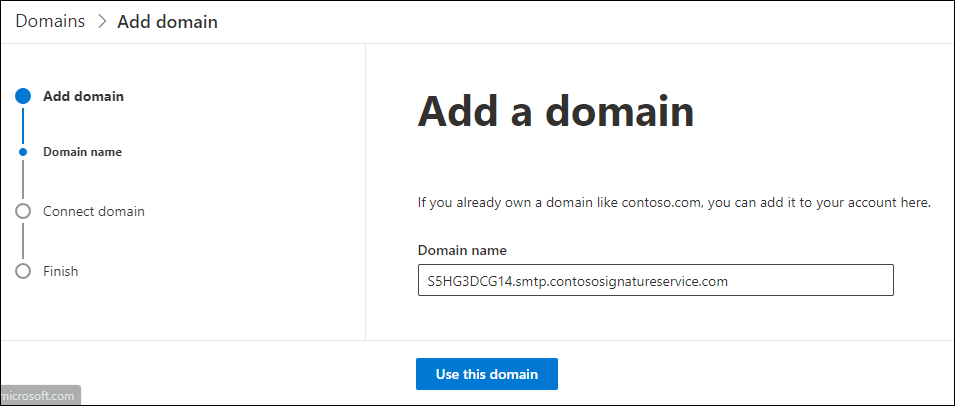
The add a domain wizard starts. On the Add a domain page, enter the custom certificate domain that the email add-on service provided when you enrolled in the service (for example, S5HG3DCG14.smtp.contososignatureservice.com), and then click Use this domain.
Note: The value must be 48 characters or less.
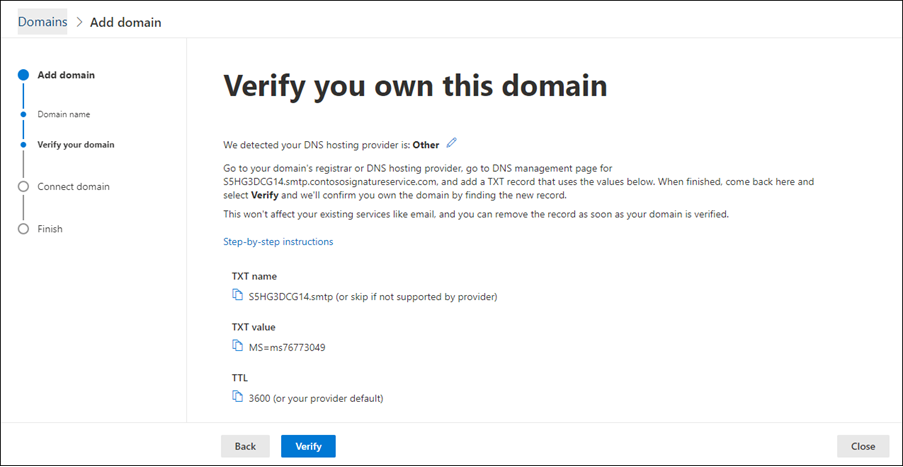
On the Domain verification page, select one of the following values:
- Add a TXT record to the domain's DNS records
- If you can't add a TXT record, add an MX record to the domain's DNS records
When you're finished, click Continue
The next page that you see depends on your previous selection. Use the details on the page to create the required TXT or MX proof of domain ownership record for the custom certificate domain.
After you've created the proof of domain ownership record, click Verify and wait for the results.
On the Connect domain page, click Save and close.
For more information, see Add your domain to Microsoft 365.
Step 4: Create a connector that receives messages from the email add-on service
The important settings for the connector are:
- From the email add-on service to Office 365.
- TLS encryption and certificate verification is based on the custom certificate domain name that you configured as an accepted domain in the previous step.
Use the EAC to create a connector that receives messages from the email add-on service
Create the inbound connector in the new EAC
Go to Mail flow > Connectors, and then click
Add a connector.
The new connector wizard opens. On the first page, configure these settings:
- Connection from: Select Your organization's email server.
- Connection to: Verify that Office 365 is selected.

When you're finished, click Next.
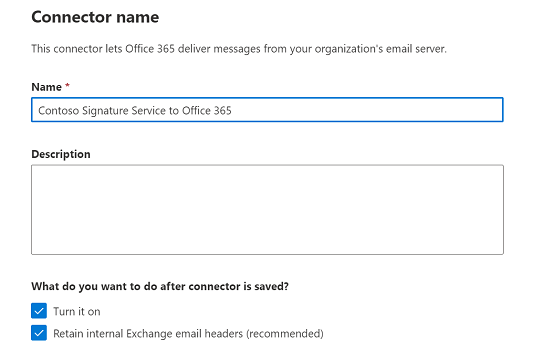
On the Connector name page, configure these settings:
- Name: Enter a descriptive name (for example, Contoso Signature Service to Office 365).
- Description: Enter an optional description.
- What do you want to do after connector is saved?: Configure these settings:
- Turn it on: Verify that this setting is selected.
- Retain internal Exchange email headers (recommended): Configure one of these values:
- Checked: Preserves internal headers in messages that are returning from the email add-on service. If you selected this value on this setting for the connector that you create in Step 1, you'll need to configure the same value here. The internal Exchange headers in the returning messages are preserved, which means the messages returning from the email add-on service are treated as trusted internal messages.
- Unchecked: Removes the internal Exchange headers (if any) from messages that are returning from the email add-on service.
When you're finished, click Next.
On the Authenticating sent email page, verify that the first option is selected (verify by certificate), and enter the certificate domain that the email add-on service gave to you when you enrolled in the service (for example, S5HG3DCG14.smtp.contososignatureservice.com).
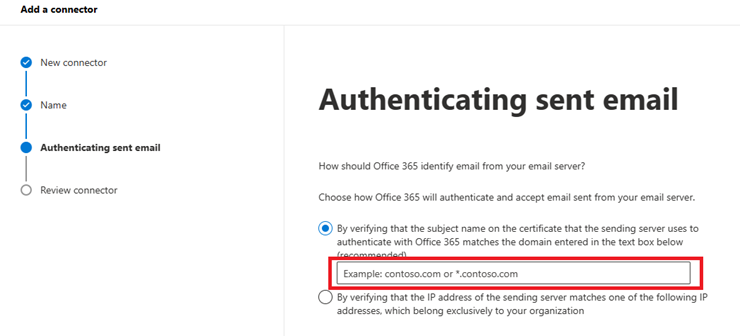
When you're finished, click Next.
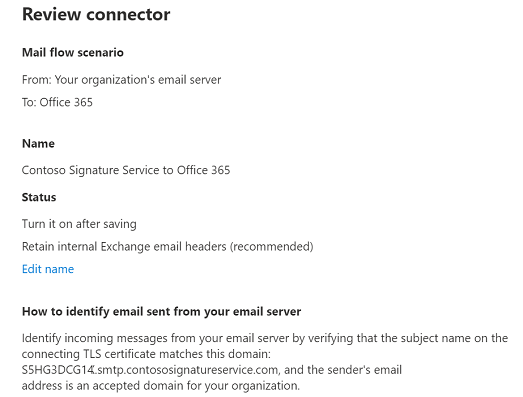
On the Review connector page, verify the settings. You can click Edit in the appropriate section to make changes. When you're finished, click Create connector*.
Create the inbound connector in the classic EAC
Go to Mail flow > Connectors, and then click New
.The new connector wizard opens. On the Select your mail flow scenario page, configure these settings:
- From: Select Your organization's email server.
- To: Select Office 365.

When you're finished, click Next.
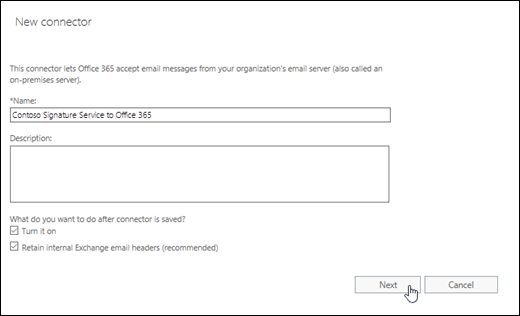
On the next page, configure these settings:
- Name: Enter a descriptive name (for example, Contoso Signature Service to Office 365).
- Description: Enter an optional description.
- What do you want to do after connector is saved?: Configure these settings:
- Turn it on: Verify that this setting is selected.
- Retain internal Exchange email headers (recommended): Configure one of these values:
- Checked: Preserves internal headers in messages that are returning from the email add-on service. If you selected this value on this setting for the connector that you create in Step 1, you'll need to configure the same value here. The internal Exchange headers in the returning messages are preserved, which means the messages returning from the email add-on service are treated as trusted internal messages.
- Unchecked: Removes the internal Exchange headers (if any) from messages that are returning from the email add-on service.
- What do you want to do after connector is saved?: Configure these settings:
When you're finished, click Next.
On the How should Office 365 identify email from your email server? page, verify that the first option is selected (verify by certificate), and enter the certificate domain that the email add-on service gave to you when you enrolled in the service (for example, S5HG3DCG14.smtp.contososignatureservice.com).

When you're finished, click Next.
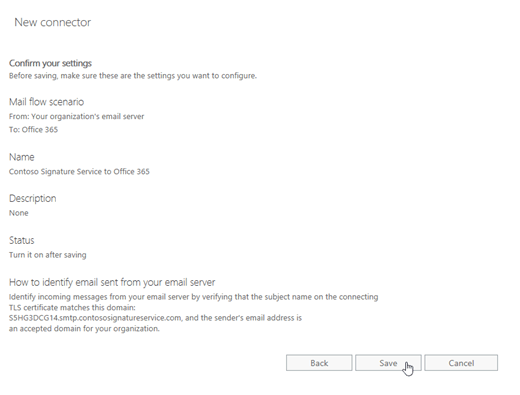
On the Confirm your settings page, verify the settings. You can click Back to modify the settings.
When you're finished, click Save.
Use Exchange Online PowerShell to create an inbound connector to receive messages from the email add-on service
To create the inbound connector from the email add-on service in Exchange Online PowerShell, use this syntax:
New-InboundConnector -Name "<Descriptive Name>" -SenderDomains * -ConnectorType OnPremises -RequireTls $true -RestrictDomainsToCertificate $true -TlsSenderCertificateName <CertificateDomainName> [-CloudServicesMailEnabled $true]
- Name: Contoso Signature Service to Office 365
- Domain name used by the email add-on service's certificate to authenticate with your Office 365 organization: S5HG3DCG14.smtp.contososignatureservice.com
- Internal Exchange message headers that identify messages as internal are preserved in the outbound messages.
New-InboundConnector -Name "Contoso Signature Service to Office 365" -SenderDomains * -ConnectorType OnPremises -RequireTls $true -RestrictDomainsToCertificate $true -TlsSenderCertificateName S5HG3DCG14.smtp.contososignatureservice.com -CloudServicesMailEnabled $true
For detailed syntax and parameter information, see New-InboundConnector.
Verify that you've successfully created the inbound connector
To verify that you've successfully created an inbound connector to receive messages from the email add-on service, use either of these procedures:
In the EAC, go to Mail flow > Connectors, select the connector, and then verify the settings.
In Exchange Online PowerShell, replace <Connector Name> with the name of the connector, and run this command to verify the property values:
Get-InboundConnector -Identity "<Connector Name>" | Format-List Name,SenderDomains,ConnectorType,RequireTls,RestrictDomainsToCertificate,TlsSenderCertificateName,CloudServicesMailEnabled