Trigger a cloud flow based on email properties
Use the When a new email arrives (V3) trigger to create a cloud flow that runs when one or more of the following email properties match criteria that you provide.
| Property | When to use |
|---|---|
| Folder | Trigger a cloud flow whenever emails arrive in a specific folder. This property can be useful if you have rules that route emails to different folders. |
| To | Trigger a cloud flow based on the address to which an email was sent. This property can be useful if you receive email that was sent to different email addresses in the same inbox. |
| CC | Trigger a cloud flow based on the CC address to which an email was sent. This property can be useful if you receive email that was sent to different email addresses in the same inbox. |
| From | Trigger a cloud flow based on the sender's email address. |
| Importance | Trigger a cloud flow based on the importance with which emails were sent. Emails can be sent with high, normal, or low importance. |
| Has Attachment | Trigger a cloud flow based on the presence of attachments in incoming emails. |
| Subject Filter | Search for the presence of specific words in the subject of an email. Your flow then runs actions that are based on the results of your search. |
Important
Each Power Automate plan includes a run quota. Always check properties in the flow's trigger when possible. Doing so avoids using your run quota unnecessarily. If you check a property in a condition, each run counts against your plan's run quota, even if the filter condition that you defined isn't met.
For example, if you check an email's From address in a condition, each run counts against your plan's run quota, even if it's not from the address that interests you.
In the following tutorials, we check all properties in the when a new email arrives (V3) trigger. Learn more by visiting the frequently asked billing questions and the pricing page.
Prerequisites
An account with access to Power Automate.
An email account with Outlook for Microsoft 365 or Outlook.com.
The Power Automate mobile app for Android, iOS, or Windows Phone.
Connections to Office, Outlook, and the push notification service.
Trigger a cloud flow based on an email's subject
In this tutorial, we create a cloud flow that sends a push notification to your mobile phone if the subject of any new email has the word "lottery" in it. Your flow then marks any such email as read.
Although this tutorial sends a push notification, you're free to use any other action that suits your workflow needs. For example, you might store the email contents in another repository such as Google Sheets or a Microsoft Excel workbook stored on Dropbox.
Sign in to Power Automate.
On the left pane, select My flows.
Select New flow > Automated cloud flow.
In the Flow name field, enter a name for your flow.
In the Choose your flow's trigger field, enter new email.
Select When a new email arrives (V3) from the list of triggers. This trigger runs each time an email arrives.
Select Create.
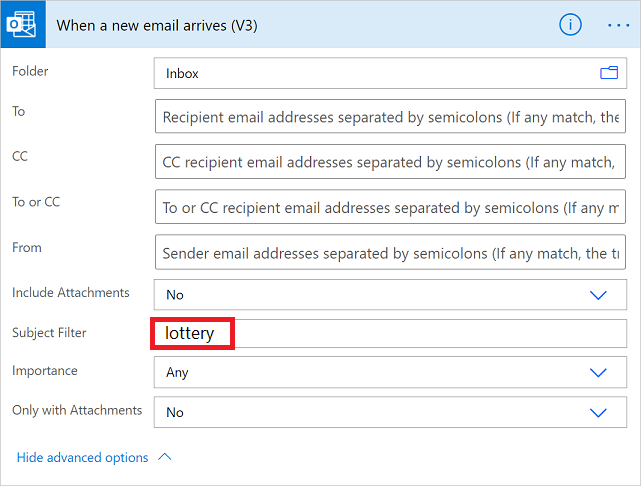
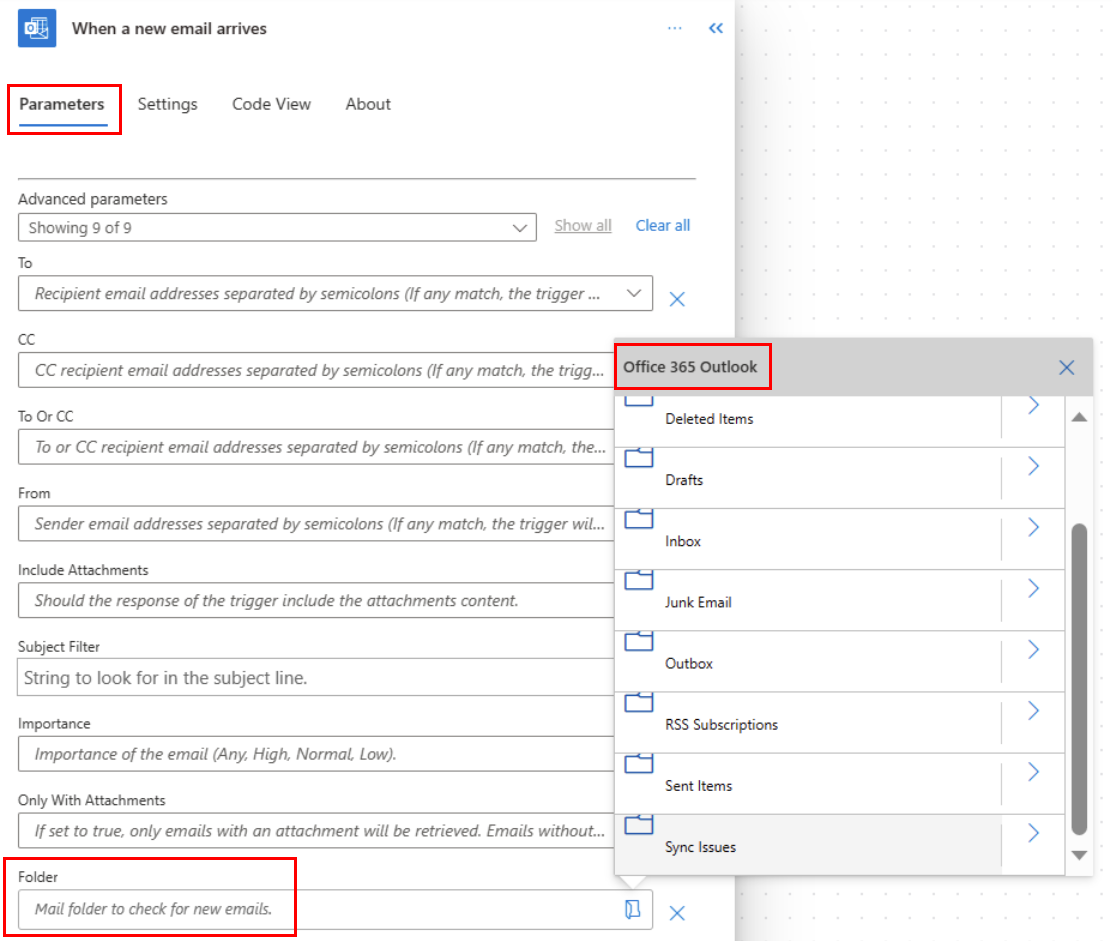
Select the folder that you'd like the flow to monitor for incoming emails, and then select Show advanced options.
To display all your email folders, select the Show Picker icon, which is located on the right side of the Folder box on the When a new email arrives (V3) card.
Note
Power Automate uses either the classic cloud flows designer or the cloud flows designer with Copilot. To identify which designer you’re using, go to the Note section in Understand the cloud flows designer with copilot capabilities.
Select the folder that you'd like the flow to monitor for incoming emails, and then select Show advanced options.
To display all your email folders, select the Show Picker icon, which is located on the right side of the Folder box on the When a new email arrives (V3) card.
In the Subject Filter box, enter the text that your flow uses to filter incoming emails.
In this example, we're interested in any email that has the word "lottery" in the subject.
Add a mobile notification action
Select New step.
Search for notification, and then select Send me a mobile notification from the list of actions.
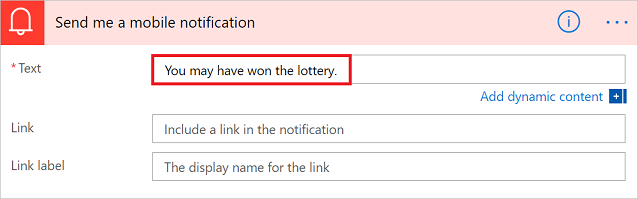
Enter the details for the mobile notification you want to receive when you receive an email that matches the Subject Filter you specified earlier.
Add a read/unread action
Select New step.
Search for read, and then select Mark as read or unread (V3) from the list of actions.
In the Mark as read or unread card, add the MessageId token in the Message Id box.
If the Message Id token isn't visible, search for it by entering Message Id in the search box.
- Select Save at the top of the page.
Congratulations! You now receive a push notification each time you receive an email that contains the word "lottery" in the subject.
Trigger a cloud flow based on an email's sender
In this tutorial, you create a cloud flow that sends a push notification to your mobile phone if any new email arrives from a specific sender (email address). The flow also marks any such email as Read.
Sign in to Power Automate.
On the left pane, select My flows.
Select New flow > Automated cloud flow.
In the Flow name field, enter a name for your flow.
In the Choose your flow's trigger field, enter new email.
Select When a new email arrives (V3) from the list of triggers. This trigger runs each time an email arrives.
Select Create.
Select the folder that you'd like the flow to monitor for incoming emails, and then select Show advanced options.
To display all your email folders, select the Show Picker icon, which is located on the right side of the Folder box on the When a new email arrives (V3) card.
In the From box, enter the email address of the sender.
Your flow takes action on any emails that are sent from this address.
Add a mobile notification action
Select New step.
Search for notification, and then select Send me a mobile notification from the list of actions.
Enter the details for the mobile notification you'd like to receive whenever a message arrives from the email address that you entered earlier.

Add a read/unread action
Select New step.
Search for read, and then select Mark as read or unread (V3) from the list of actions.
In the Mark as read or unread card, add the MessageId token in the Message Id box.
If the Message Id token isn't visible, search for it by entering Message Id in the search box.
- Give your flow a name, and then save it by selecting Create flow at the top of the page.
Trigger a cloud flow when emails arrive in a specific folder
If you have rules that route emails to different folders based on certain properties, such as the address, you might want this type of flow.
Note
If you don't already have a rule that routes email to a folder other than your inbox, create such a rule and confirm it works by sending a test email.
Sign in to Power Automate.
On the left pane, select My flows.
Select New flow > Automated cloud flow.
Search for email, and then select Office 365 Outlook - When a new email arrives (V3) from the list of triggers. This trigger runs each time an email arrives.
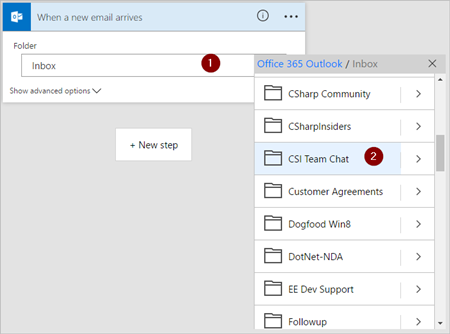
Select the folder to which you're routing specific emails. To display all email folders, first select the Show Picker icon, which is located on the right side of the Folder box on the when a new email arrives (V3) card.
Add a mobile notification action
Select New step.
Search for notification, and then select Send me a mobile notification from the list of actions.
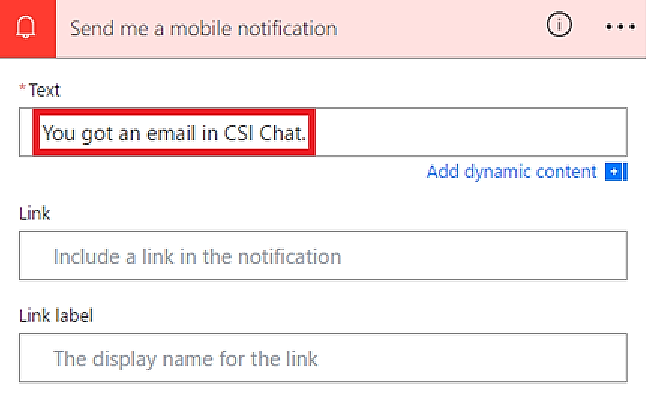
Enter the details for the mobile notification you'd like to receive when an email arrives in the folder you selected earlier. If you haven't already, enter the credentials for the notifications service.
Add a read/unread action
Select New step.
Search for read, and then select Mark as read or unread (V3) from the list of actions.
In the Mark as read or unread card, add the MessageId token in the Message Id box.
If the Message Id token isn't visible, search for it by entering Message Id in the search box.
- Give your flow a name, and then save it by selecting Create flow at the top of the page.
Test the flow by sending an email that gets routed to the folder you selected earlier in this tutorial.
Feedback
Coming soon: Throughout 2024 we will be phasing out GitHub Issues as the feedback mechanism for content and replacing it with a new feedback system. For more information see: https://aka.ms/ContentUserFeedback.
Submit and view feedback for