Extend Azure AI Health Bot with custom scenarios
Integration with Omnichannel for Dynamics 365 Customer Service allows the patient to interact with the Azure AI Health Bot by using the Dynamics 365 chat widget to access medical information and your custom scenarios. It also allows the escalation of a bot conversation to a live agent to continue the interaction. When a conversation is escalated, Dynamics passes along the conversation history and the context to the agent.
In this exercise, you complete the following tasks:
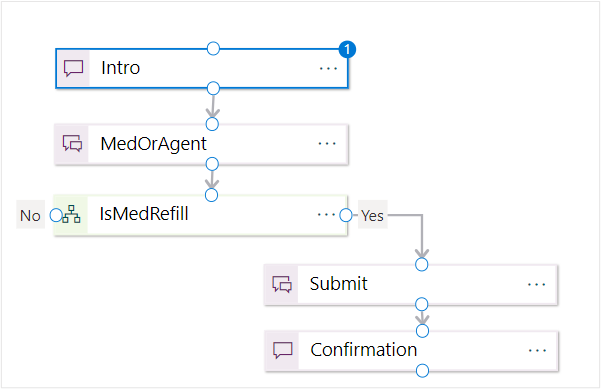
Design the following Health Bot scenario called MCH_PatientService.
Intro statement card - Triggers a welcome message to the customer.
MedOrAgent card - Prompts with the Medication refill or Live Agent action authored card.
IsMedRefill decision card - Checks the variable and submits a medication refill or starts live chat.
Submit card - Prompts an adaptive card message (input text) with name, email, and medication name.
Live Chat card - Communicates to the customer that they're being directed to a live agent.
Confirmation card - Repeats information that is gathered from the submission and then thanks the customer.
Escalate card - Triggers an escalate to live agent message on Omnichannel for Customer Service.
Design another Health Bot scenario called MCH_PatientServiceWelcome. This scenario holds the starting statement that allows the user to invoke the MCH_PatientService scenario.
Set the Automatic Welcome Scenario to be the MCH_PatientServiceWelcome custom scenario that you create. This setting begins the scenario when a user first interacts with the Health Bot.
Task: Create the MCH_PatientService scenario
In this task, you create the MCH_PatientService bot scenario by using the designer canvas.
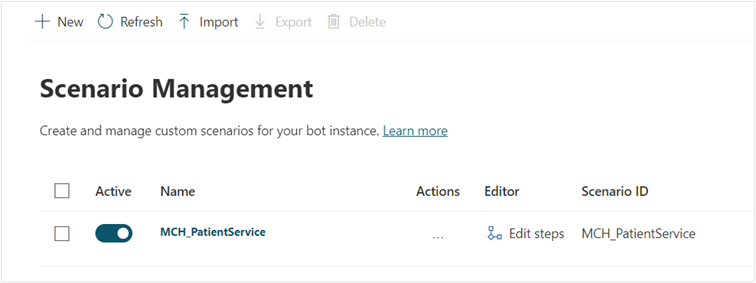
Return to the Azure AI Health Bot instance home page where you set the bot settings. This link is the portal management link that you copied from the Azure portal. Select Create new scenario on the landing page. If you aren't on the landing page, you can go to Scenario > Manage on the left navigation pane.
Enter MCH_PatientService as the Name and the Scenario ID for the new Health Bot scenario.
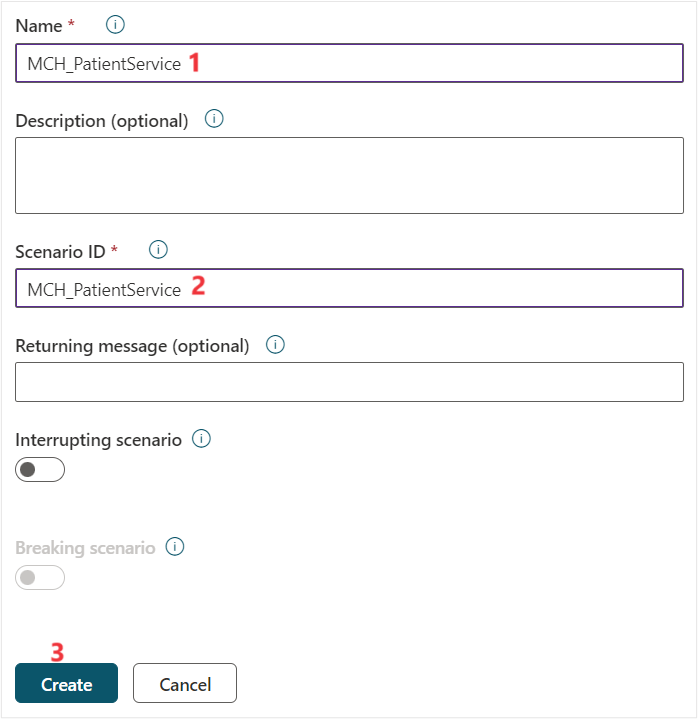
Design the scenario conversation, which should take you directly to the designer. If not, select the MCH_PatientService scenario in Scenarios > Manage to edit.

Step: Add a bot introduction statement
In this step, you add a bot introduction statement.
Select the Plus (+) symbol.

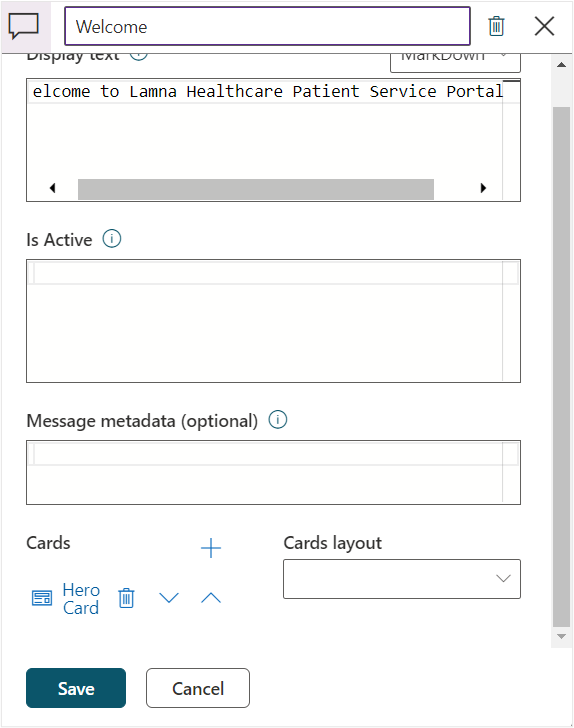
Add a beginning statement to the scenario by selecting the plus (+) sign in the center of the canvas and then by going to Conversational elements > Statement.

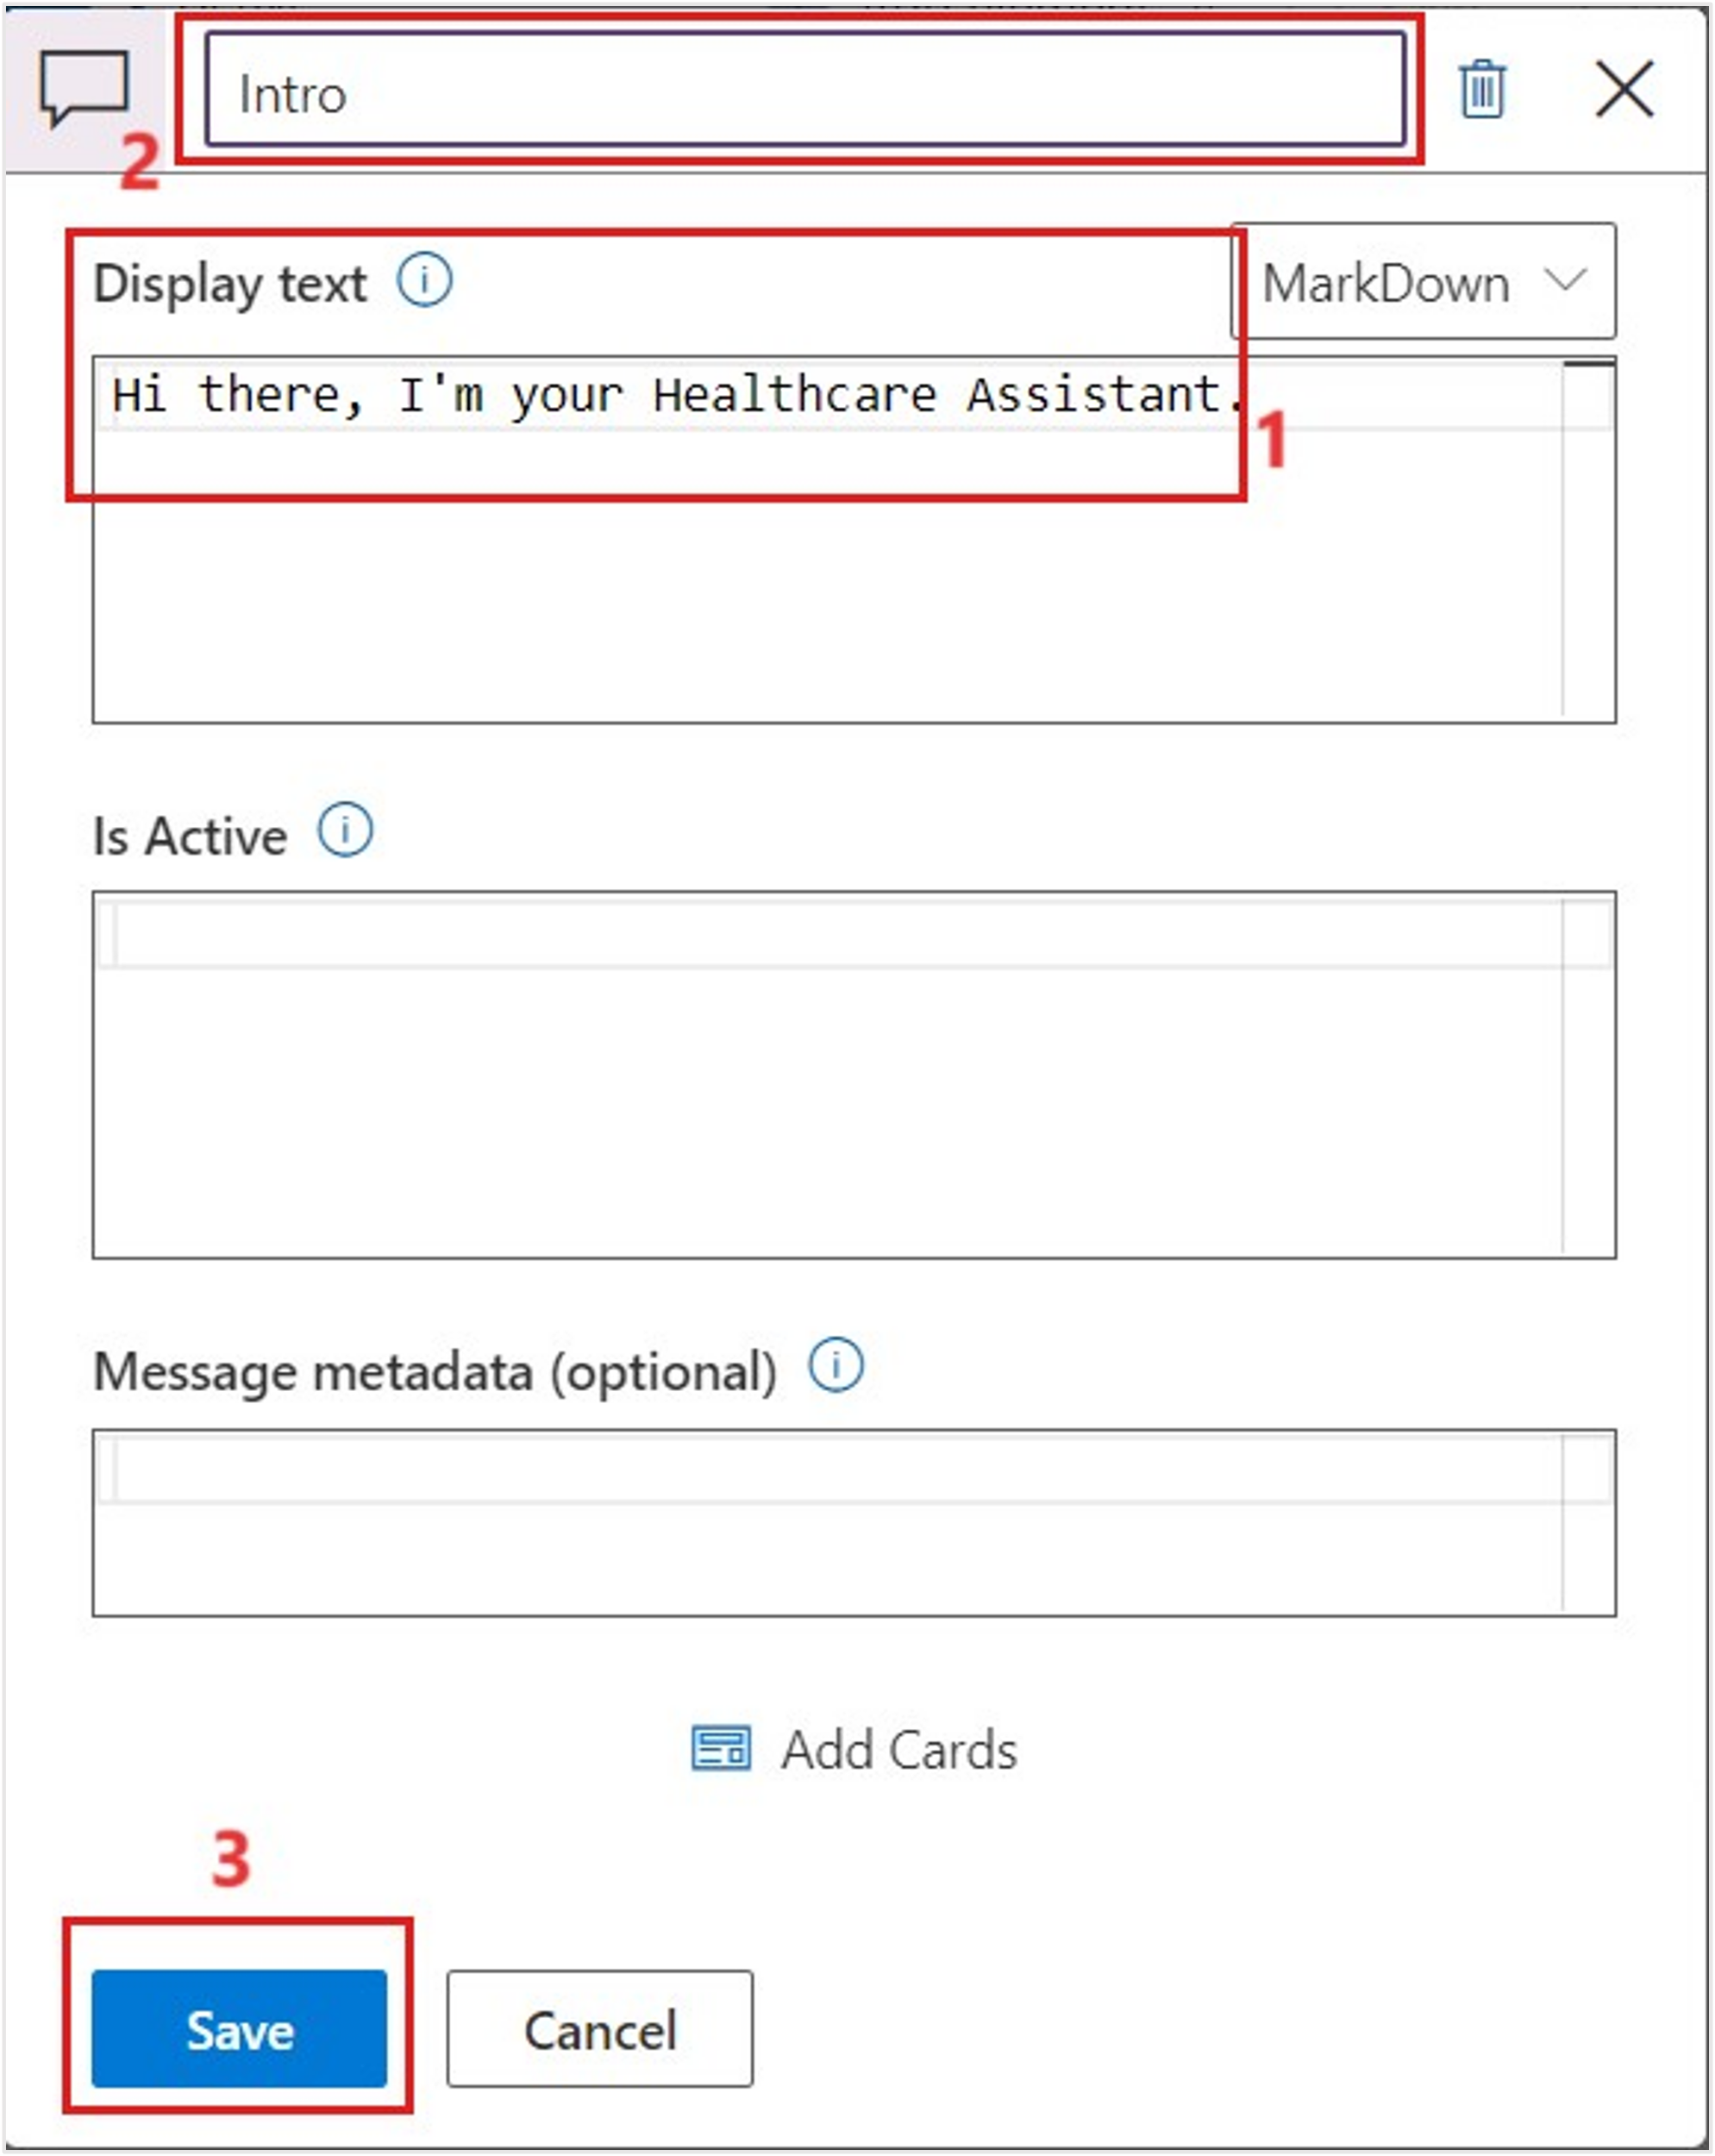
In the Display text box, enter the following message:
Hi there, I'm your Healthcare Assistant.
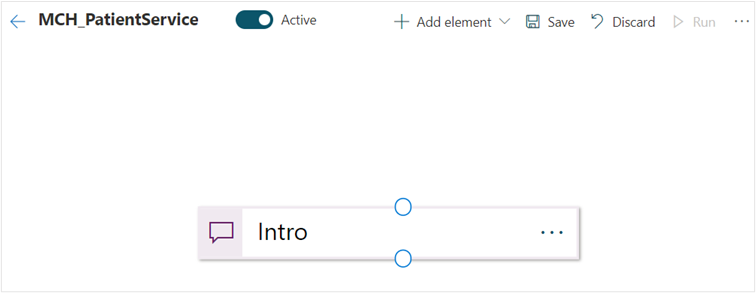
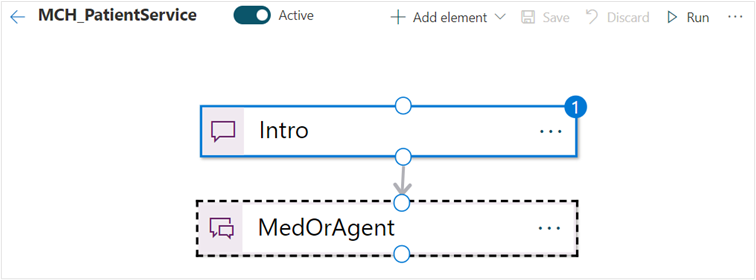
Select the pencil icon next to Statement in the upper bar and change the Title to Intro. Select Save.
The Intro statement is added to the designer canvas. Double-click if you need to edit any item on the canvas.


Step: Add a statement for a medication request or a live agent
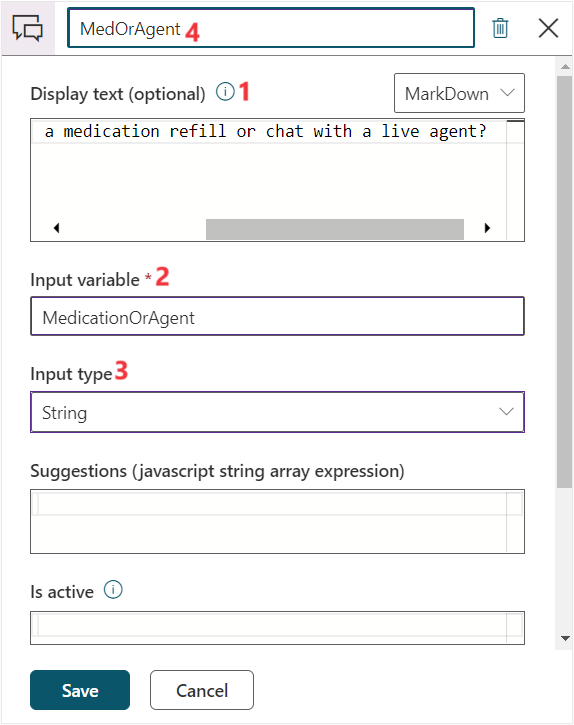
This section prompts two buttons: Medication Refill and Live Agent. When a user selects either button, the appropriate text to the MedicationOrAgent variable is set.
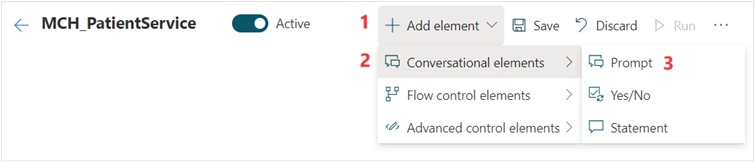
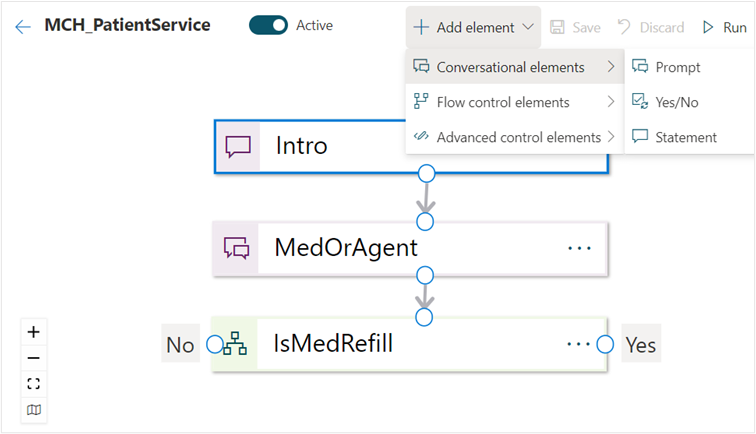
Add a prompt to the user by right-clicking the canvas or by selecting Add element > Conversational elements > Prompt.
Enter the following details:
Display text - Would you like to request a medication refill or chat with a live agent?
Input variable - MedicationOrAgent
Input type - String
Title - Rename to MedOrAgent
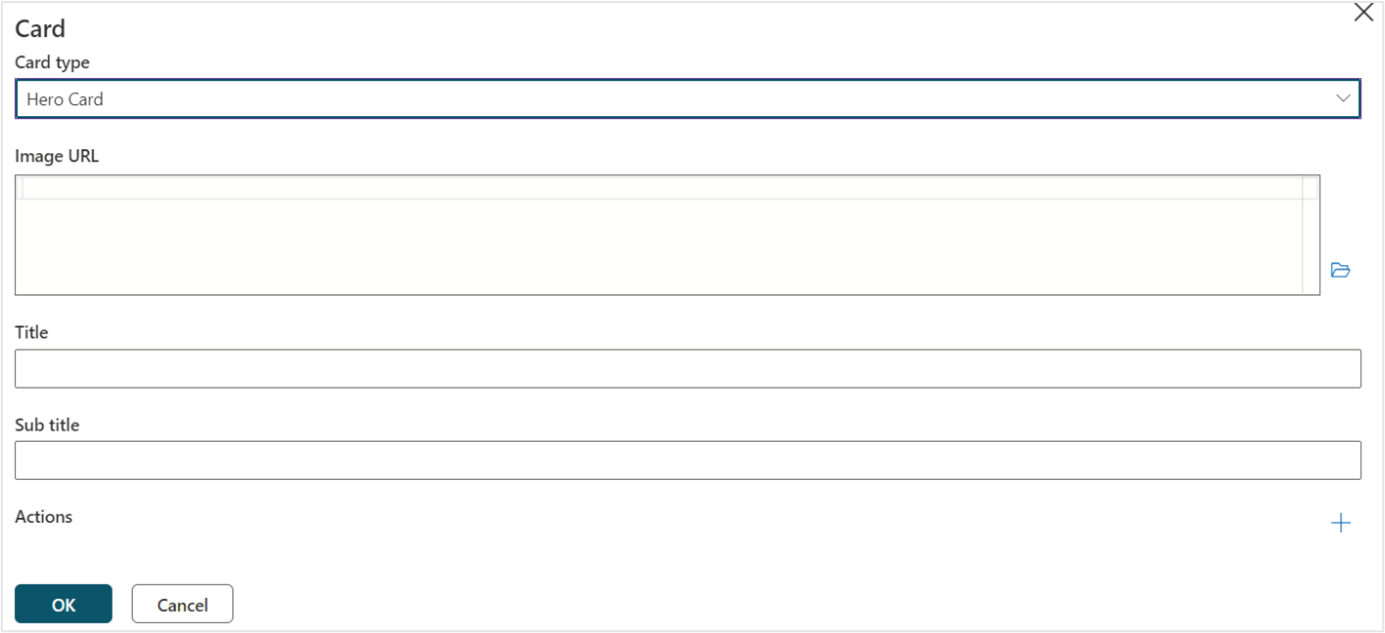
Scroll down and select the Add Cards button.
Select Hero Card from the Card type dropdown menu. Leave the title blank because you're already prompted with the display text. Select the plus (+) icon to add new actions so that the user can select a response to send to the bot.
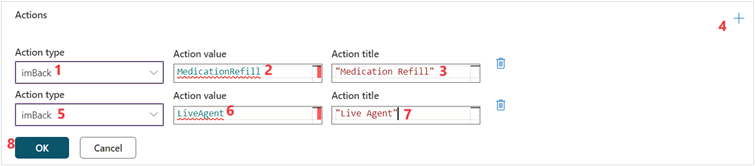
Select the plus (+) icon twice to add two actions.
For the first action, select the following values:
Action type - imBack
Action value - MedicationRefill
Action title - "Medication Refill"
For the second action, fill in the following values:
Action type - imBack
Action value - LiveAgent
Action title - "Live Agent"
Select OK to return to the prompt details. The Hero Card should be defined.
Select Vertical from the Cards layout dropdown menu. Select Save.
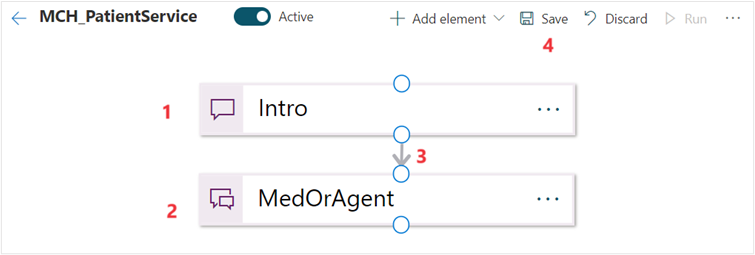
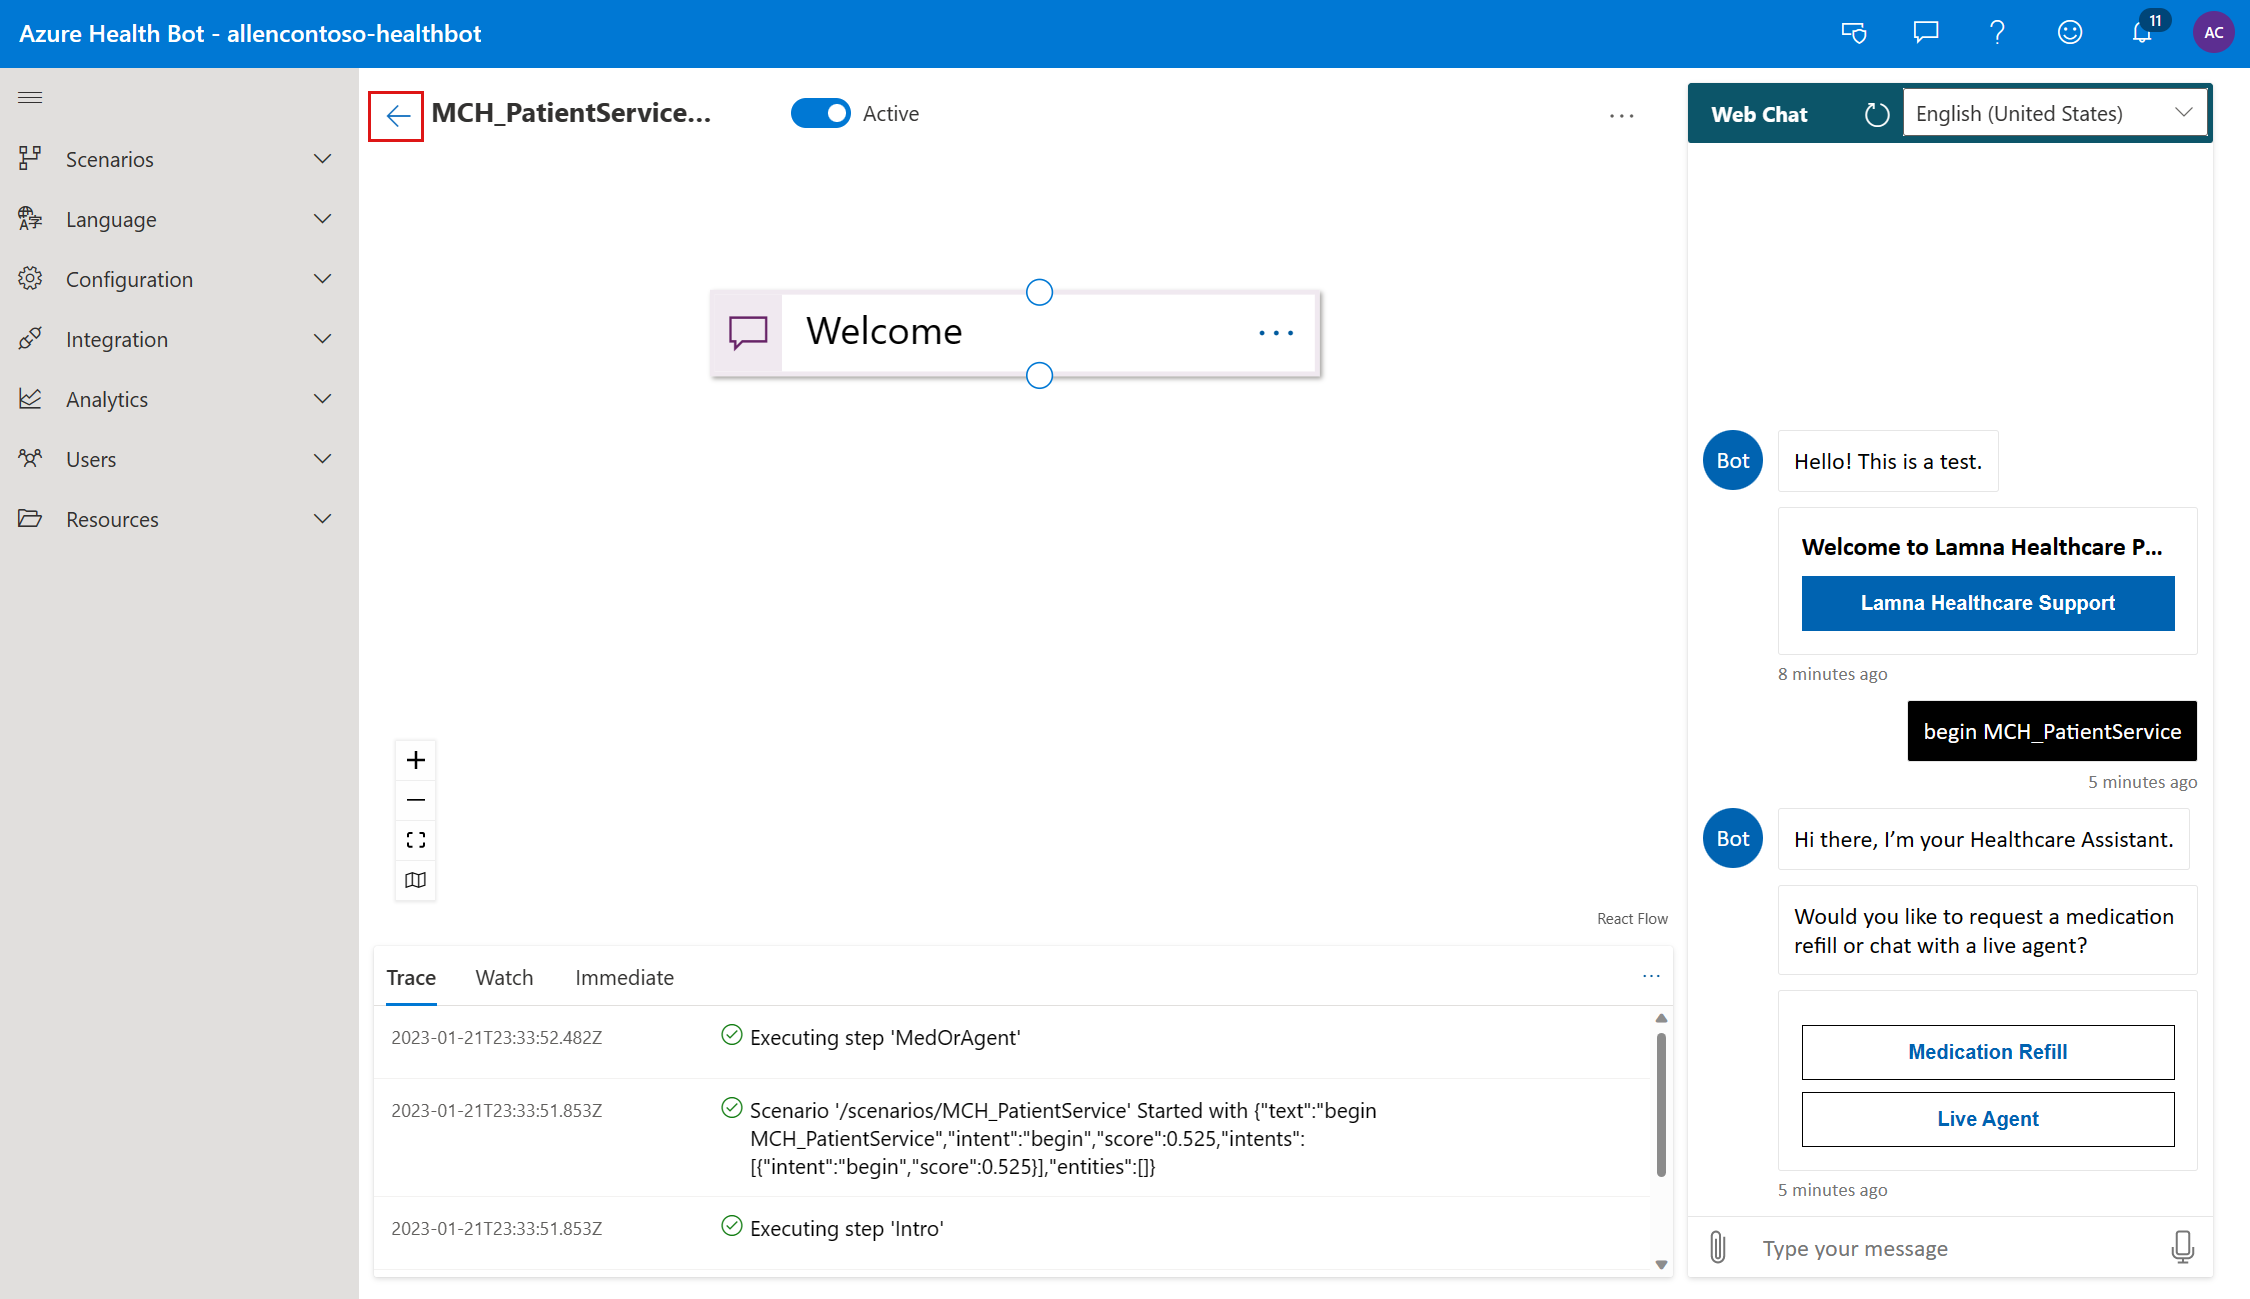
Move the Intro box above the MedOrAgent box and connect them. To do so, select the bottom circle on Intro and drag it to the top circle on the new prompt. An arrow automatically appears when you try to connect the Intro and MedOrAgent boxes. Select Save in the menu, which might have changed to an ellipsis (...).
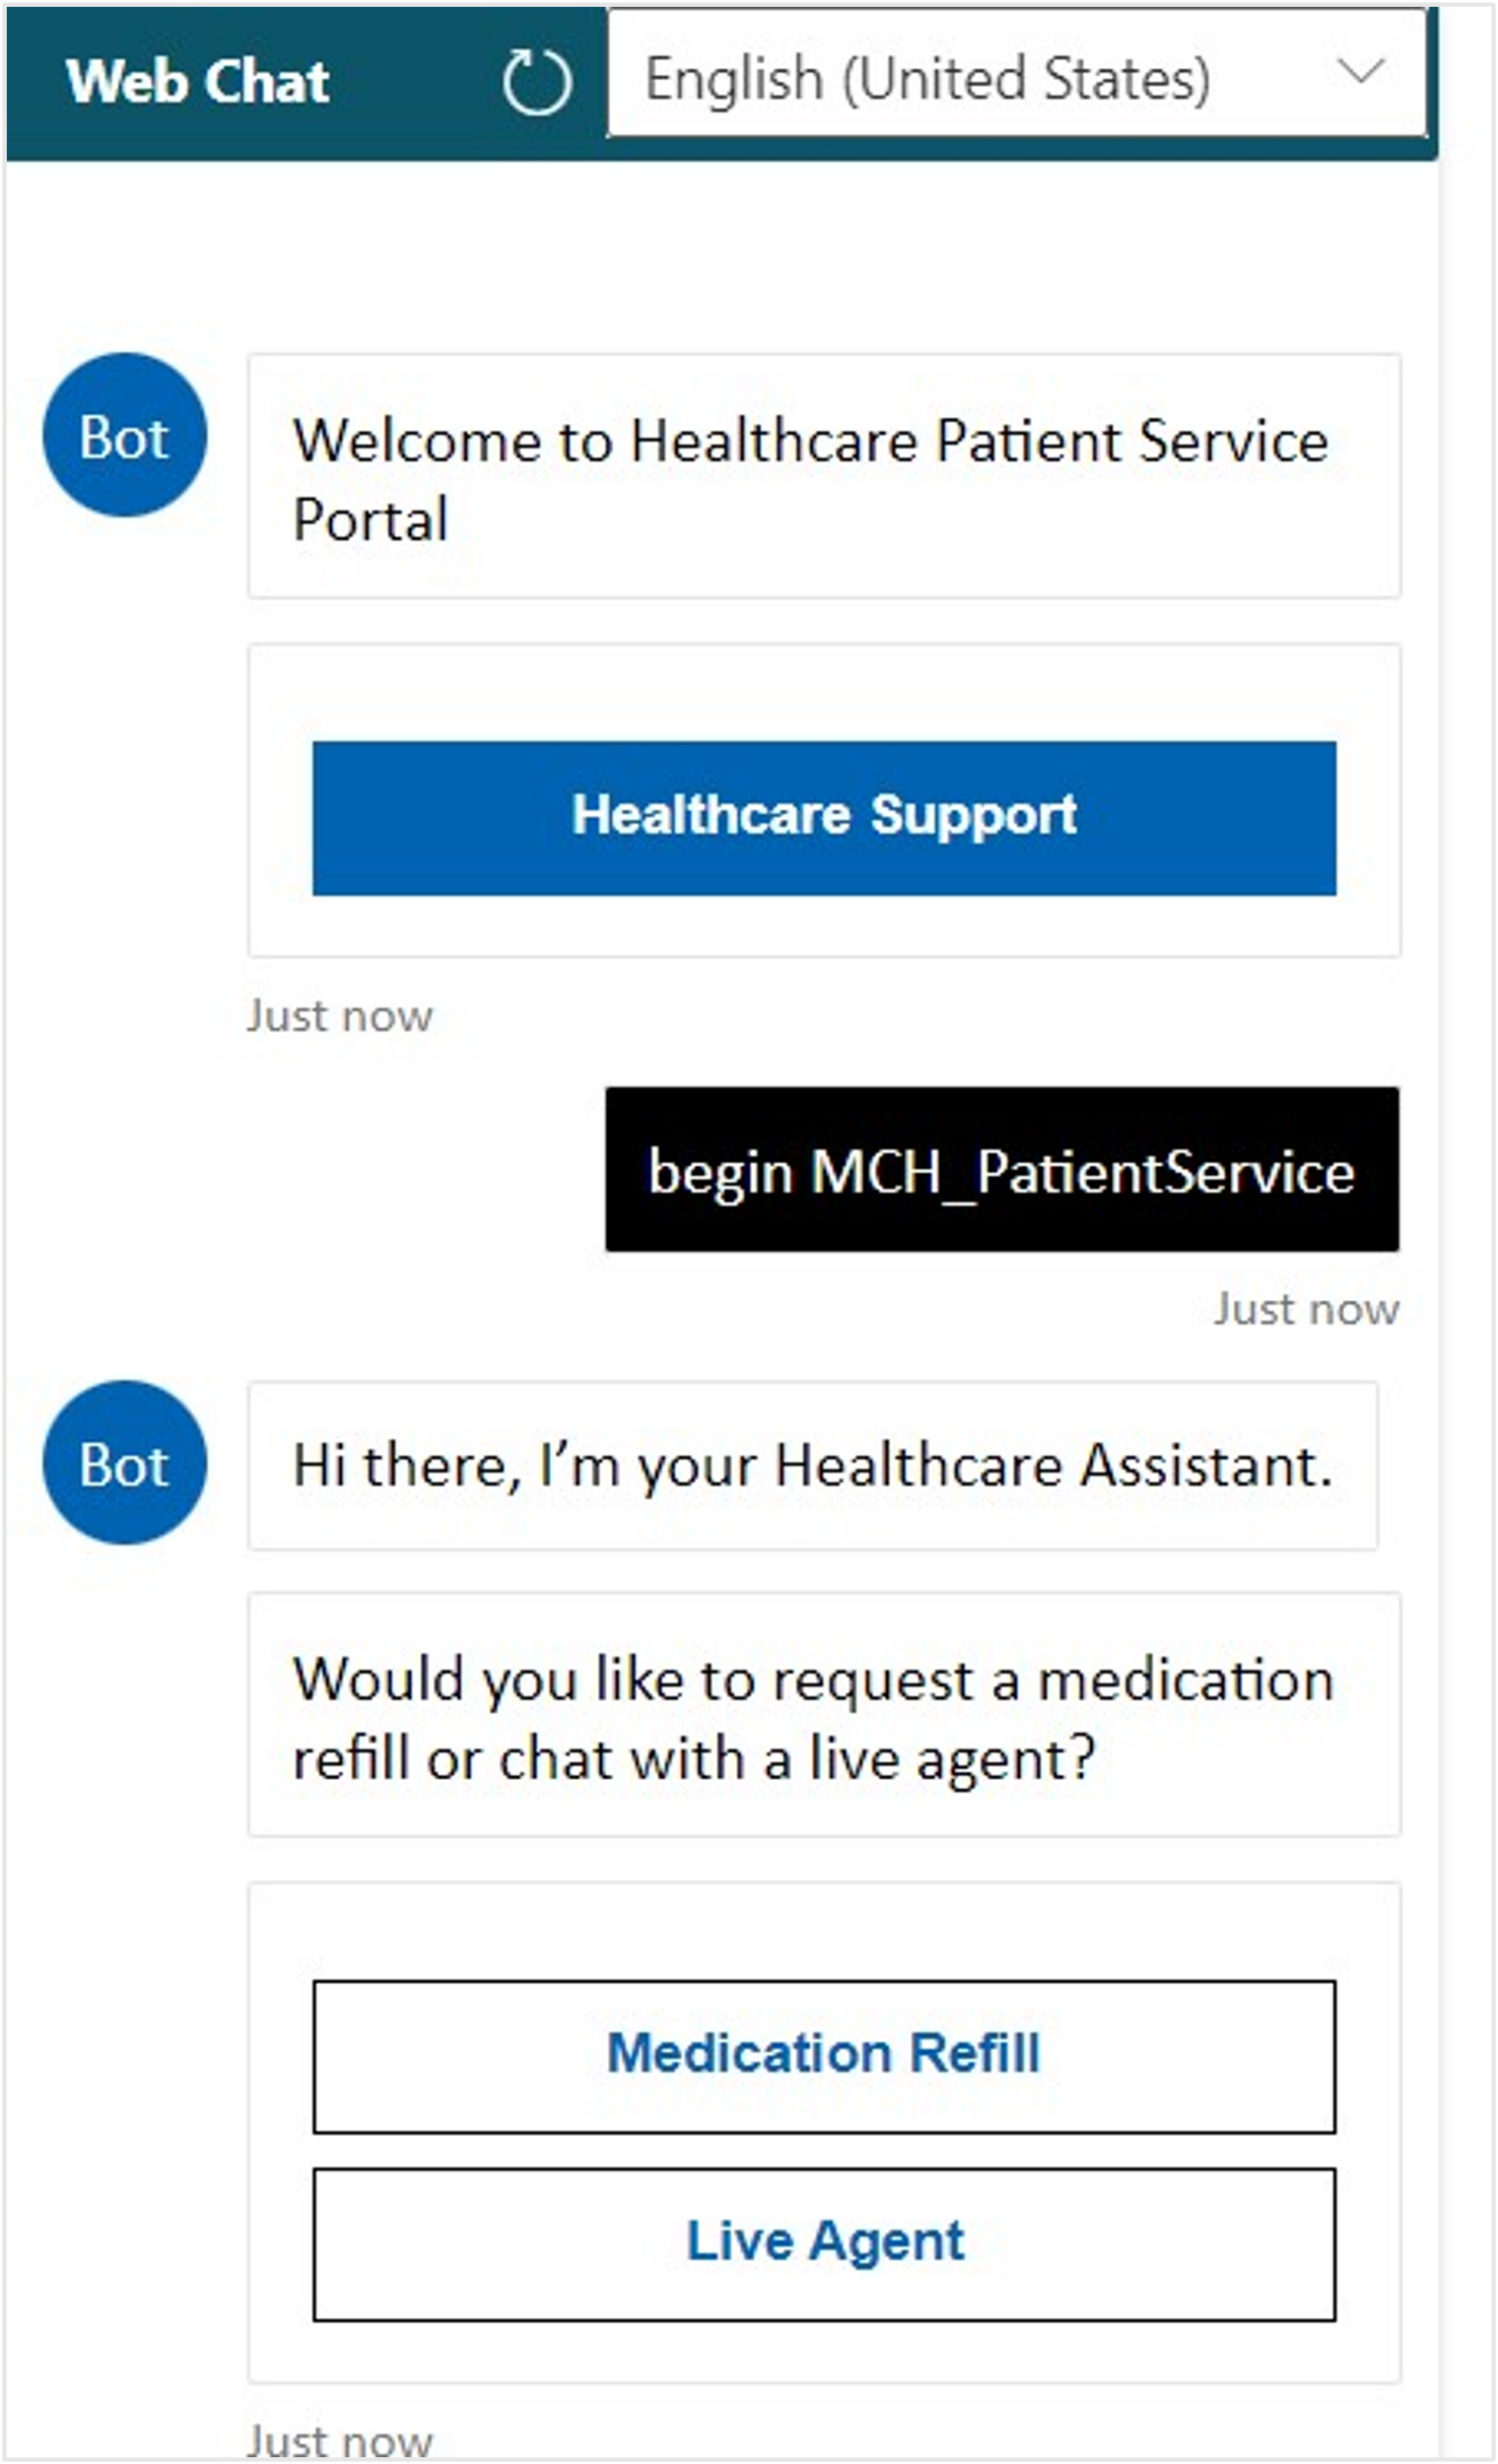
Remember to save often because the scenario doesn't AutoSave. Now that the scenario is saved, the run command should be enabled. Select Run from the menu to view the output in the Web Chat on the right.


The test welcome message should display from the previous exercise along with the new statement and prompt asking for a medication refill or chat with an agent.

Step: Add a MedicationOrAgent decision branch
This step checks whether the user has selected Medication Refill or Live Agent with the help of the MedicationOrAgent variable. It redirects the message according to the selection.
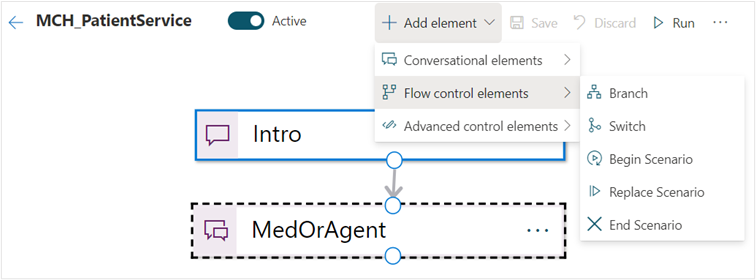
Right-click the canvas to bring up the menu, select Flow control elements > Branch to allow your logic to proceed in two different directions.
Enter the following expression in the Javascript Boolean expression box:
scenario.MedicationOrAgent === "MedicationRefill"Rename the branch to IsMedRefill and then select Save.

Place IsMedRefill below MedOrAgent. Select and drag the bottom circle of the MedOrAgent prompt to the top circle of the IsMedRefill branch decision to connect them.


Step: Prompt the user to enter data for the medication refill option
Your next step is to prompt the user to enter data for the medication refill option by following these steps:
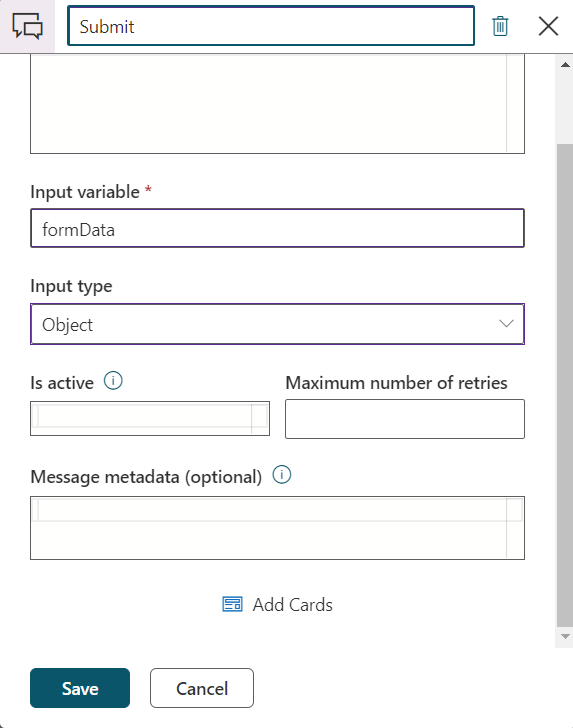
Add a Prompt element to display the form data (by using an Adaptive Card) to capture the patient's name, email, and phone number to create an appointment.
Add the following details. When you're finished, select the Add Cards button.
Input variable - formData
Input type - Object
Title - Submit
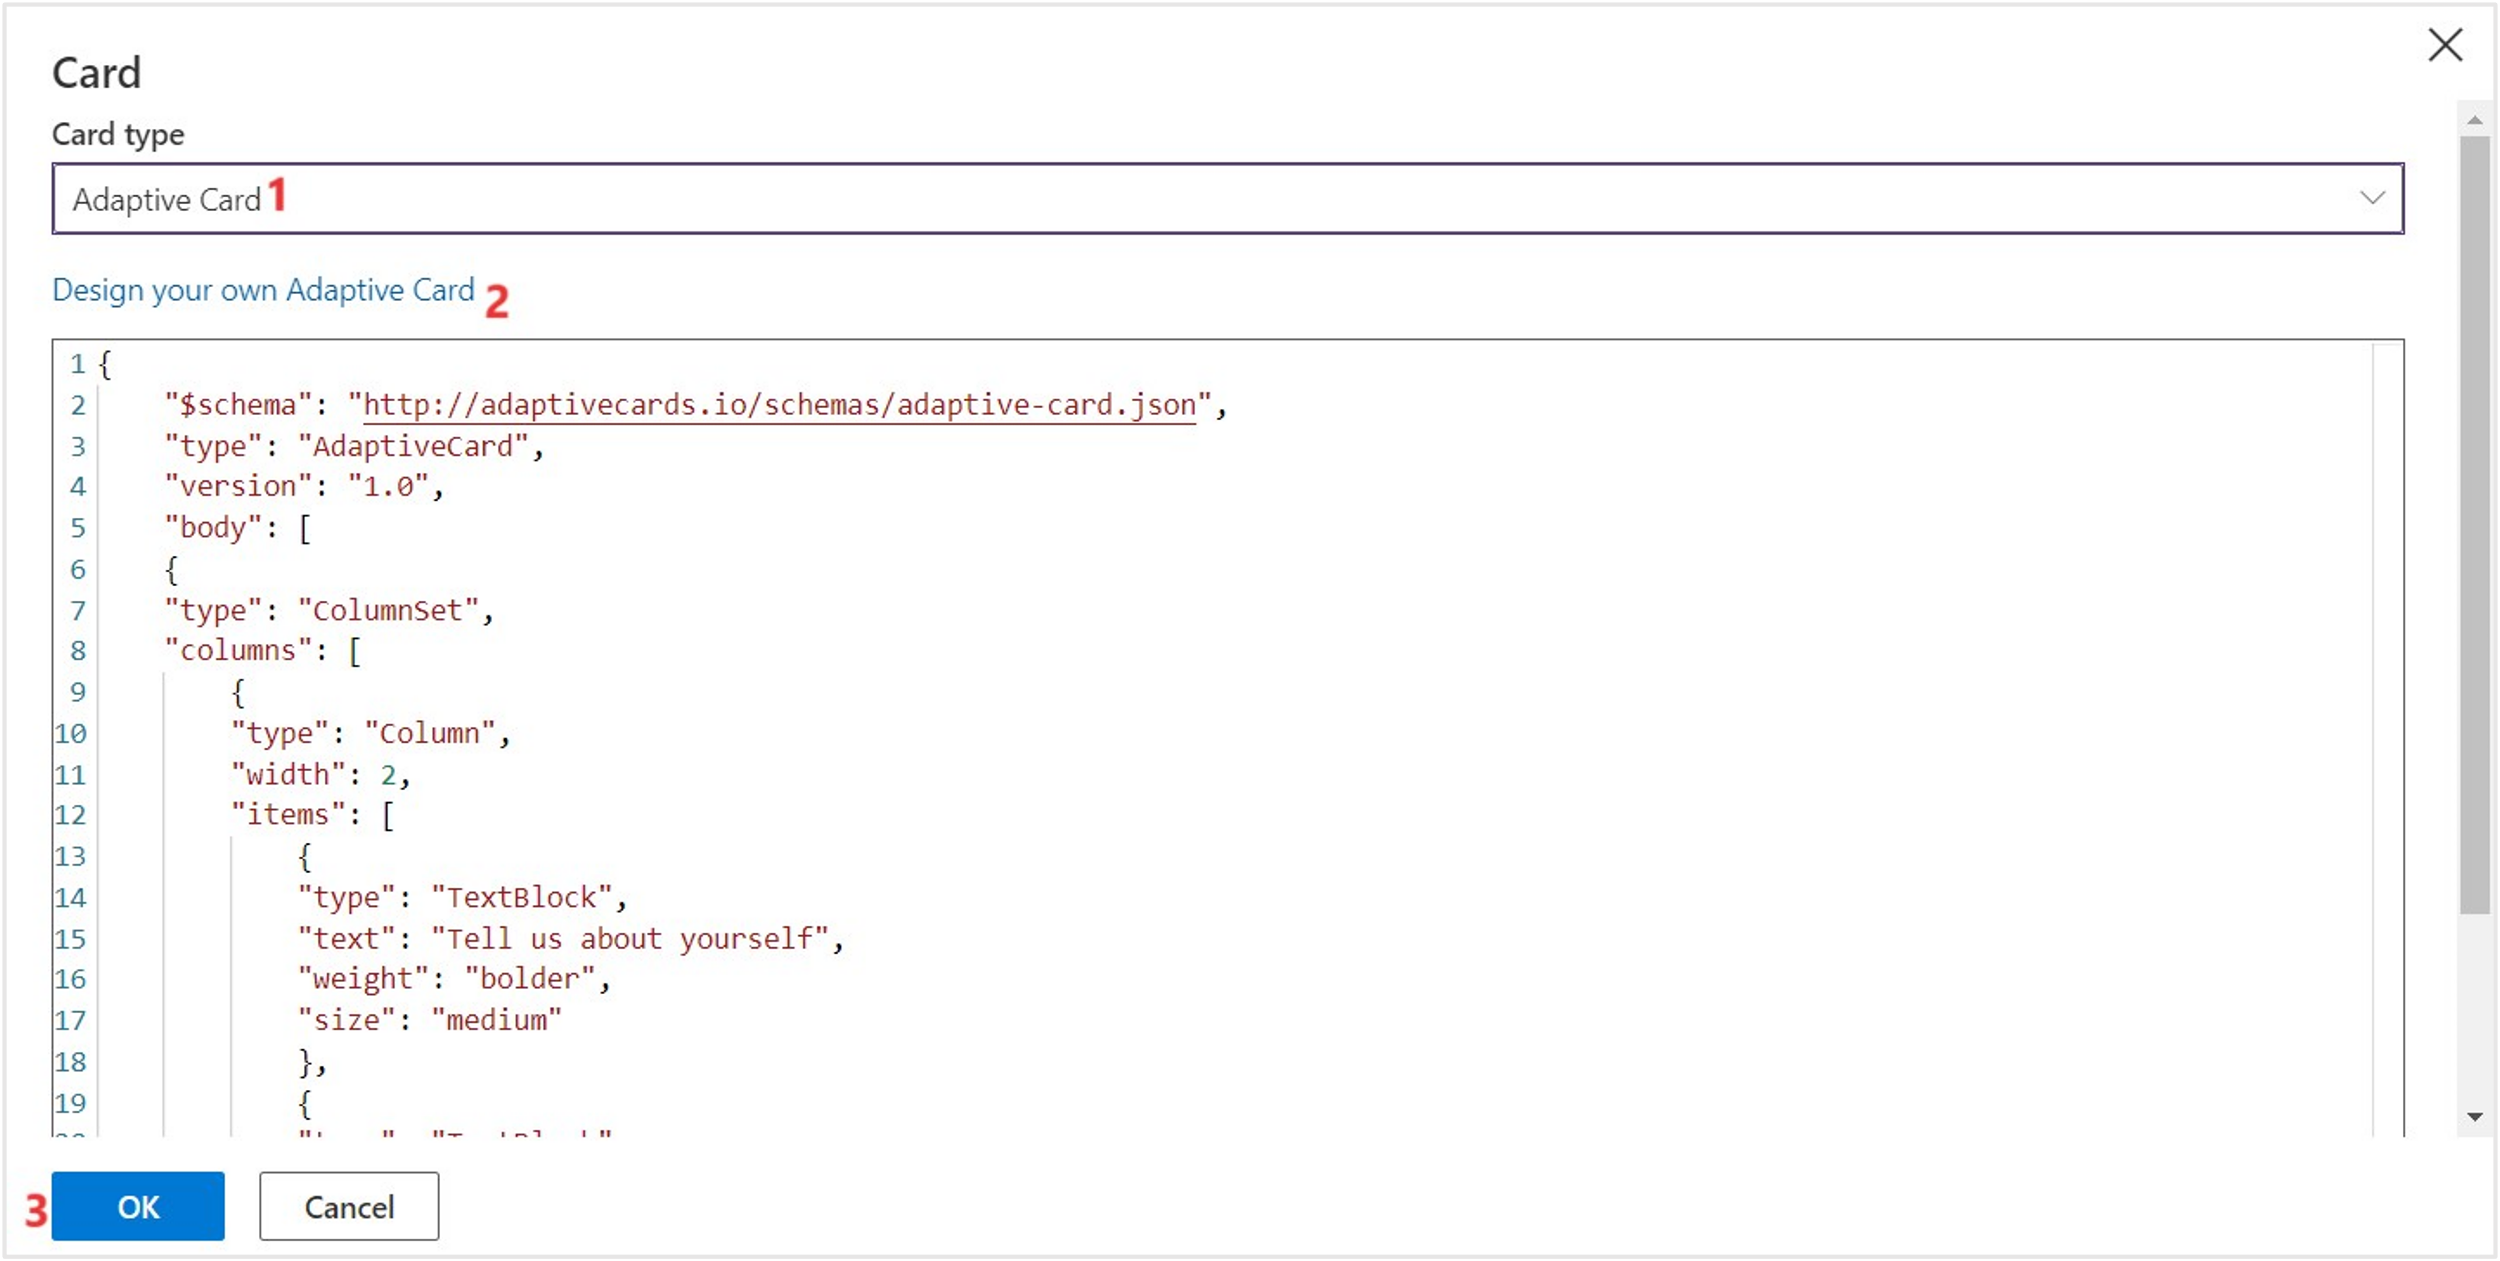
Change the Card type to Adaptive Card. Add the following JSON to your card to show multiple fields of input for the user in an appealing format. Select OK.
JSON for adaptive card:
{
    "$schema": "http://adaptivecards.io/schemas/adaptive-card.json",
    "type": "AdaptiveCard",
    "version": "1.0",
    "body": [
    {
    "type": "ColumnSet",
    "columns": [
        {
        "type": "Column",
        "width": 2,
        "items": [
            {
            "type": "TextBlock",
            "text": "Tell us about yourself",
            "weight": "bolder",
            "size": "medium"
            },
            {
            "type": "TextBlock",
            "text": "We just need a few more details to get your Medication refill.",
            "isSubtle": true,
            "wrap": true
            },
            {
            "type": "TextBlock",
            "text": "Don't worry, we'll never share or sell your information.",
            "isSubtle": true,
            "wrap": true,
            "size": "small"
            },
            {
            "type": "TextBlock",
            "text": "Your name",
            "wrap": true
            },
            {
            "type": "Input.Text",
            "id": "myName",
            "placeholder": "Full name"
            },
            {
            "type": "TextBlock",
            "text": "Your email",
            "wrap": true
            },
            {
            "type": "Input.Text",
            "id": "myEmail",
            "placeholder": "youremail@example.com",
            "style": "email"
            },
            {
            "type": "TextBlock",
            "text": "Medication Requested"
            },
            {
            "type": "Input.Text",
            "id": "myMedReq",
            "placeholder": "Medication Name",
            "wrap": "true"
            }
          ]
        }
      ]
    }
  ],
    "actions": [
    {
    "type": "Action.Submit",
    "title": "Submit"
    }
  ]
}
Note
Go to the Adaptive Card visualizer to test your own authored card.
On the prompt form, select Vertical from the Cards layout dropdown menu. Select Save.
Connect the Yes condition of the IsMedRefill branch to the Submit prompt.
Save and Run your current scenario. If you don't save the scenario first, it doesn't run with updates that have been made since the last save. If you haven't saved at all, it doesn't recognize any conversation.
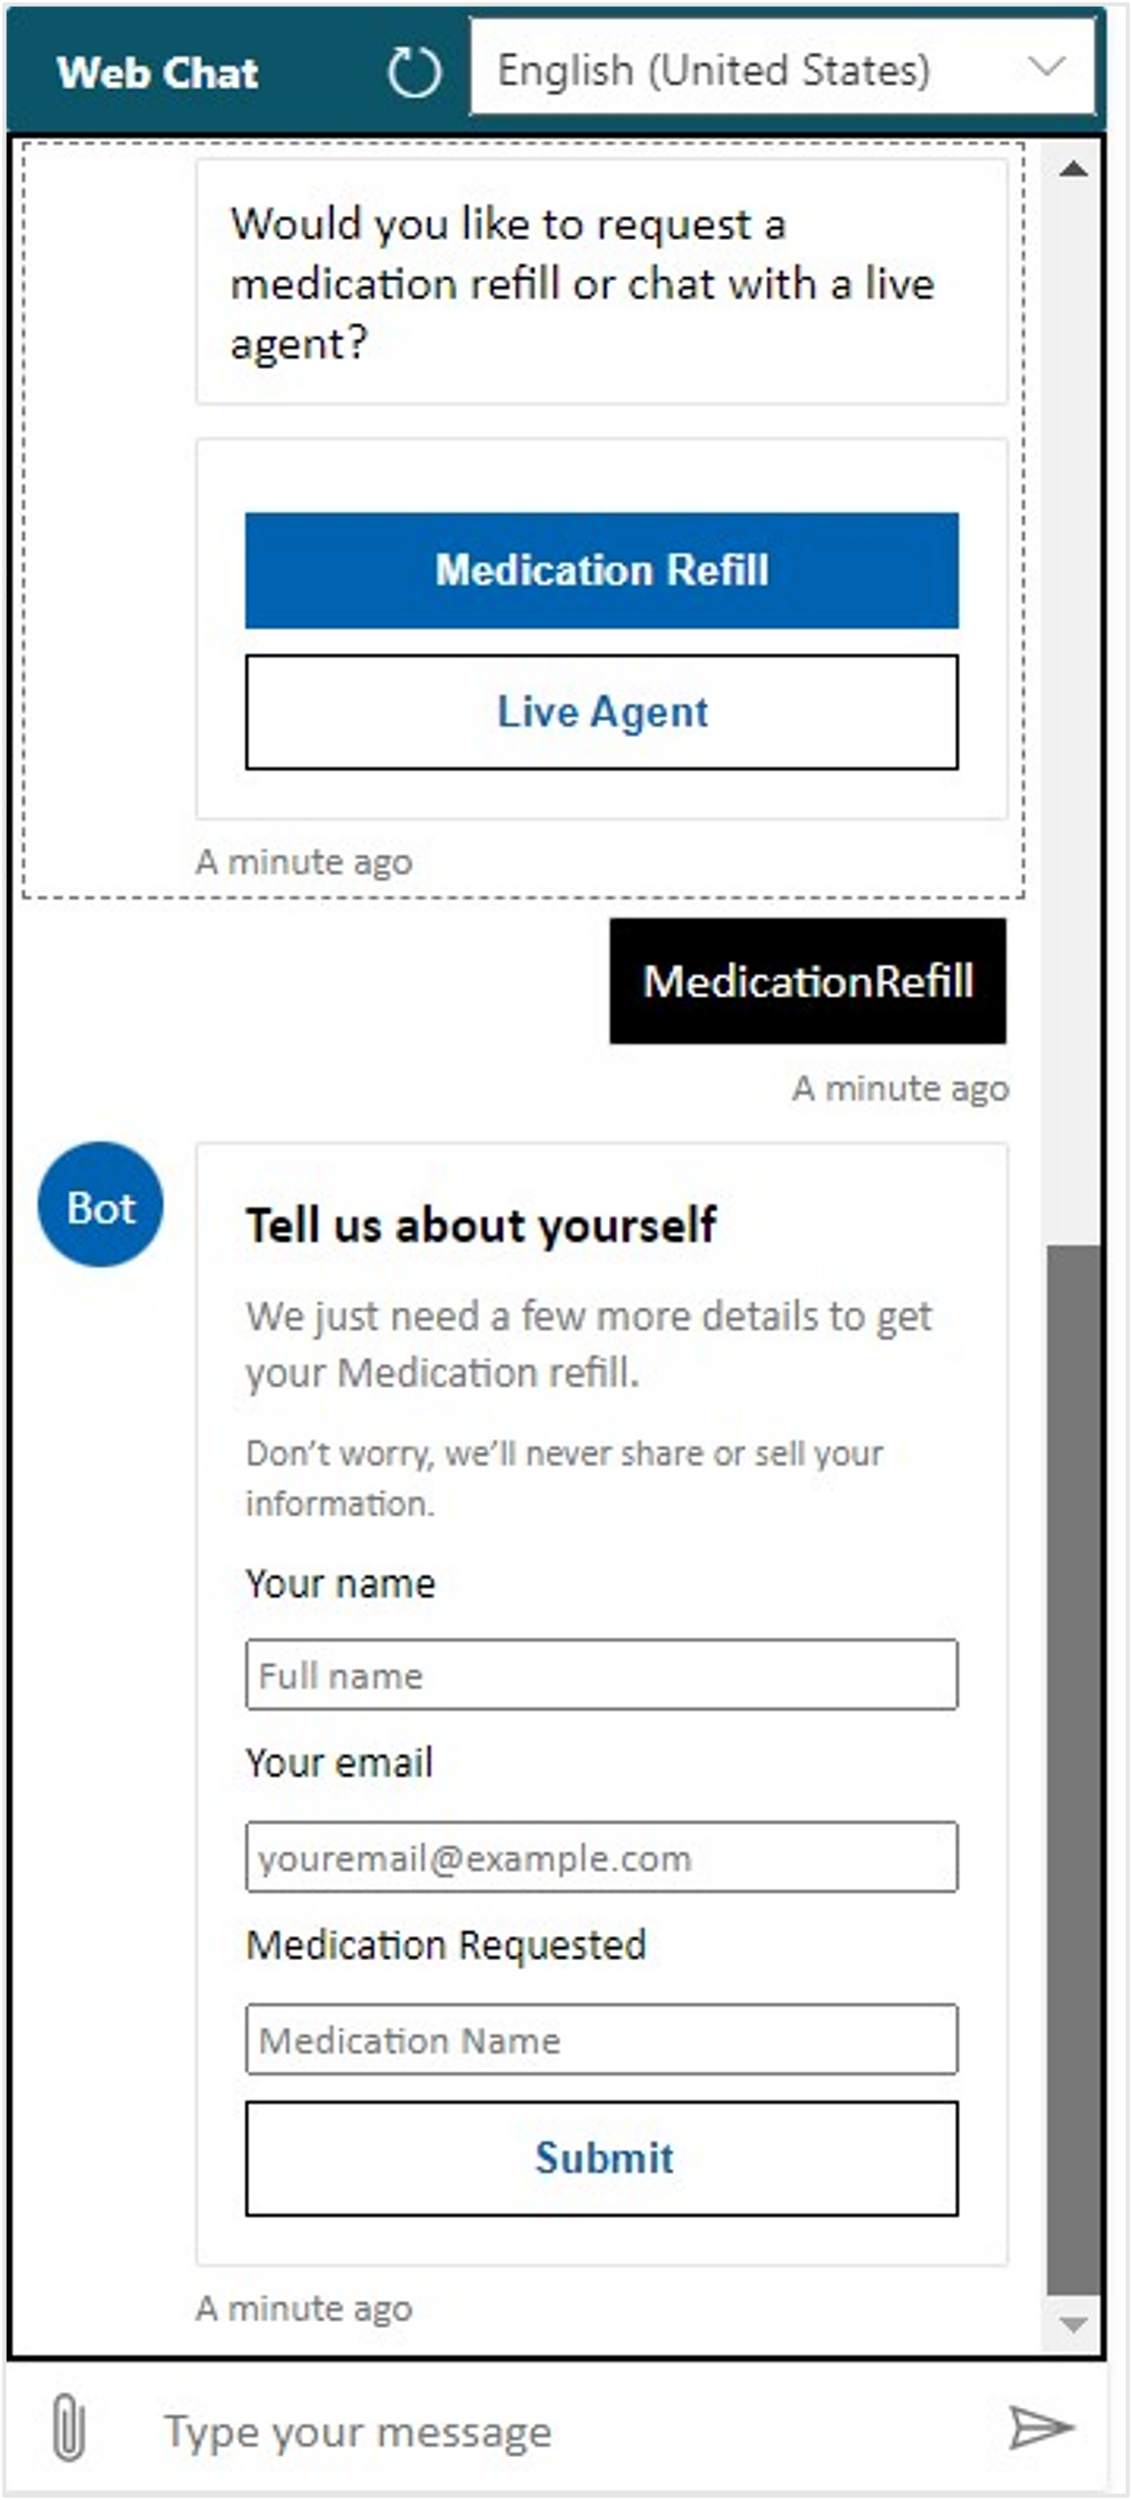
The Adaptive Card output should display in the Web Chat when the system is running the conversation and selecting Medication Refill when prompted.


Step: Add a confirmation statement
To add a confirmation statement, follow these steps:
Add a Statement element.

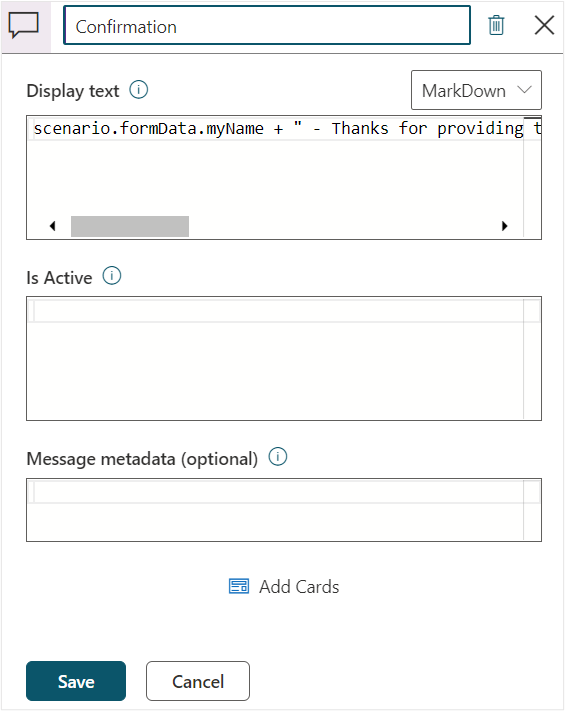
Set the Display text to this code:
scenario.formData.myName + " - Thanks for providing the information, we have created a Medication Request for you regarding the following medication: " + scenario.formData.myMedReqRename the statement to Confirmation and then select Save.
Connect the Submit element to the Confirmation element on the designer canvas.
Select Save and Run to view your scenario in the web chat. Select Refill Medication in the authored card.
Fill in information for the request and then select Submit. Note the confirmation text that's returned from the bot, which was defined in your confirmation step.


Step: Invoke a live agent action
To invoke a live agent action, follow these steps:
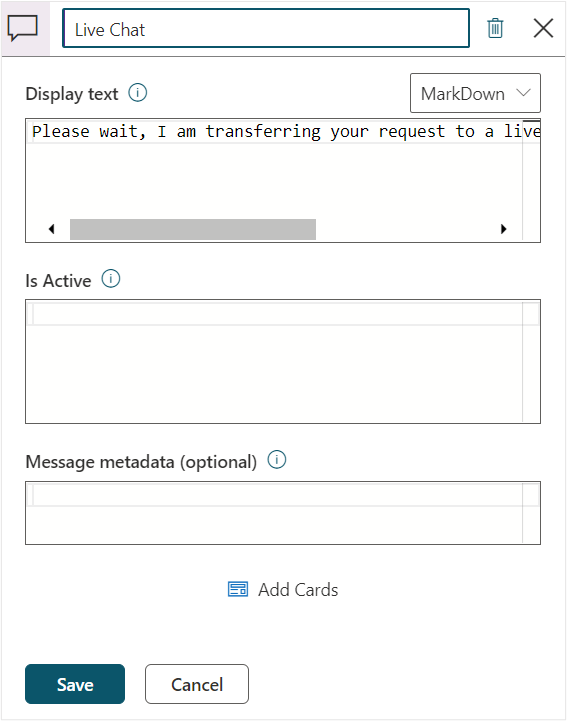
Add a Statement element to the canvas.
In the Display text box, enter Please wait, I am transferring your request to a live agent for further assistance.
Rename the statement to Live Chat and then select Save.
Connect the No decision of the IsMedRefill branch to the Live Chat statement.


Step: Add an action to invoke escalation
To add an action to invoke escalation, follow these steps:
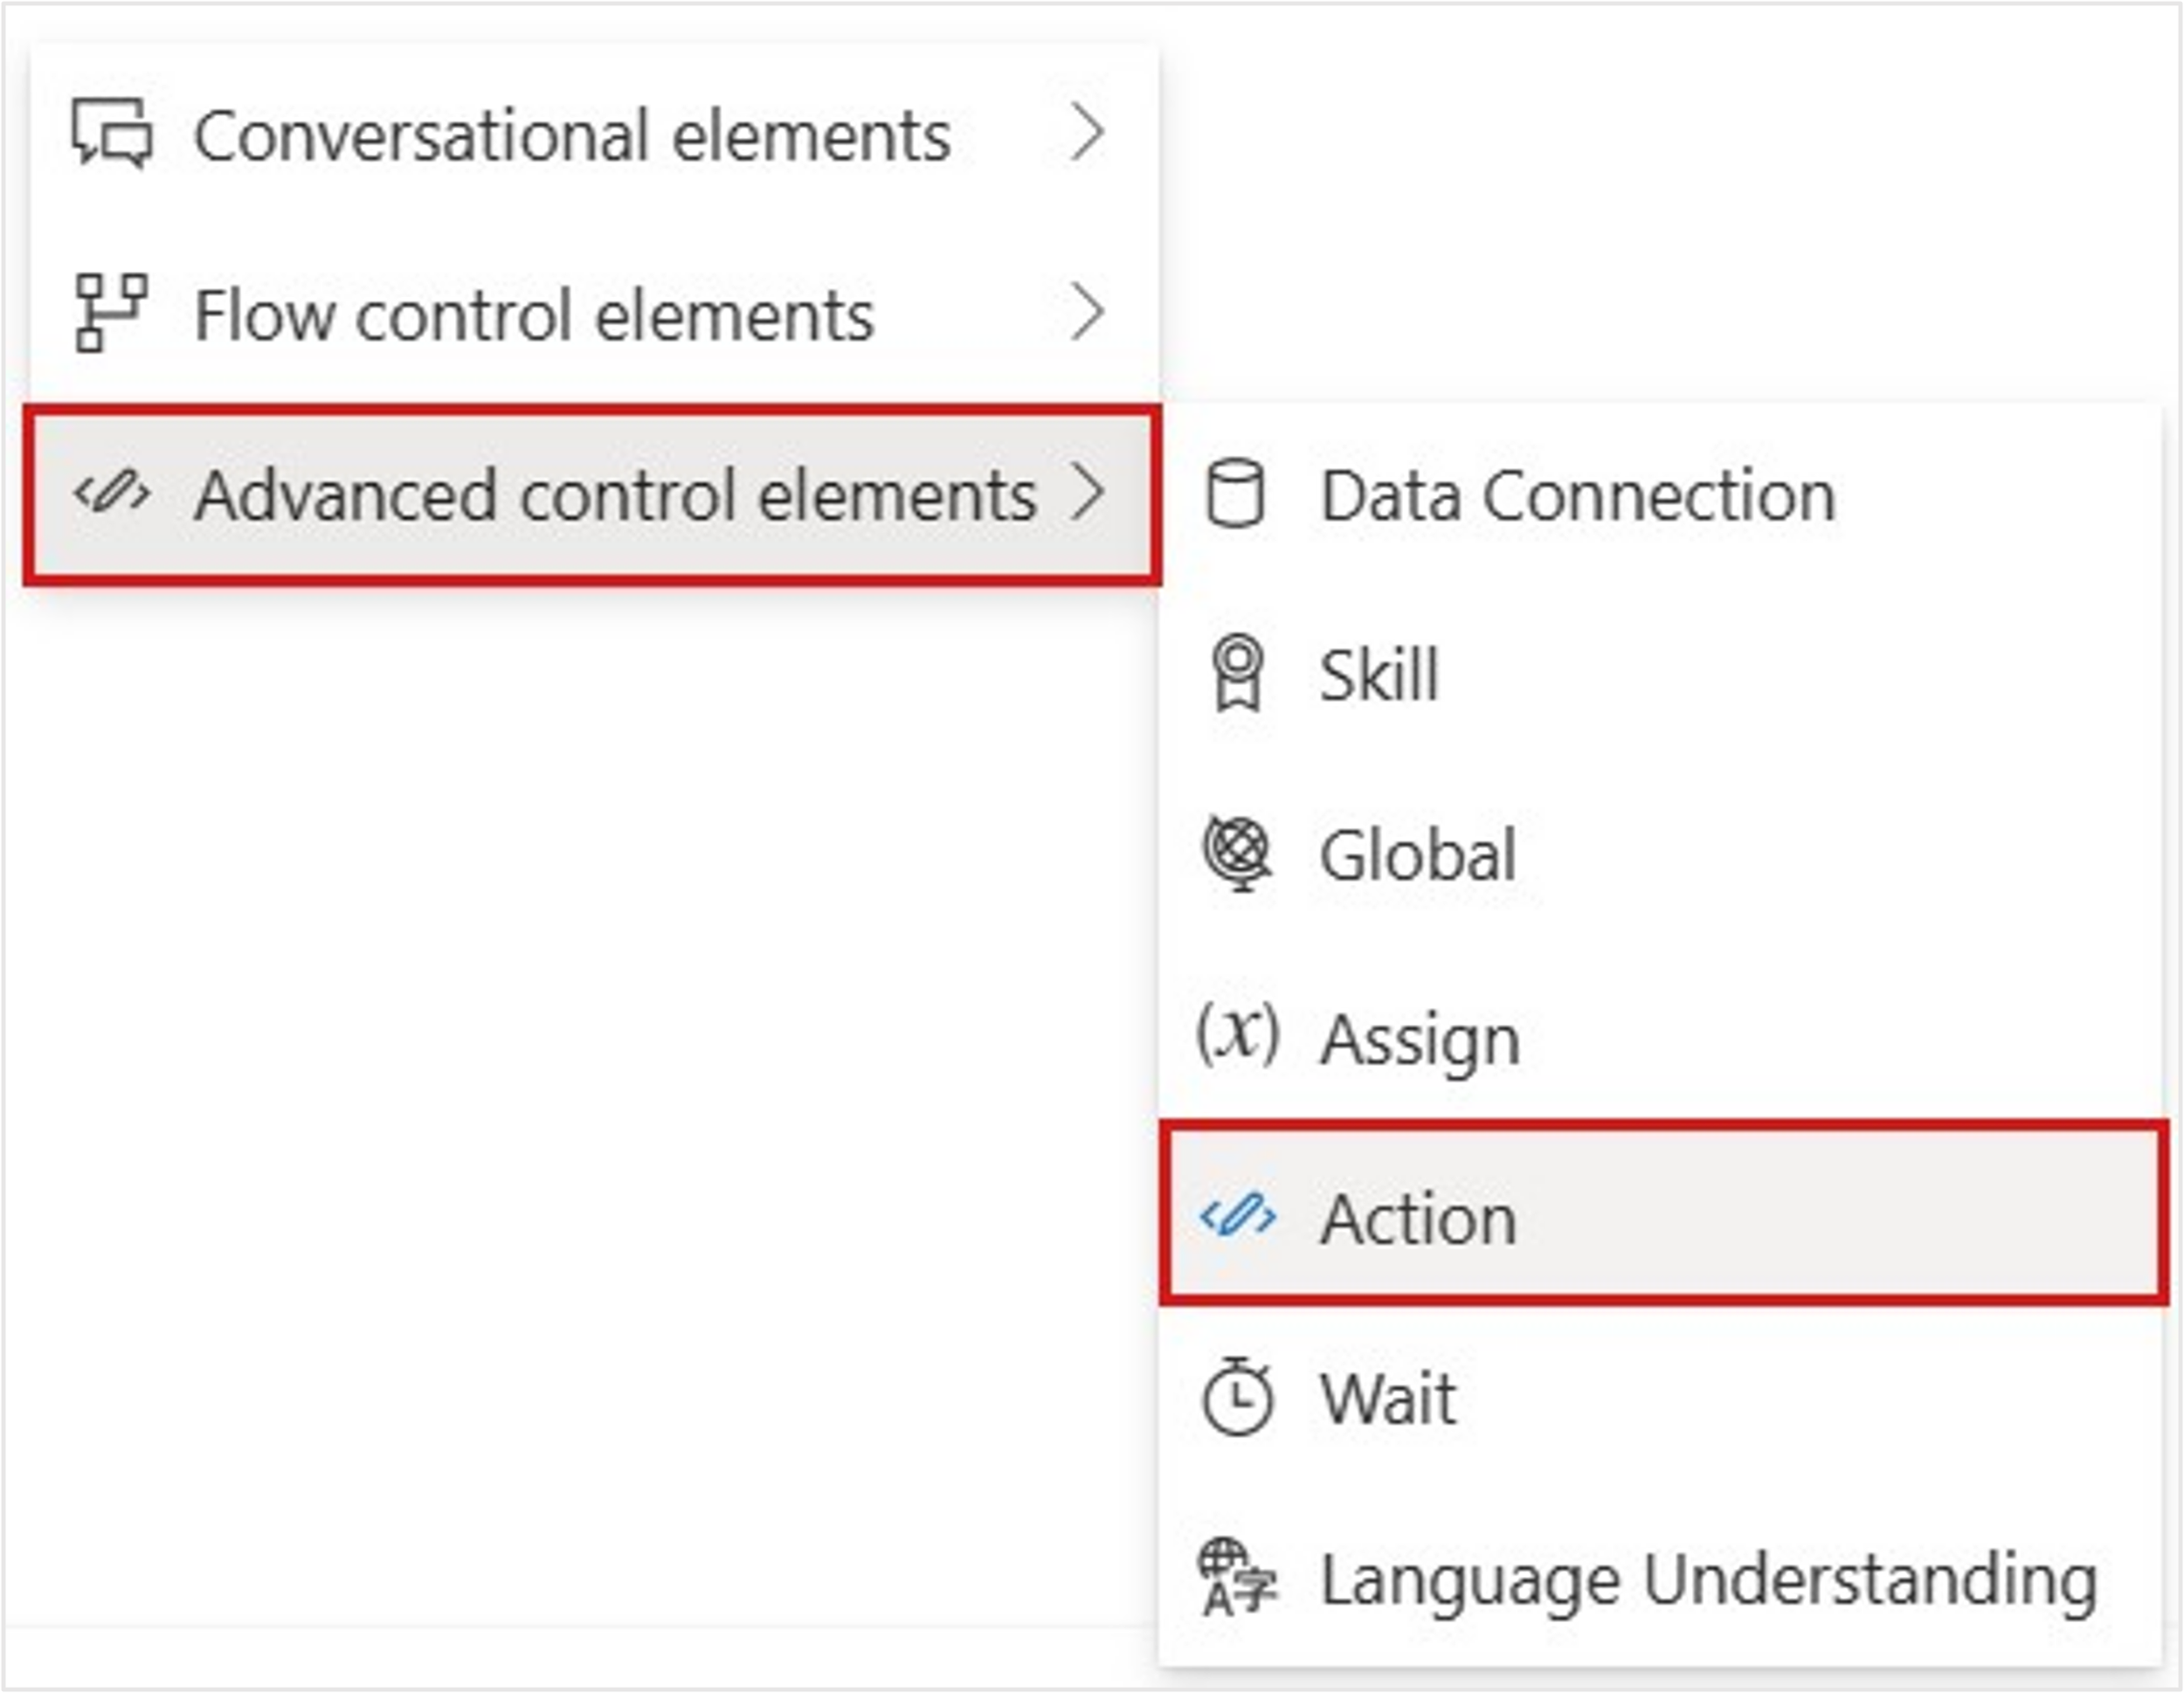
Add an Action element to the canvas, which you use to trigger an escalation to an Omnichannel live agent.
Add the following code to the action, which triggers the live agent chat:
session.sendChannelData('Escalating...', {
   "tags": JSON.stringify({type: "Escalate", context: {"EscalateToAgent": 1}})
});
Name the action Escalate and then select Save to return to the designer page.

Connect the Live Chat statement to the new Escalate action.

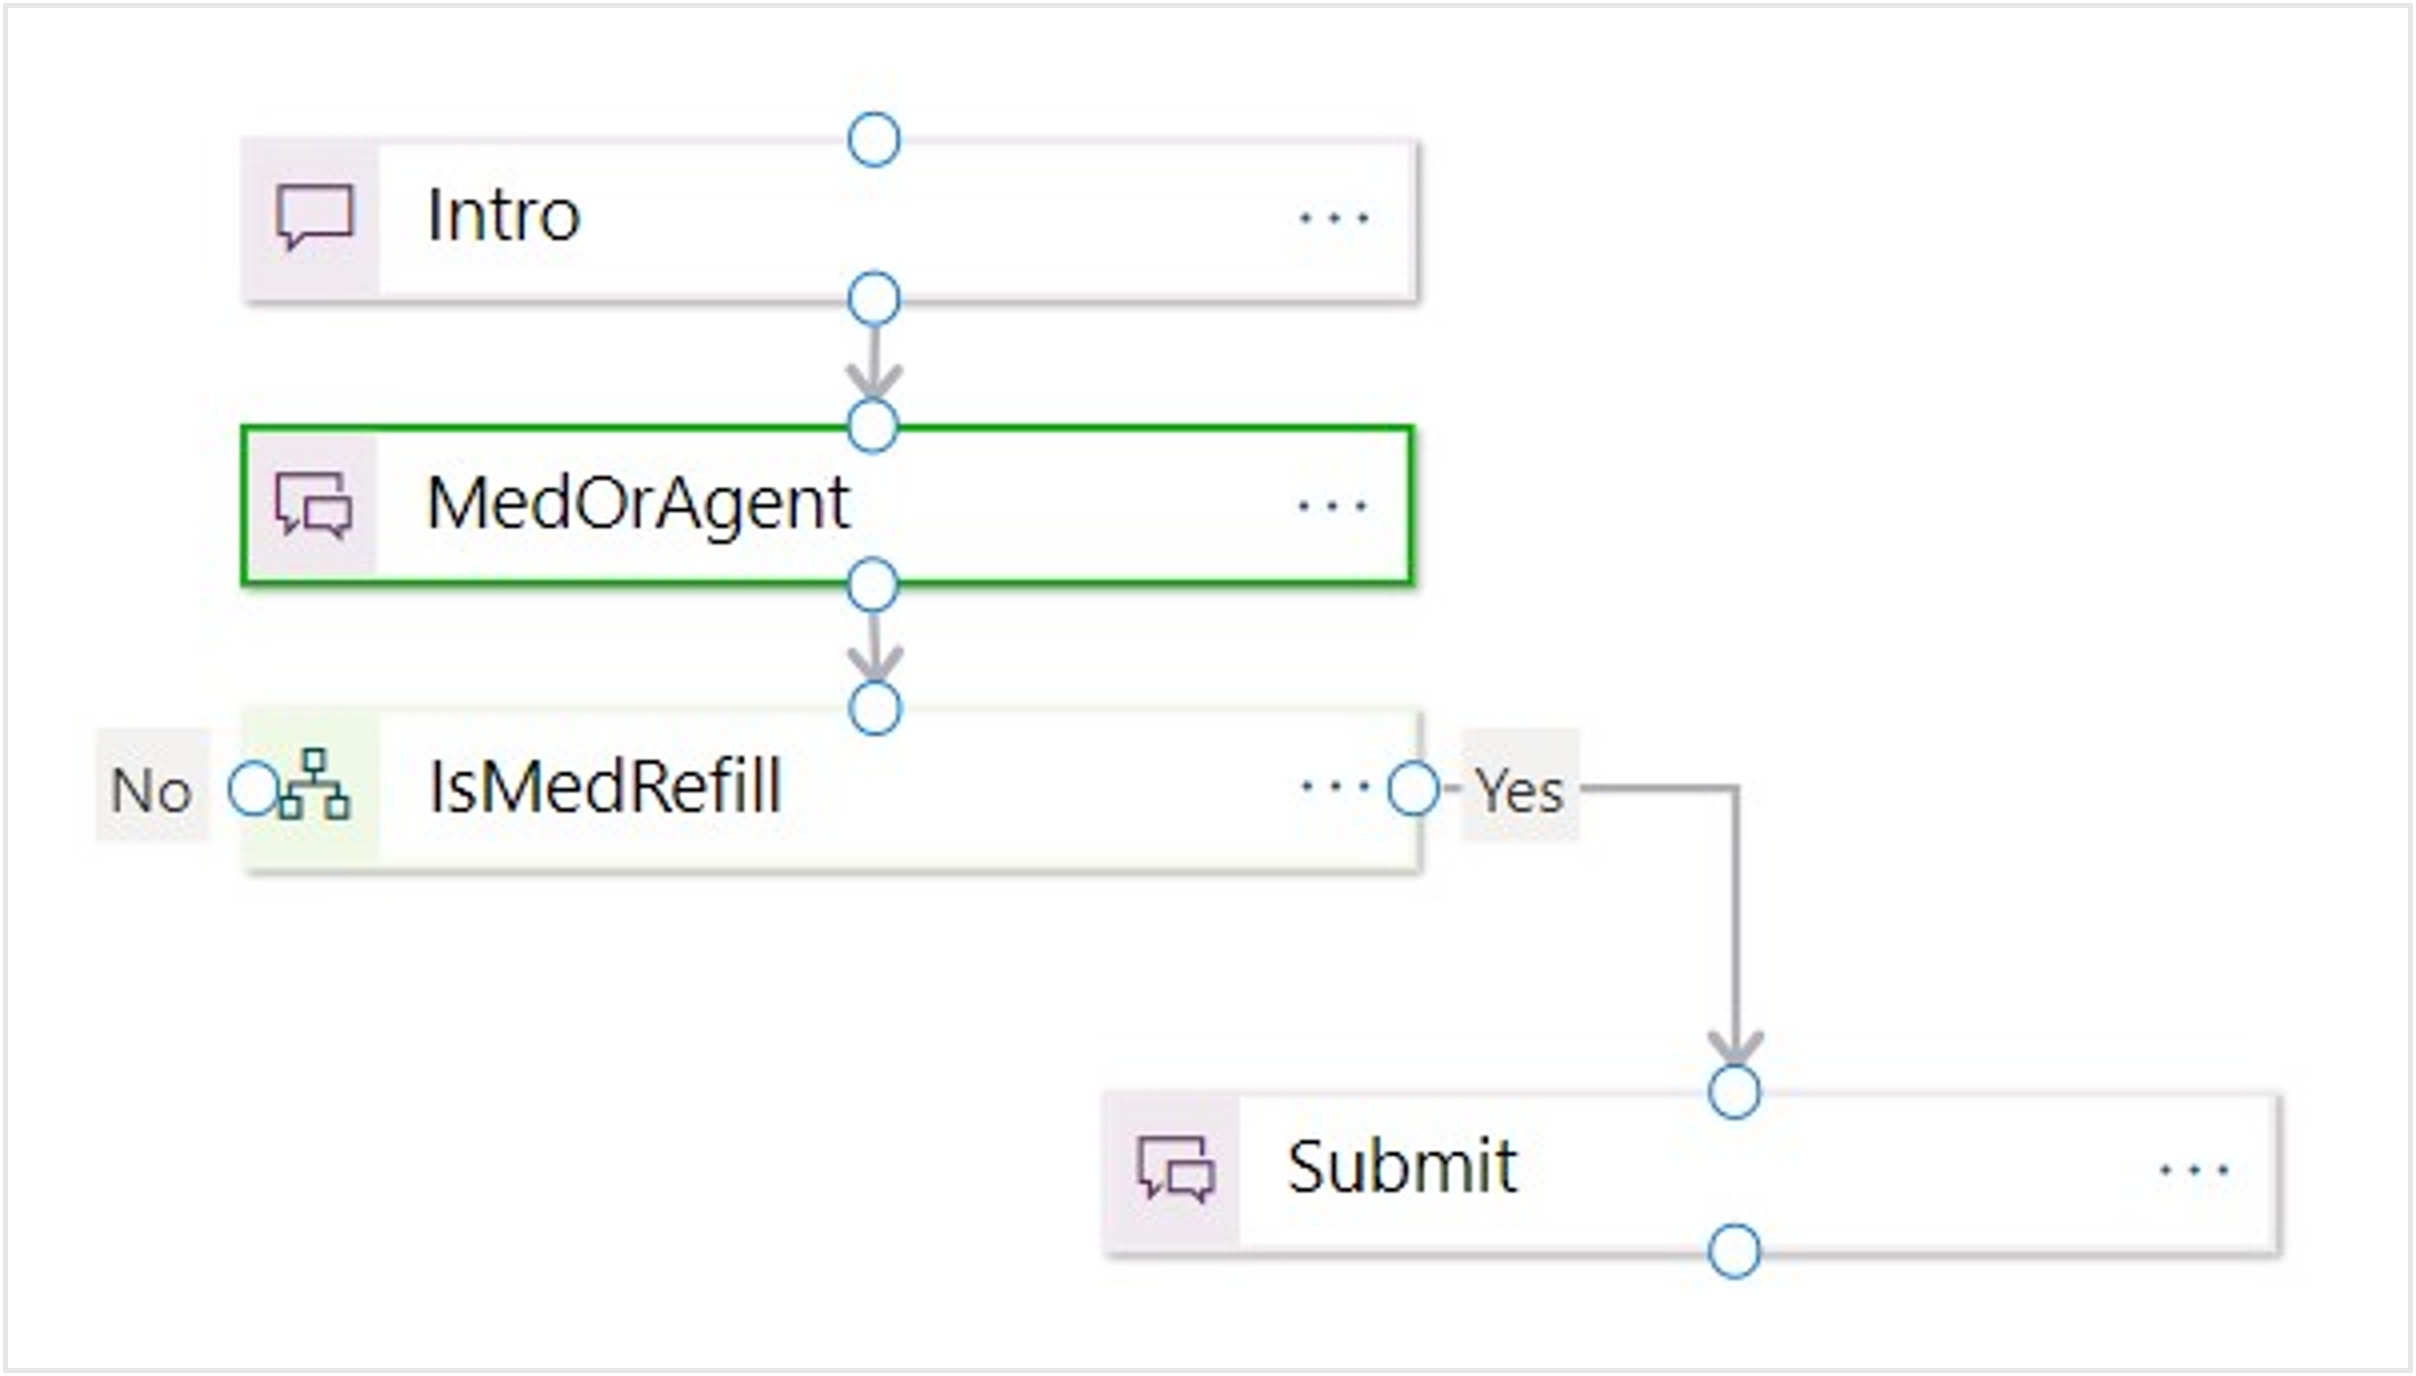
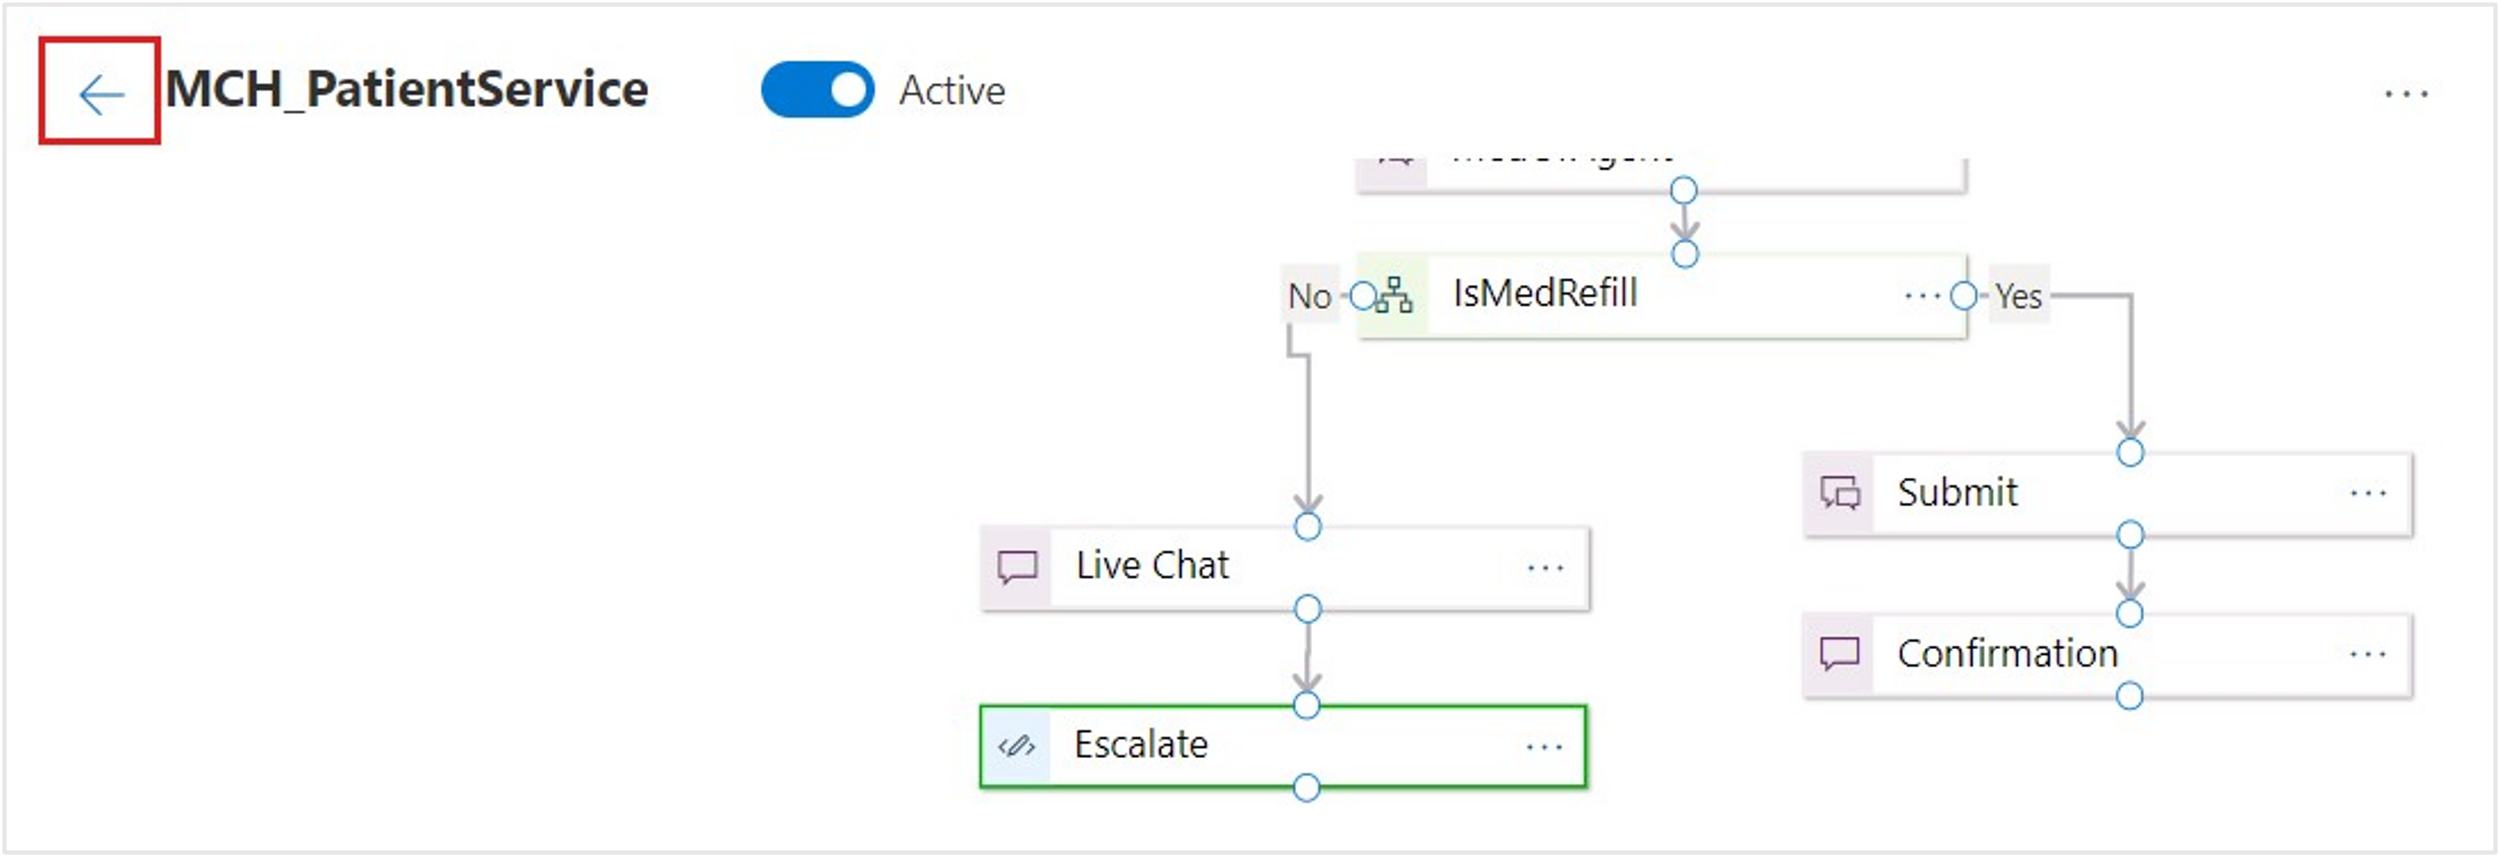
You now completed the final connection. The following screenshot shows your full scenario.
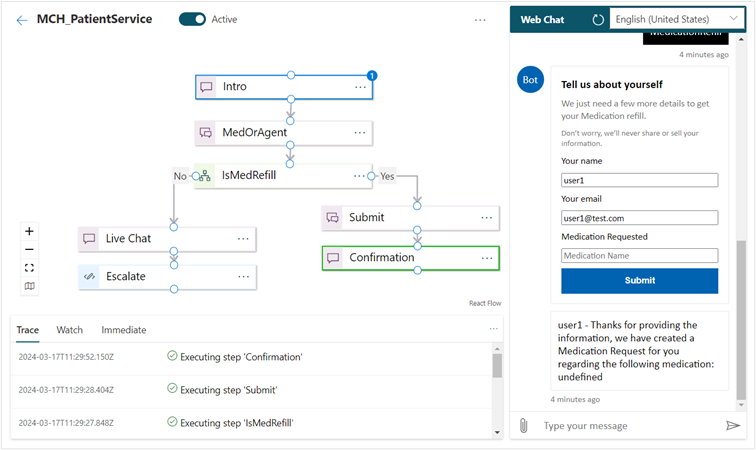
Save and Run your scenario to view the full scenario output.
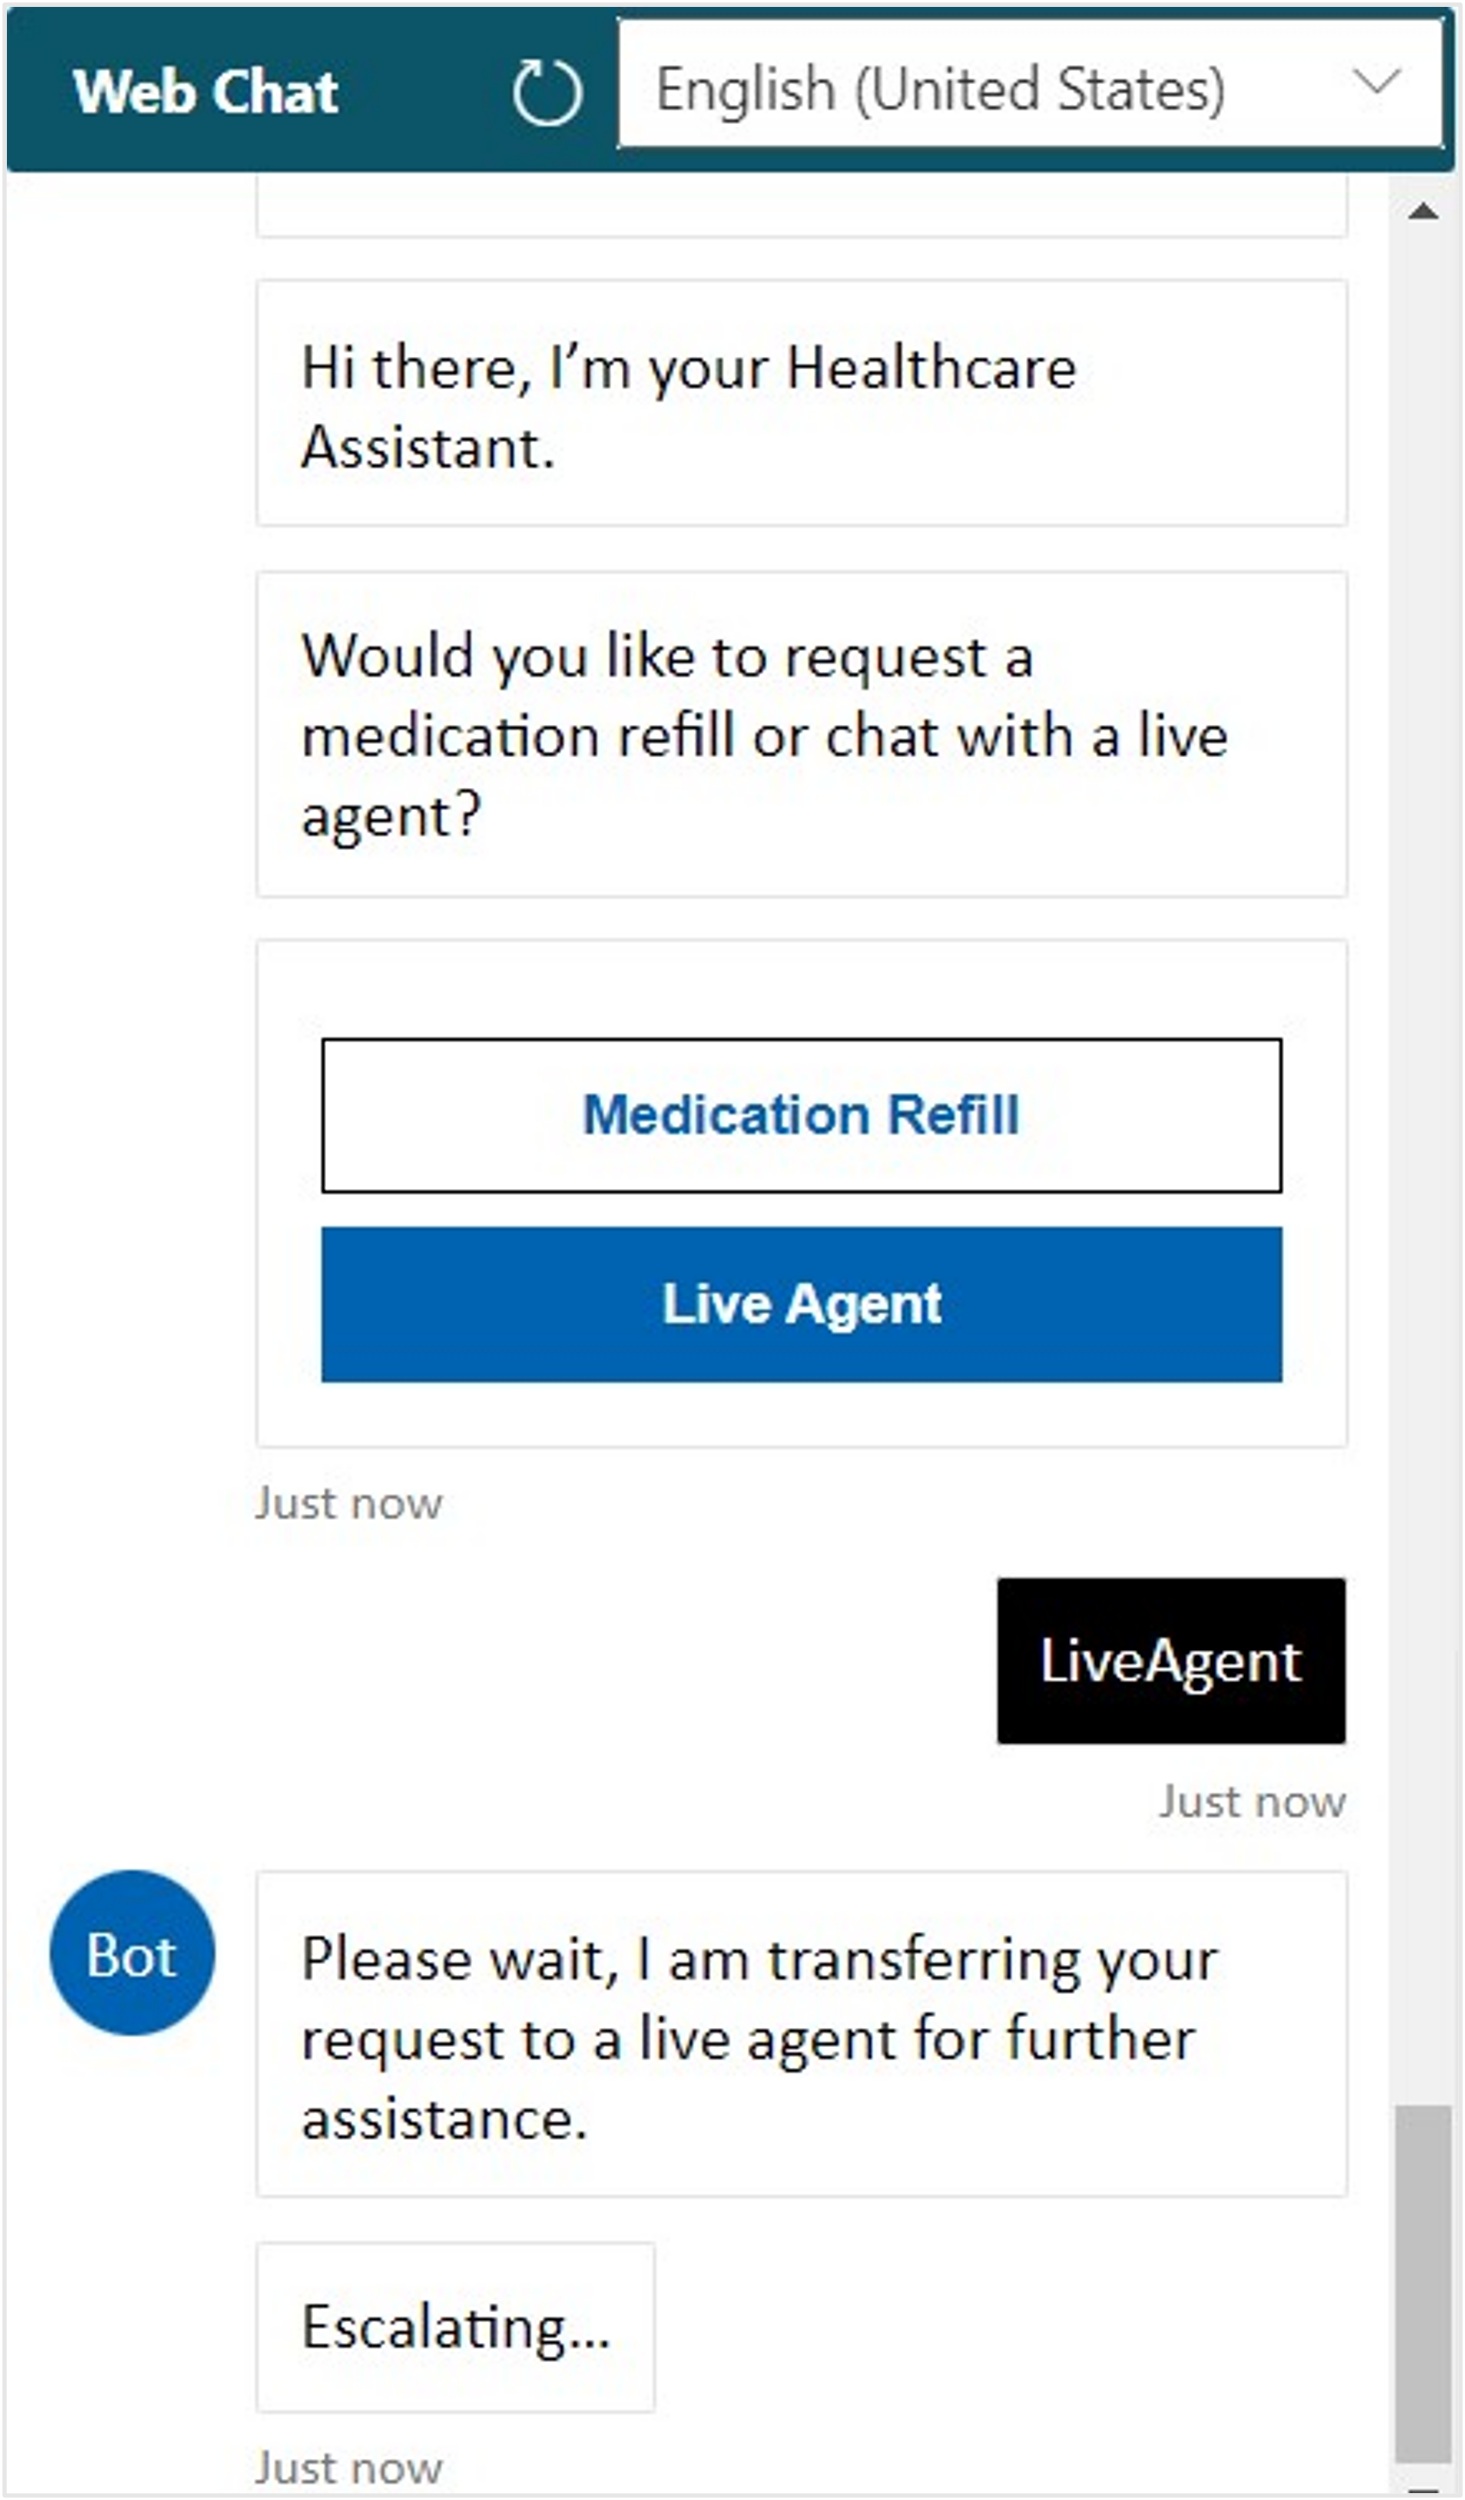
Select Live Agent in the authored card to show the escalation action.
Exit the MCH_PatientService scenario editor with the back arrow next to your scenario name. Make sure that you save before confirming to exit.


You now created a custom scenario to allow the patient to refill a medication or escalate to a live agent.
Task: Create the MCH_PatientServiceWelcome scenario
In this task, you create another bot scenario called MCH_PatientServiceWelcome to invoke the MCH_PatientService scenario. Because the automatic welcome message in the Health Bot settings can be only one step, you use it to initiate the multi-step scenario that you created.
On the Azure AI Health Bot scenarios page, select New to create another new scenario.
Enter MCH_PatientServiceWelcome as the Name and the Scenario ID for the new Health Bot scenario. Select Create.

On the scenario editor designer, add a Statement element.
Rename the statement to Welcome. Don't add Display text because you show it in the card instead. Select Add Cards.
Select Hero Card from the Card type dropdown menu. Select the plus (+) icon to add an action.
Provide the following details for the action:
Action type - imBack
Action value - begin MCH_PatientService
Action title - Lamna Healthcare Support
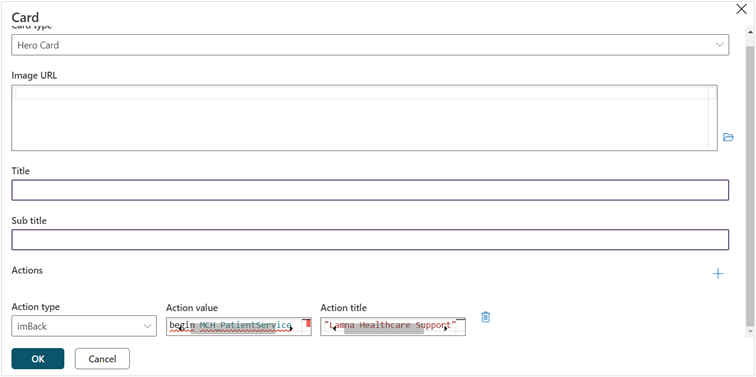
Select OK and then select Save on the statement form.
Save and Run to test your MCH_PatientServiceWelcome bot scenario in the Web Chat.
Exit the scenario designer.


You now created a welcome scenario that kicks off the MCH_PatientService scenario.
Task: Set up the welcome scenario to be automatic
In this task, you set the MCH_PatientServiceWelcome to be the Automatic Welcome Scenario in settings. This setting always triggers the scenario when a user starts a conversion with the Health Bot from the portal.
In the navigation pane, go to Configuration > Conversation.

On the Interactions tab, scroll down to the Automatic welcome section. From the Automatic welcome scenario dropdown menu, select the MCH_ PatientServiceWelcome scenario. You can clear the automatic welcome message that you previously set. Select Save.
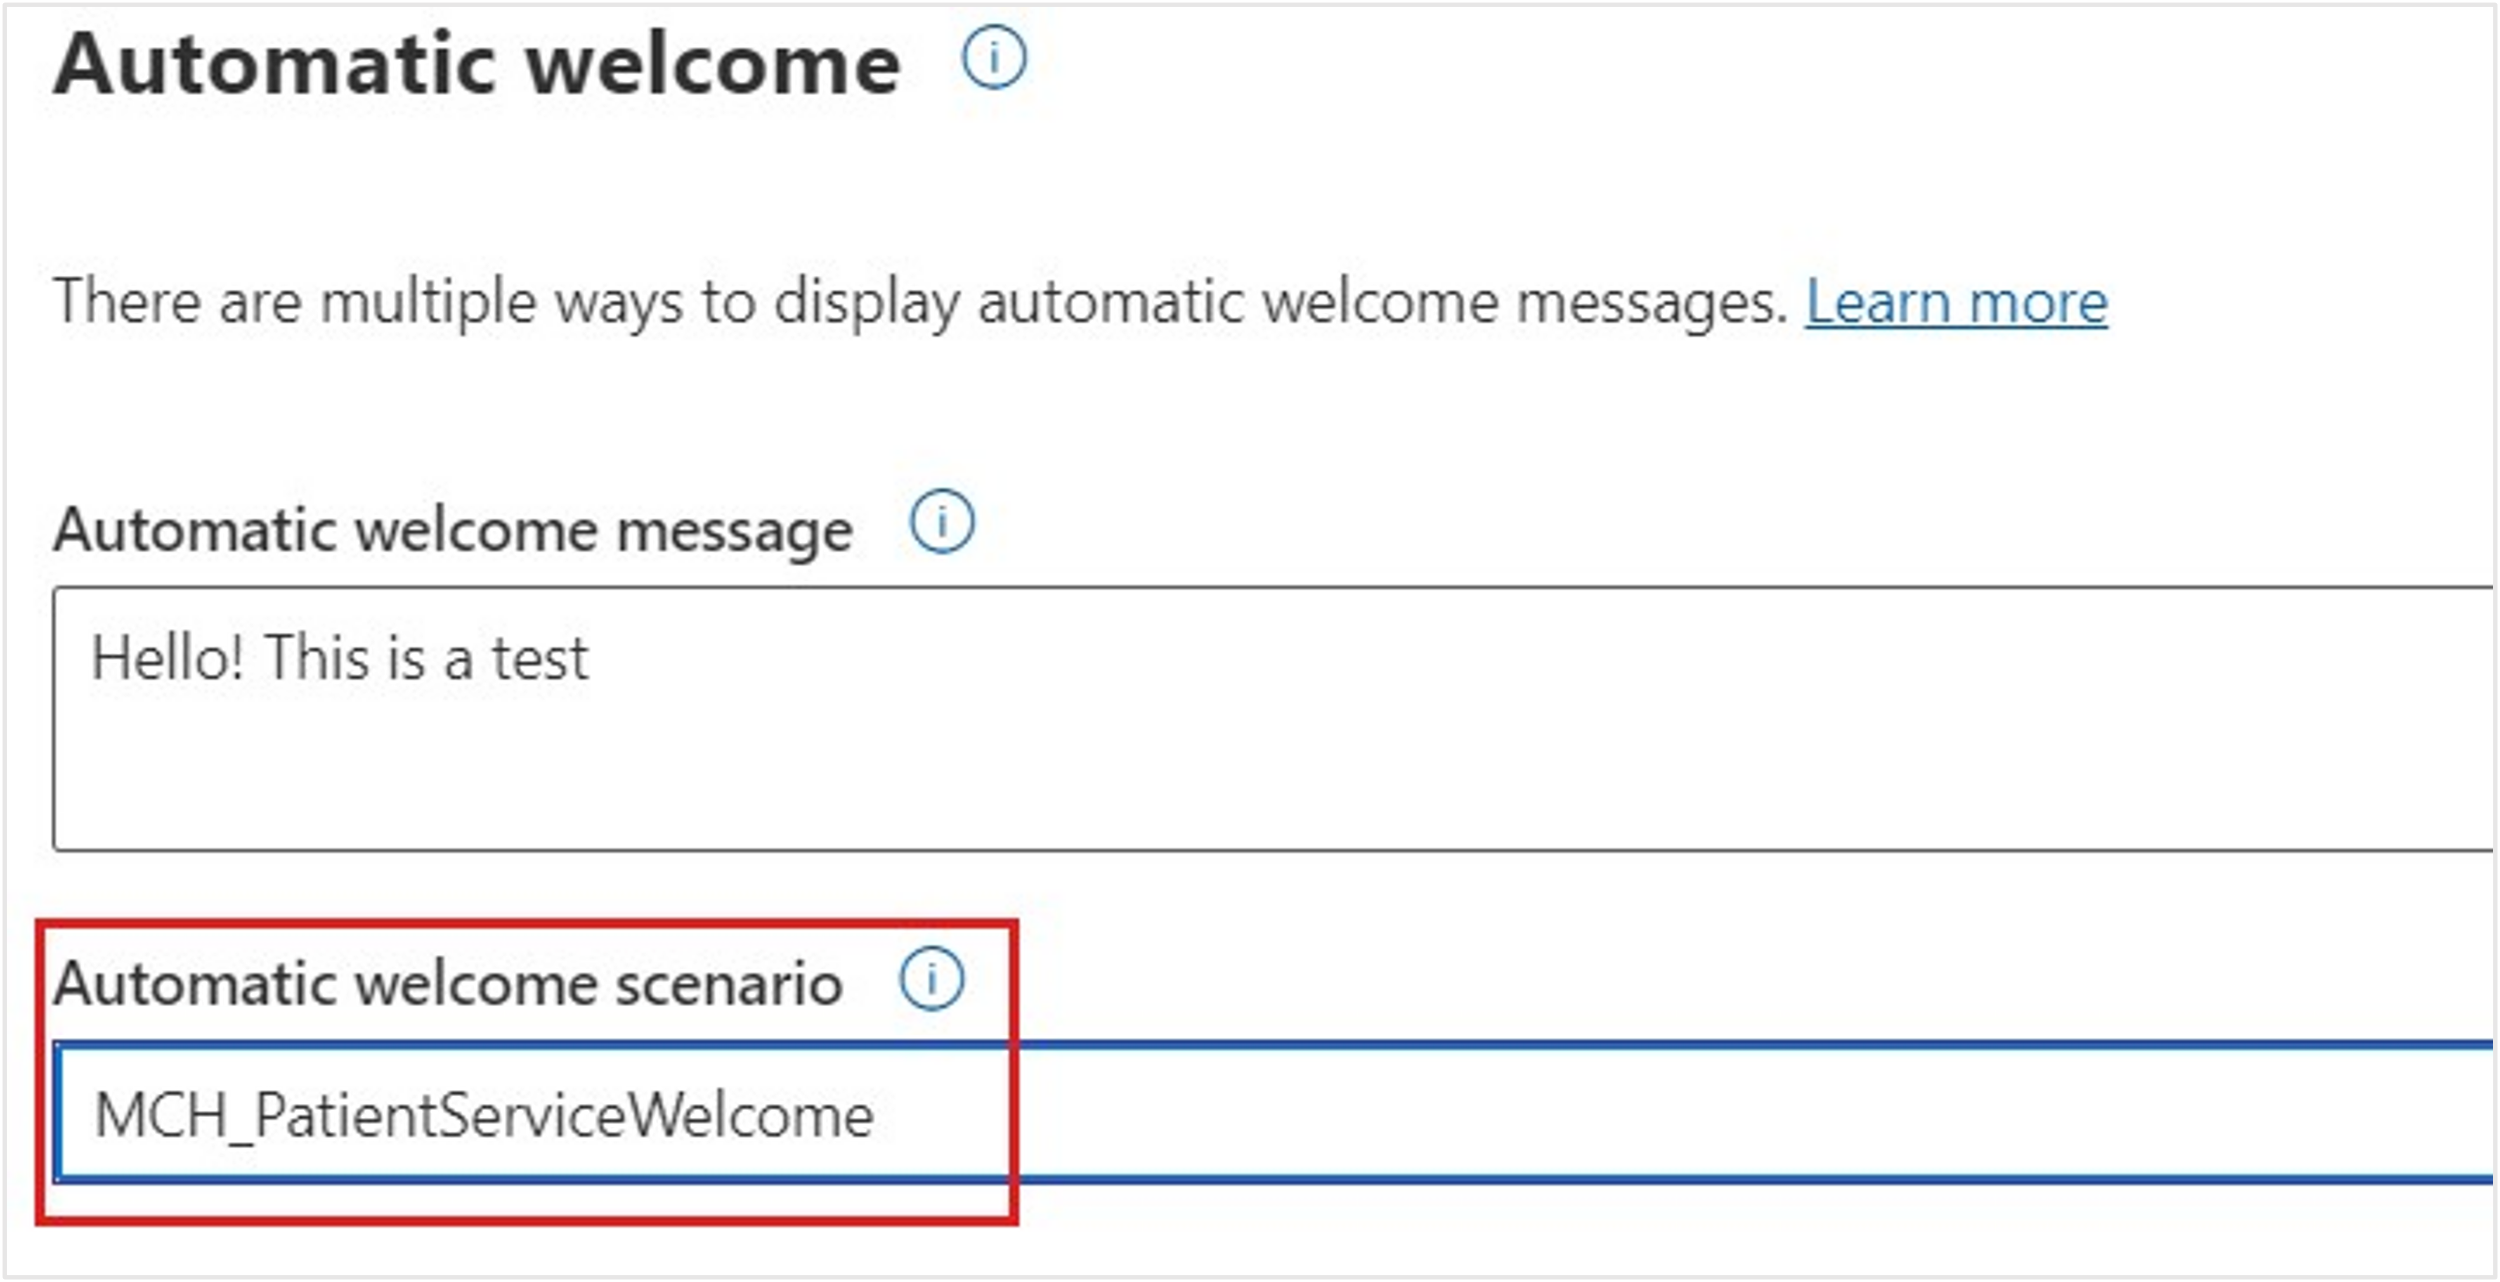


You've successfully set the MCH_PatientServiceWelcome scenario as the default scenario that kicks off when a user interacts with the Health Bot.
Task: Test Health Bot escalation from Power Apps portal to Omnichannel
In this task, you test the escalation experience from the Power Apps portal to an Omnichannel live agent.
Go to Power Apps and select Preview > Desktop to open Lamna Healthcare Patient Portal.
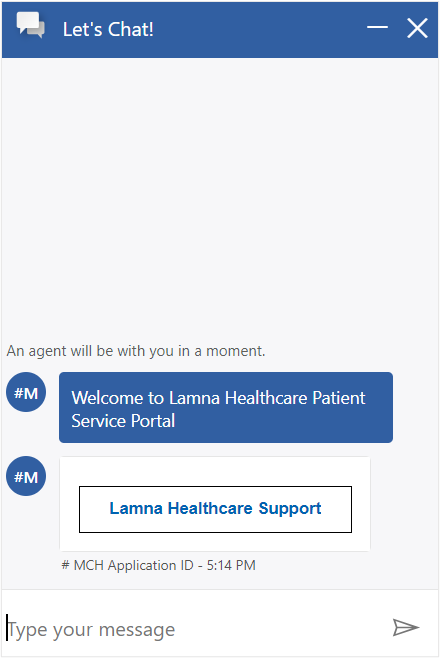
The Azure AI Health Bot Let's Chat button should display in the lower-right corner of the screen, meaning that the chat widget was successfully embedded into the Customer self-service portal.

When you select the chat widget, the bot triggers the welcome scenario message that you created and sets it as the default welcome message, MCH_PatientServiceWelcome.
Return to Power Apps and select the play button to open the Customer Service workspace.
Note
Escalation into the Customer Service workspace works only when the Presence status shows as enabled. A splash loading screen shows that goes through multiple steps and then displays the status indicator as Available after it's loaded. The status is enabled when it shows a check mark in a green circle.

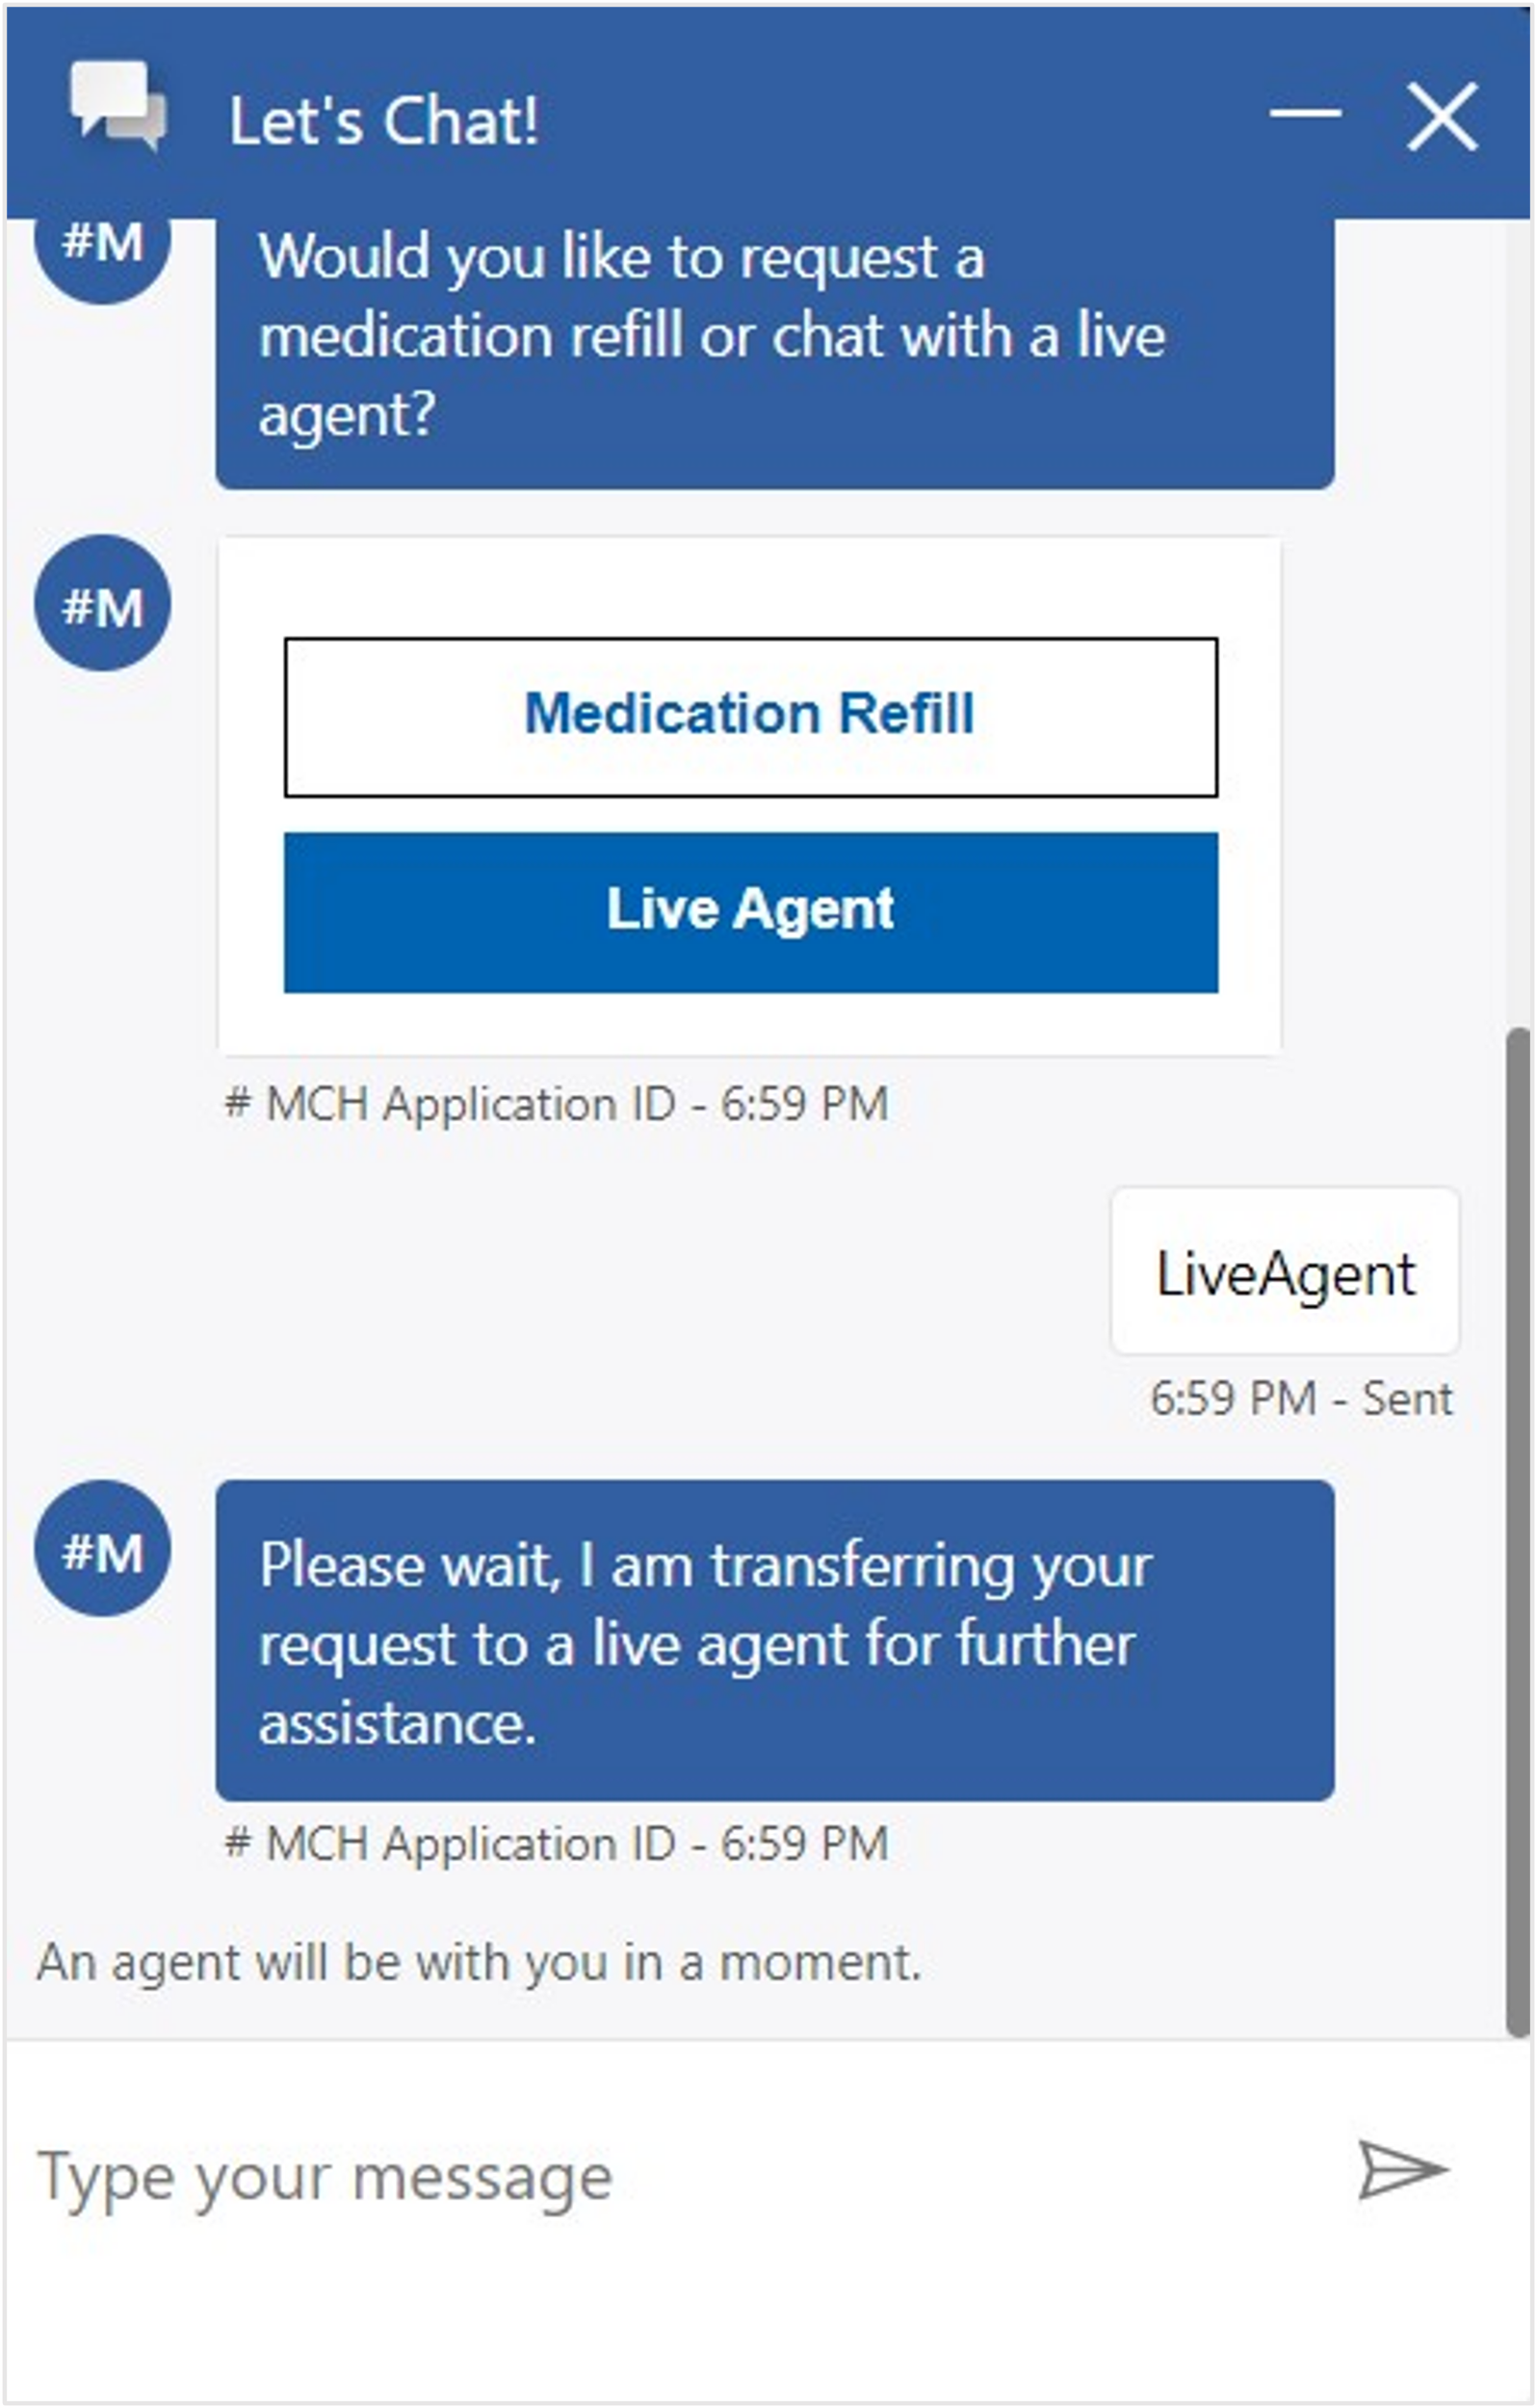
In the Health Bot dialog in the Patient Portal, select the Healthcare Support button and then select the Live Agent button to witness the escalation into Omnichannel to chat with a live agent (you).
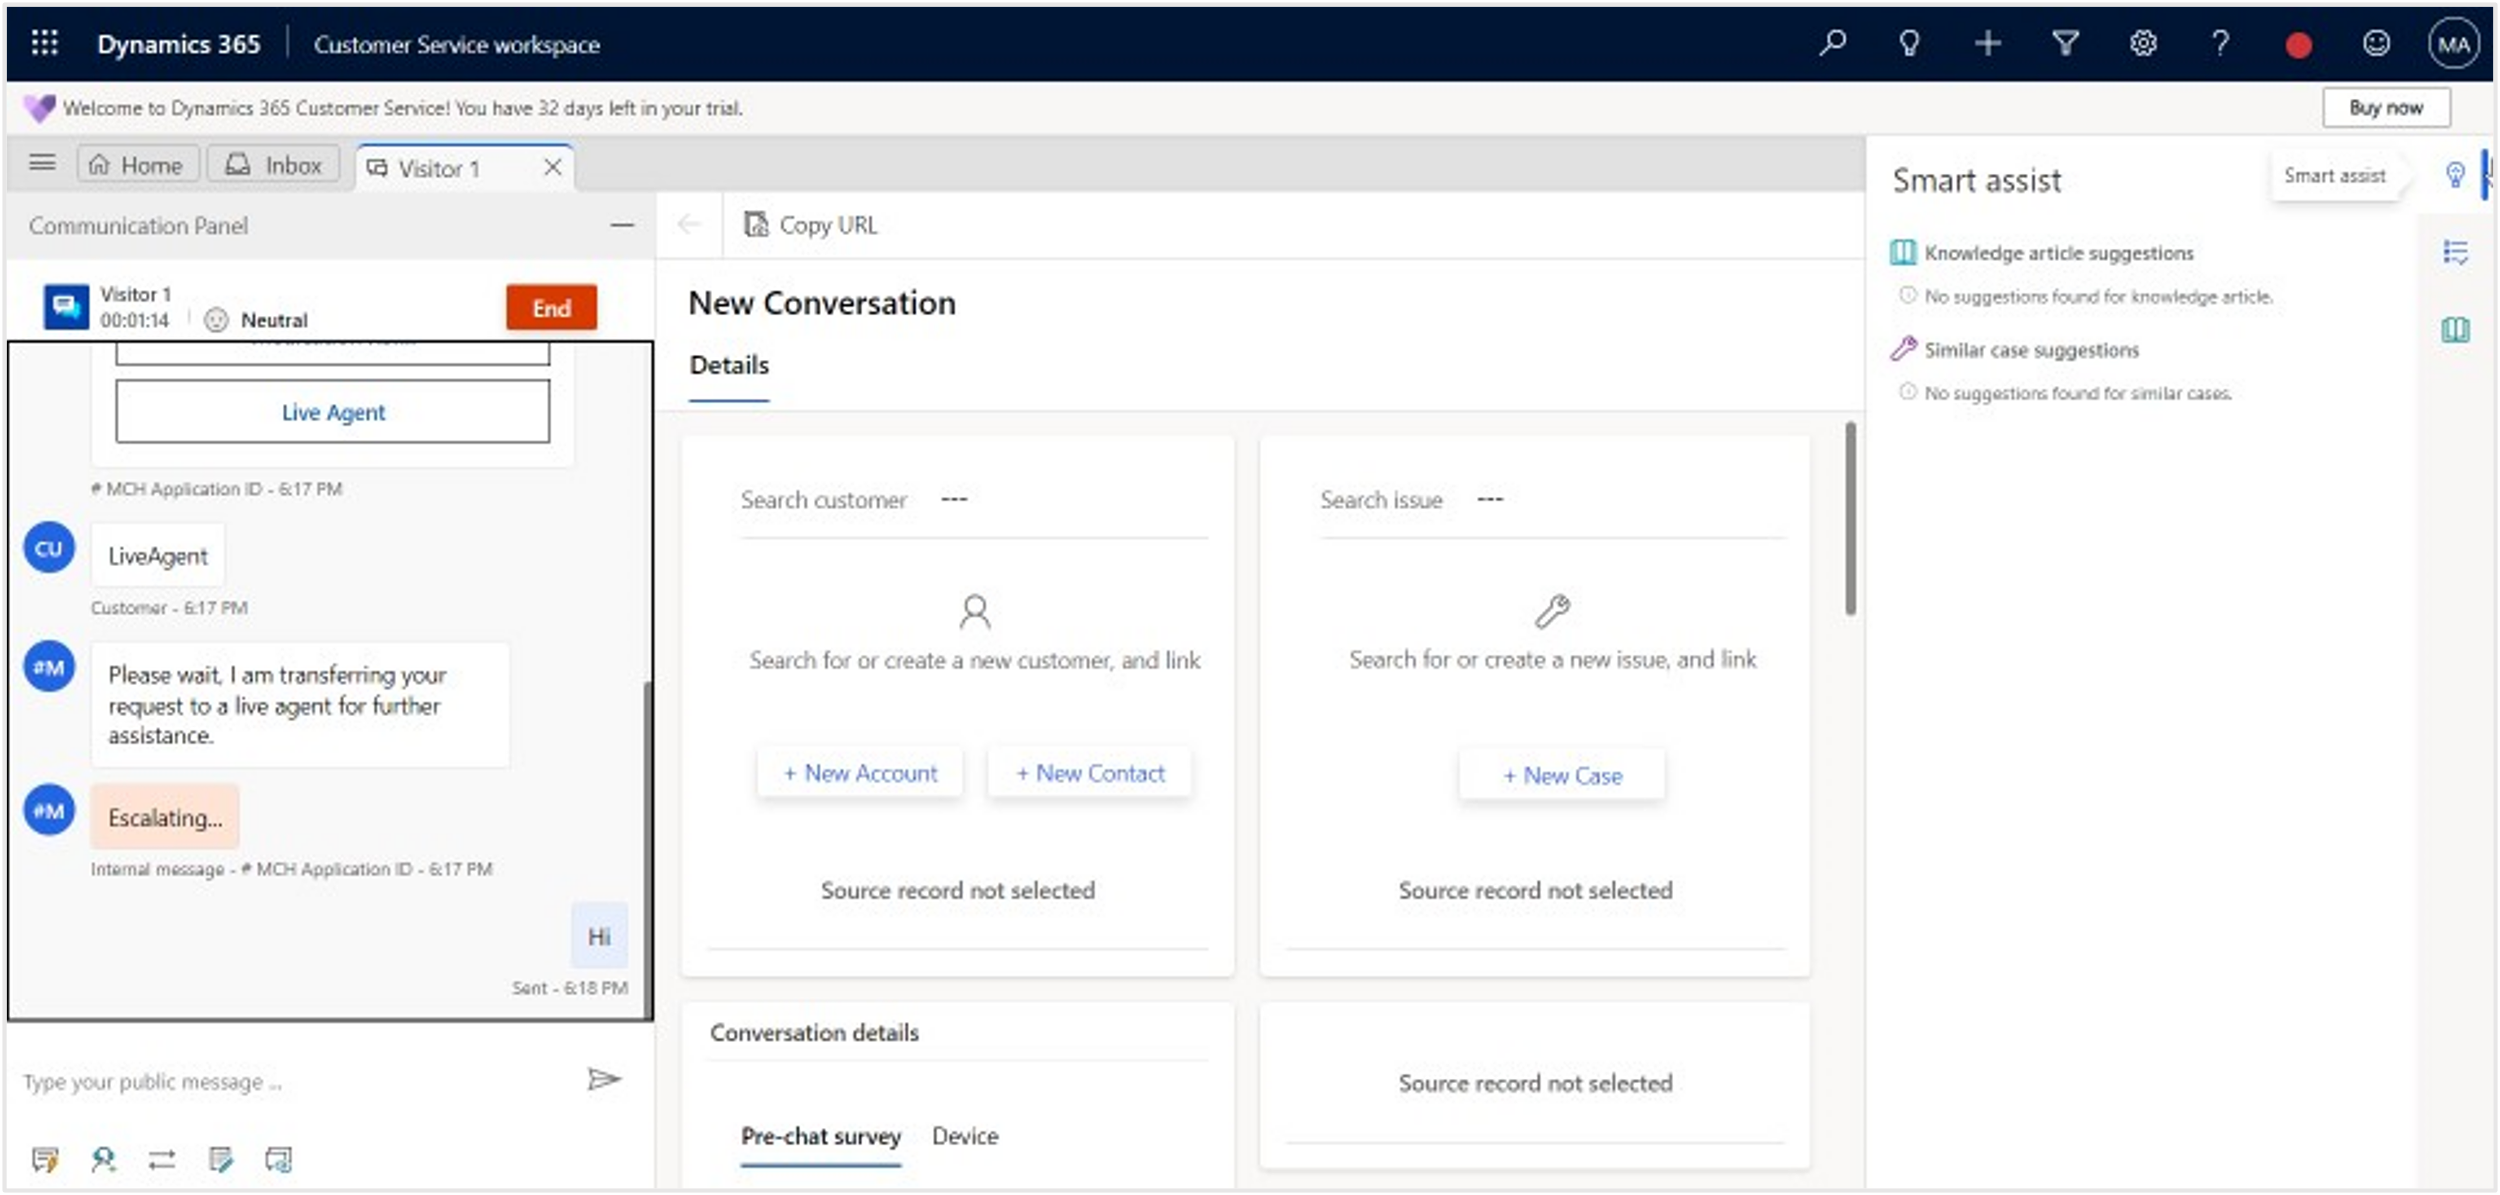
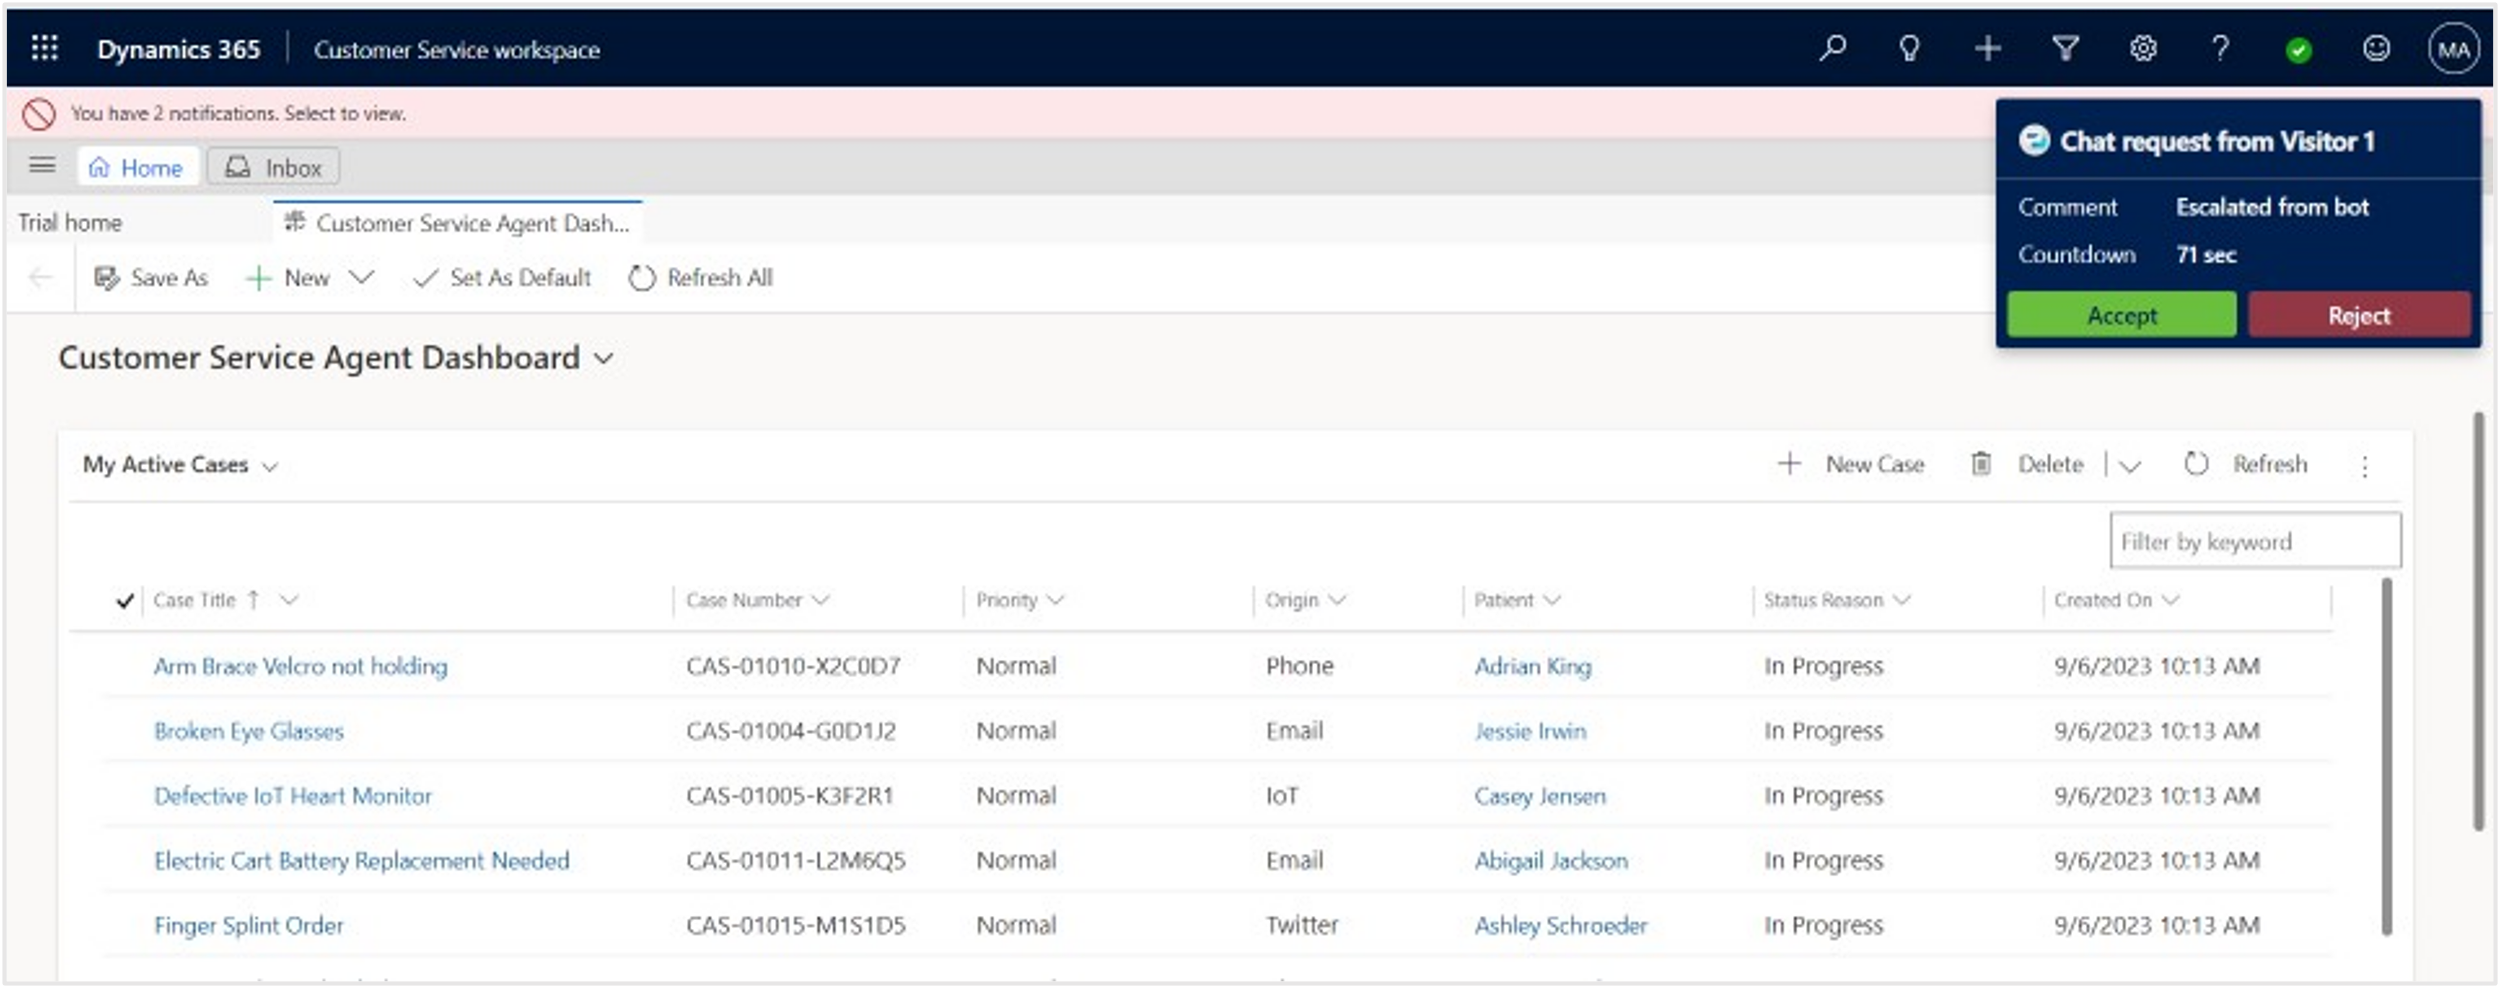
Return to Omnichannel for Customer Service. Your user, as the Live Agent, should receive an incoming notification with Accept and Reject options for the chat.
Select Accept to connect and chat with the customer, or in this case, the patient.

When a live chat agent accepts the incoming chat notification, Omnichannel for Customer Service opens a Live Chat widget, where the agent can view the entire bot conversation with the user and continue to chat with them.


Now, you successfully tested the escalation scenario from the patient by using a Health Bot in the Power Apps portal to a live agent in Omnichannel for Customer Service.