Exercise - Restore to a point in time
In this exercise, you'll learn how you can recover from a common error by using point-in-time restore (PITR). This process is easy to do in the portal or programmatically. In this exercise, you'll learn how to do it by using the Azure CLI.
Setup: Use scripts to deploy Azure SQL Database
In the terminal on the right, you'll see Azure Cloud Shell, which is a way to interact with Azure by using a browser. Before you start the exercises, you need to run a script there to create your environment: an Azure SQL Database that contains the AdventureWorks database. There will be some prompts in the script for a password and your local IP address.
These scripts should take three to five minutes to complete. Make sure to note your password, unique ID, and region, because they won't be shown again.
To get the IP address that's required, you need to disconnect from any VPN service and run
(Invoke-WebRequest -Uri "https://ipinfo.io/ip").Contentin a local PowerShell window (not in this browser). Note the resulting IP address.Run the following script in Azure Cloud Shell on the right side of this page. Enter a complex password and public IP address when prompted.
$adminSqlLogin = "cloudadmin"
$password = Read-Host "Your username is 'cloudadmin'. Please enter a password for your Azure SQL Database server that meets the password requirements"
# Prompt for local IP address
$ipAddress = Read-Host "Disconnect your VPN, open PowerShell on your machine and run '(Invoke-WebRequest -Uri "https://ipinfo.io/ip").Content'. Please enter the value (include periods) next to 'Address': "
# Get resource group and location and random string
$resourceGroup = Get-AzResourceGroup | Where ResourceGroupName -like "<rgn>Sandbox resource group name</rgn>"
$resourceGroupName = "<rgn>Sandbox resource group name</rgn>"
$uniqueID = Get-Random -Minimum 100000 -Maximum 1000000
$storageAccountName = "mslearnsa"+$uniqueID
$location = $resourceGroup.Location
# The logical server name has to be unique in the system
$serverName = "aw-server$($uniqueID)"
Output and store (in a text file or similar location) the information you'll need throughout this module by running the following script in Azure Cloud Shell. You'll probably need to select Enter after you paste in the code because the last line won't run by default.
Write-Host "Please note your unique ID for future exercises in this module:"
Write-Host $uniqueID
Write-Host "Your resource group name is:"
Write-Host $resourceGroupName
Write-Host "Your resources were deployed in the following region:"
Write-Host $location
Write-Host "Your server name is:"
Write-Host $serverName
Important
Don't forget to note your password, unique ID, and region. You'll need this information throughout the module.
Run the following script to deploy an Azure SQL database and logical server with the AdventureWorks sample. This script also adds your IP address as a firewall rule, enables Microsoft Defender for Cloud, and creates a storage account for use in upcoming units.
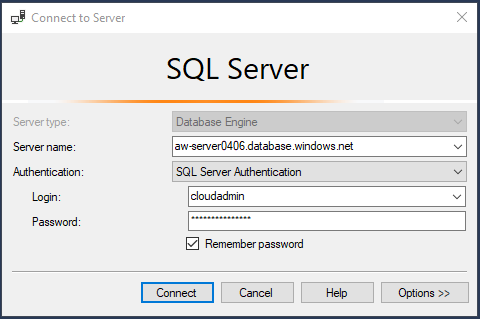
# The logical server name has to be unique in the system
$serverName = "aw-server$($uniqueID)"
# The sample database name
$databaseName = "AdventureWorks"
# The storage account name has to be unique in the system
$storageAccountName = $("sql$($uniqueID)")
# Create a new server with a system-wide unique server name
$server = New-AzSqlServer -ResourceGroupName $resourceGroupName `
    -ServerName $serverName `
    -Location $location `
    -SqlAdministratorCredentials $(New-Object -TypeName System.Management.Automation.PSCredential -ArgumentList $adminSqlLogin, $(ConvertTo-SecureString -String $password -AsPlainText -Force))
# Create a server firewall rule that allows access from the specified IP range and all Azure services
$serverFirewallRule = New-AzSqlServerFirewallRule `
    -ResourceGroupName $resourceGroupName `
    -ServerName $serverName `
    -FirewallRuleName "AllowedIPs" `
    -StartIpAddress $ipAddress -EndIpAddress $ipAddress
$allowAzureIpsRule = New-AzSqlServerFirewallRule `
    -ResourceGroupName $resourceGroupName `
    -ServerName $serverName `
    -AllowAllAzureIPs
# Create a database
$database = New-AzSqlDatabase  -ResourceGroupName $resourceGroupName `
    -ServerName $serverName `
    -DatabaseName $databaseName `
    -SampleName "AdventureWorksLT" `
    -Edition "GeneralPurpose" -Vcore 2 -ComputeGeneration "Gen5"
# Enable Azure Defender
$azureDefender = Enable-AzSqlServerAdvancedDataSecurity `
    -ResourceGroupName $resourceGroupName `
    -ServerName $serverName
# Create a storage account
$storageAccount = New-AzStorageAccount -ResourceGroupName $resourceGroupName `
    -AccountName $storageAccountName `
    -Location $location `
    -Type "Standard_LRS"
On your local computer, open SSMS and create a new connection to your logical server. For the server name, enter the name of your Azure SQL Database logical server. If you didn't save the name earlier, you might need to refer to the Azure portal to get it. For example: aw-server<unique ID>.database.windows.net.
When you're in the Azure portal, you can enter AdventureWorks in the search box to find your database and its associated logical server.
In the Authentication box, enter SQL Server Authentication. Enter the corresponding Server Admin Login and Password (the one you provided during deployment in the previous exercise).
Check the Remember password box, then select Connect.
Note
Depending on your local configuration (for example, VPN), your client IP address might differ from the IP address the Azure portal used during deployment. If it does, you'll see a message that says "Your client IP address does not have access to the server. Sign in to an Azure account and create a new firewall rule to enable access." If you get this message, sign in with the account you're using for the sandbox and add a firewall rule for your client IP address. You can complete these steps by using the pop-up wizard in SSMS.
Complete PITR
Before you go any further, it's important to understand the recommended process for doing PITR:
- A table or database is deleted by accident.
- Determine the time that you need to go back to; it should be before the error happened.
- Complete PITR via PowerShell or the Azure portal to go back to this time. This process deploys a new database and restores a copy of your database. For example: AdventureWorks-copy.
- Confirm the new database (for example, AdventureWorks-copy) is in the correct state (as it was before the accident occurred).
- Rename the original database. For example, rename AdventureWorks to AdventureWorks-old.
- Rename the new database with the original database name. For example, rename AdventureWorks-copy to AdventureWorks.
- Delete the original database. For example: AdventureWorks-old.
In this exercise, you'll complete these steps.
Simulate deletion of data
First, let's confirm that the table we'll accidentally delete exists and has data in it. Let's look at some of the values in SalesLT.OrderDetail.
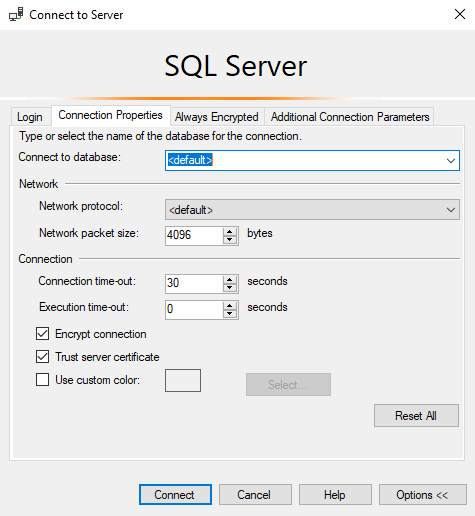
Go to SSMS and check/update your connection. Select File > Connect Object Explorer, then select the Options button.
Make sure the connection you use connects to the logical server but not to a specific database. (For example, use <default> as shown in the following screenshot.) Also, confirm that Additional Connection Parameters tab doesn't contain any text.
Expand the Databases folder, then right-click your AdventureWorks database and select New Query. Enter the following query and run it by selecting Execute, then review the results:
SELECT TOP 10 * from SalesLT.SalesOrderDetail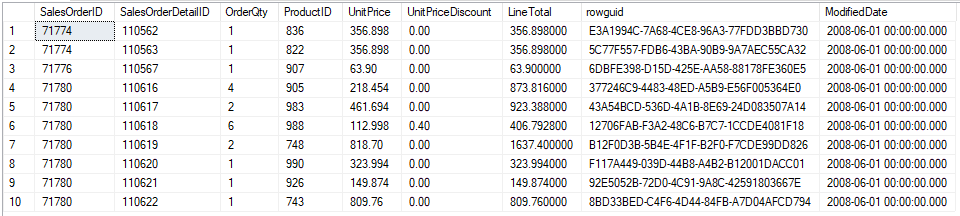
Simulate the loss of data by dropping a table in the database.
In the same query window, run this query, then select the Messages tab in the Results window and note the completion time:
DROP TABLE SalesLT.SalesOrderDetailImportant
Save the completion time. You'll need it later. Here's an example:
Completion time: 2020-06-22T09:20:27.1859237-07:00.Finally, before you start the steps to restore the database, run the following code in Azure Cloud Shell on the right side of this page to configure your environment:
$resourceGroup = Get-AzResourceGroup | Where ResourceGroupName -like <rgn>Sandbox resource group name</rgn>
$server = Get-AzureRmSqlServer -ResourceGroupName $resourceGroup.ResourceGroupName
$logical_server = $server.ServerName
$resource_group = $resourceGroup.ResourceGroupName

# Specify your default resource group and Azure SQL Database logical server
az configure --defaults group=$resource_group sql-server=$logical_server

# Confirm the defaults are set
az configure --list-defaults
The
groupandsql-serverparameters returned should match the names of your Microsoft Learn resource group and your Azure SQL Database logical server.
Identify the time to which to restore the database
The first step is to figure out the time to which to restore the database. You need to know when the last "good" transaction occurred before the "bad" one. You'll restore before the bad transaction but after the last good one.
One way to determine the drop time is by looking at the completion time of the DROP statement, which you noted in the previous step.
An alternative way is to use the Audit logs in the Azure portal. In this exercise, you didn't configure auditing to Log Analytics, but let's explore what you could do if you had. You could go to your Azure SQL database in the Azure portal. In the left pane, under Security, you could select Auditing, then you could select View audit logs. By then selecting Log Analytics, you're brought to a query editor that allows you to query logs by using Kusto Query Language (KQL). SQL professionals can use this query language to easily query logs.
You could then run the following KQL query:
search database_name_s == "AdventureWorks"
| where Category == 'SQLSecurityAuditEvents' and statement_s like 'DROP'
| project format_datetime(event_time_t, 'yyyy-MM-dd hh:mm:ss.fff'), ResourceGroup, server_instance_name_s, database_name_s,  statement_s, succeeded_s,client_ip_s, server_principal_name_s, application_name_s
| sort by event_time_t desc
The results should be similar to the following results, but with a different date and time.

Note
It can take 5 to 10 minutes for the logs to appear here, so for the purposes of this exercise, we've left it out. You'll instead use the completion time you noted in the previous step. (You need to convert it to GMT.) In a real-world situation, you're not likely to be able to get to the window with the completion time, so auditing can be a great help.
In this example, the date/time is
2020-07-24 08:06:24.386from Log Analytics and2020-07-24T13:06:24.386-07:00from SSMS. The required format is slightly different. Use the following example to determine the correct format. You might also want to subtract 0.001 seconds to ensure you restore to a time before the error occurred:- Log Analytics format:
2020-07-24 08:06:24.386 - SSMS format:
2020-07-24T13:06:24.386-07:00 - Required format:
2020-07-24T20:06:24.385
- Log Analytics format:
Set
$before_error_timeto the resulting value, substituting your time for the time in this example:$before_error_time ="2020-07-24T20:06:24.385"
Restore the database and confirm missing data
In this section, you'll use az cli db restore to restore the database to a time before the table was deleted.
Run the following script in the terminal on the right side of this window:
# Restore the database to a time before the database was deleted
az sql db restore --dest-name "AdventureWorks-copy" --name "AdventureWorks" --time $before_error_time --verbose
The restore will take about 5 to 10 minutes. When you run a restore, Azure deploys a new Azure SQL database in your Azure SQL Database logical server. The new database has the same configuration options as the original. After the Azure SQL database is deployed, Azure restores the database into the new Azure SQL database.
You can check the status by refreshing your view of databases in SSMS. Right-click the Databases folder and select Refresh. After the database is deployed, you'll see that the restore is in progress:
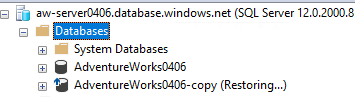
After you see that the restore is in progress, the restore should take two to three minutes more. You'll know when it's done because the command will complete. Also, you'll no longer see "(Restoring...)" next to the copy database when you start a refresh.
If you notice that the restore is taking longer than the times described earlier, that could be because of your Microsoft Learn environment. There's a limit to the number of restore requests that can be processed/submitted at once for a single subscription. If you want to learn more about the limits and related details about PITR while you wait, see Restore a database from a backup in Azure SQL Database.
You'll now confirm that the new database is in the correct state (as it was before the accident occurred). Right-click the logical server in SSMS and then select Refresh to refresh your connection to the Azure SQL Database logical server.
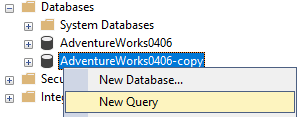
Right-click your new database (for example, AdventureWorks-copy) and then select New Query.
Use this query to confirm that the table exists:
SELECT TOP 10 * from SalesLT.SalesOrderDetailYou should get results similar to the results shown in the following screenshot. This result confirms that your database is restored to where you want it to be.
Swap the databases and clean up
Next, you'll rename the original database to AdventureWorks-old so you can later rename the new database to use the original database name. As long as your applications use retry logic, this change will make it so you don't need to change any connection strings.
If at any point your database appears unavailable (for example, you can't connect to the databases in SSMS if you refresh the connection), it could be because of updates happening to the DNS table. So although the database isn't physically unavailable, it is unresolvable. If you wait a minute or so, you should be able to resume normal activities.
Use this command to change the database name:
az sql db rename --name "AdventureWorks" --new-name "AdventureWorks-old"Now that the original database name is no longer taken, you can rename the copy database to the name of the original, again by using Azure Cloud Shell:
az sql db rename --name "AdventureWorks-copy" --new-name "AdventureWorks"You don't need the old database, so you can delete it by using
az sql db delete:az sql db delete --name "AdventureWorks-old" --yes Write-Host "Database deleted"You can confirm that the old database no longer exists by using this command:
az sql db list -o table
You've now seen how you can use PITR in Azure SQL Database. PITR is also available in Azure SQL Managed Instance for databases, but not for a whole instance. You can use almost the same commands, except that you need to use az sql midb instead of az sql db.