Exercise - Configure Azure SQL Database
In this unit, you'll deploy an Azure SQL logical server and create databases to utilize the features discussed to secure your Azure SQL Database.
Set up: Use scripts to deploy Azure SQL Database
At the right is Azure Cloud Shell, which is a way to interact with Azure by using a browser. Before you start the exercise, you'll run a script in Cloud Shell to create your environment with the sample AdventureWorks database in Azure SQL Database. In the script, you'll be prompted for a password for the new database and your local IP address to enable your device to connect to the database.
These scripts should take three to five minutes to complete. Be sure to note your password, unique ID, and region, because they won't be shown again.
Start by obtaining your local IP address. Ensure that you're disconnected from any VPN service, and open a local PowerShell terminal on your device. Run the following command and note the resulting IP address.
(Invoke-WebRequest -Uri "https://ipinfo.io/ip").ContentRun the following commands in Cloud Shell. Enter a complex password and, at the prompt, enter your local public IP address, which you obtained in the preceding step. Replace "[sandbox resource group name]" with "
[sandbox resource group name] ".$adminSqlLogin = "cloudadmin" $password = Read-Host "Your username is 'cloudadmin'. Enter a password for your Azure SQL Database server that meets the password requirements" # Prompt for local ip address $ipAddress = Read-Host "Disconnect your VPN, open PowerShell on your machine and run '(Invoke-WebRequest -Uri "https://ipinfo.io/ip").Content'. Enter the value (include periods) next to 'Address' " # Get resource group and location and random string $resourceGroup = Get-AzResourceGroup | Where ResourceGroupName -like "[sandbox resource group name]" $resourceGroupName = "[sandbox resource group name]" $uniqueID = Get-Random -Minimum 100000 -Maximum 1000000 $storageAccountName = "mslearnsa"+$uniqueID $location = $resourceGroup.Location # The logical server name has to be unique in the system $serverName = "aw-server$($uniqueID)"Output and store in a text file the information you'll need throughout the module by running the following code in Cloud Shell. You'll likely need to press
Enterafter you paste the code, because the last line won't be run by default.Write-Host "Your unique ID for future exercises in this module:" $uniqueID Write-Host "Your resource group name is:" $resourceGroupName Write-Host "Your resources were deployed in the following region:" $location Write-Host "Your server name is:" $serverNameNote
Remember to note your
password,unique ID, andregion. You'll use them throughout the module.Run the following script to deploy an Azure SQL Database logical server with the
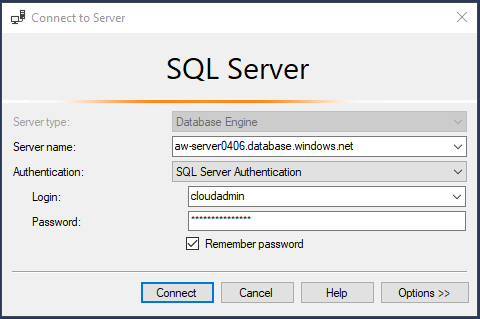
AdventureWorkssample, as well as a ledger database that we'll discuss in future units. The script also adds your IP address as a firewall rule, enables Microsoft Defender for SQL, and creates a storage account for use in future units. Allow several minutes for this script to complete.# The sample database name $databaseName = "AdventureWorks" # The ledger database name $databaseName2 = "myLedgerDatabase" # The storage account name has to be unique in the system $storageAccountName = $("sql$($uniqueID)") # Create a new server with a system wide unique server name $server = New-AzSqlServer -ResourceGroupName $resourceGroupName ` -ServerName $serverName ` -Location $location ` -SqlAdministratorCredentials $(New-Object -TypeName System.Management.Automation.PSCredential -ArgumentList $adminSqlLogin, $(ConvertTo-SecureString -String $password -AsPlainText -Force)) # Create a server firewall rule that allows access from the specified IP range and all Azure services $serverFirewallRule = New-AzSqlServerFirewallRule ` -ResourceGroupName $resourceGroupName ` -ServerName $serverName ` -FirewallRuleName "AllowedIPs" ` -StartIpAddress $ipAddress -EndIpAddress $ipAddress $allowAzureIpsRule = New-AzSqlServerFirewallRule ` -ResourceGroupName $resourceGroupName ` -ServerName $serverName ` -AllowAllAzureIPs # Create databases $database = New-AzSqlDatabase -ResourceGroupName $resourceGroupName ` -ServerName $serverName ` -DatabaseName $databaseName ` -SampleName "AdventureWorksLT" ` -Edition "GeneralPurpose" -Vcore 2 -ComputeGeneration "Gen5" $database2 = New-AzSqlDatabase -ResourceGroupName $resourceGroupName ` -ServerName $serverName ` -DatabaseName $databaseName2 ` -Edition "GeneralPurpose" -Vcore 2 -ComputeGeneration "Gen5" # Enable Microsoft Defender for SQL $azureDefender = Enable-AzSqlServerAdvancedDataSecurity ` -ResourceGroupName $resourceGroupName ` -ServerName $serverName # Create a storage account $storageAccount = New-AzStorageAccount -ResourceGroupName $resourceGroupName ` -AccountName $storageAccountName ` -Location $location ` -Type "Standard_LRS"Open SQL Server Management Studio (SSMS), and then create a new connection to your logical server. For the Server name, enter your Azure SQL Database logical server's name (for example, aw-server
<unique ID>.database.windows.net). If you didn't save the name earlier, you might need to go to the Azure portal to get it.In the Azure portal, search for AdventureWorks to find your database and its associated logical server.
Change the authentication to SQL Server Authentication and enter the corresponding server admin login and password, which you provided during deployment in the previous exercise.
Select the Remember password check box, then select Connect.
Note
Depending on your local configuration (for example, VPN), your client IP address might differ from the IP address that the Azure portal used during deployment. If it does differ, you'll get a pop-up message that reads, "Your client IP address does not have access to the server. Sign in to an Azure account and create a new firewall rule to enable access." If you get this message, sign in with the account you're using for the sandbox and add a firewall rule for your client IP address. You can complete all of these steps by using the pop-up wizard in SSMS.
Once connected to your Azure SQL logical server, expand the Databases folder.
You should see the two databases that were created,
AdventureWorksandmyLedgerDatabase. Right-clickmyLedgerDatabasedatabase and select New Query, then run the following command to create a table namedAccount.Balance. You can run the query by selecting Execute in the task bar.CREATE SCHEMA [Account]; GO CREATE TABLE [Account].[Balance] ( [CustomerID] INT NOT NULL PRIMARY KEY CLUSTERED, [LastName] VARCHAR (50) NOT NULL, [FirstName] VARCHAR (50) NOT NULL, [Balance] DECIMAL (10,2) NOT NULL ) WITH ( SYSTEM_VERSIONING = ON (HISTORY_TABLE = [Account].[BalanceHistory]), LEDGER = ON );