Lab - Explore transportation management
Read this first - before you start the lab!
Important
For this lab, you CANNOT sign in with your own credentials. Use the following steps to sign in to your lab environment with the correct credentials.
Ensure that you are signed in to Microsoft Learn.
Select Launch VM mode or Sign in to launch VM mode in this unit.
In the Resources tab on the lab side bar, select the T icon next to Password in the MININT box, to have the administrator password for the Virtual Machine entered for you.
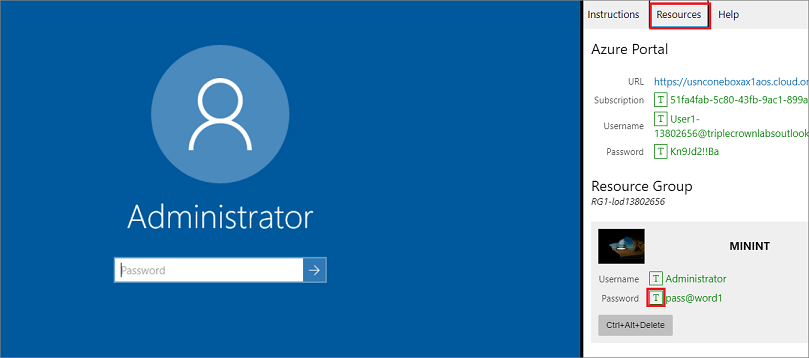
Select Enter.
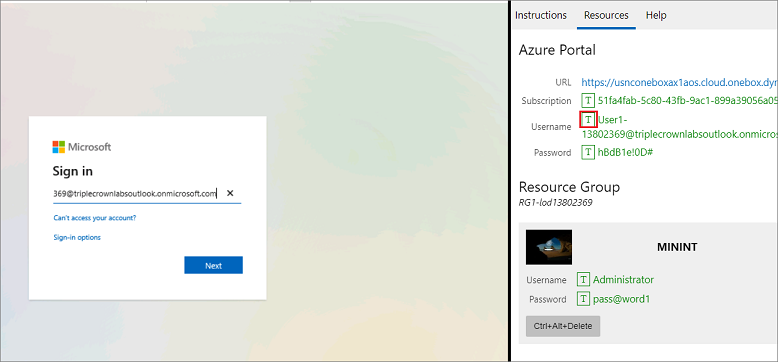
Microsoft Edge will open. Wait for it to navigate to the Sign in page for finance and operations.
On the Microsoft Sign in page in finance and operations, place your mouse cursor into the Username field.
On the Resources tab of the lab side bar, below the Azure portal heading, select the T icon next to Username, then press Enter.
Your mouse cursor will now be in the Password page.
On the Resources tab of the lab side bar, below the Azure portal heading, select the T icon next to select Password, then press Enter.
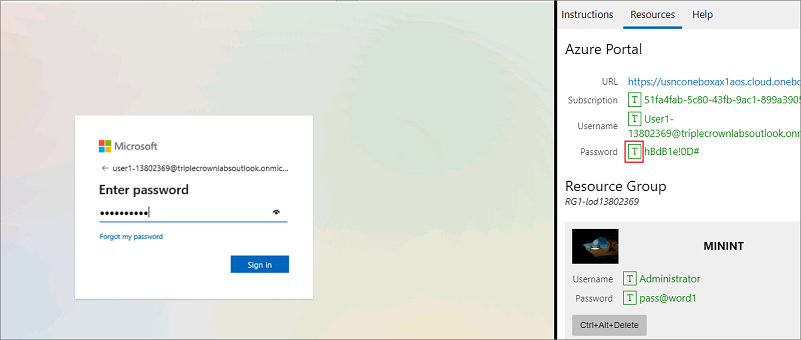
Don't stay signed in or store the password on the virtual machine.
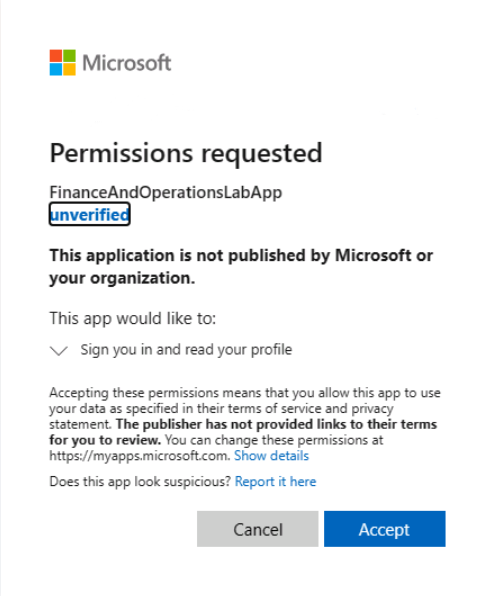
Select Accept in the Permissions requested page.
To see the lab instructions, select the Instructions tab on the lab side bar.
You can now begin your work on this lab.
Scenario - Set up a shipping carrier and carrier service
The USMF company in the United States has a new customer that is in Europe. The Transportation coordinator at Contoso Entertainment has determined that a new company will be used for transporting the products to this customer. The Transportation coordinator will set up a new ocean carrier and carrier service.
Set up a new carrier
- In company USMF, go to Transportation management > Setup > Carriers > Shipping carriers.
- On the Action Pane, select New to create a new shipping carrier.
- In the Shipping carrier field, enter Ocean Carrier 2.
- In the Name field, enter Secondary ocean carrier.
- In the Mode field, select Ocean.
- Expand the Overview FastTab.
- Set the Activate shipping carrier slider to Yes.
- Select Vendor account 1002 from the Vendor account drop-down menu.
- In the SCAC field, enter 2005.
- Set the Activate carrier rating slider to Yes.
- On the Addresses FastTab, select New.
- On the New address page, enter Ocean carrier location in the Name or description field.
- Select Business from the Purpose drop-down list.
- Select USA in the Country/region drop-down list.
- In the ZIP/postal code field, enter 11251.
- In the Street field, enter 1577 Madison Blvd.
- Set the Primary slider to Yes.
- Select OK.
- Close the Shipping carriers page.
Add a carrier service to the carrier
- Open Transportation management > Setup > Carriers > Shipping carriers.
- Select Ocean Carrier 2 in the left-hand pane.
- Expand the Services FastTab.
- Select New.
- In the Carrier service field, enter Ocean.
- In the Name field, enter Ocean.
- In the Transportation method field, select Ocean.
- Select Freight from the Billing group ID drop-down menu.
- Close the page.
Scenario - Configure a rate master
The USRT company is planning to ship some live plants to a new customer in Bothell, Washington, United States, where the zip code is 98021. The company will be shipping from their warehouse in Carmel, Indiana, United States, where the zip code is 46032.
The Transportation manager needs to configure a new Flower moving rate master and configure an assignment for the source and destination locations by using the mileage engine.
Create a rate master
- In the USRT company, open Transportation management > Setup > Rating > Rate master.
- Select New.
- In the Rate master field, enter FlowerMovingMaster.
- In the Name field, enter FlowerMovingMaster.
- In the Rating metadata ID field, select Milage.
Assign the rate base assignments
- On the Rate masters page, select Rate base on the top menu
- Select New
- In the Rate base field, enter FlowerMovingBase
- In the Name field, enter Flower Moving Base
- In the Rate master field, select FlowerMovingMaster.
- In the Break master field, select Milage
- Close the page.
- In the Rate masters page, select the Rate base assignments FastTab and then select New
- In the Name field, enter LTL.
- On the Rate base assignments FastTab, select FlowerMovingBase in the Rate base drop-down list.
- In the Service field, select Truck.
- In the Origin PC field, enter 46032.
- In the DestStartPC field, enter 98021.
- In the DestEndPC field, enter 98021.
- In the DestCountry field, enter USA.
- In the Effective start date and time field, select Go to today.
- Select Save on the Action Pane.
- Close the page.
Scenario - Create a route plan
As a member of the Supply Chain Management project team for Adventure works cycles, you need to configure a new route plan from Georgia, US to Los Angeles, US. You will also need to create a new hub for the warehouses at Georgia and Los Angeles.
Create a new route plan named "GA to LA"
- In USMF, open Transportation management > Setup > Routing > Route plans.
- Select New.
- In the Route plan field, enter GA to LA.
- In the Name field, enter Georgia to Los Angeles.
- Close the page.
Create new hubs for Georgia and Los Angeles
- Open Transportation management > Setup > Routing > Hub masters.
- Select New on the Action Pane.
- In the Hub field, enter Georgia 3.
- In the Name field, enter Savannah GA.
- Expand the Codes FastTab.
- In the Hub type field, select Hub.
- In the Rate master field, select TruckRateMaster.
- Expand the Effective dates FastTab.
- In the Effective start date and time field, select Today.
- In the Effective end date and time field, select a month from today's date.
- Expand the Address FastTab.
- Select Add.
- In the Name or description field, enter Georgia 3.
- In the Zip/postal code field, enter 31302.
- In the Street field, enter 123 ABC Street.
- Select OK.
- Select New on the Action Pane to create another record.
- In the Hub field, enter Los Angeles 2.
- In the Name field, enter Los Angeles CA 2.
- Expand the Codes FastTab.
- In the Hub type field, select Hub.
- In the Rate master field, select TruckRateMaster.
- Expand the Effective dates FastTab.
- In the Effective start date and time field, select Today.
- In the Effective end date and time field, select a month from today's date.
- Expand the Address FastTab.
- Select Add.
- In the Name or description field, enter Los Angeles 2.
- In the Zip/postal code field, enter 90001.
- In the Street field, enter 987 XYZ Avenue.
- Select OK.
- Select Save on the Action Pane.
- Close the page.
Add details to the route plan
- Open Transportation management > Setup > Routing > Route plans.
- Select the GA to LA route plan.
- Select Edit on the Action Pane.
- On the Details FastTab, select New.
- In the Origin hub field, select Georgia 3.
- In the Destination hub field, select Los Angeles 2.
- In the Shipping carrier field, select TruckCarrier.
- In the Carrier service field, select Truck.
- Select Save on the Action Pane.
- Close the page.
Scenario - Create a route guide
As a member of the Supply Chain Management project team for Adventure Works Cycles, you need to configure a new routing guide for Georgia to Los Angeles. The routing guide should ultimately lead to the result being the TruckCarrier shipping carrier, with the Truck carrier service.
Create a new route guide named "GA to LA"
- In USMF, open Transportation management > Setup > Routing > Route guides.
- Select New on the Action Pane.
- In the Routing guide field, enter GA to LA.
- In the Name field, enter Georgia to Los Angeles.
Add Information, Origin, Destination, and Result entities to the routing guide
- Expand the Information FastTab.
- In the Direction field, select Outbound.
- Set the Active slider to the Yes position.
- In the Effective start date and time field, select Today.
- In the Effective end date and time field, select a month from today's date.
- Expand the Origin FastTab.
- In the Zip/postal code field, enter 31302.
- In the Hub field, select Los Angeles 2.
- In the Country/region field, enter USA.
- Expand the Destination FastTab.
- In the Zip/postal code from field, enter 31302.
- In the Zip/postal code to field, enter 90001.
- In the Hub field, select Georgia 3.
- In the Country/region field, enter USA.
- Expand the Result FastTab.
- In the Shipping carrier field, select TruckCarrier.
- In the Carrier service field, select Truck.
Scenario - Process an inbound shipment
In this part of the lab you will:
- Create a hub, route plan, and route guide
- Initiate an inbound shipment
- Process an inbound shipment
- Confirm an inbound shipment
Prerequisite steps
Add a vendor address for the Ade Supply company
- In company USMF, open Accounts payable > Vendors > All vendors.
- Select vendor 1003 from the list of vendors.
- On the Action Pane, select Edit.
- In the Addresses FastTab, select Add.
- In the Name or description field, enter Ade Supply main location.
- In the Zip/postal code field, enter 00210.
- In the Street field, enter 123 Main Street.
- Set the Primary slider to Yes.
- Select OK.
- In the Invoice and delivery FastTab, in the Mode of delivery field, select Parce-STD.
- Close the pages.
Modify the CFR terms of delivery
- Open Accounts payable > Setup > Terms of delivery.
- Select CFR from the left-hand panel.
- Select Edit on the Action Pane.
- In the Transportation FastTab, set the Add transportation charges to retail sales orders slider to Yes.
- Close the page.
Create a hub, route plan, and route guide
You have been asked to set up a hub for the Ade Supply company and create a route plan and guide between the Ade Supply company and USMF's warehouse 61.
Create a hub for the Ade Supply company
- Open Transportation management > Setup > Routing > Hub masters.
- Select New on the Action Pane.
- In the Hub field, enter Ade Supply.
- In the Name field, enter Ade Supply NH.
- In the Codes FastTab, in the Hub type field, select Hub.
- In the Rate master field, select ParcelRateMaster.
- In the Address FastTab, select Add.
- On the New address page, in the Name or description field, enter Ade Supply NH.
- In the ZIP/postal code field, enter 00210.
- In the Street field, enter 123 Main Street.
- Select OK.
- Close the page.
Create a route plan from New Hampshire to Washington
- Open Transportation management > Setup > Routing > Route plans.
- Select New on the Action Pane.
- In the Route plan field, enter NH to WA.
- In the Name field, enter New Hampshire to Washington.
- In the Details FastTab, select New.
- In the Origin hub field, select Ade Supply.
- In the Destination hub field, select Own WHS.
- In the Shipping carrier field, select ParcelCarrier.
- In the Carrier service field, select STD.
- In the Vendor field, select 1003.
- Close the page.
Create a route guide from New Hampshire to Washington
- Open Transportation management > Setup > Routing > Route guides.
- Select New on the Action Pane.
- In the Routing guide field, enter NH to WA.
- In the Name field, enter New Hampshire to Washington.
- In the Origin FastTab, in the ZIP/postal code field, enter 00210.
- In the Destination FastTab, in the ZIP/postal code to field, enter 98052.
- In the Result FastTab, in the Route plan field, select NH to WA.
- Close the page.
Initiate an inbound shipment
You have been asked to create a new purchase order for 10 mini-speakers from the Ade Supply company. After creating the purchase order, you will need to create an inbound shipment and then rate shop for the inbound load to find the cheapest transportation rate.
Create a new purchase order
- Open Accounts payable > Purchase orders > All purchase orders.
- Select New on the Action Pane.
- On the Create purchase order page, in the Vendor account field, select 1003.
- In the General FastTab, in the Site field, select 6.
- In the Warehouse field, select 61.
- Select OK.
- In the Purchase order lines FastTab, in the Item number field, enter L0101.
- In the Quantity field, enter 10.
- In the Unit price field, enter 50.
- In the Purchase tab on the Action Pane, select Confirm.
- Select OK in the pop-up window that appears.
Create an inbound shipment
- On the Warehouse tab on the Action Pane, select Load planning workbench.
- Select the check mark column for the purchase order line that you just created.
- On the Supply and demand tab on the Action Pane, select To new load.
- On the Load template assignment page, in the Load template ID field, select Stnd Load template.
- Select OK.
Set up the rate shop for the inbound load
- On the Loads tab of the Load planning workbench, select Rate route workbench from the Rating and routing drop-down menu.
- On the Action Pane of the Rate route workbench, select Rate shop.
- On the Route results FastTab, clear the Hide exceptions check box.
- On the Action Pane, select Route with rate.
- Select the Route result for the Wh 61 to Cust 003 004 019 line for the route guide.
- Select Assign.
Process an inbound shipment
Now that the inbound shipment has been created and rated, you need to schedule an appointment for the mini-speaker shipment. You've also been asked to check the driver, Tim Smith, in and out of the appointment.
Schedule an appointment
- Open Transportation management > Planning > Loads > All loads.
- On the Loads tab, select the load ID for the purchase order that you created earlier.
- Select Appointment scheduling from the Transportation drop-down menu.
- On the Appointment scheduling page, select New on the Action Pane.
- On the Appointment details FastTab, in the Appointment rule field, select Inbound docks 61.
- On the Action Pane, select the Update status drop-down menu and then select Firm. You may have to refresh the page to enable the Update status option. If the Update status menu is still disabled, go back to the previous page and reselect Appointment scheduling from the Transportation drop-down menu and then select Firm from the Update status drop-down menu.
Check in the driver
- On the Action Pane, select the Update status drop-down arrow and then select Driver check-in.
- On the Driver check-in details page, in the Driver name field, enter Tim Smith.
- In the Driver license field, enter 123.
- Select OK.
- Close the Appointment scheduling page.
Check out the driver
- On the Transportation tab, under the APPOINTMENTS section, select Appointment scheduling.
- On the Action Pane, select the Update status drop-down arrow and select Driver check-out.
- On The driver's information page, select OK to accept the default information.
- Close the page.
Confirm an inbound shipment
You now need to confirm the inbound shipment.
- Open Transportation management > Planning > Loads > All loads.
- Select the Load ID of the load.
- In the Load details page, select the Ship and receive tab on the Action Pane, and then select Inbound shipment in the Confirm area.
- Close the page.
Scenario - Process an outbound shipment
You have been asked to confirm a sales order for Desert Wholesales, reserve stock for the order, and create an outbound transportation load.
Receive and confirm the sales order
- In company USMF, open Sales and marketing > Customers > All customers.
- In the list of customers, select the line for account US-007 and open it.
- On the Action Pane, select the Sell tab.
- In the New area, select Sales order.
- On the Sales order page, expand the Sales order lines FastTab, if it is not expanded already.
- In the existing sales order line, in the Item number field, enter A0001.
- In the Quantity field, enter 5.
- In the Site field, enter 6.
- In the Warehouse field, enter 62.
- In the Unit price field, enter 15.
- On the Action Pane, select Save.
- On the Action Pane, select the Sell tab.
- In the Generate area, select Confirm sales order.
- Confirm the information on the Confirm sales order page and then select OK.
- Select OK to post without printing.
Reserve stock for the order
- On the Sales order page, select the order line on the Sales order lines FastTab.
- Select the Inventory drop-down arrow and select Reservation.
- On the Reservation page, select Reserve lot in the Action Pane
- In the Reservation field, the value 5 now appears.
- Close the page.
Create an outbound transportation load
- On the Sales order page, select the Warehouse tab on the Action Pane.
- In the Loads area, select Load planning workbench.
- In the Sales lines tab, select the line for your current sales order.
- On the Action Pane, select Supply and demand.
- In the Add area, select To new load.
- On the Load template assignment page, select Stnd Load Template from the Load template ID drop-down menu.
- Select OK.
- Select OK to confirm exceeding capacity.
Scenario - Set up automatic freight reconciliation
You have been tasked with setting up freight reconciliation for Desert Wholesales.
Create a freight reconciliation reason code for Overtime
- Open Transportation management > Setup > Freight reconciliation > Reconciliation reasons.
- Select New.
- Enter OT in the Reconciliation reason field.
- Enter Overtime in the Description field.
- Enter 211650 in the Debit account field and then, in the dropdown that appears, select a value such as Home in the BusinessUnit field and Operations in Department field.
- Select the Pay the freight vendor check box. (You may need to tab to the Pay the freight vendor check box and use the space bar to select it.)
- Close the page.
Verify that the Freight bill type is configured
- Open Transportation management > Setup > Freight reconciliation > Freight bill type.
- Select the TL Freight bill type.
- Verify that the Engine assembly field is populated.
- Verify that two records exist: one for Billing group ID and one for External code.
- Close the page.
Create a freight bill type assignment for the Truck Carrier service
- Open Transportation management > Setup > Freight reconciliation > Freight bill type assignments.
- Select New.
- Select None in the Direction field.
- Select Ground in the Mode field.
- Select TruckCarrier in the Shipping carrier field.
- Select TL in the Freight bill type field.
- Close the page.
Create a billing group named "Duties"
- Open Transportation management > Setup > Freight reconciliation > Billing Group.
- Select New.
- Enter Duties in the Billing group ID field.
- Enter Duties in the Name field.
- Close the page.
Create an audit master for overtime
- Open Transportation management > Setup > Freight reconciliation > Audit master.
- Select New.
- Enter Overtime in the Audit master ID field.
- Select TruckCarrier in the Shipping carrier field.
- Select TL in the Freight bill type field.
- On the Result FastTab, select OT in the Overpayment reason code field.
- Select Damage claim in the Underpayment reason code field.
- Close the page.
Scenario - Work with appointment scheduling
In this part of the lab you will create a new appointment rule, sales order and a new load assignment. You will also practice checking in a driver and creating an instant appointment.
Create a new appointment rule
- In company USMF, open Transportation management > Setup > Appointment scheduling > Appointment rules.
- Select New.
- In the Appointment rule field, enter Warehouse 62.
- In the Site field, select 6.
- In the Warehouse field, select 62.
- In the Duration field, enter 30.
- In the Max. number of appointments field, enter 5.
- In the Item movement direction field, select Both.
- Select Save.
- Close the page.
Create and pick a new sales order
- Open Accounts receivable > Orders > All sales orders.
- Select New.
- In the Customer account field, select US-007.
- Select OK.
- Select A0001 for Item number on the Sales order lines.
- In the Quantity field enter 3; select 6 for Site and 62 for Warehouse; enter 15 for the unit price.
- On the Sales order page, select the Warehouse tab on the Action Pane.
- In the Loads area, select Load planning workbench.
- In the Sales lines tab, select the line for your current sales order.
- On the Action Pane, select Supply and demand.
- In the Add area, select To new load.
- On the Load template assignment page, select Stnd Load Template from the Load template ID drop-down menu.
- Select OK.
- Select OK to confirm exceeding capacity.
- Select Release to warehouse from the Release drop-down menu.
- Select OK on the dialog box.
Note
Use the Load ID that is generated by the above steps as the load to select for the rest of the exercise.
Create a new load assignment
You have been instructed to create a new load assignment for an existing sales order for Warehouse 62.
- Open Transportation management > Planning > Load planning workbench.
- In the Loads section, select Load ID, which was generated earlier.
- Select Appointment scheduling from the Transportation drop-down menu.
- On the Appointment scheduling page, select New on the Action Pane.
- On the Appointment details FastTab, in the Appointment rule field, select Warehouse 62.
- On the Action Pane, select Firm from the Update status drop-down menu. If the Update status menu is disabled, go back to the previous page and reselect Appointment scheduling from the Transportation drop-down menu and then select Firm from the Update status drop-down menu.
Check in a driver
You have been asked to create an instant appointment for driver Kim Anderson, and then you will check in Kim for the appointment.
Create an instant appointment
- Open Transportation management > Planning > Dock appointment scheduling > Driver check-in and check-out.
- On the Action Pane, select the Schedule an instant appointment drop-down arrow.
- In the Appointment rule field, select Warehouse 62.
- Select OK.
Check in a driver for the instant appointment
- On the Driver check-in and check-out list page, select the appointment ID that has just been created.
- On the Action Pane, select Driver check-in.
- On the Driver check-in details page, in the Shipping carrier field, select TruckCarrier.
- In the Driver name field, enter Kim Anderson.
- Select OK.
- Select Driver check-out in the Action Pane.
- Select OK.
- Close all pages.
Close the lab environment
- Select Done in the Instructions pane in the lab side bar.
- In the Lab is complete window, select Continue, and then select Leave to return to the next unit in the module.