Use policies to enforce standards
You're organizing your resources better in resource groups, and you've applied tags to your resources to use them in billing reports and in your monitoring solution. Resource grouping and tagging have made a difference in the existing resources, but how do you ensure that new resources follow the rules? Let's take a look at how policies can help you enforce standards in your Azure environment.
What is Azure Policy?
Azure Policy is a service you can use to create, assign, and manage policies. These policies apply and enforce rules that your resources need to follow. These policies can enforce these rules when resources are created, and you can evaluate them against existing resources to give visibility into compliance.
Policies can enforce rules such as only allowing specific types of resources to be created or only allowing resources in specific Azure regions. You can enforce naming conventions across your Azure environment. You can also enforce that specific tags are applied to resources. Let's take a look at how policies work.
Create a policy
You'd like to ensure that all resources have the Department tag associated with them and block creation if the tag doesn't exist. You'll need to create a new policy definition and assign it to a scope; in this case, the scope is our msftlearn-core-infrastructure-rg resource group. You can create and assign policies through the Azure portal, Azure PowerShell, or Azure CLI. This exercise takes you through creating a policy in the portal.
Create the policy definition
Navigate to the Azure portal in a web browser if you haven't already. In the search box in the top navigation bar, search for Policy and select the Policy service.
Select the Definitions pane from the Authoring section in the left menu.
You should see a list of built-in policies that you can use. In this case, you're going to create your own custom policy. Select + Policy definition in the top menu.
This button brings up the New policy definition dialog. To set the Definition location, select the blue Launch scope selector (...). Select the subscription in which the policy is stored, which should be the same subscription as our resource group. Select the Select button.
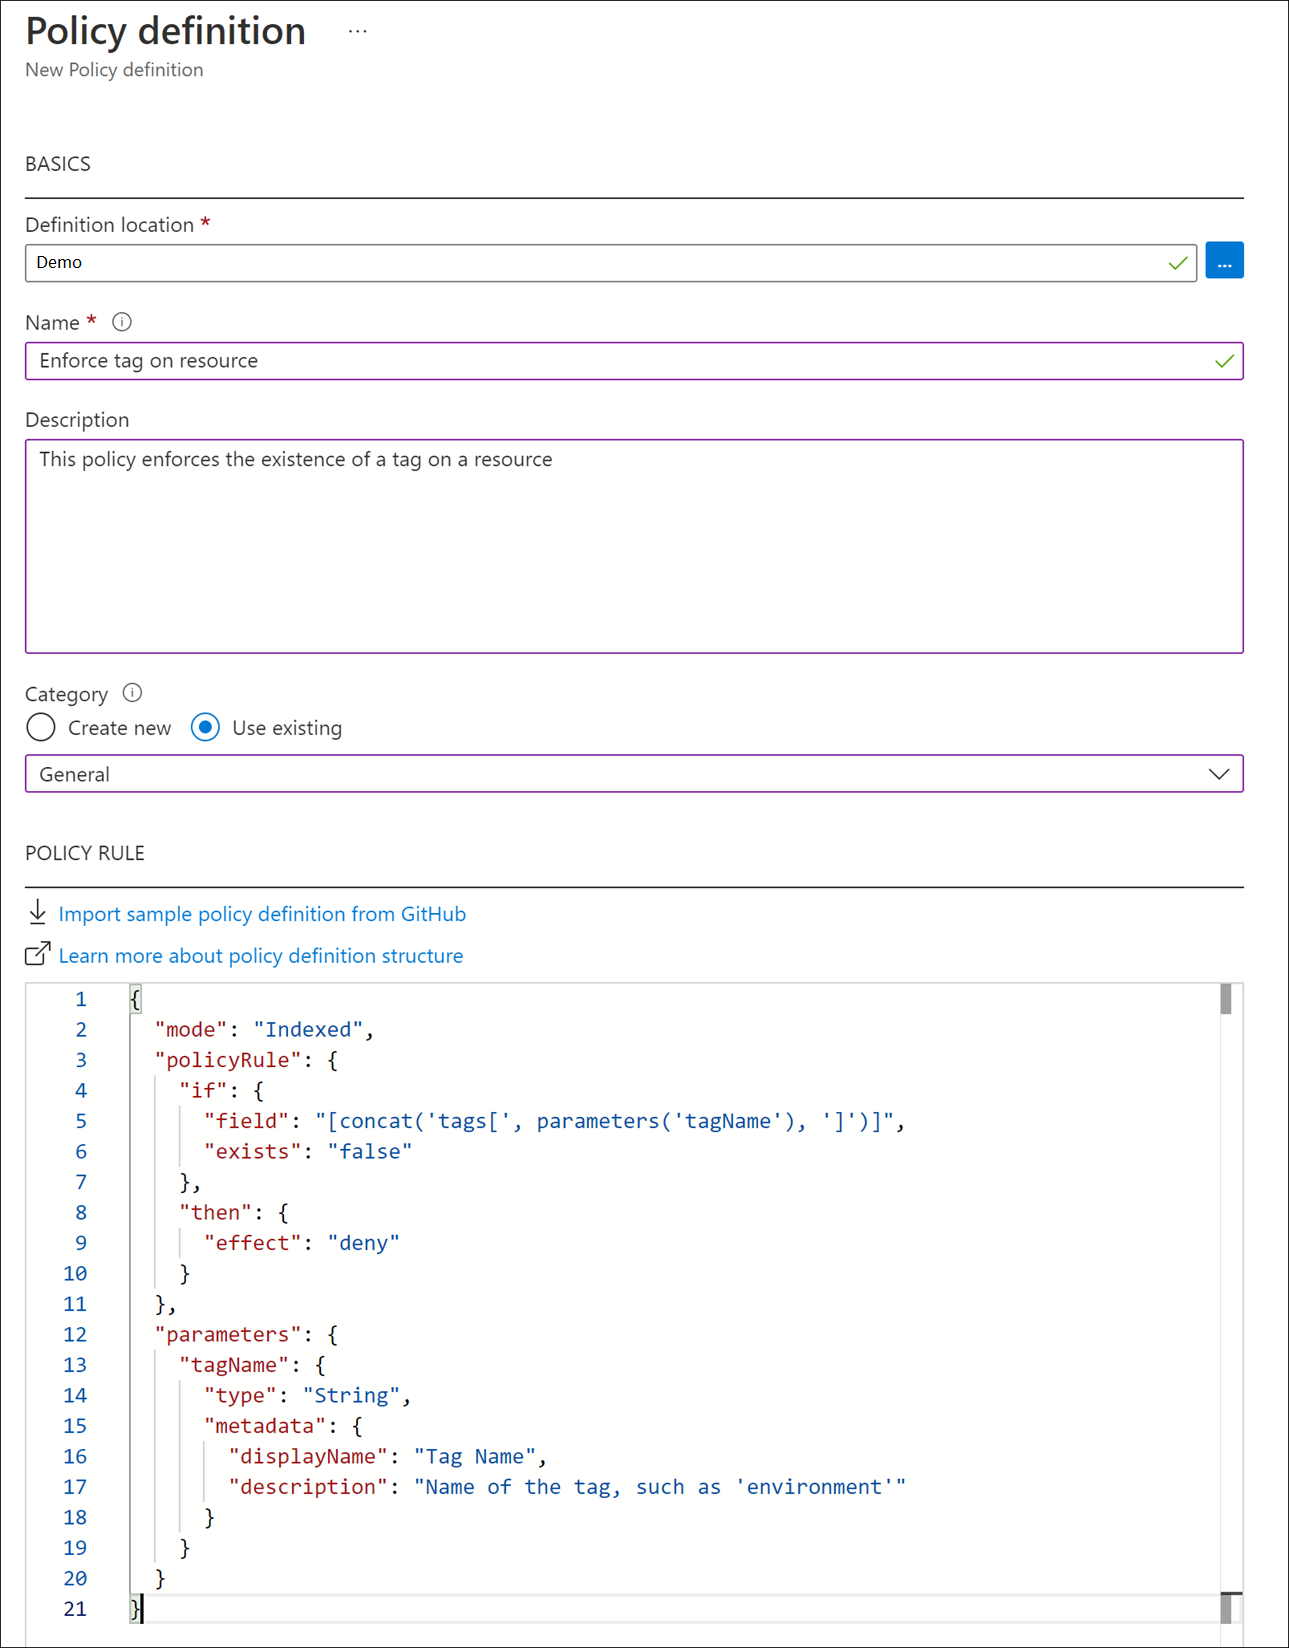
Back on the New policy definition dialog, enter Enforce tag on resource in the Name field.
For the Description, enter This policy enforces the existence of a tag on a resource.
For Category, select Use existing, then select the General category.
For the Policy rule, delete all text in the box and paste in the following JSON:
{
  "mode": "Indexed",
  "policyRule": {
    "if": {
      "field": "[concat('tags[', parameters('tagName'), ']')]",
      "exists": "false"
    },
    "then": {
      "effect": "deny"
    }
  },
  "parameters": {
    "tagName": {
      "type": "String",
      "metadata": {
        "displayName": "Tag Name",
        "description": "Name of the tag, such as 'environment'"
      }
    }
  }
}
Your policy definition should look like the following example. Select Save to save your policy definition.
Create a policy assignment
You've created the policy, but you haven't actually put it into effect yet. To enable the policy, you need to create an assignment. In this case, you'll assign it to the scope of your msftlearn-core-infrastructure-rg resource group so that it applies to anything inside the resource group.
In the policy pane, select Assignments from the Authoring section on the left.
Select Assign policy at the top.
In the Assign policy pane, you'll assign your policy to your resource group. For Scope, select the blue Launch scope selector (...). Select your subscription and the msftlearn-core-infrastructure-rg resource group, then select the Select button.
For Policy definition, select the blue Launch policy definition picker (...). In the Type drop-down, select Custom, select the Enforce tag on resource policy you created, then select the Add button.
Select the Parameters tab at the top of the screen.
On the Parameters pane, enter Department for the Tag name.
Select Review + create, then select Create to create the assignment.
Test out the policy
Now that you've assigned the policy to your resource group, any attempts to create a resource without the Department tag will fail.
Important
Please note that the policy assignment might take up to 30 minutes to take effect. Because of this delay, in the following steps the policy validation might succeed, but the deployment will still fail. If this happens, allow for additional time and retry your deployment.
On the Azure portal menu or from the Home page, select Create a resource.
Search for Storage account and select Storage account. In the results, select Create.
Select your subscription, then select the msftlearn-core-infrastructure-rg resource group.
For Storage account name, give it any name of your choice, but note that it does have to be a globally unique name.
Leave the rest of the options at their default, then select Review.
Your resource-creation validation will fail because you don't have a Department tag applied to the resource. If the policy has not caused a validation failure, you might need to wait a few more minutes for it to be enabled.
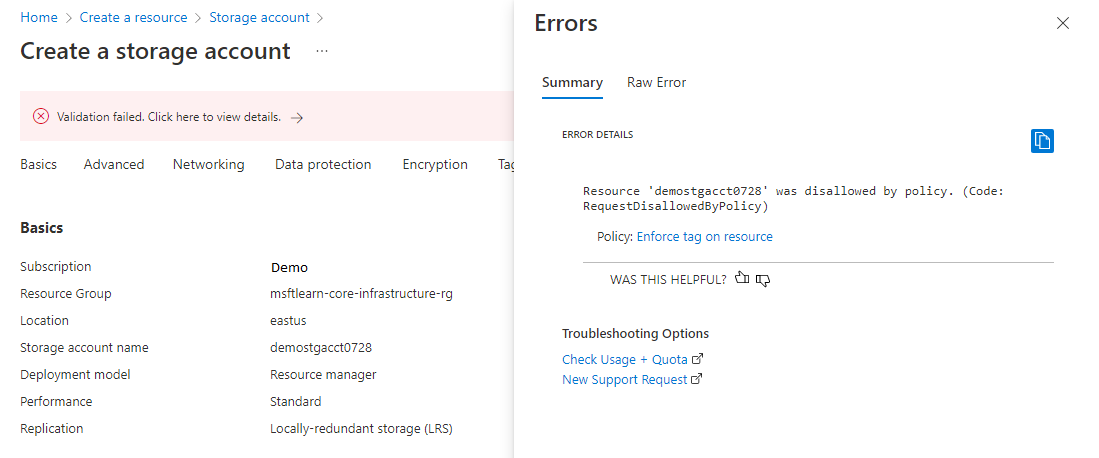
Fix the violation so you can successfully deploy the storage account.
Select Tags at the top of the Create storage account pane.
Add a
Department:Financetag to the list.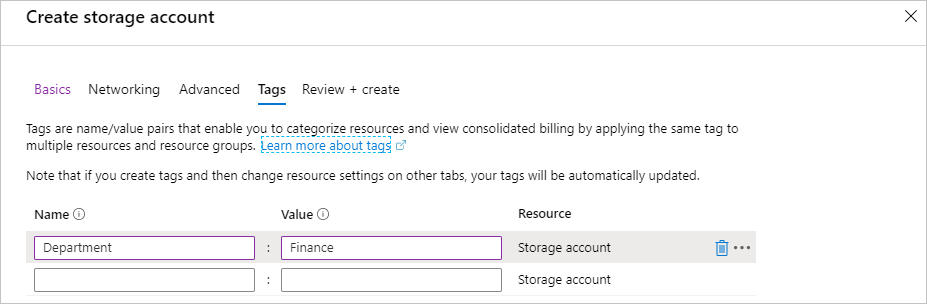
Now click Review. Validation will now pass, and if you select Create, your storage account will be created.
Use policies to enforce standards
You've seen how you can use policies to ensure that your resources have the tags that organize your resources. There are other ways we can use policies to our benefit.
You could use a policy to restrict to which Azure regions you can deploy resources. For organizations that are heavily regulated or have legal or regulatory restrictions on where data can reside, policies help to ensure that resources aren't provisioned in geographic areas that go against these requirements.
You could use a policy to restrict which types of virtual machine sizes can be deployed. You might want to allow large VM sizes in your production subscriptions, but maybe you'd like to ensure that you keep costs minimized in your dev subscriptions. By denying the large VM sizes through policy in your dev subscriptions, you can ensure they don't get deployed in these environments.
You could also use a policy to enforce naming conventions. If your organization has standardized on specific naming conventions, using policy to enforce the conventions helps us to keep a consistent naming standard across your Azure resources.