Customize and Manage CDN behavior
CDNs can improve the performance of static websites. Within the context of a global training business, your content needs to be easily accessible and up-to-date. In this unit, learn how to make other configuration changes so that CDNs work properly with static sites in production environments.
Using Custom domains
From the exercise, you saw how the CDN had a unique URL in the form of endpointname.azureedge.net. Regardless of where the user is in the world, this URL points to the nearest POP, in that way improving performance. While this approach works fine, the URL isn't memorable, and doesn't reflect your company's brand.
Custom domain settings enable you to specify a Canonical Name (CNAME) record in Domain Name System (DNS) that points to the CDN URL. Suppose the user types in the custom domain name, for example www.contoso.com. The DNS maps that domain name to the POP endpoint URL and connects the user to that URL.
Create a CNAME DNS record
To provide custom domain mapping, you first need to create the CNAME record in DNS. How you do the mapping depends on the interface that your DNS provider implements. However, what you need to configure is a record in the following form:
| Address (left field) | type | Points to (Right field) |
|---|---|---|
| www.contoso.com | CNAME | endpointname.azureedge.net. |
DNS can take up to 72 hours to update.
Mapping the temporary cdnverify subdomain
You can configure the CNAME record and publish it if your web server isn't yet online. But, you shouldn't interrupt your users when you set up the CDN record. If your domain is already in production and pointing to the origin server, setting up the CDN record without interrupting your users is important. CNAME records should point to the cdnverify subdomain. In this case, the record looks like this format:
| Address (left field) | type | Points to (Right field) |
|---|---|---|
| cdnverify.www.contoso.com | CNAME | cdnverify.contoso.azureedge.net. |
Typically, you would configure this record with a Time to Live (TTL) of 1 hour.
After you configure the cdnverify subdomain and the CNAME for the domain mapping, you can add the custom domain.
Adding a custom domain
To add a custom domain, go to the CDN endpoint that you created, and under Settings, select Custom domains. In the Custom domain pane, select Custom domain, then in the Add a custom domain, under Custom hostname, enter the hostname that matches the CNAME record in your custom domain, such as www.contoso.com.
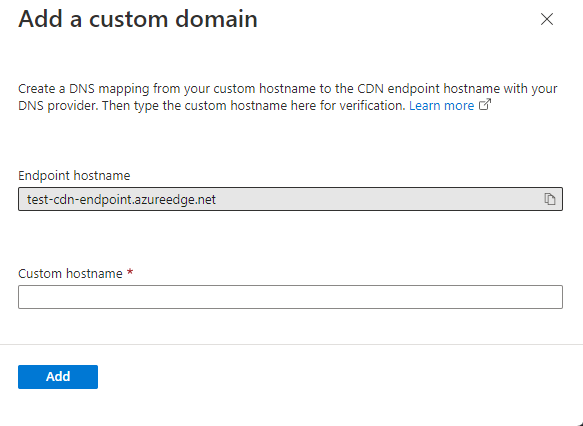
When you enter the custom domain name, Azure uses DNS to attempt to resolve the address to the endpoint hostname. You see a tick next to the Custom hostname field if they match. If you see a red exclamation mark, then you should check your DNS settings.
If the custom domain name resolves to the endpoint hostname, select Add. Now any users going to www.contoso.com are redirected to the Azure POP nearest their location.
Compressing files
Azure CDN can improve performance by compressing the files before they're delivered. The receiving browser decompresses the files. How this activity applies depends on whether the file is originally compressed on the origin server or not.
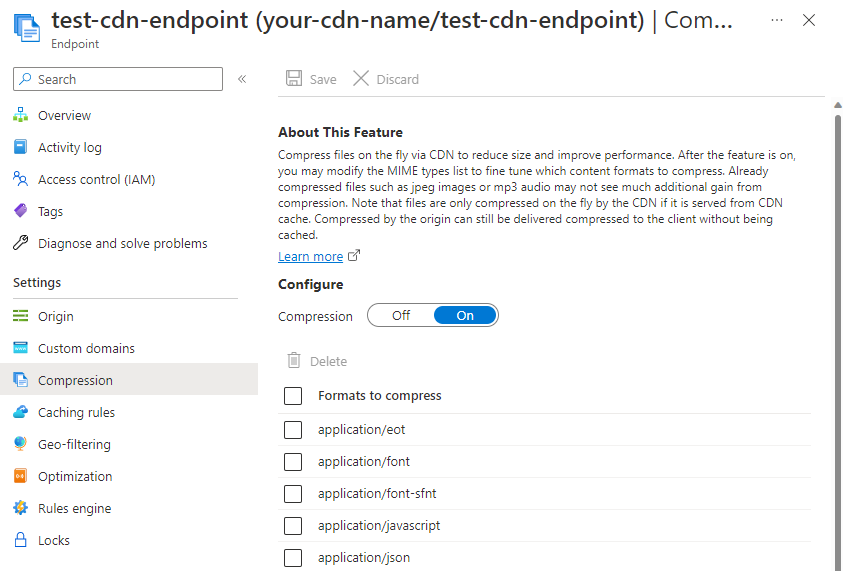
Azure CDN passes along the compressed files unaltered if you enable compression on files hosted on your origin server. Azure CDN dynamically compresses uncompressed files on the origin server that are of a type that can be compressed. It then stores the compressed files on the POP. This process improves the client experience and site performance.
Compression in Azure CDN Standard from Microsoft is on by default. You can't configure other file types to compress or delete existing file types. However, you can add and modify the file types to compress in the Edgio profile.
Controlling caching behavior
Azure CDNs provide two mechanisms for caching files. However, these configuration settings depend on the tier that you select. Caching rules in Azure CDN Standard for Microsoft are set at the endpoint level and provide three configuration options. Other tiers provide more configuration options, which include:
- Caching rules. Caching rules can be either global (apply to all content from a specified endpoint) or custom. Custom rules apply to specific paths and file extensions.
- Query string caching. Query string caching enables you to configure how Azure CDN responds to a query string. Query string caching has no effect on files that can't be cached.
With the Azure CDN Standard for Microsoft Tier, caching rules are as simple as the following three options:
- Ignore query strings. This option is the default mode. A CDN POP simply passes the request and any query strings directly to the origin server on the first request and caches the asset. New requests for the same asset ignore any query strings until the TTL expires.
- Bypass caching for query strings. Each query request from the client is passed directly to the origin server with no caching.
- Cache every unique URL. Every time a requesting client generates a unique URL, that URL is passed back to the origin server and the response cached with its own TTL. This final method is inefficient where each request is a unique URL, as the cache-hit ratio becomes low.
To change these settings, in the Endpoint pane, select Caching rules and then select the caching option that you want to apply to the endpoint and select Save.

Caching and time to live
If you publish a website through Azure CDN, the files on that site are cached until their TTL expires. The Cache-Control header contained in the HTTP response from origin server determines the TTL duration.
If you don't set a TTL on a file, Azure CDN sets a default value. However, this default can be overridden if you set up caching rules in Azure. Default TTL values are as follows:
- Generalized web delivery optimizations: seven days
- Large file optimizations: one day
- Media streaming optimizations: one year
For more information on caching, see the Further Reading section in the Summary unit.
Content updating
In normal operation, an Azure CDN edge node serves an asset until its TTL expires. The edge node reconnects to the origin server when the TTL expires and a client makes a request to the same asset. The node fetches another copy of the asset, resetting the TTL in the process.
To ensure that users always receive the latest version of an asset, consider including a version string in the asset URL. This approach causes the CDN to retrieve the new asset immediately.
Alternatively, you can purge cached content from the edge nodes, which refreshes the content on the next client request. You might purge cached content when publishing a new version of a web app or to replace any out-of-date assets.
You can purge content in several ways.
- On an endpoint by endpoint basis, or all endpoints simultaneously should you want to update everything on your CDN at once.
- Specify a file, by including the path to that file or all assets on the selected endpoint by checking the Purge All checkbox.
- Based on wildcards (*) or using the root (/).
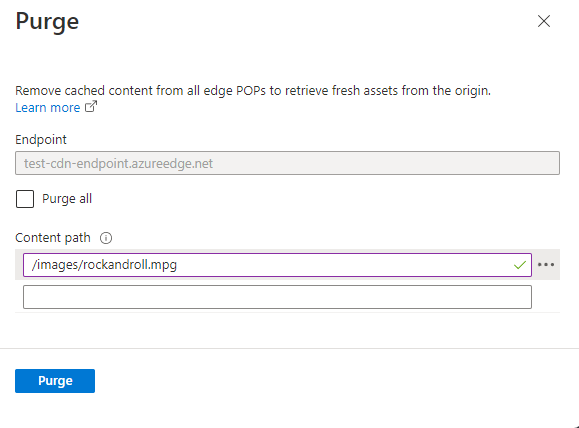
After specifying the content you want to purge, select the Purge button.
For more information about content expiration, see the Further Reading section in the Summary unit.
Geo-filtering
Geo-filtering enables you to allow or block content in specific countries/regions, based on the country/region code. In the Azure CDN Standard for Microsoft Tier, you can only allow or block the entire site. With the Edgio tier, you can also set up restrictions on directory paths. For more information, see the further reading section in the Summary unit.
To configure geo-filtering, in the properties of the respective endpoint, select Geo-filtering. On the Geo-filtering panel, select either allow or block, then in the country/region codes list, select which countries/regions you want to allow or block.
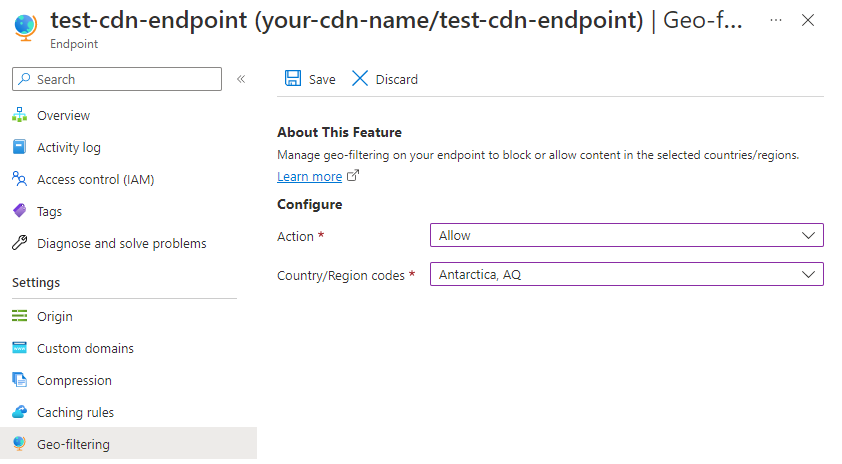
The Allow setting is more restrictive than Block. Allow allows access only for the selected countries/regions. The logic for Block is to allow access from all countries/regions, except for those countries/regions blocked.
For more information on geo-filtering, see the Further Reading section in the Summary.