Other baseline security considerations
You should follow a few more security recommendations to set general security and operational controls on your Azure subscription.
More security recommendations
The following sections describe additional recommendations that are in CIS Microsoft Azure Foundations Security Benchmark v. 1.3.0. Included with each recommendation are the basic steps to complete in the Azure portal. You should complete these steps for your own subscription and by using your own resources to validate each security recommendation. Keep in mind that Level 2 options might restrict some features or activity, so carefully consider which security options you decide to enforce.
Set an expiration date on all keys in Azure Key Vault - Level 1
In addition to the key, the following attributes might be specified for a key in Azure Key Vault. In a JSON request, an attribute's keyword and braces { } are required, even if no attribute is specified. For example, for the optional IntDate attribute, the default value is forever. The exp (expiration time) attribute identifies the expiration time at or after which the key must not be used for a cryptographic operation, except for certain operation types under specific conditions. The processing of the exp attribute requires that the current date and time are before the expiration date and time set in the exp value.
We recommend that you rotate your keys in your key vault and set an explicit expiry time for each key. This process ensures that keys can't be used beyond their assigned lifetimes. Key Vault stores and manages secrets as sequences of 8-bit bytes called octets, with a maximum size of 25 KB each for each key. For highly sensitive data, clients should consider more layers of protection for data. One example is to encrypt data by using a separate protection key prior to storage in Key Vault. Complete the following steps for all keys in each of your key vaults.
Sign in to the Azure portal. Search for and select Key vaults.
In the left menu under Objects, select Keys.
In the Keys pane for the key vault, ensure that each key in the vault has Expiration date set as appropriate.
If you change any settings, in the menu bar, select Save.
Set an expiration date on all secrets in Azure Key Vault - Level 1
Securely store and tightly control access to tokens, passwords, certificates, API keys, and other secrets. Ensure that an expiration time is set for all secrets in Azure Key Vault. Complete the following steps for all secrets in each of your key vaults.
Sign in to the Azure portal. Search for and select Key vaults.
In the left menu under Objects, select Secrets.
In the Secrets pane for the key vault, ensure that each secret in the vault has Expiration date set as appropriate.
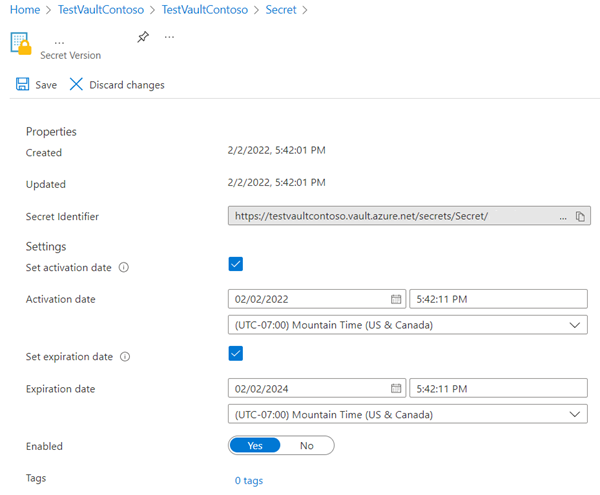
The following screenshot illustrates setting an expiration date on a password:
If you change any settings, in the menu bar, select Save.
Set resource locks for mission-critical Azure resources - Level 2
As an administrator, you might need to lock a subscription, resource group, or resource to prevent other users from accidentally deleting or modifying a critical resource. In the Azure portal, the lock levels are Read-only and Delete. Unlike role-based access control, you use management locks to apply a restriction to all users and roles. Azure Resource Manager locks apply only to operations that happen in the management plane, which consists of operations sent to https://management.azure.com. The locks don't restrict how resources perform their own functions. Resource changes are restricted, but resource operations aren't restricted.
Tip
For example, a Read-only lock on an instance of Azure SQL Database prevents you from deleting or modifying the database. It doesn't prevent you from creating, updating, or deleting data in the database. Data transactions are permitted because those operations aren't sent to https://management.azure.com.
Complete the following steps for all mission-critical resources in your Azure subscription.
Sign in to the Azure portal. Search for and select All resources.
Select a resource, resource group, or subscription that you want to lock.
In the menu under Settings, select Locks.
In the Locks pane, in the menu bar, select Add.
In the Add lock pane, enter a name for the lock and select a lock level. Optionally, you can add notes that describe the lock.
