Route triggering
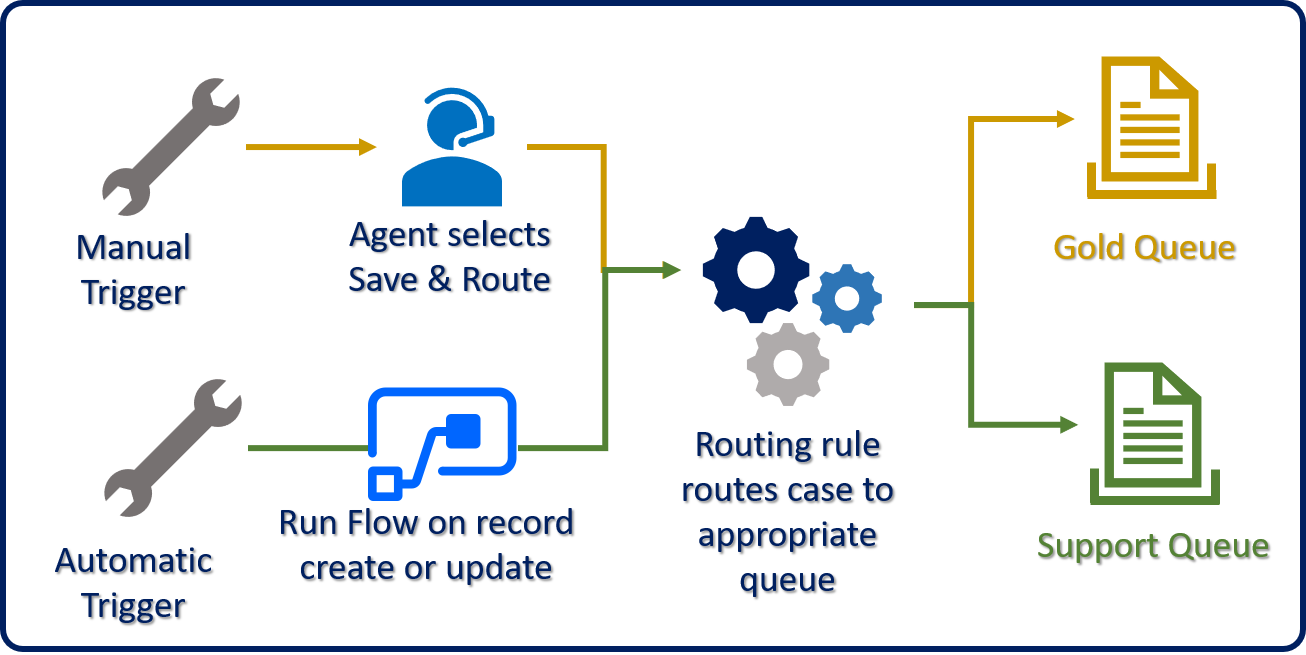
After a table has been configured for routing and has been activated, it can be triggered in one of two ways:
Manual trigger - An agent selects the Save & Route button.
Automatic trigger - With Power Automate, a custom flow can be used to trigger routing rules.
Manual trigger
After a table has been enabled for routing, the Save & Route button is added to the table form's command bar. When agents select Save & Route, they will receive a route dialog box. They can confirm routing of the item by selecting the Route button in the route dialog box.
You can perform manual routing while on a table view such as My Open Cases. When one or more rows are selected, the Apply Routing rules button appears. Selecting this button will apply the routing rule to all the selected rows.
Important
To ensure that agents can trigger routing rules with the Save & Route or Apply Routing rules buttons, at least one of their assigned security roles will need to have the permissions defined in the Routing Rule Instances table.

Automatic trigger
Frequently, applying a routing rule would be better done automatically. In these scenarios, Microsoft Flow could be used to trigger routing for rows based on conditions such as when a row is created, updated, and so on.
For example, an organization might have a customer facing portal, where customers can submit cases. In these instances, it makes sense to apply routing rules automatically to ensure that they are being handed off to the correct queue right away. This method might also apply in scenarios where specific columns on a case row are updated that could impact what queue the item is in.
When a Microsoft Flow is created from a Microsoft Dataverse solution, the Dataverse (current environment) connector can be used to run unbound actions in Microsoft Flow. An unbound action is an action that is not tied to a specific table, such as a case or lead. Because it is not bound to a specific table, it can be run on any table in the application. This approach provides organizations with extra flexibility because a single action can be used to support multiple scenarios. When Omnichannel is deployed, it contains an unbound action called msdyn_ApplyRoutingRuletablerow. This action will implement the active routing rule set for the table specified.
For example, if you wanted to automatically apply the Lead routing rule set whenever a new lead is created, you would create a Microsoft Flow that resembles the following image.

For more information, see Route trigger.
How case routing works out of the box
Because the case row is generally the key table that organizations want to use with routing, an out-of-the-box trigger is included with the solution to route the cases automatically. Routing is based on the Route Case column value on the case table row. The trigger is only evaluated when case rows are created.
When a case is created:
If Route Case is set to Yes, the row will be routed.
If Route Case is set to No, the row will not be routed.
By default, when a case is created manually, the Route Case column is set to No. Therefore, no routing is triggered when a case is manually created. An organization could build a custom flow to automatically trigger routing for cases by using any other column according to their business scenario, as explained in the previous section. In addition, a custom flow could be triggered to set the Route Case column to Yes based on a business scenario. In those instances, the case would be routed.