Work with the Task recorder
Task recorder is a tool that you can use to record actions that you take in the product user interface (UI). When you use Task recorder, all the events that you perform in the UI that are executed against the server, including adding values, changing settings, and removing data, are captured.
Task recorder comes pre-installed with finance and operations apps, and you can begin recording business processes immediately after opening the web client.
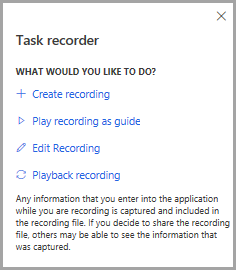
The steps that you record are collectively called a task recording. Any information that you enter into finance and operations apps while you are recording is captured and included in the recording file. If you decide to share the recording file, others may be able to see the information that was captured.
Task recordings can be used in many ways. You can read the steps of the task recording in the Help pane of finance and operations apps, or you can choose to play the recording as a task guide so that it will guide you through the UI. A task guide is a controlled, guided, interactive experience through the steps of a business process.
Task recordings can be saved to the Business Process Modeler (BPM) in Lifecycle Services. A list of steps and a business process flowchart will be generated from that recording.
Task recordings that have been saved to a BPM library can be shown in finance and operations apps as help. Task recordings can also be saved as Microsoft Word documents or an XML file. This allows you to easily produce principle training guides.
The Task recorder can take screenshots as you record a business process. These screenshots are used to generate the documents after you complete the recording. To have screenshots included in the generated document, an extension must be installed.
Task guides
You can access task guides from the Help pane. It’s important to note that task guides will not natively appear in the Help pane unless you have already connected to Lifecycle Services. When you first select a task guide, the Help pane will show the step-by-step instructions for the task.
To begin the guided, interactive experience, you can select Start task guide at the bottom of the Help pane. A pointer opens and indicates the action that you must perform. Follow the directions that appear in the UI, and enter data as directed.

To use Lifecycle Services, for your recordings, you must first authorize finance and operations apps to access Lifecycle Services.
Before connecting to the Lifecycle Services project, you will want to make sure that a Business Process Modeler (BPM) library exists in the Lifecycle Services project that you're working with.
After that, you can open finance and operations apps and go to System administration > Setup > System parameters. Select the Help tab to select a Lifecycle Services project to connect to as shown in the following image.

You can select the BPM libraries within the selected project to retrieve task recordings. This is where it is important to already have an existing BPM library. You can set the display order of the BPM libraries. This determines the order in which task recordings from the library will appear in the help pane.
When these steps have been completed, you can open the help pane in finance and operations apps and select the Task guides tab. You'll see the task guides that apply to the page that you're currently on in the system. If no task guides are found, you can enter keywords to refine your search.
Task recorder pane
To open the task recorder, you can select the gear icon in the upper-right corner of finance and operations apps and select Task recorder. The Task recorder pane will open.
To learn more about how to use the Task recorder go to Task recorder resources.