Exercise - Build the application using your agent
Now that your build agent is running and ready to receive build jobs, let's see it in action. In this unit, you'll modify a basic build configuration that we provide to build the Space Game website by using your agent and not the Microsoft-hosted agent.
Note
Run the following steps immediately after performing the steps in the previous module Create a build agent that runs on Azure.
At the end of this unit, as an optional step, you can remove the agent pool from your Microsoft Azure DevOps organization.
Fetch the branch from GitHub
In this section, you'll fetch the build-agent branch from GitHub and check out, or switch to, that branch.
This branch contains the Space Game project that you worked with in previous modules and an Azure Pipelines configuration to start with.
In Visual Studio Code, open the integrated terminal.
To download a branch named
build-agentfrom the Microsoft repository and switch to that branch, run the followinggit fetchandgit checkoutcommands:git fetch upstream build-agent git checkout -B build-agent upstream/build-agentRecall that upstream refers to the Microsoft GitHub repository. Your project's Git configuration understands the upstream remote, because you set up that relationship when you forked the project from the Microsoft repository and cloned it locally.
Shortly, you'll push this branch up to your GitHub repository, known as
origin.Optionally, in Visual Studio Code, open the azure-pipelines.yml file and familiarize yourself with the initial configuration.
The configuration resembles the basic one that you created in the Create a build pipeline with Azure Pipelines module. It builds only the application's release configuration.
Modify the build configuration
In this section, you'll modify the build configuration to switch from using a Microsoft-hosted agent to using the agent from your build pool.
In Visual Studio Code, open the azure-pipelines.yml file, then look for the
poolsection.pool: vmImage: 'ubuntu-20.04' demands: - npmModify the
poolsection as shown here:pool: name: 'MyAgentPool' demands: - npmThis version uses
nameto specify your agent pool, MyAgentPool. It maintains thedemandssection to specify that the build agent must have npm, the Node.js package manager, installed.In the integrated terminal, add azure-pipelines.yml to the index, commit the changes, and push the branch up to GitHub.
git add azure-pipelines.yml
git commit -m "Use private agent pool"
git push origin build-agent
Watch Azure Pipelines use your build agent
Watch the build run in the pipeline by using your build agent.
In Azure DevOps, go to the Space Game - web - Agent project.
On the project page or in the left pane, select Pipelines.
Select your pipeline from Recently run pipelines, and choose the most recent run (that was started when you updated the pipeline to use the MyAgentPool pool).
Choose Job and trace the run through each of the steps.
From the Initialize job task, you see that the build uses your build agent.

Optional: Remove your build pool
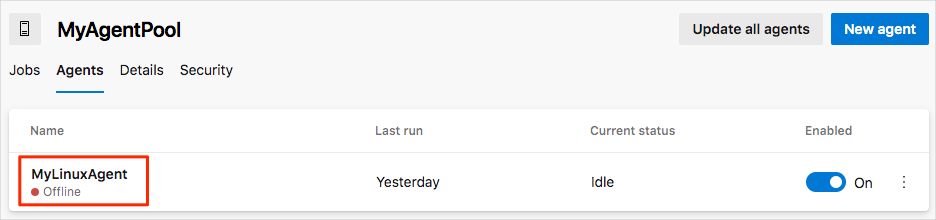
For future reference, you can keep the build pool configuration in your Azure DevOps organization, but keep in mind that the VM that hosts the agent will no longer be available to you after you perform the cleanup steps at the end of this module.
In fact, Azure DevOps will detect that the agent is offline. Azure Pipelines will check for an available agent the next time a build is queued by using the MyAgentPool pool.
As an optional step, you can remove the build pool configuration from Azure DevOps. Here's how:
In Azure DevOps, go to the Space Game - web - Agent project.
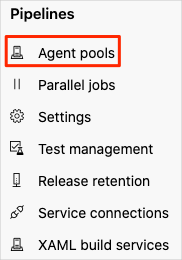
Select Project settings.
Under Pipelines, select Agent pools.
Under MyAgentPool, select the trash can icon, then select Delete.
