Exercise - Create a pipeline for your package
Here, you'll get the team's new code for the Tailspin.SpaceGame.Web.Models project that's now separate from the Tailspin.SpaceGame.Web project. You'll create an Azure Pipelines project for the Models project and see the artifact in Azure Artifacts with a version number of 1.0.0 in your feed.
What changes were made to the project?
Recall that the Space Game website is an ASP.NET Core app. It uses the Model-View-Controller (MVC) pattern to separate data from how that data is displayed in the user interface. Andy and Mara want to move the model classes to a separate library so that multiple projects can use those classes.
To do that, they create a new C# project called Tailspin.SpaceGame.Web.Models that contains only the model classes. At the same time, they remove the model classes from their existing project, Tailspin.SpaceGame.Web. They replace the model classes in their existing project with a reference to the Tailspin.SpaceGame.Web.Models project.
To build these projects, Andy and Mara use two pipelines, one for each project. You already have the first project and its associated Azure Pipelines configuration. Here, you'll fork the second project on GitHub and create an Azure Pipelines configuration to build it. You'll publish the resulting package to Azure Artifacts.
Prepare Visual Studio Code
Previously, you set up Visual Studio Code to work with the Tailspin.SpaceGame.Web project. Here, you'll open a second instance of Visual Studio Code so you can work with the Tailspin.SpaceGame.Web.Models project.
Open a second instance of Visual Studio Code.
From Visual Studio Code, open the integrated terminal.
Navigate to the parent directory from where your mslearn-tailspin-spacegame-web project is located. Here's an example that moves to your home directory:
cd ~
Get the source code
Get the source code for the Tailspin.SpaceGame.Web.Models project from GitHub and set up Visual Studio Code so you can work with the files.
Create a fork
The first step is to fork the mslearn-tailspin-spacegame-web-models repository so you can work with and modify the source files. Recall that Mara put the Models directory in a new project and removed it from the web project.
To fork the mslearn-tailspin-spacegame-web-models project into your GitHub account:
- From a web browser, go to GitHub, and sign in.
- Go to the mslearn-tailspin-spacegame-web-models project.
- Select Fork.
- To fork the repository into your account, follow the instructions.
Clone your fork locally
To clone the mslearn-tailspin-spacegame-web-models projects to your computer:
On GitHub, go to your fork of the mslearn-tailspin-spacegame-web-models project.
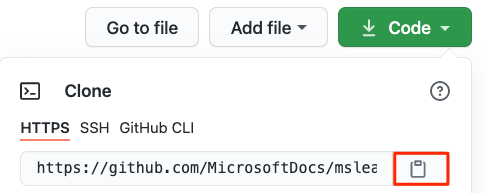
Select Code. Then, from the HTTPS tab, select the button next to the URL that's shown to copy the URL to your clipboard.
From Visual Studio Code, go to the terminal window, and run this
git clonecommand. Replace the URL that's shown with the contents of your clipboard.git clone https://github.com/your-name/mslearn-tailspin-spacegame-web-models.gitMove to the mslearn-tailspin-spacegame-web-models directory. This is the root directory of your repository.
cd mslearn-tailspin-spacegame-web-models
Open the project and examine the configuration
In Visual Studio Code, your terminal window points to the root directory of the mslearn-tailspin-spacegame-web-models project. Open the project from the file explorer so that you can view its structure and work with files.
The easiest way to open the project is to reopen Visual Studio Code in the current directory. To do so, run the following command from the integrated terminal:
code -r .You see the directory and file tree in the file explorer.
Reopen the integrated terminal. The terminal places you at the root of your web project.
Open the azure-pipelines.yml file.
You see the steps where the package is built, the version is set, and the package is added to Azure Artifacts.
This
DotNetCoreCLI@2task builds the project:- task: DotNetCoreCLI@2 displayName: 'Build the project - $(buildConfiguration)' inputs: command: 'build' arguments: '--no-restore --configuration $(buildConfiguration)' projects: '**/*.csproj'This
DotNetCoreCLI@2task packages the project with a version of 1.0.0:- task: DotNetCoreCLI@2 displayName: 'Pack the project - $(buildConfiguration)' inputs: command: 'pack' projects: '**/*.csproj' arguments: '--no-build --configuration $(buildConfiguration)' versioningScheme: byPrereleaseNumber majorVersion: '1' minorVersion: '0' patchVersion: '0'When developing your package, it's common to use the
byPrereleaseNumberversioning scheme. This appends a unique pre-release suffix such as "-CI-20190621-042647" to the end of the version number. Following this example, the complete version number would be "1.0.0-CI-20190621-042647".This
NuGetCommand@2task pushes the package to your Tailspin.SpaceGame.Web.Models Azure Artifacts feed:- task: NuGetCommand@2 displayName: 'Publish NuGet package' inputs: command: push feedPublish: '$(System.TeamProject)/Tailspin.SpaceGame.Web.Models' allowPackageConflicts: true condition: succeeded()feedPublishspecifies the name of the feed to publish to. The format of the name is<projectName>/<feedName>, where:$(System.TeamProject)is a predefined variable that refers to your project name; for example, "Space Game - web - Dependencies".Tailspin.SpaceGame.Web.Modelsis the feed name that you provided in the previous exercise.
Set permissions
Before you can set up and run your pipeline, you need to give the Build service the correct permissions.
- Go to your project in Azure DevOps.
- Select Artifacts from the menu on the left.
- Select the Settings icon at the top-right of the screen, then select the Permissions tab.
- Select the Add users/groups button.
- In the Users/Groups field, enter Space Game - web - Dependencies Build Service, select the Contributor role, and select Save.
Create the pipeline in Azure Pipelines
You learned how to set up Azure Pipelines in an earlier module. If you need a refresher, head over to Create a build pipeline with Azure Pipelines.
Here's how to set up a second pipeline to build the package, and upload that package to Azure Artifacts.
From Azure DevOps, go to the Space Game - web - Dependencies project.
From the menu on the left, select Pipelines.
Select New Pipeline.
From the Connect tab, select GitHub.
From the Select tab, select mslearn-tailspin-spacegame-web-models.
If prompted, enter your GitHub credentials. From the page that appears, scroll to the bottom, and select Approve and install.
From the Review tab, you see the new pipeline's azure-pipelines.yml file.
Select Run.
Watch the pipeline run.
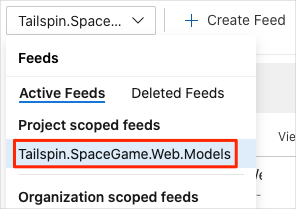
Go to the Artifacts tab.
From the dropdown at the top, select Tailspin.SpaceGame.Web.Models.
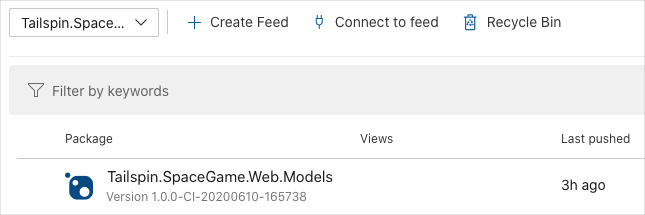
You see the resulting package, Tailspin.SpaceGame.Web.Models, in Azure Artifacts.
Select the package to go to the details page. Then, copy the version number to a location where you can easily access it later.
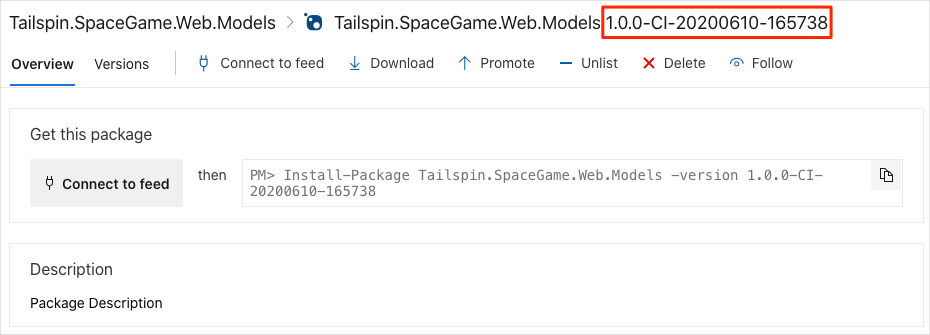
You'll use this version number in the next unit.