Opportunity management lifecycle
It's important that sales staff have all the necessary information at their disposal. This information can often mean the difference between doing business with a customer and not doing business. For example, if an opportunity is scheduled to close this week, you'll probably want to reach out to the customer as early as possible, to make sure that you stay on top of it.
Microsoft Dynamics 365 for Sales provides several tools that can help sales staff get the data that they need. Those tools include dashboards. When the Sales Hub app is first opened, the Sales Activity dashboard is shown. From there, sales staff can view their current sales pipeline, interact with open leads, and be alerted about information that's important to them.
One feature that alerts users to important information is the Relationship Assistant. The Relationship Assistant provides reminders about things like upcoming meetings or opportunities that are scheduled to close soon. Users can open the related records directly from the dashboards and interact with them as needed.
Dynamics 365 views
Microsoft Dynamics 365 provides multiple views of opportunity data. Each view is prefiltered to show opportunities in a different way. Views are another tool, in addition to dashboards, for interacting with opportunities.
You can use these views when an opportunity record is selected in the Sales Hub app. By default, you see the opportunities assigned to you. But you can select different views to see different sets of opportunities.
Here are some of the opportunity-related views that Microsoft Dynamics 365 includes:
My Open Opportunities: All the open opportunities that are assigned to the signed-in user.
Closed Opportunities: All opportunities that have been closed. Both won and lost opportunities are included.
Lost Opportunities: All closed opportunities that were identified as lost.
Recent Opportunities: All opportunities that were recently created.
Won Opportunities: All closed opportunities that were identified as won.
Account executives might use the My Open Opportunities view to see only the opportunities that are assigned to them or a team that they're a member of. After they find an opportunity that they want to work with, they can open it directly from the view.

Opportunity Pipeline view
With many opportunities to manage at one time, it can be challenging to stay on top of each one. With the Opportunity pipeline view, you have quick insights to where your deals are and which deals are at risk. The deal tracker tab lets you see where your deals are organized by close dates and deal size. The Sales funnel allows you to see how your deals are tracking across all stages of the sales cycle.
You can access the Opportunity pipeline view in the Sales Hub application by going to Opportunities, selecting Show As, and then selecting Pipeline view.

Legend:
Metrics: View the key metrics or KPIs that you want to track. Select a metric to view the underlying data.
Charts: Get a visual representation of the pipeline.
Editable grid: View a list of opportunities and edit them inline. Select any linked column to view and edit details in the side panel. Select the three-dot menu against an opportunity to perform common actions, such as closing the opportunity as won or lost, or reopening the opportunity.
Side panel: View and quickly edit details of the linked record. You can also navigate from one object to another in the side panel. For example, while you're looking at the opportunity, you can select a contact to view their details, quickly make updates, and then return to the opportunity.
To learn more about the Opportunity pipeline view, see: Manage opportunities using the Pipeline view
Working with individual opportunity records
Each opportunity record includes various relevant information that can be useful as the opportunity is being worked. This information is divided into multiple sections. Here's a description of some of the main sections and the types of information that they include:
Timeline: This pane shows related opportunity activities. All activities appear in chronological order. Activities might include phone calls that were made or received, appointments with the customer that's related to the opportunity, internal posts that colleagues have made about the record, or notes that were added about the record.
For example, the timeline might list all the appointments that the account executive had had with the customer. The account executive can then open each appointment to gather additional information from that meeting.
Assistant: This pane provides reminders or notifications about items that are related to the opportunity.
For example, the Relationship Assistant might alert you that the opportunity is set to close this week. It might also remind you about an upcoming appointment that's related to the opportunity. Appointment details can be viewed by opening the record directly from the opportunity.
Stakeholders: This grid identifies people who might have a vested interest in or be involved in the decision-making process. Typically, stakeholders are contact records that are noted in the record.
For example, a stakeholder might be a lawyer that the organization uses, a project lead, or board members who are involved in the decision-making process.
Competitors: This grid identifies any other vendors that your organization might be competing with for the customer's business.
Product Line Items: This grid identifies the products, services, and price list details for items that are included in the opportunity.
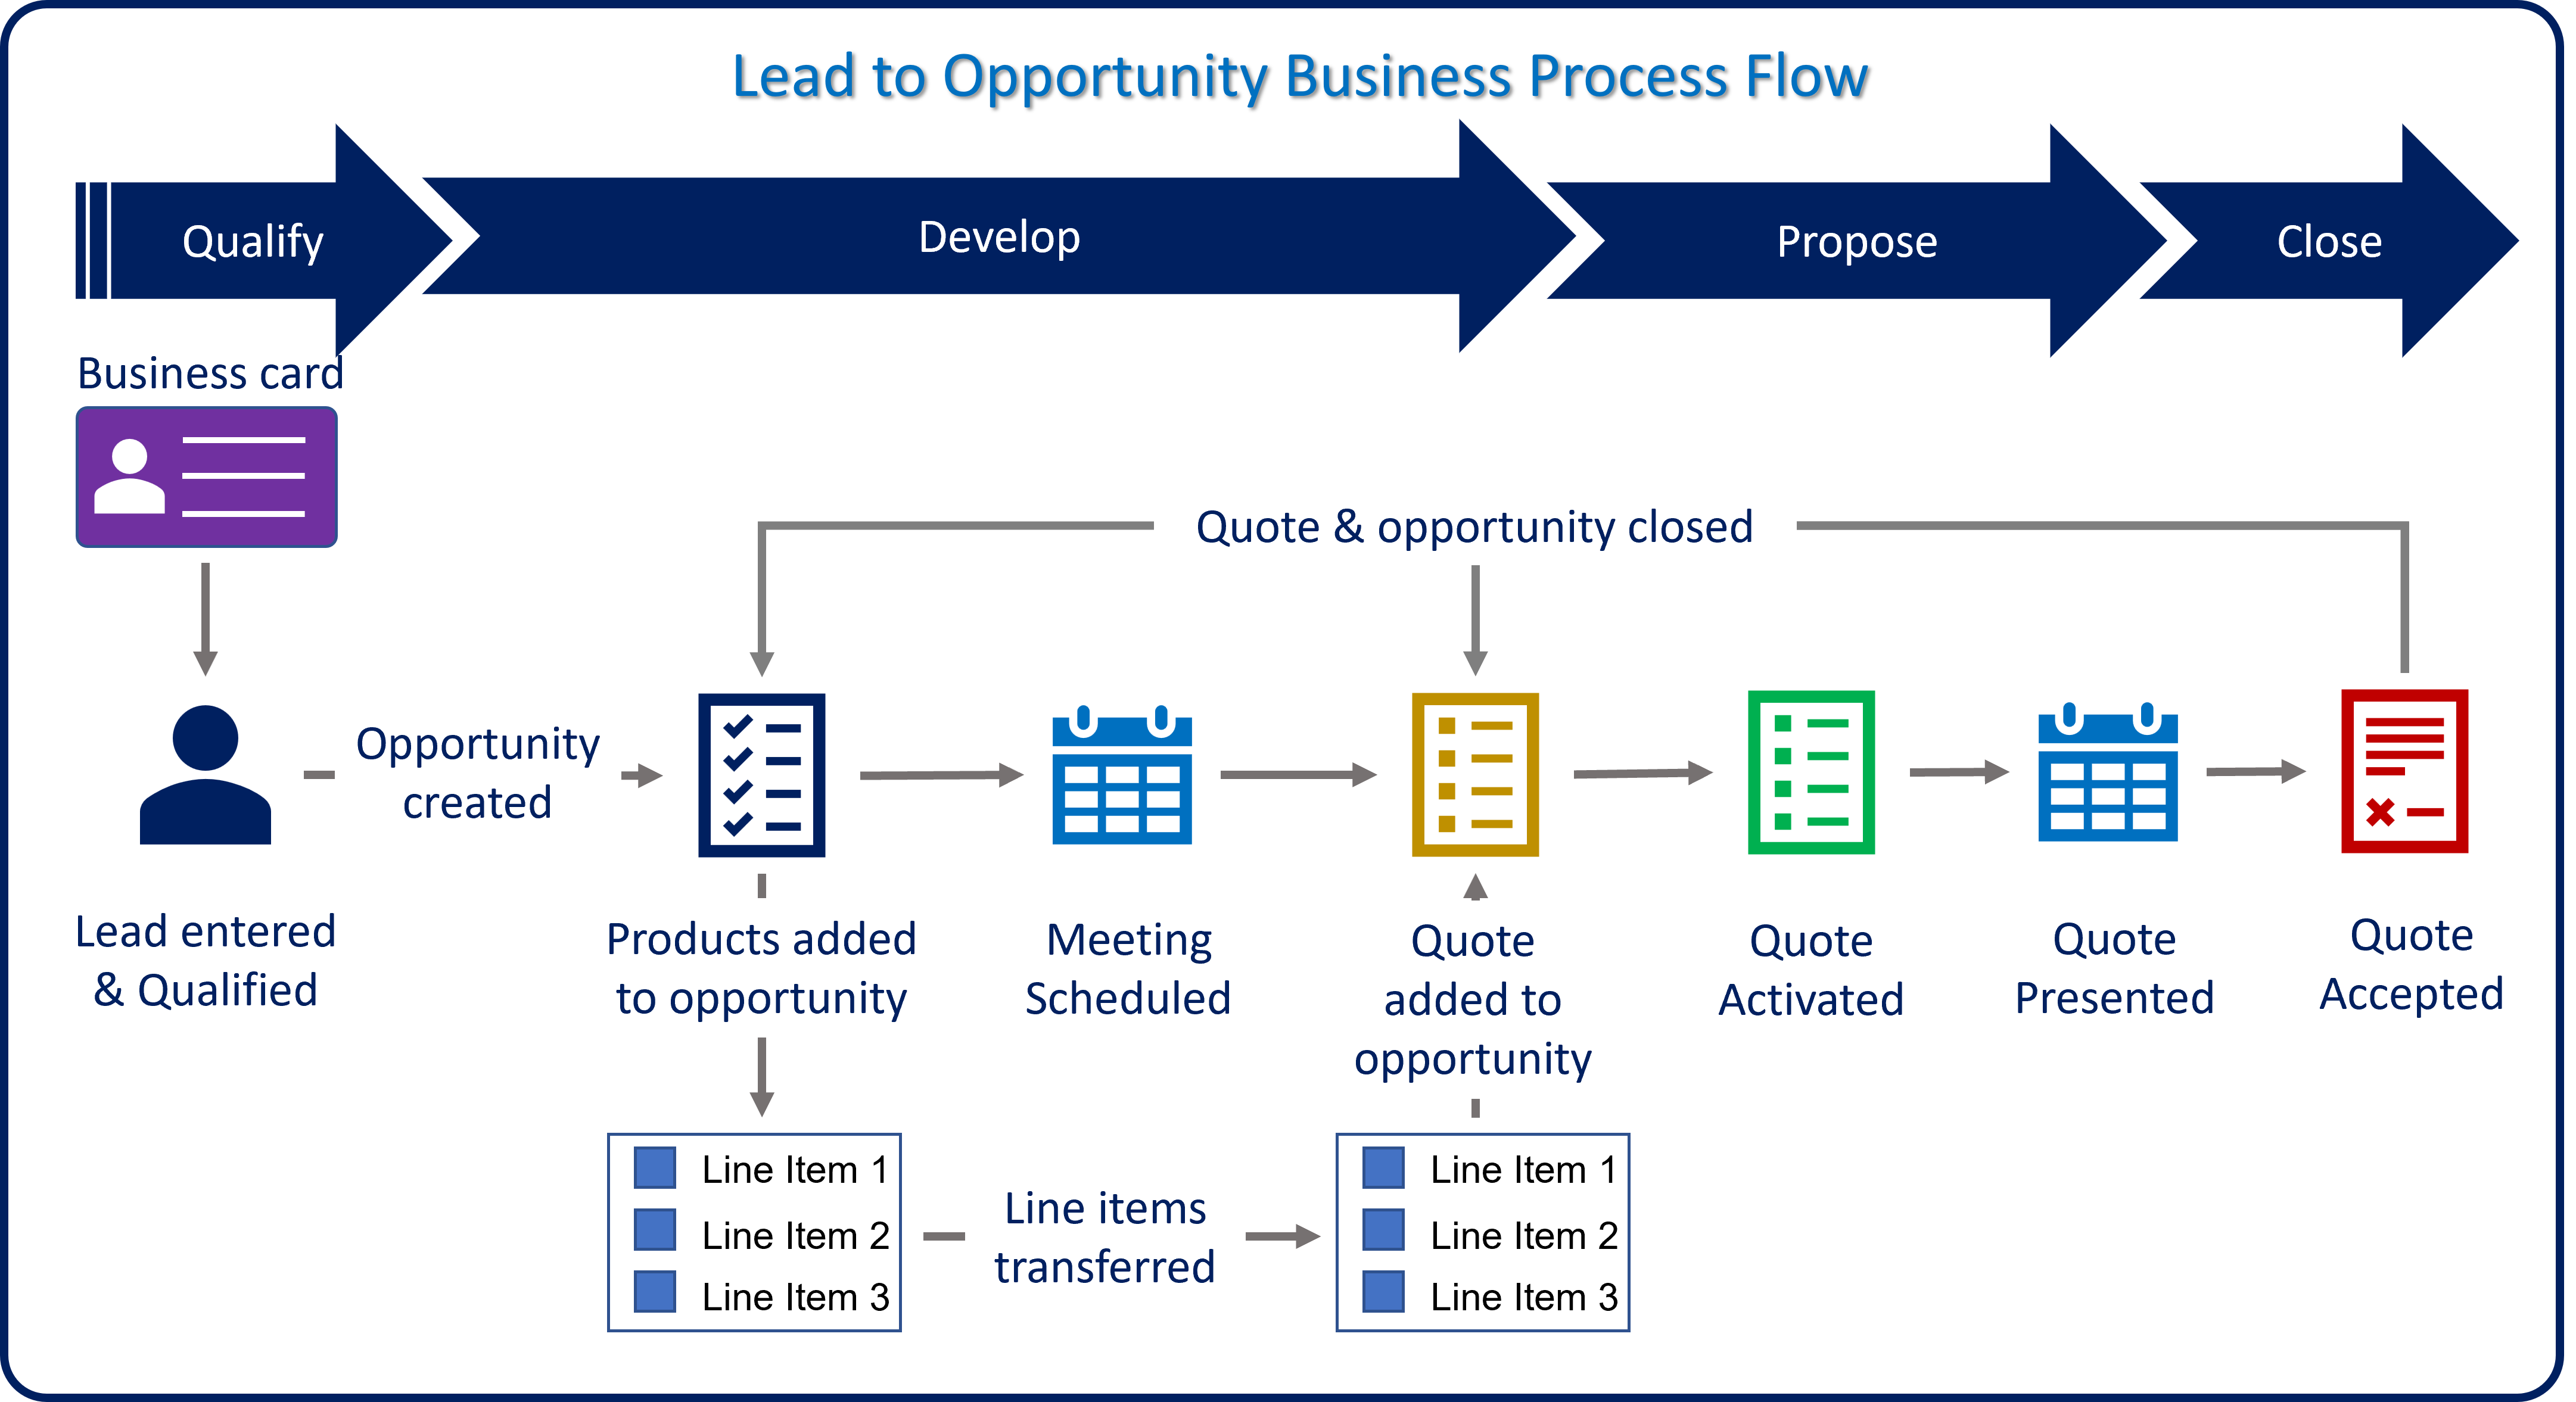
Business process flow: Business process flows (BPFs) represent guided business processes that lead account executives through the whole sales lifecycle.
Depending on the type of opportunity or company procedures, an opportunity might have multiple business processes that can be switched to, depending on specific details in the opportunity record. These details can include the size of the opportunity, the product that's attached, or the purchase timeframe.
Working with activities
Generally, in one way or another, most of the work that's needed to close an opportunity is done through interactions with the customer. This work is recorded in Dynamics 365 as an activity. Activities can be added for an opportunity before they're finished, to track actions that must be taken. You can add specific activity types, like phone calls, emails, or appointments, or you can use a task activity to track general activities that should be performed.

For example, to call a contact about the opportunity, create an activity and note what the phone call must include. After you finish the phone call, mark the activity as completed. Some activities, like email, are automatically marked as completed when they're sent from Dynamics 365. After an activity is finished, it becomes part of the history for the opportunity. You can view the different activities that have been performed for an opportunity. Filters allow you to narrow which activities are being displayed based on different factors such as the record type, activity status, due date, and more.

Sales business process flows
One of the many advantages of Business Process Flows (BPFs) in Dynamics 365 is that they can span multiple tables. This capability is important because an organization's sales lifecycle often spans multiple business tables such as going from a Lead to an Opportunity to an Order. BPFs let an organization accommodate many different sales models and approaches.
Out of the box, Dynamics 365 Sales includes two BPFs that are focused on sales:
Lead to Opportunity Sales Process: This BPF is used when an organization's sales process begins with a lead. After the lead is qualified, an opportunity is created.
Opportunity Sales Process: This BPF is used when an organization's sales process doesn't begin with a lead but begins directly with an opportunity.
These BPFs follow a common pattern of four phases. The first phase is similar in both processes, but the starting point (table) differs. The remaining phases are the same.
| Phase | Table | Description |
|---|---|---|
| Qualify | Lead (Lead to Opportunity Sales Process BPF) | If your lead isn't already in Dynamics 365 Customer Engagement apps, you must first create the lead in the system. After you've determined that your lead is interested in your solution or product and has the appropriate purchasing power, you can qualify the lead. When you qualify a lead, it's converted to an opportunity. |
| Qualify | Opportunity (Opportunity Sales Process BPF) | When you start from an opportunity, you must identify the target account and contact. You can then qualify the opportunity by collecting more information. |
| Develop | Opportunity | During this phase, you identify stakeholders, competitors, and sales team members, and come up with a proposed solution. |
| Propose | Opportunity | During this phase, you develop a proposal and present it to your potential customer. |
| Close | Opportunity | During this phase, you must work with the customer to reach a decision within the specified timeframe and close your opportunity as either won or lost. |
These phases provide a visual indicator that tells people where they are in the business process. Each phase in the BPF has steps that must be completed before the phase is complete.
BPFs are started automatically when records are created, if an appropriate BPF is available for the user who is creating the record. If multiple BPFs are available, the BPF that's started depends on the order of the processes and user roles, as defined by customizations.
Let's look at how the combination of all the features that we've mentioned can be used to close an opportunity.
Tom, an account executive, is introduced to a potential customer at a trade show. Tom and the potential customer exchange business cards, and Tom enters the lead in Dynamics 365.
Qualify: Tom qualifies the lead as a viable customer in the application.
Develop: The record is automatically advanced to the Develop phase when the lead is converted to an opportunity.
Tom enters additional information that's needed for the opportunity, like the estimated close date, customer need, and budgetary information.
Stakeholders are added. These stakeholders represent project team members, advisory board members, legal counsel, etc.
Competitors are added. Competitors are other organizations that your organization is competing against for the opportunity.
Product and pricing information is defined.
The opportunity is set to use system-calculated pricing, and a retail price list is defined.
Each line item is included, and pricing information is defined.
A meeting with the customer is scheduled for one week from today.
The Relationship Assistant reminds Tom about the appointment.
During the meeting, the customer asks for a formal proposal for the solution.
Tom advances the opportunity to the Propose phase.
Propose: A formal quote is generated and delivered to the customer.
The internal sales resources that will be needed for the opportunity are defined.
Sales team members are added.
Optional: Access teams can be used to provide record access to the team members who are defined.
A quote is added to the opportunity. It includes all the products that are defined for the opportunity.
A meeting with the customer is scheduled so that the quote can be formally presented.
The team prepares a final presentation that's attached to the opportunity.
Optional: The integration with Microsoft SharePoint or Microsoft OneDrive for Business can be used to store related documents.
The quote is activated, and it's presented to the customer during the meeting.
Notes about the meeting are updated.
The customer accepts the quote.
Tom advances the opportunity to the Close phase.
Close: The tasks that are required to close the opportunity are completed.
The final proposal is delivered to the customer and signed.
The quote is converted to an order and closed.
The opportunity is closed.
Closing opportunities
Opportunities can be closed in multiple ways. For example, an opportunity can be closed when a quote that's associated with it's closed, or when an order is created from a quote. The user who generates the order is prompted to close the opportunity too.
But most often, opportunities are manually closed. To close an opportunity, select either Close as Lost or Close as Won on the command bar in the opportunity record.
When an opportunity is either won or lost, a special type of activity is generated. This activity is referred to as a resolution activity. It helps other, non-sales users see the types of activities that occurred regarding a customer, beyond activities like phone calls, emails, and appointments.

Users can open the activities and see information about when the activity took place, the actual sales value. If the opportunity was lost, users can also see the possible reason why it was lost or the competitor that it was lost to.
Some organizations may find that the details provided on the opportunity close form do not fit their specific organizational needs. In these instances, System administrators or customizers can use the Opportunity Close quick create form to add custom fields. This allows sales representatives to capture important details about why an opportunity was closed. Sales managers can use this data to know which products are doing well and develop a better strategy. To capture any additional custom information during opportunity close, custom columns need to be added to Opportunity Close entity and their forms. The following customizations are available:
Customization of Opportunity Close entity to add custom fields, including of type Lookup.
Customization of the Opportunity Close Quick Create form to capture details such as Profit Margin, Winning Product and so on, when closing an opportunity.
Customization of form to add client-side validations. For example, when an opportunity is closed as Won, the Profit margin (custom field) is mandatory.
Customization of Opportunity Close Information form to view details of the closed opportunity.
Customization of views.
To learn more about customizing the Opportunity Close form, see: Customize the Opportunity Close form.