Execute an action
Recall that you build a logic app workflow from a trigger and actions. A trigger starts your workflow, and actions complete the remaining work. The social media monitoring app uses actions to check whether a tweet is positive or negative, insert a row into a database, or send an email.
In this unit, we'll do a quick overview for the action types. We'll then discuss how to use actions in your workflow by passing in parameters and processing returned values. Finally, we'll examine how to use the workflow designer to add and configure an action.
Action types
The core goal behind Azure Logic Apps is to help you make services and systems work together. To support this goal, Azure Logic Apps provides actions for the following tasks:
- Access external services and systems.
- Process or manipulate data or returned data.
- Alter the control flow through your app.
Let's examine each action type.
Access external services and systems
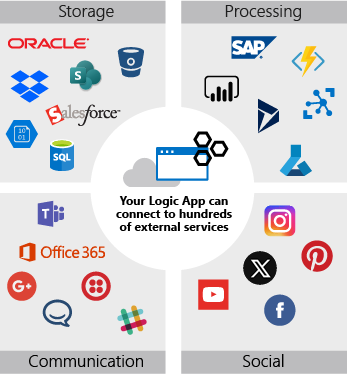
The most common action type helps you access and run specific tasks using services and systems outside your workflow in Azure Logic Apps. These actions are so common that most people mean this action type when they use the term action when referring to Azure Logic Apps. This action type provides access to hundreds of products, such as other Azure services, Microsoft services and products, Salesforce, Oracle, Dropbox, GitHub, Facebook, Twilio, Slack, Jira, and more. The following diagram shows a tiny fraction of such actions:
When you use an action to connect from your workflow to an external service or system, you typically provide connection and authorization information. This information might include a username, a password, a connection string, or an account key. The details differ and vary for each service or system.
For example, to create a connection to Azure AI services, you provide the Site URL so that your workflow knows where to send the request. You provide your Account Key to authorize your access to the service. You can get both values from your Azure AI services account. Typically, you'll copy these values into connection information box when you add the Sentiment action to your workflow.
This action type helps your workflow send data for processing or pull data into your workflow. But how do you actually work with that data inside your workflow? The next action type helps with this task.
Manipulate data
This action type helps you run operations or process data that you pull into your workflow. For example, you have actions that can concatenate multiple values into a single string, parse JSON data, select specific values from an array, and so on.
Let's examine an example. If you've used X, you might be familiar with their URL pattern that links to a specific tweet:
https://twitter.com/<username>/status/<id>
You can use this link type in your social media monitoring app. For example, you might want to store the URL link in a database so that you can access the tweet later. Or, you might want to include the URL link in an email so that your coworkers can review the tweet in the original format.
Unfortunately, the data returned by the X trigger doesn't include the complete URL link. However, the data does include the username in the TweetedBy property and the ID in the TweetId property. So, you can use the Compose action to combine these pieces into the URL. Conceptually, the operation has this logical format:
Compose: "https://twitter.com/" + [TweetedBy] + "/status/" + [TweetId]
Alter control flow
This action type helps you manage the data flow through your logic app by using constructs such as conditional statements and loops. The social media monitoring app will use a control action that creates decision branches, based on whether the tweet sentiment is positive or negative. We'll show how this action type works and discuss all the control actions later in this module.
Action parameters and return values
Consider action operations as function calls that have parameters and return values. Action parameters let you pass values into the operation. Some operations use both required and optional paramters. For example, the Azure AI services action named Sentiment has a required parameter called Text. This parameter represents the string that you want to analyze. The Sentiment action also has an optional parameter named Language that lets you provide a hint about the language used for the Text parameter.
Action return values are the results from the operation. For example, the Sentiment action returns a numeric score between 0 and 1. Scores close to 1 indicate positive sentiment, while scores close to 0 indicate negative sentiment. The following diagram summarizes the data flow for the Sentiment action as used by our example social media monitoring app:

Static versus dynamic parameters
Some parameters that you send to an action stay the same every time that your workflow runs. For example, you might want only tweets in English, so you'd always pass en for the Language parameter to the Sentiment action. This type of static parameter is straightforward. You hardcode the value when you set up the action so that the action uses the same value every time the action runs.
Other parameters that you send to an action can differ every time that your workflow runs. A good example is the Text parameter for the Sentiment action. When you pass the tweet text into the Text parameter, the text might differ every run. So, how do you get access to this dynamic value?
The tweet that we're processing is the return value or output from the When a new tweet is posted trigger. This tweet data is packaged into an object with several fields that contain the tweet's details. Azure Logic Apps automatically makes this object available throughout subsequent actions in your workflow. The workflow designer provides a visual way to easily add and configure actions in your workflow. The designer also helps you select available outputs that you want to use from the preceding trigger and actions in your workflow.
Add and configure an action using the designer
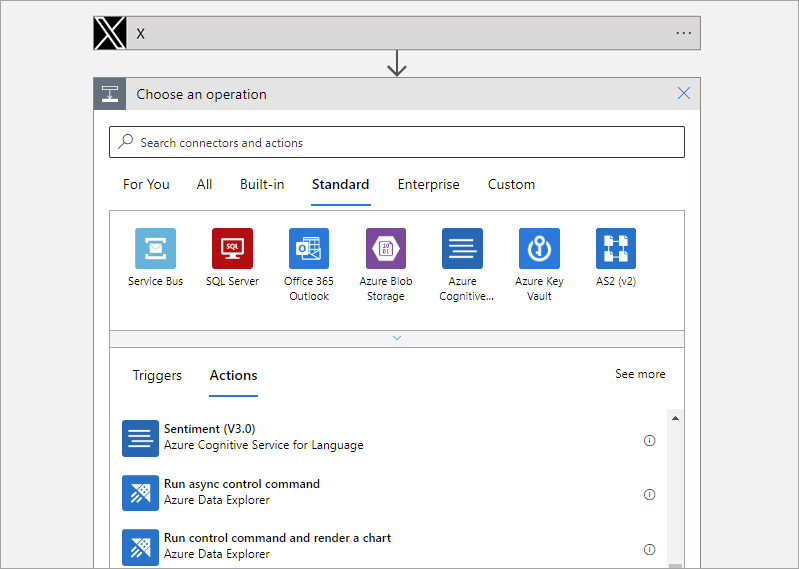
The workflow designer shows a connector gallery with the triggers and actions that you can use in your workflow. Typically, you use the search box to find a connector that interests you. Then, you review any actions that the connector provides. The following screenshot shows how the workflow designer presents connectors and actions for you to select:
You can add an action at the end of your workflow or between existing steps. After you add an action, use the designer to set configuration parameters. Again, the designer provides a visual way for you to enter the parameter values for the action.
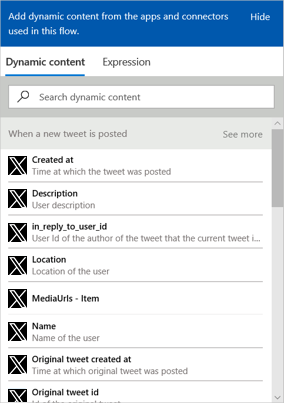
While you can manually add static parameter values, the designer has a different way for you to enter dynamic parameter values. Whenever you select inside an edit box, the designer opens a dynamic content list that shows any data or outputs available from the preceding steps. You can select the data that you need, and the designer automatically populates the edit box in your action with your selection. The following screenshot shows the dynamic tweet data from the social media monitoring logic app workflow in the designer:
The workflow designer makes adding dynamic content so easy, you don't need to remember parameter names and return values, nor do you need to worry about syntax details.