Exercise - Run the UI tests locally and in the pipeline
Before Andy and Amita run their tests in the pipeline, they want to verify that their new UI tests do what they should. In this section, you'll follow along by running the Selenium UI tests first locally and then in the pipeline.
Writing automated tests is an iterative process, just like writing any other type of code. For your own apps, you'll likely need to try a few approaches, refer to reference documentation and example code, and fix build errors.
Optional: Install the Selenium driver for Microsoft Edge
Follow this section if you want to see the tests run locally on Microsoft Edge.
The NuGet package for Chrome and Firefox installs driver software under the bin directory, alongside the compiled test code. For Edge, you need to manually install the driver. To do so:
Install Microsoft Edge.
Open Edge and navigate to
edge://settings/help. Note the version number. Here's an example: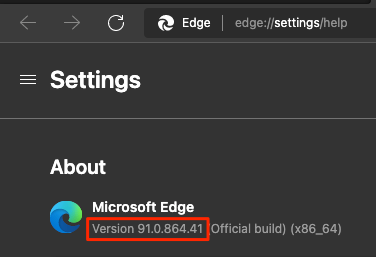
Navigate to the Microsoft Edge Driver downloads page and download the driver that matches the Edge version number. Here's an example:

Extract the .zip file to the bin/Release/net6.0 directory under your project's Tailspin.SpaceGame.Web.UITests directory. Create these directories if they don't exist.
On macOS, you might need to update your system policy to allow msedgedriver to run. To do so, in Visual Studio Code, run the following spctl command from the terminal:
spctl --add Tailspin.SpaceGame.Web.UITests/bin/Release/net6.0/msedgedriver
Export environment variables
Later in this module, you'll run Selenium tests on Windows Server 2019. The documentation lists the software that's preinstalled for you.
The section Selenium Web Drivers lists the Selenium driver versions that are available for Chrome, Firefox, and Edge. Here's an example:

For each driver, you have the environment variable that maps to the location of that driver. For example, ChromeWebDriver maps to the location of the Chrome driver.
The unit tests code is already set up to read these environment variables. These variables tell Selenium where to find the driver executable files. To run the unit tests locally, you need to export these same environment variables.
From Visual Studio Code, go to the terminal. Then run these commands. Replace the path shown with the full path to your mslearn-tailspin-spacegame-web-deploy project.
Important
Make sure to run these commands and set the environment variables in the same terminal window that you use to run the tests.
driverDir="C:\Users\user\mslearn-tailspin-spacegame-web-deploy\Tailspin.SpaceGame.Web.UITests\bin\Release\net6.0"
export ChromeWebDriver=$driverDir
export EdgeWebDriver=$driverDir
export GeckoWebDriver=$driverDir
Run the UI tests locally
The Setup method in HomePageTest.cs navigates to the Space Game home page after it sets the driver member variable.
Although you could hard-code the site URL, here we read the URL from an environment variable named SITE_URL. This way, you can run the tests multiple times against different URLs.
// Navigate to the site.
// The site name is stored in the SITE_URL environment variable to make
// the tests more flexible.
string url = Environment.GetEnvironmentVariable("SITE_URL");
driver.Navigate().GoToUrl(url + "/");
Because you haven't yet deployed the Space Game website to your App Service environment, you'll use the site that Microsoft hosts to run the tests locally.
To run the tests locally:
In Visual Studio Code, go to the integrated terminal and open a new terminal window.
Run the following commands in the new terminal window.
dotnet build --configuration Release
dotnet run --configuration Release --no-build --project Tailspin.SpaceGame.Web
Make a note of the local website link, in this example it is
http://localhost:5000.Switch back to the terminal window where you set the environment variables in the previous step, and ensure that you're in your project's root directory. Here's an example:
cd ~/mslearn-tailspin-spacegame-web-deployExport the
SITE_URLenvironment variable. Use the locally running link that you got from the previous step.export SITE_URL="http://localhost:5000"This variable points to the Space Game website that Microsoft hosts.
Run the UI tests.
dotnet test --configuration Release Tailspin.SpaceGame.Web.UITestsThis code runs the tests that are located in the Tailspin.SpaceGame.Web.UITests project.
As the tests run, one or more browsers appear. Selenium controls each browser and follows the test steps that you defined.
Note
Don't worry if all three browsers don't appear. For example, you won't see the tests run on Chrome if you don't have Chrome installed or have an incompatible version. Seeing just one browser will help give you confidence that your tests are working. In practice, in your local development environment, you might want to set up all browsers that you want to test against. This setup will allow you to verify that your tests behave as expected in each configuration before you run your tests in the pipeline.
From the terminal, trace the output of each test. Also note the test-run summary at the end.
This example shows that out of nine tests, all nine tests succeeded and zero tests were skipped:
Passed! - Failed: 0, Passed: 9, Skipped: 0, Total: 9, Duration: 5 s
Add the SITE_URL variable to Azure Pipelines
Earlier, you set the SITE_URL environment variable locally so that your tests know where to point each browser. You can add this variable to Azure Pipelines. The process is similar to how you added variables for your App Service instances. When the agent runs, this variable is automatically exported to the agent as an environment variable.
Let's add the pipeline variable now, before you update your pipeline configuration. To do so:
In Azure DevOps, go to your Space Game - web - Functional tests project.
Under Pipelines, select Library.
Select the Release variable group.
Under Variables, select + Add.
For the name of your variable, enter SITE_URL. As its value, enter the URL of the App Service instance that corresponds to your test environment, such as http://tailspin-space-game-web-test-10529.azurewebsites.net.
Near the top of the page, select Save to save your variable to the pipeline.
Your variable group should resemble this one:

Modify the pipeline configuration
In this section, you modify the pipeline configuration to run your Selenium UI tests during the Test stage.
In Visual Studio Code, open the azure-pipelines.yml file. Then modify the file like this:
Tip
This file contains a few changes, so we recommend that you replace the entire file with what you see here.
trigger:
- '*'

variables:
  buildConfiguration: 'Release'
  dotnetSdkVersion: '6.x'

stages:
- stage: 'Build'
  displayName: 'Build the web application'
  jobs:
  - job: 'Build'
    displayName: 'Build job'
    pool:
      vmImage: 'ubuntu-20.04'
      demands:
      - npm

    variables:
      wwwrootDir: 'Tailspin.SpaceGame.Web/wwwroot'
      dotnetSdkVersion: '6.x'

    steps:
    - task: UseDotNet@2
      displayName: 'Use .NET SDK $(dotnetSdkVersion)'
      inputs:
        version: '$(dotnetSdkVersion)'

    - task: Npm@1
      displayName: 'Run npm install'
      inputs:
        verbose: false

    - script: './node_modules/.bin/node-sass $(wwwrootDir) --output $(wwwrootDir)'
      displayName: 'Compile Sass assets'

    - task: gulp@1
      displayName: 'Run gulp tasks'

    - script: 'echo "$(Build.DefinitionName), $(Build.BuildId), $(Build.BuildNumber)" > buildinfo.txt'
      displayName: 'Write build info'
      workingDirectory: $(wwwrootDir)

    - task: DotNetCoreCLI@2
      displayName: 'Restore project dependencies'
      inputs:
        command: 'restore'
        projects: '**/*.csproj'

    - task: DotNetCoreCLI@2
      displayName: 'Build the project - $(buildConfiguration)'
      inputs:
        command: 'build'
        arguments: '--no-restore --configuration $(buildConfiguration)'
        projects: '**/*.csproj'

    - task: DotNetCoreCLI@2
      displayName: 'Publish the project - $(buildConfiguration)'
      inputs:
        command: 'publish'
        projects: '$(System.DefaultWorkingDirectory)/**/Tailspin.SpaceGame.Web.csproj'
        publishWebProjects: false
        arguments: '--no-build --configuration $(buildConfiguration) --output $(Build.ArtifactStagingDirectory)/$(buildConfiguration)'
        zipAfterPublish: true

    - publish: '$(Build.ArtifactStagingDirectory)'
      artifact: drop

- stage: 'Dev'
  displayName: 'Deploy to the dev environment'
  dependsOn: Build
  jobs:
  - deployment: Deploy
    pool:
      vmImage: 'ubuntu-20.04'
    environment: dev
    variables:
    - group: Release
    strategy:
      runOnce:
        deploy:
          steps:
          - download: current
            artifact: drop
          - task: AzureWebApp@1
            displayName: 'Azure App Service Deploy: website'
            inputs:
              azureSubscription: 'Resource Manager - Tailspin - Space Game'
              appName: '$(WebAppNameDev)'
              package: '$(Pipeline.Workspace)/drop/$(buildConfiguration)/*.zip'

- stage: 'Test'
  displayName: 'Deploy to the test environment'
  dependsOn: Dev
  jobs:
  - deployment: Deploy
    pool:
      vmImage: 'ubuntu-20.04'
    environment: test
    variables:
    - group: 'Release'
    strategy:
      runOnce:
        deploy:
          steps:
          - download: current
            artifact: drop
          - task: AzureWebApp@1
            displayName: 'Azure App Service Deploy: website'
            inputs:
              azureSubscription: 'Resource Manager - Tailspin - Space Game'
              appName: '$(WebAppNameTest)'
              package: '$(Pipeline.Workspace)/drop/$(buildConfiguration)/*.zip'
  - job: RunUITests
    dependsOn: Deploy
    displayName: 'Run UI tests'
    pool:
      vmImage: 'windows-2019'
    variables:
    - group: 'Release'
    steps:
    - task: UseDotNet@2
      displayName: 'Use .NET SDK $(dotnetSdkVersion)'
      inputs:
        version: '$(dotnetSdkVersion)'
    - task: DotNetCoreCLI@2
      displayName: 'Build the project - $(buildConfiguration)'
      inputs:
        command: 'build'
        arguments: '--configuration $(buildConfiguration)'
        projects: '$(System.DefaultWorkingDirectory)/**/*UITests.csproj'
    - task: DotNetCoreCLI@2
      displayName: 'Run unit tests - $(buildConfiguration)'
      inputs:
        command: 'test'
        arguments: '--no-build --configuration $(buildConfiguration)'
        publishTestResults: true
        projects: '$(System.DefaultWorkingDirectory)/**/*UITests.csproj'

- stage: 'Staging'
  displayName: 'Deploy to the staging environment'
  dependsOn: Test
  jobs:
  - deployment: Deploy
    pool:
      vmImage: 'ubuntu-20.04'
    environment: staging
    variables:
    - group: 'Release'
    strategy:
      runOnce:
        deploy:
          steps:
          - download: current
            artifact: drop
          - task: AzureWebApp@1
            displayName: 'Azure App Service Deploy: website'
            inputs:
              azureSubscription: 'Resource Manager - Tailspin - Space Game'
              appName: '$(WebAppNameStaging)'
              package: '$(Pipeline.Workspace)/drop/$(buildConfiguration)/*.zip'
The file includes these three changes:
The
dotnetSdkVersionvariable is moved to the top of the file so that multiple stages can access it. Here the Build stage and Test stage require this version of .NET Core.The Build stage publishes only the Space Game website package as the build artifact. Previously, you published the artifacts like this:
- task: DotNetCoreCLI@2
  displayName: 'Publish the project - $(buildConfiguration)'
  inputs:
    command: 'publish'
    projects: '**/*.csproj'
    publishWebProjects: false
    arguments: '--no-build --configuration $(buildConfiguration) --output $(Build.ArtifactStagingDirectory)/$(buildConfiguration)'
    zipAfterPublish: true
This task generates two build artifacts: the Space Game website package and the compiled UI tests. We build the UI tests during the Build stage to ensure that they'll compile during the Test stage, but we don't need to publish the compiled test code. We build it again during the Test stage when the tests run.
The Test stage includes a second job that builds and runs the tests. This job resembles the one that you used in the Run quality tests in your build pipeline by using Azure Pipelines module. In that module, you ran NUnit tests that verified the leaderboard's filtering functionality.
Recall that a deployment job is a special type of job that plays an important role in your deployment stages. The second job is a normal job that runs the Selenium tests on a Windows Server 2019 agent. Although we use a Linux agent to build the application, here we use a Windows agent to run the UI tests. We use a Windows agent because Amita runs manual tests on Windows, and that's what most customers use.
The
RunUITestsjob depends on theDeployjob to ensure that the jobs run in the correct order. You'll deploy the website to App Service before you run the UI tests. If you don't specify this dependency, jobs within the stage can run in any order or run in parallel.
In the integrated terminal, add azure-pipelines.yml to the index, commit the changes, and push the branch up to GitHub.
git add azure-pipelines.yml
git commit -m "Run Selenium UI tests"
git push origin selenium
Watch Azure Pipelines run the tests
Here, you watch the pipeline run. The pipeline runs the Selenium UI tests during the Test stage.
In Azure Pipelines, go to the build and trace it as it runs.
During the build, you see the automated tests run after the website is deployed.

After the build finishes, go to the summary page.
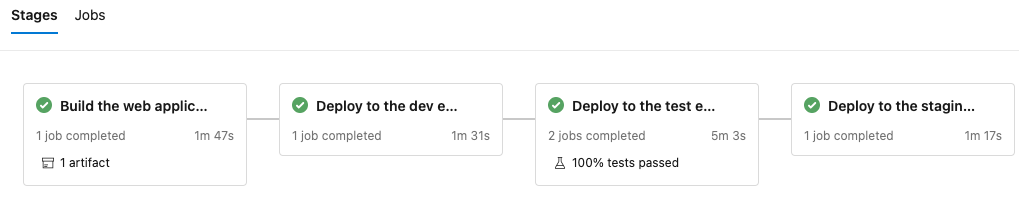
You note that the deployment and the UI tests finished successfully.
Near the top of the page, note the summary.
You note that the build artifact for the Space Game website is published just like always. Also note the Tests and coverage section, which shows that the Selenium tests have passed.

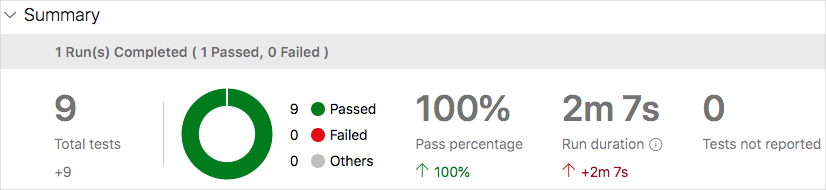
Select the test summary to see the full report.
The report shows that all nine tests have passed. These tests include three tests across three browsers.
If any test fails, you get detailed results of the failure. From there, you can investigate the source of the failure, fix it locally, and then push up the necessary changes to make the tests pass in the pipeline.
Amita: This automation is exciting! I now have UI tests that I can run in the pipeline. The tests will really save us time in the long run. I also have a pattern to follow to add more tests. Best of all, the UI tests give us added confidence in our code quality.
Andy: All true. Remember, tests that you repeatedly run manually are good candidates for automation. Good luck adding more. If you get stuck or need a code reviewer, you know where to find me.