Preview and approve your deployment
You've now learned about pipeline stages and how you can add a pipeline stage to validate your Bicep code. The next step in building confidence with your deployment is to add another stage to check exactly what your deployment will change.
In this unit, you'll learn about using the what-if command in a pipeline. You'll also learn about adding approvals so that you have the opportunity to manually verify the command's output before the deployment runs.
The what-if operation
A Bicep file describes the state that you want your Azure environment to be in at the end of a deployment. When you submit a deployment, Azure Resource Manager changes your Azure environment to match the state that's described in your Bicep file.
A deployment can result in new resources being deployed into your environment, or existing resources being updated. When you run a deployment in complete mode, it can even result in the deletion of existing resources.
When resources are created, updated, or deleted, there's a risk that things can change in a way you didn't expect. It's a good practice to add an extra step to verify which resources will be created, updated, and deleted. This verification adds value to your automation process. When you're deploying to a production environment, it's important to confirm any changes that will happen to your environment.
Resource Manager provides the what-if operation, which you can run on your Bicep file within your pipeline stage:
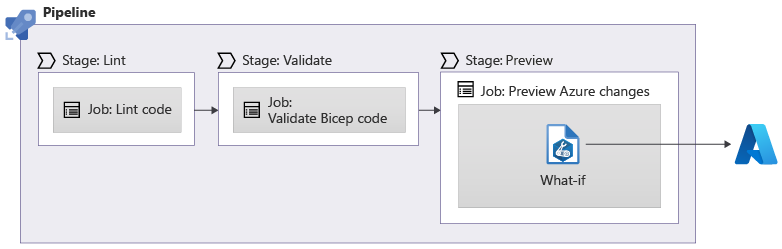
You can use the az deployment group what-if Azure CLI command from within your pipeline definition to run the what-if step:
stages:

- stage: Preview
  jobs:
  - job: Preview
    steps:
    - task: AzureCLI@2
      inputs:
        azureSubscription: 'MyServiceConnection'
        scriptType: 'bash'
        scriptLocation: 'inlineScript'
        inlineScript: |
          az deployment group what-if \
            --resource-group $(ResourceGroupName) \
            --template-file deploy/main.bicep
Tip
In this module, we'll use the Azure CLI to run the what-if operation. If you build your own PowerShell-based pipeline, you can use the New-AzResourceGroupDeployment cmdlet with the -Whatif switch, or you can use the Get-AzResourceGroupDeploymentWhatIfResult cmdlet.
The what-if operation doesn't make any changes to your environment. Instead, it describes the resources that will be created or deleted, the resource properties that will be updated, and the resources that will be deleted.
What-if sometimes shows that a resource will change when actually no change will happen. This feedback is called noise. We're working to reduce these problems, but we need your help to report these problems.
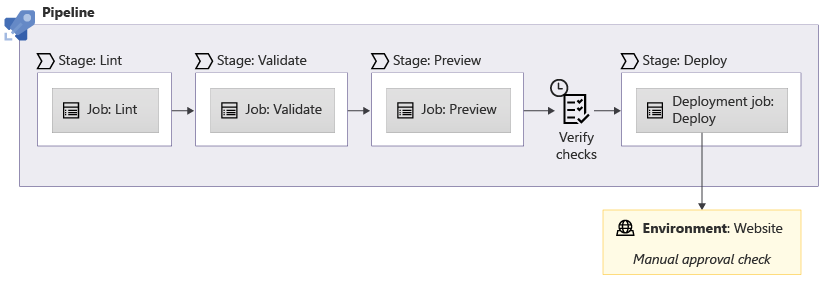
After you see the output of the what-if operation, you can determine whether to continue on to the deployment. This step typically involves a human reviewing the output from the what-if command, and then making a decision about whether the identified changes are reasonable. If a human reviewer decides that the changes are reasonable, they can manually approve the pipeline run.
To learn more about the what-if command, see the Microsoft Learn module Preview Azure deployment changes by using what-if.
Environments
In Azure Pipelines, an environment represents the place to which your solution is deployed. Environments provide features that help when you work with complex deployments. In a future module, you'll learn more about environments and their features. For now, we'll focus on their ability to add manual approvals to your pipeline.
As you already know, you use jobs to define a sequence of steps within a pipeline stage. When you include environments in your pipeline, you need to use a special type of job called a deployment job. A deployment job is similar to a normal job, but it provides some extra functionality. This functionality includes defining the environment that the deployment job uses:
variables:
  - name: deploymentDefaultLocation
    value: westus3

stages:

- stage: Preview
  jobs:
  - job: Preview
    steps:
    - task: AzureCLI@2
      inputs:
        azureSubscription: 'MyServiceConnection'
        scriptType: 'bash'
        scriptLocation: 'inlineScript'
        inlineScript: |
          az deployment group what-if \
            --resource-group $(ResourceGroupName) \
            --template-file deploy/main.bicep

- stage: Deploy
  jobs:
    - deployment: Deploy
      environment: MyAzureEnvironment
      strategy:
        runOnce:
          deploy:
            steps:
            - checkout: self

            - task: AzureResourceManagerTemplateDeployment@3
              name: Deploy
              displayName: Deploy to Azure
              inputs:
                connectedServiceName: 'MyServiceConnection'
                location: $(deploymentDefaultLocation)
                resourceGroupName: $(ResourceGroupName)
                csmFile: deploy/main.bicep
Notice that in the YAML definition for a deployment job, there are some key differences from a normal job:
- Instead of beginning with the word
job, a deployment job is defined asdeployment. - The
environmentkeyword specifies the name of the environment to target. In the preceding example, the deployment is tracked against an environment namedMyAzureEnvironment. - The
strategykeyword specifies how Azure Pipelines runs the deployment steps. Deployment strategies support complex deployment processes, especially where you have multiple production environments. In this module, we use therunOncedeployment strategy. This strategy behaves similarly to the other jobs that you're already used to.
Stage checks and approvals
After you create an environment, you can define checks. Checks are used to verify conditions that must be met before a pipeline can use the environment. An approval is a type of check that requires a human to provide a manual approval.
Checks are defined on the environment, not the pipeline. Authors of the pipeline YAML file can't remove or add these checks and approvals. Only the administrators of an environment can manage the checks and approvals on it.
In many organizations, the owner of an environment in Azure Pipelines is the person responsible for the environment that it deploys to. Checks and approvals help to ensure that the right people are involved in the deployment process.
How do checks and approvals work?
Checks and approvals are evaluated just before a pipeline stage begins. When Azure Pipelines is about to run a pipeline stage, it looks at all of the pipeline resources that stage uses, including environments. Environments can have checks that need to be satisfied.
An approval is one type of check. When you configure an approval check, you assign one or more users who need to approve the continuation of your pipeline.
Azure Pipelines provides other types of checks, too. For example, you can call an API to run some custom logic, control the business hours during which a stage can run, and even query Azure Monitor to ensure that a deployment has succeeded. We discuss only approval checks in this module, but we provide links to more information about checks in the summary.
Note
Agent pools and service connections can also have checks configured on them. You can also use a special step called a manual approval task. However, in this module, we'll focus on environments and the checks associated with them.
After your pipeline begins and reaches a stage that requires an approval check, the pipeline run pauses. All of the users who have been designated as approvers are sent a message in Azure DevOps and by email.
Approvers can inspect the pipeline logs, such as the changes that the what-if operation detects. Based on this information, they then approve or decline the change. If they approve the change, the pipeline resumes. If they decline, or if they don't respond within a configurable timeout period, the stage fails.
The importance of good practices
The environments feature in Azure Pipelines gives you the ability to link your deployments to an environment, and then the deployment inherits the checks and approvals defined by the owner of the environment. However, there's nothing to require that new pipelines use environments.
It's important that you and your organization establish good practices to review your pipeline definitions. An example is configuring your repository to require pull request reviews on any changes to your main branch by using branch protection policies. You'll learn more about this concept in a future module.
You can also add checks and approvals to service connections that ensure approval is obtained before a deployment can use a service principal's credentials. However, the approvals would also affect your pipeline's ability to run preflight validation and the what-if operation, because they require a service connection too.
You could use another, separate service connection for the what-if stage with its own service principal. The service principal used for the preflight and validation stages needs to have a custom Azure role defined, to ensure that it has the minimum permissions that it needs to do its work.