Capabilities in Configuration Manager technical preview version 1810
Applies to: Configuration Manager (technical preview branch)
This article introduces the features that are available in the technical preview for Configuration Manager, version 1810. Install this version to update and add new features to your technical preview site.
Review the technical preview article before installing this update. That article familiarizes you with the general requirements and limitations for using a technical preview, how to update between versions, and how to provide feedback.
The following sections describe the new features to try out in this version:
Improvement to client installation
When installing the Configuration Manager client, the ccmsetup process contacts the management point to locate the necessary content. Previously in this process the management point only returns distribution points in the client's current boundary group. If no content is available, the setup process falls back to download content from the management point. There's no option to fall back to distribution points in other boundary groups that might have the necessary content.
Now the management point returns distribution points based on boundary group configuration. If you define relationships on the boundary group, the management point returns distribution points in the following order:
- Current boundary group
- Neighbor boundary groups
- The site default boundary group
Note
The client setup process doesn't use the fallback time. To locate content as quickly as possible, it immediately falls back to the next boundary group.
Required app compliance policy for co-managed devices
Define compliance policy rules in Configuration Manager for required applications. This app assessment is part of the overall compliance state sent to Microsoft Intune for co-managed devices.
Try it out!
Try to complete the tasks. Then send Feedback with your thoughts on the feature.
In the Configuration Manager console, go to the Assets and Compliance workspace, expand Compliance Settings, and select the Compliance Policies node.
Create a compliance policy. For more information, see Create and deploy a device compliance policy.
On the Rules page, add a new rule for All required apps installed with a deadline older than X days. Specify a Value for the condition as the number of days.
After you deploy the compliance policy, when a required app isn't installed after the specified number of days, the device is not compliant. Open Software Center and select the Device Compliance tab to see the compliance state.
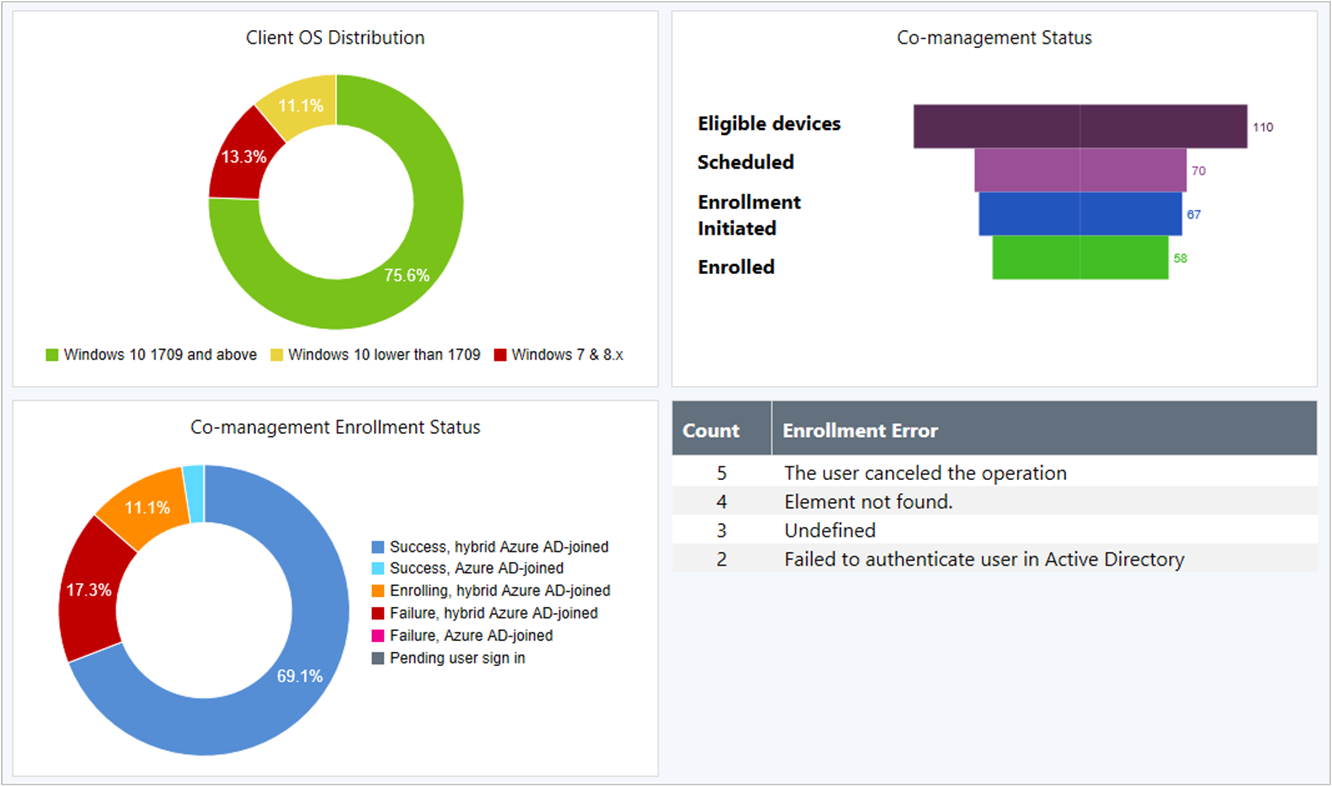
Improvement to co-management dashboard
The co-management dashboard is enhanced with more detailed information.
The Co-management enrollment status tile includes additional states. Select a state in the tile to drill through to a list of devices in that state.
A new Co-management status tile with a funnel chart showing the following states of the enrollment process:
- Eligible devices
- Scheduled
- Enrollment initiated
- Enrolled
A new tile with counts of Enrollment errors.
New boundary group options
Boundary groups now include additional settings to give you more control over content distribution in your environment. This release adds the following options:
Prefer distribution points over peers with the same subnet: By default, the management point prioritizes peer cache sources at the top of the list of content locations. This setting reverses that priority for clients that are in the same subnet as the peer cache source.
Prefer cloud distribution points over distribution points: If you have a branch office with a faster internet link, you can now prioritize cloud content.
Site system on Windows cluster node
The Configuration Manager setup process no longer blocks installation of the site server role on a computer with the Windows role for Failover Clustering. SQL Server Always On availability groups require this role, so previously you couldn't colocate the site database on the site server. With this change, you can create a highly available site with fewer servers by using an availability group and a site server in passive mode.
For more information, see High availability options.
Improvements to CMPivot
CMPivot includes the following improvements:
Save Favorite queries
On the Query Summary tab, select the count of Failed or Offline devices, and then select the option to Create Collection. This option makes it easy to target those devices with a remediation deployment.
For more information on additional performance and troubleshooting improvements to CMPivot, see Improvements to scripts.
For more general information, see CMPivot.
Improvements to scripts
The following performance and troubleshooting improvements apply to both CMPivot and Scripts:
Updated clients return output less than 80 KB to the site over a fast communication channel. This change increases the performance of viewing script or query output.
If the script or query output is greater than 80 KB, the client sends the data via a state message.
If the client isn't updated to the latest version, it continues to use state messages.
Use the following logs to troubleshoot:
On the client, by default in C:\Windows\CCM\logs:
- Scripts.log
- CcmMessaging.log
On the MP, by default in C:\SMS_CCM\Logs: MP_RelayMsgMgr.log
On the site server, by default in C:\Program Files\Configuration Manager\Logs: SMS_Message_Processing_Engine.log
For more information, see the following articles:
New client notification action to wake up device
You can now wake up clients from the Configuration Manager console, even if the client isn't on the same subnet as the site server. If you need to perform maintenance or query devices, you're not limited by remote clients that are asleep. The site server uses the client notification channel to identify another client that's awake on the same remote subnet, and uses that client to send a wake on LAN request (magic packet).
Try it out!
Try to complete the tasks. Then send Feedback with your thoughts on the feature.
In the Configuration Manager console, go to the Assets and Compliance workspace, expand Device Collections, and select a specific collection.
Select one or more clients that are offline. In the ribbon, select Client Notification and then select Wake Up.
Note
The same action is available on a specific collection. The site tries to wake up any client in that collection that's asleep.
Limitations
Manually enable the client for wake on LAN. This setting is typically on the properties of the network adapter. Check with the vendor of your network adapter for more specific information.
At least one client in the target subnet must be awake.
This feature doesn't support the following network technologies:
- IPv6
- 802.1x network authentication
Task sequence support for boundary groups
When a device runs a task sequence and needs to acquire content, it now uses boundary group behaviors similar to the Configuration Manager client.
You configure this behavior using the following settings on the Distribution Points page of the task sequence deployment:
When no local distribution point is available, use a remote distribution point: For this deployment, the task sequence can fall back to distribution points in a neighbor boundary group.
Allow clients to use distribution points from the default site boundary group: For this deployment, the task sequence can fall back to distribution points in the default site boundary group.
To use this new behavior, make sure to update clients to the latest version.
Location priority
The task sequence tries to acquire content in the following order:
Peer cache sources
Distribution points in the current boundary group
Distribution points in a neighbor boundary group
Important
Due to the real-time nature of task sequence processing, it doesn't wait for the failover time on a neighbor boundary group. It uses the failover times for prioritizing the neighbor boundary groups. For example, if the task sequence fails to acquire content from a distribution point in its current boundary group, it immediately tries a distribution point in a neighbor boundary group with the shortest failover time. If that process fails, it then fails over to a distribution point in a neighbor boundary group with a larger failover time.
Distribution points in the site default boundary group
The task sequence log file smsts.log shows the priority of the location sources that it uses based on the deployment properties.
For more information, see Configure boundary groups.
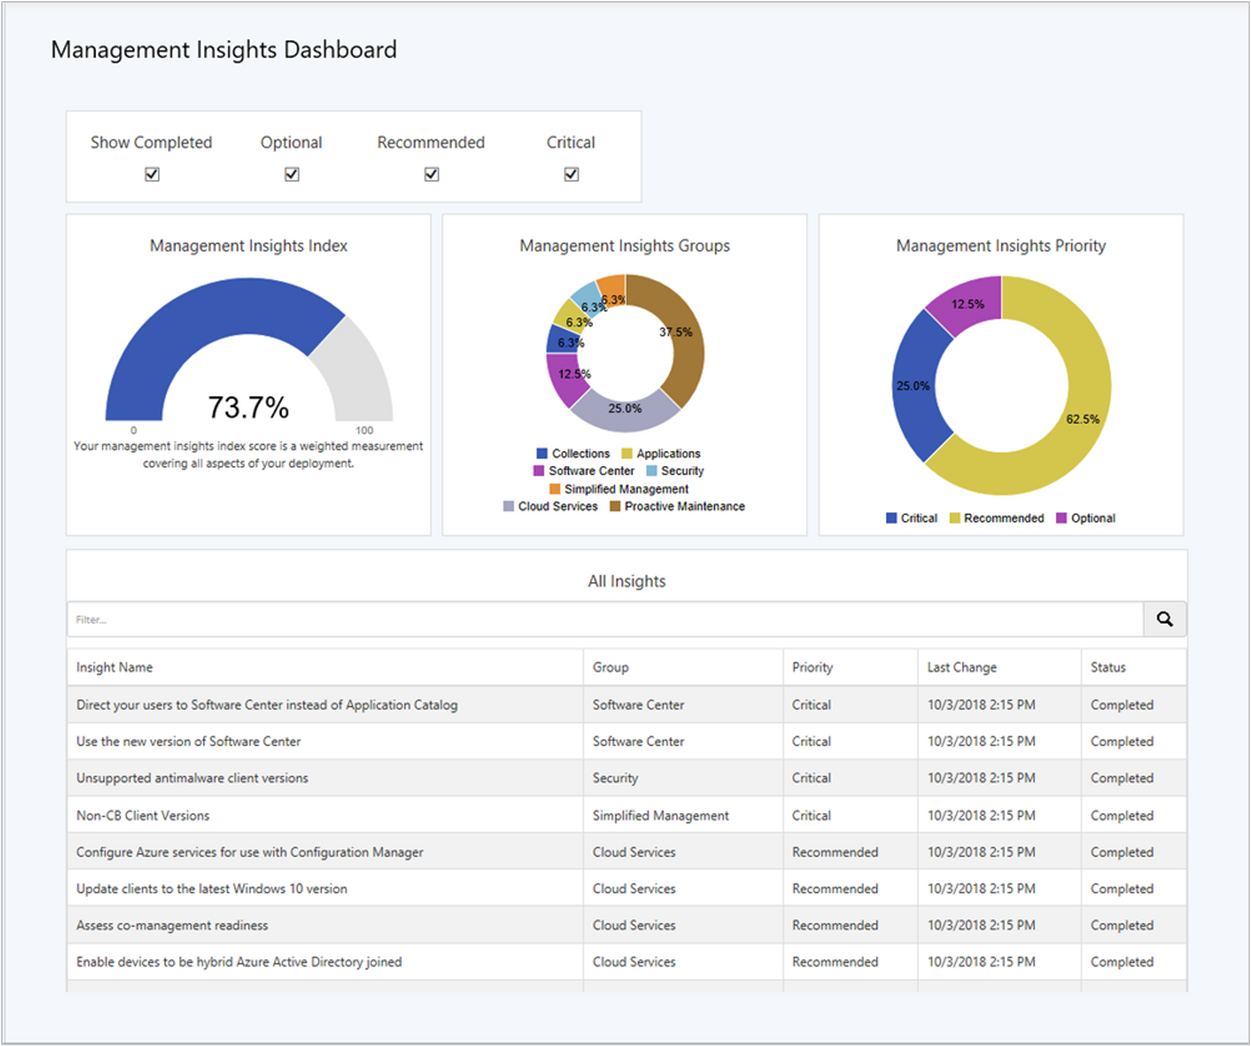
Management insights dashboard
The Management Insights node now includes a graphical dashboard. This dashboard displays an overview of the rule states, which makes it easier for you to show your progress. For more general information, see Management insights.
Use the following filters at the top of the dashboard to refine the view:
- Show Completed
- Optional
- Recommended
- Critical
The dashboard includes the following tiles:
Management insights index: Tracks overall progress on management insights rules. The index is a weighted average. Critical rules are worth the most. This index gives the least weight to optional rules.
Management insights groups: Shows percent of rules in each group, honoring the filters. Select a group to drill down to the specific rules in this group.
Management insights priority: Shows percent of rules by priority, honoring the filters. Select a priority to drill down to the specific rules with this priority.
All insights: A table of insights including priority and state.
In-console documentation dashboard
There's a new Documentation node in the new Community workspace. This node includes up-to-date information about Configuration Manager documentation and support articles. It includes the following sections:
Product documentation library
- Recommended: a manually curated list of important articles.
- Trending: the most popular articles for the last month.
- Recently updated: articles revised in the last month.
Support articles
- Troubleshooting articles: guided walkthroughs to assist with troubleshooting Configuration Manager components and features.
- New and updated support articles: articles that are new or updated in the last two months.
Improvements to driver maintenance
Driver packages now have additional metadata fields for Manufacturer and Model. Use these fields to tag driver packages with information to assist in general housekeeping, or to identify old and duplicate drivers that you can delete.
In the Software Library workspace, expand Operating Systems, and select the Driver Packages node. Select a driver package, and select Properties in the ribbon. On the General tab, select an existing value from the drop-down lists, or enter a string to create a new entry.
In the Driver Packages node, these fields display in the list as the Driver Manufacturer and Driver Model columns. They can also be used as search criteria.
Task sequence support of Windows Autopilot for existing devices
Windows Autopilot for existing devices, is now available with Windows 10 Insider Preview. This new feature allows you to reimage and provision a Windows 7 device for Windows Autopilot user-driven mode using a single Configuration Manager task sequence. For more information on this process, as well as the manual steps to use with Configuration Manager version 1806, see the blog post Upgrade Windows 7 using Windows Autopilot in Configuration Manager.
This Configuration Manager technical preview version adds native support for creating a task sequence for Windows Autopilot for existing devices.
Prerequisites
- Windows 10 Insider Preview version 17758 or later
- A Windows Autopilot for existing devices configuration file
- A device not already registered with the Windows Autopilot service. If the device is already registered the assigned profile will take precedence. The Autopilot for existing devices profile will only apply in the event that the online profile times out.
Windows 10 Insider Preview OS image
Acquire the installation media for Windows 10 Insider Preview version 17758 or later. For more information, see Windows Insider Preview Downloads.
Then create a Configuration Manager OS image. For more information, see Manage OS images.
Create the Windows Autopilot for existing devices configuration file
Run the following Windows PowerShell commands:
Install-Module AzureAD
Install-Module WindowsAutopilotIntune
Import-Module WindowsAutopilotIntune
Connect-AutopilotIntune
Get-AutopilotProfile | ConvertTo-AutopilotConfigurationJSON
Save one of the profiles to an ANSI-encoded file named AutopilotConfigurationFile.json. Save it to a location suitable as a Configuration Manager package source.
Tip
If you use the PowerShell cmdlet
Out-Fileto redirect the JSON output to a file, it uses Unicode encoding by default. Use the-Encoding ASCIIparameter to set the proper text encoding. For more information, see Out-File.Windows Notepad uses ANSI encoding by default.
Create a Configuration Manager package that contains this file. It doesn't require a program. For more information, see Create a package.
Note
Windows requires that this file is named AutopilotConfigurationFile.json. To use more than one Autopilot profile, create separate Configuration Manager packages.
For more information on this process, see the blog post Upgrade Windows 7 using Windows Autopilot in Configuration Manager.
Try it out!
Try to complete the tasks. Then send Feedback with your thoughts on the feature.
In the Configuration Manager console, go to the Software Library workspace, expand Operating Systems, and select the Task Sequences node. Select Create Task Sequence in the ribbon.
On the Create new task sequence page, select the new option to Deploy Windows Autopilot for existing devices.
On the Task sequence information page, specify a name, optionally add a description, and select a boot image. For more information on supported boot image versions, see Support for Windows ADK.
On the Install Windows page, select the Windows 10 Insider Preview OS image package.
On the Install Configuration manager page, add any necessary installation properties for your environment.
The Include updates page selects by default the option to Do not install any software updates.
Tip
Use offline image servicing to keep the image up to date with the latest Windows 10 quality updates. For more information, see Apply software updates to an OS image.
You can select applications to install as part of the task sequence on the Install applications page. However, Microsoft recommends that you mirror the signature image approach with this scenario. After the device provisions with Autopilot, apply all applications and configurations from Microsoft Intune or Configuration Manager co-management. This process provides a consistent experience between users receiving new devices and those using Windows Autopilot for existing devices.
On the new Deploy Windows Autopilot for existing devices page, select the package that includes the Autopilot configuration file. By default, the task sequence restarts the computer after it runs Windows Sysprep. You can also select the option to Shutdown computer after this task sequence completes. This option lets you prepare a device and then deliver it to a user for a consistent Autopilot experience.
Complete the wizard.
If you edit the task sequence, it's similar to the default task sequence to apply an existing OS image. This task sequence includes the following additional steps:
Apply Windows Autopilot configuration: this step applies the Autopilot configuration file from the specified package.
Prepare Windows for Capture: this step runs Windows Sysprep and includes the new option to Shutdown the computer after running this action.
Next steps
For more information about installing or updating the technical preview branch, see Technical preview.
For more information about the different branches of Configuration Manager, see Which branch of Configuration Manager should I use?
Feedback
Coming soon: Throughout 2024 we will be phasing out GitHub Issues as the feedback mechanism for content and replacing it with a new feedback system. For more information see: https://aka.ms/ContentUserFeedback.
Submit and view feedback for