User Driven Installation - Developers Guide
User Driven Installation (UDI) helps simplify the deployment of Windows® client operating systems, such as Windows 8.1, to computers using the operating system deployment (OSD) feature in Microsoft® System Center 2012 R2 Configuration Manager. UDI is part of the Microsoft Deployment Toolkit (MDT).
Introduction
Typically, when deploying operating systems using the OSD feature, you must provide all the necessary information for deploying the operating system. The information is configured in configuration files or in databases (such as the CustomSettings.ini file or the MDT database [MDT DB]). You must provide all configuration settings before you can initiate the deployment.
UDI provides a wizard-driven interface that allows you to provide configuration information immediately prior to performing the deployment. This behavior allows you to create generic OSD task sequences, and then provide computer-specific information at the time of deployment, which provides greater flexibility in the deployment process.
Target Audience
This guide is written for the developers who create custom wizard pages for the UDI Wizard and custom wizard page editors for the UDI Wizard Designer. This guide assumes that you are familiar with the development of Windows applications using:
C++, which is used to create custom wizard pages
Microsoft .NET Framework, which is used to create custom wizard page editors
Windows Presentation Foundation (WPF), which is used to create custom wizard page editors
Languages that WPF supports, such as C#, C++, or Microsoft Visual Basic® .NET, which are used to create custom wizard page editors
About This Guide
This guide provides the necessary reference information to help you customize UTI for your organization. This guide does not discuss administrative or operational topics, such as installing MDT (which includes UDI), configuring UDI to deploy operating systems and applications, or performing deployments using the UDI Wizard. For more information on those topics, see the UDI topics in Using the Microsoft Deployment Toolkit, which is included with MDT.
UDI Development Overview
UDI development allows you extend the features that UDI provides. Typically, UDI development is required when you want to collect additional information that the UDI deployment process consumes. This additional information is usually saved as task sequence variables that task sequence steps in a UDI task sequence in Configuration Manager read.
UDI Architecture
The high-level goal of UDI development is to create custom wizard pages that can be displayed in the UDI Wizard. By creating custom wizard pages, you can extend the existing features of UDI to meet the business and technical requirements of your organization. A custom wizard page collects information in addition to or in place of the wizard pages that UDI provides.
Figure 1 illustrates the relationship between the UDI Wizard Designer and the UDI Wizard.
 Figure 1. Relationship between the UDI Wizard and UDI Wizard Designer
Figure 1. Relationship between the UDI Wizard and UDI Wizard Designer
At a conceptual level, UDI development includes the creation of:
Custom wizard pages. Wizard pages are displayed in the UDI Wizard and collect the information required to complete the deployment process. You create wizard pages using C++ in Microsoft Visual Studio®. The custom wizard pages are implemented as DLLs that the UDI Wizard reads. The UDI software development kit (SDK) includes an example of how to create custom wizard pages.
Custom wizard page editors. You use wizard page editors to configure the behavior of your custom wizard page. The custom wizard page editors are implemented as DLLs that the UDI Wizard Designer reads. You create wizard page editors using:
WPF version 4.0
Microsoft Prism version 4.0
Microsoft Unity Application Block (Unity) version 2.1
MDT includes all the assemblies necessary to create a custom wizard page editor for use in the UDI Wizard Designer. The UDI SDK includes an example of how to create custom wizard page editors.
In addition, the UDI Wizard Designer consumes supporting wizard page editor configuration files. You create the wizard page editor configuration files as a part of the process for creating your custom wizard pages and custom wizard page editors. The UDI Wizard Designer creates the necessary XML information in the UDI Wizard configuration file and corresponding .app file.
Preparing the UDI Development Environment
Before you begin creating your own custom wizard pages and wizard page editors, perform the following steps to prepare the UDI development environment:
Prepare the UDI development environment prerequisites as described in Prepare the UDI Development Environment Prerequisites.
Configure the UDI development environment as described in Configure the UDI Development Environment.
Verify that the UDI development environment is configured correctly as described in Verify the UDI Development Environment.
Prepare the UDI Development Environment Prerequisites
To prepare the UDI development environment prerequisites, perform the following steps:
Prepare the UDI development environment hardware perquisites as described in Prepare the UDI Development Environment Hardware Prerequisites.
Prepare the UDI Development environment software perquisites as described in Prepare the UDI Development Environment Software Prerequisites.
Prepare the UDI Development Environment Hardware Prerequisites
The UDI development environment hardware prerequisites are the same hardware requirements for the edition of Microsoft Visual Studio you are using. For more information about these requirements, see the system requirements for each edition in the Visual Studio Documentation.
Prepare the UDI Development Environment Software Prerequisites
The UDI development environment has the following software prerequisites:
Any Windows operating system that Visual Studio 2010 supports (Windows 7 or Windows Server® 2008 R2 is recommended.)
You will need a Windows operating system that supports the processor architecture for which you want to develop. You can perform 32-bit and 64-bit UDI development using a 64-bit operating system. You only do 32-bit UDI development on 32-bit operating systems. For this reason, you should use a 64-bit operating system.
Note
IntelItanium versions (IA-64) of Windows operating system are not supported for UDI development environments.
For more information about the operating systems that Visual Studio 2010 supports, see the system requirements for each edition in the Visual Studio Documentation.
Microsoft .NET Framework version 4.0 (required by Visual Studio 2010)
C++ language (the language used in extending UDI Wizard pages)
Other languages that WPF supports, such as C#, Visual Basic .NET, or C++/Common Language Infrastructure, which are used to extend UDI Wizard Designer wizard page editors
Note
The sample source code for the UDI Wizard Designer wizard page editors is written in C#. Install the C# language if you want to use the sample source code.
Configure the UDI Development Environment
After then UDI development environment prerequisites are met, perform the following steps to configure the UDI development environment:
Install Visual Studio 2010.
Ensure that you install the C++ language and any other language that WPF supports.
Note
The sample source code for the UDI Wizard Designer editor pages is written in C#. Install the C# language if you want to use the sample source code.
For more information about installing Visual Studio 2010, see Installing Visual Studio.
Install MDT.
For more information about how to install MDT, see the section, "Installing or Upgrading to MDT", in the MDT document Using the Microsoft Deployment Toolkit.
In Windows Explorer, create local_folder (where local_folder is any folder located on a local drive on the development computer).
Copy the installation_folder\SDK folder to local_folder (where installation_folder is the folder in which you installed MDT and local_folder is any folder located on a local drive on the development computer).
You copy the SDK folder to another location because MDT is installed in the Program Files folder, which cannot be written to without elevated permissions. Copying the SDK folder to another location allows you to modify the files in the SDK folder without requiring elevated permissions.
Copy the installation_folder\Templates\Distribution\Tools folder to local_folder (where installation_folder is the folder in which you installed MDT and local_folder is the folder you created earlier in the process).
Rename the local_folder\Tools folder to local_folder\OSDSetupWizard(where local_folder is the folder you created earlier in the process).
When completed, the folder structure beneath local_folder should look like the folder structure illustrated in Figure 2 (where local_folder is the folder you created earlier in the process and is shown as UDIDevelopment in the figure).
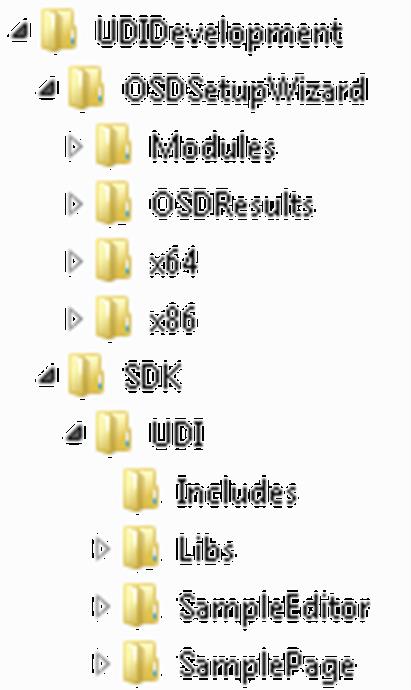 Figure 2. Folder structure for UDI development
Figure 2. Folder structure for UDI development
Verify the UDI Development Environment
When the UDI development environment is configured, verify that the UDI development environment is configured correctly by ensuring that the sample projects build correctly in Visual Studio 2010.
Verify that the UDI development environment is configured correctly by determining whether:
The SamplePage project builds correctly as described in Verify That the SamplePage Project Builds Correctly
The SampleEditor project builds correctly as described in Verify That the SampleEditor Project Builds Correctly
Verify That the SamplePage Project Builds Correctly
The SamplePage project provides an example of how to create a custom wizard page for the UDI Wizard. For more information about the SamplePage project, see Review the SamplePage Visual Studio Solution.
To verify that the SamplePage project builds correctly
Start Visual Studio 2010.
Open the SamplePage project.
The SamplePage project resides in the local_folder\SDK\UDI\SamplePage folder (where local_folder is the folder you created earlier in the process).
In Visual Studio 2010, in Solution Explorer, right-click the SamplePage project, and then select Properties.
The SamplePage Property Pages dialog box appears.
In the SamplePage Property Pages dialog box, go to Configuration Properties/Debugging.
In the Debugging properties, under Configuration, select All Configurations.
In the Debugging properties, under Command, type $(TargetDir)\OSDSetupWizard.exe.
In the Debugging properties, under Working Directory, type $(TargetDir).
In the SamplePage Property Pages dialog box, go to Configuration Properties/Build Events/Post-Build Event.
In the Post-Build Event properties, under Command Line, type the following:
copy /y "$(ProjectDir)..\..\..\..\OSDSetupWizard\x86\*.*" "$(TargetDir)"
xcopy /y /i "$(ProjectDir)..\..\..\..\OSDSetupWizard\x86\en-us" "$(TargetDir)en-us"
copy /y "$(ProjectDir)..\..\..\..\OSDSetupWizard\OSDResults\Images\UDI_Wizard_Banner.bmp" "$(ProjectDir)header.bmp"
copy /y "$(ProjectDir)Config.xml" "$(TargetDir)"
copy /y "$(ProjectDir)header.bmp" "$(TargetDir)header.bmp"
In the SamplePage Property Pages dialog box, select OK.
Save the project.
From the Debug menu, select Start Debugging.
The Microsoft Visual Studiodialog box appears indicating that the source is out of date and asks whether you want to build the project.
In the Microsoft Visual Studio dialog box, select Yes.
The No Debugging Information dialog box appears informing you that no debugging information is available for OSDSetupWizard.exe.
In the No Debugging Information dialog box, select Yes.
The UDI Wizard opens with the custom wizard page displayed.
Verify that you can select a value in Choose your location.
In the Wizard with sample page form, select Cancel.
The Cancel Wizard dialog box appears.
In the Cancel Wizard dialog box, select Yes.
Close Visual Studio 2010.
Verify That the SampleEditor Project Builds Correctly
The SampleEditor project provides an example of how to create a custom wizard page editor for the UDI Wizard Designer. For more information about the SampleEditor project, see Review the SamplePage Visual Studio Solution.
To verify that the SampleEditor project builds correctly
Start Visual Studio 2010.
Open the SampleEditor project.
The SampleEditor project resides in the local_folder\SDK\UDI\SampleEditor folder (where local_folder is the folder you created earlier in the process).
In Visual Studio 2010, in Solution Explorer, select the SampleEditor project.
From the Project menu, select Add Reference.
The Add Reference dialog box opens.
In the Add Reference dialog box, select the Browse tab.
On the Browse tab, go to installation_folder\Bin (where installation_folder is the folder in which you installed MDT). Select the following files, and then select OK:
Microsoft.Enterprise.UDIDesigner.Common.dll
Microsoft.Enterprise.UDIDesigner.DataService.dll
Microsoft.Enterprise.UDIDesigner.Infrastructure.dll
Microsoft.Practices.Prism.dll
Microsoft.Practices.ServiceLocation.dll
Microsoft.Practices.Unity.dll
RibbonControlsLibrary.dll
Note
You can select multiple files on the Browse tab by holding down the CTRL key while you select the files.
In Solution Explorer, go to SampleEditor/References.
Verify that none of the references have any warnings or errors.
In Solution Explorer, right-click the SampleEditor project, and then select Properties.
The SampleEditor Property Pages dialog box appears.
In the SampleEditor Property Pages dialog box, select the Debug tab.
On the Debug tab, select Start external program.
In Start external program, type installation_folder\Bin\UDIDesigner.exe (where installation_folder is the folder in which you installed MDT), and then select OK.
Tip
You can select the ellipsis (...) button to browse to the folder and select UDIDesigner.exe.
From the File menu, select Save All.
Copy the local_folder\SDK\SamplePage\SamplePage.dll.config file to the installation_folder\Bin\Config folder (where local_folder is the folder you created on the development computer earlier in the configuration process andinstallation_folder is the folder in which you installed MDT).
In Visual Studio 2010, from the Debug menu, select Start Debugging.
The UDI Wizard Designer starts.
In the UDI Wizard Designer, on the Ribbon, select Open.
The Open dialog box appears.
In the Open dialog box, open the local_folder\SDK\SamplePage\SamplePage\Config.xml file (where local_folder is the folder you created on the development computer earlier in the configuration process).
The Config.xml file opens, and the Custom StageGroup is displayed in the details pane.
In the details pane, select the Configure tab.
Review the configuration information for the Location box, including the following:
Unlocked button, with which you enable or disable the Location box
Default value box, in which you enter a default value to be displayed in the Location box
Friendly display name visible in summary page, in which you enter the caption for the information displayed on the Summary page
Location list box, which includes a list of possible locations
Close the UDI Wizard Designer.
Close Visual Studio 2010.
Reviewing the UDI SDK Examples
Before beginning development, review the examples provided in the UDI SDK. Use the information in this guide and the source code in the examples to help you create your own UDI custom wizard pages and wizard page editors.
Go through the UDI SDK examples by reviewing the:
Contents of the SDK folder that you copied earlier in the installation process as described in Review the Contents of the SDK Folder
Custom UDI wizard page example as described in Review the SamplePage Visual Studio Solution
Custom UDI wizard page editor example as described in Review the SampleEditor Visual Studio Solution
Review the Contents of the SDK Folder
During configuration of the UDI development environment, you copied the SDK folder from the folder in which you installed MDT to another folder that you created. Table 1 lists the folders immediately beneath the SDK folder and provides a brief description of each.
Table 1. Folders in the UDI SDK
| Folder | This folder contains |
|---|---|
| Includes | The C++ header files necessary for creating custom wizard pages for the UDI Wizard |
| Libs | The C++ library files that will be linked to your custom page; there are 32-bit and 64-bit versions of the static link libraries. Note: Itanium versions of the libraries (IA-64) are not available. |
| SampleEditor | A Visual Studio project for building a custom editor used to edit the SamplePage page in UDI Wizard Designer, which is written in C# |
| SamplePage | A Visual Studio project for building a custom UDI wizard page, which is written in Visual C++ |
Review the SamplePage Visual Studio Solution
Before you begin creating your custom wizard pages and wizard page editors, perform the following tasks to prepare the UDI development environment:
Review the stages in the life cycle of a UDI wizard page as described in Review the Wizard Page Life Cycle.
Review the Visual Studio solution for the SamplePage example in the UDI SDK as described in Review the SamplePage Example.
Review the Wizard Page Life Cycle
A UDI wizard page has methods that correspond to each stage (or phase) of the life cycle of the page. As a part of creating your custom wizard page, you need to override these methods with your code. Table 2 lists the methods that you will need to override and provides a brief description of each method, including when to use the method in the wizard page life cycle.
Table 2. Methods in a Wizard Page Life Cycle
| Method | Description |
|---|---|
| OnWindowCreated | This method is called once, after the page's window has been created. For this method, write code that initializes the page for the first time and only needs to be performed once. For example, use this method to initialize fields or to read configuration information from the Setter elements in the UDI Wizard configuration file. |
| OnWindowShown | This method is called each time the page is displayed (shown) in the UDI Wizard. It is called the first time the page is displayed and each time you navigate to the page by selecting Next or Back in the wizard. For this method, write code that prepares the page to be displayed—for example, reading memory variables, task sequence variables, or environment variables, and then updating the page based on any changes to those variables. |
| OnCommonControlEvent | This method can be called anytime the wizard page is displayed and receives a WM_NOTIFY message from a child (typically, common controls). For this method, write code that handles WM_NOTIFY based on the notification message. For example, you may want to respond to events from a common control, such as responding to select or double-click events for a TreeView control. |
| OnUnhandledEvent | This method is called anytime an unhandled window message occurs for your wizard page. This method provides the opportunity to intercept and handle these otherwise unhandled window messages. For this method, write code that handles the window messages that are pertinent to your wizard page. Typically, you will not need to override this method. |
| OnNextSelected | This method is called when you select Next in the wizard. For this method, write code that performs any necessary actions before moving to the next wizard page—for example, performing validation that can take a long time. If the validation fails, you can cancel the Next request and display a message. |
| OnWindowHidden | This method is called each time the page is hidden when either the previous or next wizard page is shown. For this method, write code that performs any actions before the page is hidden, prior to another page being shown. Typically, you will not need to override this method. |
Review the SamplePage Example
Review the SamplePage example using the following list, which represents the sequence of events during the wizard page life cycle of the SamplePage example:
The UDI Wizard, OSDSetupWizard.exe, reads the configuration information from the UDI Wizard configuration file in the example (the Config.xml file) as described in Step 1: The UDI Wizard (OSDSetupWizard.exe) Reads the Config.xml File.
The UDI Wizard loads the DLLs required for each wizard page listed in the UDI Wizard configuration file as described in Step 2: The UDI Wizard Loads the DLL for the Custom Wizard Page.
The UDI Wizard displays the custom wizard page and allows for the desired control interaction as described in Step 3: The UDI Wizard Displays the Custom Wizard Page.
When the custom wizard page has collected the information, perform any tasks necessary before selecting Next to proceed to the next wizard as described in Step 4: The Next Button Is Selected in the Custom Wizard Page.
Step 1: The UDI Wizard (OSDSetupWizard.exe) Reads the Config.xml File
When the UDI Wizard (OSDSetupWizard.exe) starts, by default it reads the UDI Wizard configuration file, which is the UDIWizard_Config.xml file—the primary configuration file for the UDI Wizard.
Note
The example uses the Config.xml file as the configuration file. In MDT, the default configuration file is the UDIWizard_Config.xml file, which resides in the Scripts folder in the MDT Files package for configuration.
You can override the default configuration file that the UDI Wizard uses by modifying the UDI Wizard task sequence step to use the /definition parameter. For more information about overriding the default configuration file that the UDI Wizard uses, see "Override the Configuration File That the UDI Wizard Uses".
The top-level elements in the Config.xml file are the
DLLs element
Style element
Pages element
StageGroups element
For more information about the schema of the UDI Wizard configuration file and each of these elements, see UDI Wizard Configuration File Schema Reference.
The UDI Wizard scans the DLLs element looking for the .dll files to load. In the example, two .dll files are listed: SamplePage.dll and SharedPages.dll. These .dll files must reside in the same folder as OSDSetupWizard.exe—the Tools\platform folder (where platform is x86 for the 32-bit version or x64 for the 64-bit version).
The UDI Wizard scans the Pages element looking for the pages that are defined. In the example, two pages are defined: Custom and SummaryPage. The Type attribute of the Page element is defined in the PageClassIDs.h file and uniquely defines the type of your custom page.
In the example, the defined type is Microsoft.SamplePage.LocationPage. For your custom page, substitute the following to avoid any potential conflicts with other pages you may create in the future:
Your organization name in the place of Microsoft.
Your project name in the place of SamplePage.
Your custom wizard page name in the place of LocationPage.
Step 2: The UDI Wizard Loads the DLL for the Custom Wizard Page
When the UDI Wizard loads your DLL, it calls the RegisterFactories function, which must be implemented in your .dll file. In the example, this function is implemented in the dllmain.ccp file. Each wizard page you create must implement the RegisterFactories function.
The RegisterFactories function is used to register the factory class of your wizard page with the class factory registry for the UDI Wizard. Class factories are classes that can create an instance of another class. The RegisterFactories function creates a new instance of a factory class and passes that class to the class factory registry for the UDI Wizard, which makes that factory class available to the wizard. The UDI Wizard looks for a factory class registered with an ID that matches the Type attribute of the Page element for the custom wizard page.
In the example, the ID is defined as ID_Location in the PageClassIds.h file as Microsoft.SamplePage.LocationPage, which matches the Type attribute for the Page element in the Config.xml file. ID_Location is passed as a parameter in the RegisterFactories function implemented in the dllmain.ccp file.
You can create a function using the Register_name function template to simplify the creation of a new factory instance and register the newly created instance. The name value provided using the Register function template must implement the iClassFactory interface. The ClassFactoryImpl Class handles most of the details for implementing a class factory.
You can also use the RegisterFactories function to register task types and validator types. For more information, see the following:
Note
The example contains and registers only the one custom wizard page. The example does not include custom tasks or validators and so does not register any custom tasks or validators.
Step 3: The UDI Wizard Displays the Custom Wizard Page
The custom wizard page in the example is defined in the LocationPage.cpp file. Wizard pages are derived from template classes that provide much of the functionality a page has. All wizard pages should derive from the WizardPageImpl Template Class, which implements the IWizardPage Interface. Each wizard page can implement other optional template classes and corresponding interfaces based on the needs of the page.
The WizardPageImpl Template Class has several useful interfaces that can help you write custom wizard pages. Implement the WizardPageImpl Template Class as the base class for your custom wizard page.
For a list of the available:
Template classes for wizard pages, see Wizard Page Helper Classes
Interfaces for the wizard page template classes, see Wizard Page Interfaces
The custom wizard page in the example is derived from the WizardPageImpl Template Class and implements the IWizardPage Interface. In addition, the custom wizard page implements the IFieldCallback interface. Both of these are implemented in the LocationPage.cpp file.
The example custom wizard page overrides the following methods:
OnWindowCreated. The OnWindowCreated method in the example wizard page calls the following methods:
AddField. This method relates the IDC_COMBO_LOCATION box control in the IDD_LOCATION_PAGE resource with the Data element named Location in the Config.xml file.
In addition to the AddField method, you could use the AddRadioGroup and AddToGroup methods to support other controls and behaviors.
Note
Ensure that you call the AddField, AddRadioGroup, or AddToGroup method prior to calling the InitFields method.
InitFields. Use this method to initialize the fields (controls) that you have added to the form. The pointer of the page is a parameter. In the example, the this pointer is passed, which refers to the current page.
Note
To support the use of the this pointer, you must implement the IFieldCallback interface in addition to the interfaces that the WizardPageImpl Template Class supports.
The IFieldCallback interface calls the SetFieldDefault method, which is used to set the default values for controls other than text box and check box controls. In the example, the SetFieldDefault method sets the initial index of the combo box control based on the default value specified in the Default element for the Field element in the Config.xml file.
The OnWindowCreated method sets up the form controller using the IFormController interface. For more information about setting up the form controller, see Setting up the Form.
InitLocations. This method populates the combo box from the list of locations in the Config.xml file. The Data element and child DataItem elements the Confg.xml file provide the list of possible values.
OnNextSelected. This method performs the following tasks:
Updates the TSLocation task sequence variable with the value selected in the combo box using the SaveFields method
Adds information that will be shown on the Summary page using the SaveFields method
Step 4: The Next Button Is Selected in the Custom Wizard Page
When the user completes the fields on the custom wizard page, they select Next, which calls the OnNextSelected method. The OnNextSelected method performs any necessary tasks before proceeding to the next wizard page, such as recording any configuration changes made on the custom wizard page.
For the example custom wizard page, the override for the OnNextSelected method is implemented in the LocationPage.ccp file. In the OnNextSelected method in the example custom wizard page, the following methods are called:
InitSection. This method initializes the header (label caption) for the summary data displayed on the Summary page. Typically, you can set this value using the DisplayName() function. The data associated with this caption is saved using the SaveFields method.
SaveFields. This method saves field values to task sequence variables and to the data displayed on the Summary page.
Review the SampleEditor Visual Studio Solution
Before you begin creating your own custom wizard pages and wizard page editors, perform the following steps to prepare the UDI development environment:
Review the architecture of the UDI Wizard Designer as described in Review the UDI Wizard Designer Architecture.
Review the components of a UDI Wizard page that can be customized using the UDI Wizard configuration file as described in Review Configurable Components of a UDI Wizard Page.
Review the EditorPage example provided in the UDI SDK as described in Review the EditorPage Example.
Review the UDI Wizard Designer Architecture
The UDI Wizard Designer was developed using WPF, Prism, and Unity. The UDI Designer is used to edit the UDI Wizard configuration file (UDIWizard_Config.xml), which the UDI Wizard (OSDSetupWizard.exe) reads at runtime. The Pages element in the UDI Wizard configuration file contains a list of pages that has a separate Page element for each wizard page.
When you edit the configuration settings for a wizard page, the UDI Wizard Designer loads the custom page editor that corresponds to the wizard page type. The custom wizard page editors are developed as WPF user controls. The custom wizard page editor pages use the Model-View-ViewModel (MVVM) design pattern for WPF.
The MVVM design pattern helps separate the user interface (UI; presentation) from the data being presented. The data is a façade over the Page element in the UDI Wizard configuration file (the Config.xml file in the example), which is accessed using the CurrentPage property of the IDataService interface.
The UDI Wizard Designer uses the DependencyAttribute to obtain access to the DataService class based on the dependency injection framework in Unity. For more information about the dependency interjection framework in Unity, see Inject Some Life into Your Applications—Getting to Know the Unity Application Block.
Review Configurable Components of a UDI Wizard Page
As you create your custom wizard page, some of the configuration settings may be set in code and cannot be changed after you have compiled the page. However, for other configuration settings, you will need to allow those configuration settings to be changed using the UDI Wizard Designer.
Typically, the configuration settings that you want to configure using the UDI Wizard Designer are saved in the UDI Wizard configuration file (the Config.xml file in the example). However, you can also create your own separate configuration file, if necessary. One example of using a separate configuration file is the UDIWizard_Config.xml.app file, which the Application Discovery task and the ApplicationPage wizard page type use.
The following is a list of the typical configuration settings that you can manage using the UDI Wizard Designer:
Field. Use fields allow users to provide input. Fields appear as Field elements in the UDI Wizard configuration file (UDIWizard_Config.xml), which contains the configuration settings for each field. The corresponding wizard page editor needs to provide a method for editing the field configuration settings for the field using the FieldElementControl.
Properties. Setters help create properties for entities on the page, such as pages in the Page element, fields in the Field element, or data in the Data or DataItem elements. You configure properties in the Setter elements. Add a separate Setter element for each property you want to define. You edit the properties using the SetterControl and configure other Setter elements using other controls.
Data. Data is used to store information for use by the wizard page and other components. You can define data for pages or fields using the Data or DataItem elements. The data can be defined in a flat or hierarchical structure through the proper use of the Data or DataItem elements. The Config.xml in the example in the SDK shows how to build flat data structures.
The custom wizard page editor that you create must be able to manage these configuration settings.
Review the EditorPage Example
The EditorPage example is used to configure the configuration settings for the SamplePage wizard page in the UDI Wizard configuration file. The EditorPage example has the following primary components:
UI to configure the Location combo box settings
UI to add or edit a location in the list of possible locations, which are shown in the Location combo box
Configuration settings read from and saved to the UDI Wizard configuration file
Supporting code for the other components
Review the EditorPage example in Visual Studio by performing the following steps:
Review how the SampleEditor wizard page editor is loaded and initialized in the UDI Wizard Designer as described in Review Wizard Page Editor Loading and Initialization.
Review the UI used to edit the Location combo box in the LocationPageEditor.xaml and LocationPageEditor.xaml.cs files as described in Review the User Interface Used to Configure the Location Combo Box.
Review the UI used to add or edit locations to the list in the AddEditLocationView.xaml and AddEditLocationView.xaml.cs files as described in Review the User Interface Used to Modify the List of Possible Locations.
Review the code used to manage configuration information saved in the UDI Wizard configuration file as described in Review the Code Used to Manage Configuration Information.
Review Wizard Page Editor Loading and Initialization
Custom wizard page editors are loaded as required by the UDI Wizard Designer. The UDI Wizard Designer configuration files are loaded when the UDI Wizard Designer starts. The UDI Wizard Designer scans the install_folder\Bin\Config folder (where install_folder is the name of the folder where MDT is installed) for files that have a .config file extension.
During the configuration of the UDI development environment, you copied the SamplePage.dll.confg file to the install_folder\Bin\Config folder. When you start the UDI Wizard Designer, the SamplePage.dll.confg file is found and loaded.
The UDI Wizard Designer uses the following attributes of the Page element in the SamplePage.dll.confg file to load and initialize the EditorPage example:
DesignerAssembly. This attribute determines the name of the DLL to be loaded. This DLL needs to be placed in the same folder as the UDIDesigner.exe file, which is the install_folder\Bin folder (where install_folder is the name of the folder in which MDT is installed).
DesignerType. This attribute is the Microsoft .NET type name of the class that contains the WPF user control.
Type. Use this attribute to configure the page type of the custom wizard page, which the UDI Wizard loads. The UDI Wizard Designer uses this attribute to locate the appropriate Page element in the UDI Wizard configuration file.
Dll. Use this attribute to configure the DLL element in the UDI Wizard configuration file, which the UDI Wizard Designer creates.
Description. Use this attribute to provide information about the wizard page editor. The value of this attribute is shown in the Add New Page dialog box in the UDI Wizard Designer, which is used to add the wizard page to the "Page Library".
DisplayName. Use this attribute to provide the name of the custom wizard page that is displayed in the UDI Wizard Designer. The value of this attribute is shown in the Add New Page dialog box in the UDI Wizard Designer, which is used to add the wizard page to the "Page Library".
In the example, the type of the SamplePage custom wizard page is Microsoft.SamplePage.LocationPage, which is saved in the Config.xml file. The Config.xml file resides in the local_folder\SDK\SamplePage\SamplePage folder to (where local_folder is the folder you created on the development computer earlier in the configuration process).
Review the User Interface Used to Configure the Location Combo Box
When the wizard page editor is loaded and initialized, the SampleEditor wizard page editor is loaded when a page with a type of Microsoft.SamplePage.LocationPage is edited. The UI for the page editor is stored in the LocationPageEditor.xaml file.
If you examine the UI on the Design tab and the code on the XAML tab, you can see the relationship between the graphical UI and the elements and attributes in the Extensible Application Markup Language (XAML).
For example, if you review the Controls:FieldElementControl element in the XAML you can see how that relates to the layout of the corresponding UI. Use the Controls:FieldElementControl element to define the FieldElementControl control.
The Binding parameters in the XAML file bind the fields on the sample page editor with the information in the UDI wizard configuration file. For example, the following code ties the Default value text box with the Default element in the UDI wizard configuration file (Config.xml in the example):
<TextBox Text="{Binding FieldData.DefaultValue,
 UpdateSourceTrigger=PropertyChanged,
 Mode=TwoWay}"/>
For more information, see How to: Make Data Available for Binding in XAML.
Use the Views:CollectionTControl.ColumnCollectionView element in the XAML to edit the list of available locations in the grid view. You use the CollectionTControl control to display the grid view and bind the grid view to the Data element with the name Location in the UDI configuration file.
Review the User Interface Used to Modify the List of Possible Locations
The UI for modifying the list of possible locations consists of:
A context-sensitive menu and Ribbon buttons that allow you to add, edit, remove, or change the order of items in the list of locations as described in Review Context-sensitive Menu and Ribbon Buttons for Modifying the List of Locations
A dialog box that is initiated when you select to add or edit an item in the list of locations as described in Review the Dialog Box for Adding or Editing Locations
Review Context-sensitive Menu and Ribbon Buttons for Modifying the List of Locations
When you right-click in the list box that contains the list of locations, a context-sensitive menu is displayed. The Ribbon has corresponding buttons that allow you to perform the same tasks. The Views:CollectionsTControl control element in the LocationPageEditor.xaml file defines the methods called based on the action taken and properties that you set as follows:
SelectedItem. This data-bound property is activated when the user selects an item from the list. This property is tied to the CurrentLocation property in the view model, which is located in the LocationPageEditorViewModel.cs file and used by the CollectionTControl control to pass the item selected when you edit or remove an existing item.
AddItemAction. This action is performed when the user selects the Add Item option from the context-sensitive menu or the corresponding buttons on the Ribbon. There is a data binding to a property in the view model that returns the AddLocationAction object. This object is the AddLocationCallback method, located in the LocationPageEditorViewModel.cs file, and displays the dialog box in the AddEditLocationView.xaml file.
EditItemAction. This action is performed when the user selects the Edit Item option from the context-sensitive menu. There is a data binding to a property in the view model that returns the EditLocationAction object. This object is the EditLocationCallback method, located in the LocationPageEditorViewModel.cs file, and displays the dialog box in the AddEditLocationView.xaml file.
RemoveAction. This action is performed when the user selects the Remove Item option from the context-sensitive menu. There is a data binding to a property in the view model that returns the RemoveAction object. This object is the EditLocationCallback method, located in the LocationPageEditorViewModel.cs file, and shows a message that confirms the deletion of the location.
Review the Dialog Box for Adding or Editing Locations
If you add a new location to the list of locations or edit an existing location, a message is displayed that is in the AddEditLocationView.xaml file. The message is displayed using the ShowDialogWindow window method in the LocationPageEditorViewModel.cs file.
The UI in the AddEditLocationView.xaml file consists of:
A dialog frame named DialogFrame, which includes the following elements:
A title, which you configure using the DialogTitle attribute of the dialog frame
An OK button, which sets the return status as for the Approved property to True (The return status is checked in the AddLocationCallback method in the LocationPageEditorViewModel.cs file to determine whether the user selected OK.)
A Cancel button, which sets the return status as for the Approved property to False (The return status is checked in the AddLocationCallback method in the LocationPageEditorViewModel.cs file to determine whether the user selected Cancel.)
A WPF element that contains:
A label, which you configure using the Content attribute
A text box, which is bound to the Data element with the name Location in the UDI configuration file (the Config.xml file in the example)
Review the Code Used to Manage Configuration Information
The configuration information for your custom wizard page is stored in the UDI Wizard configuration file, which is the:
Config.xml file in the example provided with the UDI SDK (This file contains only the configuration settings for the example.)
UDIWizard_Config.xml file provided with MDT, stored in the installation_folder\Templates\Distribution\Scripts folder (where installation_folder is the folder in which you installed MDT); this file contains the configuration settings for all the built-in wizard pages and stages
In the SampleEditor example, the Locations routine helps manage the configuration information and is located in the LocationPageEditorViewModel.cs file. The Locations routine returns a list of the locations from the UDI Wizard configuration file. Specifically, the list returned contains an item for each DataItem element in the UDI Wizard configuration file.
Creating Custom UDI Wizard Pages
The high-level process for creating custom UDI wizard pages is as follows:
Make a copy of the SamplePage solution as a starting point.
Place the desired controls (fields) on the form.
Write code to perform the appropriate tasks when the wizard page loads (overrides for the OnWindowCreated method), including the following steps:
Initialize the form.
Read memory variables, task sequence variables, environment variables, or XML file information (such as Setter properties).
Write any code to perform the appropriate tasks when the page is shown (overrides for the OnWindowShown method), including the following steps:
Enable or disable controls based on information read when the page loaded in step 3.
Update the controls based on information read when then page loaded in step 3, such as the population of controls based on the information read.
Write any code to perform the appropriate tasks while the user interacts with the wizard page.
Write any code to perform the appropriate tasks when the user selects Next in the UDI Wizard (overrides for the OnNextSelected method), including the following steps:
Update any memory variables, task sequence variables, environment variables, or XML file information.
Update summary page information (if not performed by the fields on the page).
Build the solution.
Ensure that the version of the DLL you create is the same processor platform as the installation of MDT—specifically, the processor platform for Windows Preinstallation Environment (Windows PE). The UDI Wizard can run in:
The existing operating system on the target computer. You can run 32-bit versions of your wizard page on 32-bit or 64-bit Windows operating systems. However, you can only run 64-bit versions of your wizard page on 64-bit Windows operating systems.
Windows PE on the target computer. Windows PE does not support running 32-bit applications on a 64-bit version of Windows PE. So, you need to have built a version for your wizard page for each processor architecture of Windows PE that you plan to use.
Copy the DLL for your custom wizard page to installation_folder\Templates\Distribution\Tools\ platform folder (where installation_folder is the folder in which you installed MDT and platform is x86 for the 32-bit version or x64 is for the 64-bit version).
Complete the steps for creating custom page editor.
Creating Custom Wizard Page Editors
The high-level process for creating custom UDI wizard page editors is as follows:
Make a copy of the SampleEditor solution as a starting point.
Create the primary page editor UI in an .xaml file.
Add instances of the FieldElementControl control as required by the wizard page to be configured (if required).
Add instances of the SetterControl control as required by the wizard page to be configured (if required).
Add instances of the CollectionTControl control as required by the wizard page to be configured (if required).
Add the IDataService interface.
Write the appropriate code to update the UDI Wizard configuration file based on the configuration settings to be configured using your custom wizard page editor.
Create child dialog boxes in a .xaml file, and call them from the primary page editor using the IMessageBoxService interface as required by the wizard page to be configured.
Add the appropriate interfaces to the UDI Wizard Designer Ribbon based on the requirements of the wizard page to be configured.
Build the solution.
Note
Ensure that the version of the DLL you create is the same processor platform as the installation of MDT. For example, if you install the 64-bit version of MDT, then build a 64-bit version of your custom page editor.
Create a UDI Wizard Designer configuration file to load the necessary DLLs and map the wizard page editor with the corresponding wizard page (the SamplePage.dll.config file in the example).
For more information about the elements required to perform the mapping between the wizard page and the wizard page editor, see the DesignerMappings element, child elements, and corresponding attributes.
Copy the UDI Wizard Designer configuration file that you created in the previous step to the installation_folder\Bin\Config folder (where installation_folder is the folder in which you installed MDT version).
Copy the DLL for your custom wizard page editor to the installation_folder\Bin folder (where installation_folder is the folder in which you installed MDT).
Creating Custom UDI Tasks
UDI tasks are DLLs written in C++ that implement the ITask interface. You register the DLL with the UDI Wizard Designer task library by creating a UDI Wizard Designer configuration file (.config file) and placing it in the installation_folder\Bin\Config folder (where installation_folder is the folder in which you installed MDT).
Note
You can create a DLL that contains wizard pages, tasks, and validators within the same .dll file. You can also create a single UDI Wizard Designer configuration file (.config) that contains the configuration settings for the wizard pages, tasks, and validators in the DLL.
To create custom UDI tasks
Write code that implements the ITask Interface and the following methods:
Write code that registers the custom task class factory with the factory registry.
Build the solution for your custom task.
Note
Ensure that the version of the DLL you create is the same processor platform as the installation of MDT. For example, if you install the 64-bit version of MDT, then build a 64-bit version of your custom UDI task.
Create a Task element under the TaskLibrary element in the UDI Wizard Designer configuration file similar to the following excerpt:
<Task DLL="OSDRefreshWizard.dll" Description="Discovers supported applications for install." Type="Microsoft.OSDRefresh.AppDiscoveryTask" Name="Application Discovery">
   <TaskItem Type="Setter" Name="Status Bitmap">
      <Param Name="BitmapFilename"/>
   </TaskItem>
   <TaskItem Type="Setter" Name="Log File">
      <Param Name="log"/>
   </TaskItem>
   <TaskItem Type="Setter" Name="Write Configuration File">
      <Param Name="writecfg"/>
   </TaskItem>
   <TaskItem Type="Setter" Name="Read Configuration File">
      <Param Name="readcfg"/>
   </TaskItem>
</Task>
Note
All Task elements should include the BitmapFilename parameter. Specify all other parameters as the task requires. For example, in the previous excerpt, the log parameter is used to specify a parameter for the location of a log file.
Copy the UDI Wizard Designer configuration file created in the previous step to the installation_folder\Bin\Config folder (where installation_folder is the folder in which you installed MDT).
Copy the DLL for your custom task to the installation_folder\Templates\Distribution\Tools\ platform folder (where installation_folder is the folder in which you installed MDT and platform is x86 for the 32-bit version or x64 is for the 64-bit version).
Creating Custom UDI Validators
UDI validators are DLLs written in C++ that implement the IValidator interface. You register the DLL with the UDI Wizard Designer validator library by creating a UDI Wizard Designer configuration file (.config file) and placing it in the installation_folder\Bin\Config folder (where installation_folder is the folder in which you installed MDT).
To create custom UDI validators
Write code that creates a subclass of the BaseValidator class and implements the following methods:
Init(IControl *pControl, IWizardPageContainer *pContainer, IStringProperties *pProperties). The form controller calls the Init member to initialize the validator. This method must call the Init method for the BaseValidator class. It typically reads any properties set for the validator from the UDI Wizard configuration file. For example, the InvalidCharactersValidator validator retrieves the value of the InvalidChars property using this method.
IsValid. The form controller calls this method to see whether the control contains valid text. The following is an example of the IsValid method for a validator that validates that the field is not empty:
BOOL IsValid(LPBSTR pMessage)
{
    __super::IsValid(pMessage);

    _bstr_t text;
    m_pText->GetText(text.GetAddress());
    return (text.length() > 0);
}
Init(IControl *pControl, LPCTSTR message). The form controller calls this member for each keystroke and other events so that the validator can validate the contents of the control and updated messages at the bottom of the wizard page (or clear them).
Typically, these are the only methods that you need to override. However, depending on the validator, you may need to override other methods in the subclass of the BaseValidator class you create. For more information about these other methods, see the BaseValidator class.
Write code that registers the custom task class with the registry factory.
Build the solution for your custom task.
Note
Ensure that the version of the DLL you create is the same processor platform as the installation of MDT. For example, if you install the 64-bit version of MDT, then build a 64-bit version of your custom UDI task.
Create a Validator element under the ValidatorLibrary element in the UDI Wizard Designer configuration file similar to the following excerpt:
<Validator
<Validator DLL="" Description="Must follow a pre-defined pattern" Type="Microsoft.Wizard.Validation.RegEx" Name="NamedPattern">
   <Param Description="Enter the message you want displayed when the text in this field doesn't match the pattern:" Name="Message" DisplayName="Message"/>
   <Param Description="The name of a pre-defined regular expression pattern. Must be Username, ComputerName, or Workgroup" Name="NamedPattern" DisplayName="Named Pattern"/>
</Validator>
Warning
All Validator elements should include the Message parameter. Specify all other parameters as required by the validator. For example, in the previous excerpt, the NamedPattern parameter is used to specify a parameter for the name of a predefined regular expression pattern.
Copy the UDI Wizard Designer configuration file created in the previous step to the installation_folder\Bin\Config folder (where installation_folder is the folder in which you installed MDT).
Copy the DLL for your custom task to the installation_folder\Templates\Distribution\Tools\ platform folder (where installation_folder is the folder in which you installed MDT and platform is x86 for the 32-bit version or x64 is for the 64-bit version).
UDI Wizard Reference
Wizard Page Components
You can use any of several prebuilt components to build your custom pages.
Creating Component Instances
The UDI Wizard uses class factories to create new instances of objects for you. These factories are registered with a factory registry, using a string as the key to the factory. For example, the WmiRepository component is identified by the string "Microsoft.Wizard.WmiRepository," which is available in the IWmiRepository header file as ID_WmiRepository.
Assuming that you have written your page as a subclass of WizardPageImpl, you can create a new instance of a WmiRepoistory like this:
PWmiRepository pWmi;
CreateInstance(Container(), ID_WmiRepository, &pWmi);
The CreateInstance function is a type-safe template function for creating new instances of components. PWmiRepository is a smart pointer, so it handles reference counting for you.
Creatable Components
There is a set of components that you can register with the registry. The first set of components is always registered, because the main UDI Wizard executable file provides it. The other two sets of components are provided in "optional" DLLs. For these components to be available, the DLL must be listed in the DLLs section of the .config XML file. Your code does not need to know which executable contains a specific component.
The list of component IDs for components (the component name is the same as the ID but without the initial ID_) registered with the factory registry (defined in OSDSetupWizard) is shown in Table 3.
Table 3. Component IDs
| ID | Description |
|---|---|
| ID_ACPowerTask | (ITask, IWizardComponent) A preflight task that ensures that your computer is not running on battery alone |
| ID_AppDiscoveryTask | (ITask, IWizardComponent) A specialized task for discovering which software items you have installed on your computer |
| ID_BackgroundTask | (IBackgroundTask, IWizardComponent) Can be used to run a task on another thread |
| ID_CopyFilesTask | (ITask, IWizardComponent) A task to copy one or more files |
| ID_FormController | (IFormController) You will most like not need to create an instance yourself, as your page receives its own instance |
| ID_InvalidCharactersValidator | (IValidator) Ensures that no text field contains characters from a list provided to the validator |
| ID_Logger | (ILogger) You will most like not need to create an instance yourself, as your page receives a pointer to the shared instance |
| ID_NonEmptyValidator | (IValidator) A validator that ensures that no field is empty |
| ID_PasswordValidator | (IValidator) A validator that ensures that no two text fields have the same content |
| ID_Regex | (IRegEx) Evaluates regular expressions, looking for matches |
| ID_RegExValidator | (IValidator) A validator that validates against a regular expression or a known pattern |
| ID_SimpleStringProperties | (IStringProperties, ISimpleStringProperties) Provides a simple way to send properties to tasks without using XML |
| ID_ShellExecuteTask | (ITask, IWizardComponent) Execute an external program |
| ID_SummaryBag | (ISummaryBag) Available indirectly from your page via the Form method |
| ID_TaskManager | (ITaskManager, IBackgroundCallback, IWizardComponent) Manages running a set of tasks and the UI |
| ID_WmiRepository | (IWmiRepository, IWizardComponent) Allows you to run Windows Management Instrumentation (WMI) queries |
| ID_IXmlDocument | (IXmlDocument) Provides a façade for reading and writing XML documents |
The defined OSDRefreshWizard.dll, shared pages, and other control components are shown in Table 4 and Table 5.
Table 4. Directory Controls
| ID | Description |
|---|---|
| ID_Directory | (IDirectory) A façade for obtaining directory information from the file system |
Table 5. Defined SharedPages.dll
| ID | Description |
|---|---|
| ID_ADHelper | (IADHelper) Provides a façade for a limited set of features in Active Directory® Domain Services (AD DS) |
| ID_CpuInfo | (ICpuInfo) Determines whether your CPU is 32 or 64 bit |
| ID_DomainJoinValidator | (IDomainJoinValidator) Has some methods for checking whether a set of credentials is allowed to join a domain |
| ID_DriveList | (IDriveList, IBindableList, IWizardComponent) Uses WMI to obtain a list of drives on your computer |
| ID_WiredNetworkTask | (ITask) A tasks that checks whether you are connected to the network with a hard-wired (instead of wireless) network adapter |
Control Components
You interact with the controls on your page through the GetControlWrapper template function, which provides access to one of the types of components listed in Table 6.
Table 6. Components
| Dialog control types | Description |
|---|---|
| CONTROL_CHECK_BOX | (ICheckBox) A façade for working with check box controls |
| CONTROL_COMBO_BOX | (IComboBox) A façade for combo box controls |
| CONTROL_GENERIC | (IControl) Allows you to work with most types of controls to control enable and visible state |
| CONTROL_LIST_VIEW | (IListView) A façade providing access to the features of a list view control |
| CONTROL_PROGRESS_BAR | (IProgressBar) A façade for working with the position of a progress bar control |
| CONTROL_RADIO_BUTTON | (IRadioButton) A façade for working with radio button controls |
| CONTROL_STATIC_TEXT | (IStaticText) A façade that provides read/write permission to the text of a control, such as a label or text box |
| CONTROL_TREE_VIEW | (ItreeView) A façade for working with a tree view control |
Image List Component
This component is a façade for an ImageList control on your page. You create an image list via the IListView or ITreeView interface.
FormController Component
The wizard creates this component for you and passes it to your page. You access it from your page using the Form method, which the WizardPageImpl base class implements.
InvalidCharacterValidator Component
This is a type of validator that you can include on a page. The ID is ID_InvalidCharactersValidator (defined in IValidator.h), which has a text value of "Microsoft.Wizard.Validation.InvalidChars."
This validator looks for a single property (a Setter element in the .config file) called InvalidChars, which is a list of characters that are not allowed. It checks the characters in a text box; if the text contains any characters from this list, the component reports failure.
NonEmptyValidator Component
This is a type of validator that you can include on a page. The ID is ID_NonEmptyValidator (defined in IValidator.h), which has a text value of "Microsoft.Wizard.Validation.NonEmpty."
This validator reports failure if the text box (or any other control that supports IStaticText) has an empty string value.
PasswordValidator Component
This is a type of validator that you can include on a page. The ID is ID_PasswordValidator (defined in IValidator.h), which has a text value of "Microsoft.Wizard.Validation.Password."
This validator works with two different text controls (controls that support IStaticText) and reports failure if they do not contain the same values. In other words, it fails if the Password and Confirm Password text boxes do not match.
Because this validator requires two controls, it needs more setup than other validators. The setup might look something like this:
Form()->AddToGroup(IDC_EDIT_PASSWORD, IDC_EDIT_PASSWORD2);
PValidator pValidator;
Form()->AddValidator(IDC_EDIT_PASSWORD, ID_PasswordValidator, pMessage, &pValidator);
PStaticText pPassword2;
GetControlWrapper(View(), IDC_EDIT_PASSWORD2, CONTROL_STATIC_TEXT, &pPassword2);
pValidator->SetProperty(0, pPassword2);
First, you define the Confirm Password control as a "child" of the Password control. That way, if the form controller disables the Password control, it will also disable the Confirm Password control. Next, add a password validator to the form. Finally, provide the password validator with the interface to the Confirm Password control.
Because of the requirement for two controls, you must use code to set up this validator rather than the .config XML file.
RegExValidator Component
This is a type of validator that you can include on a page. The ID is ID_RegExValidator (defined in IValidator.h), which has a text value of "Microsoft.Wizard.Validation.RegEx."
This validator compares the contents of a text control (one that supports IStaticText) to a regular expression and fails if the text does not match the regular expression.
Alternatively, you can use this validator with a predefined named pattern. To use a regular expression, the XML must contain a setter property called Pattern. If you want to use a named pattern instead, use a setter called NamedPattern set to one of the values in Table 7.
Table 7. Named Pattern Setters
| Pattern | Description |
|---|---|
| Username | Verifies that the text is either of the form domain\user or user@domain |
| ComputerName | The name must be between 1 and 15 characters long and cannot include a set of characters (such as : and ?) |
| Workgroup | The name must be between 1 and 15 characters long and cannot contain a set of characters (such as =, +, and ?) |
FactoryRegistry Component
This component keeps track of all class factories and services. It implements the IFactoryRegistry interface and is available indirectly through your page's Container method. In addition, the registry loads extension DLLs. After it loads a DLL, the registry looks for an exported function called RegisterFactories. You must implement this function and in it register the class factories for your pages, tasks, and validators (and any other class factories you want to register). Here is an example from the sample project:
extern "C" __declspec(dllexport) void RegisterFactories(IFactoryRegistry *factories)
{
Register<LocationPageFactory>(ID_LocationPage, factories);
}
Logger Component
This component is available to your page via the Logger method (implemented by WizardPageImpl). You use this method to write entries to the log file. The contents of the log file are useful for diagnosing issues users might have running the UDI Wizard.
PropertyBag Component
The property bag is a container for memory variables. It is available from your page using Container()->Properties(). Memory variables are useful for passing temporary data among different pages.
TSVariableBag and TSRepository Components
The TSVariableBag component allows you to read and write task sequence variables. It keeps the values in memory until the user selects Finish (by default). You can access the TSVariable bag via the page's TSVariables method (implemented by the WizardPageImpl base class). These components log all reads and writes of task sequence variables.
WmiRepository Component
This component provides a façade for working with WMI queries. You can call the CreateInstance helper function with ID_WmiRepository to obtain an instance of this component, which supports the IWmiRepository interface. This component returns result records via the IWmiIterator interface.
Wizard Page Helper Classes
You can create custom UDI wizard pages using built-in helper classes provided with the UDI SDK. Table 8 lists the helper classes that you can use to create custom wizard pages.
Table 8. Helper Classes
| Helper class | Description |
|---|---|
| ClassFactoryImpl Class | This is a useful base class for creating a class factory that you can then register with the factory registry. |
| Interface Template Class | Use this template class when you want to build a component that implements more than one interface. |
| Path Helper Class | This class provides common file/directory operations. |
| Pointer Template Class | This class provides reference counting for lifetime management in COM components. It is important to release interfaces when you are done with them. This template class handles the lifetime automatically. |
| PUnknown Class | This class is a smart pointer specifically for the IUnknown interface. For all other interfaces, use the Pointer template class. |
| StringUtil Helper Class | This class provides helper methods that make it easier to work with strings. |
| SubInterface Template Class | This base class makes it easier to implement a component that supports an interface that itself inherits from another interface. |
| UnknownImpl Template Class | This class handles most of the details of creating a COM component. |
| WizardComponent Template Class | This base class is used for creating components that need access to the wizard services, such as component creation and logging. |
| WizardPageImpl Template Class | This base class should be used as the base class for all custom wizard pages |
ClassFactoryImpl Class
This is a useful base class for creating a class factory that you can then register with the factory registry.
The following is an excerpt from the LocationPage.h file in the sample project to define the ClassFactoryImpl class.
#pragma once

#include "ClassFactoryImpl.h"

class LocationPageFactory :public ClassFactoryImpl
{
protected:
    IUnknown *CreateNewInstance();
};
The following is an excerpt from the LocationPage.cpp file in the sample wizard page used to define the class factory for the page.
IUnknown *LocationPageFactory::CreateNewInstance()
{
    return static_cast<IWizardPage *>(new LocationPage);
}
Interface Template Class
Use this template class when you want to build a component that implements more than one interface—for example:
classLocationPage :public Interface<IFieldCallback, WizardPageImpl<IDD_LOCATION_PAGE>>
This code creates a base class chain that supports both IFieldCalback and the interfaces that WizardPageImpl supports (which happens to be IWizardPage).
Path Helper Class
This class provides common file/directory operations:
static inline std::wstring GetModulePath(HINSTANCE hModule)
It also returns the full path to the .exe or .dll file with the instance handle that you provide to this method:
static inline std::wstring GetModuleFilename(HINSTANCE hModule)
The class returns the full path and file name of the .exe and .dll file with the instance handle that you provide to this method:
static inline std::wstring GetDirectoryName(LPCWSTR fullName)
. . . or just the path while stripping the file name:
static inline std::wstring GetFileName(LPCWSTR fullName)
Given a path with a file name, the path helper class returns the file name only:
static inline std::wstring Combine(LPCWSTR path, LPCWSTR name)
Finally, the class returns a new string that is the combined path and file name (or another path).
Pointer Template Class
This class is defined in Pointer.h. Because COM components use reference counting for lifetime management, it is important that you always release interfaces when you are done with them. Microsoft provides a template class that handles the lifetime automatically. For example, if you want a smart pointer for an XML interface, you could write something like this:
Pointer<IXMLDOMNode> pNewChild
pXmlDom->CreateNode(NODE_ELEMENT, L"MyElement", L"", &pNewChild);
The first line defines the smart pointer. The second line shows retrieving a smart pointer via another call. The & operator always releases an existing interface if it contains one and returns the address for the internal pointer. Once you have retrieved a pointer like this, the Pointer instance calls Release for you when the variable goes out of scope. Microsoft recommends that you use smart pointers instead of calling AddRef and Release manually.
In addition, the Pointer smart pointer class calls QueryInterface to retrieve other interfaces for you. For example, when the factory registry creates a new instance of a component, it has code like this:
PWizardComponent pComp = pUnknown;
if (pComp != nullptr)
    pComp->SetContainer(m_pContainer);
The first line calls QueryInterface behind the scenes to request the IWizardComponent interface. The resulting smart pointer will equal nullptr if the component does not support that interface.
PUnknown Class
This class is a smart pointer specifically for the IUnknown interface. For all other interfaces, use the Pointer template class.
StringUtil Helper Class
This class is defined in Utilities.h and provides helper methods that make it easier to work with strings:
static inline int CompareIgnore(LPCWSTR first, LPCWSTR second)
This method compares two strings while ignoring case (see Table 9).
Table 9. StringUtil Helper Class
| Returns | Description |
|---|---|
| 0 | Strings match, ignoring case |
| <0 | First < second |
| >0 | First > second |
Here is an example:
static inline std::wstring Format(LPCWSTR input, int index, LPCWSTR value)
static inline std::wstring Format(LPCWSTR input, int index, DWORD value)
These methods are a bit like the Microsoft .NET Format methods in the sense that parameters are in the form of {0}. However, they do not perform any formatting of the input—just substitution:
static inline std::wstring Printf(std::wstring format, I val)
static inline std::wstring Printf(std::wstring format, I val1, J val2)
static inline std::wstring Printf(std::wstring format, I val1, J val2, K val3)
static inline std::wstring Printf(std::wstring format, I val1, J val2, K val3, L val4)
These are wrappers around the StringCchPrintf that return a wstring so you do not have to allocate memory for strings or buffers yourself.
SubInterface Template Class
This base class makes it easier to implement a component that supports an interface that itself inherits from another interface. For example, the ICheckBox interface inherits from IControl. Here is how this class is used to define the CheckBoxWrapper:
classCheckBoxWrapper :public SubInterface<IControl, UnknownImpl<ICheckBox> >
The base interface is the first parameter, while the derived interface is the second parameter.
UnknownImpl Template Class
This class is defined in UnknownImpl.h and handles most of the details of creating a COM component. Here is an example of how you would use this base class:
classDirectory :public UnknownImpl<IDirectory>
This code defines a class that supports the IDirectory interface.
WizardComponent Template Class
This class is defined in IWizardComponent.h and is a useful base class for creating components that need access to the wizard services, such as component creation and logging.
As an example, here is how the CopyFilesTask component is defined:
classCopyFilesTask :public WizardComponent<ITask>
{
    ...
The parameter for this template class is the "main" interface you want to use for your component, which in the case of tasks is ITask. Using WizardComponent means that your component supports both the interface your provide (ITask in this example) and IWizardComponent.
Whenever you use the class factory registry to create a new component, the registry calls the component's IWizardComponent->SetContainer method to provide your component access to the wizard services.
WizardPageImpl Template Class
Use this class as the base class for your custom pages—for example:
class LocationPage :public WizardPageImpl<IDD_LOCATION_PAGE>
The parameter is the resource ID for your dialog box template.
Wizard Page Interfaces
The UDI Wizard uses interfaces to access the different controls on your page. Within you page, you use the GetControlWrapper function to retrieve a control wrapper. Here is an example:
PStaticText pFormat;
GetControlWrapper(View(), IDC_CHECK_PARTITION, CONTROL_STATIC_TEXT, &pFormat);
Here, PStaticText is a smart pointer to the IStaticText interface. Smart pointers automatically call the COM Release() method when they go out of scope or you pass the address of a variable (like &pFormat) to a method.
IADHelper Interface
__interfaceIADHelper : IUnknown
{
    HRESULT Init(ILogger *pLogger);
    HRESULT ValidLogon(LPCTSTR userName, LPCTSTR password, LPCTSTR domain);
    HRESULT HasAccess(LPCTSTR username, LPCTSTR password, LPCTSTR domain, LPCTSTR computerName, LPCTSTR accountDomain);
};
HRESULT Init(ILogger *pLogger)
Initialize this component, passing it to the logger so that it can log information.
HRESULTValidLogon(LPCTSTR userName, LPCTSTR password, LPCTSTR domain)
This method verifies whether a set of credentials is valid, as shown in Table 10.
Table 10. HResultValidLogon
| HResult | Description |
|---|---|
| S_OK | Credentials are valid |
| S_FALSE | Credentials are not valid |
| E_FAIL | Could not locate the domain controller; check logs for details |
HRESULT HasAccess(LPCTSTR username, LPCTSTR password, LPCTSTR domain, LPCTSTR computerName, LPCTSTR accountDomain)
This method verifies whether a set of credentials has read/write access to the computer object in AD DS, as shown in Table 11.
Table 11. HResult HasAccess
| HRESULT | Description |
|---|---|
| S_OK | The user has access |
| E_FAIL | The user does not have access. Check the log file for additional information. |
IBackgroundTask Interface
__interface IBackgroundTask : IUnknown
{
    HRESULT Init(ITask *pTask, int id, IBackgroundCallback *pCallback);
    void Start(void);
    BOOL Running(void);
    HRESULT Wait(DWORD waitMilliseconds);
    HRESULT Terminate(DWORD exitCode);
    HRESULT GetExitCode(LPDWORD pCode, HRESULT *pHresult);
    HRESULT Close(void);
};
Overview
The Progress page uses this class to run tasks on a separate thread. You can also use this class whenever you want to perform operations on a separate thread. Tasks are any class that supports the ITask interface.
This interface is implemented by the ID_BackgroundTask ("Microsoft.Wizard.BackgroundTask") component, defined in the IBackgroundTask.h interface.
HRESULT Init(ITask *pTask, int id, IBackgroundCallback *pCallback)
This interface initializes the component, as shown in Table 12.
Table 12. HRESULT Init
| Parameter | Description |
|---|---|
| pTask | Pointer to the class that contains the code you want to run on another thread |
| Id | A number you can use in the callback's Finished method to tell which task finished running; useful if you start several tasks with the same callback method |
| pCallback | A class that implements the Finished method, which is called whenever a task finishes running; the call to the Finished method will be on the background thread, not the UI thread |
void Start(void)
This method starts the task on a background thread and returns the elements shown in Table 13.
Table 13. Return Background Thread
| Returns | Description |
|---|---|
| E_INVALIDARG | The task is already running, so you cannot start it right now. |
| E_FAIL | There was a problem starting the thread. |
| S_OK | The thread was started. |
BOOL Running()
This method returns TRUE if the background task is currently running and FALSE if it is not running.
HRESULT Wait(DWORD waitMilliseconds)
This method waits until either the thread stops running or the number of milliseconds has elapsed.
HRESULT Terminate(DWORD exitCode)
This method kills the thread that is running (see Table 14 and Table 15). This process may take a short amount of time to finish after this method returns.
Table 14. HRESULT Terminate Exit Code
| Parameter | Description |
|---|---|
| exitCode | The exit code that will be sent to the Finished callback method, which will also be available from the GetExitCode method. |
Table 15. Termination Codes
| Returns | Description |
|---|---|
| E_FAIL | The call to terminate failed. |
| S_OK | The request to terminate the thread succeeded. |
HRESULT GetExitCode(LPDWORD pCode, HRESULT *pHresult)
Use this method to get the results of running the task on the background thread (see Table 16).
Table 16. Result Codes
| Parameter | Description |
|---|---|
| pCode | Pointer to a DWORD that will be set on return or nullptr if you do not need the return value. On exit, this parameter is set to STILL_ACTIVE if the thread is running, the code returned by the task's Execute method, or the value passed to the Terminate method if you called that method. |
| pHresult | Pointer to an HRESULT that will be set on return or nullptr if you do not need the HRESULT value. |
HRESULT Close(void)
This method releases the background thread. It returns E_INVALIDARG if the thread is currently running and S_OK otherwise.
ICheckBox Interface
__interface ICheckBox : IControl
{
    void Check(BOOL check);
    BOOL IsButtonChecked();
};
void Check(BOOL check)
Set the checked state of the check box. When the method is TRUE, the check box is selected; when the method is FALSE, the check box is cleared.
BOOL IsButtonChecked()
This method reports the current check state of a check box.
IComboBox Interface
__interface IComboBox : IControl
{
    HRESULT Bind([in] IBindableList *pList);
    HRESULT Select(int index);
    int Selected(void);
    void Add([in] LPCTSTR caption);
    HRESULT GetText([out, retval] LPBSTR pText);
    void Clear();
};
Overview
This interface is implemented by the CheckBoxWrapper component. You retrieve an instance of this component using the GetControlWrapper helper function with the type CONTROL_COMBO_BOX.
HRESULT Bind([in] IBindableList *pList)
Use this method when you have a data source that implements the IBindableList interface. The list box initializes the contents with the captions from this list.
HRESULT Select(int index)
Select the item in the combo box at the index.
int Selected(void)
This method returns the index of the selected item or -1 if nothing is selected.
void Add([in] LPCTSTR caption)
Manually add an item to the combo box.
HRESULT GetText([out, retval] LPBSTR pText)
Retrieve the string of the currently selected item in the combo box.
void Clear()
Remove all the items from the combo box.
IControl Interface
__interface IControl : IUnknown
{
    HRESULT SetEnable(BOOL enable);
    BOOL IsEnabled(void);
    HRESULT SetVisible(BOOL visible);
};
Overview
This interface is implemented by the ControlWrapper component. You retrieve an instance of this component using the GetControlWrapper helper function with the type CONTROL_GENERIC.
HRESULT SetEnable(BOOL enable)
Enable or disable the control.
BOOL IsEnabled(void)
Returns TRUE if the control is enabled, FALSE if it is not.
HRESULT SetVisible(BOOL visible)
Show or hide the control.
ICpuInfo Interface
__interface ICpuInfo : IUnknown
{
    BOOL Is64Bit(void);
};
Overview
You obtain this interface by creating a new ID_CpuInfo component. The single method reports whether the CPU is 32 or 64 bit. Note that if you have a 32-bit operating system on a 64-bit computer, this method returns TRUE, because it is only reporting the width of the CPU (not the operating system).
IDirectory Interface
__interface IDirectory : IUnknown
{
    BOOL FileExists(LPCWSTR name);
    BOOL FindFirst([in] LPCWSTR name);
    HRESULT FoundName([out, retval] LPBSTR name);
    DWORD FoundAttributes(void);
    BOOL FindNext(void);
    void FinishFind(void);
};
Overview
The Directory component, which you create using ID_Directory, provides a façade for working with directories in the file system.
BOOL FileExists(LPCWSTR name)
This method returns TRUE if a file with the name you provide exists.
BOOL FindFirst([in] LPCWSTR name)
This method finds a first match for the name you provide. It supports wildcard characters and returns both file and directory names. The method returns TRUE if a match was found, FALSE otherwise.
HRESULT FoundName([out, retval] LPBSTR name)
This method retrieves the name of the file found with a call to FindFirst or FindNext.
DWORD FoundAttributes(void)
This method returns the attribute for the most recent found file or directory. You can use code as follows to test whether it is a directory:
pDirectory->FoundAttributes() & FILE_ATTRIBUTE_DIRECTORY
BOOL FindNext(void)
Find the next. This method returns TRUE if another match was found, FALSE otherwise.
void FinishFind(void)
This method releases resources used for the Find operation.
IDomainJoinValidator Interface
__interface IDomainJoinValidator : IUnknown
{
    HRESULT Init(ILogger *pLogger, IWizardPageContainer *pContainer, IStaticText *pUsername, IStaticText *pPassword, IStaticText *pComputerName);
    HRESULT IsUsernameValid(LPCWSTR domainName);
    BOOL CanModifyComputerAdEntry(LPCWSTR domainName);
};
Overview
You obtain an instance of this interface using the ID_DomainJoinValidator value to the CreateInstance template function.
HRESULT Init(ILogger *pLogger, IWizardPageContainer *pContainer, IStaticText *pUsername, IStaticText *pPassword, IStaticText *pComputerName)
Initialize the instance, as shown in Table 17.
Table 17. HRESULT Init - Instance Initialization
| Parameter | Description |
|---|---|
| pLogger | The logger instance, which is available to your page via the page's Logger method |
| pContainer | Passes the results from your page's Container method |
| pUsername | The text box that contains the user name to be validated |
| pPassword | The text box that contains the password to be validated |
| PComputerName | The text box that contains the name of the computer that will eventually be joined to the domain |
HRESULT IsUsernameValid(LPCWSTR domainName)
This method uses the IADHelper->ValidLogon method to do the work. See that method for details.
BOOL CanModifyComputerAdEntry(LPCWSTR domainName)
Verify whether the user has rights to modify the computer entry. Most of the work is done by IADHelper->HasAccess. If this method returns FALSE, check the log file for details.
IDriveList Interface
__interface IDriveList : IUnknown
{
    HRESULT Init(IWmiRepository *pWmi);
    HRESULT SetWhereClause(LPCTSTR whereClause);
    HRESULT SetMinimumDriveSize(__int64 size);
    HRESULT Update(void);
    HRESULT AddProperty(ENUM_DISK_QUERY_SECTION section, LPCTSTR propName, LPCTSTR propNameReturned);

    size_t Count(void);
    HRESULT GetProperty(size_t index, LPCTSTR propName,  LPVARIANT value);
    HRESULT GetCaption(size_t index,  LPBSTR pCaption);
}
HRESULT Init(IWmiRepository *pWmi)
Call this method before you call any other components. You will need to create a new WmiRepository before you call this method.
HRESULT SetWhereClause(LPCTSTR whereClause)
This method allows you to add text that will appear as a "where" clause in the query. For example, the following line returns only USB drives:
pDrives->SetWhereClause(L"WHERE InterfaceType='USB'");
HRESULT SetMinimumDriveSize(__int64 size)
Set the minimize drive size, in bytes, for drives that will be returned from the query.
HRESULT Update(void)
Execute the query. The drive list available after calling this method is sorted by drive letter.
HRESULT AddProperty(ENUM_DISK_QUERY_SECTION section, LPCTSTR propName, LPCTSTR propNameReturned)
This method adds the names of additional properties that you want to make available in the query results. Call this method before calling Update. Table 18 shows three of the useful properties.
Table 18. HRESULT AddProperty: Useful Properties
| Section | Property | Description |
|---|---|---|
| DISKQUERY_LOGICALDISK | Size | The size, in bytes, represented as a string |
| DISKQUERY_DISKPARTITION | DiskIndex | The disk number as an integer, starting with 0 |
| DISKQUERY_LOGICALDISK | VolumeName | The volume label |
size_t Count(void)
The number of records the query returns. Call Update before you call this method.
HRESULT GetProperty(size_t index, LPCTSTR propName, LPVARIANT value)
This method retrieves the value of a property from the query results, as shown in Table 19.
Table 19. HRESULT GetProperty
| Parameter | Description |
|---|---|
| Index | Zero-based index to the result record |
| propName | Name of the property, such as "Size" |
| Value | On return, this parameter contains a variant value of the property |
HRESULT GetCaption(size_t index, LPBSTR pCaption)
This method retrieves the caption for a record which is the same as the Caption property.
IImageList Interface
__interface IImageList
{
    HRESULT CreateImageList(int width, int height, UINT flags);
    HImageList GetImageList(void);
    int AddImage(HInstance hInstance, int resourceId);
};
Overview
This interface is implemented by the ImageList component. You retrieve an instance of this component from the IListView interface.
HRESULT CreateImageList(int width, int height, UINT flags)
Create a new image list, which this component manages. Call this method only once.
HImageList GetImageList(void)
This method returns the handle for the image list in case you need to perform other operations on the image list.
int AddImage(HInstance hInstance, int resourceId)
Add a new image to the image list from a resource, as shown in Table 20.
Table 20. HRESULT IImageList Interface
| Parameter | Description |
|---|---|
| hInstance | Instance handle of the module that contains the bitmap resource |
| resourceId | ID of the resource to load into the image list |
IListView Interface
__interface IListView : IControl
{
    int AddItem([in] LPCTSTR text);
    int AddColumn(int width, [in] LPCTSTR text);
    HRESULT SetSubItem(int index, int column, [in] LPCTSTR text);
    int GetWidth(void);
    void SetExtendedStyle(DWORD style);
    int GetSelectedItem(void);
    HRESULT SelectItem(int index);
    BOOL IsItemChecked(int index);
    int GetItemCount(void);
    HRESULT CreateImageList(int width, int height, UINT flags);
    int AddImage(HINSTANCE hInstance, int resourceId);
    HRESULT SetImage(int index, int imageIndex);
    HRESULT Clear(void);
};
Overview
This interface is implemented by the ControlWrapper component. You retrieve an instance of this component using the GetControlWrapper helper function with the type CONTROL_LIST_VIEW.
int AddItem([in] LPCTSTR text)
Add a new row to the list box. The method returns the index of the item just added.
int AddColumn(int width, [in] LPCTSTR text)
Add a new column to the list view.
HRESULT SetSubItem(int index, int column, [in] LPCTSTR text)
Set the text in a column other than the first column of the list box, as shown in Table 21.
Table 21. HRESULT SetSubItem
| Parameter | Description |
|---|---|
| index | The index of the list item you want to modify |
| column | The index of the column you want to update; the first column is set with AddItem, columns two and following are set with this method |
| text | The string to show in the column |
int GetWidth(void)
This method returns the width of the entire text box.
void SetExtendedStyle(DWORD style)
This method allows you to set extended styles on the list box—for example:
m_pList->SetExtendedStyle(LVS_EX_FULLROWSELECT);
int GetSelectedItem(void)
This method returns the index of the list view item currently selected.
HRESULT SelectItem(int index)
Set the selected item in the list to this index.
BOOL IsItemChecked(int index)
This method returns TRUE if an item in the list is selected. This method requires that you call SetExtendedStyle to set the check box style.
int GetItemCount(void)
This method returns the number of items in the list view.
HRESULT CreateImageList(int width, int height, UINT flags)
Create a new image list, and attach it to the list view.
int AddImage(HINSTANCE hInstance, int resourceId)
Add an image to the list view's image list. You need to call CreateImageList, first.
HRESULT SetImage(int index, int imageIndex)
Set the image that will be shown on the left side for a specific list view item.
HRESULT Clear(void)
Remove all items from the list view.
IProgressBar Interface
__interface IProgressBar : IControl
{
    HRESULT SetPercentage(int position);
    int GetPercentage(void);
};
Overview
This interface is implemented by the ProgressBarWrapper component. You retrieve an instance of this component using the GetControlWrapper helper function with the type CONTROL_PROGRESS_BAR.
HRESULT SetPercentage(int position)
Set the position of the progress bar using a number between 0 and 100. By default, new Win32® progress bars have a maximum range of 100.
int GetPercentage(void)
This method returns the current position of the progress bar.
IRadioButton Interface
__interface IRadioButton : IControl
{
public:
    void SetGroup(int firstId, int lastId);
    void CheckRadio(int id);
    BOOL IsButtonChecked(int id);
    void EnableRadio(int id, BOOL enable);
};
Overview
This interface is implemented by the RadioButtonWrapper component. You retrieve an instance of this component using the GetControlWrapper helper function with the type CONTROL_RADIO_BUTTON.
void SetGroup(int firstId, int lastId)
Provide the wrapper with the range of radio buttons that should be treated as a group. Call this method before you call CheckRadio.
void CheckRadio(int id)
Set the specific radio button to be the single button in the group of radio buttons selected. Call SetGroup before calling this method.
BOOL IsButtonChecked(int id)
This method returns TRUE if the radio button is currently selected, FALSE otherwise.
void EnableRadio(int id, BOOL enable)
This method enables or disables a radio button.
IStaticText Interface
__interface IStaticText : IControl
{
    HRESULT SetText([in] LPCTSTR pText);
    HRESULT GetText([out, retval] LPBSTR pText);
};
Overview
This interface is implemented by the StaticTextWrapper component. You retrieve an instance of this component using the GetControlWrapper helper function with the type CONTROL_STATIC_TEXT.
HRESULT SetText([in] LPCTSTR pText)
Set the text for the control.
HRESULT GetText([out, retval] LPBSTR pText)
This method returns the current value of the text for the control.
ITask Interface
__interface IControl : IUnknown
{
    HRESULT Init(IStringProperties *pProperties, ISettingsProperties *pTaskSettings);
    HRESULT Execute(LPDWORD pReturnCode);
};
Implement this interface if you want your component to be available as a task in the preflight page or if you want to use the BackgroundTask component to perform work on a background thread.
Here are components that implement the ITask interface:
ID_ShellExecuteTask, L"Microsoft.Wizard.ShellExecuteTask"
ID_CopyFilesTask, L"Microsoft.Wizard.CopyFilesTask"
ID_ACPowerTask, L"Microsoft.OSDRefresh.ACPowerTask"
ID_WiredNetworkTask, L"Microsoft.SharedPages.WiredNetworkTask"
Init
HRESULT Init(IStringProperties *pProperties, ISettingsProperties *pTaskSettings)
If you are writing a task for the preflight page, call this method to initialize your task. The .config file contain XML that might look something like this:
<Task DisplayName="Check Windows Scripting Host" Type="Microsoft.Wizard.ShellExecuteTask">
  <Setter Property="filename">%windir%\system32\cscript.exe</Setter>
  <Setter Property="parameters">Preflight\OSDCheckWSH.vbs</Setter>
  <Setter Property="BitmapFilename">images\WinScriptHost.bmp</Setter>
  <ExitCodes>
    <ExitCode State="Success" Type="0" Value="0" Text="" />
    <ExitCode State="Error" Type="-1" Value="*" Text="Windows Scripting Host not installed." />
  </ExitCodes>
</Task>
The pProperties parameter provides access to the three setter values, whereas the pTaskSettings parameter provides access to the Task element and children. Most tasks only need to read data from the pProperties parameter.
Execute
HRESULT Execute(LPDWORD pReturnCode)
Here is where you write the code that performs the task. This method should return S_OK if there were no errors, and it can return another HRESULT if an error occurred while the task was running. Values other than S_OK that this method returns are matched up to <Error> elements in the <ExitCodes> section if you are using the preflight page.
The pReturnCode parameter must be updated with a number that reports the state of the task. These values are matched by the preflights page to <ExitCode> elements.
ITreeView Interface
__interface ITreeView : IControl
{
    void EnableCheckboxes(void);
    HRESULT CreateImageList(int width, int height, UINT flags);
    int AddImage(HINSTANCE hInstance, int resourceId);

    HTREEITEM AddItem(LPCTSTR text, HTREEITEM hParent = NULL);
    void SetImage(HTREEITEM item, int image, int expandImage);

    void Clear(void);
    BOOL SetFirstVisible(HTREEITEM item);
    BOOL SelectItem(HTREEITEM item);
    void CheckItem(HTREEITEM item, UINT checkState);
    HTREEITEM SelectedItem(void);
    int SetItemHeight(SHORT height);
    HRESULT EnableItem(HTREEITEM item, BOOL enable);
    void Expand(HTREEITEM hItem, BOOL expand);

    HTREEITEM GetChild(HTREEITEM hParent);
    HTREEITEM GetParent(HTREEITEM hNode);
    HTREEITEM GetNextItem(HTREEITEM hPrevious);

    UINT IsChecked(HTREEITEM item);
    BOOL IsEnabled(HTREEITEM item);

    INT_PTR CommonControlEvent(WORD controlId, void* pInfo, BOOL *pCancel);
    HRESULT SetEventHandler(ITreeViewEvent *pEventHandler);

    void SetSelectedBackColor(COLORREF color);
};
Overview
This interface is implemented by the TreeViewWrapper component. You retrieve an instance of this component using the GetControlWrapper helper function with the type CONTROL_TREE_VIEW.
void EnableCheckboxes(void)
This method turns on check boxes in the tree view control by setting the TVS_CHECKBOXES style.
HRESULT CreateImageList(int width, int height, UINT flags)
Add a new image list to the tree view control. The flags parameter is passed in the call to the ImageList_Create Win32 function.
int AddImage(HINSTANCE hInstance, int resourceId)
Add an image to the image list from a resource (resourceId) in the module with the instance handle hInstance.
HTREEITEM AddItem(LPCTSTR text, HTREEITEM hParent = NULL)
Add a node to the tree view. The new node will be added at the top level if hParent is NULL. Otherwise, provide the handle to the parent item where you want the new item added. This method returns the handle to the new item.
void SetImage(HTREEITEM item, int image, int expandImage)
Set the image to use for a tree view item. You can set both the normal and the expanded image.
void Clear(void)
Remove all items from the tree view.
BOOL SetFirstVisible(HTREEITEM item)
Ensure that the tree view item is visible. The tree view will scroll if required to make this item visible.
BOOL SelectItem(HTREEITEM item)
Set the currently selected item to the item that you provide. You can call SetFirstVisible after this to ensure that the newly selected item is visible.
void CheckItem(HTREEITEM item, UINT checkState)
The method basically sets the image that will be shown for the check box in the tree view. These images are in a separate ImageList control that the tree view manages. By default, this image list has three images in it, shown in Table 22.
Table 22.void CheckItem Image List Default
| checkState | Description |
|---|---|
| 0 | Blank |
| 1 | Cleared |
| 2 | Selected |
HTREEITEM SelectedItem(void)
This method returns the handle of the tree view item currently selected.
int SetItemHeight(SHORT height)
This method sets the height of all items in the tree view control in pixels. It returns the previous height in pixels.
HRESULT EnableItem(HTREEITEM item, BOOL enable)
This method enables or disables a single item in the tree. Disabling an item with children will not disable the children.
void Expand(HTREEITEM hItem, BOOL expand)
This method expands or collapses a node in the tree.
HTREEITEM GetChild(HTREEITEM hParent)
This method returns the first child of a tree view item or NULL if there are no children.
HTREEITEM GetParent(HTREEITEM hNode)
This method returns the handle of the parent for a node in the tree view or NULL if the node is at the top level.
HTREEITEM GetNextItem(HTREEITEM hPrevious)
You can call this method with a handle that GetChild returns to iterate through all the children of a node. This method returns the next sibling in the tree that shares the same parent.
UINT IsChecked(HTREEITEM item)
This method returns 0 if the tree view node is not selected and 1 if it is.
BOOL IsEnabled(HTREEITEM item)
This method returns TRUE if the tree view node is enabled, FALSE otherwise.
INT_PTR CommonControlEvent(WORD controlId, void* pInfo, BOOL *pCancel)
This method is for internal use only.
HRESULT SetEventHandler(ITreeViewEvent *pEventHandler)
Call this method if you want to receive notification when the selected item changes or the user changes the check state of a tree view item. You must implement the ITreeViewEvent in your component to receive these callbacks.
void SetSelectedBackColor(COLORREF color)
Set the background color used for the selected item.
IWmiIteration Interface
__interface IWmiIterator : IUnknown
{
    HRESULT Next(void);
    HRESULT GetProperty(LPCTSTR propertyName, [out] LPVARIANT pValue);
};
Overview
You typically use this interface, along with IWmiRepository, when working with WMI calls. The IWmiIteration interface allows you to iterate through the values that a query returns.
HRESULT Next(void)
Move to the next item in the query results, as shown in Table 23.
Table 23. HRESULT Next(void) Query Returns
| HRRESULT | Description |
|---|---|
| S_OK | Moved to the next result; you can use GetProperty to retrieve properties of that result. |
| S_FALSE | There are no more items in the list. |
| E_NOT_SET | There are no query results |
HRESULT GetProperty(LPCTSTR propertyName, [out] LPVARIANT pValue)
This method retrieves the value of a property from the current result record, as shown in Table 24 and Table 25.
Table 24. HRESULT GetProperty
| Parameter | Description |
|---|---|
| propertyName | Name of the property you want to retrieve |
| pValue | Points to a VARIANT structure that on return contains the property value |
Table 25. HRESULT GetProperty Result
| HRESULT | Description |
|---|---|
| S_OK | Property value was retrieved. |
| WBEM_E_NOT_FOUND | There is no property with the name. |
| E_NOT_VALID_STATE | There is no current record. |
Note
The GetProperty method can return other WMI error codes other than those listed in Table 25. The values listed are the common results that are returned.
IWmiRepository Interface
__interface IWmiRepository : IUnknown
{
    HRESULT SetNamespace(LPCWSTR namespaceName);
    HRESULT ExecQuery(LPCWSTR query, [out] IWmiIterator **ppIterator);
};
Overview
This interface is implemented by the WmiRepository component (ID_WmiRepository).
HRESULT SetNamespace(LPCWSTR namespaceName)
This method sets the WMI namespace that will be used for the query. Call this method before you call ExecQuery. If you do not call this method, the namespace will be root\cimv2. This method always returns S_OK.
HRESULT ExecQuery(LPCWSTR query, [out] IWmiIterator **ppIterator)
Execute a query against the WMI namespace set with a call to SetNamespace, as shown in Table 26 and Table 27.
Table 26. HRESULT ExecQuery
| Parameter | Description |
|---|---|
| Query | The string for the WMI query you want to execute |
| ppIterator | Pass a pointer to an interface pointer, which on return will be filled in with an interface, giving you access to the query results |
Table 27. HRESULT Query Result
| HRESULT | Description |
|---|---|
| S_OK | Query succeeded |
| Other | If the query did not succeed, returns a WMI HRESULT |
IFormController Interface
__interface IFormController : IUnknown
{
    Init(IWizardPageView *pView, IWizardPageContainer *pContainer);
    SetPageInfo(ISettingsProperties *pPageInfo);

    Validate(void);

    AddToGroup(int groupControlId, int controlId);
    UpdateCheckGroup(int groupControlId);
    AddValidator(int controlId, IValidator *pValidator, IControl *pCOntrol = 0);

    AddValidator(int controlId, LPCWSTR validatorId, LPCWSTR message, IValidator **ppValidator = nullptr);
    DisableValidation(int controlId, BOOL disable);

    AddField(LPCWSTR fieldName, int controlId, BOOL suppressLog, DialogControlTypes type);
    AddRadioGroup(LPCWSTR groupName, int radioControlId);
    EnableRadioGroup(LPCWSTR groupName, BOOL enable);
    InitFields(IFieldCallback *pFieldCallback = nullptr);
    SaveFields(IFieldCallback *pFieldCallback = nullptr);
    BOOL IsFieldDisabled(int controlId);

    InitSection(LPCWSTR key, LPCWSTR sectionCaption);
    AddSummaryItem(LPCWSTR first, LPCWSTR second);
    SuppressLogValue(LPCWSTR tsVariableName);
    SaveText(int controlId, LPCWSTR tsVariableName, LPCWSTR summaryCaption);
    LoadText(int controlId, LPCWSTR tsVariableName);

    void ControlEvent(WORD eventId, WORD controlId);
    BOOL IsValid(void);
 };
Overview
Each page in the UDI Wizard has its own form controller that implements this interface. You use this controller to connect the field data in the .config XML file to the controls on your page. The form controller then handles many of the details for you.
Setting up the Form
Generally, set up the form controller in your page's OnWindowCreated method. Doing so usually involves calling the methods shown in Table 28.
Table 28. OnWindowCreated Method
| Method | Description |
|---|---|
| Init | Initializes the form controller |
| AddField | Provides a connection between a field in the .config XML file that is a string name and a control in your page's dialog box that is an ID |
| AddRadioGroup | Used to connect a radio button to both a group and a control in your dialog box |
| AddToGroup | Allows you "child" controls that are enabled or disabled along with their parent or based on which radio button is selected |
| InitFields | Call after you have called all the Add methods to set up the form |
| Validate | Performs the initial validation |
Processing Form Events
Add the following call to your OnControlEvent method:
Form()->ControlEvent(eventId, controlId);
This call passes events on to the form controller so it can process form-related events.
Save Form Data
In the OnNextSelected method, call the form methods shown in Table 29.
Table 29. OnNextSelected Method
| Method | Description |
|---|---|
| InitSection | Provides the name of the section that will be shown on the Summary page for this page |
| SaveFields | Save field values to task sequence variables and to the Summary page |
Init
HRESULT Init(IWizardPageView *pView, IWizardPageContainer *pContainer)
You usually call this method near the start of your page's OnWindowCreated method. The command should look something like this:
Form()->Init(View(), Container());
SetPageInfo
HRESULT SetPageInfo(ISettingsProperties *pPageInfo)
This method is called internally, and you should not call it yourself. It provides the page's XML to the form controller.
Validate
HRESULT Validate(void)
This method executes all the validators attached to controls. If a validator does not pass, the form controller displays a warning message and disables the Next button, then stops processing validators. Typically, you only need to call this method at the end of your OnWindowCreated method; it always returns S_OK.
AddToGroup
AddToGroup(int groupControlId, int controlId)
This method adds a control as a "child" of a check box or radio button, as shown in Table 30. All such child controls will be disabled when the parent control is not selected. The method always returns S_OK.
Table 30. AddToGroup
| Parameter | Description |
|---|---|
| groupControlId | The ID of the check box or radio button that will control the enable state of the child control |
| Controlld | The ID of the control that you want to add as a child |
UpdateCheckGroup
HRESULT UpdateCheckGroup(int groupControlId)
This method updates the enable or disable status of a group's child controls based on the status of the parent control. Generally, you do not need to call this method yourself, because the form controller calls it for you.
AddValidator
HRESULT AddValidator(int controlId, IValidator *pValidator, IControl *pControl = 0)
Call this method only if you have a validator you want to create in code instead of with the XML. This method always returns S_OK.
AddValidator
HRESULT AddValidator(int controlId, LPCWSTR validatorId, LPCWSTR message, IValidator **ppValidator = nullptr)
Call this method only if you have a validator you want to create in code instead of with the XML.
DisableValidation
HRESULT DisableValidation(int controlId, BOOL disable)
Call this method to either explicitly disable validator for a control or restore normal validation, as shown in Table 31. This method is useful, for example, when you have enable/disable rules for controls that are not covered with form validation and you need to disable validation for a control. In other words, you would not normally call this method. This method always returns S_OK.
Table 31. HRESULT DisableValidation
| Parameter | Description |
|---|---|
| controlId | The control for which you want to enable or disable validation |
| Disable | Set to TRUE to disable validation and to FALSE to restore normal validation |
AddField
HRESULT AddField(LPCWSTR fieldName, int controlId, BOOL suppressLog, DialogControlTypes type)
Add a control mapping between the name in a Field element of the .config XML file and the control ID in your page's dialog box, as shown in Table 32. You must call this method before the call to InitFields, because InitFields uses this information. This method always returns S_OK.
Table 32. HRESULT AddField
| Parameter | Description |
|---|---|
| Fieldname | Name of the field as it appears in your page's XML |
| controlId | The ID of the control in your page's dialog box template |
| suppressLog | Set to TRUE if you do not want the values from this field written to the log file; always set this parameter to TRUE for password or PIN fields |
| Type | The type of control, which is one of the following: - CONTROL_STATIC_TEXT - CONTROL_COMBO_BOX - CONTROL_LIST_VIEW - CONTROL_PROGRESS_BAR - CONTROL_GENERIC - CONTROL_RADIO_BUTTON - CONTROL_CHECK_BOX - CONTROL_TREE_VIEW |
AddRadioGroup
HRESULT AddRadioGroup(LPCWSTR groupName, int radioControlId)
This method adds a control to a named radio button group, as shown in Table 33. You must call this before the InitFields method, because that method uses attributes on the RadioGroup element to control settings for all the radio button controls in the group. Radio groups can be locked, for example, so that all the radio buttons are disabled, but child controls are enabled or disabled based only on which radio button is selected. This method always returns S_OK.
Table 33. HRESULT AddRadioGroup
| Parameter | Description |
|---|---|
| groupName | A string that defines a group of radio buttons on this page |
| radioControlId | The ID of a single radio button to add to this group |
EnableRadioGroup
HRESULT EnableRadioGroup(LPCWSTR groupName, BOOL enable)
This method allows you to enable or disable an entire radio button group. Disabling a radio group disables all the radio button controls in the group as well as any children of those radio buttons that have been added with AddToGroup. See Table 34 and Table 35.
Table 34. EnableRadioGroup
| Parameter | Description |
|---|---|
| groupName | Name of a radio button group that you defined already with a call to AddRadioGroup |
| Enable | Set to TRUE to enable the radio button group and FALSE to disable the group |
Table 35. HRESULT EnableRadioGroup
| HRESULT | Description |
|---|---|
| S_OK | Group enabled or disabled |
| E_INVALIDARG | There is no radio button group with the name you provided |
InitFields
HRESULT InitFields(IFieldCallback *pFieldCallback = nullptr)
Before calling this method, call AddField for each field that the XML can control. This method always returns S_OK.
The pFieldCallback parameter is optional. If you provide it, the form controller calls SetFieldDefault for controls that are not either CONTROL_STATIC_TEXT or CONTROL_CHECK_BOX. This behavior allows you to retrieve a default value from the XML and set it in the control yourself.
SaveFields
HRESULT SaveFields(IFieldCallback *pFieldCallback = nullptr)
This method saves field values to task sequence variables and to the summary data that will be shown on the Summary page. Providing a pointer in pFieldCallback allows you to handle saving values for controls that do not support CONTROL_STATIC_TEXT.
IsFieldDisabled
BOOL IsFieldDisabled(int controlId)
This method allows you to determine whether a field has been disabled in the XML.
InitSection
HRESULT InitSection(LPCWSTR key, LPCWSTR sectionCaption)
This method initializes the summary data that will be shown on the Summary page, as shown in Table 36. Call this method in your OnNextSelected method before calling SaveFields. This method always returns S_OK.
Table 36. HRESULT InitSection
| Parameter | Description |
|---|---|
| Key | This parameter should be unique to your page. It is used to ensure that each page has its own summary information. |
| sectionCaption | The header that will be shown on the Summary page for this page's summary information. Typically, you use DisplayName() as the value for this parameter. |
AddSummaryItem
HRESULT AddSummaryItem(LPCWSTR first, LPCWSTR second)
This method allows you to add summary items to the Summary page above and beyond those items set with the XML. See Table 37.
Table 37. HRESULT AddSummaryItem
| Parameter | Description |
|---|---|
| First | The caption for the summary item, which is shown on the left side |
| Second | The value that will be shown on the right side |
SuppressLogValue
HRESULT SuppressLogValue(LPCWSTR tsVariableName)
Call this method for task-sequence variables for which you do not want the values to be written to the log file. Call this method for task sequence variables that store passwords, PINs, or other sensitive values a user might enter.
SaveText
HRESULT SaveText(int controlId, LPCWSTR tsVariableName, LPCWSTR summaryCaption)
This method saves the value of a text control to both a task sequence variable and the summary section. Typically, you will not need to call this method yourself, because the form controller does this for all fields. See Table 38.
Table 38. HRESULT SaveText
| Parameter | Description |
|---|---|
| controlId | The ID of the text box that contains the value you want to save (or any other control that can return text) |
| tsVariableName | Name of the task sequence variable that you want to modify |
| summaryCaption | The caption on the Summary page for this value |
LoadText
HRESULT LoadText(int controlId, LPCWSTR tsVariableName)
This method reads the value of a task sequence variable and sets the text box to this value.
ControlEvent
void ControlEvent(WORD eventId, WORD controlId)
Call this method on your OnControlEvent method to ensure that the form controller can process control events, which it needs to do to function correctly. The values you pass to this method are the same values passed to the OnControlEvent method.
IsValid
BOOL IsValid(void)
This method returns the status of the most recent validation of the form. If any of the control validators reported an error, this method returns FALSE. In other words, it returns TRUE only if all the controls on the page are valid.
IValidator Interface
__interface IValidator : IUnknown
{
    HRESULT Init(IControl *pControl, LPCTSTR message);
    HRESULT Init(IControl *pControl, IWizardPageContainer *pContainer, IStringProperties *pProperties);
    BOOL, IsValid(LPBSTR pMessage);
    HRESULT SetProperty(int propertyId, LPVARIANT pValue);
    HRESULT SetProperty(int propertyId, IUnknown *pUnknown);
    HRESULT SetProperty)(int propertyId, LPCTSTR pValue);
};
Overview
Validators are components that can validate a single control on your page. The easiest way to implement a validator is to make it a subclass of the BaseValidator class, which is defined in the BaseValidator.h header file.
HRESULT Init(IControl *pControl, LPCTSTR message)
If you create a validator in code, you can call this method to initialize the validator. See Table 39.
Table 39. HRESULT Init
| Parameter | Description |
|---|---|
| pControl | The control that your validator must validate |
| Message | The message to display on the page if the control is not valid |
HRESULT Init(IControl *pControl, IWizardPageContainer *pContainer, IStringProperties *pProperties)
The form controller calls this method to initialize validators that it creates based on the page's XML. See Table 40.
Table 40. HRESULT Init Method
| Parameter | Description |
|---|---|
| pControl | The control that your validator must validate |
| pContainer | In case your validator needs access to the logger or needs to create other components |
| pProperties | Provides access to the properties (setter elements) for your validator |
BOOL, IsValid(LPBSTR pMessage)
This method returns TRUE if the control is valid or FALSE if the control is invalid. On return, pMessage should be filled in with a new BSTR that contains the message to display when the control is not valid.
HRESULT SetProperty(int propertyId, LPVARIANT pValue)
You can implement this method if you need extra values that are not provided in the XML.
HRESULT SetProperty(int propertyId, IUnknown *pUnknown)
You can implement this method if you need extra values that are not provided in the XML.
HRESULT SetProperty)(int propertyId, LPCTSTR pValue)
You can implement this method if you need extra values that are not provided in the XML.
IRegEx Interface
__interface IRegEx : IUnknown
{
    BOOL MatchesRegex(LPCTSTR input, LPCTSTR regex);
    HRESULT GetMatch(size_t index, LPBSTR pValue);
};
This method is implemented by the ID_Regex component (IRegex.h) and provides support for regular expression processing.
BOOL MatchesRegex(LPCTSTR input, LPCTSTR regex)
This method runs the regular expression against the input text. It uses the C++ standard library's regex_match function to do the actual work. The method returns TRUE if there were matches, FALSE otherwise.
HRESULT GetMatch(size_t index, LPBSTR pValue)
This method allows you to retrieve the matches from the most recent MatchesRegex call. Note that there is no error processing in this method, and it either returns S_OK or throws an exception.
ISummaryInfo Interface
__interface ISummaryInfo : IUnknown
{
    size_t Count(void);
    HRESULT Clear(void);
    HRESULT AddInfo(LPCTSTR pFirst, LPCTSTR pSecond);
    HRESULT GetInfo(size_t index, LPBSTR pFirst, LPBSTR pSecond);
    HRESULT GetCaption(LPBSTR pCaption);
    HRESULT SetCaption(LPCTSTR caption);
};
You should not need to use this interface directly. Instead, use IFormController.
ISummaryBag
__interface ISummaryBag : IUnknown
{
    size_t Count(void);
    HRESULT GetInfoByIndex(size_t index, [out] ISummaryInfo **ppSummary);
    HRESULT GetInfoByKey(LPCTSTR key, [out] ISummaryInfo **ppSummary);
};
You should not need to use this interface directly. Instead, use IFormController.
ITSVariableBag Interface
__interface ITSVariableBag : IUnknown
{
    void GetValue([in] LPCTSTR variableName, [out] LPBSTR pValue);
    void SetValue([in] LPCTSTR variableName, [in] LPCTSTR pValue);
    void Clear(void);
    HRESULT Remove([in] LPCTSTR variableName);
    HRESULT SuppressLogValue([in] LPCTSTR variableName);
    void Save(void);
};
This interface provides access to task sequence variables. You can access this interface using your page's TSVariables() method.
void GetValue([in] LPCTSTR variableName, [out] LPBSTR pValue)
This method reads the value of a task sequence variable.
Note
Values are cached after the first read.
void SetValue([in] LPCTSTR variableName, [in] LPCTSTR pValue)
This method sets the value of a task sequence variable. This value is saved in memory. Task sequence values are written once you select Finish in the UDI Wizard.
void Clear(void)
This method removes all task sequence values that have been saved in memory.
HRESULT Remove([in] LPCTSTR variableName)
This method removes a specific task sequence value from memory. The next time you call GetValue with the same task sequence name, the method attempts to retrieve it from the task sequence.
HRESULT SuppressLogValue([in] LPCTSTR variableName)
Whenever task sequence variables are written, such as when you select Finish in the UDI Wizard, the names and values are written to the log file. Call this method to suppress logging of sensitive values, such as passwords or PINs, for a specific task sequence variable.
void Save(void)
This method saves all task sequence values that have been set with calls to SetValue.
ITSVariableRepository Interface
__interface ITSVariableRepository : IUnknown
{
    void GetValue([in] LPCTSTR variableName, BOOL logValue, [out] LPBSTR pValue);
    void SetValue([in] LPCTSTR variableName, BOOL logValue, [in] LPCTSTR value);
};
This interface is for internal use by TSVariableBag for reading and writing task sequence variables.
IWizardFinish Interface
__interface IWizardFinish : IUnknown
{
    HRESULT Canceled(void);
    HRESULT Finished(void);
};
This interface is useful in advanced scenarios where you want to perform additional processing when you select Finish or Cancel in the UDI Wizard. The UDI Wizard contains a Finish task that saves task sequence variables when you select Finish. If you cancel the wizard, the task only sets the OSDSetupWizCancelled task sequence variable to TRUE and does not save changes to any other task sequence variables.
If you create your own finish component, you need to register it with code like this:
Register<MyFinishTaskFactory>(ID_MyFinishTask, pRegistry);

PWizardFinish pFinish;
CreateInstance(pRegistry, ID_MyFinishTask, &pFinish);

PWizardFinishService pService;
GetService<IWizardFinishService>(pRegistry, &pService);

pService->Register(pFinish);
IBindableList Interface
__interface IBindableList : IUnknown
{
    size_t Count(void);
    HRESULT GetCaption(size_t index, LPBSTR pCaption);
};
Implement this interface if you have a data source component that you want to bind to a combo box by calling its Bind method.
size_t Count(void)
This method returns the number of items in the list.
HRESULT GetCaption(size_t index, LPBSTR pCaption)
This method returns the caption of the item at a specific index.
IDataNodes Interface
__interface IDataNodes : IUnknown
{
    size_t Count();
    HRESULT SetCaptionProperty(LPCTSTR captionProperty);
    HRESULT GetProperty(size_t index, LPCTSTR propertyName, [out] LPBSTR propertyValue);
    HRESULT GetNode(size_t index, [out] ISettingsProperties **ppNode);
};
This interface provides access to hierarchical data that can be saved in a page. You obtain this interface via methods on the ISettingsProperties interface, which is available to your page through the Settings method.
Data in a page's XML can look something like this
      <Data Name="Network">
        <DataItem>
          <Setter Property="DisplayName">Public</Setter>
          <Setter Property="Share">\\servername\Share</Setter>
        </DataItem>
        <DataItem>
          <Setter Property="DisplayName">Dev Team</Setter>
          <Setter Property="Share">\\servername\DevShare</Setter>
        </DataItem>
      </Data>
Calling Settings()->GetDataNode(L"Network", &pData) gives you an IDataNodes instance with two data items (each of which in turn has two properties).
size_t Count()
This method returns the number of DataItem elements.
HRESULT SetCaptionProperty(LPCTSTR captionProperty)
The component that supports this interface also supports IBindableList, which makes it easy to populate a combo box with data from the page's XML. This method controls which property (setter) in each DataItem element will be used for this binding. For example, you could call this method with DisplayName, and it would use that setter property for data binding. The combo box would then contain Public and Dev Team as items.
HRESULT GetProperty(size_t index, LPCTSTR propertyName, [out] LPBSTR propertyValue)
This method gets a property from one of the DataItem elements. See Table 41 and Table 42.
Table 41. DataItem GetProperty
| Parameter | Description |
|---|---|
| Index | The index value (starting with 0) of the DataItem for which you want to retrieve a property value |
| propertyName | Name of the setter property for which you want to retrieve a value |
| propertyValue | On return, contains the string value of a property |
Table 42. HRESULT GetProperty
| HRESULT | Description |
|---|---|
| S_OK | The property was retrieved. |
| E_INVALIDARG | The index is past the end of the array. |
HRESULT GetNode(size_t index, [out] ISettingsProperties **ppNode)
This method is similar to GetProperty, but instead of returning one value from a DataItem, it returns the entire DataItem wrapped in an ISettingsProperties interface. See Table 43 and Table 44.
Table 43. HRESULT GetNode
| Parameter | Description |
|---|---|
| Index | The index value (starting with 0) of the DataItem for which you want to retrieve a property value |
| ppNode | On exit, the ISettingsProperties interface that wraps the DataItem node |
Table 44. HRESULT GetNode Results
| HRESULT | Description |
|---|---|
| S_OK | The node was retrieved. |
| E_INVALIDARG | The index is past the end of the array. |
IFactoryRegistry Interface
__interface IFactoryRegistry : IUnknown
{
    void Register(LPCTSTR type,  IClassFactory *pFactory);
    HRESULT LoadAndRegister(LPCTSTR dllName, ILogger *pLogger);
    BOOL Contains(LPCTSTR type);
    HRESULT GetFactory(LPCTSTR type,  IClassFactory **ppFactory);
    HRESULT CreateInstance(LPCTSTR type,  IUnknown **ppInstance);
    HRESULT SetContainer(IWizardPageContainer *pContainer);
    HRESULT RegisterService(REFGUID iid, IUnknown *pService);
    HRESULT GetService(REFGUID iid,  IUnknown **ppService);
};
Overview
When you create a new custom page, at a minimum you need to create a page factory—a class that implements IClassFactory. (You can use ClassFactoryImpl as a base class for your factory.)
void Register(LPCTSTR type, IClassFactory *pFactory)
This method registers a class factory with the registry. See Table 45.
Table 45. IClassFactory void Register
| Parameter | Description |
|---|---|
| Type | A string that identifies the factory you are registering; generally, this parameter should have your company name in the string to ensure that it is unique |
| pFactory | A pointer to your class factory instance |
HRESULT LoadAndRegister(LPCTSTR dllName, ILogger *pLogger)
This method is for internal use only.
BOOL Contains(LPCTSTR type)
This method is generally for internal use. It checks to see whether a class factory has been registered for a type.
HRESULT GetFactory(LPCTSTR type, IClassFactory **ppFactory)
This method allows you to retrieve the class factory. Typically, you would call CreateInstance. However, if you are going to create a large number of the same component, it is more efficient to retrieve the factory, and then ask it to create the instances for you.
HRESULT CreateInstance(LPCTSTR type, IUnknown **ppInstance)
This method creates a new instance of a component, given its type. Use the CreateInstance template method instead, which allows type-safe object creation.
HRESULT SetContainer(IWizardPageContainer *pContainer)
This method is for internal use only.
HRESULT RegisterService(REFGUID iid, IUnknown *pService)
Services are single instances of a component that can be used in multiple places. You can use this method to register a service on one page, and then retrieve that same instance from another page.
HRESULT GetService(REFGUID iid, IUnknown **ppService)
This method retrieves a service that was previously registered with a call to RegisterService.
HRESULT SetLanguage(LANGID languageId)
This method sets the language of the UDI Wizard to the language identifier you provided in the languageId parameter.
LANGID GetLanguage()
This method returns the value of the language identifier you provided with the /locale command-line parameter for the UDI Wizard. The method returns one of the following values:
Value of the language identifier provided with the /locale command-line parameter
0, if you did not provide the /locale command-line parameter
ILogger Interface
__interface ILogger : IUnknown
{
    HRESULT Init(LPCWSTR logFilename);
    HRESULT MoveLog(LPCWSTR logFilename);
    HRESULT LogBase(EMessageType messageType, LPCTSTR component, SYSTEMTIME eventTime, LPCTSTR message);
    HRESULT Log(EMessageType messageType, LPCTSTR component, LPCTSTR message);
    HRESULT Error(HRESULT error, LPCTSTR component, LPCTSTR message);
    HRESULT Error2(HRESULT error, LPCTSTR component, LPCTSTR message, LPCTSTR message2);
    HRESULT Normal(LPCTSTR component, LPCTSTR message);
    HRESULT Normal2(LPCTSTR component, LPCTSTR message, LPCTSTR message2);
    HRESULT Verbose(LPCTSTR component, LPCTSTR message);
    HRESULT Verbose2(LPCTSTR component, LPCTSTR message, LPCTSTR message2);
    HRESULT Debug(LPCWSTR component, LPCWSTR message);
    HRESULT EnableDebug(BOOL debug);
    HRESULT Close(void);
    HRESULT GetLogFilename(LPBSTR pFilename);
};
Overview
The UDI Wizard logs information to a log file, which helps troubleshoot issues found in the field. It is a good idea for your pages to log information. You can obtain a pointer to this interface from within your page using the page's Logger() method. Lines in the log file contain a "level" number that represents error, normal, verbose, or debug messages.
Note
Debug messages are not saved to the log file unless debug support is turned on. You can turn on debug support by adding the following line to the Style element in the .config file:
<Setter Property="debug">true</Setter>
Init
HRESULT Init(LPCWSTR logFilename)
This method is for internal use only.
MoveLog
HRESULT MoveLog(LPCWSTR logFilename)
This method is for internal use only.
LogBase
HRESULT LogBase(EMessageType messageType, LPCTSTR component, SYSTEMTIME eventTime, LPCTSTR message)
This method is for internal use only.
Log
HRESULT Log(EMessageType messageType, LPCTSTR component, LPCTSTR message)
This method is for internal use only.
Error
HRESULT Error(HRESULT error, LPCTSTR component, LPCTSTR message)
Call this method to log information about an error. See Table 46.
Table 46. HRESULT Error
| Parameter | Description |
|---|---|
| Error | The error code returned by a call (This code will be displayed in the log entry as a number.) |
| Component | A string that identifies the source of the error, which is generally your page or the component that you have written |
| Message | The message that explains what caused the error |
Error2
HRESULT Error2(HRESULT error, LPCTSTR component, LPCTSTR message, LPCTSTR message2)
This method is like the Error method but allows you to provide a two-part message. The final message will have "message," and then "message2" in the output file. This is simply a convenience method.
Normal
HRESULT Normal(LPCTSTR component, LPCTSTR message)
This method logs a normal message. See the description of the Error method for parameters.
Normal2
HRESULT Normal2(LPCTSTR component, LPCTSTR message, LPCTSTR message2)
This method logs a normal message. See the description of the Error2 method for parameters.
Verbose
HRESULT Verbose(LPCTSTR component, LPCTSTR message)
This method logs a verbose message. See the description of the Error method for parameters.
Verbose2
HRESULT Verbose2(LPCTSTR component, LPCTSTR message, LPCTSTR message2)
This method logs a verbose message. See the description of the Error2 method for parameters.
Debug
HRESULT Debug(LPCWSTR component, LPCWSTR message)
This method logs a debug message. See the description of the Error method for parameters. Debug messages are not saved to the file unless enabled. See the Overview section for details.
EnableDebug
HRESULT EnableDebug(BOOL debug)
This method is for internal use only.
Close
HRESULT Close(void)
This method is for internal use only.
GetLogFilename
HRESULT GetLogFilename(LPBSTR pFilename)
This method retrieves the name of the log file.
IOrientation Interface
__interface IOrientation : IUnknown
{
    void SetController(IWizardDialogController *pController);
    int AddPage(LPCTSTR name);
    void SelectPage(int index);
};
This interface is for internal use only.
ISettings Interface
__interface ISettings : IUnknown
{
    int NumDlls();
    int NumPages();

    HRESULT SetStage(LPCWSTR stageName);
    HRESULT GetDllName(long index, __out LPBSTR pDllName);
    HRESULT GetPageInfo(long index, __out ISettingsProperties **ppPageInfo);
    HRESULT GetStyle(__out ISettingsProperties **ppStyleInfo);
};
This interface is for internal use only.
ISettingsProperties Interface
__interface ISettingsProperties : IUnknown
{
    HRESULT GetAttribute(LPCTSTR attributeName, __out LPBSTR attributeValue);
    IStringProperties * Properties();
    HRESULT SelectNodes(LPCTSTR xPath, __out IXMLDOMNodeList **ppList);
    HRESULT SelectSingleNode(LPCTSTR xPath, __out IXMLDOMNode **ppNode);
    HRESULT GetDataNode(LPCTSTR name, __out ISettingsProperties **ppNode);
    HRESULT GetDataNodes(__out IDataNodes **ppNodes);
    HRESULT GetChildDataNodes(LPCTSTR childeName, __out IDataNodes **ppNodes);
};
Overview
This interface provides access to page data. To get to the top level of page data, use the page's Settings() method.
HRESULT GetAttribute(LPCTSTR attributeName, LPBSTR attributeValue)
This method allows you to retrieve the values of attributes on the main node, which is the Page node when you are using the Settings() method of the page.
IStringProperties * Properties()
This method provides access to the setter property values under the main node. For a page, these are the top-level properties.
HRESULT SelectNodes(LPCTSTR xPath, IXMLDOMNodeList **ppList)
Call this method if you want to directly get a list of XML nodes using an XPath expression. It is better to use one of the other methods if you can. Use this method only if you cannot get to nodes any other way.
HRESULT SelectSingleNode(LPCTSTR xPath, IXMLDOMNode **ppNode)
Call this method if you want to directly get a single XML node using an XPath expression. It is better to use one of the other methods if you can. Use this method only if you can't get to a node any other way.
HRESULT GetDataNode(LPCTSTR name, ISettingsProperties **ppNode)
Retrieve a Data element based on that element's Name attribute.
HRESULT GetDataNodes(IDataNodes **ppNodes)
This method retrieves a list of DataItem elements under the current node. From the page level, call GetDataNode to retrieve an ISettingsProperty interface for the data. Then, on that instance, call GetDataNodes to retrieve the list of records. For example, given this XML:
    <Page ...>
      <Data Name="Network">
        <DataItem>
          <Setter Property="DisplayName">Public</Setter>
          <Setter Property="Share">\\servername\Share</Setter>
        </DataItem>
        <DataItem>
          <Setter Property="DisplayName">Dev Team</Setter>
          <Setter Property="Share">\\servername\DevShare</Setter>
        </DataItem>
      </Data>
PSettingsProperties pData;
Settings()->GetDataNode(L"Network", &pData);
PDataNodes pNodes;
pData->GetDataNodes(&pNodes);
HRESULT GetChildDataNodes(LPCTSTR childeName, IDataNodes **ppNodes)
This method provides a quick way to get to the set of DataItem nodes under a specific Data node. Using the XML from the GetDataNodes example, the following code does exactly the same thing as the four lines of code in the example under GetDataNodes but with error checking:
ISimpleStringProperties Interface
ISimpleStringProperties Interface
__interface ISimpleStringProperties : IStringProperties
{
void Add(LPCTSTR propertyName, LPCTSTR value);
};
By itself, this interface may not be useful. However, it is implemented by the ID_SimpleStringProperties component, which also implements the IStringProperties interface. You can use this component in cases where you need to pass a set of properties to another component, such as a task, but you want to add values programmatically instead of using values from XML. Here is an example of how you would use this interface:
PSimpleStringProperties *pProperties;
CreateInstance(Container(), ID_SimpleStringProperties, &pProperties);
pProperties->Add(L"filename", L"%windir%\\system32\\cscript.exe");
pTask->Init(pProperties, nullptr);
IStringProperties
__interface IStringProperties : IUnknown
{
    HRESULT Get(LPCTSTR propertyName, [out] LPBSTR pPropValue);
};
This interface provides simple access to a set of setter elements that come from XML. This interface is available for the properties of a page using Settings()->Properties().
HRESULT Get(LPCTSTR propertyName, [out] LPBSTR pPropValue)
This method retrieves a single property value. See Table 47 and Table 48.
Table 47. IHRESULT Get Property Value
| Parameter | Description |
|---|---|
| propertyName | Name of the property that you want to read |
| pPropValue | On exit, contains the property value as a string (This value will be nullptr if there is no such property.) |
Table 48. IHRESULT Get Property Value Results
| HRESULT | Description |
|---|---|
| S_OK | Property value is retrieved. |
| E_INVALIDARG | There is no property with the name you provided. |
ITaskManager Interface
__interface ITaskManager : IUnknown
{
    HRESULT Init(IWizardPageView *pPageView, int idListView, int idMessage, int idRetryButton, ISettingsProperties *pPageInfo, ITaskManagerCallback *pCallback);
    HRESULT SetFailMessage(LPCWSTR message);

    HRESULT Start(void);

    HRESULT GetTaskMessage(size_t index, LPBSTR message);
    HRESULT GetResultType)(size_t index, LPBSTR type);
    HRESULT GetProperty(size_t index, LPCTSTR propertyName, LPBSTR value);
    int GetSelectedIndex(void);
    HRESULT Wait(DWORD waitMilliseconds);
    size_t FailedCount(void);
    size_t WarningCount(void);
    size_t SucceedCount(void);
    size_t RunningCount(void);

    void OnCommonControlEvent(WORD controlId, LPNMHDR pInfo);
    void OnControlEvent(WORD eventId, WORD controlId);
    void EnableButtons(BOOL enable);
}
This interface is implemented by the TaskManager component (ID_TaskManager in ITaskManager.h), which is the component that runs tasks on the preflight page. You can either use the preflight page directly, which is what you do most of the time, or build your own page, letting this component do most of the work.
HRESULT Init(IWizardPageView *pPageView, int idListView, int idMessage, int idRetryButton, ISettingsProperties *pPageInfo, ITaskManagerCallback *pCallback)
You must call this method before calling any other method. It initializes the TaskManager component. See Table 49.
Table 49. HRESULT Init
| Parameter | Description |
|---|---|
| pPageView | Provides access to the page that will be running tasks (This page must have a specific set of controls, which are outlined in the next few parameters.) |
| idListView | The control ID of a ListView control that will display the list of tasks and the status of those tasks |
| idMessage | The control ID of a text box that will be used to display a message for the task that you select |
| idRetryButton | The control ID of a button you can select to run the tasks again |
| pPageInfo | A wrapper around the page's XML (TaskManager loads the set of tasks to run from this XML.) |
| pCallback | Can be null (If this parameter is not null, TaskManager calls the Started method when it starts a task and the Finished method for each task that finishes running.) |
HRESULT SetFailMessage(LPCWSTR message)
This method sets the message that will be displayed if one or more tasks fail.
HRESULT Start(void)
This method starts all the tasks. Each task is started on a separate thread.
HRESULT GetTaskMessage(size_t index, LPBSTR message)
This method is for internal use only. It retrieves the current message for a task based on its index in the list of tasks.
HRESULT GetResultType)(size_t index, LPBSTR type)
This method retrieves the current "type" for a task. Table 50 shows the available types.
Table 50. HRESULT GetResultType
| Type | Description |
|---|---|
| 0 | Represents a task that succeeded |
| 1 | Represents a tasks that returned a warning |
| -1 | Represents a failed task |
The type is retrieved by looking at the task's exit or error code and finding a match in the task's <ExitCodes> XML element.
HRESULT GetProperty(size_t index, LPCTSTR propertyName, LPBSTR value)
This method is used by the progress and preflight pages to retrieve the BitmapFilename setter property so it can display an image next to the message for the task that you highlight. In other words, you can add a custom setter to the task's XML, and then retrieve it with this method.
int GetSelectedIndex(void)
This method retrieves the index of the currently selected task, which is useful if you want to retrieve additional information about the task (see GetProperty method) to display for the selected task. The progress and preflight pages use this method to display an image for the selected task.
HRESULT Wait(DWORD waitMilliseconds)
This method mainly helps with unit tests so the test can ensure that tasks finish before the unit test exits. You would not normally call this method. It returns either when all tasks finish running or the wait time has elapsed.
size_t FailedCount(void)
This method returns the number of tasks currently marked as failed.
size_t WarningCount(void)
This method returns the number of tasks currently marked as warning.
size_t SucceedCount(void)
This method returns the number of tasks currently marked as succeeded.
size_t RunningCount(void)
This method returns the number of tasks currently running.
void OnCommonControlEvent(WORD controlId, LPNMHDR pInfo)
Call this method from your page's OnCommonControlEvent so the TaskManager can process events it needs.
void OnControlEvent(WORD eventId, WORD controlId)
Call this method from your page's OnControlEvent so the TaskManager can process events it needs.
void EnableButtons(BOOL enable)
This method is for internal use only.
IWizardComponent Interface
__interface IWizardComponent : IUnknown
{
    HRESULT SetContainer(IWizardPageContainer *pContainer);
};
Overview
Typically, you will not implement this interface directly but instead through the WizardComponent template class. If your component implements this interface and you have registered a class factory with the registry, your component receives a pointer to the IWizardPageContainer instance when it is created. This helps you, for example, access the Logger or the registry for creating other components that your component might need.
IWizardDialogController Interface
__interface IWizardDialogController : IUnknown
{
    void Initialize(ISettings *pSettings);
    void InitPages(void);
    void Start();
    void Next();
    void Finish();
    void Previous();
    int NumPages();
    void Cancel();

    HRESULT Focus(WizardButtons button);
    HRESULT SetEnable(WizardButtons button, BOOL enable);
    void ShowWarningMessage(LPCTSTR message);
    void HideWarningMessage();

    void ChangePage(size_t newIndex);
    IUnknown *CurrentPage(void);
    HRESULT GetCurrentTitle([out, retval] LPBSTR pDisplayName);
};
This interface is for internal use only.
IWizardDialogView Interface
__interface IWizardDialogView : IUnknown
{
    HRESULT LoadBannerImage(LPCTSTR bannerFilename);
    HRESULT LoadPage(LPCTSTR pageType, ISettingsProperties *pPageSettings, IWizardPageView **view);
    HRESULT SetEnable(WizardButtons button, BOOL enable);
    HRESULT Focus(WizardButtons button);
    void EnableFinish(BOOL isFinish);
    void Exit(int exitCode);
    void ShowWarningMessage(LPCTSTR message);
    void HideWarningMessage(void);
    void SetTitle(LPCTSTR title);
    void SetPageTitle(LPCTSTR title);
    int ShowMessageBox(LPCTSTR message, LPCTSTR lpCaption, UINT uType);
    HWND GetHwnd(void);
    void UpdateFocus(void);
};
This interface is for internal use only.
IWizardPage Interface
__interface IWizardPage : IUnknown
{
    HRESULT SetPageSettings(ISettingsProperties *pPageSettings);
    HINSTANCE GetInstanceHandle(void);
    int GetDialogResourceId(void);
    void WindowCreated(IWizardPageView *pView, IWizardPageContainer *pContainer);
    void WindowShown(void);
    void WindowHidden(void);

    HRESULT NextSelected(void);
    void ControlEvent(WORD eventId, WORD controlId);
    void CommonControlEvent(WORD controlId, LPNMHDR pInfo, LPBOOL pCancel);
    void UnhandledEvent(HWND hwnd, UINT message, WPARAM wParam, LPARAM lParam);
};
Overview
This interface is implemented by WizardPageImpl, so you will not typically have to implement this it yourself. The wizard calls all of these methods for you when it interacts with your custom pages.
IWizardPageContainer Interface
__interface IWizardPageContainer : IUnknown
{
    ILogger * Logger(void);
    IPropertyBag * Properties(void);
    HRESULT CreateInstance(LPCTSTR type, [out] IUnknown **ppInstance);
    HRESULT GetService(REFIID iid, [out] IUnknown **ppInstance);
    HRESULT ReplaceVariables(LPCTSTR source, [out] LPBSTR pDest);
    HRESULT GotoPage(LPCTSTR pageName);
    int ShowMessageBox(LPCTSTR message, LPCTSTR lpCaption, UINT uType);
    BOOL InPreview(void);
    HWND GetHwnd(void);
};
Overview
This interface is available to your page via the Container method (implemented by WizardPageImpl) and gives you access to various services of the wizard.
ILogger * Logger(void)
Use this method to write messages to the log file—for example:
Logger()->Verbose(s_component, L"Message for log file");
IPropertyBag * Properties(void)
This method provides access to "memory" variables, which are properties that are in memory only while the UDI Wizard is running. These properties are available to other pages either in code or in the XML using the $memoryVarName$ syntax.
HRESULT CreateInstance(LPCTSTR type, [out] IUnknown **ppInstance)
This method allows you to create a new instance of any component that has been registered. However, it is better to use the template function CreateInstance, because it is strongly typed.
HRESULT GetService(REFIID iid, [out] IUnknown **ppInstance)
This method allows you to retrieve a service that has been registered. However, it is better to call the GetService template function, which is strongly typed (instead of using IUnknown).
HRESULT ReplaceVariables(LPCTSTR source, [out] LPBSTR pDest)
This method handles working with variables inside string values. It supports the formats shown in Table 51 and Table 52.
Table 51. HRESULT ReplaceVariables
| Format | Description |
|---|---|
| $Name$ | Replaces the value of a memory variable with this name (If there is no memory variable with the name, the "token" will be removed.) |
| %Name% | Either a task sequence variable or an environment variable. The order is as follows: 1. Use the value of a task sequence variable, if present. 2. Use the value of an environment variable, if present. 3. Otherwise, remove this text from the string. |
Table 52. HRESULT Parameter
| Parameter | Description |
|---|---|
| Source | The input string, which can contain any combination of $ and % variables or none at all |
| pDest | On return, contains a new string that has all the tokens replaced according to Table 51 |
HRESULT GotoPage(LPCTSTR pageName)
This method has not been fully tested. The idea is that you can switch directly to a specific page based on the name of the page as defined in the .config XML file. Calling this method bypasses the OnNextSelected on your page. In addition, the behavior of this method is subject to change, so use it at your own risk.
int ShowMessageBox(LPCTSTR message, LPCTSTR lpCaption, UINT uType)
This method displays a message box with the text and caption that you provide. The uType parameter is any value that you can supply to the MessageBox Win32 function.
BOOL InPreview(void)
This method returns TRUE if you launched the wizard in "preview" mode by supplying the /preview switch. In preview mode, the Next button is never disabled. This method allows you to bypass code in preview mode, for example, that could cause issues when you do not have valid data on the page.
HWND GetHwnd(void)
This method returns the HWND for the main dialog box. Use this method with care. Generally, the UDI Wizard application programming interface is designed so that you never work directly with window handles.
IWizardPageView Interface
__interface IWizardPageView : IUnknown
{
    HRESULT GetControlWrapper(int itemId, DialogControlTypes controlType, IUnknown **ppControl);
    HWND GetHwnd(void);
    HWND GetControl(int itemId);
    HRESULT Show (void);
    HRESULT Hide(void);
    HRESULT Focus(int itemId);
    IWizardPage * Page(void);
    IFormController * Form(void);

    HRESULT FocusWizardButton(WizardButtons button);
    HRESULT SetEnable(WizardButtons button, BOOL enable);
    void ShowWarningMessage(LPCTSTR message);
    void HideWarningMessage(void);
};
This interface is available to the code in your page through the View method (implemented by WizardPageImpl).
HRESULT GetControlWrapper(int itemId, DialogControlTypes controlType, IUnknown *ppControl)
The UDI Wizard uses wrappers, which are really façades for interacting with the controls on your page. Using these façades instead of the actual controls makes it much easier to write tests for your page, because you can provide mock façades from your tests.
Instead of using this method directly, it is better to use the GetControlWrapper template method, which is strongly typed—for example:
PComboBox m_pLanguagePackCombo;
GetControlWrapper(View(), IDC_MY_COMBO, CONTROL_COMBO_BOX, &m_pCombo);
HWND GetHwnd(void)
This method returns the window handle for your page. Generally, you should not need access to this window handle.
HWND GetControl(int itemId)
If you must, you can call this method to get the window handle for a control on your page. (It is better to call the GetControlWrapper template function).
HRESULT Show (void)
This method is for internal use only.
HRESULT Hide(void)
This method is for internal use only.
HRESULT Focus(int itemId)
Set the input focus to a specific control.
IWizardPage * Page(void)
This method is for internal use only.
IFormController * Form(void)
This method is for internal use only.
HRESULT FocusWizardButton(WizardButtons button)
Sets the focus to one of the wizard's buttons.WizardButtons has two values: BackButton and NextButton.
HRESULT SetEnable(WizardButtons button, BOOL enable)
Request that one of the wizard buttons be enabled or disabled. The button might not match the state that you request. For example, if you run the UDI Wizard with the /preview switch, the buttons will always be enabled. WizardButtons has two values: BackButton and NextButton.
void ShowWarningMessage(LPCTSTR message)
This method displays a warning message at the bottom of the page content area. This message can be any text you want.
void HideWarningMessage(void)
Hide a warning message that you displayed with a call to ShowWarningMessage.
IXmlDocument Interface
__interface IXmlDocument : IUnknown
    HRESULT Load(LPCTSTR filename);
    HRESULT LoadXml(LPCTSTR xml);
    HRESULT Save(LPCWSTR filename);
    HRESULT GetParseErrorMessage(LPBSTR pMessage);
    HRESULT SelectNodes(LPCTSTR xpath, IXMLDOMNodeList **ppNodes);
    HRESULT SelectSingleNode(LPCTSTR xpath, IXMLDOMNode **ppNode);
    HRESULT AddSchema(LPCTSTR filename, LPCTSTR ns);
    HRESULT AddAttribute(IXMLDOMNode *pNode, LPCWSTR name, LPCWSTR value);
    HRESULT CreateNode(DOMNodeType type, LPCWSTR name, LPCWSTR ns, IXMLDOMNode **ppNode);
};
Overview
This interface is implemented by the ID_IXmlDocument component, which is a façade designed to make it easier to work with XML documents in C++.
HRESULT Load(LPCTSTR filename)
This method loads an XML document from an external file. It returns S_OK if the file was loaded without errors or S_FALSE if an error occurred. When there is an error, you can get the error message by calling GetParseErrorMessage.
HRESULT LoadXml(LPCTSTR xml)
This method loads an XML document from a string instead of an external file. Other than the source for reading the XML, the behavior is the same as the Load method.
HRESULT Save(LPCWSTR filename)
This method saves the XML document that is in memory to an external file.
HRESULT GetParseErrorMessage(LPBSTR pMessage)
This method returns a new string with the error message from loading the XML document, if any. It always returns S_OK.
HRESULT SelectNodes(LPCTSTR xpath, IXMLDOMNodeList **ppNodes)
This method allows you to use an XPath expression to retrieve a collection of nodes from the document. It always returns S_OK.
HRESULT SelectSingleNode(LPCTSTR xpath, IXMLDOMNode **ppNode)
This method allows you to use an XPath expression to retrieve one node from the document. It always returns S_OK.
HRESULT AddSchema(LPCTSTR filename, LPCTSTR ns)
This method adds the name of an external schema file that will be used to validate the schema of your XML document when it is loaded. The namespace you provide is the string you can use in XPath queries, although this has not been tested.
HRESULT AddAttribute(IXMLDOMNode *pNode, LPCWSTR name, LPCWSTR value)
This method adds a new attribute to an existing node in the XML document. See Table 53.
Table 53. HRESULT AddAttribute
| Parameter | Description |
|---|---|
| pNode | The node to which you want to add an attribute |
| Name | Name of the new attribute |
| Value | The value for the new attribute |
HRESULT CreateNode(DOMNodeType type, LPCWSTR name, LPCWSTR ns, IXMLDOMNode **ppNode)
Call this method to create a new node:
Pointer<IXMLDOMNode> pNewChild
pXmlDom->CreateNode(NODE_ELEMENT, L"MyElement", L"", &pNewChild);
Once you create a new node, you can add it as a child to another node by calling the parent's appendChild method.
Helper Functions
CreateInstance Template Function
HRESULT CreateInstance(IWizardPageContainer *pContainer, LPCTSTR type, I **ppObject)
This function is defined in IWizardPageContainer.h and provides a type-safe wrapper over the IWizardPageContainer->CreateInstance method—for example:
CreateInstance<IDirectory>(Container(), ID_Directory, &pDirectory);
This code creates a new ID_Directory component to retrieve the IDirectory interface of that component.
GetService Template Function
void GetService(IWizardPageContainer *pContainer, I **ppService)
This function is defined in IWizardPageContainer.h and provides a type-safe wrapper over the IWizardPageContainer->GetService method—for example:
GetService<ITSVariableBag>(Container(), &pTsBag);
This function retrieves the task sequence component, which supports the ITSVariableBag interface. (For ITSVariableBag, you can use the TSVariables method of the WizardPageImpl class, instead.)
UDI Wizard Designer Configuration File Schema Reference
This file is consumed by the UDI Wizard Designer. A separate file is created for each custom .dll file, which can contain custom wizard page editors, custom tasks, or custom validators. The file must end with .config and reside in the installation_folder\Bin\Config folder (where installation_folder is the folder in which you installed MDT).
Table 54 lists the elements in the UDI Wizard Designer configuration file and their descriptions. The DesignerConfig element is the root node for this reference.
Table 54. Elements in the UDI Wizard Designer Configuration File and Their Descriptions
| Element Name | Description |
|---|---|
| DesignerConfig | Specifies the root for all other elements |
| DesignerMappings | Groups a set of Pageelements |
| Page | Specifies a wizard page editor to be loaded in the UDI Wizard Designer, which is used to edit the configuration settings for a wizard page |
| Param | Specifies a parameter that is passed to the parent Task or Validator element and corresponds to a Setter element in the UDI Wizard configuration file Note: The attributes for this element are different if the parent is the Task or Validator element. |
| Task | Specifies a task within the task library |
| TaskItem | Specifies a group of parameters that are passed to the task |
| TaskLibrary | Groups a set of Task elements |
| Validator | Specifies a validator within the validator library |
| ValidatorLibrary | Groups a set of Validator elements |
DesignerConfig
This element specifies the root for all other elements.
Element Information
Table 55 provides information about the DesignerConfig element.
Table 55. DesignerConfig Element Information
| Attribute | Value |
|---|---|
| Number of occurrences | One: This element is required. |
| Parent elements | None |
| Contents | DesignerMappings, TaskLibrary, ValidatorLibrary |
Element Attributes
This element has no attributes.
Remarks
None.
Example
<DesignerConfig>
   + <TaskLibrary>
   + <ValidatorLibrary>
   + <DesignerMappings>
</DesignerConfig>
DesignerMappings
This element groups a set of Page elements.
Element Information
Table 56 provides information about the DesignerMappings element.
Table 56. DesignerMappings Element Information
| Attribute | Value |
|---|---|
| Number of occurrences | Zero or one within the DesignerConfig element (This element is optional if there are no custom wizard page in the DLL that corresponds to this UDI Wizard Designer configuration file.) |
| Parent elements | DesignerConfig |
| Contents | Page |
Element Attributes
This element has no attributes.
Remarks
None.
Example
<DesignerConfig>
   + <TaskLibrary>
   + <ValidatorLibrary>
   - <DesignerMappings>
        <Page DLL="SharedPages.dll"
           Description="Used to display text that describes the current stagegroup"
           Type="Microsoft.SharedPages.WelcomePage"
           DisplayName="Welcome"
           Image="Welcome_188.png"
           DesignerType="Microsoft.Enterprise.UDIDesigner.CoreModules.Views.WelcomePageView"
           DesignerAssembly="Microsoft.Enterprise.UDIDesigner.CoreModules.dll"/>
        <Page DLL="OSDRefreshWizard.dll"
           Description="Captures or restores user state data"
           Type="Microsoft.OSDRefresh.UserStatePage"
           DisplayName="User Data"
           Image="UserState_188.png"
           DesignerType="Microsoft.Enterprise.UDIDesigner.CoreModules.Views.UserStatePageView"
           DesignerAssembly="Microsoft.Enterprise.UDIDesigner.CoreModules.dll"/>
        <Page DLL="OSDRefreshWizard.dll"
           Description="Allows selecting the image to install, target drive, and whether to format"
           Type="Microsoft.OSDRefresh.VolumePage"
           DisplayName="Volume"
           Image="Volume_188.png"
           DesignerType="Microsoft.Enterprise.UDIDesigner.CoreModules.Views.VolumePageView"
           DesignerAssembly="Microsoft.Enterprise.UDIDesigner.CoreModules.dll"/>
     </DesignerMappings>
</DesignerConfig>
Page
This element specifies a wizard page editor to be loaded in the UDI Wizard Designer, which is in turn used to edit the configuration settings for a wizard page.
Element Information
Table 57 provides information about the Page element.
Table 57. Page Element Information
| Attribute | Value |
|---|---|
| Number of occurrences | One or more for each wizard page defined in the DesignerMappings element |
| Parent elements | DesignerMappings |
| Contents | Any well-formed XML content |
Element Attributes
Table 58 lists the attributes of the Page element and a description for each.
Table 58. Attributes and Corresponding Values for the Page Element
| Attribute | Description |
|---|---|
| Description | Specifies text that provides information about the parameter, which is displayed in the UDI Wizard Designer |
| DesignerAssembly | Specifies the name of the .dll file associated with the wizard page editor (The .dll file must exist in the installation_folder\Bin folder (where installation_folder is the folder in which you installed MDT.) |
| DesignerType | Specifies the name of the wizard page editor within the .dll file specified in the DesignerAssembly attribute (This is the Microsoft .NET type for the wizard page editor, with the fully qualified Microsoft .NET namespace.) |
| DisplayName | Specifies the user-friendly name of the page editor, which is displayed in the UDI Wizard Designer |
| DLL | Specifies the name of the .dll file associated with the wizard page (The .dll file must exist in the installation_folder\Templates\Distribution\Tools\platform folder (where installation_folder is the folder in which you installed MDT and platform is x86 for the 32-bit version or x64 is for the 64-bit version.) Note: Ensure that the DLL processor architecture matches the MDT processor architecture installed. For example, if you installed a 32-bit version of MDT, then ensure you use a 32-bit DLL for the wizard page. |
| Image | Specifies the name of an image of the page that is in Portable Network Graphics (PNG) format (The .png file must exist in the installation_folder\Bin\Images folder (where installation_folder is the folder in which you installed MDT.) |
| Type | Specifies the wizard page editor and must match the named used when the custom page was registered |
Remarks
The UDI Wizard Designer uses the Page element like a template to create the initial XML for a new wizard. The UDI Wizard Designer performs schema validation to ensure that the Page and child elements have a valid format. This element provides a mapping between the UDI Wizard page type and the information that the UDI Wizard Designer needs to edit and create pages of this type using a custom page editor.
Example
None.
Param
This element specifies a parameter that is passed to the parent Task or Validator element and corresponds to a Setter element in the UDI Wizard configuration file.
Element Information
Table 59 provides information about the Param element.
Table 59. Param Element Information
| Attribute | Value |
|---|---|
| Number of occurrences | One or more for each TaskItem or Validator parent element |
| Parent elements | TaskItem, Validator |
| Contents | Any well-formed XML content |
Element Attributes
Table 60 lists the attributes of the Param element and provides a description of each.
Table 60. Attributes and Corresponding Values for the Param Element
| Attribute | Description |
|---|---|
| Description | Specifies text that provides information about the parameter, which is displayed in the UDI Wizard Designer Note: This attribute is valid only for the Validator element. |
| DisplayName | Specifies the user-friendly name of the validator parameter, which is displayed for the appropriate UDI Wizard page in the UDI Wizard Designer (This name is usually more descriptive than the Name attribute.) Note: This attribute is valid only for the Validator element. |
| Name | Specifies the name of the parameter that is passed to the task or validator, depending on the parent element (This attribute will become the Property attribute in a Setter element in the UDI Wizard configuration file.) Note: This parameter is used for both TaskItem and Validator parent elements. |
Remarks
None.
Example
None.
Task
This element specifies a task within the task library.
Element Information
Table 61 provides information about the Task element.
Table 61. Task Element Information
| Attribute | Value |
|---|---|
| Number of occurrences | One or more within the TaskLibrary element (This element is not optional if the TaskLibrary element is specified.) |
| Parent elements | TaskLibrary |
| Contents | TaskItem |
Element Attributes
Table 62 lists the attributes of the Task element and provides a description of each.
Table 62. Attributes and Corresponding Values for the Task Element
| Attribute | Description |
|---|---|
| Description | Specifies text that provides information about the task, which is displayed in the UDI Wizard Designer |
| DLL | Specifies the name of the .dll file associated with the task (The .dll file must exist in the installation_folder\Templates\Distribution\Tools\platform folder (where installation_folder is the folder in which you installed MDT and platform is x86 for the 32-bit version or x64 for the 64-bit version.) |
| Name | Specifies the name of the task, which is displayed in the appropriate UDI Wizard page and in the UDI Wizard Designer |
| Type | Specifies the task type, which is registered with the factory registry and used to call a specific task within a .dll file |
Remarks
None.
Example
None.
TaskItem
This element specifies a group of parameters that are passed to the task.
Element Information
Table 63 provides information about the TaskItem element.
Table 63. TaskItem Element Information
| Attribute | Value |
|---|---|
| Number of occurrences | One or more for each Task element |
| Parent elements | Task |
| Contents | Param |
Element Attributes
Table 64 lists the attributes of the TaskItem element and provides a description of each.
Table 64. Attribute and Corresponding Values for the TaskItem Element
| Attribute | Description |
|---|---|
| Type | Specifies the of element type that will be created in the UDI Wizard configuration file. An XML element will be created that corresponds to the value of this attribute. For example, if the value for this attribute is File, then a File element will be created in the UDI Wizard configuration file. Currently, the only values supported are: - File, which requires two Param child elements (one Param child element with the Name attribute set to Source and another Param child element with the Name attribute set to Dest) - Setter, which requires one Param child element |
Remarks
None.
Example
None.
TaskLibrary
This element groups a set of Task elements.
Element Information
Table 65 provides information about the TaskLibrary element.
Table 65. TaskLibrary Element Information
| Attribute | Value |
|---|---|
| Number of occurrences | Zero or one within the DesignerConfig element (This element is optional if there are no custom tasks in the DLL that correspond to this UDI Wizard Designer configuration file.) |
| Parent elements | DesignerConfig |
| Contents | Task |
Element Attributes
This element has no attributes.
Remarks
None.
Example
<DesignerConfig>
   - <TaskLibrary>
        +<Task DLL="" Description="Executes a process with the given command line." Type="Microsoft.Wizard.ShellExecuteTask" Name="Shell Execute Task">
        +<Task DLL="OSDRefreshWizard.dll" Description="Discovers supported applications for install." Type="Microsoft.OSDRefresh.AppDiscoveryTask" Name="Application Discovery">
        +<Task DLL="SharedPages.dll" Description="Check to ensure a wired network connection is available." Type="Microsoft.SharedPages.WiredNetworkTask" Name="Wired Network Check">
        +<Task DLL="OSDRefreshWizard.dll" Description="Check to ensure power source is AC (not battery)." Type="Microsoft.OSDRefresh.ACPowerTask" Name="AC Power Check">
        +<Task DLL="" Description="Check to ensure power source is AC (not battery)." Type="Microsoft.Wizard.CopyFilesTask" Name="Copy Files Task">
     </TaskLibrary>
   + <ValidatorLibrary>
   + <DesignerMappings>
</DesignerConfig>
Validator
This element specifies a validator within the validator library.
Element Information
Table 66 provides information about the Validator element.
Table 66. Validator Element Information
| Attribute | Value |
|---|---|
| Number of occurrences | Zero or more within the ValidatorLibrary element (This element is optional.) |
| Parent elements | ValidatorLibrary |
| Contents | Param |
Element Attributes
Table 67 lists the attributes of the Validator element and provides a description of each.
Table 67. Attributes and Corresponding Values for the Validator Element
| Attribute | Description |
|---|---|
| Description | Specifies text that provides information about the validator, which is displayed in the UDI Wizard Designer |
| DisplayName | Specifies the user-friendly name of the validator displayed in the UDI Wizard Designer (This name is usually more descriptive than the Name attribute.) |
| DLL | Specifies the name of the .dll file associated with the validator (The .dll file must exist in the installation_folder\Templates\Distribution\Tools\platform folder (where installation_folder is the folder in which you installed MDT and platform is x86 for the 32-bit version or x64 for the 64-bit version.) |
| Name | Specifies the name of the validator, which is displayed in the appropriate UDI Wizard page and in the UDI Wizard Designer |
| Type | Specifies the validator type, which is registered with the registry factor and used to call a specific validator within a .dll file |
Remarks
None.
Example
None.
ValidatorLibrary
This element groups a set of Validator elements.
Element Information
Table 68 provides information about the ValidatorLibrary element.
Table 68. ValidatorLibrary Element Information
| Attribute | Value |
|---|---|
| Number of occurrences | Zero or one within the DesignerConfig element (This element is optional if there are no custom validators in the DLL that correspond to this UDI Wizard Designer configuration file.) |
| Parent elements | DesignerConfig |
| Contents | Validator |
Element Attributes
This element has no attributes.
Remarks
None.
Example
<DesignerConfig> + <TaskLibrary> - <ValidatorLibrary> +<Validator DLL="" Description="Requires text in a field" Type="Microsoft.Wizard.Validation.NonEmpty" Name="NonEmpty"> +<Validator DLL="" Description="Doesn't allow certain characters to be in a field" Type="Microsoft.Wizard.Validation.InvalidChars" Name="InvalidChars"> +<Validator DLL="" Description="Must follow a pre-defined pattern" Type="Microsoft.Wizard.Validation.RegEx" Name="NamedPattern"> +<Validator DLL="" Description="Require the contents match a regular expression" Type="Microsoft.Wizard.Validation.RegEx" Name="RegEx"> </ValidatorLibrary> + <DesignerMappings></DesignerConfig>
UDI Wizard Designer Reference
Controls
The controls used to create custom wizard page editors for use in the UDI Wizard Designer are WPF UserControl instances. Table 69 lists the controls that you can use to create custom wizard page editors.
Table 69. Controls That Can Be Used to Create Custom Wizard Page Editors
| Control | Description |
|---|---|
| CollectionTControl | This control is used to edit data stored in the Data element within a Page element. |
| FieldElementControl | This control is used to edit a field, which is typically linked to a TextBox control on the .xaml page. |
| SetterControl | This control is used to modify the value of a setter element in the UDI Wizard configuration file. |
CollectionTControl
This control provides many capabilities for editing data. The best way to learn how to use this control is to look at the sample, which shows how to edit data under a page's Data element. In particular, the sample shows how to add, remove, and edit items in this control.
FieldElementControl
Use this control to edit a field, which is typically linked to a TextBox control on the .xaml page.
Example
The following excerpt from an .xaml file illustrates the use of the FieldElementControl to configure the default value for a field on a wizard page using a child TextBox control:
<Controls:FieldElementControl
Width="450"
Margin="0,5"
FieldData="{Binding DataContext.Location, ElementName=ControlRoot}"
HeaderText="Location Combo Box"
InstructionText="Here you can configure the behavior of the location combo box."
HideValidationTab="True">

<TextBox Text="{Binding FieldData.DefaultValue,
 UpdateSourceTrigger=PropertyChanged,
 Mode=TwoWay}"/>
</Controls:FieldElementControl>
Properties
FieldData
This string property contains information for connecting the FieldElementControl to the underlying XML for the field. The connection is made to a property of the page editor interface. The following excerpt from an .xaml file illustrates the use of the FieldData property:
FieldData="{Binding DataContext.Location, ElementName=ControlRoot}"
In this excerpt, the page editor interface is called ControlRoot and is specified in the ElementName parameter. The binding is performed to the DataContext.Location property of the ControlRoot page editor interface. DataContext is a view model that points to the Page element within the UDI Wizard configuration file. Location is a property of the view that returns a list of the possible locations and is defined by a Data element within the UDI Wizard configuration file. Each location is defined by a DataItem element within the UDI Wizard configuration file.
HeaderText
This string property allows you to specify a header for the FieldElementControl control. The header acts as a title for the control and is formatted as bold, orange text displayed immediately above the control.
InstructionText
This string property allows you to specify informational text for the FieldElementControl control. Typically, the text is used to provide a brief description of the field and explain how configuring the field affects the corresponding wizard page.
HideEnableButton
This Boolean property allows you to control the visibility of the button that changes state between Unlocked and Locked (enabled or disabled). If set to:
True, the button is not visible
False, the button is visible (This is the default value.)
HideDefaultTab
This Boolean property allows you to control the visibility of the section that contains the control used to set the default value. Although the property refers to a tab, there is no tab on the FieldElementControl but rather a section that can be hidden. If set to:
True, the section is not visible
False, the section is visible (This is the default value.)
HideBorder
This Boolean property allows you to control the visibility of the border around the field control. If set to:
True, the border is not visible
False, the border is visible (This is the default value.)
HideImage
This Boolean property allows you to control the visibility of the image that the FieldImageSource property configures. If set to:
True, the image is not visible
False, the image is visible (This is the default value.)
HideValidationTab
This Boolean property allows you to control the visibility of the section where the list of validators is managed. Although the property refers to a tab, there is no tab on the FieldElementControl but rather a section that can be hidden. If set to:
True, the section is not visible
False, the section is visible (This is the default value.)
HideSummaryTab
This Boolean property allows you to control the visibility of the section in which you configure the field summary caption. The caption and corresponding value from the field are displayed on a SummaryPage wizard page type in a stage flow. Although the property refers to a tab, there is no tab on the FieldElementControl but rather a section that can be hidden. If set to:
True, the section is not visible
False, the section is visible (This is the default value.)
HideTaskSequenceTab
This Boolean property allows you to control the visibility of the section in which you configure the task sequence variable that corresponds to the field. Although the property refers to a tab, there is no tab on the FieldElementControl but rather a section that can be hidden. If set to:
True, the section is not visible
False, the section is visible (This is the default value.)
SetterControl
Use this control to modify the value of a Setter element in the UDI Wizard configuration file. This control contains a child control used to modify the value of the setter element.
Example
The following excerpt from an .xaml file illustrates the use of the SetterControl to modify a Setter element named KeyLocationSetter using a child TextBox control.
<Controls:SetterControl Margin="5"
        Width="450"
        HeaderText="Title text"
        SetterData="{Binding KeyLocationSetter}"
        InstructionText="What this means..."
        HorizontalAlignment="Left">

    <TextBox
                   Margin="0,3"
                   Text="{Binding SetterData.SetterValue, Mode=TwoWay, UpdateSourceTrigger=PropertyChanged}"
    />

</Controls:SetterControl>
Properties
SetterData
You need to bind this to a property of your view or view model that connects to the setter. Doing so is similar to how you would bind to a field, as described for the FieldElementControl.
HeaderText
This property allows you to set the text that will appear in the header of the control. Think of this property as a title for the control; by default, it appears as bold, orange text.
InstructionText
Set this property to the text you want to appear below the header—typically instruction text that tells the user of your custom editor when and why they would want to modify the behavior of the field.
Interfaces
Table 70 lists the interfaces that you can use to create custom wizard page editors.
Table 70. Interfaces That Can Be Used to Create Custom Wizard Page Editors
| Interface | Description |
|---|---|
| IDataService | Use this interface to connect fields to the Data elements in the UDI Wizard configuration file. |
| IMessageBoxService | This interface provides access to methods that you can use to display message boxes. |
IDataService
This interface contains several properties and methods, but there is only one property that you are like to need. That property is the only one documented here.
You can use dependency injection to obtain a pointer to this interface using code like this in your class:
[Dependency]
public IDataService DataService { get; set; }
Properties
Table 71 lists the properties for the IDataService interface.
Table 71. Properties for the IDataService Interface
| Interface | Description |
|---|---|
| CurrentPage | This property provides access to the XML elements, attributes, and values beneath the context of the current page being edited in the UDI Wizard configuration file |
CurrentPage
XElement CurrentPage { get; set; }
This property provides access to the XML for the current page. You should never set this property, but you are free to modify the XML for your page. The sample page editor shows examples of modifying the XML. You use this property primarily when you have custom data. For fields and properties (setters), you can use prebuilt controls that take care of all the details.
IMessageBoxService
This interface provides access to methods that you can use to display message boxes. You may be wondering why you need an interface to display a message box. The reality is that you do not: Microsoft uses this interface with in code, because it aids in writing automated tests for designer pages.
However, using these methods does provide one useful benefit: The dialog boxes always have the "owner" set to the UDI Wizard, which ensures that the dialog box is grouped correctly with the main window.
You can use dependency injection to obtain a pointer to this interface using code like this in your class:
[Dependency]
public IMessageBoxService MessageBoxes { get; set; }
Methods
Table 72 lists the methods for the IMessageBoxService interface.
Table 72. Methods for the IMessageBoxService Interface
| Method | Description |
|---|---|
| ShowMessageBox | This overloaded method is used to display a message box with the following members: - ShowMessageBox(String message, String caption, MessageBoxImage icon) - ShowMessageBox(string message, string caption, MessageBoxButton button, MessageBoxImage icon) - ShowMessageBox(Exception exception) |
| ShowDialogWindow | Use this method to create a new dialog box. |
| ShowWizardWindow | Use this method to display a custom editor inside a dialog box that includes Next and Back buttons for navigation. |
ShowMessageBox
This method displays a message box that is a child of the custom wizard page editor. This member is overloaded: Table 73 contains a list of the members and a brief description of each. For complete information about each member (including syntax, usage, and examples), see the section that corresponds to each member.
Table 73. Overloaded Members for the ShowMessagBox Method
| Member | Description |
|---|---|
| ShowMessageBox(String message, String caption, MessageBoxImage icon) | Displays a message box with an icon and an OK button |
| ShowMessageBox(string message, string caption, MessageBoxButton button, MessageBoxImage icon) | Displays a message box with an icon and different possible combinations of buttons |
| ShowMessageBox(Exception exception) | Displays a message box that provides information about an exception and has an OK button |
ShowMessageBox(String message, String caption, MessageBoxImage icon)
void ShowMessageBox(String message, String caption, MessageBoxImage icon);
This method displays a message box with an OK button. See Table 74.
Table 74. Parameters for the ShowMessageBox(String message, String caption, MessageBoxImage icon) Method
| Parameter | Description |
|---|---|
| message | The message to display in the content area of the message box |
| caption | The text to show in the title bar of the dialog box |
| icon | The type of icon to show in the message box |
ShowMessageBox(string message, string caption, MessageBoxButton button, MessageBoxImage icon)
MessageBoxResult ShowMessageBox(string message, string caption, MessageBoxButton button, MessageBoxImage icon);
This method displays a message box with the set of buttons you want shown and reports which button you selected. See Table 75.
Table 75. Parameters for the ShowMessageBox(string message, string caption, MessageBoxButton button, MessageBoxImage icon) Method
| Parameter | Description |
|---|---|
| message | The message to display in the content area of the message box |
| caption | The text to show in the title bar of the dialog box |
| button | Which buttons to show |
| icon | The type of icon to show in the message box |
ShowMessageBox(Exception exception)
void ShowMessageBox(Exception exception);
This method displays a message box that reports information about an exception. This message box has a single OK button. See Table 76.
Table 76. Parameters for the ShowMessageBox(Exception exception) Method
| Parameter | Description |
|---|---|
| exception | The exception that you want to report (The dialog box uses exception.Message as the contents.) |
ShowDialogWindow
void ShowDialogWindow(Type viewType, DialogInteraction dialogPayload);
This method creates a new dialog box, the contents of which is the text you supply in the viewType parameter. The UDI Designer creates a new instance of this type and wraps it in a dialog box that has OK and Cancel buttons.
You pass data to your control using the dialogPayload parameter. The SampleEditor solution in the SDK directory has an example of how to use this functionality.
ShowWizardWindow
void ShowWizardWindow(Type viewType, DialogInteraction dialogPayload);
This method allows you to display a custom editor inside a dialog box that includes Next and Back buttons for navigation. Microsoft has not provided a sample for how to use this method.
UDI Wizard Configuration File Schema Reference
This file is consumed by the UDI Wizard and configured by the UDI Wizard Designer. This file is used to configure the:
Wizard pages displayed in the UDI Wizard
The sequence of the wizard pages in the UDI Wizard
Settings for the fields on each wizard page
Available StageGroups in the UDI Wizard Designer
Available Stages within each deployment wizard in the UDI Wizard Designer
77 lists the elements in the UDI Wizard Configuration File and their descriptions. The Wizard element is the root node for this reference.
Table 77. Elements in the UDI Wizard Configuration File and Their Descriptions
| Element name | Description |
|---|---|
| Data | Groups the individual DataItem elements within a Page element and is named by the Name attribute. |
| DataItem | Groups the individual Setter elements within a Page element. You can create hierarchical data by including one or more Data elements within a DataItem element. Each DataItem element represents an individual item. For example, a list of available drives might have a DataItem for the display name and another DataItem element for the corresponding drive letter. |
| Default | Specifies a default value for the field specified in the parent Field or RadioGroup element. The default is set to the value bracketed by this element. |
| DLL | Specifies a DLL that is to be loaded and referenced by the UDI Wizard and the UDI Wizard Designer. |
| DLLs | Groups the individual DLL elements. |
| Error | Specifies a possible error code that can a task can return. The value of the error code is returned by the task's HRESULT and is trapped by this element to provide more specific error information. |
| ExitCode | Specifies a possible exit code for a task. The exit codes are return codes that the task expects. Create an ExitCode element for each possible exit code. Otherwise, you can specify an asterisk (*) in the Value attribute to handle return codes not listed in other ExitCode elements. |
| ExitCodes | Groups a set of ExitCode and Error elements for a Task element or an Error element. |
| Field | Specifies an instance of a control in a Page element that is used to provide customization with XML. Not all controls allow customization with XML—only controls that use the Field element. |
| Fields | Groups the individual Field elements within a Page element. |
| File | Specifies the source and destination for a file copy operation using the Microsoft.Wizard.CopyFilesTask task type. You can include a separate File element to copy more than one file in a single task. |
| Page | Specifies an instance of a page and includes all the configuration settings for the page. |
| PageRef | Specifies a reference to an instance of a page within a Stage within a StageGroup. |
| Pages | Groups the individual Page elements. |
| RadioGroup | Specifies a group of radio buttons within a Field element. |
| StageGroup | Specifies a group of one or more stages. |
| StageGroups | Groups a set of stage groups within a UDI Wizard configuration file. |
| Setter | Specifies a property setting of a value for a property that is named in the Property property. |
| Stage | Specifies a stage within a StageGroup and contains one or more PageRef elements. |
| Style | Groups the individual setter elements that configure the UDI Wizard look and feel, including the title shown at the top of the wizard and the banner image shown on the UDI Wizard. |
| Task | Specifies a task that is to be run on the page specified in the parent Page element. |
| Tasks | Groups a set of tasks for a Page element. |
| Validator | Specifies a validator for the field control that is specified in the parent Field element. |
| Wizard | Specifies the root for all other elements. |
Data
This element groups the individual DataItem elements within a Page element and is named by the Name attribute.
Element Information
Table 78 provides information about the Data element.
Table 78. Data Element Information
| Attribute | Value |
|---|---|
| Number of occurrences | Zero or more within each Page element (This element is optional.) |
| Parent elements | Page, DataItem |
| Contents | DataItem, Setter |
Element Attributes
Table 79 lists the attributes of the Data element and provides a description of each.
Table 79. Attributes and Corresponding Values for the Data Element
| Attribute | Description |
|---|---|
| Name | Specifies the name of the Data element |
Remarks
The Name attribute allows code to retrieve a specific set of data.
Example
None.
DataItem
This element groups the individual Setter elements within a Page element. You can create hierarchical data by including one or more Data elements within a DataItem element. Each DataItem element represents an individual item. For example, a list of available drives might have a DataItem for the display name and another DataItem element for the corresponding drive letter.
Element Information
Table 80 provides information about the DataItem element.
Table 80. DataItem Element Information
| Attribute | Value |
|---|---|
| Number of occurrences | Zero or more within each Data element (This element is optional.) |
| Parent elements | Data |
| Contents | Data, Setter |
Element Attributes
This element has no attributes.
Remarks
None.
Example
None.
Default
This element specifies a default value for the field specified in the parent Field or RadioGroup element. The default is set to the value that this element brackets.
Element Information
Table 81 provides information about the Default element.
Table 81. Default Element Information
| Attribute | Value |
|---|---|
| Number of occurrences | Zero or more within a Field or RadioGroup element (This element is optional.) |
| Parent elements | Field, RadioGroup |
| Contents | Can be any well-formed XML content but is typically standard text |
Element Attributes
This element has no attributes.
Remarks
None.
Example
In the following example, the default for the TimeZone field is set to "Pacific Standard Time":
<Field Name="TimeZone" Enabled="true" VarName="OSDTimeZone" Summary="Time Zone:">
  <Default>Pacific Standard Time</Default>
DLL
This element specifies a DLL for the UDI Wizard and UDI Wizard Designer to load and reference.
Element Information
Table 82 provides information about the DLL element.
Table 82. DLL Element Information
| Attribute | Value |
|---|---|
| Number of occurrences | One or more within the DLLs element |
| Parent element | DLLs |
| Contents | No content allowed for this element |
Element Attributes
Table 83 lists the attributes of the DLL element and provides a description of each.
Table 83. Attributes and Corresponding Values for the DLL Element
| Attribute | Description |
|---|---|
| Name | Specifies the name of the DLL for the UDI Wizard and UDI Wizard Designer to reference |
Remarks
None.
Example
<DLLs>
  <DLL Name="OSDRefreshWizard.dll" />
  <DLL Name="SharedPages.dll" />
</DLLs>
DLLs
This element groups the individual DLL elements.
Element Information
Table 84 provides information about the DLLs element.
Table 84. DLLs Element Information
| Attribute | Value |
|---|---|
| Number of occurrences | One |
| Parent elements | Wizard |
| Contents | DLL |
Element Attributes
This element has no attributes.
Remarks
None.
Example
<DLLs>
   <DLL Name="OSDRefreshWizard.dll" />
   <DLL Name="SharedPages.dll" />
</DLLs>
Error
This element specifies a possible error code that a task can return. The value of the error code is returned and trapped by the task's HRESULT to provide more specific error information.
Element Information
Table 85 provides information about the Error element.
Table 85. Error Element Information
| Attribute | Value |
|---|---|
| Number of occurrences | Zero or more within each ExitCode element (This element is optional.) |
| Parent elements | ExitCodes |
| Contents | Any well-formed XML content |
Element Attributes
Table 86 lists the attributes of the Error element and provides a description of each.
Table 86. Error Element Information
| Attribute | Description |
|---|---|
| State | Specifies the return state of a task that encountered an error. Typically, the value for this attribute is set to Error. This value is displayed in the State column on the wizard page in the UDI Wizard. |
| Text | Specifies the descriptive text about the error condition that the task encountered. |
| Type | Specifies whether this element represents an error, warning, or success. The value specified inType must be unique within an ExitCodes element. The following are valid values for this element: - **0.**The element represent a success. - 1. The element represents a warning. - -1. The element represents an error. |
| Value | Specifies the value of the code that the task returned as a numeric value. Specifying the value of an asterisk (*) indicates the default element for return codes that are not listed in other Error elements. |
Remarks
None.
Example
None.
ExitCode
This element specifies a possible exit code for a task. The exit codes are return codes that the task expects. Create an ExitCode element for each possible exit code. Otherwise, you can specify an asterisk (*) in the Value attribute to handle return codes not listed in other ExitCode elements.
Element Information
Table 87 provides information about the ExitCode element.
Table 87. ExitCode Element Information
| Attribute | Value |
|---|---|
| Number of occurrences | Zero or more within each ExitCodes element (This element is optional.) |
| Parent elements | ExitCodes |
| Contents | At least one ExitCode element and zero or more Error elements |
Element Attributes
Table 88 lists the attributes of the ExitCode element and provides a description of each.
Table 88. Attributes and Corresponding Values for the ExitCode Element
| Attribute | Description |
|---|---|
| State | Specifies the return state of a task. The value of this attribute is displayed in the State column on the corresponding wizard page in the UDI Wizard. You can use any values for this attribute that are meaningful for your task. The following are typical values used for this attribute: - Success - Warning - Error |
| Text | Specifies the descriptive text about the exist code of the task. |
| Type | Specifies whether this element represents an error, warning, or success. The value specified in type must be unique within an ExitCodes element. The following are valid values for this element: - 0. The element represents a success. - 1. The element represents a warning. - -1. The element represents an error. |
| Value | Specifies the value of the code that the task returned as a numeric value. Specifying the value of an asterisk (*) indicates the default element for return codes that are not listed in other ExitCode elements. |
Remarks
None.
Example
None.
ExitCodes
This element groups a set of ExitCode and Error elements for a Task or an Error element.
Element Information
Table 89 provides information about the ExitCodes element.
Table 89. ExitCodes Element Information
| Attribute | Value |
|---|---|
| Number of occurrences | One within each Task element |
| Parent elements | Task |
| Contents | Error, ExitCode |
Element Attributes
This element has no attributes.
Remarks
None.
Example
None.
Field
This element specifies an instance of a control in a Page element used to provide customization with XML. Not all controls allow customization with XML—only controls that use the Field element.
Element Information
Table 90 provides information about the Field element.
Table 90. Field Element Information
| Attribute | Value |
|---|---|
| Number of occurrences | Zero or more within each Field element (This element is optional.) |
| Parent elements | Fields |
| Contents | Default, Validator |
Element Attributes
Table 91 lists the attributes of the Field element and provides a description of each.
Table 91. Attributes and Corresponding Values for the Field Element
| Attribute | Description |
|---|---|
| Enabled | Specifies whether the field is enabled for user input (The attribute can be set to True or False.) |
| Name | Specifies the name of the field |
| Summary | Specifies the descriptive text displayed on the Summary wizard page for the value that this field sets |
| VarName | Specifies the task sequence variable name read or configured using the field in the parent Field element |
Remarks
This element can contain zero or more Default elements and zero or more Validator elements.
Example
None.
Fields
This element groups the individual Field elements within a Page element.
Element Information
Table 92 provides information about the Fields element.
Table 92. Fields Element Information
| Attribute | Value |
|---|---|
| Number of occurrences | Zero or more within each Page element (This element is optional.) |
| Parent elements | Page |
| Contents | Field, RadioGroup |
Element Attributes
This element has no attributes.
Remarks
None.
Example
None.
File
This element specifies the source and destination for a file copy operation using the Microsoft.Wizard.CopyFilesTask task type. You can include a separate File element to copy more than one file in a single task.
Element Information
Table 93 provides information about the File element.
Table 93. File Element Information
| Attribute | Value |
|---|---|
| Number of occurrences | One or more for each task that has a task type of Microsoft.Wizard.CopyFilesTask |
| Parent elements | Task |
| Contents | None |
Element Attributes
Table 94 lists the attributes of the File element and provides a description of each.
Table 94. Attributes and Corresponding Values for the File Element
| Attribute | Description |
|---|---|
| Dest | Specifies the fully qualified or relative path to the destination folder for the file specified in the Source attribute. Environment variables are allowed as a part of the path. |
| Source | Specifies the fully qualified or relative path to the source file that the Microsoft.Wizard.CopyFilesTask task type copies. This attribute supports wildcard characters so that multiple files can be copied using a single File element. Environment variables are allowed as part of the path. |
Remarks
None.
Example
None.
Page
This element specifies an instance of a page and includes all the configuration settings for the page.
Element Information
Table 95 provides information about the Page element.
Table 95. Page Element Information
| Attribute | Value |
|---|---|
| Number of occurrences | One or more within each Pages element |
| Parent elements | Pages |
| Contents | Data, Fields, Setter, Tasks |
Element Attributes
Table 96 lists the attributes of the Page element and provides a description of each.
Table 96. Attributes and Corresponding Values for the Page Element
| Attribute | Description |
|---|---|
| DisplayName | Specifies the user-friendly name of the wizard page displayed in the UDI Wizard Designer. This name is usually more descriptive than the Name attribute. |
| Name | Specifies the name of the wizard page displayed in the UDI Wizard Designer. |
| Type | Specifies the type of wizard page that directly relates to a specific wizard page within a DLL. |
Remarks
None.
Example
None.
PageRef
This element specifies a reference to an instance of a page within a Stage within a StageGroup.
Element Information
Table 97 provides information about the PageRef element.
Table 97. PageRef Element Information
| Attribute | Value |
|---|---|
| Number of occurrences | One or more within a Stage element |
| Parent elements | Stage |
| Contents | None |
Element Attributes
Table 98 lists the attribute of the PageRef element and provides a description of it.
Table 98. Attributes and Corresponding Values for the PageRef Element
| Attribute | Description |
|---|---|
| Page | Specifies the instance of a page within a Stage within a StageGroup. Set this value to the Name attribute of a Page element. |
Remarks
None.
Example
None.
Pages
This element groups the individual Page elements.
Element Information
Table 99 provides information about the Pages element.
Table 99. Pages Element Information
| Attribute | Value |
|---|---|
| Number of occurrences | One |
| Parent elements | Wizard |
| Contents | Page |
Element Attributes
This element has no attributes.
Remarks
None.
Example
<Pages>
   + <Page Name="WelcomePage" DisplayName="Welcome" Type="Microsoft.SharedPages.WelcomePage">
   + <Page Name="ConfigScanPage" DisplayName="Deployment Readiness" Type="Microsoft.OSDRefresh.ConfigScanPage">
   + <Page Name="ConfigScanBareMetal" DisplayName="Deployment Readiness" Type="Microsoft.OSDRefresh.ConfigScanPage">
   + <Page Name="RebootPage" DisplayName="Reboot" Type="Microsoft.OSDRefresh.RebootPage">
   + <Page Name="WelcomePageReplace" DisplayName="Welcome" Type="Microsoft.SharedPages.WelcomePage">
   + <Page Name="VolumePage" DisplayName="Volume" Type="Microsoft.OSDRefresh.VolumePage">
   + <Page Name="UserRestorePage" DisplayName="Select Target" Type="Microsoft.OSDRefresh.UserStatePage">
   + <Page Name="ComputerPage" DisplayName="New Computer Details" Type="Microsoft.OSDRefresh.ComputerPage">
   + <Page Name="AdminAccounts" DisplayName="Administrator Password" Type="Microsoft.SharedPages.AdminAccountsPage">
   + <Page Name="UDAPage" DisplayName="User Device Affinity" Type="Microsoft.OSDRefresh.UDAPage">
   + <Page Name="LanguagePage" DisplayName="Language" Type="Microsoft.OSDRefresh.LanguagePage">
   + <Page Name="ApplicationPage" DisplayName="Install Programs" Type="Microsoft.OSDRefresh.ApplicationPage">
     <Page Name="SummaryPage" DisplayName="Summary" Type="Microsoft.Shared.SummaryPage" />
   + <Page Name="UserCapturePageOldPC" DisplayName="Select Target" Type="Microsoft.OSDRefresh.UserStatePage">
   + <Page Name="ProgressPage" DisplayName="Capture Data" Type="Microsoft.OSDRefresh.ProgressPage">
   + <Page Name="RebootAfterCapture" DisplayName="Reboot" Type="Microsoft.OSDRefresh.RebootPage">
</Pages>
RadioGroup
This element specifies a group of radio buttons with in a Field element.
Element Information
Table 100 provides information about the RadioGroup element.
Table 100. RadioGroup Element Information
| Attribute | Value |
|---|---|
| Number of occurrences | Zero or more within a Fields element (This element is optional.) |
| Parent elements | Fields |
| Contents | Default |
Element Attributes
Table 101 lists the attributes of the RadioGroup element and provides a description of each.
Table 101. Attributes and Corresponding Values for the RadioGroup Element
| Attribute | Description |
|---|---|
| Locked | Specifies whether the group of radio buttons is enabled for user input. The attribute can be set to: - True. Specifies that the radio buttons are disabled and users cannot select a radio button in the group. - False. Specifies that the radio buttons are enabled and users can select a radio button in the group. |
| Name | Specifies the name of the radio option group. |
Remarks
None.
Example
None.
StageGroup
This element specifies a deployment stage group.
Element Information
Table 102 provides information about the StageGroup element.
Table 102. StageGroup Element Information
| Attribute | Value |
|---|---|
| Number of occurrences | One or more within a StageGroups element |
| Parent elements | StageGroups |
| Contents | Stage |
Element Attributes
Table 103 lists the attributes of the StageGroup element and a description of the attribute.
Table 103. Attributes and Corresponding Values for the StageGroup Element
| Attribute | Description |
|---|---|
| DisplayName | Specifies the user-friendly name of the stage group displayed in the UDI Wizard Designer. This name is usually more descriptive than the Name attribute. |
Remarks
None.
Example
None.
StageGroups
This element groups a set of stage groups within a UDI Wizard configuration file.
Element Information
Table 104 provides information about the StageGroups element.
Table 104. StageGroups Element Information
| Attribute | Value |
|---|---|
| Number of occurrences | Zero or one within a Wizard element |
| Parent elements | Wizard |
| Contents | StageGroup |
Element Attributes
This element has no attributes.
Remarks
None.
Example
None.
Setter
This element specifies a property setting for the value for a property that is named in the Property property.
Element Information
Table 105 provides information about the Setter element.
Table 105. Setter Element Information
| Attribute | Value |
|---|---|
| Number of occurrences | Zero or more within each parent element (This element is optional.) |
| Parent elements | Data, DataItem, Page, Style, Task, Validator |
| Contents | Contains a string value in the Property attribute |
Element Attributes
Table 106 lists the attribute of the Setter element and provides a description of it.
Table 106. Attributes and Corresponding Values for the Setter Element
| Attribute | Description |
|---|---|
| Property | Specifies the property name being set. The property name is set to the value that this attribute brackets. |
Remarks
None.
Example
None.
Stage
This element specifies a Stage within a StageGroup and contains one or more PageRef elements.
Element Information
Table 107 provides information about the Stage element.
Table 107. Stage Element Information
| Attribute | Value |
|---|---|
| Number of occurrences | One or more within a StageGroup element |
| Parent elements | StageGroup |
| Contents | PageRef |
Element Attributes
Table 108 lists the attributes of the Stage element and provides a description of each.
Table 108. Attributes and Corresponding Values for the Stage Element
| Attribute | Description |
|---|---|
| DisplayName | Specifies the user-friendly name of the wizard page displayed in the UDI Wizard Designer. This name is usually more descriptive than the Name attribute. |
| Name | Specifies the name of the stage. The value of this element is used when starting the UDI Wizard with the /stage: name command line parameter. |
Remarks
None.
Example
None.
Style
This element groups the individual Setter elements that configure the UDI Wizard look and feel, including the title shown at the top of the wizard and the banner image shown on the UDI Wizard.
Element Information
Table 109 provides information about the Style element.
Table 109. Style Element Information
| Attribute | Value |
|---|---|
| Number of occurrences | One |
| Parent elements | Wizard |
| Contents | Setter |
Element Attributes
This element has no attributes.
Remarks
None.
Example
<Style>
  <Setter Property="bannerFilename">UDI_Wizard_Banner.bmp</Setter>
  <Setter Property="title">Operating System Deployment (OSD) Refresh Wizard</Setter>
</Style>
Task
This element specifies a task that is to be run on the page specified in the parent Page element.
Element Information
Table 110 provides information about the Task element.
Table 110. Task Element Information
| Attribute | Value |
|---|---|
| Number of occurrences | One or more within a Tasks element |
| Parent elements | Tasks |
| Contents | ExitCodes, File, Setter |
Element Attributes
Table 111 lists the attributes of the Task element and provides a description of each.
Table 111. Attributes and Corresponding Values for the Task Element
| Attribute | Description |
|---|---|
| DependsOn | Specifies whether the task is dependent on another task. The value of this attribute is set to the Name attribute of another Task element. Note: This attribute cannot be configured using the UDI Wizard Designer. However, you can manually add this attribute to a Task element by directly modifying the .xml file. |
| DisplayName | Specifies the user-friendly name of the task displayed in the UDI Wizard Designer. This name is usually more descriptive than the Name attribute. |
| Name | Specifies the name of the task. This name must be unique. |
| Type | Specifies the task type for the task to be run, which is defined in the DLL that contains the task. |
Remarks
None.
Example
None.
Tasks
This element groups a set of tasks for a Page element.
Element Information
Table 112 provides information about the Tasks element.
Table 112. Tasks Element Information
| Attribute | Value |
|---|---|
| Number of occurrences | Zero or one within each Page element (This element is optional.) |
| Parent elements | Page |
| Contents | Task |
Element Attributes
Table 113 lists the attributes of the Tasks element and provides a description of each.
Table 113. Attributes and Corresponding Values for the Tasks Element
| Attribute | Description |
|---|---|
| NameTitle | Specifies the caption that appears at the top of the column that contains the name of the tasks in the appropriate wizard page. |
| StatusTitle | Specifies the caption that appears at the top of the column that contains the status of the tasks in the appropriate wizard page. |
Remarks
None.
Example
None.
Validator
This element specifies a validator for the field control that is specified in the parent Field element.
Element Information
Table 114 provides information about the Validator element.
Table 114. Validator Element Information
| Attribute | Value |
|---|---|
| Number of occurrences | Zero or one within a Field element |
| Parent elements | Field |
| Contents | Setter |
Element Attributes
Table 115 lists the attribute of the Validator element and provides a description of it.
Table 115. Attributes and Corresponding Values for the Validator Element
| Attribute | Description |
|---|---|
| Type | Specifies the type for the validator, which is defined in the DLL that contains the validator |
Remarks
None.
Example
None.
Wizard
This element specifies the root for all other elements.
Element Information
Table 116 provides information about the Wizard element.
Table 116. Wizard Element Information
| Attribute | Value |
|---|---|
| Number of occurrences | One |
| Parent elements | None |
| Contents | DLLs, Pages, StageGroups, Style |
Element Attributes
This element has no attributes.
Remarks
None.
Example
<Wizard>
   + <DLLs>
   + <Style>
   + <Pages>
   + <StageGroups>
</Wizard>
Feedback
Coming soon: Throughout 2024 we will be phasing out GitHub Issues as the feedback mechanism for content and replacing it with a new feedback system. For more information see: https://aka.ms/ContentUserFeedback.
Submit and view feedback for