New configuration profiles for macOS Big Sur and newer versions of macOS
Applies to:
- Microsoft Defender for Endpoint Plan 1
- Microsoft Defender for Endpoint Plan 2
- Microsoft Defender XDR
Want to experience Microsoft Defender for Endpoint? Sign up for a free trial.
If you have deployed Microsoft Defender for Endpoint on macOS in a managed environment (through JAMF, Intune, or another MDM solution), you must deploy new configuration profiles. Failure to do these steps will result in users getting approval prompts to run these new components.
JAMF
JAMF System Extensions Policy
To approve the system extensions, create the following payload:
In Computers > Configuration Profiles select Options > System Extensions.
Select Allowed System Extensions from the System Extension Types drop-down list.
Use UBF8T346G9 for Team Id.
Add the following bundle identifiers to the Allowed System Extensions list:
- com.microsoft.wdav.epsext
- com.microsoft.wdav.netext


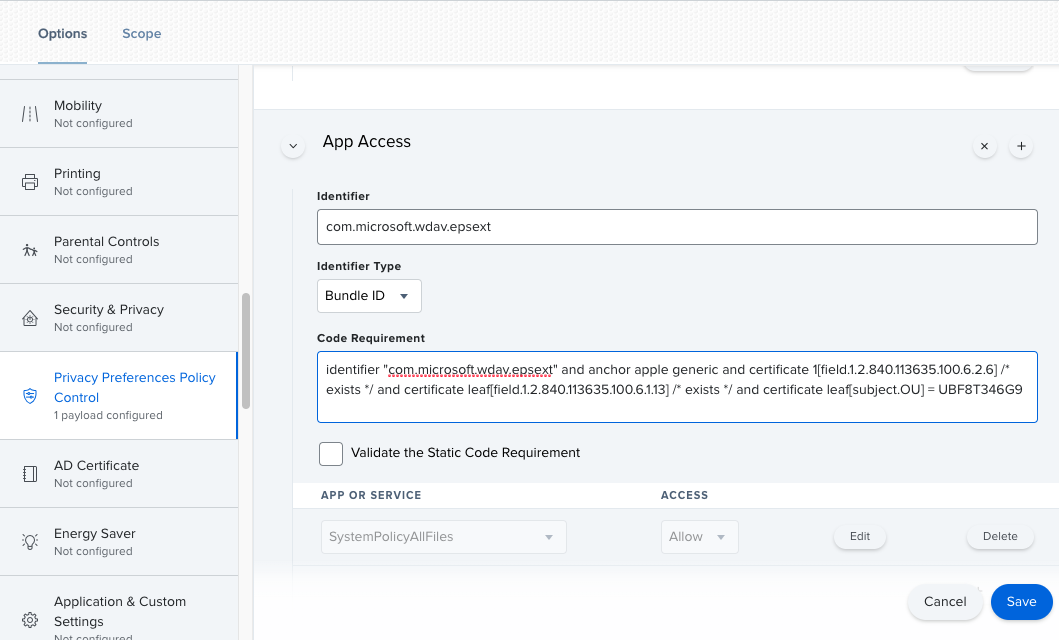
Privacy Preferences Policy Control
Add the following JAMF payload to grant Full Disk Access to the Microsoft Defender for Endpoint Endpoint Security Extension. This policy is a pre-requisite for running the extension on your device.
Select Options > Privacy Preferences Policy Control.
Use
com.microsoft.wdav.epsextas the Identifier andBundle IDas Bundle type.Set Code Requirement to
identifier "com.microsoft.wdav.epsext" and anchor apple generic and certificate 1[field.1.2.840.113635.100.6.2.6] /* exists */ and certificate leaf[field.1.2.840.113635.100.6.1.13] /* exists */ and certificate leaf[subject.OU] = UBF8T346G9Set App or service to SystemPolicyAllFiles and access to Allow.

Network Extension Policy
As part of the Endpoint Detection and Response capabilities, Microsoft Defender for Endpoint on macOS inspects socket traffic and reports this information to the Microsoft Defender portal. The following policy allows the network extension to perform this functionality.
Note
JAMF doesn't have built-in support for content filtering policies, which are a pre-requisite for enabling the network extensions that Microsoft Defender for Endpoint on macOS installs on the device. Furthermore, JAMF sometimes changes the content of the policies being deployed. As such, the following steps provide a workaround that involve signing the configuration profile.
Save the following content to your device as
com.microsoft.network-extension.mobileconfigusing a text editor:<?xml version="1.0" encoding="UTF-8"?><!DOCTYPE plist PUBLIC "-//Apple//DTD PLIST 1.0//EN" "http://www.apple.com/DTDs/PropertyList-1.0.dtd"> <plist version="1"> <dict> <key>PayloadUUID</key> <string>DA2CC794-488B-4AFF-89F7-6686A7E7B8AB</string> <key>PayloadType</key> <string>Configuration</string> <key>PayloadOrganization</key> <string>Microsoft Corporation</string> <key>PayloadIdentifier</key> <string>DA2CC794-488B-4AFF-89F7-6686A7E7B8AB</string> <key>PayloadDisplayName</key> <string>Microsoft Defender Network Extension</string> <key>PayloadDescription</key> <string/> <key>PayloadVersion</key> <integer>1</integer> <key>PayloadEnabled</key> <true/> <key>PayloadRemovalDisallowed</key> <true/> <key>PayloadScope</key> <string>System</string> <key>PayloadContent</key> <array> <dict> <key>PayloadUUID</key> <string>2BA070D9-2233-4827-AFC1-1F44C8C8E527</string> <key>PayloadType</key> <string>com.apple.webcontent-filter</string> <key>PayloadOrganization</key> <string>Microsoft Corporation</string> <key>PayloadIdentifier</key> <string>CEBF7A71-D9A1-48BD-8CCF-BD9D18EC155A</string> <key>PayloadDisplayName</key> <string>Approved Network Extension</string> <key>PayloadDescription</key> <string/> <key>PayloadVersion</key> <integer>1</integer> <key>PayloadEnabled</key> <true/> <key>FilterType</key> <string>Plugin</string> <key>UserDefinedName</key> <string>Microsoft Defender Network Extension</string> <key>PluginBundleID</key> <string>com.microsoft.wdav</string> <key>FilterSockets</key> <true/> <key>FilterDataProviderBundleIdentifier</key> <string>com.microsoft.wdav.netext</string> <key>FilterDataProviderDesignatedRequirement</key> <string>identifier "com.microsoft.wdav.netext" and anchor apple generic and certificate 1[field.1.2.840.113635.100.6.2.6] /* exists */ and certificate leaf[field.1.2.840.113635.100.6.1.13] /* exists */ and certificate leaf[subject.OU] = UBF8T346G9</string> </dict> </array> </dict> </plist>Verify that the above file was copied correctly by running the
plutilutility in the Terminal:$ plutil -lint <PathToFile>/com.microsoft.network-extension.mobileconfigFor example, if the file was stored in Documents:
$ plutil -lint ~/Documents/com.microsoft.network-extension.mobileconfigVerify that the command outputs
OK.<PathToFile>/com.microsoft.network-extension.mobileconfig: OKFollow the instructions on this page to create a signing certificate using JAMF's built-in certificate authority.
After the certificate is created and installed to your device, run the following command from the Terminal to sign the file:
$ security cms -S -N "<CertificateName>" -i <PathToFile>/com.microsoft.network-extension.mobileconfig -o <PathToSignedFile>/com.microsoft.network-extension.signed.mobileconfigFor example, if the certificate name is SigningCertificate and the signed file is going to be stored in Documents:
$ security cms -S -N "SigningCertificate" -i ~/Documents/com.microsoft.network-extension.mobileconfig -o ~/Documents/com.microsoft.network-extension.signed.mobileconfigFrom the JAMF portal, navigate to Configuration Profiles and click the Upload button. Select
com.microsoft.network-extension.signed.mobileconfigwhen prompted for the file.
Intune
Intune System Extensions Policy
To approve the system extensions:
In Intune, open Manage > Device configuration. Select Manage > Profiles > Create Profile.
Choose a name for the profile. Change Platform=macOS to Profile type=Extensions. Select Create.
In the
Basicstab, give a name to this new profile.In the
Configuration settingstab, add the following entries in theAllowed system extensionssection:
| Bundle identifier | Team identifier |
|---|---|
| com.microsoft.wdav.epsext | UBF8T346G9 |
| com.microsoft.wdav.netext | UBF8T346G9 |

- In the
Assignmentstab, assign this profile to All Users & All devices. - Review and create this configuration profile.
Create and deploy the Custom Configuration Profile
The following configuration profile enables the network extension and grants Full Disk Access to the Endpoint Security system extension.
Save the following content to a file named sysext.xml:
<?xml version="1.0" encoding="UTF-8"?><!DOCTYPE plist PUBLIC "-//Apple//DTD PLIST 1.0//EN" "http://www.apple.com/DTDs/PropertyList-1.0.dtd">
<plist version="1">
<dict>
<key>PayloadUUID</key>
<string>7E53AC50-B88D-4132-99B6-29F7974EAA3C</string>
<key>PayloadType</key>
<string>Configuration</string>
<key>PayloadOrganization</key>
<string>Microsoft Corporation</string>
<key>PayloadIdentifier</key>
<string>7E53AC50-B88D-4132-99B6-29F7974EAA3C</string>
<key>PayloadDisplayName</key>
<string>Microsoft Defender System Extensions</string>
<key>PayloadDescription</key>
<string/>
<key>PayloadVersion</key>
<integer>1</integer>
<key>PayloadEnabled</key>
<true/>
<key>PayloadRemovalDisallowed</key>
<true/>
<key>PayloadScope</key>
<string>System</string>
<key>PayloadContent</key>
<array>
<dict>
<key>PayloadUUID</key>
<string>2BA070D9-2233-4827-AFC1-1F44C8C8E527</string>
<key>PayloadType</key>
<string>com.apple.webcontent-filter</string>
<key>PayloadOrganization</key>
<string>Microsoft Corporation</string>
<key>PayloadIdentifier</key>
<string>CEBF7A71-D9A1-48BD-8CCF-BD9D18EC155A</string>
<key>PayloadDisplayName</key>
<string>Approved Network Extension</string>
<key>PayloadDescription</key>
<string/>
<key>PayloadVersion</key>
<integer>1</integer>
<key>PayloadEnabled</key>
<true/>
<key>FilterType</key>
<string>Plugin</string>
<key>UserDefinedName</key>
<string>Microsoft Defender Network Extension</string>
<key>PluginBundleID</key>
<string>com.microsoft.wdav</string>
<key>FilterSockets</key>
<true/>
<key>FilterDataProviderBundleIdentifier</key>
<string>com.microsoft.wdav.netext</string>
<key>FilterDataProviderDesignatedRequirement</key>
<string>identifier "com.microsoft.wdav.netext" and anchor apple generic and certificate 1[field.1.2.840.113635.100.6.2.6] /* exists */ and certificate leaf[field.1.2.840.113635.100.6.1.13] /* exists */ and certificate leaf[subject.OU] = UBF8T346G9</string>
</dict>
<dict>
<key>PayloadUUID</key>
<string>56105E89-C7C8-4A95-AEE6-E11B8BEA0366</string>
<key>PayloadType</key>
<string>com.apple.TCC.configuration-profile-policy</string>
<key>PayloadOrganization</key>
<string>Microsoft Corporation</string>
<key>PayloadIdentifier</key>
<string>56105E89-C7C8-4A95-AEE6-E11B8BEA0366</string>
<key>PayloadDisplayName</key>
<string>Privacy Preferences Policy Control</string>
<key>PayloadDescription</key>
<string/>
<key>PayloadVersion</key>
<integer>1</integer>
<key>PayloadEnabled</key>
<true/>
<key>Services</key>
<dict>
<key>SystemPolicyAllFiles</key>
<array>
<dict>
<key>Identifier</key>
<string>com.microsoft.wdav.epsext</string>
<key>CodeRequirement</key>
<string>identifier "com.microsoft.wdav.epsext" and anchor apple generic and certificate 1[field.1.2.840.113635.100.6.2.6] /* exists */ and certificate leaf[field.1.2.840.113635.100.6.1.13] /* exists */ and certificate leaf[subject.OU] = UBF8T346G9</string>
<key>IdentifierType</key>
<string>bundleID</string>
<key>StaticCode</key>
<integer>0</integer>
<key>Allowed</key>
<integer>1</integer>
</dict>
</array>
</dict>
</dict>
</array>
</dict>
</plist>
Verify that the above file was copied correctly. From the Terminal, run the following command and verify that it outputs OK:
$ plutil -lint sysext.xml
sysext.xml: OK
To deploy this custom configuration profile:
In Intune, open Manage > Device configuration. Select Manage > Profiles > Create profile.
Choose a name for the profile. Change Platform=macOS and Profile type=Custom. Select Configure.
Open the configuration profile and upload sysext.xml. This file was created in the preceding step.
Select OK.

In the
Assignmentstab, assign this profile to All Users & All devices.Review and create this configuration profile.

Tip
Do you want to learn more? Engage with the Microsoft Security community in our Tech Community: Microsoft Defender for Endpoint Tech Community.
Feedback
Coming soon: Throughout 2024 we will be phasing out GitHub Issues as the feedback mechanism for content and replacing it with a new feedback system. For more information see: https://aka.ms/ContentUserFeedback.
Submit and view feedback for