Live Share canvas overview
In conference rooms and classrooms across the globe, whiteboards are a pivotal part of collaboration. In modern times however, the whiteboard is no longer enough. With numerous digital tools such as PowerPoint being the focal point of collaboration in the modern era, it's essential to enable the same creative potential.
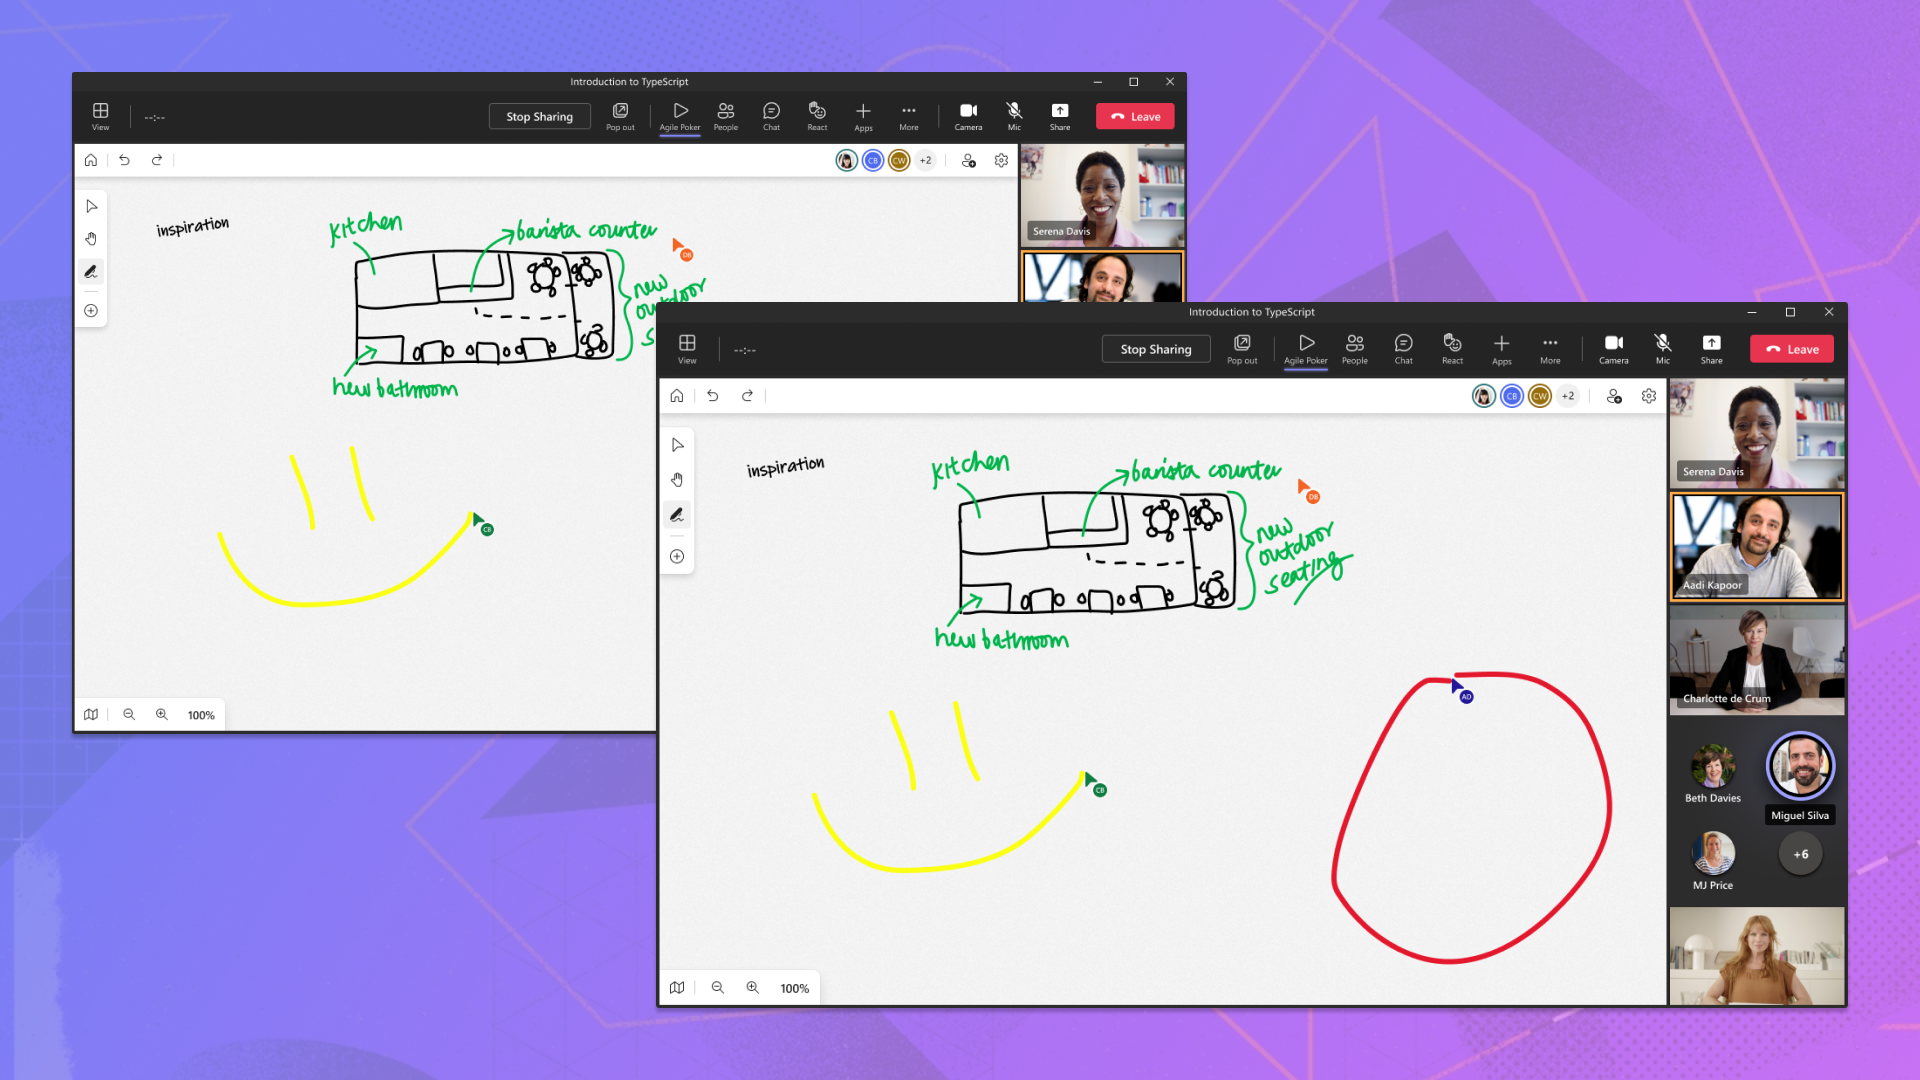
To enable more seamless collaboration, Microsoft created PowerPoint Live, which has become instrumental to how people work in Microsoft Teams. Presenters can annotate over slides for everyone to see, using pens, highlighters, and laser pointers to draw attention to key concepts. Using Live Share canvas, your app can bring the power of PowerPoint Live inking tools with minimal effort.
Install
Live Share canvas is a JavaScript package published on npm, and you can download through npm or yarn. You must also install its peer dependencies, which includes @microsoft/live-share, fluid-framework, and @fluidframework/azure-client. If you are using Live Share in your tab application, you must also install @microsoft/teams-js version 2.11.0 or later.
npm install @microsoft/live-share @microsoft/live-share-canvas fluid-framework @fluidframework/azure-client --save
npm install @microsoft/teams-js --save
OR
To add the latest version of the SDK to your application using Yarn:
yarn add @microsoft/live-share @microsoft/live-share-canvas fluid-framework @fluidframework/azure-client
yarn add @microsoft/teams-js
Setting up the package
Live Share canvas has two primary classes that enable turn-key collaboration: InkingManager and LiveCanvas. InkingManager is responsible for attaching a fully-featured <canvas> element to your app, while LiveCanvas manages the remote synchronization with other meeting participants. Used together, your app can have complete whiteboard-like functionality in just a few lines of code.
| Classes | Description |
|---|---|
| InkingManager | Class that attaches a <canvas> element to a given <div> to automatically manage pen or highlighter strokes, laser pointer, lines and arrows, and erasers. Exposes a set of APIs (to control which tool is active) and basic configuration settings. |
| LiveCanvas | A SharedObject class that synchronizes strokes and cursor positions from InkingManager for everyone in a Live Share session. |
Example:
<body>
  <div id="canvas-host"></div>
</body>
import { LiveShareClient } from "@microsoft/live-share";
import { InkingManager, LiveCanvas } from "@microsoft/live-share-canvas";
import { LiveShareHost } from "@microsoft/teams-js";

// Setup the Fluid container
const host = LiveShareHost.create(host);
const liveShare = new LiveShareClient(host);
const schema = {
  initialObjects: { liveCanvas: LiveCanvas },
};
const { container } = await liveShare.joinContainer(schema);
const { liveCanvas } = container.initialObjects;

// Get the canvas host element
const canvasHostElement = document.getElementById("canvas-host");
const inkingManager = new InkingManager(canvasHostElement);

// Begin synchronization for LiveCanvas
await liveCanvas.initialize(inkingManager);

inkingManager.activate();
Canvas tools and cursors
Now that the Live Share canvas is set up and synchronizing, you can configure the canvas for user interaction, such as buttons to select a pen tool. In this section, we'll discuss what tools are available and how to use them.
Inking tools
Each inking tool in Live Share canvas renders strokes as users draw. If using a touch screen or stylus, the tools also support pressure dynamics, affecting stroke width. Configuration settings include brush color, thickness, shape, and an optional end arrow.
Pen tool

The pen tool draws solid strokes that are stored into the canvas. The default tip shape is a circle.
<div>
  <button id="pen">Enable Pen</button>
  <label for="pen-color">Select a color:</label>
  <input type="color" id="color" name="color" value="#000000" />
  <button id="pen-tip-size">Increase pen size</button>
</div>
import {
  InkingManager,
  InkingTool,
  fromCssColor,
} from "@microsoft/live-share-canvas";
// ...

// Change the selected tool to pen
document.getElementById("pen").onclick = () => {
  inkingManager.tool = InkingTool.pen;
};
// Change the selected color for pen
document.getElementById("pen-color").onchange = () => {
  const colorPicker = document.getElementById("color");
  inkingManager.penBrush.color = fromCssColor(colorPicker.value);
};
// Increase the tip size for pen
document.getElementById("pen-tip-size").onclick = () => {
  inkingManager.penBrush.tipSize = inkingManager.penBrush.tipSize + 1;
};
Highlighter tool

The highlighter tool draws translucent strokes that are stored into the canvas. The default tip shape is a square.
<div>
  <button id="highlighter">Enable Highlighter</button><br />
  <label for="highlighter-color">Select a color:</label>
  <input type="color" id="highlighter-color" name="highlighter-color" value="#FFFC00" />
  <button id="highlighter-tip-size">Increase tip size</button>
</div>
import {
  InkingManager,
  InkingTool,
  fromCssColor,
} from "@microsoft/live-share-canvas";
// ...

// Change the selected tool to highlighter
document.getElementById("highlighter").onclick = () => {
  inkingManager.tool = InkingTool.highlighter;
};
// Change the selected color for highlighter
document.getElementById("highlighter-color").onchange = () => {
  const colorPicker = document.getElementById("highlighter-color");
  inkingManager.highlighterBrush.color = fromCssColor(colorPicker.value);
};
// Increase the tip size for highlighter
document.getElementById("highlighter-tip-size").onclick = () => {
  inkingManager.highlighterBrush.tipSize = inkingManager.penBrush.tipSize + 1;
};
Eraser tool
The eraser tool erases entire strokes that cross its path.
<div>
  <button id="eraser">Enable Eraser</button><br />
  <button id="eraser-size">Increase eraser size</button>
</div>
import {
  InkingManager,
  InkingTool,
} from "@microsoft/live-share-canvas";
// ...

// Change the selected tool to eraser
document.getElementById("eraser").onclick = () => {
  inkingManager.tool = InkingTool.eraser;
};
// Increase the tip size for eraser
document.getElementById("eraser-size").onclick = () => {
  inkingManager.eraserSize = inkingManager.eraserSize + 1;
};
Point eraser tool
The point eraser tool erases individual points within strokes that cross its path by splitting existing strokes in half. This tool is computationally expensive and may result in slower frame rates for your users.
Note
The point eraser shares the same eraser point size as the regular eraser tool.
<div>
  <button id="point-eraser">Enable Point Eraser</button><br />
</div>
import {
  InkingManager,
  InkingTool,
} from "@microsoft/live-share-canvas";
// ...

// Change the selected tool to eraser
document.getElementById("point-eraser").onclick = () => {
  inkingManager.tool = InkingTool.pointEraser;
};
Laser pointer
The laser pointer is unique as the tip of the laser has a trailing effect as you move your mouse. When you draw strokes, the trailing effect renders for a short period before it fades out completely. This tool is perfect to point out information on the screen during a meeting, as the presenter doesn't have to switch between tools to erase strokes.
<div>
  <button id="laser">Enable Laser Pointer</button><br />
  <label for="laser-color">Select a color:</label>
  <input type="color" id="laser-color" name="laser-color" value="#000000" />
  <button id="laser-tip-size">Increase tip size</button>
</div>
import {
  InkingManager,
  InkingTool,
  fromCssColor,
} from "@microsoft/live-share-canvas";
// ...

// Change the selected tool to laser pointer
document.getElementById("laser").onclick = () => {
  inkingManager.tool = InkingTool.laserPointer;
};
// Change the selected color for laser pointer
document.getElementById("laser-color").onchange = () => {
  const colorPicker = document.getElementById("laser-color");
  inkingManager.laserPointerBrush.color = fromCssColor(colorPicker.value);
};
// Increase the tip size for laser pointer
document.getElementById("laser-tip-size").onclick = () => {
  inkingManager.laserPointerBrush.tipSize = inkingManager.laserPointerBrush.tipSize + 1;
};
Line and arrow tools

The line tool allows users to draw straight lines from one point to another, with an optional arrow that can be applied to the end.
<div>
  <button id="line">Enable Line</button><br />
  <button id="line-arrow">Enable Arrow</button><br />
  <input type="color" id="line-color" name="line-color" value="#000000" />
  <button id="line-tip-size">Increase tip size</button>
</div>
import {
  InkingManager,
  InkingTool,
  fromCssColor,
} from "@microsoft/live-share-canvas";
// ...

// Change the selected tool to line
document.getElementById("line").onclick = () => {
  inkingManager.tool = InkingTool.line;
  inkingManager.lineBrush.endArrow = "none";
};
// Change the selected tool to line
document.getElementById("line-arrow").onclick = () => {
  inkingManager.tool = InkingTool.line;
  inkingManager.lineBrush.endArrow = "open";
};
// Change the selected color for lineBrush
document.getElementById("line-color").onclick = () => {
  const colorPicker = document.getElementById("line-color");
  inkingManager.lineBrush.color = fromCssColor(colorPicker.value);
};
// Increase the tip size for lineBrush
document.getElementById("line-tip-size").onclick = () => {
  inkingManager.lineBrush.tipSize = inkingManager.lineBrush.tipSize + 1;
};
Clear all strokes
You can clear all strokes in the canvas by calling inkingManager.clear(). This deletes all strokes from the canvas.
Import and export raw strokes
Live Share Canvas supports importing and exporting raw strokes from InkingManager, which enables you to export them to your back-end for later use in a future session.
// Export raw strokes
const strokes = inkingManager.exportRaw();

// Optionally clear out existing strokes, and import strokes
inkingManager.clear();
inkingManager.importRaw(strokes);
Export strokes as an SVG
You can export your entire drawing within the InkingManager to a scalable vector graphic (SVG). The SVG contents are returned as a string, which you can then store in your server as an .svg file extension.
// Export raw strokes
const svgText = inkingManager.exportSVG();
Cursors
You can enable live cursors in your application for users to track each other's cursor positions on the canvas. Unlike the inking tools, cursors operate entirely through the LiveCanvas class. You can optionally provide a name and picture to identify each user. You can enable cursors separately or with the inking tools.
// Optional. Set user display info
liveCanvas.onGetLocalUserPictureUrl = () => "YOUR USER PICTURE URI";
// Toggle Live Canvas cursor enabled state
liveCanvas.isCursorShared = !isCursorShared;
Optimizing across devices
For most applications on the web, content renders differently depending on the screen size or varying application state. If InkingManager isn't optimized correctly for your app, it might cause strokes and cursors to appear differently for each user. Live Share canvas supports a simple set of APIs, which allows the <canvas> to adjust stroke positions to align correctly with your content.
By default, Live Share canvas works a lot like a whiteboard app, with the content being center aligned to the viewport with a 1x zoom level. Only part of the content is being rendered within the visible bounds of the <canvas>. Conceptually, it's like recording a video from bird's-eye view. While the viewport of the camera is recording a portion of the world beneath it, the real world stretches nearly infinitely in every direction.
Here's a simple diagram to help visualize this concept:
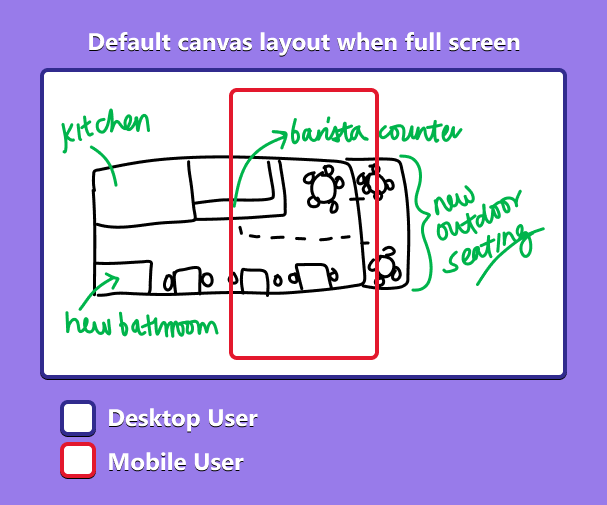
You can customize this behavior in the following ways:
- Changing the starting reference point to the top-left corner of the canvas.
- Alter the pixel offset x and y positions of the viewport.
- Change the scale level of the viewport.
Note
Reference points, offsets, and scale levels are local to the client and aren't synchronized across meeting participants.
Example:
<body>
  <button id="pan-left">Pan left</button>
  <button id="pan-up">Pan up</button>
  <button id="pan-right">Pan right</button>
  <button id="pan-down">Pan down</button>
  <button id="zoom-out">Zoom out</button>
  <button id="zoom-in">Zoom in</button>
  <button id="change-reference">Change reference</button>
</body>
// ...

// Pan left
document.getElementById("pan-left").onclick = () => {
  inkingManager.offset = {
    x: inkingManager.offset.x - 10,
    y: inkingManager.offset.y,
  };
};
// Pan up
document.getElementById("pan-up").onclick = () => {
  inkingManager.offset = {
    x: inkingManager.offset.x,
    y: inkingManager.offset.y - 10,
  };
};
// Pan right
document.getElementById("pan-right").onclick = () => {
  inkingManager.offset = {
    x: inkingManager.offset.x + 10,
    y: inkingManager.offset.y,
  };
};
// Pan down
document.getElementById("pan-down").onclick = () => {
  inkingManager.offset = {
    x: inkingManager.offset.x,
    y: inkingManager.offset.y + 10,
  };
};
// Zoom out
document.getElementById("zoom-out").onclick = () => {
  if (inkingManager.scale > 0.1) {
    inkingManager.scale -= 0.1;
  }
};
// Zoom in
document.getElementById("zoom-in").onclick = () => {
  inkingManager.scale += 0.1;
};
// Change reference
document.getElementById("change-reference").onclick = () => {
  if (inkingManager.referencePoint === "center") {
    inkingManager.referencePoint = "topLeft";
  } else {
    inkingManager.referencePoint = "center";
  }
};
Ideal scenarios
With web pages coming in all shapes and sizes, it isn't possible to make Live Share canvas to support every scenario. The package is ideal for scenarios in which all users are looking at the same content at the same time. While not all the content needs to be visible on the screen, it must be content that scales across devices linearly.
Here are a couple examples of scenarios where Live Share canvas is a great option for your application:
- Overlay images and videos that render with the same aspect ratio on all clients.
- Viewing a map, 3D model, or whiteboard from the same rotation angle.
Both the scenarios work well because the content can be viewed the same on all devices even if the users are looking at it with different zoom levels and offsets. If your app's layout or content changes depending on screen size and it isn't possible to generate a common view for all participants, Live Share canvas might not be a good fit for your scenario.
Code samples
| Sample name | Description | JavaScript |
|---|---|---|
| Live Canvas demo | Simple whiteboard application. | View |
| React media template | Draw over a synchronized video player. | View |
Next step
See also
Platform Docs
Feedback
Coming soon: Throughout 2024 we will be phasing out GitHub Issues as the feedback mechanism for content and replacing it with a new feedback system. For more information see: https://aka.ms/ContentUserFeedback.
Submit and view feedback for