Localization for Office Add-ins
You can implement any localization scheme that's appropriate for your Office Add-in. The JavaScript API and manifest schema of the Office Add-ins platform provide some choices. You can use the Office JavaScript API to determine a locale and display strings based on the locale of the Office application, or to interpret or display data based on the locale of the data. You can use the manifest to specify locale-specific add-in file location and descriptive information. Alternatively, you can use Visual Studio and Microsoft Ajax script to support globalization and localization.
Use the JavaScript API to determine locale-specific strings
The Office JavaScript API provides two properties that support displaying or interpreting values consistent with the locale of the Office application and data.
Context.displayLanguage specifies the locale (or language) of the user interface of the Office application. The following example verifies if the Office application uses the en-US or fr-FR locale, and displays a locale-specific greeting.
function sayHelloWithDisplayLanguage() {
    const myLanguage = Office.context.displayLanguage;
    switch (myLanguage) {
        case 'en-US':
            write('Hello!');
            break;
        case 'fr-FR':
            write('Bonjour!');
            break;
    }
}

// Function that writes to a div with id='message' on the page.
function write(message) {
    document.getElementById('message').innerText += message;
}
Context.contentLanguage specifies the locale (or language) of the data. Extending the last code sample, instead of checking the displayLanguage property, assign
myLanguagethe value of the contentLanguage property, and use the rest of the same code to display a greeting based on the locale of the data.const myLanguage = Office.context.contentLanguage;
Control localization from the manifest
The techniques for localizing with the manifest differ depending on whether you are using the XML manifest or the unified manifest for Microsoft 365 (preview) which is supported only on Outlook for Windows.
Every Office Add-in specifies a DefaultLocale element and a locale in its manifest. By default, the Office Add-in platform and Office client applications apply the values of the Description, DisplayName, IconUrl, HighResolutionIconUrl, and SourceLocation elements to all locales. You can optionally support specific values for specific locales, by specifying an Override child element for each additional locale, for any of these five elements. The value for the DefaultLocale element and for the Locale attribute of the Override element is specified according to RFC 3066, "Tags for the Identification of Languages." Table 1 describes the localizing support for these elements.
Table 1. Localization support
| Element | Localization support |
|---|---|
| Description | Users in each locale you specify can see a localized description for the add-in in AppSource (or private catalog). For Outlook add-ins, users can see the description in the Exchange Admin Center (EAC) after installation. |
| DisplayName | Users in each locale you specify can see a localized description for the add-in in AppSource (or private catalog). For Outlook add-ins, users can see the display name as a label for the Outlook add-in button and in the EAC after installation. For content and task pane add-ins, users can see the display name on the ribbon after installing the add-in. |
| IconUrl | The icon image is optional. You can use the same override technique to specify a certain image for a specific culture. If you use and localize an icon, users in each locale you specify can see a localized icon image for the add-in. For Outlook add-ins, users can see the icon in the EAC after installing the add-in. For content and task pane add-ins, users can see the icon on the ribbon after installing the add-in. |
| HighResolutionIconUrl Important: This element is available only when using add-in manifest version 1.1. | The high resolution icon image is optional but if it is specified, it must occur after the IconUrl element. When HighResolutionIconUrl is specified, and the add-in is installed on a device that supports high dpi resolution, the HighResolutionIconUrl value is used instead of the value for IconUrl. You can use the same override technique to specify a certain image for a specific culture. If you use and localize an icon, users in each locale you specify can see a localized icon image for the add-in. For Outlook add-ins, users can see the icon in the EAC after installing the add-in. For content and task pane add-ins, users can see the icon on the ribbon after installing the add-in. |
| Resources Important: This element is available only when using add-in manifest version 1.1. | Users in each locale you specify can see string and icon resources that you specifically create for the add-in for that locale. |
| SourceLocation | Users in each locale you specify can see a webpage that you specifically design for the add-in for that locale. |
Note
You can localize the description and display name for only the locales that Office supports. See Overview of deploying languages for Microsoft 365 Apps for a list of languages and locales for the current release of Office.
Examples
For example, an Office Add-in can specify the DefaultLocale as en-us. For the DisplayName element, the add-in can specify an Override child element for the locale fr-fr, as shown below.
<DefaultLocale>en-us</DefaultLocale>
...
<DisplayName DefaultValue="Video player">
    <Override Locale="fr-fr" Value="Lecteur vidéo" />
</DisplayName>
Note
If you need to localize for more than one area within a language family, such as de-de and de-at, we recommend that you use separate Override elements for each area. Using the language name alone, in this case, de, is not supported across all combinations of Office client applications and platforms.
This means that the add-in assumes the en-us locale by default. Users see the English display name of "Video player" for all locales unless the client computer's locale is fr-fr, in which case users would see the French display name "Lecteur vidéo".
Note
You may only specify a single override per language, including for the default locale. For example, if your default locale is en-us you cannot not specify an override for en-us as well.
The following example applies a locale override for the Description element. It first specifies a default locale of en-us and an English description, and then specifies an Override statement with a French description for the fr-fr locale.
<DefaultLocale>en-us</DefaultLocale>
...
<Description DefaultValue=
   "Watch YouTube videos referenced in the emails you receive
   without leaving your email client.">
   <Override Locale="fr-fr" Value=
   "Visualisez les vidéos YouTube référencées dans vos courriers
   électronique directement depuis Outlook."/>
</Description>
This means that the add-in assumes the en-us locale by default. Users would see the English description in the DefaultValue attribute for all locales unless the client computer's locale is fr-fr, in which case they would see the French description.
In the following example, the add-in specifies a separate image that's more appropriate for the fr-fr locale and culture. Users see the image DefaultLogo.png by default, except when the locale of the client computer is fr-fr. In this case, users would see the image FrenchLogo.png.
<!-- Replace "domain" with a real web server name and path. -->
<IconUrl DefaultValue="https://<domain>/DefaultLogo.png"/>
<Override Locale="fr-fr" Value="https://<domain>/FrenchLogo.png"/>
The following example shows how to localize a resource in the Resources section. It applies a locale override for an image that is more appropriate for the ja-jp culture.
<Resources>
      <bt:Images>
        <bt:Image id="icon1_16x16" DefaultValue="https://www.contoso.com/icon_default.png">
          <bt:Override Locale="ja-jp" Value="https://www.contoso.com/ja-jp16-icon_default.png" />
        </bt:Image>
 ...
For the SourceLocation element, supporting additional locales means providing a separate source HTML file for each of the specified locales. Users in each locale you specify can see a customized webpage that you design for that them.
For Outlook add-ins, the SourceLocation element also aligns to the form factor. This allows you to provide a separate, localized source HTML file for each corresponding form factor. You can specify one or more Override child elements in each applicable settings element (DesktopSettings, TabletSettings, or PhoneSettings). The following example shows settings elements for the desktop, tablet, and smartphone form factors, each with one HTML file for the default locale and another for the French locale.
<DesktopSettings>
   <SourceLocation DefaultValue="https://contoso.com/Desktop.html">
      <Override Locale="fr-fr" Value="https://contoso.com/fr/Desktop.html" />
   </SourceLocation>
   <RequestedHeight>250</RequestedHeight>
</DesktopSettings>
<TabletSettings>
   <SourceLocation DefaultValue="https://contoso.com/Tablet.html">
      <Override Locale="fr-fr" Value="https://contoso.com/fr/Tablet.html" />
   </SourceLocation>
   <RequestedHeight>200</RequestedHeight>
</TabletSettings>
<PhoneSettings>
   <SourceLocation DefaultValue="https://contoso.com/Mobile.html">
      <Override Locale="fr-fr" Value="https://contoso.com/fr/Mobile.html" />
   </SourceLocation>
</PhoneSettings>
Localize extended overrides
Note
This section is not applicable if you are using the unified manifest (preview).
Some extensibility features of Office Add-ins, such as keyboard shortcuts, are configured with JSON files that are hosted on your server, instead of with the add-in's XML manifest. This section assumes that you're familiar with extended overrides. See Work with extended overrides of the manifest and ExtendedOverrides element.
Use the ResourceUrl attribute of the ExtendedOverrides element to point Office to a file of localized resources. The following is an example.
    ...
    </VersionOverrides>
    <ExtendedOverrides Url="https://contoso.com/addin/extended-overrides.json"
                       ResourceUrl="https://contoso.com/addin/my-resources.json">
    </ExtendedOverrides>
</OfficeApp>
The extended overrides file then uses tokens instead of strings. The tokens name strings in the resource file. The following is an example that assigns a keyboard shortcut to a function (defined elsewhere) that displays the add-in's task pane. Note about this markup:
- The example isn't quite valid. (We add a required additional property to it below.)
- The tokens must have the format ${resource.name-of-resource}.
{
    "actions": [
        {
            "id": "SHOWTASKPANE",
            "type": "ExecuteFunction",
            "name": "${resource.SHOWTASKPANE_action_name}"
        }
    ],
    "shortcuts": [
        {
            "action": "SHOWTASKPANE",
            "key": {
                "default": "${resource.SHOWTASKPANE_default_shortcut}"
            }
        }
    ]
}
The resource file, which is also JSON-formatted, has a top-level resources property that is divided into subproperties by locale. For each locale, a string is assigned to each token that was used in the extended overrides file. The following is an example which has strings for en-us and fr-fr. In this example, the keyboard shortcut is the same in both locales, but that won't always be the case, especially when you are localizing for locales that have a different alphabet or writing system, and hence a different keyboard.
{
    "resources":{
        "en-us": {
            "SHOWTASKPANE_default_shortcut": {
                "value": "CTRL+SHIFT+A",
            },
            "SHOWTASKPANE_action_name": {
                "value": "Show task pane for add-in",
            },
        },
        "fr-fr": {
            "SHOWTASKPANE_default_shortcut": {
                "value": "CTRL+SHIFT+A",
            },
            "SHOWTASKPANE_action_name": {
                "value": "Afficher le volet de tâche pour add-in",
              }
        }
    }
}
There is no default property in the file that is a peer to the en-us and fr-fr sections. This is because the default strings, which are used when the locale of the Office host application doesn't match any of the ll-cc properties in the resources file, must be defined in the extended overrides file itself. Defining the default strings directly in the extended overrides file ensures that Office doesn't download the resource file when the locale of the Office application matches the default locale of the add-in (as specified in the manifest). The following is a corrected version of the preceding example of an extended overrides file that uses resource tokens.
{
    "actions": [
        {
            "id": "SHOWTASKPANE",
            "type": "ExecuteFunction",
            "name": "${resource.SHOWTASKPANE_action_name}"
        }
    ],
    "shortcuts": [
        {
            "action": "SHOWTASKPANE",
            "key": {
                "default": "${resource.SHOWTASKPANE_default_shortcut}"
            }
        }
    ],
    "resources": {
        "default": {
            "SHOWTASKPANE_default_shortcut": {
                "value": "CTRL+SHIFT+A",
            },
            "SHOWTASKPANE_action_name": {
                "value": "Show task pane for add-in",
            }
        }
    }
}
Match date/time format with client locale
You can get the locale of the user interface of the Office client application by using the displayLanguage property. You can then display date and time values in a format consistent with the current locale of the Office application. One way to do that is to prepare a resource file that specifies the date/time display format to use for each locale that your Office Add-in supports. At run time, your add-in can use the resource file and match the appropriate date/time format with the locale obtained from the displayLanguage property.
You can get the locale of the data of the Office client application by using the contentLanguage property. Based on this value, you can then appropriately interpret or display date/time strings. For example, the jp-JP locale expresses data/time values as yyyy/MM/dd, and the fr-FR locale, dd/MM/yyyy.
Use Visual Studio to create a localized and globalized add-in
If you use Visual Studio to create Office Add-ins, the .NET Framework and Ajax provide ways to globalize and localize client script files.
You can globalize and use the Date and Number JavaScript type extensions and the JavaScript Date object in the JavaScript code for an Office Add-in to display values based on the locale settings on the current browser. For more information, see Walkthrough: Globalizing a Date by Using Client Script.
You can include localized resource strings directly in standalone JavaScript files to provide client script files for different locales, which are set on the browser or provided by the user. Create a separate script file for each supported locale. In each script file, include an object in JSON format that contains the resource strings for that locale. The localized values are applied when the script runs in the browser.
Example: Build a localized Office Add-in
This section provides examples that show you how to localize an Office Add-in description, display name, and UI.
Note
To download Visual Studio, see the Visual Studio IDE page. During installation you'll need to select the Office/SharePoint development workload.
Configure Office to use additional languages for display or editing
To run the sample code provided, configure Office on your computer to use additional languages so that you can test your add-in by switching the language used for display in menus and commands, for editing and proofing, or both.
You can use an Office Language pack to install an additional language. For more information about Language Packs and where to get them, see Language Accessory Pack for Office.
After you install the Language Accessory Pack, you can configure Office to use the installed language for display in the UI, for editing document content, or both. The example in this article uses an installation of Office that has the Spanish Language Pack applied.
Create an Office Add-in project
You'll need to create a Visual Studio Office Add-in project.
Note
If you haven't installed Visual Studio, see the Visual Studio IDE page for download instructions. During installation you'll need to select the Office/SharePoint development workload. If you have previously installed Visual Studio 2019 or later, use the Visual Studio Installer to ensure that the Office/SharePoint development workload is installed.
Choose Create a new project.
Using the search box, enter add-in. Choose Word Web Add-in, then select Next.
Name your project WorldReadyAddIn and select Create.
Visual Studio creates a solution and its two projects appear in Solution Explorer. The Home.html file opens in Visual Studio.
Localize the text used in your add-in
The text that you want to localize for another language appears in two areas.
Add-in display name and description. This is controlled by entries in the add-in manifest file.
Add-in UI. You can localize the strings that appear in your add-in UI by using JavaScript code, for example, by using a separate resource file that contains the localized strings.
Localize the add-in display name and description
In Solution Explorer, expand WorldReadyAddIn, WorldReadyAddInManifest, and then choose WorldReadyAddIn.xml.
In WorldReadyAddInManifest.xml, replace the DisplayName and Description elements with the following block of code.
Note
You can replace the Spanish language localized strings used in this example for the DisplayName and Description elements with the localized strings for any other language.
<DisplayName DefaultValue="World Ready add-in">
  <Override Locale="es-es" Value="Aplicación de uso internacional"/>
</DisplayName>
<Description DefaultValue="An add-in for testing localization">
  <Override Locale="es-es" Value="Una aplicación para la prueba de la localización"/>
</Description>
When you change the display language for Microsoft 365 from English to Spanish, for example, and then run the add-in, the add-in display name and description are shown with localized text.
Lay out the add-in UI
In Visual Studio, in Solution Explorer, choose Home.html.
Replace the
<body>element contents in Home.html with the following HTML, and save the file.<body> <!-- Page content --> <div id="content-header" class="ms-bgColor-themePrimary ms-font-xl"> <div class="padding"> <h1 id="greeting" class="ms-fontColor-white"></h1> </div> </div> <div id="content-main"> <div class="padding"> <div class="ms-font-m"> <p id="about"></p> </div> </div> </div> </body>
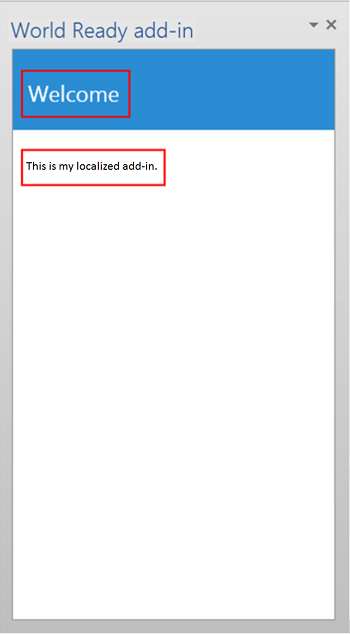
The following figure shows the heading (h1) element and the paragraph (p) element that will display localized text when you complete the remaining steps and run the add-in.
Figure 1. The add-in UI
Add the resource file that contains the localized strings
The JavaScript resource file contains the strings used for the add-in UI. The HTML for the sample add-in UI contains an <h1> element that displays a greeting, and a <p> element that introduces the add-in to the user.
To enable localized strings for the heading and paragraph, you place the strings in a separate resource file. The resource file creates a JavaScript object that contains a separate JavaScript Object Notation (JSON) object for each set of localized strings. The resource file also provides a method for getting back the appropriate JSON object for a given locale.
Add the resource file to the add-in project
In Solution Explorer in Visual Studio, right-click the WorldReadyAddInWeb project and choose Add > New Item.
In the Add New Item dialog box, choose JavaScript File.
Enter UIStrings.js as the file name and choose Add.
Add the following code to the UIStrings.js file, and save the file.
/* Store the locale-specific strings */

const UIStrings = (function ()
{
    "use strict";

    const UIStrings = {};

    // JSON object for English strings
    UIStrings.EN =
    {
        "Greeting": "Welcome",
        "Introduction": "This is my localized add-in."
    };

    // JSON object for Spanish strings
    UIStrings.ES =
    {
        "Greeting": "Bienvenido",
        "Introduction": "Esta es mi aplicación localizada."
    };

    UIStrings.getLocaleStrings = function (locale)
    {
        let text;

        // Get the resource strings that match the language.
        switch (locale)
        {
            case 'en-US':
                text = UIStrings.EN;
                break;
            case 'es-ES':
                text = UIStrings.ES;
                break;
            default:
                text = UIStrings.EN;
                break;
        }

        return text;
    };

    return UIStrings;
})();
The UIStrings.js resource file creates an object, UIStrings, which contains the localized strings for your add-in UI.
Localize the text used for the add-in UI
To use the resource file in your add-in, you'll need to add a script tag for it on Home.html. When Home.html is loaded, UIStrings.js executes and the UIStrings object that you use to get the strings is available to your code. Add the following HTML in the head tag for Home.html to make UIStrings available to your code.
<!-- Resource file for localized strings: -->
<script src="../UIStrings.js" type="text/javascript"></script>
Now you can use the UIStrings object to set the strings for the UI of your add-in.
If you want to change the localization for your add-in based on what language is used for display in menus and commands in the Office client application, you use the Office.context.displayLanguage property to get the locale for that language. For example, if the application language uses Spanish for display in menus and commands, the Office.context.displayLanguage property will return the language code es-ES.
If you want to change the localization for your add-in based on what language is being used for editing document content, you use the Office.context.contentLanguage property to get the locale for that language. For example, if the application language uses Spanish for editing document content, the Office.context.contentLanguage property will return the language code es-ES.
After you know the language the application is using, you can use UIStrings to get the set of localized strings that matches the application language.
Replace the code in the Home.js file with the following code. The code shows how you can change the strings used in the UI elements on Home.html based on either the display language of the application or the editing language of the application.
Note
To switch between changing the localization of the add-in based on the language used for editing, uncomment the line of code const myLanguage = Office.context.contentLanguage; and comment out the line of code const myLanguage = Office.context.displayLanguage;
/// <reference path="../App.js" />
/// <reference path="../UIStrings.js" />


(function () {
    "use strict";

    // The initialize function must be run each time a new page is loaded.
    Office.initialize = function (reason)
    {

        $(document).ready(function () {
            // Get the language setting for editing document content.
            // To test this, uncomment the following line and then comment out the
            // line that uses Office.context.displayLanguage.
            // const myLanguage = Office.context.contentLanguage;

            // Get the language setting for UI display in the Office application.
            const myLanguage = Office.context.displayLanguage;
            let UIText;

            // Get the resource strings that match the language.
            // Use the UIStrings object from the UIStrings.js file
            // to get the JSON object with the correct localized strings.
            UIText = UIStrings.getLocaleStrings(myLanguage);

            // Set localized text for UI elements.
            $("#greeting").text(UIText.Greeting);
            $("#about").text(UIText.Introduction);
        });
    };
})();
Test your localized add-in
To test your localized add-in, change the language used for display or editing in the Office application and then run your add-in.
In Word, choose File > Options > Language. The following figure shows the Word Options dialog box opened to the Language tab.
Figure 2. Language options in the Word Options dialog box
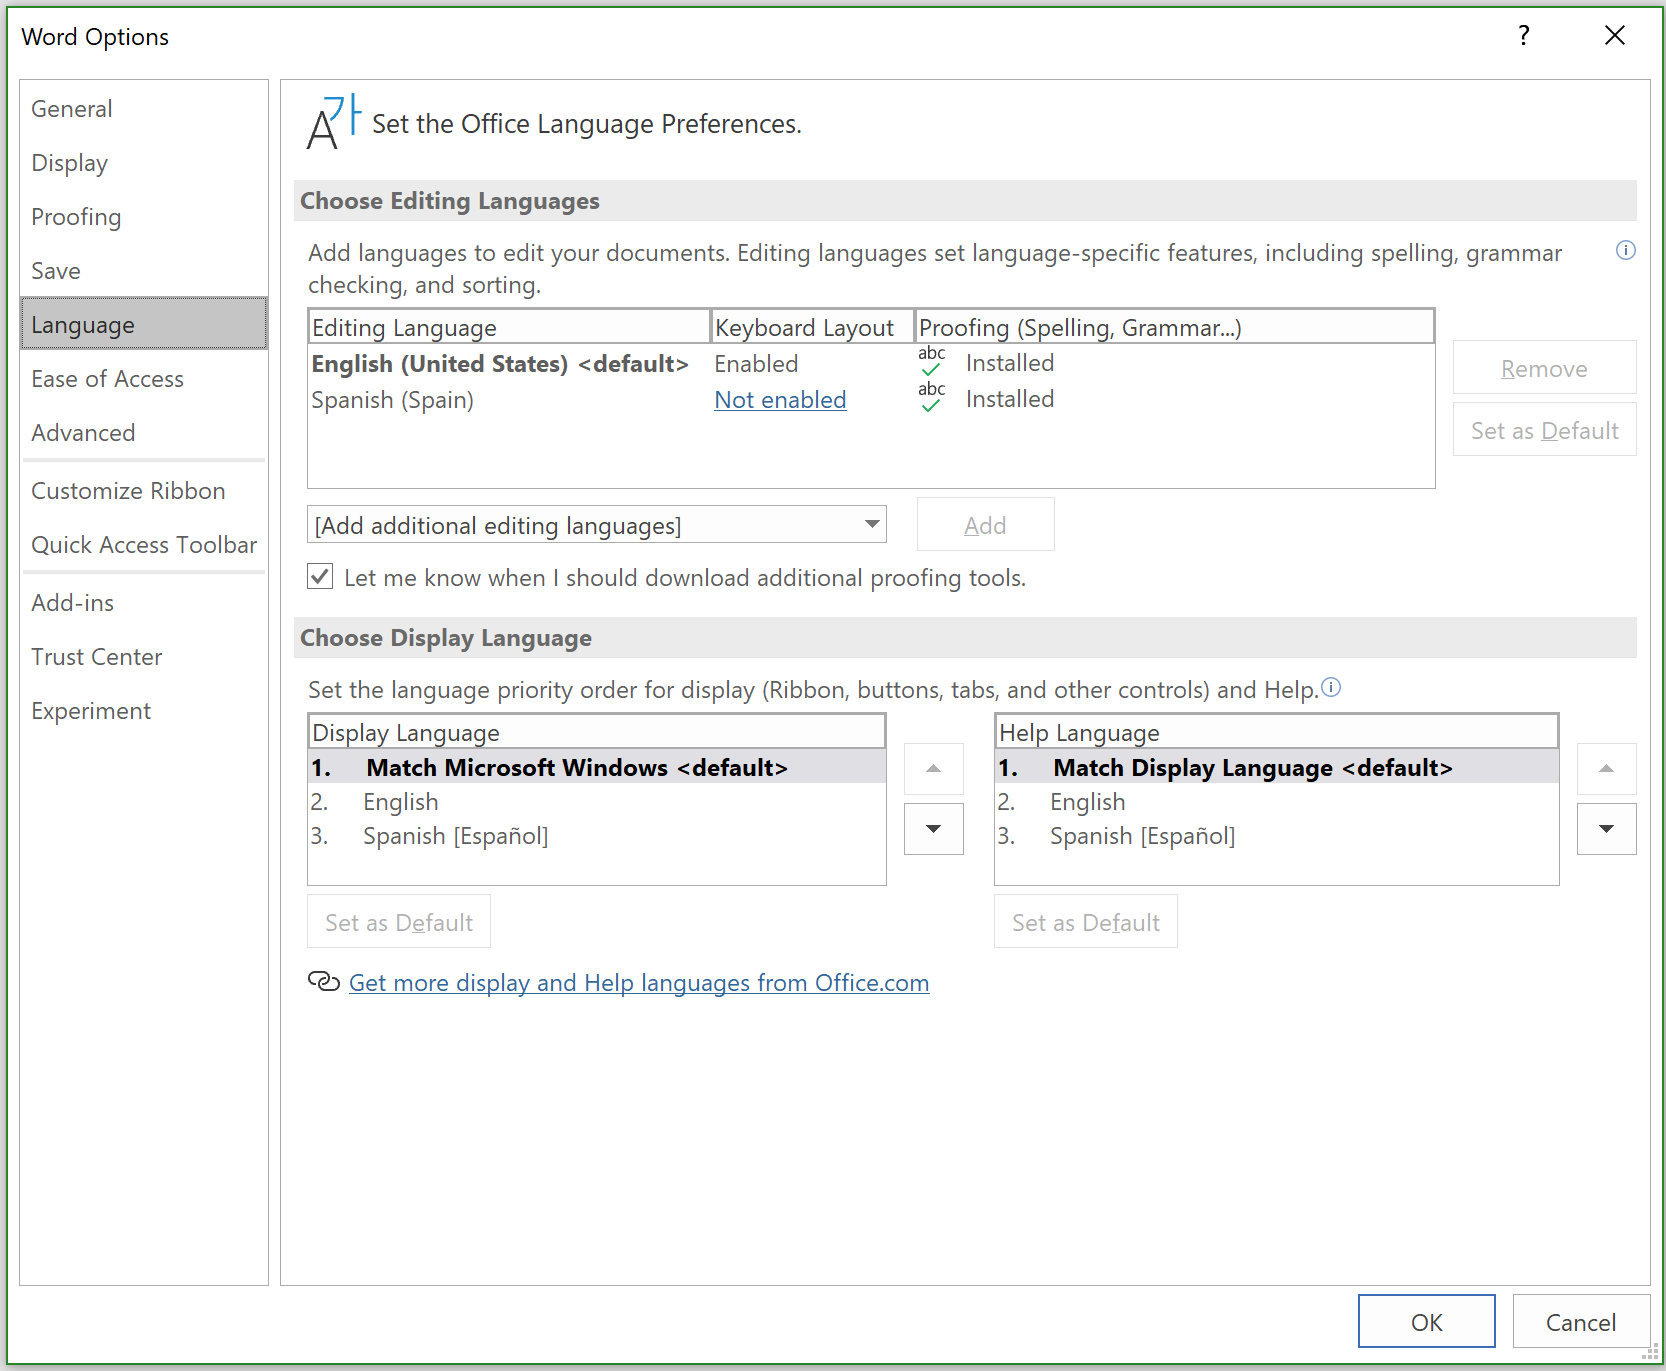
Under Choose Display Language, select the language that you want for display, for example Spanish, and then choose the up arrow to move the Spanish language to the first position in the list. Alternatively, to change the language used for editing, under Choose Editing Languages, choose the language you want to use for editing, for example, Spanish, and then choose Set as Default.
Choose OK to confirm your selection, and then close Word.
Press F5 in Visual Studio to run the sample add-in, or choose Debug > Start Debugging from the menu bar.
In Word, choose Home > Show Taskpane.
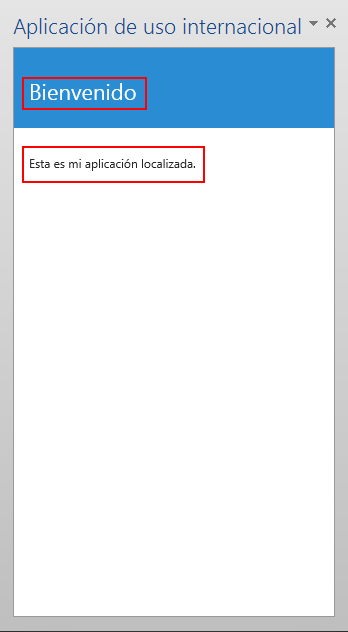
Once running, the strings in the add-in UI change to match the language used by the application, as shown in the following figure.
Figure 3. Add-in UI with localized text
See also
Office Add-ins
Feedback
Coming soon: Throughout 2024 we will be phasing out GitHub Issues as the feedback mechanism for content and replacing it with a new feedback system. For more information see: https://aka.ms/ContentUserFeedback.
Submit and view feedback for