How to determine the license type of your Microsoft Office product
Summary
This article helps you determine the licensing type of your Microsoft Office product, whether it's Microsoft 365, Office LTSC 2021, Office 2019, Office 2016, or Office 2013.
License types
To determine whether you have a retail edition or a volume license edition, use one of the following methods, depending on which version of Microsoft Office product you've installed.
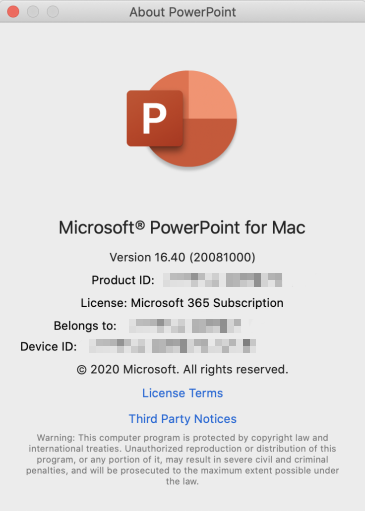
Microsoft 365
If you're using a Microsoft 365 product, see View Microsoft 365 licenses and services with PowerShell. Follow the steps to find your license type and other details about your version of Office.
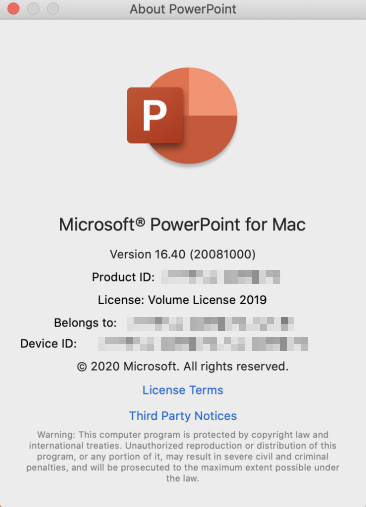
Office LTSC 2021, Office 2019 and Office 2016
Press Windows logo key+X on your keyboard to open the quick action menu.
Select Command Prompt (Admin).

If a security prompt window is displayed, select Allow.
Using the command line to check your license type
Open an elevated Command Prompt window.
Type the following command to navigate to the Office folder.
For 32-bit (x86) Office
cd c:\Program Files (x86)\Microsoft Office\Office16\For 64-bit (x64) Office
cd c:\Program Files\Microsoft Office\Office16\Type
cscript ospp.vbs /dstatus, and then press Enter.
In this example, the screen displays the Retail type license. If you have a volume license (VL) product, the license type is displayed as VL or Volume Licensing.
Office 2013
Method 1: Search DVD or ISO file for Admin folder
This method requires that you have access to the DVD or ISO file that's used to install your Office product.
Open File Explorer, and navigate to the DVD or ISO file.
Search for a folder that's named Admin.
- If the Admin folder exists, this disc is a volume license (VL) edition.
- If the Admin folder does not exist, this disc is a retail edition.
Note
Retail media includes a lowercase "r" before the ".WW" in the folder name and before the "WW.msi" in the MSI file name. For example, the installation file for Proplus retail is ProplusrWW.msi in the ProplusrWW folder. Proplus non-retail is ProplusWW.msi in the PlusplusWW.

Method 2: Use the command-line interface
Open an elevated Command Prompt window.
Windows 10, Windows 8.1, or Windows 8
Press Windows logo key+X on your keyboard to open the quick action menu.
Select Command Prompt (Admin).
If a security prompt window is displayed, select Allow.
Windows 7
- Select Start, and type cmd.
- On the Start menu, right-click Command Prompt, and then select Run as administrator.
- If a security prompt window is displayed, select Allow.
Type the following command to navigate to the Office folder:
For 32-bit (x86) Office
cd c:\Program Files (x86)\Microsoft Office\Office15\For 64-bit (x64) Office
cd c:\Program Files\Microsoft Office\Office15\
At the command prompt, type
cscript ospp.vbs /dstatus, and then press Enter.
In this example, the license channel is reflected as RETAIL or VOLUME.
More information
For more information, see Find details for other versions of Office.
To get support for your Microsoft product, go to the Office product page, and log in to your My Account panel. Within the panel, you can find your product details, support options, and information about any subscriptions that you have.
Still need help? Go to Microsoft Community.
Feedback
Coming soon: Throughout 2024 we will be phasing out GitHub Issues as the feedback mechanism for content and replacing it with a new feedback system. For more information see: https://aka.ms/ContentUserFeedback.
Submit and view feedback for