Extract data from the SAP GUI UI with Power Automate
When you create or update records in SAP, it generates status information which includes the newly generated record IDs. SAP displays this status information in the lower part of the SAP UI.
Here's a sample status message that SAP displays after you create an SAP PM notification.

This status information might be useful for the automation process steps later. Therefore you should extract and assign this status data to variables for downstream data processing.
We have multiple ways to achieve this, depending on your development approach. The two approaches are low-code or pro-code techniques.
Pro-code approach
The pro-code approach uses VBScript commands to extract information from SAP UI elements.
To extract SAP status data, such as a newly created purchase requisitions or plant maintenance notification numbers, you need access to the status bar UI element.
Here's how you access the status bar UI element.
session.findById("wnd\[0\]/sbar/pane\[0\]").Text
Let's walk through the end-to-end experience. We'll record how to create an SAP PM Notification and modify the code that's generated to return the newly created Id to Power Automate Desktop.
In case you've never heard of SAP's PM Notification or you don't have access to it, don't worry you'll still be able understand the steps needed to extract such data for your own scenario.
Here are the steps:
Confirm that all SAP GUI scripting configurations are done.
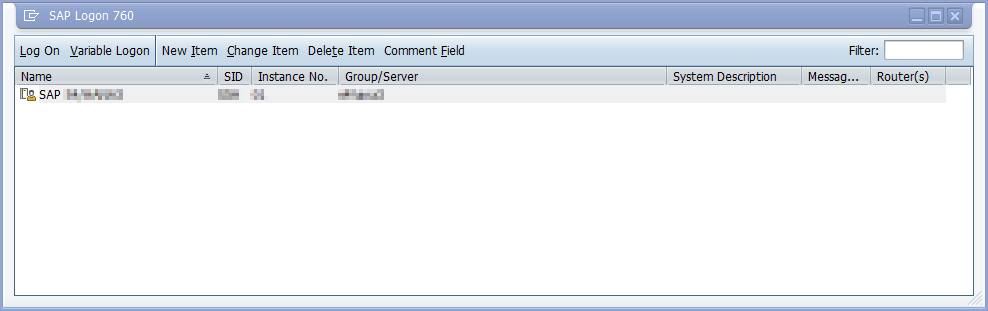
Open SAP Logon and select the SAP system to which you want to sign in.
Select Customize Local Layout (Alt+F12), and then select Script Recording and Playback....
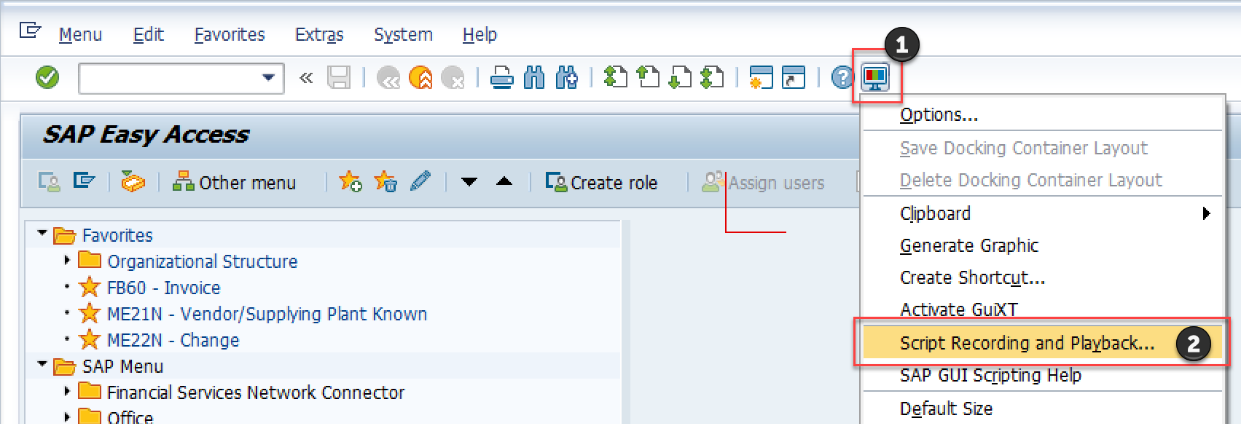
Select More.
Under Save To, provide the file path and filename where you want to store the captured user interactions.
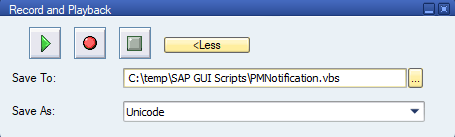
Select the Record Script button to start the screen capturing process. Every interaction you do now in SAP is captured as repeatable VBScript commands.
Note
If you recorded steps and saved to this file before, you'll need to confirm if you want to overwrite the file.
Enter transaction code IW21, and then select Enter.
Provide the Notification type, and then select Enter.
Enter a Short Text, Planner Group, Main WorkCtr, and any other field that you need.
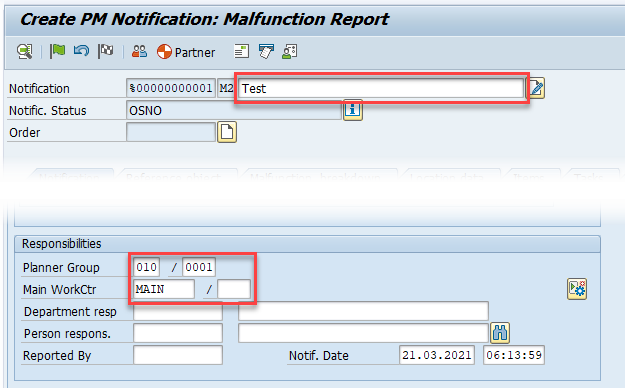
Select Save (Ctrl+S) on the toolbar.
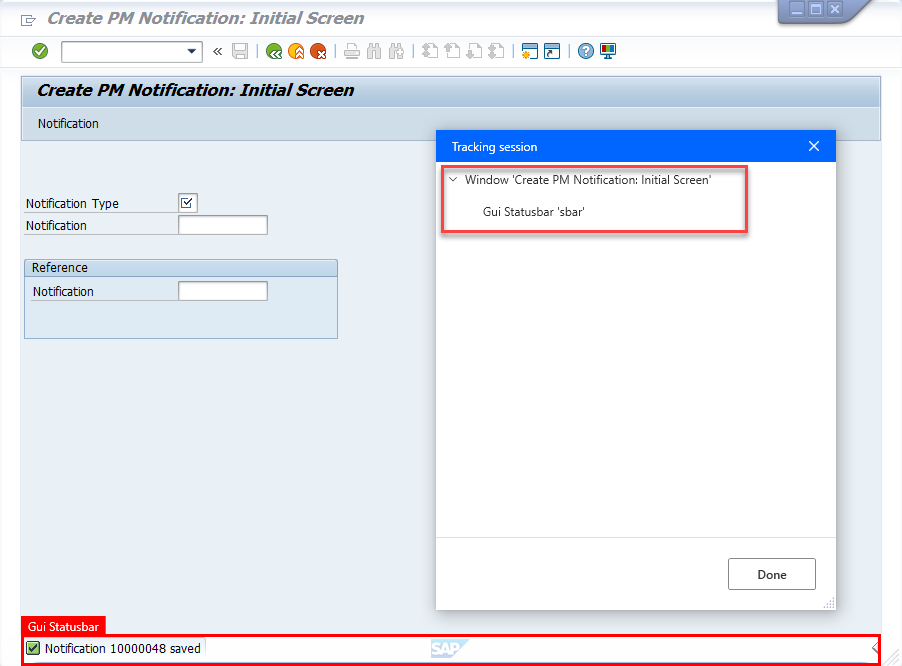
Back in the Create PM Notification initial form, you'll notice a new status message in the status bar in the lower-left corner of the UI.

Select Exit (Shift+F3) on the toolbar, and then stop the recording.
Optionally, log off from SAP and close all SAP windows.
Let's examine the generated VBScript code:
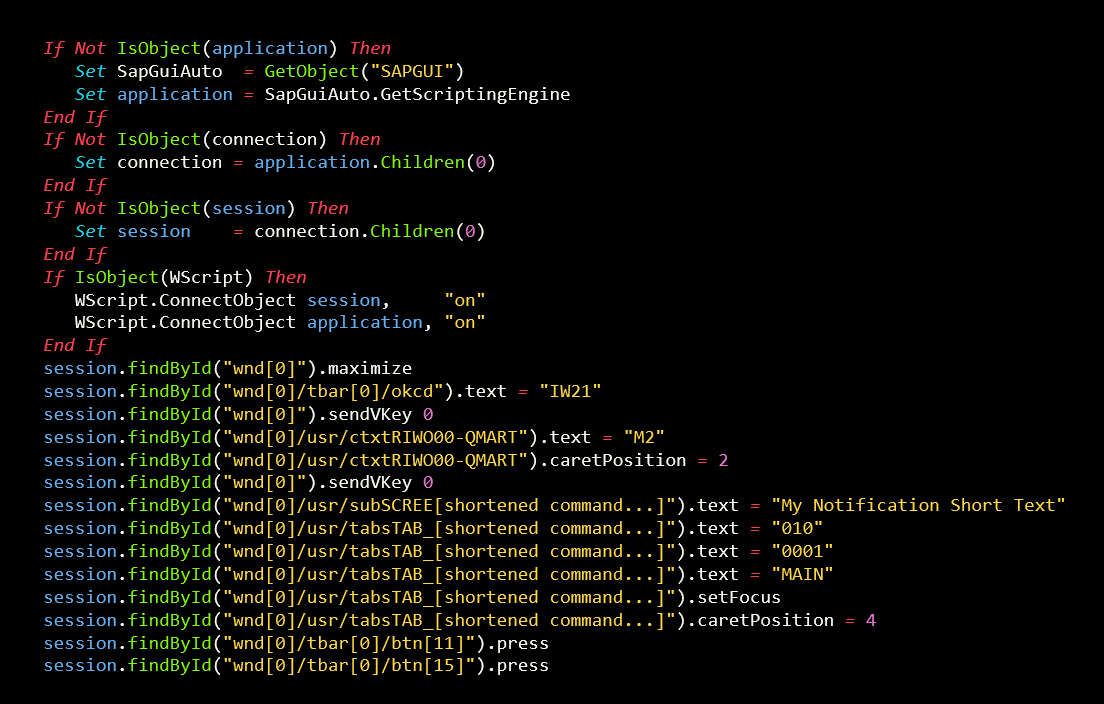
Screenshot of VBScript generated during SAP Notification creation If Not IsObject application Then Set SapGuiAuto GetObject quot SAPGUI quot Set application SapGuiAuto GetScriptingEngine End If If Not IsObject connection Then Set connection application Children 0 End If If Not IsObject session Then Set session connection Children 0 End If If IsObject WScript Then WScript ConnectObject session quot on quot WScript ConnectObject application quot on quot End If session findById quot wnd 0 quot maximize session findById quot wnd 0 tbar 0 okcd quot text quot IW21 quot session findById quot wnd 0 quot sendVKey 0 session findById quot wnd 0 usr ctxtRIWO00 QMART quot text quot M2 quot session findById quot wnd 0 usr ctxtRIWO00 QMART quot caretPosition 2 session findById quot wnd 0 quot sendVKey 0 session findById quot wnd 0 usr subSCREE shortened command quot text quot My Notification Short Text quot session findById quot wnd 0 usr tabsTAB_ shortened command quot text quot 010 quot session findById quot wnd 0 usr tabsTAB_ shortened command quot text quot 0001 quot session findById quot wnd 0 usr tabsTAB_ shortened command quot text quot MAIN quot session findById quot wnd 0 usr tabsTAB_ shortened command quot setFocus session findById quot wnd 0 usr tabsTAB_ shortened command quot caretPosition 4 session findById quot wnd 0 tbar 0 btn 11 quot press session findById quot wnd 0 tbar 0 btn 15 quot press.
Now, let's adjust the generated code to include a step that extracts, trims, and then returns the new notification ID to the Run VBScript action.
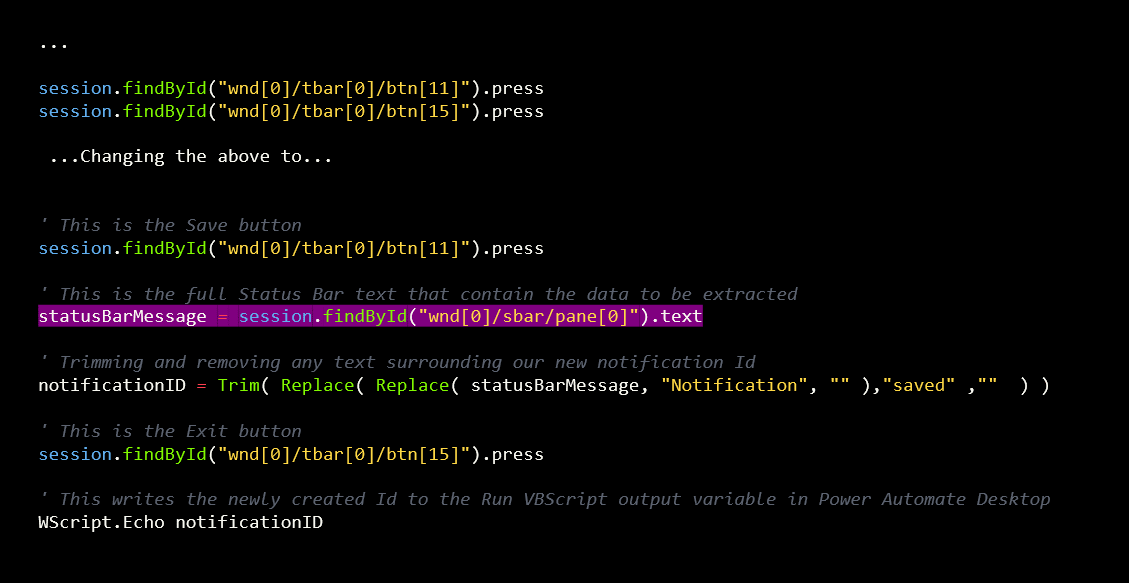
Screenshot of adjusted VBScript that returns SAP Notification to Power Automate Desktop via a variable 39 This is the Save button session findById quot wnd 0 tbar 0 btn 11 quot press 39 This is the full Status Bar text that contain the data to be extracted statusBarMessage session findById quot wnd 0 sbar pane 0 quot text 39 Trimming and removing any text surrounding our new notification Id notificationID Trim Replace Replace statusBarMessage quot Notification quot quot quot quot saved quot quot quot 39 This is the Exit button session findById quot wnd 0 tbar 0 btn 15 quot press 39 This writes the newly created Id to the Run VBScript output variable in Power Automate Desktop WScript Echo notificationID.
This sets the VBScriptOutput variable of the Run VBScript action to the newly created notification ID.
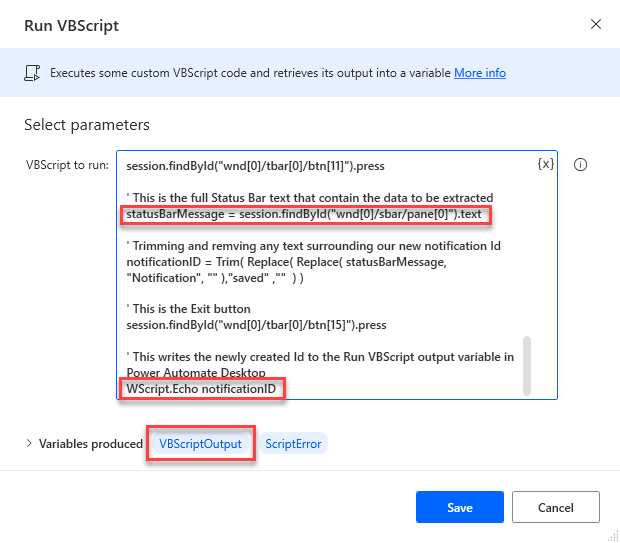
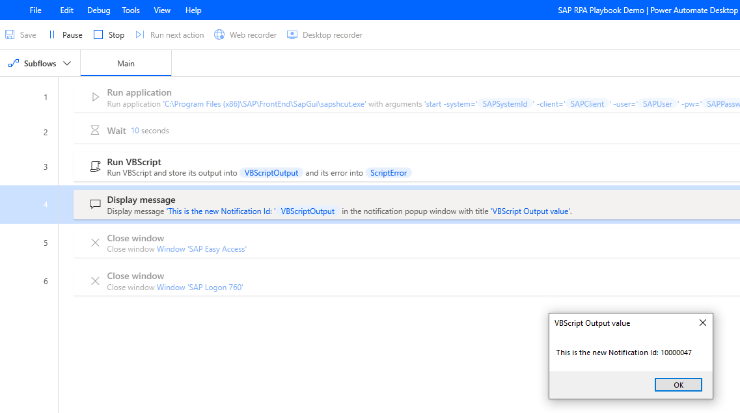
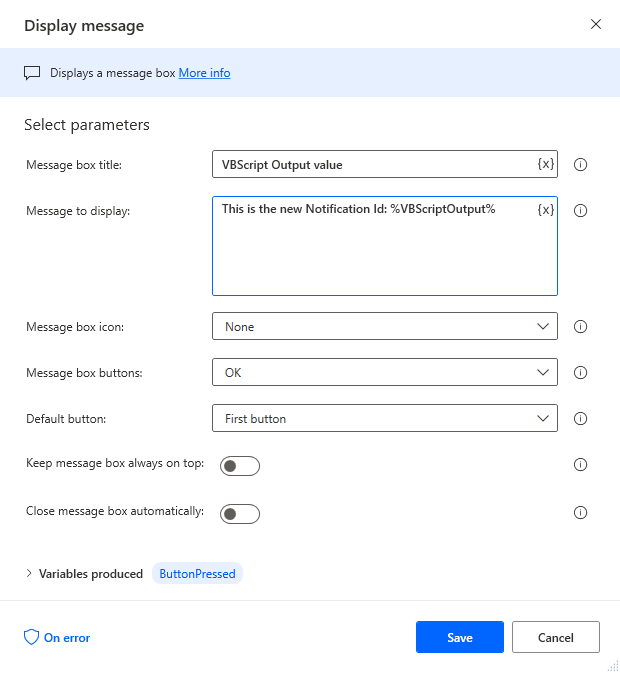
If you want to see the contents of the VBScriptOutput, you can use a display message action, similar to the output in the following images.
Low-code approach
The low-code approach uses actions and custom selectors to extract newly generated record IDs or other status messages that are important for downstream flow processing.
The following steps won't go into detail about how to record or use manual action design to create a new SAP PM Notification record. Please review Low-code or No-code RPA with SAP GUI in Power Automate Desktop if you need a refresher on how to do that.
Follow these steps for a low-code approach:
Use the desktop recorder or manual action design to capture all controls that you need for the SAP PM Notification process.
Create a notification record, and capture the status text that appears after you select Save on the toolbar of the Create PM Notification screen.

After the item is saved, you'll be redirected to the previous screen where you should see a new notification number in the status bar text.
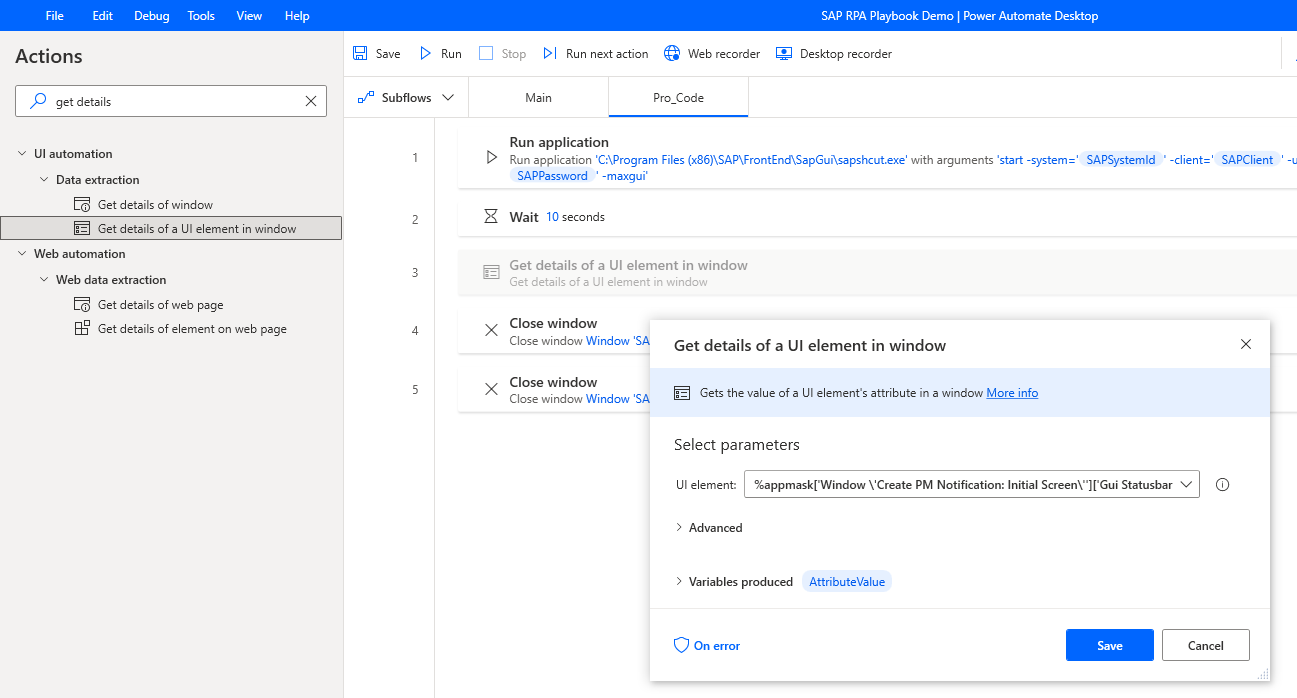
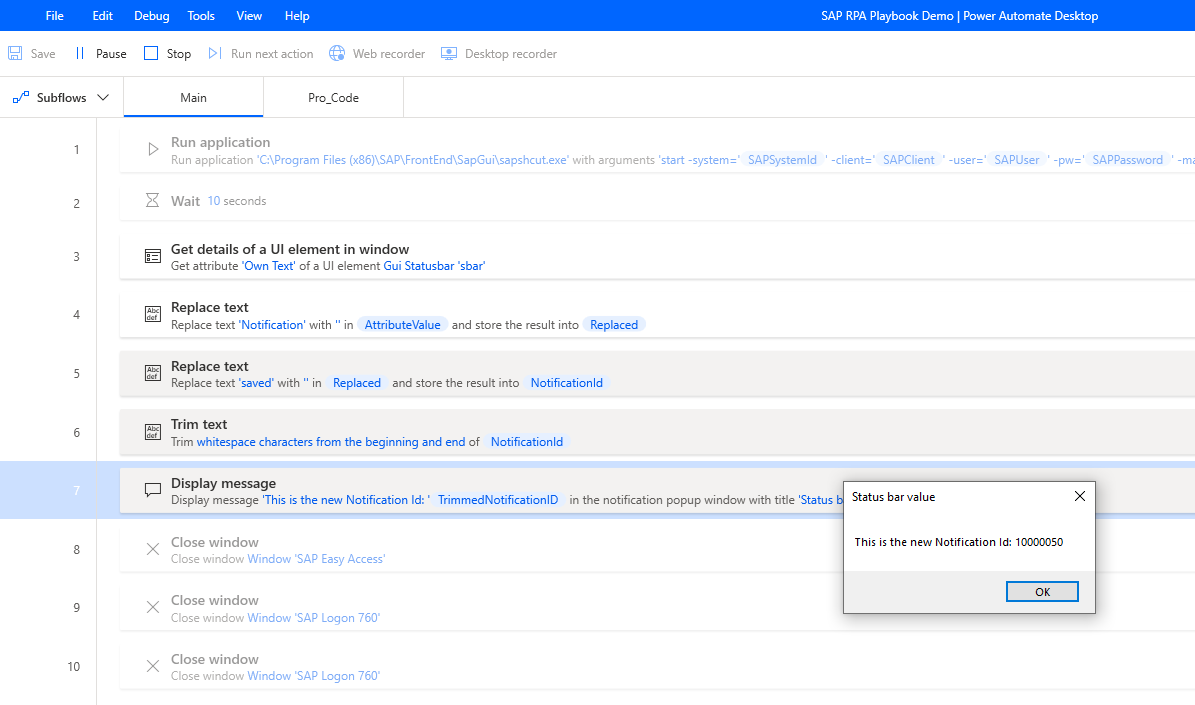
Now, go back to Power Automate Desktop, search for an action named Get details of a UI element in window, and add it to your authoring canvas.
Select the UI element dropdown menu, and then select Add a new UI element button.
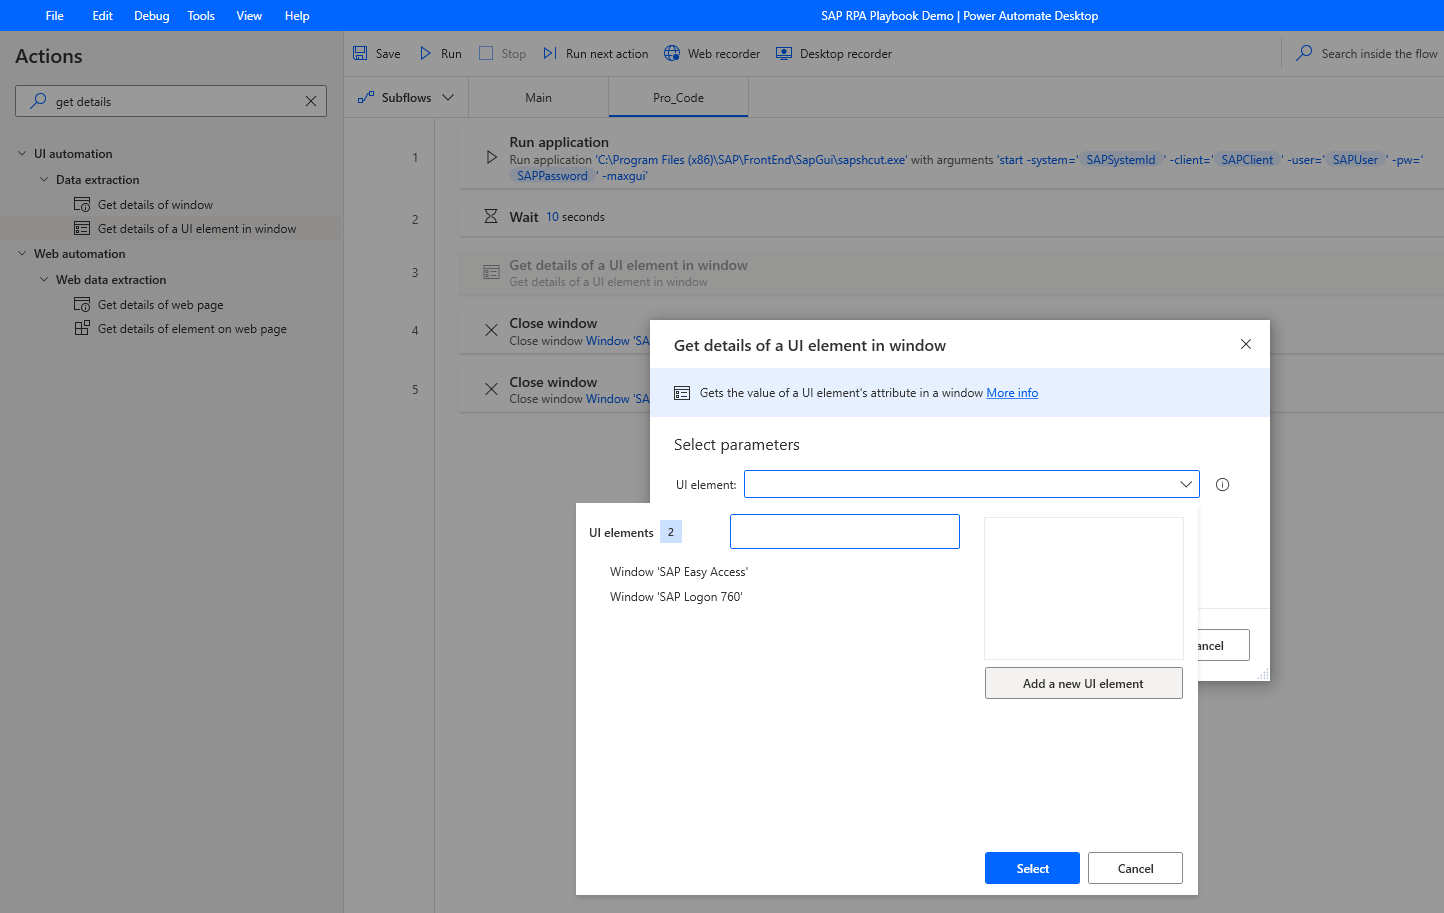
Select the SAP Easy Access window and hover over the status bar until a red border labeled Gui Statusbar appears. While the border is active, hold down Ctrl and then click to select the status bar.
Select Save.
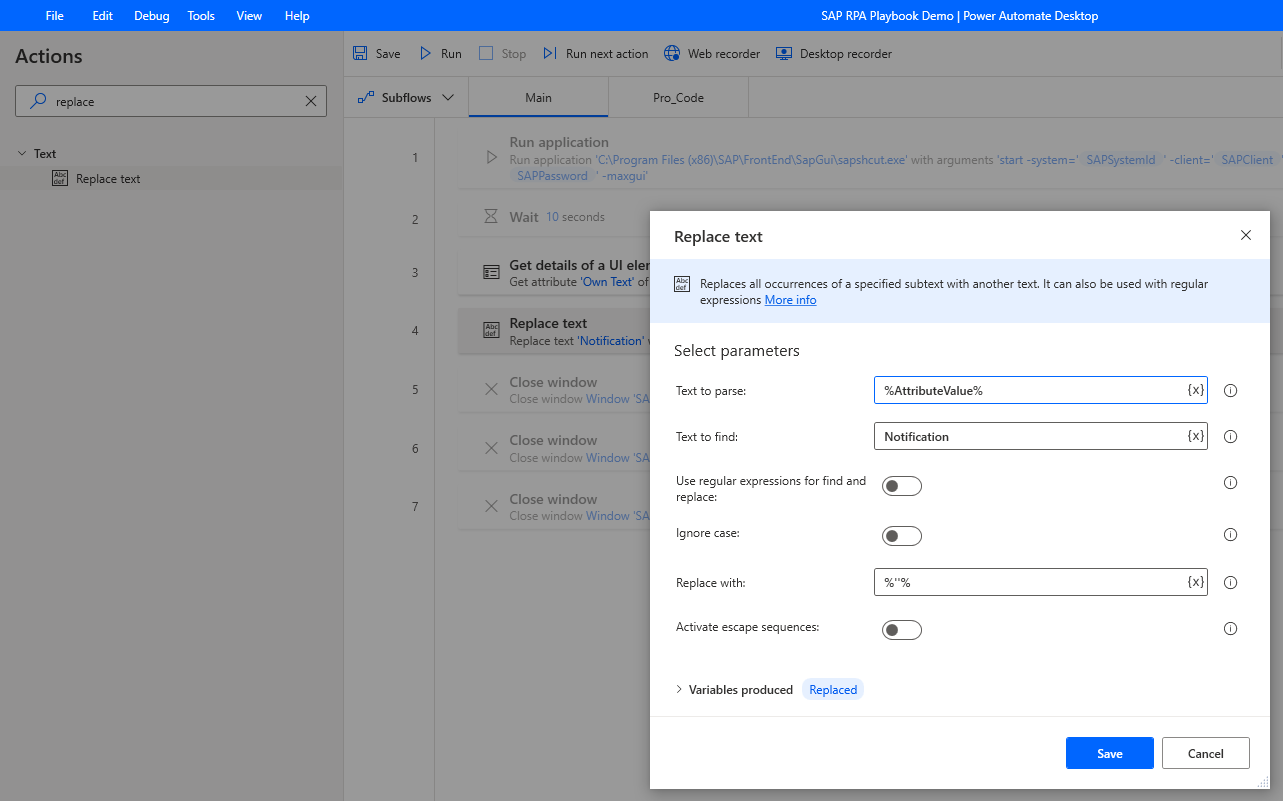
Search for the Replace text action in the Actions pane, and drag it onto the design canvas.
In Text to find, enter Notification. Under Replace with, enter a blank string by entering the following characters: %''%
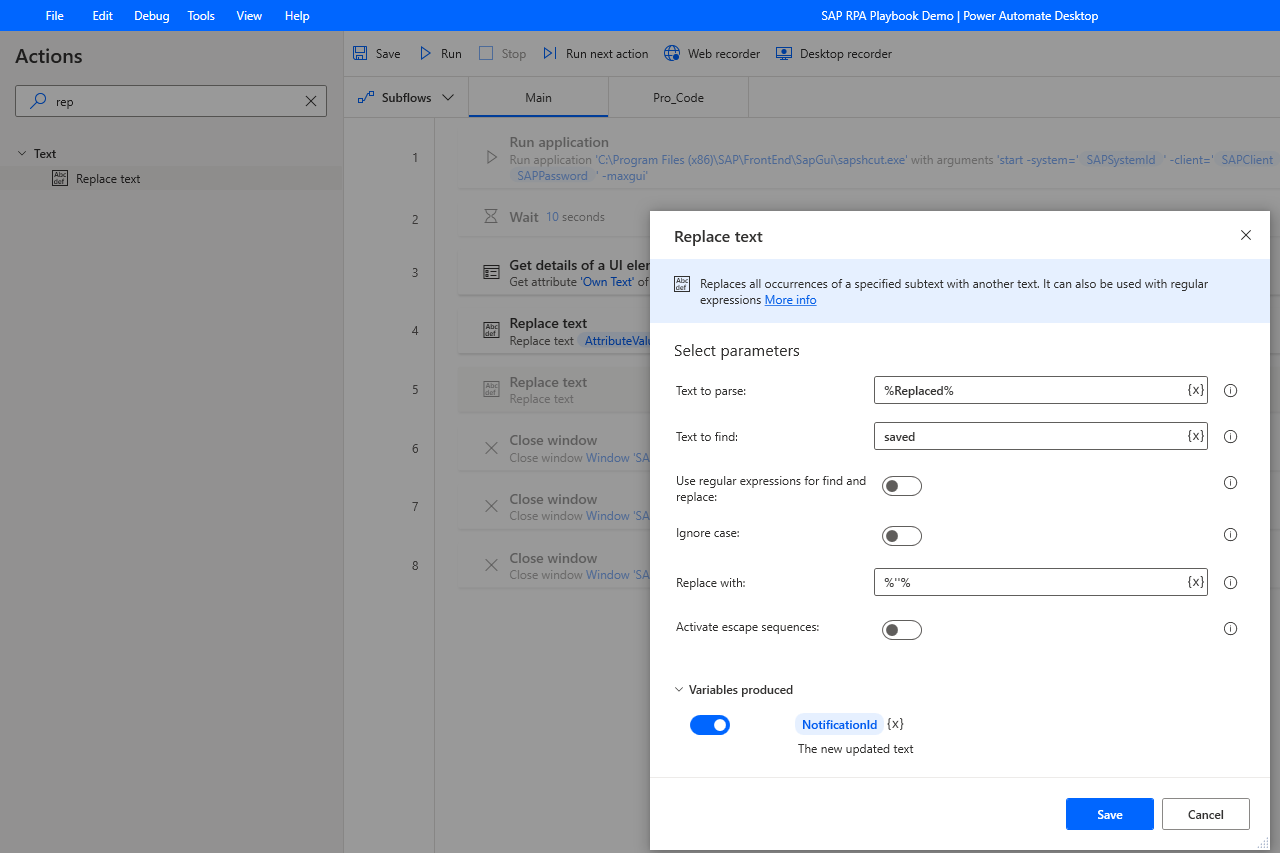
Add another Replace text action, and rename the Variables produced to %NotificationId%. In Text to find, enter save, and under Replace with, enter a blank string (%''%).
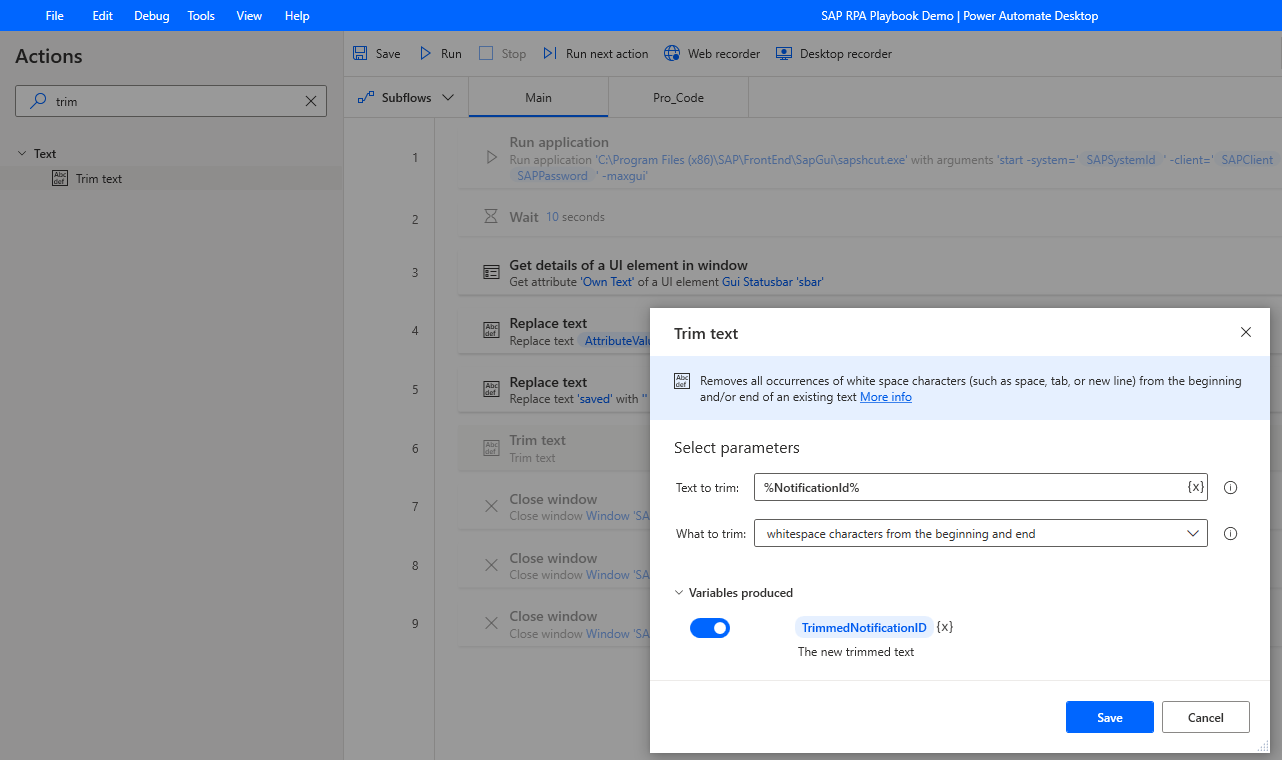
Search for the Trim text action on the Actions pane, drag it onto the design canvas, select %NotificationId% as Text to trim value and rename Variables produced to %TrimmedNotificationID%.
Search for the Display message action on the Actions pane, and drag it onto the design canvas. Set Message box title and Message to display to suit your needs.
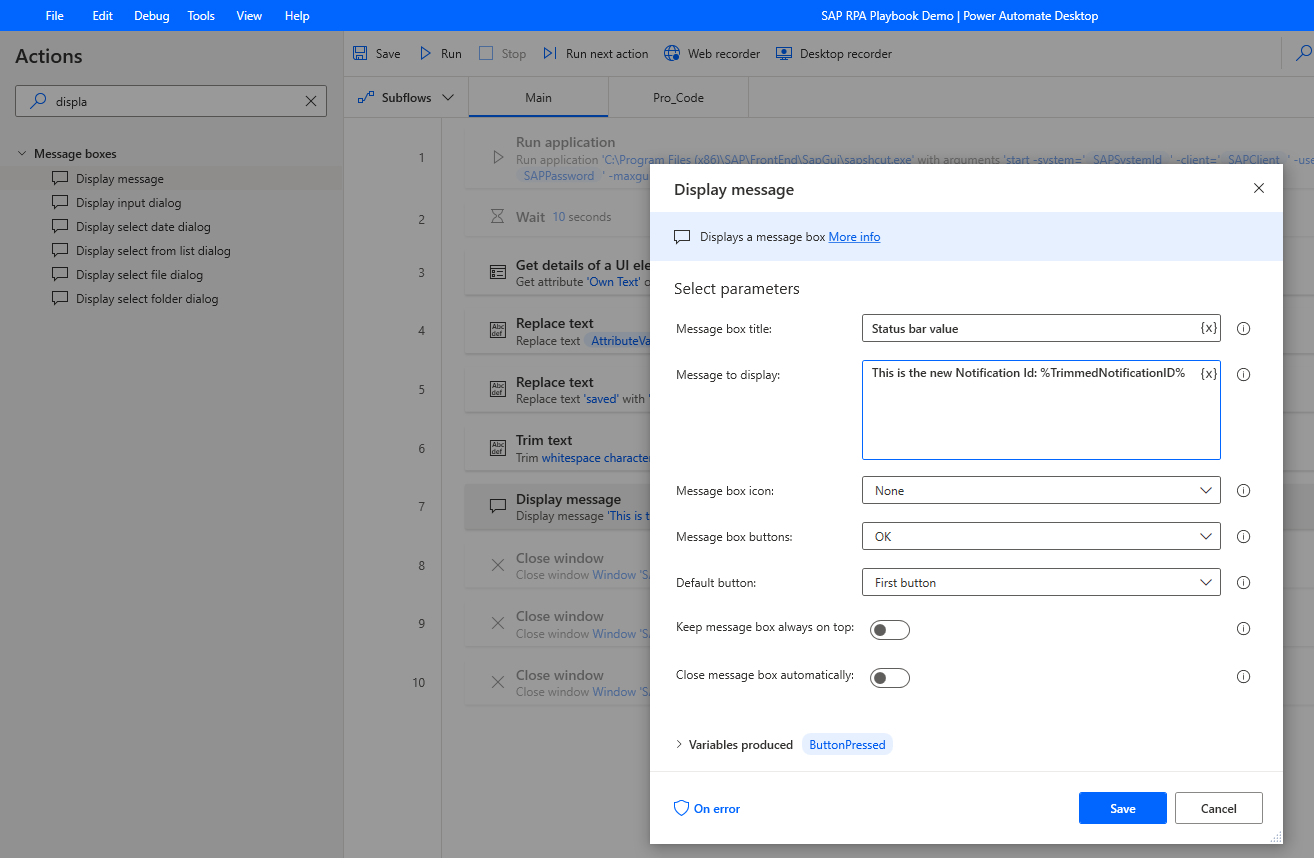
Run the automation that creates a new SAP PM Notification and extracts its newly generated notification ID that can be displayed as shown in the following image.
Feedback
Coming soon: Throughout 2024 we will be phasing out GitHub Issues as the feedback mechanism for content and replacing it with a new feedback system. For more information see: https://aka.ms/ContentUserFeedback.
Submit and view feedback for