Cancel or resubmit flow runs in bulk
You can cancel or resubmit your flow runs in bulk instead of one at a time, which can be a huge time saver.
Resubmit flow runs
You can resubmit previous runs of a flow in bulk. To do this, follow these steps:
Sign in to Power Automate.
On the left panel, select My flows.
On the right panel, select the cloud flow that you would like to resubmit or cancel.
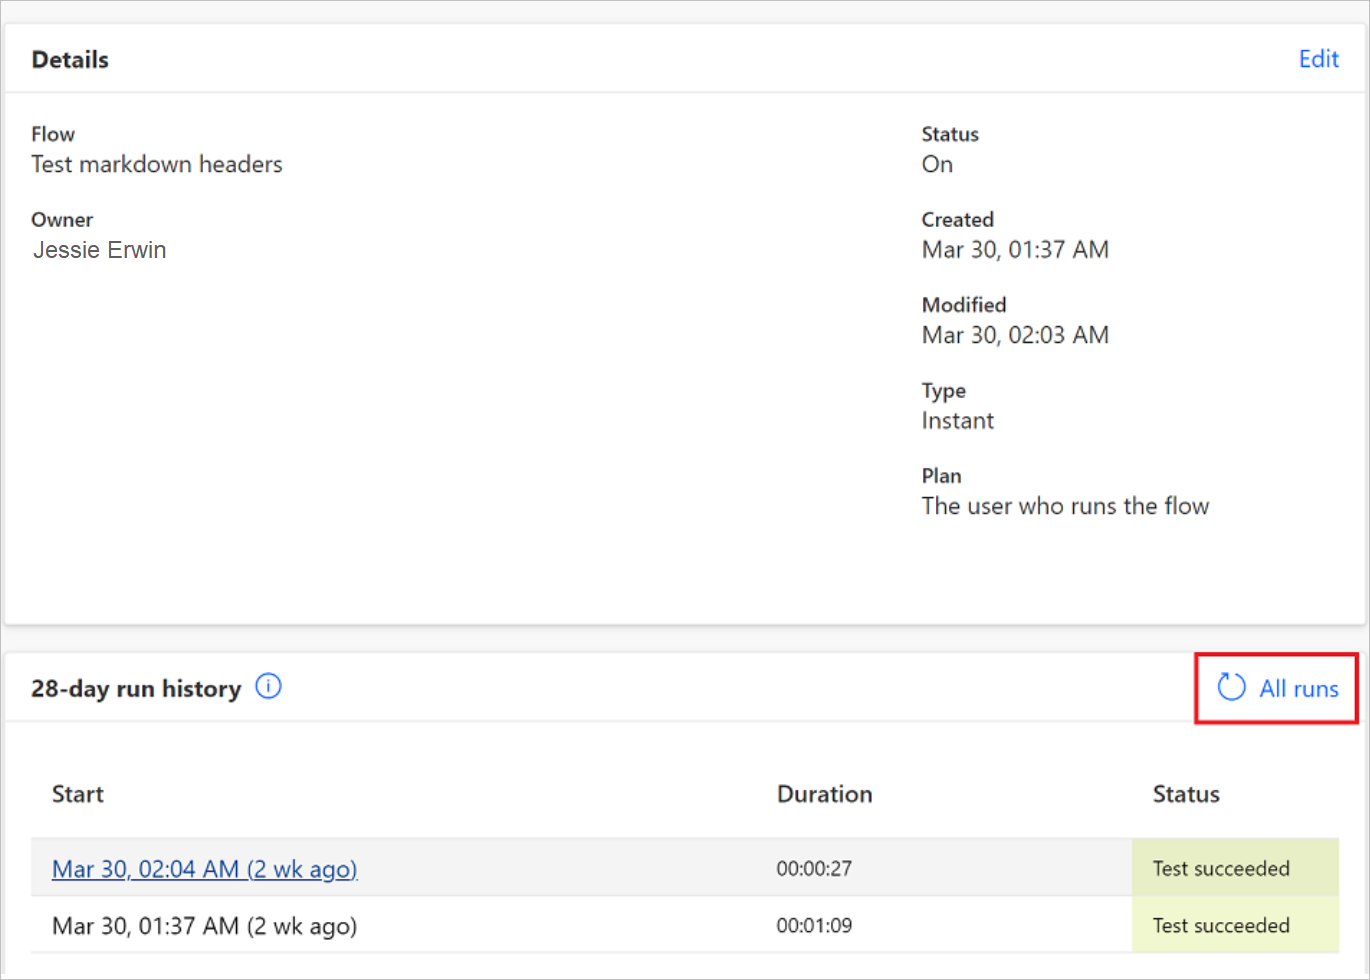
Select All runs.
Tip
- The flow must have runs to cancel or resubmit the flow runs.
- You can resubmit or cancel up to 20 flows at a time.
Select the flow runs that you would like to resubmit or cancel on the Run history page.
Select Resubmit flow run(s).

Important
The number of flows that you can resubmit is limited based on the maximum number of API calls for the connectors in the flow.
Cancel flow runs
You can cancel flow runs either through the Run history page or by using a template. If you need to cancel up to 20 runs, use the Run history page. If you need to cancel more than 20 (even hundreds), use the template. Procedures for both methods are detailed in the following sections.
Cancel up to 20 flow runs
To cancel flow runs that are in progress, follow the steps outlined previously in Resubmit flow runs with one exception: In step 6, select Cancel flow run(s), as shown in the following screenshot.

Cancel more than 20 flow runs
The template cancels runs at approximately five (5) runs per minute. You might be subject to throttling if you change the delay period in the template flow.
Note
- You can use the template only of you have a license that includes premium connectors. To learn more, go to Types of Power Automate licenses—Premium connectors.
- This template isn't available for sovereign cloud customers.
Follow these steps to cancel flow runs using a template:
Obtain the Environment Id and Flow Id.
To find the Environment Id, select Home in the left navigation pane and look at the URL in your browser's address bar. Everything between
environments/and/homeis the Environment Id:
If you can't locate the Environment ID, ask your administrator to go to the Power Platform admin center Details section. To learn more, go to Find your environment and organization ID.
To find the Flow Id, select My flows in the left navigation pane and select your flow. When the Details page opens, look at the URL in your browser's address bar. Everything between
flows/and/detailsis the Flow Id:
Sign in to Power Automate.
Access the Cancel all my flow runs template.
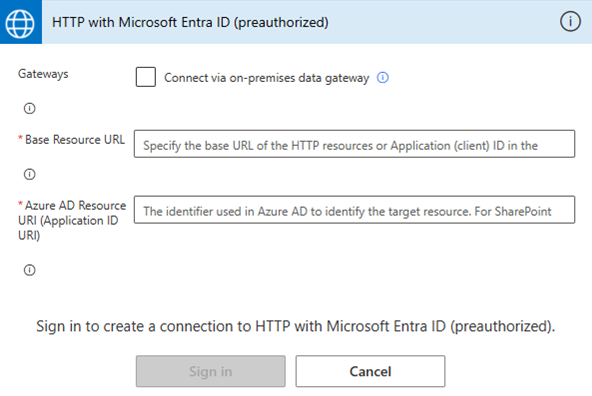
Sign in to HTTP with Microsoft Entra ID (preauthorized).
Enter the following parameters, and then select Sign in:
- Leave the Gateways box unchecked.
- In the Base Resource URL field, enter
https://api.flow.microsoft.com. - In the Azure AD Resource URI (Application ID URI) field, enter
https://service.flow.microsoft.com.
Sign in to Power Automate Management.
In the Authentication Type field, select First Party from the dropdown menu.
Select Sign in. The designer opens.

In the designer, select Save to save the flow.
To run your flow, select Run > Continue.
In the Environment Id and Flow Id fields, enter the Environment Id and Flow Id you obtained in step 1.
Select Run Flow. All flow runs are canceled.

To verify the cancellation, view the Run history page.
For an example of the Run history page, go to the Cancel up to 20 flow runs section in this article.
Feedback
Coming soon: Throughout 2024 we will be phasing out GitHub Issues as the feedback mechanism for content and replacing it with a new feedback system. For more information see: https://aka.ms/ContentUserFeedback.
Submit and view feedback for