Use the admin app and dashboard
This article is meant for business admins in regional medical organizations to use the admin app (model-driven app) to perform the following activities:
Add and manage master data in entities required for the solution
Create and manage portal users (contacts). These users are typically the admins from parent medical organizations that manage one or more hospital systems.
View approve, and decline portal user requests.
View Power BI dashboards in their tenant.
Prerequisites
Ensure you have the appropriate security role and access to the admin app (model-driven app). Contact your IT Admin if you are unable to access or use the admin app.
Ensure you have access to the sample data. The sample data is available in the deployment package under the SampleData folder.
Add and manage master data
When you sign into the admin (model-driven) app, you will see the entities in the left pane where you need to populate the master data. Select the entity in the left navigation pane to view or manage the data.

Hierarchy area: Data for entities in this area can be added either by importing data from the sample data files or manually. The entities under the Hierarchy area are listed in the order you should populate data. Also, parent org admins (hospital admins) can view and manage data under the following entities for their hospital from the portal: Systems, Regions, and Facilities.
Admin Entities area: Data in the Supplies entity is added by importing data from the sample data file. You can also manually add and manage supplies data later.
Customers area: You use Portal Users to manage portal users and User Requests to manage portal user requests.
Resources area: Select Documentation to view this document.
There are two ways in which you can add master data to entities in the app:
Import data using the sample data files.
Manually configure and manage the data.
Import data using sample files
The sample data files are available in the deployment package (.zip). When you extract the .zip file, the sample data files are available under the SampleData folder.
Under the SampleData folder, the files are named to denote the sequence in which data should be imported into your app. Otherwise, data import will fail.
0_Supplies.xlsx
1_Counties.xlsx
2_Regional Organization.xlsx
3_Parent Organizations.xlsx
4_Systems.xlsx
5_Regions.xlsx
6_Facilities.xlsx
Note
We provide name and FIPS code for all the counties in the Washington state as sample data that you can import. You should import the Counties data using the sample data file into your system before proceeding with importing or managing data in any other entities.
To obtain data about counties in other states, visit https://www.census.gov/geographies/reference-files/2018/demo/popest/2018-fips.html
How to load data from data files
To load sample data from the Excel file to an entity:
In the left navigation pane of the admin app, select select an entity. For example, select Parent Org.
Select Import from Excel to select the data file.
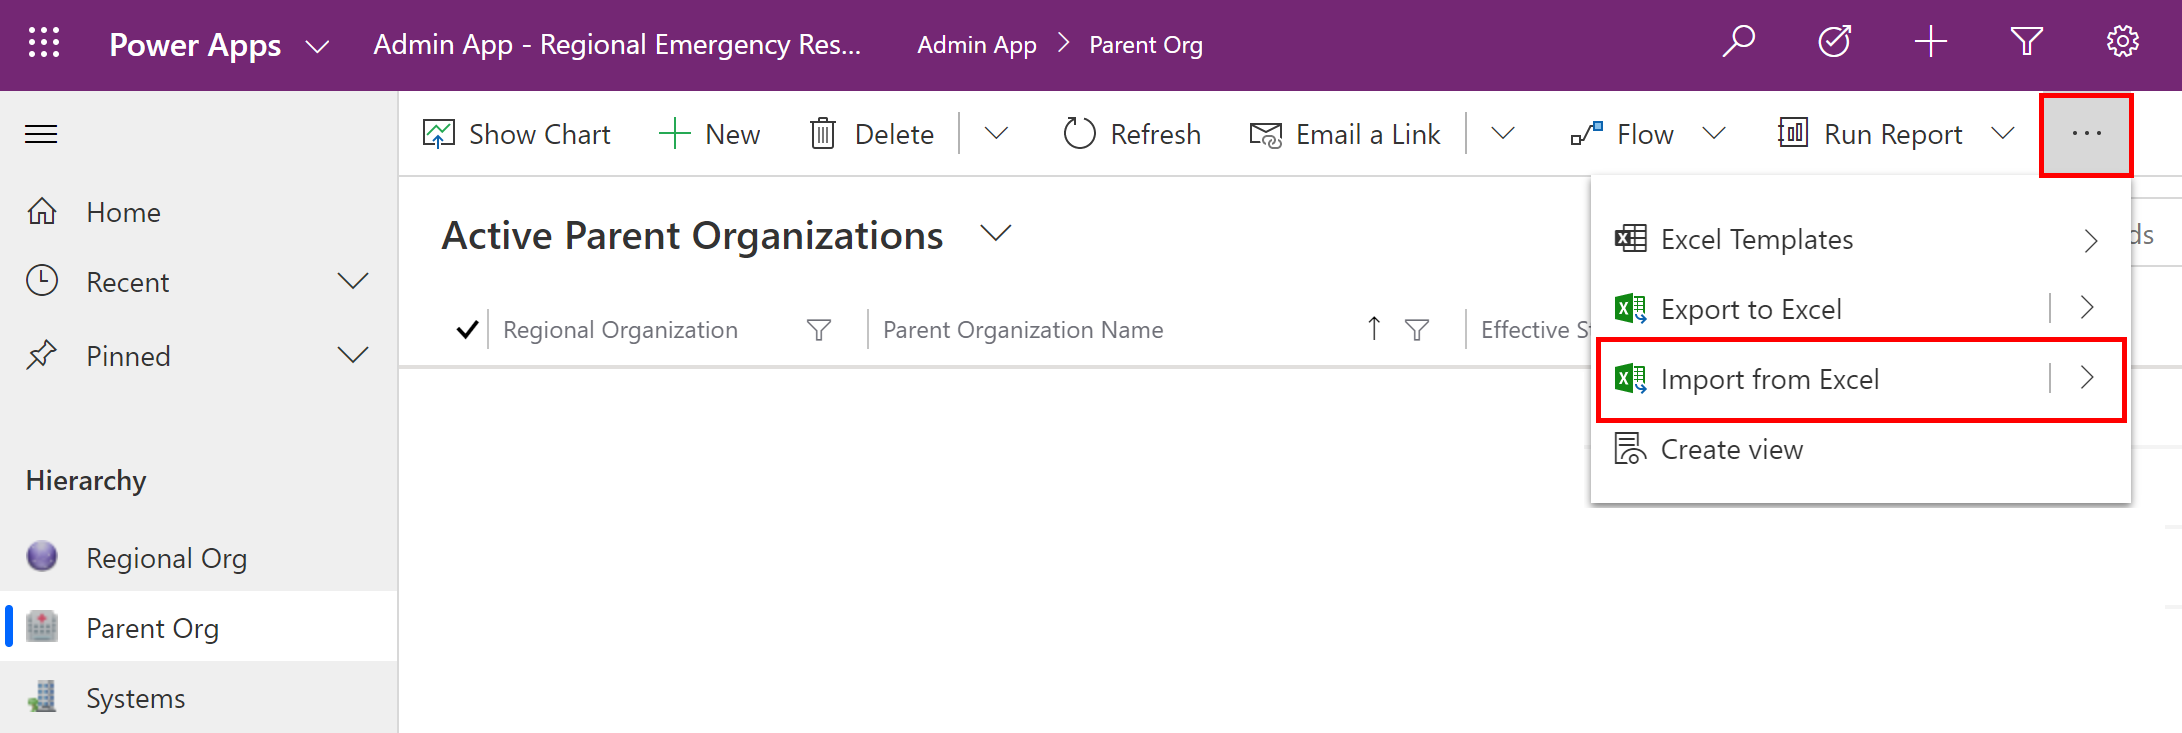
Browse to the SampleData folder and select the 3_Parent Organizations.xlsx file and proceed with the wizard steps to import the data.
After the sample data is imported, you will see the imported records in the entity:
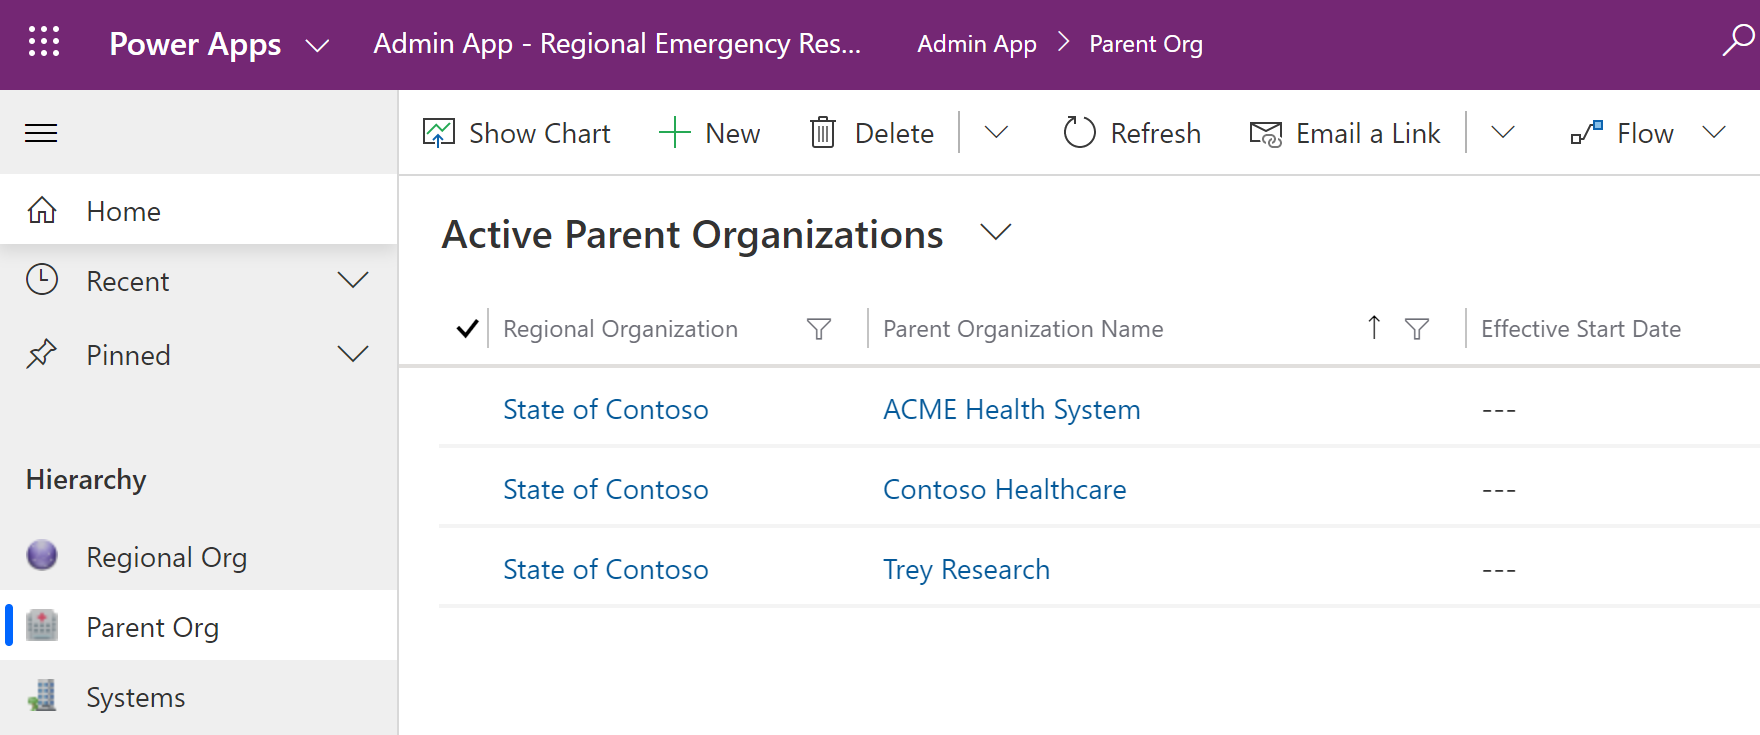
Manually configure and manage master data for your organization
Admins can use the model-driven app in Power Apps to create and manage master data for their organization. This data is required for the Emergency Response Solution to work.
To start, you must add master data in the following entities:
Hospital systems managed by each parent org
Regions) for each hospital system
Facilities) within each region of a hospital system
Sign into the admin app using the URL provided by your IT admin to add and manage data.
Supplies and Counties data
Use the sample data files (0_Supplies.xlsx and 1_Counties.xlsx) in the deployment package to import data for Supplies and Counties entity.
Regional Org data
This is the regional network organization that will deploy the solution and manage data from various parent organizations.
To create a record:
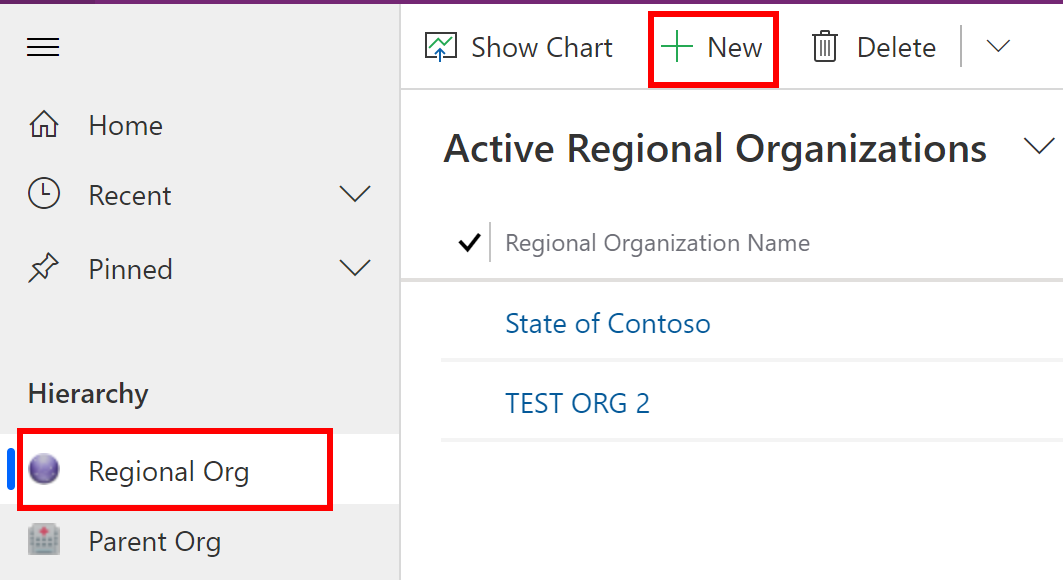
Select Regional Org in the left pane and select New.
In the New Regional Organization page, specify the organization name:
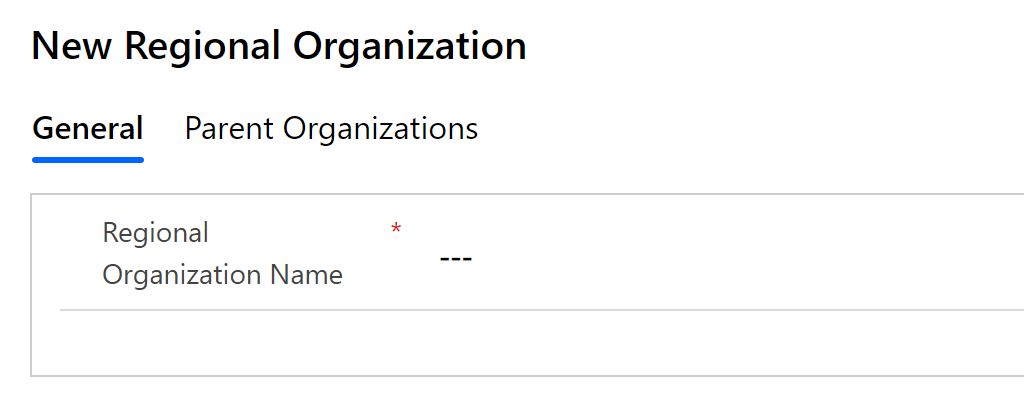
Select Save & Close. The newly created record will be available in the Regional Org list.
To edit the record, select the record, update the values as required, and select Save & Close.
Parent Org data
The Parent Org entity stores the parent organization that will be using the portals set up by regional org to view and manage data related to parent organization’s hospital systems.
To create a record:
Select Parent Org in the left pane and select New.
In the New Parent Organization page, specify appropriate values:
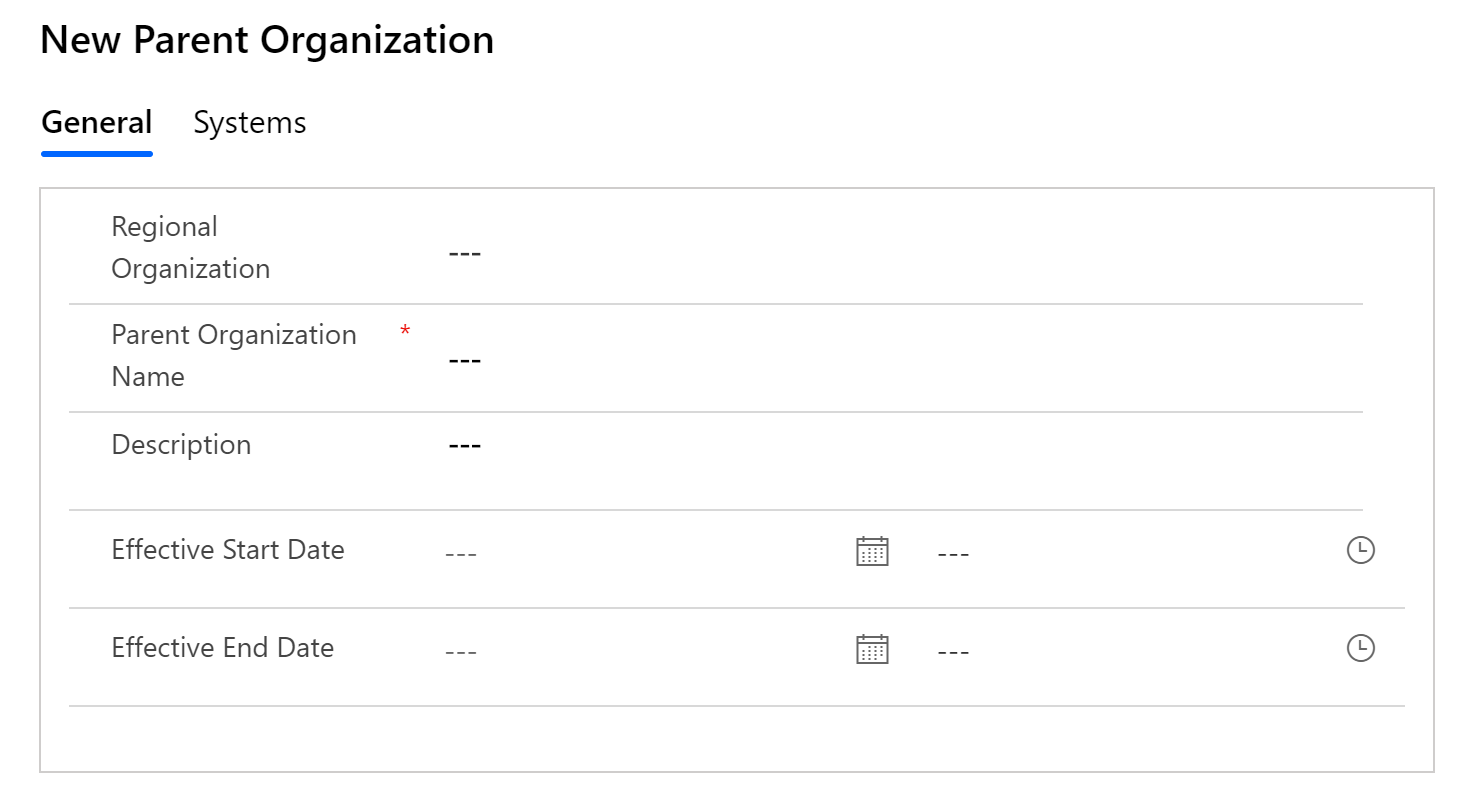
Field Description Regional Organization Select a regional org. This list is populated based on the Regional Org data you have created earlier. Parent Organization Name Specify the parent organization name. Description Type an optional description. Effective Start Data Type start date and time for this parent organization. Effective End Date Type end date and time for this parent organization. Select Save & Close. The newly created record will be available in the Parent Org list.
To edit the record, select the record, update the values as required, and select Save & Close.
Systems data
The Systems entity lets you create and manage entries for Hospital Systems. This allows you to manage multiple hospital systems within the same parent organization.
To create a record:
Select Systems in the left pane and select New.
In the New System page, specify appropriate values:
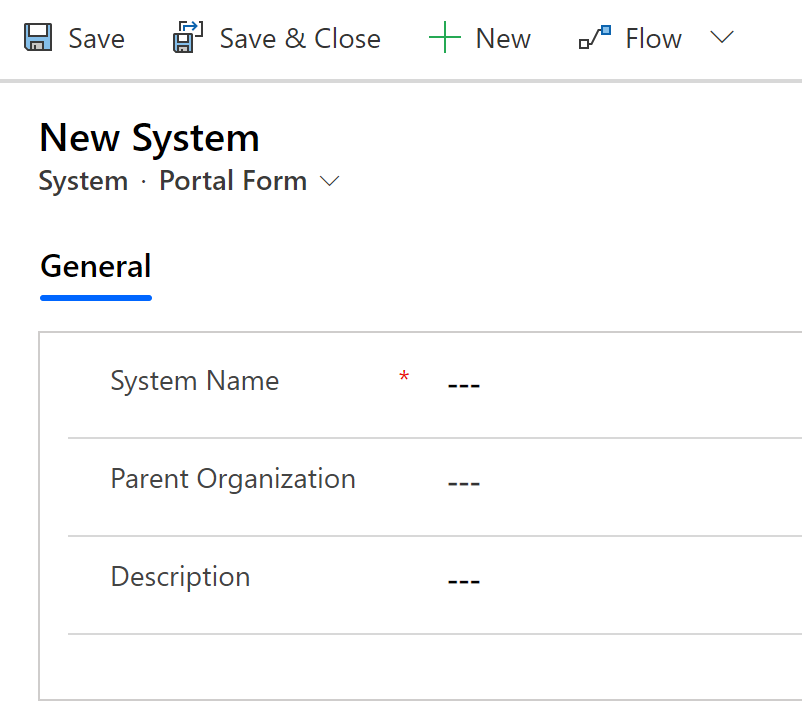
Field Description System Name Type a name for your Hospital. Parent Organization Select a parent org to associate to. This list is populated based on the Parent Org data you have created earlier. Description Type an optional description. Select Save & Close. The newly created record will be available in the Systems list.
To edit the record, select the record, update the values as required, and select Save & Close.
Regions data
The Regions entity lets you manage the geographical regions for your hospital systems.
To create a record:
Select Regions in the left pane and select New.
In the New Region page, specify appropriate values:

Field Description System Select a hospital system this region is associated with. This list is populated based on the Systems data you have created earlier. Region Name Type the region name. For example, Seattle. Description Type an optional description. Select Save & Close. The newly created record will be available in the Regions list.
To edit the record, select the record, update the values as required, and select Save & Close.
Facilities data
The Facilities entity lets you manage the hospital locations within each region. For example, Redmond and Bellevue facilities within the Seattle region.
To create a record:
Select Facilities in the left pane and select New.
In the New Facility page, specify appropriate values:
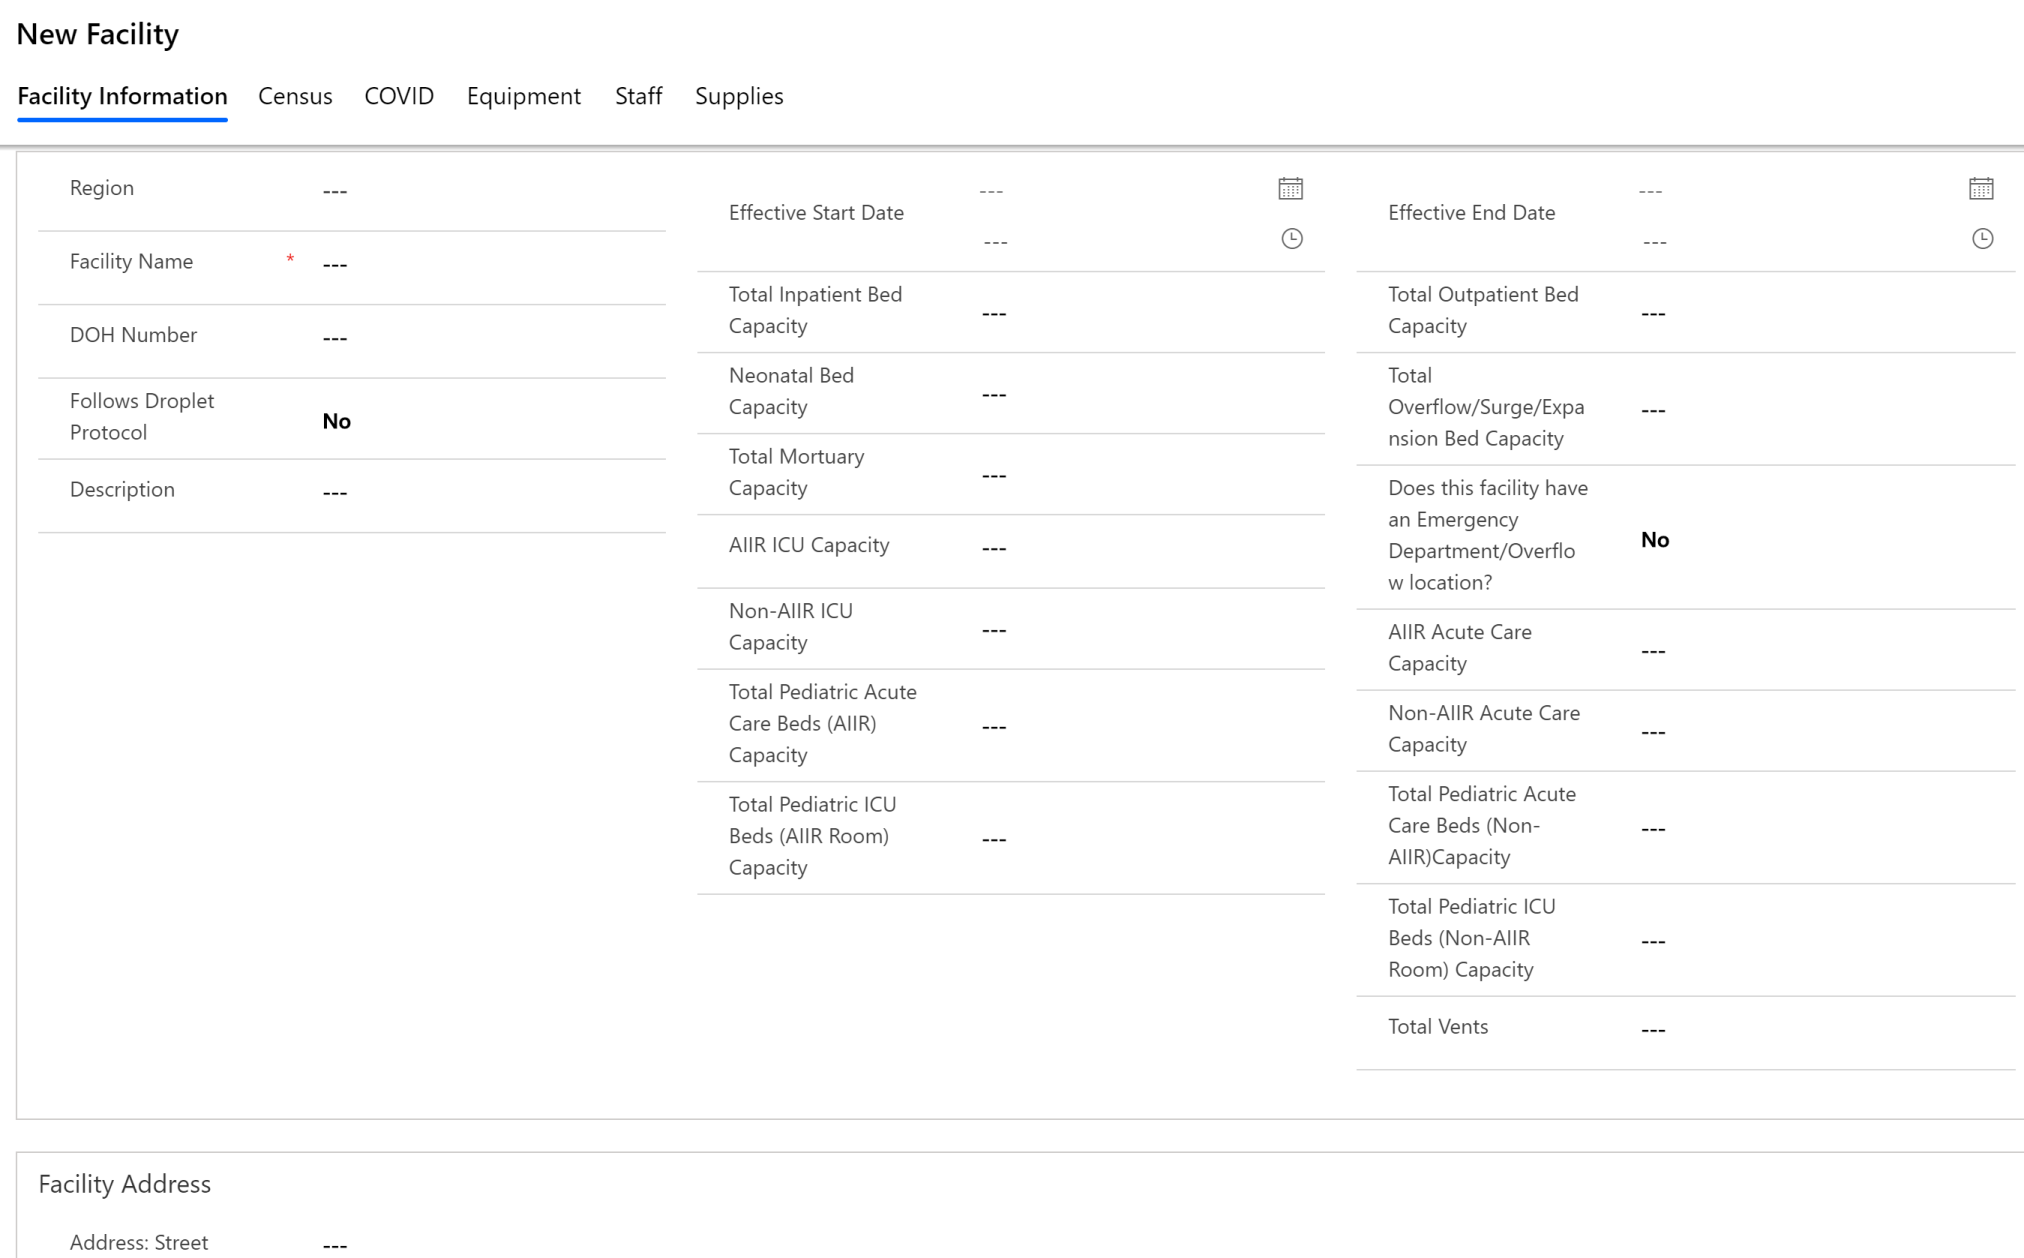
Field Description Region Select a region this facility is associated with. This list is populated based on the Regions data you have created earlier. Facility Name Type the facility name. DOH Number Type Department of Health (DOH) number for this facility. Follows Droplet Protocol Indicates whether the facility follows Droplet Precautions for patients known or suspected to be infected with pathogens transmitted by respiratory droplets, such as in COVID-19 cases. Select Yes or No. Description Type an optional description. Effective Start Data Type start date and time for this facility. Total Inpatient Bed Capacity Type the total inpatient bed capacity. Neonatal Bed Capacity Type the total neonatal bed capacity. Total Mortuary Capacity Type the total mortuary capacity.
Note: When set to at least 1, causes field Number of decedent accommodations currently in use to be available for the facility's Bed capacity form in the portal.AIIR ICU Capacity Type the total number of ICU beds in AIIR (Airborne Infection Isolation Room). Non-AIIR ICU Capacity Type the total number of ICU beds in non-AIIR. Total Pediatric Acute Care Beds (AIIR) Capacity Type the total pediatric acute care beds in AIIR. Total Pediatric ICU Beds (AIIR) Capacity Type the total pediatric ICU beds in AIIR. Effective End Date Type end date and time for this facility. Total Outpatient Bed Capacity Type the total number of outpatient bed capacity in the facility. Total Outflow/Surge/Expansion Bed Capacity Type the total number of outflow/surge/expansion beds the facility can have. These beds are those that can be staffed above and beyond licensed bed capacity if patients need to be admitted. Does this facility have an Emergency Department/Overflow location? Select Yes/No to confirm if the facility has emergency department or overflow location(s). AIIR Acute Care Capacity Type the total number of Acute care beds in AIIR . Non-AIIR Acute Care Capacity Type the total number of Acute care beds in non- AIIR (Airborne Infection Isolation Room). Total Pediatric Acute Care Beds (Non-AIIR) Capacity Type the total pediatric acute care beds in non-AIIR. Total Pediatric ICU Beds (Non-AIIR) Capacity Type the total pediatric ICU beds in non-AIIR. Total Vents Type the total number of ventilators in the facility. Facility Address Type the Street, City, County, State, Zip code, Latitude, and Longitude for the facility. Select Save & Close. The newly created record will be available in the Facilities list.
To edit the record, select the record, update the values as required, and select Save & Close.
You can also view and manage the associated Census, COVID, Equipment, Staffing, and Supplies data entered by the parent organizations for a facility by opening a facility record, and using the respective tabs in the record.

Manage portal users
Use the Portal Users entity to add and manage portal users. These portal users are the admins from the various parent organizations who report their hospital systems data to regional organizations and also manage other admins, healthcare workers, or report viewers using the portals.
Create a portal user
Sign into the admin app using the URL provided by your IT admin.
In the left pane, select Portal Users. You see a list of portal users, if they are already added by other admins in your org. Selecting a user will open the details about the user.
Select New to create a new portal user. On the New Contact page, specify appropriate values
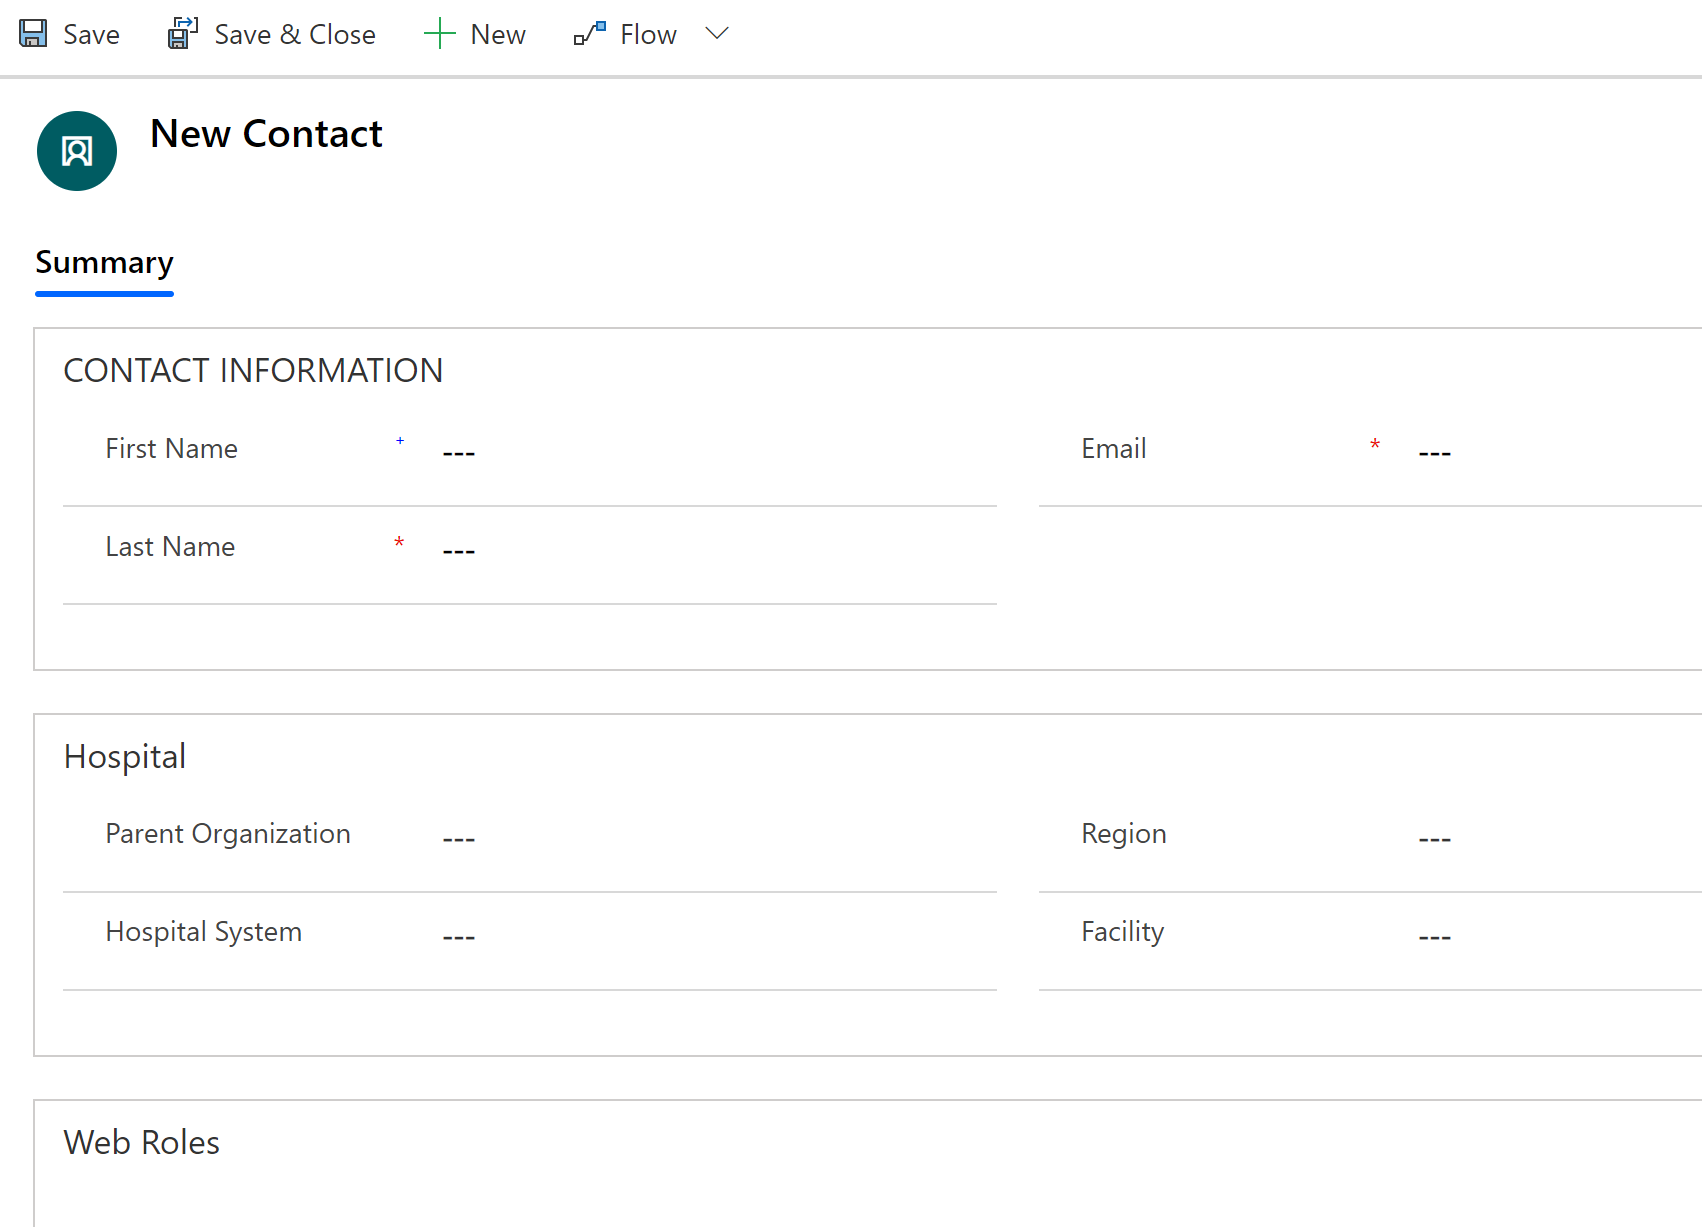
Field Description First Name First name of the user. Last Name Last name of the user Email Email of the user where the invitation will be sent. Parent Organization Select a parent organization that this portal user will be associated with. This ensures that the user has access only to the hospital systems data under the selected parent org. If you don’t specify a parent org for the user, they will have access to data for all the parent orgs under the regional org. Hospital System Select a hospital that this portal user will be associated with. Region Select a region that this portal user will be associated with. Facility Select a facility that this portal user will be associated with. Save the record. On saving the record, the Web Roles area becomes available. Select Add Existing Web Role.
In the lookup records page, press enter to displays the existing web roles.

Select roles as per the portal access you need to provide to the user. To give access to all the features in the portal, select all the four roles: Organization HealthCare Worker, Parent Organization Administrator, Regional Report Viewer, and Report Viewer.
For information about each of these roles, see the User roles section in the portal administration topic.
To grant a role, select the role, and select Add.
Save the portal user record.
Depending on the roles(s) you granted to the user, they will view respective areas in the portal. More information: Portal for admins and report viewers and Portal for healthcare workers
An email will be sent automatically to the newly created user with an invitation code to join portals. The portal user can redeem the invitation to sign in and start using the portal. More information: Get started with the portal
Manage portal user requests
You can view, approve, and decline portal user requests using the User Requests option.
Use the appropriate view to view a list of approved, declined, inactive, and pending user requests.
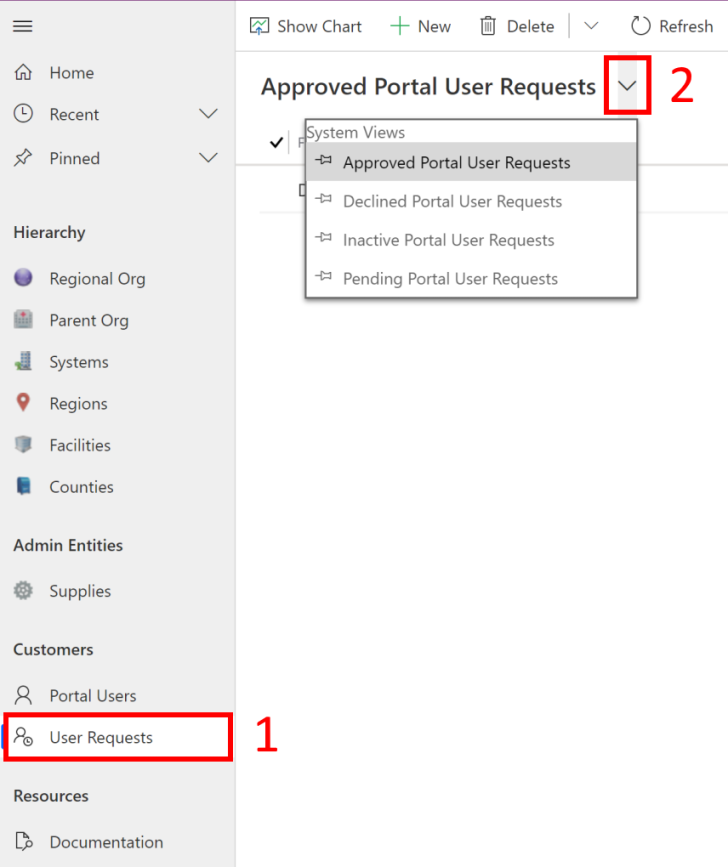
Approve or decline user request
To approve or decline user requests:
Sign into the admin app using the URL provided by your IT admin.
In the left pane, select User Requests, and then select Pending Portal User Requests view. You see a list of portal user requests pending for approval.
Double-click a user request to open it.
On the user request form:
Select the appropriate roles for the user in the Choose roles for the user area. To grant or deny a role, select Yes or No respectively for each role.
From the Request State list, select Approve or Decline.
Select the save icon in the lower-right corner.
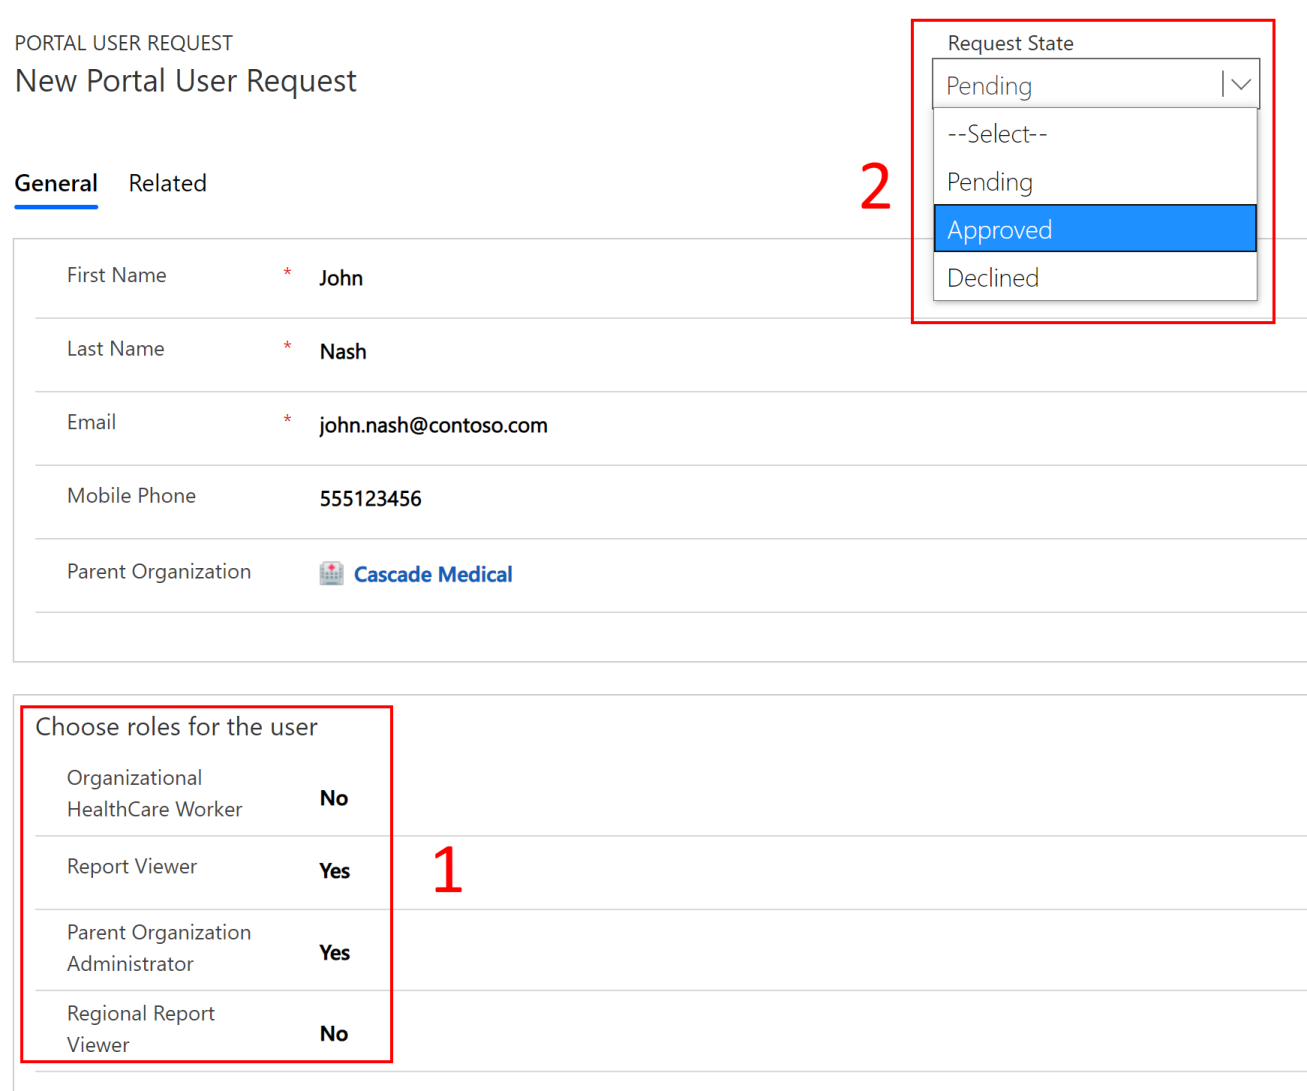
Based on the approval or decline, the following happens:
If you approve the access request, the user record is created with selected roles and the user receives an email with invitation code. The user can redeem the invitation code to sign in to the portal. More information: Redeem invitation
If you decline the access request, the user record isn't created, and the user receives an email stating that the request is declined.
View the Power BI dashboard
Business admins in the regional organization can view the Power BI dashboard in their Power BI tenant if the regional IT admin published the report as an app and granted access to business admins. More information: Step 5: Configure and publish Power BI dashboard
To view the Power BI dashboard:
Sign into Power BI.
The workspace where the app was published will be available for you to access the dashboard.
The Power BI dashboard that is available to you in your Power BI tenant is the same as the one available to users of the portal. The primary difference is that as a business admin of a regional organization, you can view data for all the parent organizations that report data to the regional organization, whereas users viewing the dashboard embedded in portal can only view data for their parent organization and associated hospital systems.
For detailed information presented in the Power BI dashboard, see Get insights in the portal topic.
Issues and feedback
To report an issue with the Regional Government Emergency Response and Monitoring solution, visit https://aka.ms/rer-issues.
For feedback about the Regional Government Emergency Response and Monitoring solution, visit https://aka.ms/rer-feedback.
Feedback
Coming soon: Throughout 2024 we will be phasing out GitHub Issues as the feedback mechanism for content and replacing it with a new feedback system. For more information see: https://aka.ms/ContentUserFeedback.
Submit and view feedback for