Accelerating Excel with Microsoft HPC Pack : Building VBA Applications and Workbooks for a Microsoft HPC Pack
Abstract
HPC Services for Excel supports a variety of new programming models that allow you to run Excel calculations on an HPC cluster. In this article we'll discuss how to use Excel VBA macros to build workbooks that utilize an HPC cluster to run calculations in parallel. To support HPC Services for Excel, your workbook needs to include a set of macros that implement the asynchronous functions. This article describes the macro framework and how to define calculations within the framework. This article includes an example of how to build a workbook from scratch, and an example of converting an existing workbook to run on a cluster.
Introduction
Would you spend one hour to make your Excel workbook run four times faster? How about eight times faster, or even more? If you have long-running or slow Excel workbooks, you can use HPC Services for Excel with a Microsoft HPC cluster to dramatically improve calculation performance.
HPC Services for Excel supports a variety of new programming models allowing you to run Excel calculations on an HPC cluster. But you don't need to understand code development, or know C#, to use HPC Services for Excel. In this article we'll discuss how to build workbooks that utilize an HPC cluster for calculation, using only Excel VBA.
In reality, it will probably take more than an hour to convert one of your workbooks to run on the cluster, depending on how complicated the workbook is. But if you spend an hour working through the examples in this article, you'll understand the concepts involved and the requirements for converting just about any workbook to run on an HPC cluster. You'll also see the performance benefits you can get with some simple changes to your VBA code.
Intended Audience
This article is intended for Excel developers who are familiar with writing VBA macros. Familiarity with Microsoft HPC Pack is helpful, but is not required.
If you're interested in the performance possibilities of HPC Services for Excel but you don't want to walk through the complete development process, the download files include completed versions of the two workbooks discussed in this article. If you'd like to try running these workbooks on a Microsoft HPC Cluster, please read the section "Before You Start" to make sure you have all the requirements in place before you start. For additional examples and documentation, go to https://github.com/Azure-Samples/hpcpack-samples.
Download Files
You can find some sample files used in the sections that follow from HPC Pack Sample Github Repository. The sample files include skeleton macro files you can import into your workbooks to simplify the development process. There's also a basic workbook that we'll use as a starting point to develop a workbook for HPC Services for Excel.
Structure and Formatting
The screenshots in this article all come from Excel and the HPC Cluster Manager. In the hands-on examples included in this article, code examples are formatting using a code style that represents the VBA editor:
'==========================================================
'
' Section 1: Variables and constants
'
'==========================================================

Dim SentRecords As Integer
Dim RcvRecords As Integer
When lines of code are added or modified, they'll be highlighted in green. Much of the code included here is either imported from existing files, or copied between different VBA files. In that case some long lines of code may be truncated to fit within the margins of this document. Try to copy-and-paste from existing documents rather than from this article, to avoid accidentally including the truncated code examples.
Overview
HPC Services for Excel supports a number of programming models for developing and running Excel calculations on a Microsoft HPC cluster. The solution you select should depend on your particular needs and your development skills.
| Intended Use | Skills Required | Solution |
|---|---|---|
| Calculate workbooks in parallel, for better performance (faster calculation times) or the ability to process more data in the same amount of time | Excel VBA (macro) development | Executing Workbooks on an HPC Cluster with Excel VBA |
| Build custom applications and services which execute Excel workbooks on an HPC cluster and integrate with stand-alone applications or batch scripts | .NET programming using C#, VBA.NET, or any language supported by the .NET CLR | Developing custom HPC services and client applications for Excel |
| Speed up calculation of Excel User-Defined Functions (UDFs) contained in Excel extension libraries (XLLs) | C or C++ programming, Excel extension library (XLL) development | Cluster-Enabled Excel User-Defined Functions |
We'll address each of these programming models in future articles. Today, we'll address the first model: calculating Excel workbooks in parallel using only Excel VBA. Even if you would like to move towards more complex development with Excel and Microsoft HPC Pack, this can be a great place to start: it's the simplest and fastest way to get Excel applications running on an HPC cluster, and it will help you understand the requirements for and benefits of using HPC Services for Excel.
To support Excel developers, HPC Services for Excel includes a set of libraries that you can use directly from Excel -- on your desktop -- to build and run Excel workbooks on a Microsoft HPC cluster. With these libraries, you don't need to know .NET programming or C#. All the work can be done from Excel by writing VBA macros. With this framework, you can dramatically speed up the calculation of Excel workbooks simply by writing VBA code and executing the workbooks on the cluster.
HPC Services for Excel includes a client/service framework specifically designed to be used from Excel on the desktop. There are two important parts to this framework: a client library, which is installed on the desktop; and a service library, which is installed on the cluster compute nodes. These libraries are installed by default when you install Microsoft HPC Pack, so you won't need to do any custom configuration to use them.
Once the client and service library are installed, you can build and run Excel workbooks for the cluster simply by adding some VBA macros to your workbook. We'll describe these new VBA macros as the macro framework. When we refer to the macro framework, we're specifically describing the new macros you add to your workbooks to support calculation on an HPC cluster.
Before we discuss the specific macros, it's worth highlighting a few key concepts that impact how the macros are constructed and how they work.
Asynchronous Calculation
The most important concept to understand in developing workbooks for HPC Services for Excel, and using the macro framework, is asynchronous calculation.
A typical Excel application runs synchronously. That is, you press a button to run a macro, and the macro executes some VBA code. Within this code you might make changes to the spreadsheet, call other VBA functions, access databases, or anything else. But you expect that the macros will run from beginning to end, and then complete.
The asynchronous model is a little different. In this model, you write VBA functions, but you don't call them directly. Instead, a client library -- code that's installed with HPC Services for Excel -- will call your VBA functions.
If you're familiar with Excel events in VBA, then you already know this model. For example, if you write a VBA function that runs on the Workbook.Open event, you know that the code will run whenever the workbook is opened. But you don't call that code directly; rather, Excel calls the function you write automatically when the workbook is opened.
The asynchronous programming model works the same way. You write functions that will be called during a calculation, but instead of calling them yourself, you wait for Excel -- or in this case, the HPC Services for Excel library -- to call the functions.
Iterative Calculation and Parallel Calculation
Another important concept is iterative calculation. Iterative calculation refers to a type of calculation that runs the same basic calculation steps over different sets of data.
The most common example of iterative calculation is Monte Carlo simulation. In a Monte Carlo simulation you usually have a complex calculation -- such as generating securities prices -- based on some random input value, like the expected return over several years. A Monte Carlo simulation runs the same calculation thousands of times, each time with a different random input value.
That's an iterative calculation because each time the price is calculated, with a different random input value, the whole calculation is run again. These calculations are independent; that is, in each individual calculation there's no reference to any prior or subsequent calculation.
Another common example involves running a calculation over a set of records from a database. In this case, you might have a complex calculation -- such as an insurance or actuarial model -- that's based on some parameters, like the age and sex of an insurance policy holder. The iterative calculation will run the same model for thousands of individual policy holders. Each calculation is independent of all the other calculations.
The macro framework we're discussing here is designed to work with these kinds of iterative calculations. That's important because when we run a calculation on an HPC cluster, we're going to run the calculation in parallel -- we'll run the same calculation many times, but we'll run several instances of the calculation at the same time on the cluster compute nodes.
If the calculation were not independent -- if the results of any single calculation depended on previous calculations we had run -- then this wouldn't work. Therefore the framework we're discussing here is only applicable for iterative, independent calculations -- calculations which can be parallelized.
The Macro Framework
To support HPC Services for Excel, your workbook needs to include a set of macros that implement the asynchronous functions. This is the macro framework. There are six macros used in the framework, which you can add to any Excel workbook. The six macros, with a brief description of what they do, are
| Macro Name | Action |
|---|---|
| HPC_Initialize | Perform any pre-calculation or initialization steps |
| HPC_Partition | Collect required parameters for a single calculation step |
| HPC_Execute | Perform one calculation step, as part of a larger overall calculation |
| HPC_Merge | Process the results of a single calculation step |
| HPC_Finalize | Perform any post-calculation processing |
| HPC_ExecutionError | Handle errors arising from the calculation |
(Don't worry if those descriptions aren't immediately clear: we'll describe each of these functions in more detail below).
The same macros have to be added to any spreadsheet to support calculation on the cluster, but what's in the macros -- the specific calculation functions -- can be different. To simplify the process, the download files included with this article include a "skeleton" macro file that you can import into your workbook. Once you have the basic macros in place, you can fill them in as necessary to support your calculation.
Each macro has a specific purpose in the macro framework, and each will be called by the HPC Services for Excel client library during a cluster calculation. When a calculation runs, each macro will get called at a specific point. A typical calculation runs like this:
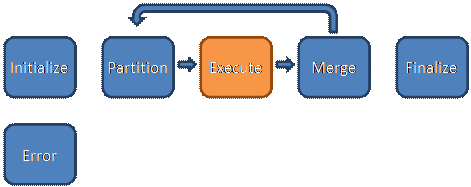
When a cluster calculation runs, first the client library will call the HPC_Initialize macro. That's used to handle any required initialization; for example, you might want to clear out old results from your spreadsheet.
Next, the calculation runs through three macros: HPC_Partition, HPC_Execute, and HPC_Merge. In the diagram above, these are shown as a loop. That's not really what happens during a calculation, but logically you can think of this as a loop. First the client library calls HPC_Partition. HPC_Partition is designed to collect any data required for a single calculation step. For example, if you want to calculate a set of rows one by one, HPC_Partition might return the row number for a single step: first row 1, then row 2, and so on.
Next, the HPC_Execute macro is called. This macro runs the actual calculation. If we're calculating row-by-row, then this will calculate a single row. HPC_Execute will return the result of the calculation: for example, it might return the last cell in the row which is the end result of a longer calculation.
After HPC_Execute, the client library will call HPC_Merge. Whatever HPC_Execute has calculated will be sent to HPC_Merge. The HPC_Merge macro is designed to take those results and return them to the spreadsheet running on your desktop. In the HPC_Merge macro, you might insert the calculation results back into your spreadsheet, or you might write them to a log file.
These three macros -- HPC_Partition, HPC_Execute, and HPC_Merge -- will be called multiple times, once for each step in your calculation, until the entire calculation is complete. These macros implement the iterative calculation model discussed above. The macros might be called many times during a single workbook calculation, but each time they are called represents a single calculation step, or iteration.
After the last calculation step has completed, the client library will call HPC_Finalize. You can use this macro to perform any post-calculation processing: for example, you might want to find the average of all the previous calculation steps by using another VBA macro.
The sixth and final macro, HPC_ExecutionError, is only used when the calculation encounters some error. If so, this macro is called and you can add some error handling code -- for example, you might show a pop-up dialog to the user warning them of the error.
In the diagram above, the HPC_Execute macro is highlighted in orange. That's to indicate that this macro is somewhat unusual. All the other macros run on the desktop, in Excel on your workstation. When we run a calculation on an HPC cluster, however, the HPC_Execute macro actually runs on the cluster compute nodes.
That's how HPC Services for Excel, and the macro framework, support cluster calculation. While we write all the macros in the same workbook -- the workbook on your desktop -- when the calculation runs, the workbook will be copied to the cluster compute nodes and the HPC_Execute macro will be run on one of the compute nodes.
It's important to understand this, because it has some implications for how workbooks use and manage data during the calculation. The three main calculation macros -- HPC_Partition, HPC_Execute, and HPC_Merge -- pass data back and forth during the calculation process. In a typical VBA application, there are lots of ways to share data between different macros. For example, you can use global variables in your VBA code, or write values into spreadsheet cells. But when we're running the calculation on an HPC cluster, we need to send data between the macros running on the desktop, and the HPC_Execute macro running on the compute nodes.
For that reason, any data we need to run the calculation must be sent from the HPC_Partition macro to the HPC_Execute macro directly. We do this by using the return value from the HPC_Partition macro. That return value becomes the argument (or parameter) to the HPC_Execute function. So data will pass directly between these two macros, and you can pass any value or set of values (as an Array) between these macros. But again, you can't use global variables or the spreadsheet cells to pass information between the two macros because when it runs on the cluster, there are actually multiple copies of the workbook running at the same time -- one on the desktop, and one (or more) on the cluster compute nodes.
In the same way, when the calculation in HPC_Execute is complete, it will return a result as the return value of the macro function. That result becomes the argument (or parameter) to the next macro, HPC_Merge. Once again any results you want to return -- the results of the calculation -- must be sent in this way, as the return value of the function.
Building Cluster-Enabled Workbooks with Excel and HPC Services for Excel
In the sections that follow we'll walk through building two workbooks that support calculation on an HPC cluster. In the first section, we'll build a workbook from scratch. This should help you understand the concepts involved and the requirements for using HPC Services for Excel. In the second section, we'll take an existing workbook -- one that was designed to run on the desktop -- and convert it so it can run on the cluster.
Before You Start: Prerequisites and Requirements
HPC Services for Excel is a set of tools included with the Microsoft HPC Pack 2008 R2 Beta 2 and later versions. You'll need a Microsoft HPC Pack cluster installed and configured. Installing an HPC cluster is outside of the scope of this article; we'll only address the specific configuration you will need for HPC Services for Excel. For more information on installing and configuring the cluster, see the documentation included with Microsoft HPC Pack. On your desktop, you'll need the HPC Pack client utilities.
On the cluster
After you have an HPC cluster up and running, you'll need to install Excel on the cluster compute nodes. You can use the standard Office installation kit to install Excel, or see the HPC Pack documentation for more information ways to automate the Excel installation.
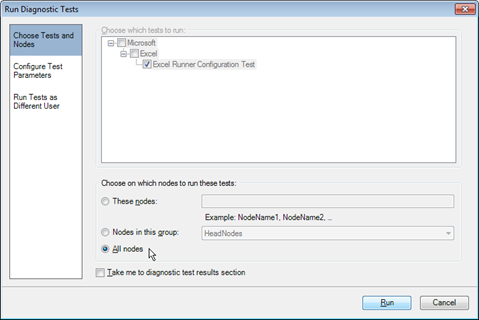
After Excel is installed on your cluster compute nodes, you can run the HPC diagnostic test to ensure that everything is configured properly. To run the diagnostic test, use HPC Cluster Manager (either on the cluster head node, where it's installed by default, or on your desktop if you have installed the client utilities).
To verify that the HPC service for Excel are configured correctly
In the HPC Cluster Manager, click Diagnostics.
In Tests, expand Microsoft and then select Excel.
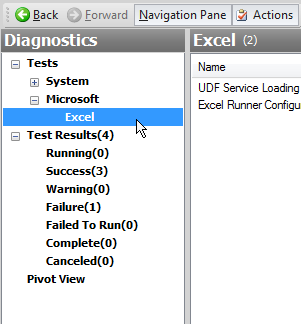
In the view pane, double-click Excel Runner Configuration Test.
In the configuration dialog, select All Nodes and then click Run.
In the Navigation Pane, click Test Results to see the progress of the test. The test that you are running appears in the view pane.
After the test is complete, you can click on the test in the main window to see the results.
If the test shows Failure, double-click the test and try to correct any errors in the popup window. Common errors you might see are that Excel is not installed on a compute node, or that Excel has not been activated. Make any changes you need and then re-run the diagnostic test using the instructions above.
When the test shows Success, you're ready to continue.
The last thing you'll need is a share directory. When we calculate a workbook on an HPC cluster, each of the cluster compute nodes actually loads and runs a copy of the workbook. To support that, you need to create a share directory that is visible both to the cluster compute nodes and to your desktop.
If you have access to the cluster head node, create a share directory on the head node. This is convenient because you know that the cluster compute nodes can access the head node. If you can't create a share directory on the head node, create the share directory anywhere within the domain that is accessible both to your desktop and to the cluster compute nodes.
On the desktop
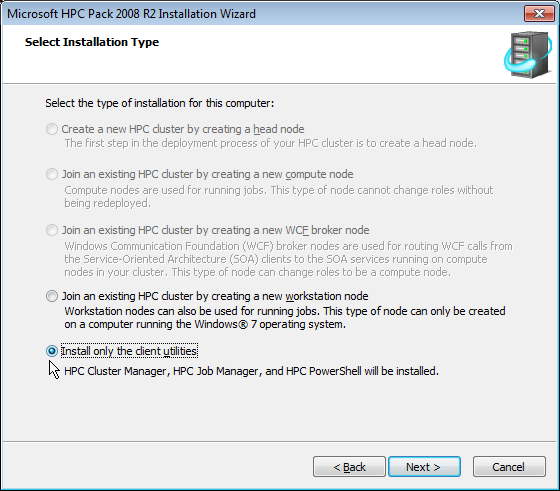
On the desktop, you'll need to install Excel and the Microsoft HPC Pack client utilities (installing the client utilities will require Administrator permissions). To install the client utilities, run the HPC Pack installer on your desktop. It will offer an option for installing just the client utilities.
Summary
You should now have:
A Microsoft HPC cluster installed and configured.
Excel 2016 (or later) installed on the cluster compute nodes.
A network share directory.
Excel 2016 (or later) and the Windows HPC Pack client utilities installed on your desktop.
When all that is ready, you can start building workbooks that run on the cluster with HPC Services for Excel.
Part I: Building a workbook from scratch
This part includes the following sections:
Starting a new workbook
Preparing the workbook
Designing the cluster calculation
Running the workbook on the cluster
Last Steps: User Interface
Starting a new workbook
Start Excel with a new workbook. We'll be using VBA, so make sure you have the Developer tab available on the Excel ribbon.
To turn on the Developer tab
Click the File tab on the Excel ribbon.
Click Options.
In the Excel options dialog, select Customize Ribbon on the left.
Check the box next to Developer and click OK to close the dialog.

Preparing the workbook
To prepare your workbook, you need to import the macro files and add the HPC references.
To build the basic workbook, we'll need two sets of macros. The first set of macros implements the framework functions (the functions described in the Overview section above). These macros are used by the HPC Services for Excel client library during the calculation. The second set of macros contains the "control" functions -- these macros run the actual calculation.
The sample files include basic "skeleton" macro files for each of these that you can use to get started. You don't have to use these files -- you can also write your own, if you prefer -- but the macros themselves are generic, and you may find that using these files is all you need. You can also modify these files to make any changes you need for your particular workbook.
We'll need to add two references to this project to use HPC Services: Microsoft_Hpc_Excel and Microsoft_Hpc_Scheduler_Properties. Microsoft_Hpc_Excel is the client library, which provides an object we can use to control a cluster calculation. Microsoft_Hpc_Scheduler_Properties has definitions for some cluster-specific fields and types that we'll need.
Note: In the Overview section above, we described the tools as a client/server framework; the client library was installed when you installed the HPC Pack SDK and it will now be available in VBA.
To import the macro files and add references
On the Developer tab of the ribbon, click Visual Basic to open the VBA editor.
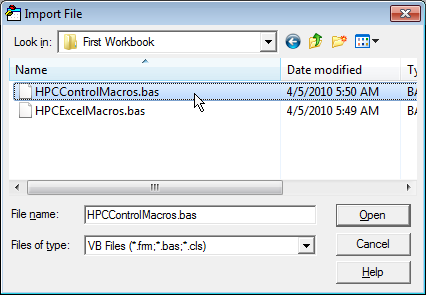
In the VBA editor, right-click VBA Project at the top of the tree view and then click Import File.

In the dialog box, locate the project files that you downloaded. Go into the directory "First Workbook", select the file "HPC Excel Macros.bas" and click OK. That adds the first macro file to your project, and it will be available in the Modules folder of the VBA project window.
Repeat steps 1-3 to import "HPC Control Macros.bas" and then click OK. That adds the second macro file to your project.
Verify that these two macro files appear in the VBA project window:

In the VBA editor window, click Tools, and then click References to open the project references dialog box.
In the list of available references, scroll down until you find Microsoft (R) HPC Pack Assemblies, and select the check box next to each one. When you've checked the boxes, the dialog will look like this:

Click OK to close the project references dialog.
If you don't find this entry in the list, click Browse.. and find the file %CCP_HOME%\Bin\Microsoft.Hpc.Excel.tlb. If you still can't find it, verify that you have installed the HPC Pack Client Components. If the files are installed, the Add/Remove programs control panel displays an entry for "Microsoft HPC Pack Client Components". If you don't see that entry, try re-installing the client components as described in the above section "Before you Start".
Defining the calculations in the macro framework
Our aim in building this workbook is to illustrate how a cluster calculation works, so we don't need to build a very complicated spreadsheet. We'll construct a calculation that runs 100 individual steps. To do that, we'll add a counter to the HPC Excel macros file, and use that counter in the macros when the calculation runs.
We'll use the counter to keep track of how many calculation steps have been sent, so we can limit the calculation to 100 steps. HPC_Initialize is called whenever we start a new calculation, so we can reset the counter in that function. We want to increment the counter for each calculation step. We can do that in the HPC_Partition macro. Remember that the HPC_Partition macro is used to collect any data necessary for an individual calculation step; and once the calculation is complete, the HPC_Partition macro should return Null. So to run a calculation for 100 steps, we'll increment the counter every time HPC_Partition is called; and once the counter reaches 100, we'll return Null.
To construct a calculation that runs 100 steps
In the VBA project window, in the Modules folder, double click HPCExcelMacros.
At the top of the file, in "Section 1: Variables and constants", add a counter variable named SentRecords as shown below:
'==========================================================
'
' Section 1: Variables and constants
'
'==========================================================

Dim SentRecords As Integer
Scroll down until you find the HPC_Initialize function, and add a line to reset the counter variable:
'----------------------------------------------------------
'
' HPC_Initialize will be called when the client starts
' a calculation. Put any pre-calculation steps in this
' function.
'
'----------------------------------------------------------

Public Function HPC_Initialize()

 SentRecords = 0

End Function
Scroll down until you find the macro HPC_Partition, then modify it so it looks like this:
Public Function HPC_Partition() As Variant

    If SentRecords = 100 Then
        HPC_Partition = Null
    Else
        SentRecords = SentRecords + 1
        HPC_Partition = SentRecords
    End If

End Function
Save the workbook.
Note: Because the new workbook includes macros, you'll need to save it as either a macro-enabled workbook (XLSM file) or a binary workbook (XLSB file). Either one is fine. Usually we recommend saving workbooks as binary (XLSB) files, because they're smaller and a bit more efficient.
Now we have a calculation which will run 100 steps and then complete. The modifications you just made are all you have to do to create an Excel cluster calculation.
Running the workbook locally and exploring the macros
Now that we have a calculation, we can add a button to run the workbook, and then run the workbook on the desktop. To see how the macros work, we will add a few new pieces of code to our macro skeleton, and rerun the workbook to see what the changes did. We will test the workbook locally (on the desktop) before we run the workbook on the cluster.
Adding a button that runs the workbook locally
To add a button that runs the workbook locally
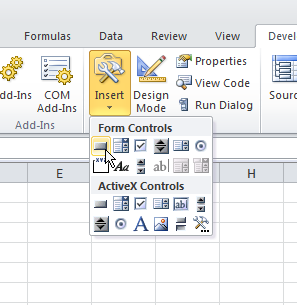
With your Excel workbook open, click the Developer tab on the ribbon.
On the Developer tab, click Insert and then select the button control -- the first control in the list.

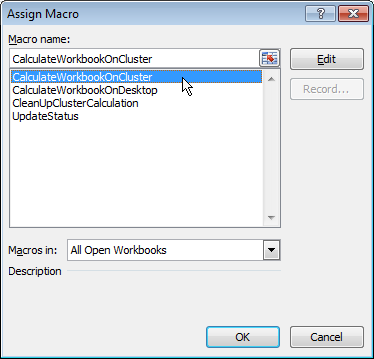
After you've clicked the button, draw a rectangle somewhere on the spreadsheet to insert the button in that location. After you position the button, the Assign Macro dialog box appears.

In the dialog box, select the macro CalculateWorkbookOnDesktop from the list and then click OK. Be sure to select the desktop macro -- we want to test the workbook first and find any errors before we run it on the cluster.
Right-click the new button and then select Edit Text to change the label.
Name the label "Desktop" or something similar.
Optionally, you can verify that you have assigned the correct macro by right-clicking the button and selecting Assign Macro. In the dialog box, verify that CalculateWorkbookOnDesktop is selected.
Save the workbook.
Click the button to run the workbook on the desktop.
If there are any errors, you'll see an error dialog box and the portion of VBA code with the error will be highlighted -- go back over the sections above and check that everything looks correct.
If everything is working, nothing will happen because our workbook doesn't do anything. This is a little unsatisfying, so let's make a few more changes so we can see the calculation.
Modifying the HPC_Excecute and the HPC_Merge macros
Remember that the flow of information goes from HPC_Partition (which collects the parameters needed for the calculation), to HPC_Execute (which runs the calculation), and then to HPC_Merge (which processes the result). When a calculation executes, whatever is returned from the HPC_Partition macro is used as the input to the HPC_Execute macro. The HPC_Execute macro is designed to use that input data, perform some calculation step, and then return a result. The result then passes to HPC_Merge, which can insert the results in the spreadsheet.
In an earlier step, you added code to the HPC_Partition macro to update a counter variable. So in our example, HPC_Partition returns the value of the counter variable and passes that value to HPC_Execute. To illustrate the flow of information and have our workbook return some results, we will simply pass this counter value along through the macros. We will add a line of code to the HPC_Execute macro so that it takes the input and passes it along as the return value. The value of our counter variable then passes to the HPC_Merge macro, which we will modify so that it inserts the value of the counter into our spreadsheet.
To modify HPC_Execute and HPC_Merge
On the Developer tab of the ribbon, click Visual Basic to open the VBA editor.
In the VBA editor, in the project tree, double-click the HPCExcelMacros module to open the macro file.
.Scroll to the HPC_Execute macro, and add a line of code that passes the input value along as the return value. The macro should look like this:
Public Function HPC_Execute(data As Variant) As Variant

    HPC_Execute = data

End Function
Scroll to the HPC_Merge macro, and add a line of code to insert the input value into the spreadsheet. The macro should look like this:
Public Function HPC_Merge(data As Variant)

    Cells(data, 1).Value = data

End Function
Note: The "data" value is the counter, which was returned from HPC_Execute. So here in the HPC_Merge macro, we're filling in a cell in the spreadsheet -- using the counter as the row number -- and setting the value to be the counter. The VBA expression "Cells" means create a reference in the spreadsheet with the given row and column numbers. So every time the HPC_Merge macro is called, it will insert a value into column 1 (column A in the spreadsheet), with a different row number.
Now go back to the spreadsheet and click your "Desktop" button to run the calculation.
You'll see the first column fill up with numbers from 1-100, which are the counter values. Every time you click the button it will fill in the same numbers, so it's hard to tell that it's running; we can make one more small change to see the numbers filling in.
Modifying the HPC_Initialize macro
The HPC_Initialize macro is called when we first run the workbook. In an earlier step, we added a line of code to reset the counter variable. We can also use this macro to erase the values that were inserted in the spreadsheet during the previous run.
To modify the HPC_Initialize macro
On the Developer tab of the ribbon, click Visual Basic to open the VBA editor.
In the VBA editor, in the project tree, double-click the HPCExcelMacros module to open the macro file.
Scroll to the HPC_Initialize macro**.** Add a line of code that empties the first column. The macro should look like this:
Public Function HPC_Initialize()

    Range("A:A").Value = ""
    SentRecords = 0

End Function
Now go back to the spreadsheet and click your "Desktop" button to run the calculation.
It should now be obvious that the macro is filling in the column with numbers every time you click it. If there are any errors, you'll see an error message and the VBA code with the error will be highlighted -- double check that it matches the code listed above and try again.
Running the workbook on the cluster
Now we have a very simple Excel calculation using the HPC macro framework, and we can run it on the cluster. To do that, we'll first need to set a few values to tell Excel how to contact the cluster. These values are defined in the HPCControlMacros module**.** At the top of this file, there are two values you'll need to fill in: the cluster scheduler and the share directory. Remember that you (the desktop user) must have write access to this share directory; and the cluster compute nodes must have read access to the directory. In most cases, your cluster calculations will run under your user account, but it's possible to use a different user account when you connect to the cluster session (more on that in a moment).
To specify the head node and the share directory
On the Developer tab of the ribbon, click Visual Basic to open the VBA editor.
In the VBA editor, in the project tree, double-click the HPCControlMacros module to open the macro file.
For the cluster scheduler, use the name of your cluster head node -- this is the computer name that you would use on the network. You can use a fully-qualified name (for example, headnode.mynetwork.com), but that's not necessary if you're in the same domain.
For the share directory, use the full path to the share directory you created earlier (in the "Before You Start" section).
For example, in my cluster the scheduler name is "HN01"; and I created a share directory on the head node called "HPCTemp". So my settings look like this:
'----------------------------------------------------------
'
' This is the cluster scheduler, or head node.  Fill in
' the hostname of your cluster scheduler.
'
'----------------------------------------------------------
Private Const HPC_ClusterScheduler = "HN01"

'----------------------------------------------------------
'
' This is a network share used to store a temporary copy
' of the workbook.  Make sure that the directory exists,
' that you have write access to the directory, and that
' the compute nodes in the cluster have read access.
'
'----------------------------------------------------------
Private Const HPC_NetworkShare = "\\HN01\HPCTemp"
Now go back to the Excel spreadsheet. We'll add another button, this time to run the calculation on the cluster.
To add a button that runs the workbook on the cluster
On the Developer tab, click Insert and then select the button control -- the first control in the list.

After you've clicked the button, draw a rectangle somewhere on the spreadsheet to insert the button in that location. After you position the button, the Assign Macro dialog box appears.
In the dialog box, select the macro CalculateWorkbookOnCluster from the list and then click OK.
Right-click the new button and then select Edit Text to change the label.
Name the label "Cluster" or something similar.
Save the workbook.
Click the button to run the workbook on the cluster.
If this is the first time you've run any cluster jobs, either using Excel or using any other application, you'll see a user authentication dialog. Type your username and password, and (if you like) check the box to save your credentials. If you want to run calculations on the cluster as a different user, you can enter different user account settings.
Note: Make sure that your user account -- either your standard user account, or whatever you wish to use -- is designated as a cluster user in HPC Cluster Manager.
If there are any errors, you'll see a message box describing the error. If the calculation worked on the desktop, the most likely errors you'll receive now have to do with the cluster settings -- the head node or the share directory. If the message box describes either of those errors, double check the settings you changed in the last step. Make sure that you have the correct name for the cluster head node, and that the share directory is writable by your user account.
What happens when a workbook runs on the cluster
Let's review what happens when you run the cluster calculation. When you click the button, it calls the macro CalculateWorkbookOnCluster. That macro uses the client library to start a cluster calculation with the settings you provided for the cluster head node and share directory.
When the calculation starts, the HPC Services for Excel client code takes over. Remember, you added a reference to the HPC library in the VBA editor at the beginning of this part -- that's the client library. First, the client library will create a cluster "session", used to manage the calculation. That takes a few seconds, and after you click the button you'll notice a few seconds' delay.
Next the client library will call the HPC_Initialize macro. That happens on the desktop. In this workbook, that macro (1) resets the internal counter; and (2) empties column A in the spreadsheet. So when you click the button, first you'll see the delay as the session is created; and then you'll see column A is cleared. That's the HPC_Initialize macro.
Next, the client library will start calling the HPC_Partition macro. This also happens on the desktop. In our code, the HPC_Partition macro increments the counter and returns the counter value. Every time this macro returns a value -- until it returns Null, on the last call -- the client library will send a request to the HPC scheduler.
When the scheduler receives one of these requests, it will forward the request to one of the cluster compute nodes for processing. When the compute node receives the request, it will start Excel, load the workbook, and then call the HPC_Execute macro.
This is the HPC_Execute macro we have in our workbook, but when the calculation runs on the cluster, the HPC_Execute macro is actually run on the compute nodes -- unlike all the other macros. That's why we're passing data from one macro to another. Information flows from one macro to the next, but as data is passed from the HPC_Partition macro to the HPC_Execute macro, it is sent from the desktop, through the HPC scheduler, and to one of the compute nodes.
After one of the compute nodes runs the HPC_Execute macro, when the macro is completed the result of the calculation -- the value returned from the HPC_Execute macro -- is sent back to the scheduler, and then returned to the client library on the desktop. When the client library receives the calculation result, it will call the HPC_Merge macro on the desktop. So once again you can think of information flowing from one macro (HPC_Execute) to the next (HPC_Merge), but this is happening over the network: from the workbook running on the compute node to the workbook running on the desktop.
It's important to understand that these macro function calls -- each of the calls to HPC_Partition, as we send data to the cluster, and each of the calls to HPC_Merge, as data is received -- happen asynchronously. That is, when a calculation is sent to the cluster the client library will not wait (or block) until that particular calculation is complete before it sends the next one. If the HPC_Partition macro is very fast, as it is in this case, it's possible that all 100 calculation requests will be sent before any one of those requests is completed.
It's also worth noting that as the results come back from the cluster -- and the HPC_Merge macro is called in our workbook -- they might not come back in the same order that we sent them. That's because as each request is sent to the cluster, the scheduler will forward it to one particular compute node. The compute node will calculate the request, using the HPC_Execute macro in the workbook, and then send back the result. But for a number of reasons, one compute node might run more slowly or more quickly than another compute node; and if that happens, results might be returned in a different order.
You probably won't notice that in this workbook, because the macros are so simple. But it's something that we'll have to prepare for in more complicated workbooks, as we have longer calculation functions, and we'll address it below when we build a "real" workbook.
Communicating calculation progress
At this point you've built a complete workbook that runs on the HPC cluster; you should now understand what the various macros do, and why they're designed the way they are. You should have a sense of how data moves between the macros, and what parts are executed on the desktop and on the cluster.
Before we finish up with the simple workbook, we can make a few final changes to add some visual feedback -- basically a simple user interface. When you ran the workbook on the cluster, the only feedback you had that it was working was the numbers filling in in the spreadsheet. That's a start, but we can make some changes that will make it more obvious what the workbook is doing. What we're going to do is add a few more variables to keep track of the calculation, and then display them in the Excel status bar.
Our code will include the following counters:
We already have a counter variable that keeps track of the number of times HPC_Partition macro was called. That represents the number of times data was sent from the desktop to the cluster.
We can add another counter that's incremented every time the HPC_Merge macro is called -- that represents how many times data has come back from the cluster to the desktop.
We can also add some variables to keep track of time -- how long the calculation takes. This can be really useful to check if the cluster calculation is in fact faster than the desktop (and if so, how much faster).
Using these firsts two counters, we can see the number of outstanding requests, and get a sense of the overall progress of the calculation. We'll add a new VBA function that can report the calculation status. This function has three parts:
It creates a string showing the number of calculations sent (the number of times HPC_Partition was called) and the number of results received back (the number of times HPC_Merge was called).
If the "CalculationComplete" variable is true, it updates the string to show the total calculation time.
It uses Application.StatusBar to set the Excel status bar message with the information we've just created.
We can use the HPC macros that are already in place to update these values and update the status bar message with the new function.
The following procedure describes how to incorporate these new elements into our sample.
To add progress variables to the macros and update the Excel status bar
Go back to the VBA editor, and double-click the module HPCExcelMacros to open the macro code. At the top of the VBA code, after the original counter, add these new variables:
'==========================================================
'
' Section 1: Variables and constants
'
'==========================================================

Dim SentRecords As Integer
Dim RcvRecords As Integer
Dim CalculationComplete As Boolean
Dim StartTime As Double
Dim FinishTime As Double
Next we'll add a new VBA function called "UpdateStatus" that can report the calculation status. Scroll down to the bottom of the file, and add code as follows:
Sub UpdateStatus()

    Dim statusMessage As String
    statusMessage = "Calculated " & RcvRecords & "/" & SentRecords

    If CalculationComplete Then
        statusMessage = statusMessage & "; Completed in " & _
           FormatNumber(FinishTime - StartTime) & "s"
    End If

    Application.StatusBar = statusMessage

End Sub
We need to initialize the variables. As with the original counter, we're going to do that in the HPC_Initialize macro. Scroll to that macro, and add a few lines:
Public Function HPC_Initialize()

    Range("A:A").Value = ""
    SentRecords = 0
    RcvRecords = 0
    StartTime = Timer
    CalculationComplete = False
    UpdateStatus

End Function
Note: What we're doing here is (1) clearing the two counters, setting them to zero; (2) setting the "StartTime" value to the current time (the "Timer" call in VBA returns the current time, in seconds); and (3) setting the "CalculationComplete" flag to false, meaning it hasn't completed yet. Once these values are set, we call the new "UpdateStatus" macro to write the message to the status bar.
Scroll down to the HPC_Partition macro. In this macro we're already setting the first counter, so we only need to make one change: after updating the counter, we add a line to call the new macro and update the status bar.
Public Function HPC_Partition() As Variant

    If SentRecords = 100 Then
        HPC_Partition = Null
    Else
        SentRecords = SentRecords + 1
        UpdateStatus
        HPC_Partition = SentRecords
    End If

End Function
Now scroll down to the HPC_Merge macro. Here, we want to update the new counter -- the one representing messages returned back to the desktop -- and again update the status bar. So modify the HPC_Merge macro:
Public Function HPC_Merge(data As Variant)

    Cells(data, 1).Value = data
    RcvRecords = RcvRecords + 1
    UpdateStatus

End Function
Scroll down to the HPC_Finalize macro. This macro is called when the whole calculation is complete; so we can use this to set the "CalculationComplete" flag, as well as to figure out how long the total calculation took:
Public Function HPC_Finalize()

    CalculationComplete = True
    FinishTime = Timer
    UpdateStatus

    ' Clean up the calculation.  It's a good idea to
    ' leave this here, even if you make changes to
    ' this function.  The function we call here is in
    ' the "HPCControlMacros" module.

    CleanUpClusterCalculation

End Function
Note: When we set the "FinishTime" field to Timer, we're setting it with the current time, in seconds. In the UpdateStatus macro we're using the "StartTime" and "FinishTime" to figure out the total calculation time.
Save the workbook
Go back to the Excel spreadsheet and click the "Cluster" button.
You'll see the status bar update with numbers as the calculation runs; first you'll see the number of calculations sent (the second number) jump up to 100, and then after a brief delay you'll see the number of results received (the first number) climb up to 100.
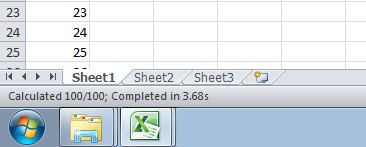
What you're seeing here is the asynchronous messaging we discussed above. Because the HPC_Partition macro is so fast, the client library is able to send all 100 requests before any of the calculations complete. There's a brief delay -- that delay is the compute nodes starting Excel and loading the workbook. Once each compute node has started Excel, calculating the results is pretty fast, and the first number gets up to 100 quickly.
If you click the "Desktop" button, you'll see that the numbers move in a different way. On the desktop, the client library is calling the same macros, but it is doing it synchronously (that is, not asynchronously). To run the desktop calculation, the client library will call each macro in turn -- first HPC_Partition, then HPC_Execute, and then HPC_Merge -- but in this case, it will wait for each macro to complete before calling the next one. That's why when you run on the desktop, you'll see both numbers moving together.
Part 2: Converting a "desktop" workbook to run on the HPC cluster
In the last section, we constructed a workbook from scratch to calculate on an HPC cluster. In this section we'll take an existing workbook and modify it to run on the cluster. If you followed the last part, you should have an understanding of what's required -- although there were a lot of individual steps, the actual work involved was very simple. In summary, we:
Added two macro files.
Added two references to the VBA project.
Made a few modifications to the macros.
Added buttons to run the spreadsheet.
Converting an existing workbook is about the same amount of work. There's not a lot of new VBA code to add, and most if it can re-use the same skeleton macro files. For the most part converting an existing workbook involves moving code around -- copying code from existing macros into the HPC macros.
The difficult part of converting an existing workbook is figuring out what code to move, and where it should go. Excel VBA is a comprehensive development environment, and there are lots of ways to build Excel applications: different developers might write the same application in many different ways.
In this section, we're going to take an existing workbook and convert it to run on the cluster. You should read this section as a guide, or as an example, and then try to apply the concepts to your own workbooks. We have a fairly simple example in this case (although it's based on a real workbook that was used to solve a real business problem). For just about any workbook, the process will be the same, but the specific details will be different.
Analyzing the workbook
In Excel, open the workbook "ConvertiblePricing.xlsb" from the "Second Workbook" directory. You might get a warning about macros; if so, click "enable macros" to continue.
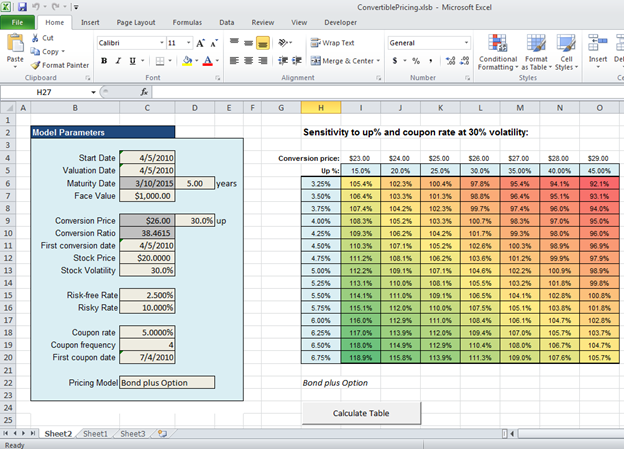
This workbook calculates convertible bond prices, based on the values in the "Model Parameters" section on the left. The table on the right is used to understand what effect small changes in the parameters -- changes in the conversion price and in the coupon rate -- will have on the final price.
Click the "Calculate Table" button in the spreadsheet. You'll see the table fill in, slowly, as each price is calculated. On a typical workstation, filling in the complete table will take somewhere between 1-2 minutes.
To figure out what this workbook does when we click the button, we can walk through the VBA code.
To identify the macro and see the code
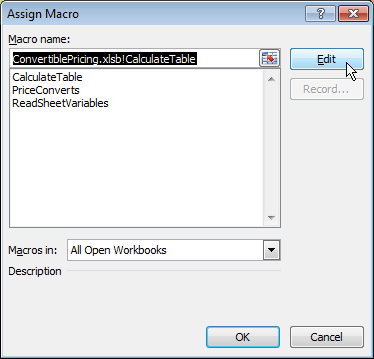
Right-click the "Calculate Table" button and select Assign Macro.
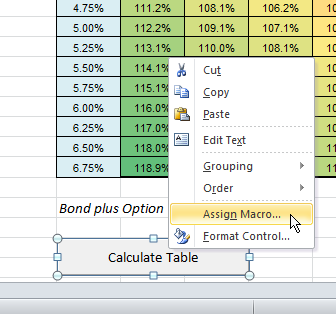
The macro dialog shows which macro is currently used by the button. In the dialog, click Edit to jump into the code. You should see the code for the "CalculateTable" macro. This is the code that's executed when you click the button in the spreadsheet.
Looking at this macro, you can see a few distinct sections. First, there are some variable declarations. Next there's some initialization code. Finally there's a section that calculates the table -- we can identify where it loops over the rows and columns in the table and fills in values.
This macro is fairly short, but if you look at the loop you'll see that it calls some other functions -- the functions "FullDiscountModel" and "BondPlusOptionModel". These are the actual calculation routines, the business logic that power this workbook.
In the VBA editor, you can jump to the source of any function by right-clicking on the name and selecting "Definition". If you right-click on "FullDiscountModel" and select "Definition", you'll see that the actual calculation is rather complex. But to convert the workbook to run on the cluster, we don't have to modify or even understand that calculation. We only need to worry about the control code -- that is, the function that contains the loop.
This workbook is very cleanly designed, in that the business logic is contained in separate functions. In other cases all this code might be in a single macro, which would make the workbook harder to understand. But in either case, what we will have to do to convert this workbook is take the control code -- the startup routines and the loop functions -- and move them to the HPC macros.
We also know that in this workbook, the calculations are independent. That is, each cell of the table is calculated without reference to any other cell in the table. That means the workbook is iterative, and it will support parallelization (as discussed in the Overview section, above). It might not always be obvious that calculations are independent. One way to figure this out is to write some test functions -- for example, we could re-write the "CalculateTable" macro (the macro that's called when you push the button in the spreadsheet) -- to run only a single calculation, or one cell in the table. In that way we could identify whether the results were consistent and, if so, we could make a determination whether the calculations were in fact independent.
To summarize, the features that are most important for any workbook to support execution on a Microsoft HPC Cluster are as follows:
The workbook is iterative: it runs the same calculation many times, with different sets of input data; or it runs many individual calculations, such as rows or cells in a table, one at a time.
The individual calculations are independent: that is, the results of one single calculation don't affect any of the other calculations.
Both of these are true for this workbook, so it's a good candidate for running on the cluster.
Preparing the workbook
As in the last workbook, the first changes we'll make have to do with setting up the VBA environment. We can use skeleton macro files to save some time -- these will include the HPC macros that we'll need for the calculation.
In the last workbook, we made some changes to the skeleton macro files to add some user feedback (displaying the calculation progress in the Excel status bar). In this second workbook, the skeleton macro files already include that status bar code.
To import the macro files and add references
On the Developer tab of the ribbon, click Visual Basic to open the VBA editor.
In the VBA editor, right-click VBA Project at the top of the tree view and then click Import File.
In the dialog box, locate the project files that you downloaded. Go into the directory "Second Workbook", select the file "HPCExcelMacros.bas" and click OK.
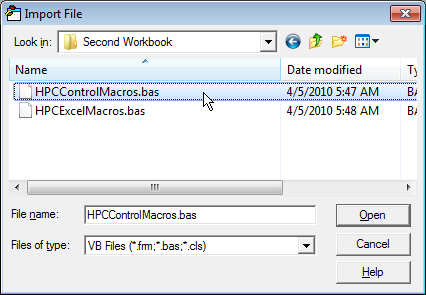
Repeat steps 1-3 to import "HPCControlMacros.bas" and then click OK. That adds the second macro file to your project.
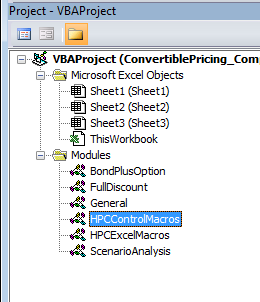
Verify that these two macro files appear in the VBA project window:
In the VBA editor window, click Tools, and then click References to open the project references dialog box.
In the list of available references, scroll down until you find Microsoft (R) HPC Pack Assemblies, and select the check box next to it. When you've checked the box, the dialog will look like this:
Click OK to close the project references dialog.
Defining the calculations in the macro framework
With the VBA environment set up, we can move to the next step -- modifying the macros to run the calculation. The HPCExcelMacros module includes the same macros as in the first workbook, only this time they already include the counters and the code for updating the status bar.
Defining variables and copying initialization code from the original macro
The first things we'll need are counters for the row and column. In this workbook, we're dividing the calculation so that each cell in the table is calculated separately. The original macro used loops to run through each cell in the table, but in the HPC macro functions we're using the asynchronous framework so we need to keep track of the row and column numbers as we send out each individual calculation. We'll use row and column variables in the macros to step through each cell in the table; they reflect the row and column we're calculating at each step.
We'll go back to the original macro to see what it did when it started, and then move that to the HPC_Initialize macro.
To set variables and modify HPC_Initialize
On the Developer tab of the ribbon, click Visual Basic to open the VBA editor.
In the VBA editor, in the project tree, double-click the HPCExcelMacros module to open the macro file.
At the top of the file, in "Section 1: Variables and constants", add row and column variables as shown below:
'==========================================================
'
' Section 1: Variables and constants
'
'==========================================================

Dim CurrentRow As Integer
Dim CurrentCol As Integer

Dim SentRecords As Integer
Dim RcvRecords As Integer
Dim CalculationComplete As Boolean
Dim StartTime As Double
Dim FinishTime As Double
Scroll to the HPC_Initialize macro and initialize the row and column counters we just set up:
Public Function HPC_Initialize()

    CurrentRow = 1
    CurrentCol = 1

    ' clear counters, capture starting time and update status bar

    SentRecords = 0
    RcvRecords = 0
    StartTime = Timer
    CalculationComplete = False
    UpdateStatus

End Function
In the VBA editor, double-click the "ScenarioAnalysis" module in the VBA project window. That was the file containing the original macro code. The initialization part is the first section, which figures out the size of the table and sets some variables (NumRows and NumCols):
    ' clear values, then figure out the size of the table

    Range("cashtable").ClearContents

    NumCols = 1
    While NumCols < MaxSensTblSize And CDbl(Range("table1").Offset(0, NumCols …
        NumCols = NumCols + 1
    Wend
    NumRows = 1
    While NumRows < MaxSensTblSize And _
       CDbl(Range("table1").Offset(NumRows + 1, 0).Value) <> 0 And _
       CDbl(Range("table1").Offset(NumRows + 1, 0).Value) <> …
        NumRows = NumRows + 1
    Wend
Copy the code from the original macro, then go back to the HPCExcelMacros module (double-click HPCExcelMacros in the VBA project window) and paste it into the HPC_Initialize macro.
The final code in HPC_Initialize now looks like this:
Public Function HPC_Initialize()

    ' clear values, then figure out the size of the table

    Range("cashtable").ClearContents

    NumCols = 1
    While NumCols < MaxSensTblSize And CDbl(Range("table1").Offset(0, NumCols + …
        NumCols = NumCols + 1
    Wend
    NumRows = 1
    While NumRows < MaxSensTblSize And _
       CDbl(Range("table1").Offset(NumRows + 1, 0).Value) <> 0 And _
       CDbl(Range("table1").Offset(NumRows + 1, 0).Value) <> …
        NumRows = NumRows + 1
    Wend

    CurrentRow = 1
    CurrentCol = 1

    ' clear counters, capture starting time and update status bar

    SentRecords = 0
    RcvRecords = 0
    StartTime = Timer
    CalculationComplete = False
    UpdateStatus

End Function
Modifying the HPC_Partition macro
The next macro to modify is the HPC_Partition macro. Remember that this macro collects whatever data is necessary to run a single calculation. In this case, that's going to be the row and column number. For this workbook, we want to calculate each individual table cell on the cluster separately; and to do that, we'll use the row and column number.
All the macros in the HPC framework use the Variant data type for inputs and outputs. The Variant type can be any primitive type (integer, long, double, string) or an Array of these types. We need to include both the row and column, so we can use an Array.
The other thing we need to do in the HPC_Partition macro is figure out when the calculation is complete. In this case, the calculation will be complete when we've reached the end of the table. We can do that by incrementing the row and column numbers as we move through the table. Whenever we reach the end of a column, we move to the next column. When we've passed the last column, the table is finished and we want the function to return Null.
To modify the HPC_Partition macro
In the HPCExcelMacros code, scroll to the HPC_Partition section and add code to declare an array for the row and column:
Public Function HPC_Partition() As Variant

    Dim data(3) As Variant

    ' update the status bar with the counters

    SentRecords = SentRecords + 1
    UpdateStatus

End Function
Add code to check for the end of the table. This will end the calculation when we've finished the table.
Public Function HPC_Partition() As Variant

    Dim data(3) As Variant

    ' first check the row; if we're past the bottom
    ' of the table, increment the column and set the
    ' row back to the top

    If CurrentRow > NumRows Then
        CurrentRow = 1
        CurrentCol = CurrentCol + 1
    End If

    ' next check the column; if we're past the last
    ' column, then we're done

    If CurrentCol > NumCols Then

        ' return null to indicate the end of the calculation
        HPC_Partition = Null

        ' and exit the function now, we can skip the rest
        Exit Function
    End If

    ' update the status bar with the counters

    SentRecords = SentRecords + 1
    UpdateStatus

End Function
If we haven't yet finished the table, the last part of the function will store the row and column values and use them as the return value for the function; and then move to the next row:
Public Function HPC_Partition() As Variant

    Dim data(3) As Variant

    ' first check the row; if we're past the bottom
    ' of the table, increment the column and set the
    ' row back to the top

    If CurrentRow > NumRows Then
        CurrentRow = 1
        CurrentCol = CurrentCol + 1
    End If

    ' next check the column; if we're past the last
    ' column, then we're done

    If CurrentCol > NumCols Then

        ' return null to indicate the end of the calculation
        HPC_Partition = Null

        ' and exit the function now, we can skip the rest
        Exit Function
    End If

    data(0) = CurrentRow
    data(1) = CurrentCol
    HPC_Partition = data

    ' move to the next row

    CurrentRow = CurrentRow + 1

    ' update the status bar with the counters

    SentRecords = SentRecords + 1
    UpdateStatus

End Function
So to review, the HPC_Partition macro has two purposes: it collects parameters necessary for a single calculation (here that's the row and column number); and when the calculation is complete it signals that by returning Null. In the function we've created it does that by stepping through the table, first by row and then by column, and when it's passed the last column, it returns Null to indicate that the table is complete.
Modifying the HPC_Execute macro
The next macro is HPC_Execute. Remember that this macro is designed to run the actual calculation, or the business logic. The inputs to this function will be whatever we returned from the HPC_Partition macro in the last step. Because we just wrote the HPC_Partition macro, we know that the inputs to the HPC_Execute macro will be the row and column number of the table cell we want to calculate.
The body of the HPC_Execute macro is going to be code copied from the original calculation macro. We'll need two parts of this code: the variable declarations at the top, and the code that runs the loop. We already used the section dealing with the size of the table in the HPC_Initialize macro, so we don't need that again, but it will be easier to copy the whole code block and then remove the parts we don't need. Then we'll make a few changes to support the asynchronous framework.
To modify the HPC_Execute macro
Go back to the original macro by double-clicking the "ScenarioAnalysis" module in the VBA project window.
Copy the code from the first line:
Dim Prem as doubleDown to the last line:
Next colsGo back to the HPCExcelMacros module (by double-clicking in the VBA project window) and paste the code into the HPC_Execute macro.
In the HPC_Execute macro, delete the lines that we've already used, starting from:
' clear values, then figure out the table sizeDown to the line just before:
' set up and run through the tableVerify that the HPC_Execute macro looks like this:
Public Function HPC_Execute(data As Variant) As Variant

    Dim Prem As Double
    Dim TempPIKdate As Date
    Dim TempPIKfreq As Double
    Dim rws As Integer
    Dim cols As Integer
    Dim Model As Integer

    ' set up and run through the table

    Call ReadSheetVariables
    TempPIKdate = PIKdate 'Save this value!
    TempPIKfreq = PIKfreq 'Save this value!

    Model = 1
    If Range("PricingModel").Value2 = "Bond plus Option" Then
        Model = 2
    End If

    For cols = 1 To NumCols
        For rws = 1 To NumRows

            Call ReadSheetVariables
            PIKdate = TempPIKdate
            PIKfreq = TempPIKfreq
            PIKrate = CDbl(Range("table1").Offset(rws, 0).Value)
            Prem = CDbl(Range("table1").Offset(0, cols).Value)
            If Prem = 0 Then End
            Ratio = CDbl(Face / Underlying / (1 + Prem))

            Select Case Model
            Case 1
                Range("cashtable").Cells(rws, cols).Value = …
            Case Else
                Range("cashtable").Cells(rws, cols).Value = …
            End Select

        Next rws
    Next cols

End Function
Note: In the macro we now have the calculation part of the function, including the loop that runs through each cell of the table. For the asynchronous framework, we don't want to use a loop here; we just want to calculate a single cell. Remember that the HPC_Execute macro is code which will run on the compute nodes, and we're giving it the row and column number we want to calculate.
Remove the lines that make up the loop (the highlighted lines below):
Public Function HPC_Execute(data As Variant) As Variant

    Dim Prem As Double
    Dim TempPIKdate As Date
    Dim TempPIKfreq As Double
    Dim rws As Integer
    Dim cols As Integer
    Dim Model As Integer

    ' set up and run through the table

    Call ReadSheetVariables
    TempPIKdate = PIKdate 'Save this value!
    TempPIKfreq = PIKfreq 'Save this value!

    Model = 1
    If Range("PricingModel").Value2 = "Bond plus Option" Then
        Model = 2
    End If

    For cols = 1 To NumCols
        For rws = 1 To NumRows

            Call ReadSheetVariables
            PIKdate = TempPIKdate
            PIKfreq = TempPIKfreq
            PIKrate = CDbl(Range("table1").Offset(rws, 0).Value)
            Prem = CDbl(Range("table1").Offset(0, cols).Value)
            If Prem = 0 Then End
            Ratio = CDbl(Face / Underlying / (1 + Prem))

            Select Case Model
            Case 1
                Range("cashtable").Cells(rws, cols).Value = …
            Case Else
                Range("cashtable").Cells(rws, cols).Value = …
            End Select

        Next rws
    Next cols

End Function
Replacing the loop with the row and column number that are passed in to the function. The modified code should look like this:
    rws = data(0)
    cols = data(1)

    Call ReadSheetVariables
    PIKdate = TempPIKdate
    PIKfreq = TempPIKfreq
    PIKrate = CDbl(Range("table1").Offset(rws, 0).Value)
    Prem = CDbl(Range("table1").Offset(0, cols).Value)
    If Prem = 0 Then End
    Ratio = CDbl(Face / Underlying / (1 + Prem))

    Select Case Model
    Case 1
        Range("cashtable").Cells(rws, cols).Value = FullDiscountModel(360) / Face
    Case Else
        Range("cashtable").Cells(rws, cols).Value = BondPlusOptionModel(360) …
    End Select
Instead of the loop, now we're using the values from our data Array -- the Array we returned from the HPC_Partition macro -- which contains the row and column of the cell we want to calculate. So to review that last step, we removed the two loop lines,
    For cols = 1 To NumCols
        For rws = 1 To NumRows
as well as the "Next" lines at the end of the loop,
        Next rws
    Next cols
and added lines just above the loop to use the the data Array variable:
    rws = data(0)
    cols = data(1)
The last change we want to make to the HPC_Execute function has to do with returning the data. Remember that data moves through the macros, each macro passing results to the next one. The original VBA code for this workbook was designed to run on the desktop, so as each cell was calculated the result was pasted into the spreadsheet. Because this workbook is going to run on the cluster, instead of pasting results into the spreadsheet, we need to collect the calculation result and return it from the function.
And there's one other thing we need to consider: when the HPC_Execute function runs on a compute node, it will calculate the result for a particular cell in the table. This result is then going to get returned to the desktop and sent to the HPC_Merge macro. But remember that in the asynchronous framework, results can get sent back in any order -- not necessarily the same order that we sent them. So we need to tell the HPC_Merge macro which cell in the table we've calculated.
We can do that by including the row and column number in the results data. As with the HPC_Partition macro, we can return an Array from the HPC_Excecute macro. Doing that will allow the function to return not only the result, but also which cell was calculated.
In fact we can simply re-use the same Array that was passed in to the function to return the result, because that Array already contains the row and column number.
To store the result, change the code so it reads as follows:
    Select Case Model
    Case 1
        data(2) = FullDiscountModel(360) / Face
    Case Else
        data(2) = BondPlusOptionModel(360) / Face
    End Select

    HPC_Execute = data
We've changed the code which inserted values into the spreadsheet to instead store the result values in the data array. And the last line uses the data array as the return value from the function, so the results -- and the row and column numbers -- will be sent to the next macro.
So the complete, final code for the HPC_Execute macro should look like this:
Public Function HPC_Execute(data As Variant) As Variant

    Dim Prem As Double
    Dim TempPIKdate As Date
    Dim TempPIKfreq As Double
    Dim rws As Integer
    Dim cols As Integer
    Dim Model As Integer

    ' set up and run through the table

    Call ReadSheetVariables
    TempPIKdate = PIKdate 'Save this value!
    TempPIKfreq = PIKfreq 'Save this value!

    Model = 1
    If Range("PricingModel").Value2 = "Bond plus Option" Then
        Model = 2
    End If

    rws = data(0)
    cols = data(1)

    Call ReadSheetVariables
    PIKdate = TempPIKdate
    PIKfreq = TempPIKfreq
    PIKrate = CDbl(Range("table1").Offset(rws, 0).Value)
    Prem = CDbl(Range("table1").Offset(0, cols).Value)
    If Prem = 0 Then End
    Ratio = CDbl(Face / Underlying / (1 + Prem))

    Select Case Model
    Case 1
        data(2) = FullDiscountModel(360) / Face
    Case Else
        data(2) = BondPlusOptionModel(360) / Face
    End Select

    HPC_Execute = data

End Function
Modifying the HPC_Merge macro
The last macro we need to modify is the HPC_Merge macro. Remember that this macro receives a single calculation result from the cluster. We want to use it to insert the result into the table.
The input to HPC_Merge is going to be whatever we return from HPC_Execute. Because we just wrote the HPC_Execute macro, we know that the return value will be an Array containing the row and column number and the result of the calculation. To update the table, we can use code from the original macro (this is code that we just changed in the HPC_Execute function).
The original line of code, in the ScenarioAnalysis module, looked like this:
Range("cashtable").Cells(rws, cols).Value = FullDiscountModel(360) / Face
We'll rewrite that line to use the values passed in to the macro in the data parameter. The completed HPC_Merge macro should look like this:
Public Function HPC_Merge(data As Variant)

    Range("cashtable").Cells(data(0), data(1)).Value = data(2)

    ' update the status bar with the counters

    RcvRecords = RcvRecords + 1
    UpdateStatus

End Function
This is the same line of code that was just removed from the HPC_Execute macro. We've replaced the row and column values (rws and cols in the original line) with the row and column from the Array. We've also replaced the function call with the result, which is stored in the same Array.
Those are all the modifications we have to make to run this workbook on the cluster. While it might seem like a lot of steps, particularly if this is the first time you've used HPC Services for Excel, look back at the macros to see the total code that was changed. It's really not a whole lot. For the most part, this involved copying and pasting from the original macro into the HPC macros. To support asynchronous calculation, we made a number of changes to the code -- but even that was relatively simple. We made no changes to the actual business logic in this workbook, and you don't even have to understand the business logic functions in order to convert the workbook. More importantly, if users make changes to the business logic in the future, it won't require changing the cluster calculation.
Running the workbook
To test changes to the code, we'll first run it on the desktop. As in the first workbook we'll add a new button to the spreadsheet, and use that to run the calculation. Then we'll specify the head node and the file share, add a button that runs the workbook on the cluster, and then run the workbook on the cluster.
Adding a button that runs the workbook locally
To add a button that runs the workbook locally
(1) With your Excel workbook open, click the Developer tab on the ribbon.
(2) On the Developer tab, click Insert and then select the button control -- the first control in the list.
(3) After you've clicked the button, draw a rectangle somewhere on the spreadsheet to insert the button in that location. After you position the button, the Assign Macro dialog box appears. !

(4) In the dialog box, select the macro CalculateWorkbookOnDesktop from the list and then click OK. Be sure to select the desktop macro -- we want to test the workbook first and find any errors before we run it on the cluster.
(5) Right-click the new button and then select Edit Text to change the label.
(6) Name the label "Desktop" or something similar.
(7) Save the workbook.
(8) Click the button to run the workbook on the desktop.
If there are any errors, you'll see an error dialog box and the portion of VBA code with the error will be highlighted. Double-check against the code listed above to resolve any errors.
If there are no errors, you'll see the table being filled in. The values should be the same as when you clicked the original button on the spreadsheet. Again this is running on the desktop, so it should run about the same speed as the original button -- somewhere between 1-2 minutes on most workstations.
Because we're running with the macro framework code, you'll also see the calculation progress displayed in the Excel status bar. As with the first workbook, running on the desktop you'll see the numbers move together, because on the desktop the workbook runs synchronously.
Running the workbook on the cluster
Next we'll try running the workbook on the cluster. To do that, we'll first need to set a few values to tell Excel how to contact the cluster. These values are defined in the HPCControlMacros module**.** At the top of this file, there are two values you'll need to fill in: the cluster scheduler and the share directory. Remember that you (the desktop user) must have write access to this share directory; and the cluster compute nodes must have read access to the directory. In most cases, your cluster calculations will run under your user account, but it's possible to use a different user account when you connect to the cluster session (more on that in a moment).
To specify the head node and the share directory
On the Developer tab of the ribbon, click Visual Basic to open the VBA editor.
In the VBA editor, in the project tree, double-click the HPCControlMacros module to open the macro file.
For the cluster scheduler, use the name of your cluster head node -- this is the computer name that you would use on the network. You can use a fully-qualified name (for example, headnode.mynetwork.com), but that's not necessary if you're in the same domain.
For the share directory, use the full path to the share directory you created earlier (in the "Before You Start" section).
Now go back to the Excel spreadsheet. We'll add another button, this time to run the calculation on the cluster.
To add a button that runs the workbook on the cluster
On the Developer tab, click Insert and then select the button control -- the first control in the list.
After you've clicked the button, draw a rectangle somewhere on the spreadsheet to insert the button in that location. After you position the button, the Assign Macro dialog box appears.
In the dialog box, select the macro CalculateWorkbookOnCluster from the list and then click OK.
Right-click the new button and then select Edit Text to change the label.
Name the label "Cluster" or something similar.
Save the workbook.
Click the button to run the workbook on the cluster.
If this is the first time you've run any cluster jobs, either using Excel or using any other application, you'll see a user authentication dialog. Type your username and password, and (if you like) check the box to save your credentials. If you want to run calculations on the cluster as a different user, you can enter different user account settings.
Note: Make sure that your user account -- either your standard user account, or whatever you wish to use -- is designated as a cluster user in HPC Cluster Manager.
If there are any errors, you'll see a popup dialog box. If the desktop calculation worked, the most likely errors at this point will have to do with the settings you created for the cluster head node and the share directory. Double-check those settings and try again.
If there are no errors, you'll see the cluster calculation start. First there will be a brief pause as the client library creates an HPC session for calculation. Next the client library will call the HPC_Initialize macro, and you'll see the table is erased. If you look at the Excel status bar, you'll see that first all the records are sent to the cluster; the second number will jump up to 105 (there are 105 cells in the table). After that you'll see another brief pause before any results are returned. This pause occurs as each compute node starts Excel and loads the workbook.
After this pause you'll see results start to populate the table, and the status bar will start showing the number of results returned. Because this is a long calculation, it's very likely that you'll see results returned out-of-order; there will be blank spaces in the table, which then get filled in. Once again that's because the calculation is asynchronous, and some compute nodes calculate faster than others. Eventually the table will be filled in completely and the status bar will show the calculation time.
Even if you have only two compute nodes in your HPC cluster, the calculation should be a lot faster than running on the desktop. If you have four nodes, eight nodes, or more, the calculation should be extremely fast. You can always click the "Desktop" button again to compare the performance of the desktop calculation to the cluster calculation.
Best Practices for Cluster-Enabled Excel Workbooks
The following note describes some important considerations to keep in mind when you are designing Excel workbooks for use with HPC Services for Excel. This note applies to workbooks using the HPC/Excel macro framework running from VBA or with the .NET ExcelClient library.
Cluster Application Performance
When you design an application for calculation on an HPC cluster, typically you divide the work required into individual tasks, and you send those tasks to the cluster for calculation. The performance benefits of using HPC come from parallelization -- having many Compute Nodes working at the same time.
It's the responsibility of the HPC Scheduler (the Head Node) to distribute these tasks to the Compute Nodes for processing. However to ensure that the Compute Nodes are never waiting for work, you should try to ensure that the HPC Scheduler always has a list of tasks to process. If the Scheduler has to wait for the next processing task, then one or more Compute Nodes will sit idle -- doing nothing -- and you won't get the best utilization of your HPC cluster.
You can ensure that the Scheduler and the Compute Nodes always have enough work to do by sending computation requests as quickly as possible. In the HPC/Excel macro framework, requests are sent with the HPC_Partition macro. Therefore it's important to ensure that the Partition macro is as fast as possible. If you can design the Partition macro to send tasks quickly, you'll ensure that the cluster is fully utilized and you'll get the best possible performance from HPC.
When individual calculations on the cluster Compute Nodes complete, results are sent back to your desktop application. In the HPC/Excel macro framework, results are processed using the HPC_Merge macro. You want to make this macro as fast as possible as well, for two reasons. First, if the Merge macro is slow to process results, this may needlessly tie up cluster resources. Second, slow processing of results will slow down your overall calculation -- reducing the benefits of using HPC. If you ensure that the Merge macro processes results quickly, you'll release any cluster resources for other use, and you'll make the overall user experience better.
Improving HPC/Excel Macro Performance
In this section we'll describe a few steps you can take to help make sure your HPC-enabled Excel workbooks are as efficient as possible, so you can get the best possible performance when you run calculations on an HPC cluster.
This list isn't comprehensive, but you may find some tips that apply to your workbook. And remember that these are optimizations -- the best approach when designing HPC-enabled Excel workbooks is to design the calculation first and keep it as simple as possible; then once you have the workbook running correctly on the cluster, make the kind of changes we describe here to improve overall performance.
Avoid opening and closing resources in the Partition and Merge macros
Opening and closing external resources -- such as log files or database connections -- can take a long time, and may slow down the Partition and Merge macros. Additionally, you should avoid reading large data sets in these macros if possible. For example you don't want to open a database connection, search the records, and locate a single record for each call to the Partition macro.
A better approach is to open these resources once, in the Initialize macro, and perform any initial processing steps. For example, if you need to load a large data set from a database, create the database connection and perform the query in the Initialize macro. Then in the Partition macro, you can just move to the next record. You can close the database connection in the Finalize macro.
Similarly, if you are writing to a log file in the Merge macro, consider opening the file in the Initialize macro. In the Merge macro you can write results one at a time, and then you can close the log file in the Finalize macro.
Avoid recalculating the spreadsheet in the Merge macro
If you are inserting results into the spreadsheet in the Merge macro, you might inadvertently recalculate the spreadsheet -- if the spreadsheet is very complicated, this can slow down processing.
By default, Excel will recalculate the spreadsheet whenever you change the value of a cell -- including if you update the cell from a VBA macro. Excel will recalculate only those parts of the spreadsheet which are affected by the change -- so if the cell sits by itself, this won't be significant. But if the cell is used as part of a larger calculation, or as chart data, then the recalculation may be slow.
If you are updating any spreadsheet cells in the Merge macro, consider disabling automatic recalculation. You can disable automatic recalculation in the Initialize macro. Then in the Finalize macro you can recalculate the entire spreadsheet, and re-enable automatic calculation.
In the Initialize macro, you can turn off automatic calculation with
Application.Calculation = xlCalculationManual
You can then recalculate the spreadsheet and re-enable automatic calculation in the Finalize macro with
Application.Calculate
Application.Calculation = xlCalculationAutomatic
Insert blocks of data instead of individual values
When you update spreadsheet cells from VBA, this involves a number of internal steps -- and it may be slower than you expect. It is almost always better to change multiple cells as a single block, instead of one at a time.
If the Execute macro returns a large number of values -- an Array of 100 numbers, for example -- there are two ways to insert this data into the spreadsheet. You can insert them one at a time, in a loop:
For i = 1 To 100 Step 1
   Cells(1, i).Value2 = v(i)
Next i
Or, you can insert the full range as an array:
Range(Cells(2, 1), Cells(2, 100)).Value2 = v
Inserting one cell takes about the same amount of time as inserting a block of cells. So if you have an array of 100 values, the first way of doing this -- inserting cells one at a time in a loop -- can take up to 100 times as long as the second approach, inserting the block of cells as an array.
Turn off screen updates
If you are making any changes to the spreadsheet in the Merge macro -- if you are updating cells, or changing chart data -- turning off screen updates can reduce the processing time. This works because Excel consumes some time updating the screen and the user interface.
You can disable screen updates in the Initialize macro and re-enable screen updates in the Finalize macro. In the Initialize macro, use
Application.ScreenUpdating = False
In the Finalize macro, use
Application.ScreenUpdating = True
That will disable screen updates during the calculation and re-enable updates after the calculation has completed. When you re-enable screen updates in the Finalize macro, Excel will automatically refresh the screen.
Use data structures to temporarily hold information in memory
If collecting information for processing -- what you do in the Partition macro -- is very time consuming, or if you need to do very complex post-processing of results -- in the Merge macro -- consider using data structures to store information in memory during the calculation.
For example, if each of your calculation requests in the Partition macro requires a very complicated database query, this can slow down processing and result in poor performance. In this case, it may be a good idea to perform this complex processing in the Initialize macro before the calculation starts.
If you perform this complex processing in the Initialize macro, you can store each of the calculation requests in a data structure in VBA, such as an Array of Variants. Then in the Partition macro, you can simply return the next entry in the Array. That will help ensure that the Partition macro is as fast as possible.
Similarly, if you must perform very complex post-processing on results as they arrive, it may be advisable to store the results in a data structure in the Merge macro, and then process the results in the Finalize macro after the calculation is complete.
For example, if you are storing results in a database, but each database write requires a complex insert statement, it may be better to move this processing to the Finalize macro. You can create a data structure -- such as an Array of Variants -- and in the Merge macro, simply insert each result into the Array. Then in the Finalize macro, you can loop through the Array and perform the necessary database write operations all at once.
Final Notes
Converting an existing workbook to use HPC Services for Excel is more of an art then a science. The specific details -- what code to move, and where to move it -- will always depend on the particular workbook.
However you should now understand the concepts involved, and understand why we use the asynchronous macro framework. To convert any workbook to use HPC Services for Excel requires creating a parallel calculation in essentially the same way: add the macro framework functions to your workbook, and fill in the appropriate code.
You can use the "skeleton" macro files included with this article in your own workbooks. Follow the steps you used in the examples above to identify the iterative code in your workbook, and move it to the appropriate macros. And remember to test the calculation on your desktop to identify any errors before you run calculations on the cluster.
You should also have a sense of the performance benefits you can get from running Excel workbooks on an HPC cluster with HPC Services for Excel. In this article we started with a workbook that was already reasonably fast -- to calculate the entire workbook only took about 1-2 minutes on the desktop. But even that workbook could run twice as fast, four times as fast, or faster, on an HPC cluster. The actual performance depends on the number of available compute nodes in your cluster, and you can always improve performance by adding more compute nodes to the cluster.
With a relatively small amount of work, it's possible to convert many long-running Excel workbooks to run on a Microsoft HPC cluster with HPC Services for Excel. And for really long-running workbooks -- workbooks that take hours or even days to calculate -- using HPC Services for Excel can result in really dramatic performance improvement.